Lumens LC100 User manual

1
LC100
CaptureVision Station
[Important]
User Manual - English
To download the latest versions of the Quick Start
Guide, multilingual user manual, software, driver,
etc., please visit Lumens
https://www.MyLumens.com/support

2
Table of Contents
Chapter 1 Package Contents..................................................................3
Chapter 2 Product Overview...................................................................4
2.1 RS-232/RS-485 I/O pin description ................................................................5
Chapter 3 Instruction for installation.....................................................6
3.1 Product connection diagram .........................................................................6
3.2 Live Streaming Application Diagram.............................................................6
Chapter 4 Function Description .............................................................7
4.1 LCM Screen .....................................................................................................7
4.2 Real-time operation menu..............................................................................8
4.3 Parameter setting............................................................................................9
4.4 Online Director..............................................................................................23
4.5 File management...........................................................................................27
Chapter 5 Troubleshooting...................................................................31
Chapter 6 Safety Instructions...............................................................32
Addendum 1...............................................................................................33
Copyright Information...............................................................................34
Supplier's Declaration of Conformity 47 CFR § 2.1077 Compliance Information .................35

3
Chapter 1 Package Contents
LC100
Power Adapter
Power Cord
3-PIN to 2-PIN
connector
Appearance may vary
depending on country/
region
(For Japan only)
Quick Installation
Guide
RS-232/RS-485
Connector (x2)
Mounting Metal Plate
(x2)
Mounting sheet metal
screws (M3 x 6 x 4)
Cable holder-1
Cable holder-2
Hard drive cables
Hard drive locking
screws
(2.5”x 4/ 3.5”x 4)

4
Chapter 2 Product Overview
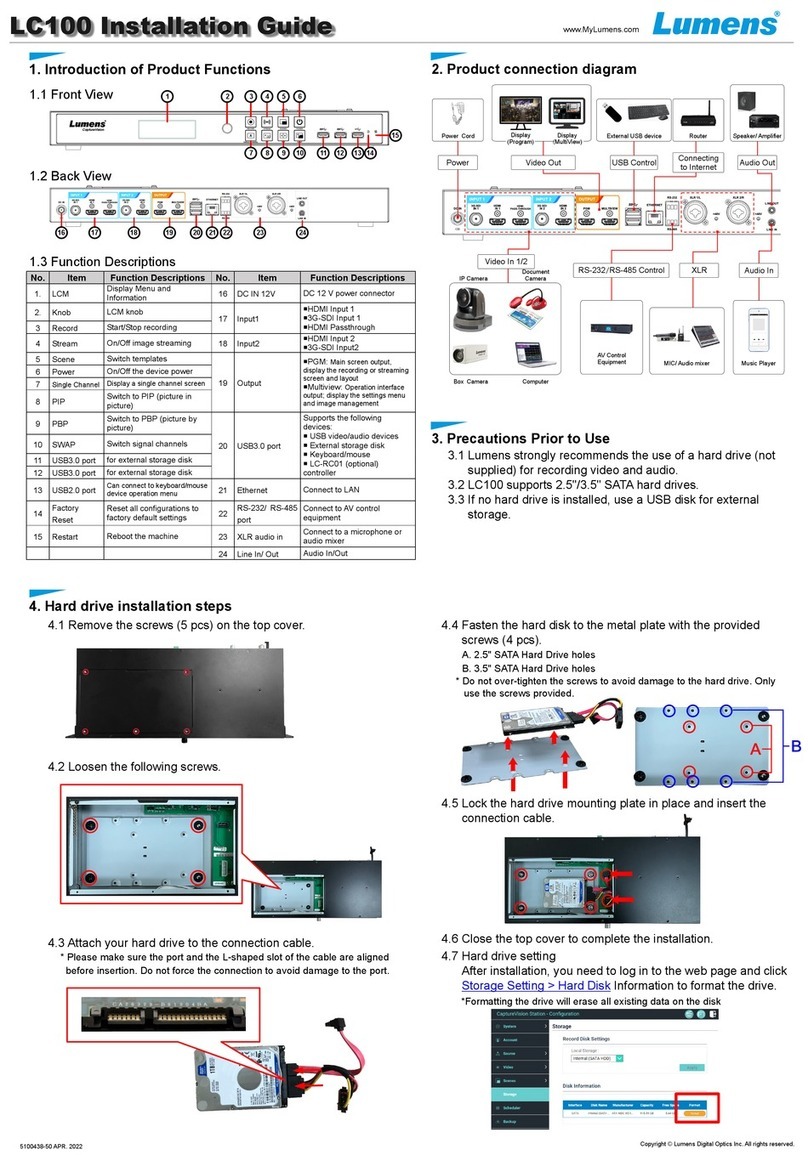
The LC100 CaptureVision Station uses the Linux operating system and an ARM
architecture processor to provide stable recording services. It supports video recording,
mixing and switching from various input signal sources. It enables voice, image, and data
in bidirectional transmission through the public network and support pre-scheduled
recording and uploading. You can start recording automatically without being on site.
LC100 is widely used in education, corporate meetings, government agencies, etc., for
live or recorded environments.
NO
Name
Function Descriptions
NO
Name
Function Descriptions
1.
LCM
Display Menu and
Information
16
DC IN 12V
DC 12V power connector
2.
Knob
LCM knob
17
Input1
HDMI input 1
3G-SDI input 1
HDMI Passthrough
3
Record
Start/Stop recording
Press and hold for 3
seconds: Pause Recording
4
Stream
On/Off image streaming
18
Input2
HDMI input 2
3G-SDI input 2
5
Scene
Switch templates
19
Output
PGM: Main screen output, display the
recording or streaming screen and layout
Multiview: Operation interface output; display
the settings menu and image management
6
Power
On/Off the device power
Press and hold for 6
seconds: Force to reboot
7
Single
Channel
Display a single channel
screen
8
PIP
Switch to PIP (picture in
picture)
9
PBP
Switch to PBP (picture by
picture)
20
USB3.0 port
Supporting the following devices:
USB video/audio devices
External storage disk
Keyboard/mouse device
LC-RC01 (optional) USB connection
10
SWAP
Switch CH1/CH2 signal
channels
11
USB 3.0 port
External storage disk
12
USB 3.0 port
External storage disk
13
USB 2.0 port
External storage disk
21
Ethernet
Can connect to a router or hub
14
Factory Reset
Reset all configurations to
factory default settings
22
RS-232/
RS-485 port
Connect to AV control equipment
15
Restart
Reboot the machine
23
XLR audio in
Connect to a microphone or audio mixer
24
Line In/Out
Audio In/Out
Front panel
Rear panel

5
2.1RS-232/RS-485 I/O pin description
RS-232
Pin NO.
Function
1
TX+
2
RX-
3
GND
RS-485
Pin NO.
Function
4
T/R+
5
T/R -
6
GND
6
5
4
3
2
1

6
Chapter 3 Instruction for installation
3.1Product connection diagram
3.2Live Streaming Application Diagram

7
Chapter 4 Function Description
4.1LCM Screen
4.1.1 Setting Menu
1st Level
Major Items
2nd Level
Minor Items
3rd Level
Adjustment Values
Function Descriptions
Information
IP/ FW/ Mode/
SN/ MAC
Display the current system
information
Video Source
Ch 1/ CH2
1. HDMI1 or HDMI2
2. SDI1 or SDI2
3. Source Name 5
4. Source Name 6
5. Source Name 7
6. Source Name 8
Select the video source of
CH1/CH2
Audio Level
PGM Audio Level
Display PGM volume level
PGM Volume
0~125
Set PGM volume
PGM Mute
Mute/ UnMute
Set PGM Mute on/off
Mode Settings
RC(Record)
Full HD 60/ 50FPS 6Mbps
Full HD 30/ 25FPS 4Mbps
Full HD 30/ 25FPS 3Mbps
HD 30/ 25FPS 2Mbps
HD 30/ 25FPS 1.5Mbps
SD 30/ 25FPS 800Kbps
SD 30/ 25FPS 500Kbps
User Defined
Set up the recording encoded
format
ST(Stream)
Full HD 4/ 3Mbps
HD 2/ 1.5Mbps
SD 800/ 500Kbps
User Defined
Set the streaming encoded
format
IP Configuration
IP Assignment
DHCP/ Static IP
Set dynamic/static host
IP
192.168.100.150
IP address
SM
255.255.255.0
Subnet Mask
GW
192.168.100.254
Gateway
DNS1
192.168.1.211
Domain name 1
DNS2
192.168.1.212
Domain name 2
Edit
Edit/ Save
Click Edit to modify the relevant
IP settings, and then click Save
to save the settings
Storage
System Storage
Shows USB or SATA based on
the storage location

8
1st Level
Major Items
2nd Level
Minor Items
3rd Level
Adjustment Values
Function Descriptions
Remaining space
Shows the remaining space and
total space
4.1.2 Message Description
Item
Message
Description
1.
USB Disk Insert
USB flash drive or USB HD is inserted into LC100
2.
USB Disk Remove
USB flash drive or USB HD is removed from LC100
3.
No Storage
There is no HDD or USB disk when recording
4.
No Enough Storage
There is no enough recording space when the recording is activated
5.
Record Error
Recording failure or abnormality when the recording is activated
6.
Update Firmware …
FW updating
7.
Front panel lock
Front panel lock is on
4.2Real-time operation menu
Connect the HDMI1 MultiView output to the display panel to show the real-time
operation menu
Connect the keyboard/mouse through the USB port and use the keyboard/mouse to
select the menu settings
No
Icon
Name
Function Descriptions
1
Parameter
setting
Perform the system network setting, recording/streaming encoded
setting
2
Casting
management
Input signal source selection, audio management, recording/streaming
control, output version selection, and network video camera control
3
File
management
Conduct the video file content management, including the following
functions: Upload, download, delete, replay video files
4
About
Display the current firmware version and relevant production
information of LC100
5
NA
Device IP
When connecting to the router, the current assigned device IP address
will be displayed

9
4.3Parameter setting
This Section provides descriptions of the web-based interface to control the display
items. HDMI MultiView only provides items of [System Settings] and [Video Settings].
4.3.1 System Settings
4.3.1.1System Settings
You may set up the device’s basic information, initial date and time, and others here.
No
Item
Function Descriptions
1
Device
Identification
Defines the device name and device description for LC100
<Remark> Display name only accepts English characters and numbers
2
Date & Time
LC100 supports different time zone setting. It can synchronize time with NTP
service (default) and manual setup
Time Zone: Select the correct time zone according to current location
Configuration Mode:
NTP service: Synchronizes time with a network server
Manual Setup: Sets time manually
3
Front Panel Lock
After checking the box, no action will be triggered when any front panel
button is pressed
4
Welcome Image
You can customize a welcome image for LC100
1 Click [Browse] and select a file to upload. Once done, a thumbnail will be
generated
File format:
File format: PNG
File Size (Max.): 3 MB
Resolution Size (Max.): 1920 x 1080
2 Click [Apply] to save this change. If you need to select another file, click
[Cancel] and reselect a file
1
2
3
4

10
5
Intermission
Image
You can customize an intermission image for LC100
1 Click [Browse] and select a file to upload. Once done, a thumbnail will be
generated
File format:
File format: PNG
File Size (Max.): 3 MB
Resolution Size (Max.): 1920 x 1080
2 Click [Apply] to save this change. If you need to select another file, click
[Cancel] and reselect a file
4.3.1.2Network
The factory setting of LC100 is DHCP. The IP address is assigned by the router. If you want to
use a static IP address, please configure the connection here.
No
Item
Function Descriptions
1
Ethernet Setting
DHCP: Dynamic IP address as default
Static IP: Configure static IP address according to the network and
manually enter network information
Select and fill in required network setting information and click [Apply] to save
the settings
<Caution>The system will restart after changing network setting.
Please connect and log in again

11
4.3.1.3Services
No
Item
Function Descriptions
1
Main Firmware
Main firmware information and update
Select the master firmware file you want to update, and then click
[Apply] to update it
Engineering mode, for Lumens engineers only
2
Service History
Saves system log files to user’s computer
1 Enter file name
2 Click [Export] to export system log files
<Remark> The length of file name must be between 0 ~ 16 characters.
{}()’&@~^$%”|,`:?<>*\/#; symbols, and space are forbidden
3
Reset
Restores LC100 to factory reset
<Remark> Check [Keep Network Settings] and the network settings will be
remained
4
Restart the
device
Restart the LC100
1
2
3
4

12
4.3.1.4Setting File
You can export the configuration files of the device to a computer, and import the configuration
files to another device to apply the same configuration.
No
Item
Function Descriptions
1
Export
Exports the current configuration of LC100 as a configuration file
2
Import
Imports the exported configuration files from a LC100 to another LC100
4.3.1.5Display Settings
No
Item
Function Descriptions
1
Output Resolution
Select LC100 HDMI output: 50Hz/60Hz
4.3.1.6Extension control panel
No
Item
Function Descriptions
1
Extension control
panel
Display the connection information of LC-RC01 extension control panel
(optional). When there is no connection, the blank appears on the
information field
1
2

13
4.3.2 Account
You can manage accounts for 3 kinds of user mode here: modify the user name and
password to [System Management], [Director], and [Content Management].
No
Item
Username/Password
Function Descriptions
1
System
Management
admin / admin
Sets up the permission of main system management
2
Online
Director
director / director
Manages playback and changes simple basic image
settings and the permission of Director
3
Content
Management
video / video
Views the permission of file storage and playback
[Caution]
The length of user name must be between 4 ~ 16 characters. {}()’&@~^$%”|,`:?<>*\/#; symbols, and
space are forbidden
The length of password must be between 8 ~ 16 characters. {}()’~^”|,`:?<>*\/; symbols, and space are
forbidden
Duplicate username is forbidden
1
2
3

14
4.3.3 Video Source
4.3.3.1Network Device Management
No
Item
Function Descriptions
1
Network Camera
1 Click [Refresh] and automatically scan the network cameras in the
same LAN
2 Click [Login Verification] and enter login information to connect the
camera
3 Once the status display “OK”, indicating that the image can be set
under the signal source input selection
2
Network Streaming
1 Click [Add]
2 Enter the network streaming name and URL, and then click [Apply]
3 The newly added network streaming name will be displayed in the
list
Lumens Network
Camera
Account: admin
Password: 9999
1
2
Login Verification
Username:
Password:
Verific-
ation
Name:
Cancel
Apply

15
4.3.3.2Video communication source management
No
Item
Function Descriptions
1
Video
communication
source
management
Display the video communication source information for users to edit the
source name and order
<Caution>ID1-4 are fixed as HDMI 1 / HDMI 2 / SDI 1 / SDI 2 (not
removable)
<Remark> Source name supports 2 ~ 16 characters, and can have the
English letter/number/blank/underline/- entered
4.3.4 Video Settings
4.3.4.1Record Settings
No
Item
Function Descriptions
1
Encoder Settings
Recording Mode: You can select Movie Mode (MP4) and Movie/Resource
Mode (MP4)
Movie Mode: Only record the single PGM 2-channel composite screen
Resource Mode: Can record the single PGM 2-channel composite
screen and 2 signal source screens
Encode Profile: Default recording encoded formats are available to be
selected by resolutions and average bitrates (Please refer to the
Instruction on Encode Profile). You can also set user-defined image
quality.
Preferentially record to front USB hard drive: Videos or pictures will be
preferentially recorded to the USB flash drive which has already been
1
2
3

16
connected to the front and rear USB port
Cycling Record: Enabling the cycle record function can prevent recording
error when storage device is full
2
Audio Settings
Audio Delay Adjustment: 0 ~ 600 ms
Audio source: Set the audio source for Channel recording files
<Remark> The selection of non PGM Audio may increase CPU loading.
Users may check out CPU information on the Director page of real-time
operation menu under MultiView.
3
Video File Name
Setting
Customizes the prefix name of video file
Instruction on Encode Profile
Name
Video Resolution/ABR
Description
Full HD
1080p / 4 - 6 Mbps
Dynamic scene; Large film site; Local drive recording
Internet Full HD
1080p / 3 Mbps
General scene, Medium film site, Local drive recording
HD
720p / 2 Mbps
Static scene, Small film site, Local drive recording
Internet HD
720p / 1.5 Mbps
Suitable for online live-stream
SD
480p / 800 kbps
Static scene, suitable for online live-stream
Mobile network SD
480p / 500 kbps
You can watch the LC100 live-stream screen on a
mobile device.
User-Defined
Click to open User-Defined. Once done, click “Save”.
4.3.4.2Streaming Settings
You may change the streaming settings here. Related settings must follow the streaming
protocol and the settings recommended by server system support.
No
Item
Function Descriptions
1
Encoder Settings
Encode Profile: Default recording encoded formats are available to be
selected by resolutions and average bitrates (Please refer to 4.2.4.1
Record Settings_ the Instruction on Encode Profile). You can also
set user-defined image quality.
2
Streaming Settings
Streaming 1 / Streaming 2 / Streaming 3: You can customize 3
push addresses of network streaming Supported streaming type:
RTMP / RTMPS / RTP / YouTube / YouTube_Gaming / Facebook
Live / Twitch / SRT
1
2

17
Real Time Streaming Protocol (RTSP): The default RTSP location
for the customized LC100 real-time streaming path is:
rtsp://LC100_IP_address:554/pgm
4.3.5 Scene
4.3.5.1Scene
LC100 provides 5 overlay styles, 5 background images, and 5 scenes. You can also add your
own styles.
No
Item
Function Descriptions
1
Overlay
For overlay style setting, you can adjust the order by dragging the
mouse left and right. Users can upload their own files for application.
Click [ ] and select a desired file from the window. Check the
preview image and file name, and click [Apply] to start uploading and
applying this overlay style. Click [Delete] to cancel the upload.
Supports 30 groups of overlay styles
File format:
PNG format
Supported size: (a) 1920 x 136
(b) 1080 x 240
(c) 800 x 320
(d) 640 x 400
1
2
3
Streaming Settings
Streaming 1
Streaming 2
Streaming 3
Port:
Verification
RTSP URL:
Factory Reset

18
2
Background Image
For background image setting, you can adjust the order by dragging
the mouse left and right. Users can upload their own files for
application.
Click [ ] and select a desired file from the window. Check the
preview image and file name, and click [Apply] to start uploading and
applying this background image. Click [Delete] to cancel the upload.
Supports 9 groups of background images
File format:
PNG format
Supported size: 1920 x 1080
3
Scene
Scene is the integration of “Overlay,” “Background Image,” and
“Production Layout,” which provides the scene made of different
background images, layout, and overlay style. You can customize the
layout content in 30 scenes.
Click [ ] to open scene settings. Enter the scene name and
select the required overlay, layout, and background image. Once
done, click “Apply”.
4.3.5.2Macro
Use together with LC-RC01 extended control panel (optional) to set scene/preset position
setting, camera start and stop tracking.
Macro [1 ~ 3] settings correspond to [1 ~ 3] keys on the extension control panel
No
Item
Function Descriptions
1
Scene Selection
Select a scene to be set. Each supports up to 30 sets of scene
If the overlay style of the scene needs to be change, please refer to
2
Camera Preset
Supports 9 groups of preset position setting, camera start and stop
1
2

19
Position Setting
tracking
<Remark> After checking the box, the Marco will proceed the setting
of the network camera on Channel 1 ~ 2.
4.3.5.3Time Stamp
No
Item
Function Descriptions
1
Enable Time Stamp
Turn on/off Time Stamp
<Remark> When the Time Stamp function is enabled, other overlays
cannot be applied
2
Format
Time display format
3
Color
Color setting
4
Size
Font size setting
5
X / Y Position (0 ~ 100)
X: Time Stamp display position (left and right) in the PGM screen
0: The leftmost / 100: The rightmost
Y: Time Stamp display position (up and down) in the PGM screen
0: Top / 100: Bottom
1
3
2
5
4

20
4.3.6Storage Settings
You can set up recording storage, cycle recording, and display hard drive information
and NAS setting here.
No
Item
Function Descriptions
1
Recording Hard
Drive Setting
Local storage: Click the drop-down menu and select SATA HDD or
USB HD for the local storage hard drive
Please refer to 2. Hard Drive Information below for formatting the hard
drive.
<Remark> Formats supported: exFAT/ FAT32/ NTFS
<Caution>To ensure proper storage and playing of recorded files, please
remove the USB flash drive 30 seconds after the recording is finished
2
Hard Drive
Information
Display hard drive information, free space, and capacity. Click “Format” to
clear the internal storage devices. Confirm if you want to format the hard
drive in the pop-up dialog and click “Confirm” to delete all video files.
3
NAS setting
Enable NAS mounting and related settings.
It is required to go to Backup Setting> Upload Setting> Mode to select
NAS. After recording, the video can be uploaded to NAS.
<Remark> The SMB settings for NAS mounting:
Please check the SMB encryption specification for NAS first.
Enter the encryption specification in [Options].
Please enter vers = 1.0 for SMB1.0.
Please enter vers = 2.0 for SMB2.0.
Please enter vers = 3.0 for SMB3.0.
1
2
3
Other manuals for LC100
2
Table of contents
Other Lumens Measuring Instrument manuals
Popular Measuring Instrument manuals by other brands

Honeywell
Honeywell HEN04112 user guide

BW SENSING
BW SENSING AS400S Series Technical manual

MULTI MEASURING INSTRUMENTS
MULTI MEASURING INSTRUMENTS M-3000 instruction manual

kirchgaesser
kirchgaesser MIDEX-H Series operating instructions

Roadmaster
Roadmaster 9530 Installation instructions and user guide

Zhejiang Uniview Technologies
Zhejiang Uniview Technologies B3223P30 Release notes