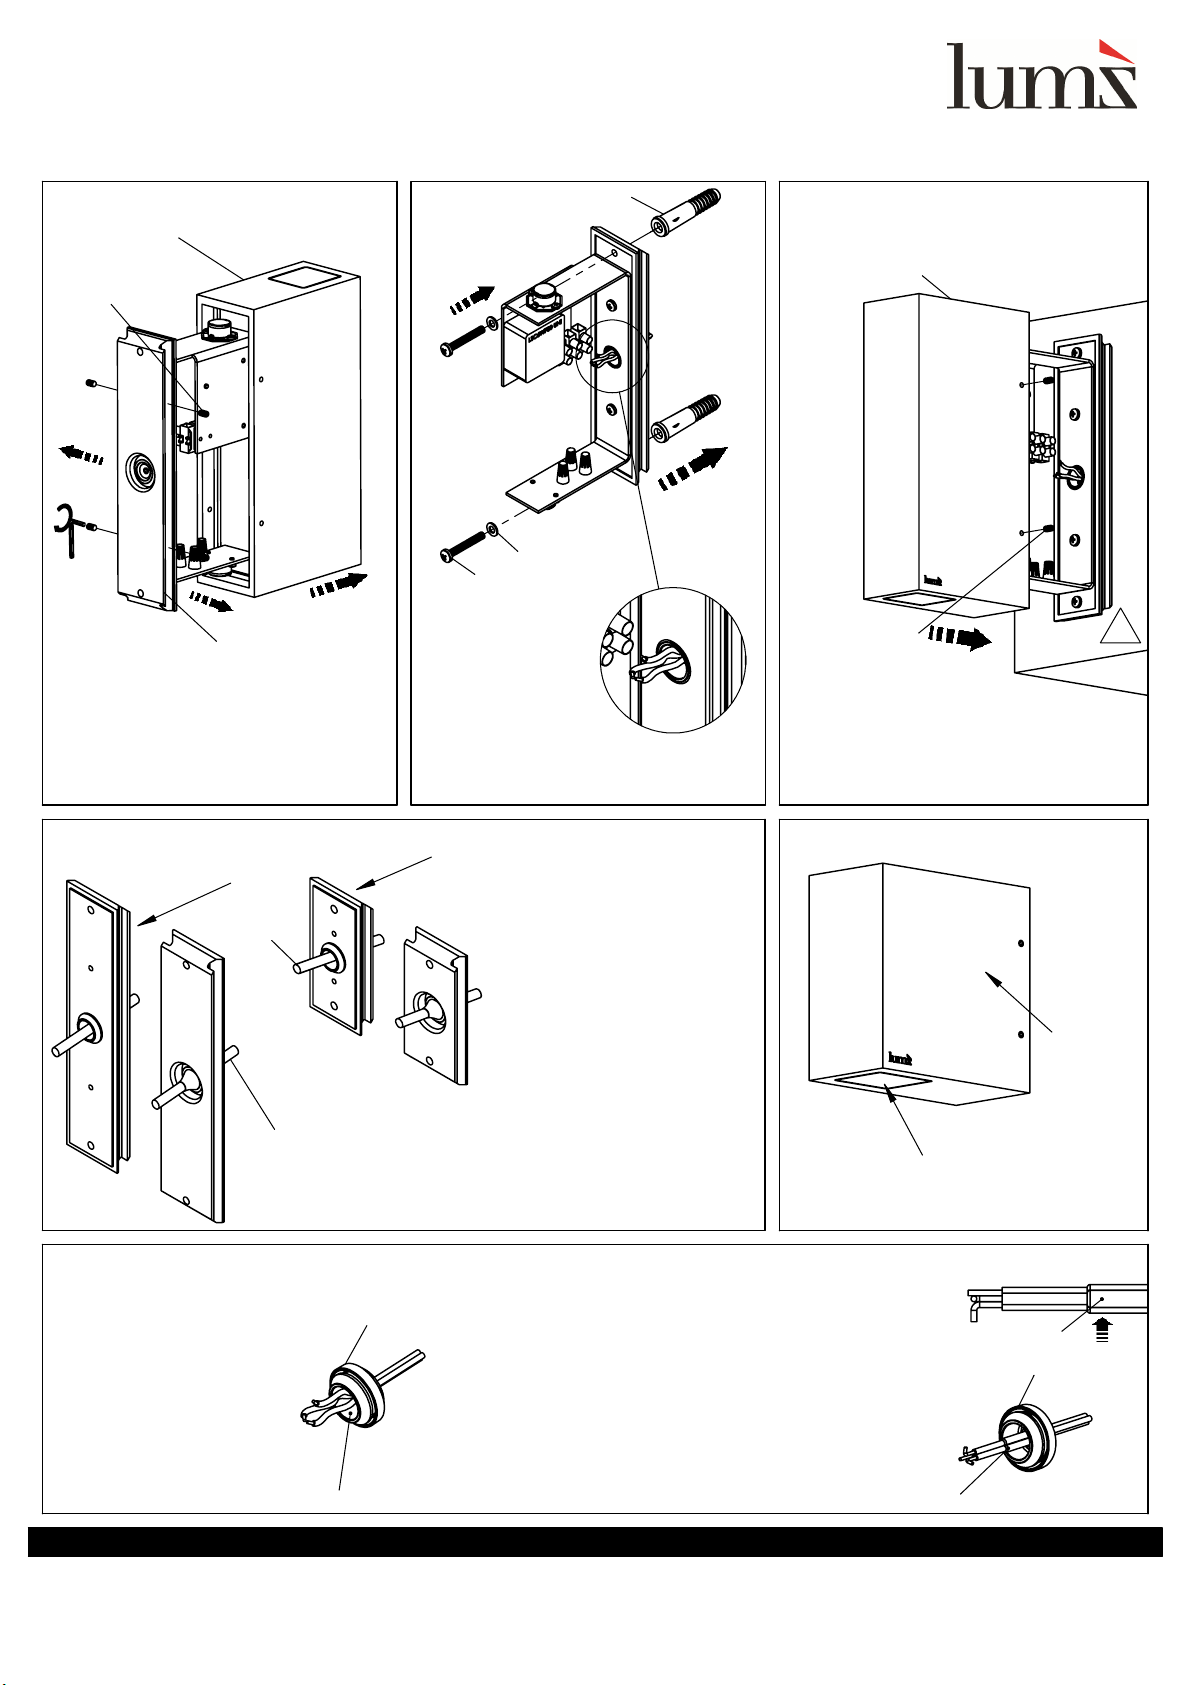
manuals.online logo
Brands
  1. Home
  2. •
  3. Brands
  4. •
  5. lumz
  6. •
  7. Outdoor Light
  8. •
  9. lumz ZARA Series User manual

lumz ZARA Series User manual

This manual suits for next models

2

Other lumz Outdoor Light manuals

lumz LUCCI BL-16A-J-W9-30 Series User manual

lumz

lumz LUCCI BL-16A-J-W9-30 Series User manual

lumz PIXA Series User manual

lumz

lumz PIXA Series User manual

Popular Outdoor Light manuals by other brands

Kichler Lighting HELEN 37536 instructions

Kichler Lighting

Kichler Lighting HELEN 37536 instructions

Thorn OXANE L installation instructions

Thorn

Thorn OXANE L installation instructions

esotec Solar Globe Light multicolor 20 operating instructions

esotec

esotec Solar Globe Light multicolor 20 operating instructions

mitzi HL200201 ELLIS Assembly and mounting instructions

mitzi

mitzi HL200201 ELLIS Assembly and mounting instructions

HEPER TILA S AFX 3 Module Installation & maintenance instructions

HEPER

HEPER TILA S AFX 3 Module Installation & maintenance instructions

Designplan TRON 180 installation instructions

Designplan

Designplan TRON 180 installation instructions

Sealey LED37 instructions

Sealey

Sealey LED37 instructions

nordlux VEJERS Mounting instruction

nordlux

nordlux VEJERS Mounting instruction

SImx ELITE LED LHTC637 installation instructions

SImx

SImx ELITE LED LHTC637 installation instructions

GEV CAROLINE 10833 manual

GEV

GEV CAROLINE 10833 manual

WE-EF PFL540 LED Installation and maintenance instructions

WE-EF

WE-EF PFL540 LED Installation and maintenance instructions

HEPER DOGO Side LW6048.585-US Installation & maintenance instructions

HEPER

HEPER DOGO Side LW6048.585-US Installation & maintenance instructions

BEGA 84 253 Installation and technical information

BEGA

BEGA 84 253 Installation and technical information

HEPER LW8034.003-US Installation & maintenance instructions

HEPER

HEPER LW8034.003-US Installation & maintenance instructions

HEPER MINIMO Installation & maintenance instructions

HEPER

HEPER MINIMO Installation & maintenance instructions

LIGMAN BAMBOO 3 installation manual

LIGMAN

LIGMAN BAMBOO 3 installation manual

Maretti TUBE CUBE WALL 14.4998.04 quick start guide

Maretti

Maretti TUBE CUBE WALL 14.4998.04 quick start guide

Maxim Lighting Carriage House VX 40428WGOB installation instructions

Maxim Lighting

Maxim Lighting Carriage House VX 40428WGOB installation instructions

manuals.online logo
manuals.online logoBrands
  • About & Mission
  • Contact us
  • Privacy Policy
  • Terms and Conditions

Copyright 2025 Manuals.Online. All Rights Reserved.

110
110
55
110
212
WALL MOUNTING BRACKET
LUMINAIRE BODY
SET SCREW
PROVIDED
TO THE WALL
PLASTIC ANCHOR
NYLON WASHER
#12 X 1
screw
!
LUMINAIRE BODY
SET SCREWS
PROVIDED
CONCRETE
WALL
we brighten up your life
LUMZ PTE LTD
INSTALLATION MANUAL
ZARA
Factory:
No.14, Jalan Anggerik Mokara 31/44, Kota Kemuning Seksyen 31,
40460 Shah Alam, Selangor, Malaysia.
Tel: (00603) 5121 1887
Fax: (00603) 5121 5187
Email: [email protected]
o
o
o
o
o
o
o
Housing made of aluminium
Impact resistance tempered glass lens
Mounting bracket with 2 fixing holes
Operating temperature: -20°C~+40°C.
LED lifetime up to 50,000 hours
Voltage range: 100 - 240 VAC ~ 50 /60 Hz
Wattage: 4.5 W & 9 W
PRODUCT DESCRIPTION & DIMENSION
IP 65 IK 08
CLASS I WITH INTERGRAL DRIVER
WARNING
!
MAKE SURE POWER IS DISCONNECTED UNTIL INSTALLATION OF PRODUCT IS COMPLETELY FINISHED.
FAILURE TO DO SO COULD RESULT IN ELECTRICAL SHOCK CAUSING SERIOUS INJURY OR DEATH.
WL-23A-J-W4-30-xx
WL-23A-J-W4-40-xx
DESCRIPTION
MODEL:
Connect wires from the luminaire to AC power as follows:
1. Connect BLUE / BLACK wire to the NEUTRAL wire.
2. Connect GREEN / YELLOW-GREEN wire to the GROUND or EARTH wire.
3. Connect BROWN / RED wire to the LIVE wire.
INSTALLATION
Connect all wires from the luminaire to AC power using a connector.
Make sure all wiring connections are tight so that no bare wires are visible.
Good connections may avoid tripping from happening.
ACCESSORIES MOUNTING (OPTIONAL)
!
WIRING INSTALLATION
Singapore Office (HQ Sales & Marketing):
1 Coleman Street #10-06, The Adelphi,
179803, Singapore.
Tel: (0065) 9758 2771
[email protected]
www.lumzlighting.com
ZARA/INSTALLATION MANUAL/REV.0
1/2
WL-24A-J-W9-30-xx
WL-24A-J-W9-40-xx
ZARA.D
ZARA.UDL
Note: Luminaire comes with:
1. 1pc of Hex Key
2. 2 pcs of Nylon Washer
ZARA.D
Fix luminaire body back to wall
mounting bracket with set
screws provided.
Make sure all screws fix tightly.
Connect wires with connector.
# Make sure power is disconnected
before installation
# Recommended screw: #12 X 1 screw
Using Hex Key provided,
remove all four set screws from luminaire
body to separate wall mounting bracket
for installation.
Pierce the rubber
grommet
Lead power supply
cables through the
hole of the grommet.
LUMINAIRE BODY
WALL MOUNTING BRACKET
SET SCREW
PROVIDED
TO THE WALL
PLASTIC ANCHOR
NYLON WASHER
#12 X 1
screw
INSIDE
OUTSIDE
ZARA D
DIRECTION
CABLE
CABLE
OUTSIDE
INSIDE
CABLE
ZARA UDL
DIRECTION
CABLE
SILVER
COATING
BLACK
SILKSCREEN
GROMMET
FILL WITH
SILICON SEALANT
HEAT SHRINK TUBE
GROMMET
HEAT
SET SCREW
PROVIDED
CONCRETE
WALL
LUMINAIRE BODY
!
we brighten up your life
LUMZ PTE LTD
INSTALLATION MANUAL
Factory:
No.14, Jalan Anggerik Mokara 31/44, Kota Kemuning Seksyen 31,
40460 Shah Alam, Selangor, Malaysia.
Tel: (00603) 5121 1887
Fax: (00603) 5121 5187
Email: [email protected]
PIERCING THE GROMMET
Singapore Office (HQ Sales & Marketing):
1 Coleman Street #10-06, The Adelphi,
179803, Singapore.
Tel: (0065) 9758 2771
[email protected]
www.lumzlighting.com
ZARA/INSTALLATION MANUAL/REV.0
2/2
INSTALLATION
ZARA.UDL
ZARA
ADDITIONAL INSTRUCTIONS
PRODUCT APPEARANCE
Connect wires with connector.
# Make sure power is disconnected
before installation
Fix luminaire back to wall
mounting bracket with set
screws provided.
Make sure all screws fix tightly.
# Recommended screw: #12 X 1 screw
Pierce the rubber
grommet
Lead power supply
cables through the
hole of the grommet.
Using Hex Key provided,
remove all four set screws from luminaire
body to separate wall mounting bracket
for installation.
Pierce the grommet using power
supply cable.
Grommet for this luminaire is
suitable for cables with size
from
Ø5 mm to Ø10 mm
.
# Do not use tools or any sharp object to pierce the
grommet.
A damaged grommet may lose its waterprofing ability.
Use a heat shrink tube to wrap the cable
Apply a thin layer of silicone sealant on the cables
Slide a piece of heat shrink tube over the cables. Place it approximately
on the area that will be covered by the grommet.
Using a heat gun, heat the surface while moving the heat gun back and
forth and rotate the cables simultaneously. Put an appropriate distance
between the heat gun and the heat shrink tube to allow it to shrink.
Alternatively, a lighter can also be used to heat it.
Make sure the heat shrink tube is uniformly shrunken.
Fill the grommet cavity with
silicone sealant
The cavity on the inside of the
grommet needs to be filled with a
waterproof material in order to
prevent water from going through
the pierced hole.
The recommended way to do this is
by filling silicone sealant.
For electrical cable without jacket, electrical connection can be done in 2 ways: