LY International Electronics HS-8250 User manual

Home Central Audio System HS-8250
Welcome to use the central audio system. For better use of this equipment, please read this
manual thoroughly before use.
http://www.lyintlcorp.com/
User
’
s
Manual
Home Central Audio System HS-8250
Room Controller HS-825R
IR Remote Controller HS-818

Contents
※ General Description .................................................................................. 错误!未定义书签。
1.About the Central Audio System. ..................................................................................... 1
2.HS-8250 Features ................................................................................................................ 1
※ HS-8250 appearance and functions ........................................................ 错误!未定义书签。
1.Functions of Front Panel ................................................................................................... 2
2.Functions of Back Panel .................................................................................................... 4
※ Connection Instructions ........................................................................... 错误!未定义书签。
1.Schematics of Input Connection ...................................................................................... 1
2.Connection Schematics for Tuner Module ...................................................................... 2
3.Connection Schematics for Infrared Learning ................................................................ 4
4.Connection Schematics for Zone 1 Output ..................................................................... 4
5.Connection Schematics for Other Zone Outpu............................................................... 5
6. Connection Figure of Wired Remote Controller ............................................................ 7
※ Operating Instructions for Host.............................................................................................. 7
※ Operating Instructions for Host.............................................................................................. 8
1. Power On State ..................................................................................................................... 8
2.Operating Instructions for Manual Control of Zone 2-12 ................ 错误!未定义书签。
3.Operating Instructions for Manual Control of Zone 1 .................................................... 9
3.1 Zone 1 control (Karaoke mic not input) ........................................................... 9
3.2 Zone 1 control (Karaoke mic input) ....................................................................12
4.Instructions for Manual Operation of MP3 Player ........................... 错误!未定义书签。
4.1 Mode Selection ........................................................................ 错误!未定义书签。
4.2 Time Display ............................................................................ 错误!未定义书签。
4.3 Music Selection ....................................................................... 错误!未定义书签。
5.Instructions for Manual Operation of Tuner ..................................... 错误!未定义书签。
5.1 Band Selection ........................................................................ 错误!未定义书签。
5.2 Search Radio............................................................................ 错误!未定义书签。
5. 3 Store Radio ............................................................................. 错误!未定义书签。
5. 4 Mute Mode ............................................................................... 错误!未定义书签。
5.5 Load Radio Frequency ............................................................. 错误!未定义书签。
6.Timer Programming ............................................................................ 错误!未定义书签。
6.1 Timer Setting ............................................................................ 错误!未定义书签。
6.2 Time Calibration ...................................................................................................16
6.3 Infrared Learning ..................................................................................................17
6.4 Copy Timer Point ..................................................................... 错误!未定义书签。
6.5 System Setting .....................................................................................................18

※ Functions of Infrared Remote Controller ............................................... 错误!未定义书签。
1. Introduction of HS-808II Infrared Remote Controlle.......................... 错误!未定义书签。
2. Introduction of HS-818 Infrared Remote Controller .......................................................20
※ Fabrication of Wired Remote Controller Wires ...................................... 错误!未定义书签。
※ About the Format of USB Disk File ......................................................................................21
※ Precautions .............................................................................................................................22
1.Safety Precautions .............................................................................. 错误!未定义书签。
2.After-sales Service Precautions ........................................................ 错误!未定义书签。
※ Packing List ............................................................................................... 错误!未定义书签。
※ Performance Specifications ..................................................................... 错误!未定义书签。
1.MP3 Player ........................................................................................................................26
2.AM/FM Tuner .....................................................................................................................26
3. Timer ................................................................................................................................26
4.General Index ....................................................................................................................27

* * Home Central Audio HS-8250
HS-8250
1
※ General Description
1.About the Central Audio System
The HS-8250 is a set of modern central audio system to your desire.
Besides all traditional family audio systems functions, this system is also provided with: 1) Timer
function. 2) Different rooms can hear different music at the same time. And you can control
the working status of the host from the room. For example, on room controller HS-825R installed in
the room, you may select the program played by the host, control the volume and tone.
The host has integrated the functions of MP3 player, tuner, zone divider, timer, pre / power
amplifier and Karaoke. It is provided with DVD, PC, TV, AUX and iPod input ports for peripheral
audio equipment, and line audio signal output port for zone 1 and 2. There are 12 zones, among
which the 1st zone is of 5.1 channel and the others are of stereo channel. The 5.1 channel is
available with two input modes: line input and fiber optical input. There are 12 remote control data
interfaces connected to the wired remote controllers for 12 zones, so that the host and remote
controller set up an interactive dual-way control, providing high convenience for the users.
2.HS-8250 Features
Modern central audio system with plentiful functions.
There are 12 zones, among which the 1st zone is of 5.1 channel (Front Left, Front Right,
Rear Left, Rear Right, Center and SW ) and the others are of stereo channel.
The 1st zone has 5.1 channel output, each channel is 60W, and zone 2 & 3 are 2 x 60W,
zone 4 to 12 are 2 x 20W outputs.
The 1st zone is provided with 5.1 channel line input and fiber optical input, as well as Dolby
and DTS decoding functions. DSP surround processing function is provided, and different
sound field effects are available for selection.
Zone 1 have Karaoke function, 2 mic inputs
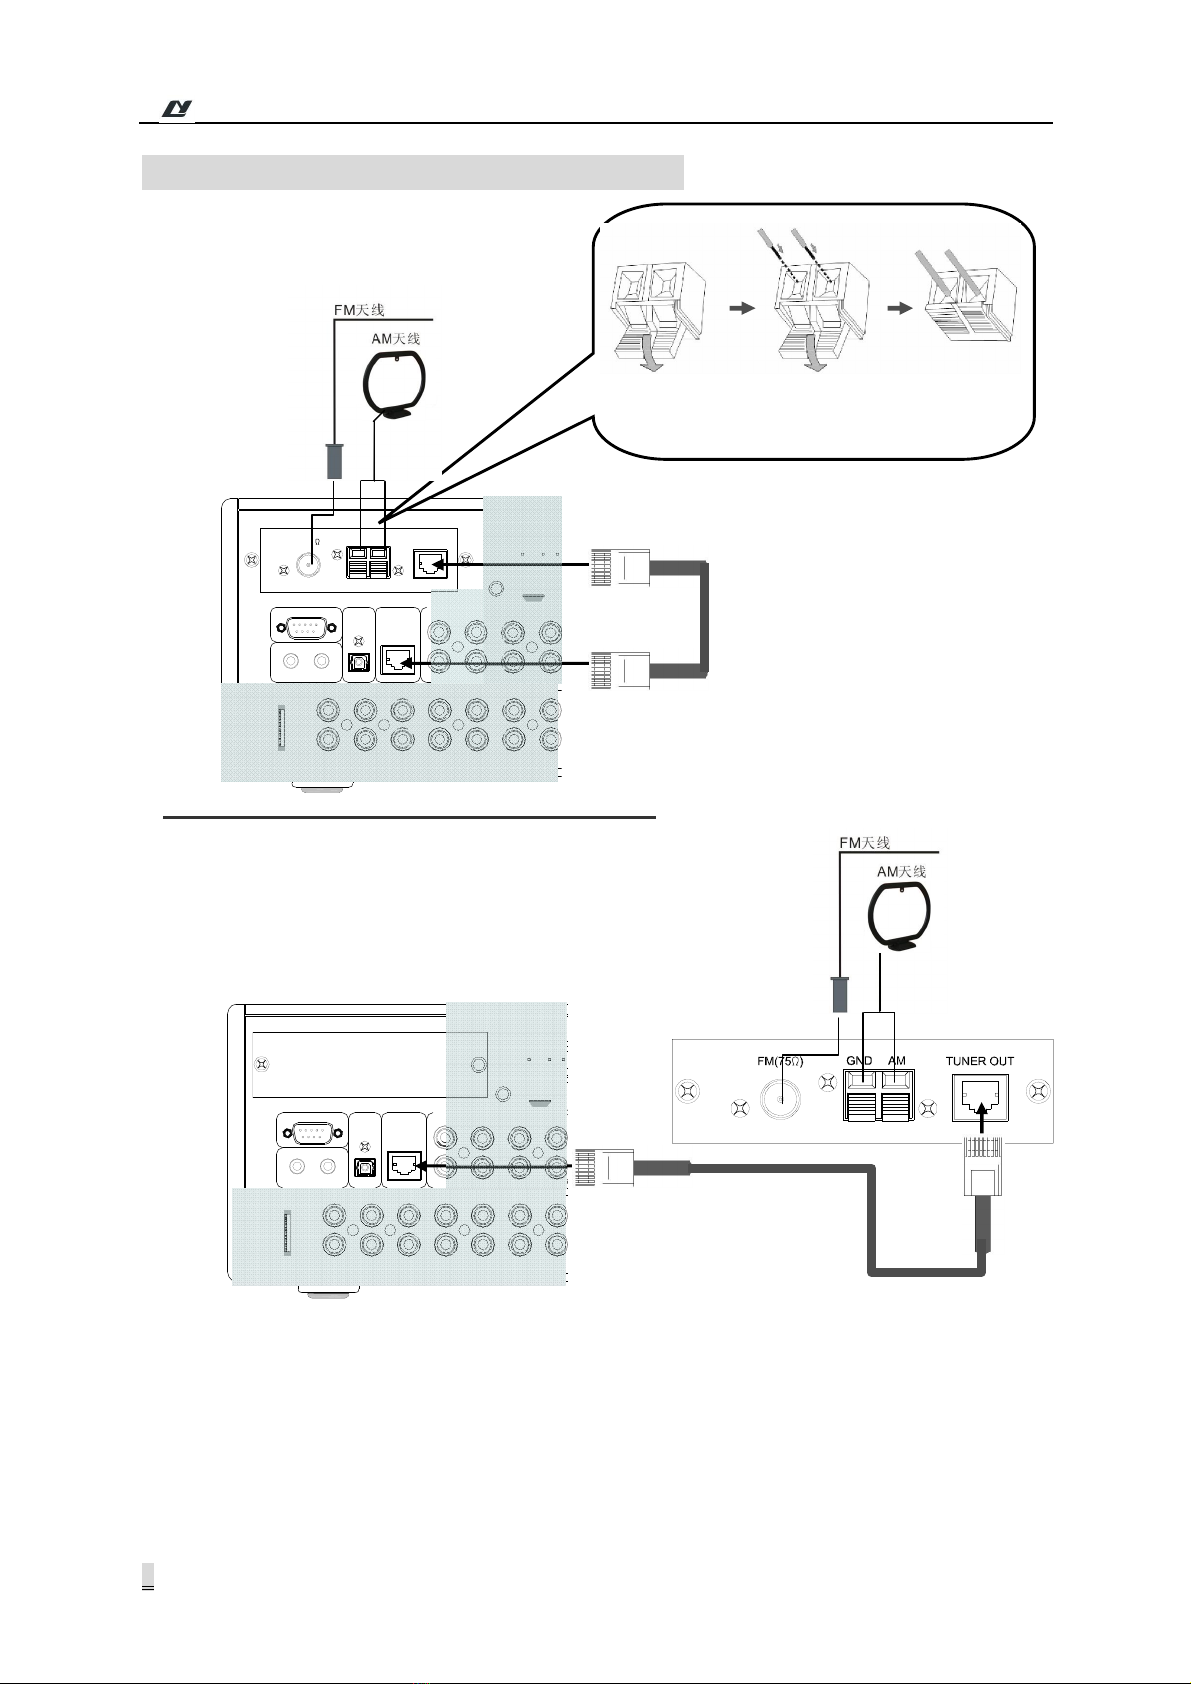
AM/FM radio function is provided. This function is realized in form of modular design, and
can be separated from the host for installation at a position with better receiving effect. The
module is connected to the host via T568A network cable.
MP3 play function and USB port are provided. Support the music files of MP3 format stored
in USB disc, MP3 player, mobile HDD, card reader and other storage devices.
Provided with DVD audio input, PC audio input, TV audio input, one auxiliary audio input
and iPod input. Also provided with line audio signal output port for zone 1 & 2, DVD/TV video
input and 12-zone video outputs.
HDMI input/output
Timer control function. The user may edit 100 timing point, with one week as a cycle.
1 AC220V power socket provided, with its switching state interlinked to the switch of zone.
Infrared learning function provided, so that it can learn the remote controller of any brand.
RS232 remote control port provided, so that the user may control the functions of this device
via central control equipment.
Inductive touch keys are designed for the panel, with two control modes available, i.e. local
control and remote control.
Video switching function. The video is switched in synchronization with the audio input.

* * Home Central Audio HS-8250
HS-8250 2
※ HS-8250 appearance and functions
1.Functions of Front Panel
1) Power Switch (POWER)
2) Power Indicator (POWER)
3) Zone ON/OFF Key
① Execute ON/OFF control to the
zone directly from main interface.
② Return to main interface from any of
Level I menu.
4) Key for Moving Cursor / Quick
Search of Radio Station
This is a multifunctional key:
① It is generally used to move the
cursor forward or load the options
for selection. In some operations, it
is equivalent to a digital wheel
rotating counterclockwise.
② Under radio working state, it can be
used to search the radio station
from high frequency to low
frequency and will be stopped
automatically when searching a
station.
5) Key for Moving Cursor / Quick
Search of Radio Station
This is a multifunctional key:
① It is generally used to move the
cursor backward or load the options
for selection. In some operations, it is
equivalent to a digital wheel rotating
clockwise.
② Under radio working state, it can be
used to search the radio station from
low frequency to high frequency and
will be stopped automatically when
searching a station.
6) Enter / Confirm Key (SELECT)
7) LCD Screen
8) Operation Option Control Key
(TIMER)
Enter the operation option interface.
This interface includes such operation
options as the timer setting, time
calibration, infrared learning, timer copy
and system setting. The interface is as
shown below:
9) Key for Controlling MP3 (MP3)
10) Key for Controlling Tuner (TUNER)
11) Displaying Zone State (ZONE)
Press this key to enter the main
interface that displays the state of 12
POWER
USB
ON O FF
DIGITAL WHEE L
IR B AND MEMO MONO /
ON/ OFF
M P3 TU NE R
TIM ER ZO NESEL ECT
1 2 3 4 5 6 7 8 9 10 11 12
13 14 15 16 17 18 19 20
D I G I T A L MIC 1 MIC 2
KARAOKE
21
Hom e Central Audio System HS-8250
Operation Options
TIMER SET IR SETUP ADJ TIME
COPY TIMER EXIT SYSTEM SET

* * Home Central Audio HS-8250
HS-8250
3
zones. It can also used to enter the
standby interface (time interface) from
main interface. The main interface is
below:
12) Multifunctional Digital Wheel
① Used to search the radio frequency
under tuner mode.
② Used to search the program under
MP3 mode, and select and confirm
the play mode.
③ Used to direct the options, select
the desired options and confirm the
result of current operation under
timer mode.
④ Used to direct the options under
zone control mode and enter the
zone control interface; also used to
perform operations and confirm the
result of current operation.
13) Infrared Window (IR)
14) USB Port (USB)
Used for inserting USB disk, mobile
HDD or card reader.
15) AM/FM Band
16) Key for Radio Storage (MEMO)
17) MONO/
This is a multifunctional key:
① Under tuner state, it serves as a key
for switching between mono /
stereo.
② Play / stop key under MP3 state.
18) Key
This is a multifunctional key:
① Mute key under tuner state.
② Play / Pause key under MP3 state.
19) Key
This is a multifunctional key:
① A key for searching the radio station
forward under tuner state.
② A key for searching the desired
program forward under MP3 state.
20) Key
This is a multifunctional key:
① A key for searching the radio station
backward under tuner state.
② A key for searching the desired
program backward under MP3
state.
21)Karaoke input
Forced Switching of Key Functions
The function keys on the host panel can be forcibly switched of their functions under Level I menu
(interface). For example, you may touch MP3 key on the panel under tuner state interface, so that
the screen will change from display of tuner state to MP3 state, in which case you can operate
MP3 state. You may touch TIMER to enter operation option interface, touch ZONE or zone
ON/OFF key to enter the zone state display (main interface of equipment system). The interface
that can be directly switched is as shown below:
DVD
TUNER
PC TV MP3
PC
1
2
3
4
5
6
BAND FM
100.45MHz
SIGN
STEREO
AM/FM PLAYER
CH 40
DVD
TUNER
PC
TV MP3
PC
1
2
3
4
5
6
LOOP
MP3 PLAYER
03
\
0 1
Override category. Please wait…
PLAY ALL
03
:
57
04 :
15
OPTION
TIMER SET
IR SETUP ADJ TIME
COPY TIMER
EXIT SYSTEM SET

* * Home Central Audio HS-8250
HS-8250 4
2.Functions of Back Panel
1) Optical Input Port for 5.1 Channel
(OPTICAL INPUT)
please refer to the Connection
Instructions (on page 5).
2) Tuner Mode (Page 5)
The tuner function is realized in form of
modular design, and can be separated
from the host for installation at a
position with better receiving effect. The
module is connected to the host via
T568A network cable.
3) Tuner Module Port (TUNER INPUT)
For connecting the tuner module signal.
4) DVD/TV Video Input Port (VIDEO
INPUT DVD) Page 5
5) Wired Remote Controller Port for Zone
1 ~ 12 (REMOTE INPUT) Page 10
6) HDMI input/output
7) Zone 1 PA Output Port (ZONE1
SPEAKER OUTPUT) (Page 7)
8) Zone 2/Zone 3 PA Output Port (Page 9)
(ZONE2/ZONE3 SPEAKER OUTPUT)
9) AC220V Timer Power Output Socket
(TIMER)
The switching state of timer power
output socket is interlinked to the switch
of zone. You may switch on any of the
zones to switch on this power output.
This power output is switched off when
all the zones are switched off. Timer
control over its switching state is
provided. (Page 15)
10) RS232 Port (RS232)
User may control the functions of this
device via central control equipment.
11) Remote Control Output Port (REMOTE
OUT) Page 7
Connected to infrared receiver for
infrared learning of the function controls
over external DVD and TV.
12) iPod input
13) 5.1 Channel Input Port for Zone 1 (5.1
INPUT)
For connection and description, please
refer to the Connection Instructions (on
page 5).
14) DVD/PC/TV/AUX Audio Input Port
15) Line Signal Output for Zone 1 / Zone 2
16) 5.1 Ch Sub Woofer Output for Zone 1
(SUB WOOFER) (Page 7) This signal
has no PA and it is output via line directly.
17) Zone 1 ~ 12 Video Output (Page 8)
For transmitting DVD/TV video signals
to 12 zones, with its distribution
changing synchronously with the audio
signal.
18) Zone 4 ~ 12 PA Output Port (Page 9)
19) AC220V Working Power Input
L
R
L
R
FRONT SURROUND SUB
WOO FER
CENTER
5.1 INPUT
AUXPC TVDV D ZONE 1 Z ONE2
L
R
L
R
L
R
L
R
SUB
WOOFER
OUTPUTINPUT
ZONE10 ZONE12
ZON E9 ZONE11ZON E7ZONE 5ZON E3Z ONE 1
ZON E8ZON E6ZON E4ZON E2
VIDE O OUTPUT
TV
DVD
VIDEO
INPUT
TUNER
INPUT
OP TICAL
INPUT
REMOTE O UT
~220 V/50Hz/4A
TIMER OUT/2A
1 2
请勿打开,以免触电
警告
RISK OF E LEC TRIC SHOCK
DO NO T O PEN
CAUTION
RS232 IN
GND AM
FM(75 )
91 2 3 4 5 7 8
10
11
13
14
15
16
17
18
19
TUNE R OUT SPEAKER OUTPUT
FRONT CE NT ERSURROUN D
L R L R
L LR R
ZONE3ZONE2
L RL L R R
ZONE 1
ZONE 6ZONE 5ZON E4
R
ZONE 9ZONE 8ZONE 7 ZONE1 2ZONE11ZONE 10
L L R L R L R L R L R L L R L RR
REMOTE INPUT
1 2 3 4
HDMI -IN1 HD M I-IN2 HD MI -OUT
IPOD IN
12
6

※ Connection Instructions
1.Schematics of Input Connection
Tips: you can use normal DVD player, or Blue-ray HD DVD player.
1)normal DVD and other audio sources wiring.
Notes :
The 5.1 channel input and optical input on DVD player provide
audio signal to zone 1 only. When connecting the optical port, please
remove the dustproof cap as directed. Please keep the dustproof cap
properly. To keep the optical port clean, please cover up the dustproof
cap when this port is long put out of use.
The video signals input from DVD and TV are transmitted to 12 zones
respectively via 12 video output ports on this device.
Except optical input, the other inputs above are connected by using
lotus connector.
2)Blue-ray HD DVD wiring.
3 HDMI interface (2 inputs for connecting to Blue-ray HD DVD, and TV Box,
1 output for connecting to HD TV in Zone 1.
L
R
L
R
FRONT SURROUND SUB
WOOFER
CENTER
5.1 INPUT
AUXPC TVDVD ZONE1 ZONE2
L
R
L
R
L
R
L
R
SUB
WOOFER
OUTPUTINPUT
ZONE10 ZONE12
ZONE9 ZONE11ZONE7ZONE5ZONE3ZONE1
ZONE8ZONE6ZONE4ZONE2
VIDEO OUTPUT
TV
DVD
VIDEO
INPUT
TUNER
INPUT
OPTICAL
INPUT
REMOTE OUT
1 2
RS232 IN
GND AM
FM(75 ) TUNER OUT
L
L
ZONE4
L
REMOTE INPUT
1 2 3 4
HDMI-IN1 HDMI-IN2 HDMI-OUT
IPOD IN
光纤接口
DVD video signal
fiber optic
5.1 audio signal
Stereo signal
TV audio signal
DVD PC Other audio source
TV box
AUX audio signal
TV video signal
iPod
iPod signal
Optical Port
RCA Connector

* * Home Central Audio HS-8250
2
Tips: only zone 1 support HD video, other zones are not.
2.Connection Schematics for Tuner Module
The tuner function is realized in form of modular design, and can be separated from the host for
installation at a position with better receiving effect. Installation of the tuner module on a better
place can improve the receiving effect. The tuner module is connected to the host via T586A
network cable. Even the module is installed on the host, it can also be connected to the back panel
on this device.
Notes: To separate the tuner module from this device, the extension wire, if needed, shall
be fabricated as follows:
RJ45 Port
The colors from left to right are:
Green white, green, orange white, blue, Blue
white, orange, brown white and brown. The two
ends match each other.
Spring
clamp
Pin 1
L
R
L
R
FRONT SURROUND SUB
WOOFER
CENTER
5.1 INPUT
AUXPC TVDVD ZONE1 ZONE2
L
R
L
R
L
R
L
R
SUB
WOOFER
OUTPUTINPUT
ZONE10 ZONE12
ZONE9 ZONE11ZONE7ZONE5ZONE3ZONE1
ZONE8ZONE6ZONE4ZONE2
VIDEO OUTPUT
TV
DVD
VIDEO
INPUT
TUNER
INPUT
OPTICAL
INPUT
REMOTE OUT
1 2
RS232 IN
GND AM
FM(75 ) TUNER OUT
L
L
ZONE4
L
REMOTE INPUT
1 2 3 4
HDMI-IN1 HDMI-IN2 HDMI-OUT
IPOD IN
Fiber optic
5.1Audio signal
Stereo signal
Blue-ray DVD
TV Box
Video signal
HD Video signal
DVD video signal
DVD HD video signal
B
oth are 5.1 audio
inputs, you can
choose any one.
HD TV
HD Video signal

* * Home Central Audio HS-8250
3
The tuner connection is as shown below:
Connection of tuner module to this device:
Connection of tuner module for not installation on this device:
L
R
L
R
FRONT SURROUND SUB
WOOFER
CENTER
5.1 INPUT
AUXPC TVDVD
L
R
L
R
L
R
INPUT
ZONE5
ZONE3ZONE1
ZONE6
ZONE4ZONE2
VIDEO OUTPUT
TV
DVD
VIDEO
INPUT
TUNER
INPUT
OPTICAL
INPUT
REMOTE OUT
1 2
RS232 IN
GND AM
FM(75 ) TUNER OUT
REMOTE INPUT
1
HDMI-IN1
IPOD IN
L
R
L
R
FRONT SURROUND SUB
WOOFER
CENTER
5.1 INPUT
AUXPC TVDVD
L
R
L
R
L
R
INPUT
ZONE5
ZONE3ZONE1
ZONE6
ZONE4ZONE2
VIDEO OUTPUT
TV
DVD
VIDEO
INPUT
TUNER
INPUT
OPTICAL
INPUT
REMOTE OUT
1 2
RS232 IN
GND AM
FM(75 ) TUNER OUT
REMOTE INPUT
1
HDMI-IN1
IPOD IN
Open cover
Connect
the wire
Release
cover
TUNER OUT
TUNER INPUT

* * Home Central Audio HS-8250
4
3.Connection Schematics for Infrared Learning
4.Connection Schematics for Zone 1 Output
Connection Schematics for 5.1 Channel Output
L
R
L
R
FRONT SURROUND SUB
WOOFER
CENTER
5.1 INPUT
AUXPC TVDVD
L
R
L
R
L
R
INPUT
ZONE5
ZONE3ZONE1
ZONE6
ZONE4ZONE2
VIDEO OUTPUT
TV
DVD
VIDEO
INPUT
TUNER
INPUT
OPTICAL
INPUT
REMOTE OUT
1 2
RS232 IN
GND AM
FM(75 ) TUNER OUT
REMOTE INPUT
1
HDMI-IN1
IPOD IN
HS
-
825
0
+
-
+
-
+
-
+
-
+
-
L R
Front
L R
Surround
Center
Sub woofer
Central control
DVD
TV
The transmitter connected to REMOTE OUT1 port on the
infrared remote controller corresponds to external DVD player;
the transmitted connected to REMOTE OUT2 corresponds to TV.

* * Home Central Audio HS-8250
5
Placement Schematics for 5.1 Sound Box
① Center
② Front Left
③ Front Right
④ Rear Left Surround
⑤ Rear Right Surround
⑥ Sub Woofer
Integrated Connection Schematics for Zone 1 Output
The PA output power of
each channel ①-⑤ is 60W
Line signal output from ⑥
channel
① Center
② Front Left
③ Front Right
④ Rear Left Surround
⑤ Rear Right Surround
⑥ Sub Woofer
TV
A
udio signal
5.1 Channel
5.1 Channel
Room Controller HS-825R
AUXPC TVDVD ZONE1 ZONE2
L
R
L
R
L
R
L
R
SUB
WOOFER
OUTPUTINPUT
ZONE10 ZONE12
ZONE9 ZONE11ZONE7ZONE5ZONE3ZONE1
ZONE8ZONE6ZONE4ZONE2
VIDEO OUTPUT
TV
DVD
VIDEO
INPUT
RISK OF ELECTRIC SHOCK
DO NOT OPEN
CAUTION
TUNER OUT
SPEAKER OUTPUT
FRONT CENTERSURROUND
L R L R
L LR R
L
ZONE1
ZONE6ZONE5ZONE4
R
ZONE9ZONE8ZONE7
ZONE10
L L R L R L R L R L R L
REMOTE INPUT
1 2 3 4
HDMI-IN1 HDMI-IN2 HDMI-OUT
HD TV
Infrared remote

* * Home Central Audio HS-8250
6
5.Connection Schematics for Other Zone Output
Connection schematics for Zone 2 and Zone 3 output: The zone 2 and zone 3 are of stereo
dual-channel output, with each channel at 60W. The zone 2 has two groups of ports, and the
signals are output in parallel. You may connect one of them, or connect two sound boxes at the
same time. Take care that the total resistance shall not be lower than 4Ω.
Integrated connection schematics for other zones: The zone 4 ~ zone 12 of this device are of
stereo dual-channel output, with each channel at 20W.
Zone 2 can be
connected like
this
Zone 2 can
also be
connected
like this
Zone 2 Speaker Zone 3 Speaker Zone 3 Speaker Zone 2 Speaker
Zone 1 TV Zone 12 TV
Zone 2 Line Output
HiFi PA
Zone 12
Zone 1
Each zone have independent video output

* * Home Central Audio HS-8250
7
6. Connection Figure of Wired Remote Controller
Wired remote
controller of
every room can
be controlled by
the infrared
L
R
L
R
FRONT SURROUND SUB
WOOFER
CENTER
5.1 INPUT
AUXPC TVDVD ZONE1 ZONE2
L
R
L
R
L
R
L
R
SUB
WOOFER
OUTPUTINPUT
ZONE10 ZONE12
ZONE9 ZONE11ZONE7ZONE5ZONE3ZONE1
ZONE8ZONE6ZONE4ZONE2
VIDEO OUTPUT
TV
DVD
VIDEO
INPUT
TUNER
INPUT
OPTICAL
INPUT
REMOTE OUT
~220V/50Hz/4A
TIMER OUT/2A
1 2
请勿打开,以免触电
警告
RISK OF ELECTRIC SHOCK
DO NOT OPEN
CAUTION
RS232 IN
GND AMFM(75 ) TUNER OUT SPEAKER OUTPUT
FRONT CENTERSURROUND
L R L R
L LR R
ZONE3ZONE2
L RL L R R
ZONE1
ZONE6ZO NE5ZONE4
R
ZONE9ZONE8ZONE7 ZONE12ZONE11ZONE10
L L R L R L R L R L R L L R L RR
REMOTE INPUT
1 2 34
HDMI-IN1 HDMI-IN2 HDMI-OUT
IPOD IN
Note: in four
input
connections of
DATA1 to
DATA4, the
number of any
one of wired
remote
controller
connected in
“hand-in-hand”
manner can be
12; the total
length of any
Infrared remote

* * Home Central Audio HS-8250
8
※Operating Instructions for Host HS-8250
1. Power On State
Connect all the wires correctly and check for no error. Then, connect the power supply. Press
down Power On/Off key to switch on the device. If there is no zone opened, the system will be
under standby state and display the standby interface on the screen (Fig. 1-1). The power indicator
is red. In this case, the timer power output is off. Under standby state, you may press ON/OFF key
or ZONE key to enter the main interface (Fig. 1-2). After a zone is opened, the current state of
switching, audio source and volume in this zone will be immediately displayed. In this case, the
power indicator will be green, while the timer power output will be opened. (Note: If all the zones
are closed, the timer power output will also be closed. If one of the zones is opened, the timer
power output will be automatically opened).
2.Operating Instructions for Manual Control of Zone 2-12
The control of zone 2 ~ 12 includes the selection of audio source, adjustment of volume and tone,
and testing of clock sound for each zone. The operating procedures are as follows:
Enter Zone Operation Interface Under the main interface, rotate the digital wheel * to
select a zone (Fig. 2-1) and press digital wheel once # to enter the zone operation interface
(Fig. 2-2). Under this interface, you may carry out the above operations to the opened
zones.
Select Audio Source There are two ways for selecting the audio source:
① From zone operation interface, rotate the digital wheel * to move the cursor to pane behind
the “Program” (Note: The cursor herein refers to the dark grey icon when an option is
selected). Press the digital wheel # once, so that the icon will appear behind the pane.
Rotate the digital wheel * to display the 6 types of audio source in turn. When the desired
audio source is on display, stop rotating the digital wheel and press the digital wheel #
again, so that the selected audio source will be allocated to this zone.
② Select the audio source from remote controller. You may select by directly pressing the
source name key or SOURCE+/SOURCE- key on the remote controller.
Volume / Tone Control There are two ways for controlling the volume and tone:
(Fig.1-1)
(
Fig.1
-
2
)
ON/OFF
DVD
TUNER
PC TV MP3
PC
1
2
3
4
5
6
2010 / 03 / 05 POWER OFF
MON. 8:35:16
NEXT TIMER POINT∶TUES.07:55:00
Notes
In the operations marked * below, the functions for rotating the digital wheel can also be done by using
the key . In the operations marked #, the functions for pressing the digital wheel can also
be done by using the key .

* * Home Central Audio HS-8250
9
① From zone control interface, you may rotate the digital wheel * to move the cursor to the
sliding pane behind the "Volume" option. Press the digital wheel # once, so that the icon
will appear behind the pane. Then, rotate the digital wheel * clockwise or counterclockwise
to move the slider left and right, so that the zone volume will be increased or decreased
accordingly. Adjust the treble or bass tone in the same way.
②Use the wired remote controller or infrared remote controller to control the zone volume /
tone under the interface except “Operation Option”. For control of the zone volume / tone
from wired remote controller, please refer to the Operating Instructions for HS-815R
(Wired Remote Controller).
Ringer Testing Rotate the digital wheel * to move the cursor to “Ringer Testing” option and
press the digital wheel # once, so that a set of ringers will be output from the output port.
(Note: The remote controller does not provide the “Ringer Testing” function)
After completion of the above operations, rotate the digital wheel * to move the cursor to
“CONFIRM” checkbox. Then, press the digital wheel # once to confirm and exit. The other
zones from zone 2 to 12 may be controlled according to the method above.
3.Operating Instructions for Manual Control of Zone 1
Zone 1 is different from other zones. Except the 7 audio sources in other zones, the zone 1 also
has 5.1 channel and optical input source, totaled 9 types of audio sources for selection. Meanwhile,
it differs from other zones in view of zone output mode ad tone / volume control. The detailed
operations are as follows:
HS-8250 Zone 1 have Karaoke function, control interface is different between Karaoke
mic input and not input. Cause Karaoke mode only support stereo output, so it is not
support mode setting and speaker setting in Karaoke mode.
3.1 Zone 1 control (Karaoke mic not input)
When Karaoke mic not input, in main interface rotate the digital wheel * to move the cursor to
zone 1 state pane (Fig. 3-1). Then, press the digital wheel # once to enter the zone 1 control (hall
control) interface (Fig. 3-2).
1) Select Audio Source The selection of audio source for zone 1 is same as that for other
zones. The only difference is that the zone 1 has two more options, i.e. 5.1 channel (5.1LINE)
and optical (OPTICAL) source. Except that the 5.1 channel (5.1LINE) and optical (OPTICAL)
(Fig.2-1)
(Fig.2-2)
Zone 02 Control
DVD
Pro
Volum
Bass
Treble
YES
Chime
(Fig.3-1)
(Fig.3-2)
Press digital wheel
or
Press digital wheel
Or
DVD
TUNER
PC
TV MP3
PC
1
2
3
4
5
6
DVD
TUNER
PC
TV MP3
PC
1
2
3
4
5
6
HALL CONTROL
DVD
SOUR.
VOL.& TONE
SPK. SETUP SEPA. VOL.
MODE SETUP OK

* * Home Central Audio HS-8250
10
can be manually selected from the host panel, they can also be selected by pressing the
SOURCE+/SOURCE- on infrared remote controller.
2) Total Volume / Tone Rotate the digital wheel * to move the cursor to “Total Volume/Tone”
option and press the digital wheel # once to enter “Hall Total Volume / Tone Control" interface
(Fig. 3-3), where you can control the total volume and tone of zone 1 (hall) and carry out ringer
testing. For control of the volume and tone, please refer to the Operating Methods for Control
of Zone 2~12 Volume and Tone. It will not be repeated here.
3)Speaker Setting Rotate the digital wheel * to move the cursor to “Speaker Setting” option and
press the digital wheel # once to enter the “Hall Speaker Setting” interface (Fig. 3-4) (Next
page). Among the setting options:
Testing: Used for testing if the speakers work normally. The “Normal” option refers to the
current program being played. Then, exit the test state.
Front: It is provided with two options, i.e. Big and Small, used for setting big sound box or
small sound box.
Center: It is provided with three options, i.e. Big, Small and None. Except for setting the big
sound box or small sound box, it is also used for setting the center signal YES or No under
AUTO and Dolby Pro mode. If setting to “No”, the center signal is distributed to the two
loudspeakers on left and right.
Surround: It is provided with three options, i.e. Big, Small and None. Except for setting the big
sound box or small sound box, it is also used for setting the surround signal YES or No under
AUTO and Dolby Pro mode. If setting to “No”, the surround signal is canceled.
Sub Woofer: It is provided for setting sub woofer signal YES or No under AUTO and Dolby Pro
mode. If setting to “No”, the sub woofer signal is distributed to the two loudspeakers on left
and right.
The above settings can be done by using the digital wheel, or by using the key
and . After setting, press “Confirm” to confirm and exit the setting interface.
4)Independent Volume Rotate the digital wheel * to move the cursor to “Independent Volume"
option and press the digital wheel # once to enter the “Hall Independent Volume Control”
interface (Fig. 3-5).
(图 3-2)
(Fig.3-3)
(Fig.3-2)
(Fig.3-4)
(Fig.3-2)
Press digital wheel
or
Press digital wheel
Or
Press digital wheel
Or
HALL CONTROL
DVD
SOUR.
VOL. & TONE
SPK. SETUP SEPA. VOL.
MODE SETUP OK
HALL VOL. AND TONE CONTROL
CHIME TEST.
VOL.
TREB.
BASS
OK
HALL CONTROL
DVD
SOUR.
VOL. & TONE
SPK. SETUP
SEPA. VOL.
MODE SETUP
OK
HALL SPEAKER SETUP
NORMAL
TEST
LARGE
FRON.
LARGE
CENT.
LARGE
SURR.
OK
HAVE
WOOF.
HALL CONTROL
DVD
SOUR.
VOL. & TONE
SPK. SETUP
SEPA. VOL.
MODE SETUP
OK
HALL SEPARATE VOLUME CONTROL
FRON.
CENT.
SURR.
WOOF.
OK

* * Home Central Audio HS-8250
11
The hall independent volume control refers to independent control over the volume of several
channels, e.g. front and surround. The operation is same as that for zone volume control. It may
be done by using digital wheel or by using the keys and .
5) Mode Setting Rotate the digital wheel * to move the cursor to “Mode Setting” option and
press the digital wheel # once to enter the “Mode Setting” interface (Fig. 3-6).
Listening Mode: Three options are provided, namely: AUTO, Dolby Pro Logic and STEREO.
Rotate the digital wheel to move the cursor to the pane behind "Listening Mode”, and press
the digital wheel. When the icon appears in pane, rotate the digital wheel to adjust the
option. Select the desired option and press the digital wheel again to confirm. The effect
under three modes is respectively:
① STEREO: Forcibly there is output from the speakers on front left and front right only, but no
signal output from other channels. It is effective for all program types.
② AUTO:Auto mode. If the input is Dolby digital AC-3, the listening mode will be AC-3
DIGITAL. If the input is DTS, the listening mode will be DTS DIGITAL.
③ Dolby Pro Logia: Dolby Pro Logic processing mode, which can process the stereo
(dual-channel) movie and music of any quality into surround output with 5 full-range
channels.
DSP Effect: Operate as above by using the digital wheel. Its function is to simulate the effect
of different fields from internal DSP, including: HALL, CHURCH, DISCO, THEATER, LIVE,
MOVIE, MUSIC and SIMULATE.
① HALL: Simulate the hall effect.
② CHURCH: Simulate the church effect.
③ DISCO: Simulate the disco hall effect.
④ THEATER: Simulate the theater effect.
⑤ LIVE: Simulate the live effect.
⑥ MOVIE: Simulate the cinema effect.
⑦ MUSIC: Simulate the music hall effect.
After setting, select “Confirm" and press the digital wheel to confirm the setting and exit the
setting interface.
Notes:
The 5.1 channel input and output have corresponding through mode. Therefore, when you
(Fig.3-2)
(Fig.3-6)
Press digital wheel
Or
(Fig. 3-5)
HALL CONTROL
DVD
SOUR.
VOL. & TONE
SPK. SETUP
SEPA. VOL.
MODE SETUP
OK
HALL SO UND FIELD MODE
LISTEN MODE
LIVE
DSP EFFECT
OK
AUTO

* * Home Central Audio HS-8250
12
have selected the program of 5.1 channel source in zone 1,
① The “Speaker Setting” option will be disabled;
② The “Mode Setting” option will be disabled.
3.2 Zone 1 control(Karaoke mic input)
When Karaoke mic input it will show as below.
As show on above picture(Fig.3-7) press ‘Yes’ to enter ‘HALL
KARAOKE CONTROL’ interface (Fig. 3-8), and here you can
select source for zone 1, control volume. And you press
‘KARAOKE’ you will enter Karaoke control interface(Fig.3-7).
In Karaoke mode, if pull out the mic it will exit Karaoke control
interface automatically, and enter zone interface.
Totally have 9 accompany source, any one can be chosen as the accompany music.
4.Instructions for Manual Operation of MP3 Player
Press “MP3” key on the panel to enter the MP3 player setting interface (Fig. 4-1) (Next page).
4.1 Mode Selection
This operation is used for selecting the play mode of MP3. Three modes are available for selection,
i.e. “Play All”, “Play One” and “Repeat One”. The "Play All” mode refers to sequential play of all the
music files stored in the memory. The “Play One" mode refers to play of the currently selected
music only. The “Repeat One” mode refers to repeated pay of the currently selected music.
How to Set: Rotate the digital wheel to the pane behind the “Mode” option and press the digital
wheel until the icon appear behind the pane. Rotate the digital wheel to select. After selection,
press the digital wheel again to confirm and exit.
4.2 Time Display
As shown in Fig. 4-1 (next page), the time “00:00” in front indicates the time progress of the music
being played, and the time “00:00” behind indicates the total time length of the music being played.
4.3 Music Selection
As shown in Fig. 4-1, move the cursor to the pane “ \ “. Press and rotate the digital wheel
to select. The number in the front pane represents the directory. Selecting 03 indicates that you
KARAOKE
60%
Mic
Yes
(Fig. 3-7)
Rever
Delay
FB
134ms
+2dB
Bass
-
2dB
Treble
Tone
F+1
Mic Volume
Mic Reverb
Mic Delay
Mic Treble
Mic Feedback
Yes
Mic Bass
Accompany music tone
HALL KARAOKE CONTROL
Sour
Vol Tone
KARAOKE
Yes
(Fig. 3-8)
DVD

* * Home Central Audio HS-8250
13
have selected the third director in USB disk. The number in the rear pane represents the serial
number of the music in this directory. The name of the selected music is displayed behind the pane.
When selecting the music, please watch the notes on the lower of the screen. If the screen
displays “No USB disk. Please insert USB Disk", this indicates that there is no USB disk inserted
into USB port, or you have inserted an USB disk that cannot be recognized by the equipment. If
you have inserted an USB disk and the equipment has accessed it, the note “USB disk inserted.
Please wait…” will appear on the lower of the screen. If there is no music under a directory in USB
disk, the note “No music found under this directory. Please select another directory" will appear if
this directory is selected. After that, the equipment automatically turn to another directory and
display the names of the music on that directory.
For manual control of MP3 player, you may use the “ “ and “ “ key on the equipment panel
to select the music, and use the “ “ key to control the play and pause. You may also control by
using the wired remote controller and infrared remote controller. For detailed operating methods,
please refer to the introduction of key functions in the Operating Instructions.
5.Instructions for Manual Operation of Tuner
Press the “TUNER” key on the panel to enter the tuner control interface (Fig. 5-1). From this
interface, you can control the tuner band, radio frequency and channel. In zone 1, the tuner
effect is best set to STEREO mode from the "Listening Mode” of “Hall Sound Field Mode Setting".
5.1 Band Selection
From the panel, you may press the BAND key under the screen to switch between AM and FM.
You may use the band switching key on the wired remote controller and infrared remote controller
to switch between AM and FM. The frequency range of AM band is 522kHz-1620kHz; and the
frequency range of FM band is 87.00MHz-108.00MHz.
5.2 Search Radio
From the panel, you may press the “ “ and " “ key under the screen to search the
radio storage number forward or backward and load the saved radio. You may also search the
radio by rotating the digital wheel. Rotate the digital wheel clockwise to search toward the high
band, with slow rotation of the digital wheel for one grid to increase the frequency by one step
(One step is 50kHz for FM band and 9kHz for AM band). When searching the radio station, the
black message indication bar as shown in Fig. 5-1 will be displayed behind "Signal” option. The
indication bar will be become wider if the signal is strong, and will become narrow if the signal is
weak. Quick rotation of the digital wheel for one turn can enter the auto search state. It will be
stopped when searching the radio frequency or reaching the highest band. Rotate the digital wheel
counterclockwise to search toward the low band, with slow rotation of the digital wheel for one grid
to decrease the frequency by one step (One step is 50kHz for FM band and 9kHz for AM band).
The signal display and auto search are same as above. You may also use the key
LOOP
MP3 PLAYER
03
\
0 1
star
PLAY ALL
00
:
58
04 :
27
BAND FM
100.45MHz
SIGN
STEREO
AM/FM PLAYER
CH 40
(Fig. 4-1) (Fig. 5-1)
This manual suits for next models
2
Table of contents
Other LY International Electronics Stereo System manuals