manuals.online logo
Brands
  1. Home
  2. •
  3. Brands
  4. •
  5. Lyfco
  6. •
  7. Indoor Furnishing
  8. •
  9. Lyfco Steninge 166-1-54 User manual

Lyfco Steninge 166-1-54 User manual

ASSEMBLY MANUAL
BRUKSANVISNING
MODEL NAME: Steninge
SteningeMODELLNAMN:
SKU: 166-1-54
Konsumentkontakt
Arc E-commerce AB
Box 3124
13603 Haninge
XX-YYWW
Please don’t remove the batch code sticker at back side of this product!
Any feedback please take picture of this batch code for traceablity purpose
NOTE: 50% TIGHTEN BEFORE FIXING ALL BOLTS
VIKTIGT – LÄS MONTERINGSANVISNINGARNA NOGA INNAN DU BÖRJAR
Ta inte bort ettiketten med batchnummer som finns på möbeln. Om du behöver hjälp med service eller reklamation av din möbel –
ange möblensbatchnummer till återförsäljaren, så att du kan få rätt reservdelar till just din möbel.
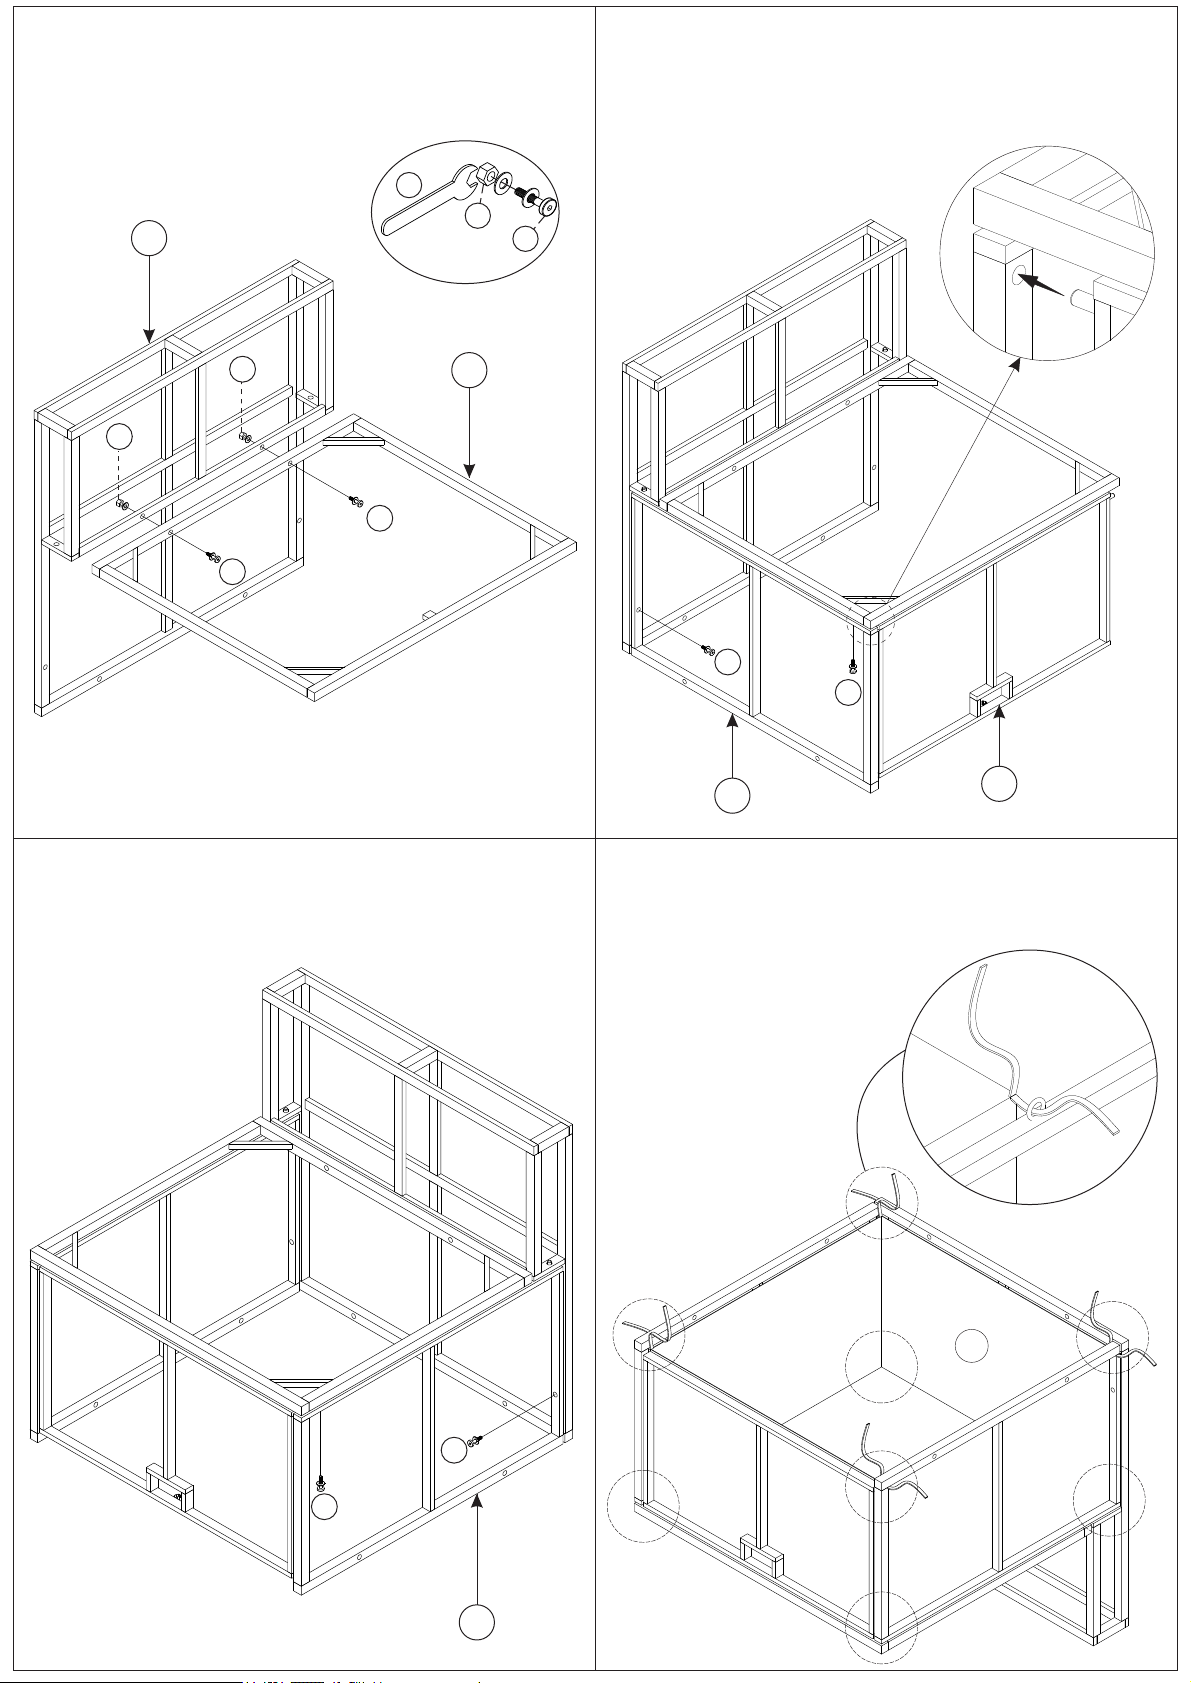
Attention! Please note that at first all screws should be inserted slightly by hand!
Turn 2-3 times so that the screw grips on its own and connects all elements loosely. The screws
must only be driven in tightly when all elements are connected with each other in this way.
Otherwise the setup won´t be possible. Only by driving them in tightly afterwards, small
deviations of the borehole or the welded joints, which always occur with handcrafted products,
can be compensated.
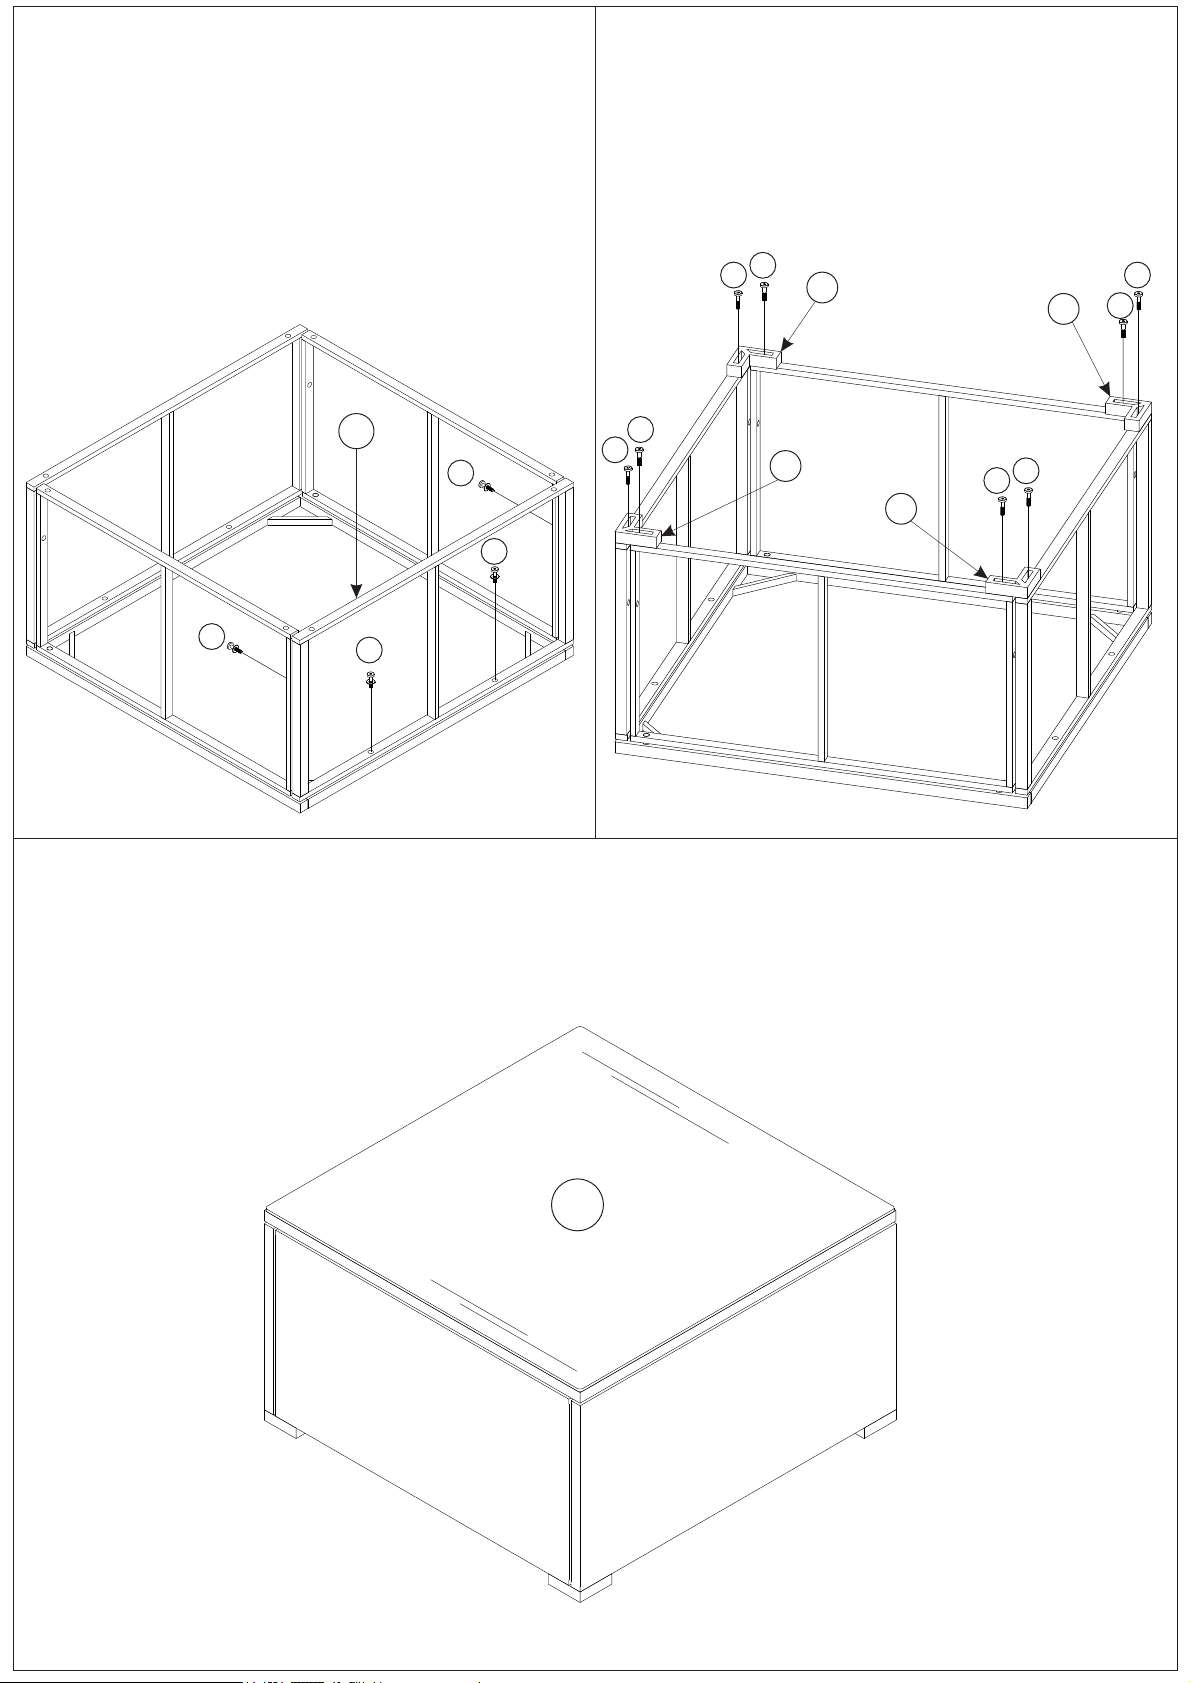
Notes on an optimized assembly:
Before you completely tighten the screws, check carefully all the screws and tighten them
(only) to the extent that the product remains (especially chairs or loungers) still under load. If
you are sure that your product can withstand load, place it on a solid, level ground and put
some weight on it, please carefully and always with cushions. The various components can then
align with each other. Then tighten completely the screws. Thus you achieve and optimal
alignment of the product and prevent wobbling. Don’t sit, find some weight.
Your new product was made by hand.
Slightly irregularities are rather seen as a
quality attribute than as a reason for
complaints.
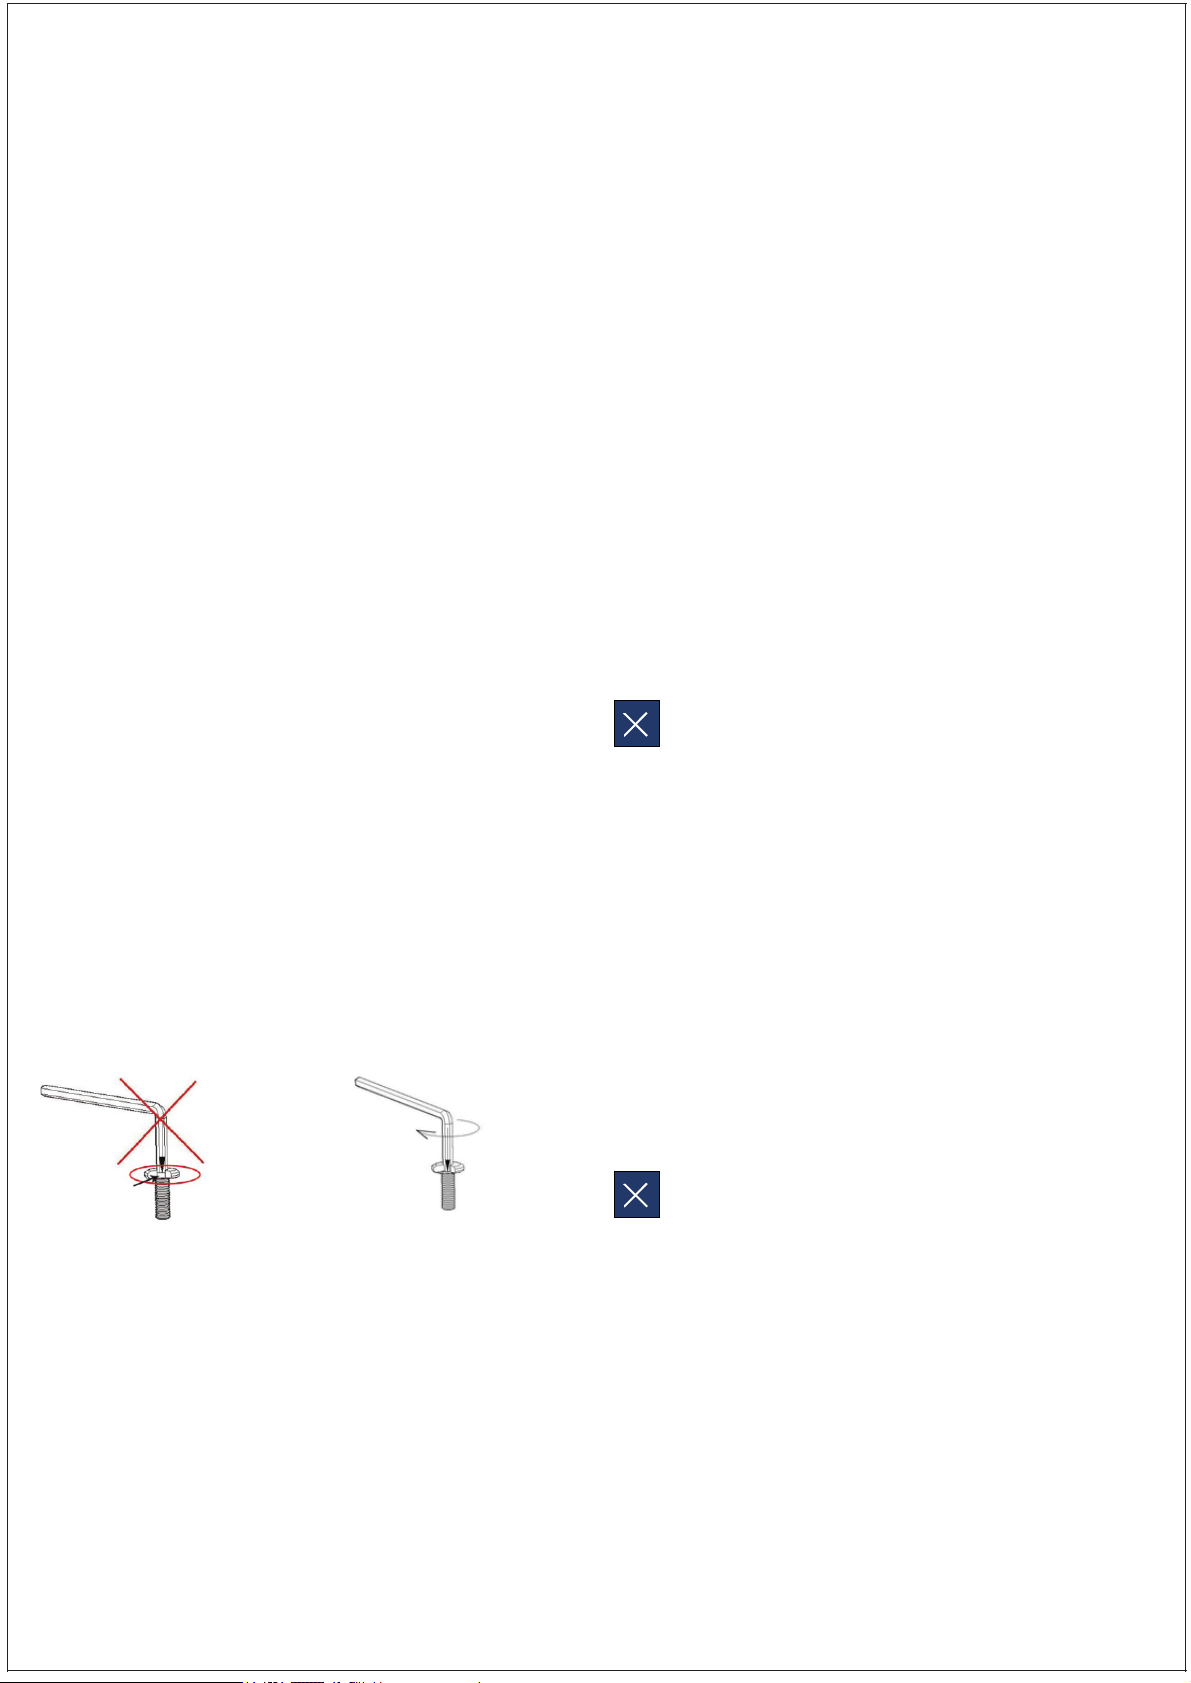
Tip: Always fully insert the hex key inside
designated notch of screw.
If you don´t do that and slip out of the
screw, the screw will suffer damage and it
can caused the screw head to become
round inside you won´t be able to find grip
with the hex key anymore!
VIKTIGHT
Don´t use this product if parts are missing, damaged or
worn down.
Don´t use any electronic tools to set up these product.
The high energy of these electronic tools will cause
screw overghten and therefor they won’t grid.
Don´t overghten screws or bolts. Only ghten the
screws enrely aer the product is completely set up.
You shouldn’t sit or stand on it.
Don´t let your product stand in the rain. Protect it from
weather impacts. In mes of freeze and over the
winter, we suggest you to store the product in a
covered dry place.
Var uppmärksam! Sätt först i samtliga skruvar löst. Dra inte åt, för då finns risk att skruvhålen inte
passar.
Innan du drar åt skruvarna helt, gör såhär för bästa resultat:
Ställ möbeln på en helt slät yta och lägg ett tillräckligt tungt föremål (ca 10-15kg) på den, så att
alla ben nuddar marken. Skruva därefter i skruvarna helt. Obs – använd inte din kroppstyngd, då
det är för mycket vikt. Om du följer dessa råd, blir din möbel stabil.
Om du inte följer dessa instruktioner kommer möbeln att bli ostadig och ”vickig” då produkten
upplevs ojämn.
Din nya möbel är handgjord. Små avvikelser
kan därför förekomma och är ett
kvalitetsattribut snarare än ett fel.
Tips: Var noga att alltid sätta in insexnyckeln
helt ner i skuven.
Om du inte gör det finns risk att insexnyckeln
slinter, vilket skadar skruven.
Skruvenkandåbliobrukbar.
Använd inte den här produkten om delar saknas,
är skadade eller utslitna.
Använd inte elektriska skruvdragare för att
montera produkten. Den höga kraften i elektriska
verktyg kommer dra åt skruvarna för hårt vilket
kan skada gängorna.
Spänn inte skruvar eller muttrar för hårt. Dra åt
alla skruvar efter att hela möbeln monterats.
Stå eller sitt inte på bordet.
För att förlänga livslängden på möbeln, undvik
att låta den stå i regn. Under vintertid
rekommenderar vi att möbeln förvaras inomhus,
i torr miljö.
DONT’S
1
2
3
4
5
6
7
Bolt M6x40mm
Bolt M6x30mm
Bolt M6x25mm
Bolt M6x55mm
Nut M6
Seat Cushion
Seat Corner Cushion
B
C
E
F
G
Panel Frame B
Panel Frame C
Right Back Frame E
Left Back Frame F
Panel Frame G
HardwareComponent
1 pc
9 pcs
5 pcs
1 pc
3 pcs
3 pcs
3 pcs
88 pcs
5 pcs
3 pcs
38 pcs
27 pcs
51 pcs
38 pcs
A
Back Frame
D
Seat Frame D
8
9
10
11
12
13
16
15
Back Pillow
Big Corner Pillow
Small Corner Pillow
Table Glass
Sofa Leg
Sofa Connector
Allen key
Spanner
H
J
Seat Frame H
Stool Top Frame
HardwareComponent
3 pcs
44 pcs
1 pc
5 pcs
3 pcs
3 pcs
1 pc
I
Table Top Frame 1 pc
Stool Cushion
14
1 pc
1 pc
1 pc
8 pcs
K
Right Frame 1 pc
L
Left Frame 1 pc
M
Back Frame 1 pc
N
Seat Frame 1 pc
17
Seat Cushion 1 pc
18
Back Cushion 1 pc
R
Rain Cover 4 pcs
ComponentComponent
Panel Frame
P1
4 pcs
P
Panel Frame 4 pcs
Q
O
Front Frame
Fold Frame
1 pc
1 pc
4 pcs
A1
Back Frame
C2
Panel Frame 4 pcs
D1
Seat Frame 4 pcs
N1
Bottom Frame 4 pcs
R
STEP 1
1
5
A1
D1
1
5
Connect Back Frame (A1) & Seat Frame (D1) with
Bolt (1) & Nut M6 (5)
STEP 2
STEP 3
Connect part from STEP 3 & Rain Cover (R),
tie the rope of rain cover with round hole
14
5
1
STEP 4
3
C2
P1
3
Connect part from STEP 1, Panel Frame (P) &
Panel Frame (C2) with Bolt (3)
Connect part from STEP 2 &
with Bolt (3)
Panel Frame (P1)
P
3
3
Connect part from STEP 4 & Bottom Frame (N1)
with Bolt (2)
4
4
4
44
44
412
12
12 12
8
6
STEP 5
Connect part from STEP 5 & Sofa Leg (12)
with Bolt (4)
Put on Seat Cushion (6) & Back Pillow (8) to complete.
N1
2
22
2
2
2
STEP 6
5
1
1
5
EF
14
5
1
G
B
3
2
3H
3
1
11
5
55
1
STEP 7
Connect Right Frame E (E) & Left Frame (F)
with Bolt (1) & Nut M6 (5)
STEP 8
Connect Panel Frame B (B) & Panel Frame G (G)
with Bolt (3)
STEP 9
Connect part from STEPS 7 & 8 with Bolt (2) & (3)
STEP 10
Connect part from STEP 9 & Seat Frame (H)
with Bolt (1),Nut M6 (5) & (3)
5
14
5
1
12
4
12
4
7
10
9
3
3
3
3
I
C
B
B
STEP 12
Connect part from STEP 10 & Sofa Leg (12)
with Bolt (4)
Put on Seat Corner Cushion (7), Big Corner
Pillow (9), Small Corner Pillow (10) to complete
STEP 11
STEP 13
Connect Table Top Frame (I), Panel Frame C (C) &
Panel Frame B (B) with Bolt (3)
STEP 14
Connect part from STEP 13 & Panel Frame B (B)
with Bolt (3)
33
3
3
4
44
44
44
4
11
C
12
12
12
12
STEP 15
Connect part from STEP 14 & Panel Frame C (C)
with Bolt (3)
Connect part from STEP 15 & Sofa Leg (12)
with Bolt (4)
STEP 16
STEP 17
Put on Table Glass (11) to complete table.
3
3
3
3
IB
STEP 18
Connect Table Top Frame (I), Panel Frame C (C) &
Panel Frame B (B) with Bolt (3)
STEP 19
Connect part from STEP 18 & Panel Frame B (B)
with Bolt (3)
33
3
3
4
44
44
44
4
C
12
12
12
12
STEP 20
Connect part from STEP 19 & Panel Frame C (C)
with Bolt (3)
Connect part from STEP 20 & Sofa Leg (12)
with Bolt (4)
STEP 21
CB
STEP 22
Put on Stool Cushion (16) to complete table.
16
STEP 23
A
B
B
3
3
Connect 2pcs Panel Frame B(B) & Back Frame(A)
with Bolt (3) .
Connect part from STEP 23 & Panel Frame C (C)
with Bolt (3).
C
3
3
STEP 24 STEP 25
Connect part from STEP 24 & Seat Frame (D)
with Bolt (2), (1) & Nut (5)
D
3
3
11
5
5
14
5
1
4
12
STEP 26
Overturn part from STEP 25, connect part from
STEP 25 & Sofa Leg (12) with Bolt (4)
STEP 27
Put on Seat Cushion (6) & Back Cushion(8)
to complete the chair.
8
6
STEP 28 STEP 29
Connect Back Frame (M) & Seat Frame (N) with
Bolt (1) & Nut (5)
Connect part from STEP 28 & Right Frame (K)
with Bolt (1) & Nut (5)
111
1
1
1
5
5
5
5
5
5
K
M
N
STEP 30 STEP 31
STEP 32 STEP 33
Connect part from STEP 29 & Fold Frame (Q) Connect part from STEP 30 & Left Frame (L) with
Bolt (1) & Nut (5)
Connect part from STEP 31 & Front Frame (O)
with Bolt (3)
Connect part from STEP 32 & Sofa Leg (12)
with Bolt (4)
Q
3
4
5
5
5
5
1
1
1
1
L
3
3
3
O
4
4
4
4
4
4
4
12
12
12
12
STEP 34
Put on Seat Cushion (17) & Back Cushion (18) to compelet armchair
17
18
FINISH

Other Lyfco Indoor Furnishing manuals

Lyfco Lysekil User manual

Lyfco

Lyfco Lysekil User manual

Lyfco Allarp 166-1-63 User manual

Lyfco

Lyfco Allarp 166-1-63 User manual

Lyfco Vrango 166-1-75 User manual

Lyfco

Lyfco Vrango 166-1-75 User manual

Lyfco 166-1-71 User manual

Lyfco

Lyfco 166-1-71 User manual

Popular Indoor Furnishing manuals by other brands

Relita LUKA Assembly instructions

Relita

Relita LUKA Assembly instructions

Home Styles 88 5527 08 quick start guide

Home Styles

Home Styles 88 5527 08 quick start guide

Space 2387C operating instructions

Space

Space 2387C operating instructions

Furniture of America CM3882PC - 2PK Assembly instructions

Furniture of America

Furniture of America CM3882PC - 2PK Assembly instructions

Furniture of America CM6495 Assembly instructions

Furniture of America

Furniture of America CM6495 Assembly instructions

Next 984335 Assembly instructions

Next

Next 984335 Assembly instructions

Riverside Furniture Sierra Assembly instructions

Riverside Furniture

Riverside Furniture Sierra Assembly instructions

Genie CM7989HB-FQ-A4 Assembly instructions

Genie

Genie CM7989HB-FQ-A4 Assembly instructions

WASHTOWER 70-183-17 Assembling Instruction

WASHTOWER

WASHTOWER 70-183-17 Assembling Instruction

Leuwico Go2 basic user manual

Leuwico

Leuwico Go2 basic user manual

DREAMS Angel manual

DREAMS

DREAMS Angel manual

Niche NBC2930 Assembly instructions

Niche

Niche NBC2930 Assembly instructions

AMQ Revi installation guide

AMQ

AMQ Revi installation guide

Teknion hiSpace operation instruction

Teknion

Teknion hiSpace operation instruction

Oxford Garden TRAVIRA 39" TABLE Assembly instructions

Oxford Garden

Oxford Garden TRAVIRA 39" TABLE Assembly instructions

GrainWood Shaker Assembly instructions

GrainWood

GrainWood Shaker Assembly instructions

Bell'O AVSC2155 Assembly instructions

Bell'O

Bell'O AVSC2155 Assembly instructions

VERTUO 1012486 Assembly guide

VERTUO

VERTUO 1012486 Assembly guide

manuals.online logo
manuals.online logoBrands
  • About & Mission
  • Contact us
  • Privacy Policy
  • Terms and Conditions

Copyright 2025 Manuals.Online. All Rights Reserved.