Lynx A1200 User manual

OWNERS MANUAL
MODEL A1200
1
THREE-YEAR LIMITED WARRANTY
At LoveLess Ash, we stand behind our products. We warranty this
product, to the original retail purchaser, against defects in materials
or workmanship for a period of (3) three years after date of purchase.
This limited warranty does not cover claims resulting from: (I) misuse
(II) neglect (III) modication (IV) failure to follow instructions.
Warranty Claims
For warranty or returns with any of our products, please contact your place of purchase. Technical support is
Write your serial number and model number below for your records. Model and
serial numbers are found next to the plug. You should record both model and
serial numbers in a safe place for future use.
Serial Number
Model Number
800.568.3949
1285 East 650 South
Price, Utah 84501
lovelessash.com
LYNX ASH VACUUM
WARNING:
- To reduce the risk of electric shock -
Do not use outdoors or on wet surface
- To reduce the risk of electric shock -
Unplug before cleaning or servicing
- For Household Use Only
LovelessAsh.com
Price, Utah 84501
XXXXXX
Serial Number
Model: A1200
120V~, 60Hz, 8.3A. 1000W
Conforms To ULStd. 1017
Certified To CSAStd. C22.2 No. 243-10
Manufactured Date: ___________
8
800.568.3949
1285 East 650 South
Price, Utah 84501
lovelessash.com

IMPORTANT SAFETY INSTRUCTIONS
IMPORTANTES MESURES DE SECRITE
IMPORTANTE PARA SU SEGURIDAD
SAVE THESE INSTRUCTIONS CONSERVER CES INSTRUCTIONS GUARDAR ESTA INSTRUCTIONES
NOTE: The reading and understanding of the Owner’s Manual is imperative prior to operating this
machine. If you or your operator(s) cannot read English, have this manual explained fully before
attempting to operate this machine. Si Ud. o sus operadores no pueden leer el inglés, el contendio
completo de este manual será explicado antes de intentar operacion de esta máquina.
Read the Owner’s Manual completely before
attempting to operate this unit. Failure to fol-
low the warnings and instructions may result in
burns, re, electric shock, or personal injury:
WORK AREA SAFETY
•
Do not operate vacuum in explosive
atmospheres. Sparks from static electrici-
ty or the motors may ignite dust or fumes.
ELECTRICAL SAFETY
• Connect to a properly grounded outlet.
See grounding instructions.
• Always unplug unit when not in use and
before servicing.
• Electrical parts of this vacuum may only
be worked on by a skilled electrician and
in accordance with the electrical engi-
neering regulations.
• Do not handle plug or operate vacuum
with wet hands.
PERSONAL SAFETY
• Do not allow to be used as a toy. Close
attention is necessary when used by or
near children.
• Do not change lters, clean the unit, or
empty the tank until the plug has been
disconnected from the electrical outlet.
• Keep hair, loose clothing, ngers and all
parts of body away from openings and
moving parts. There is a risk of injury
through getting stuck or being drawn into
moving machinery.
TOOL USE AND CARE
• Always check the lters before each use.
Do not use without lters in place.
• Do not use with damaged cord or plug.
• Do not use if vacuum is not working as it
should.
• Do not expose your vacuum to excessive
heat as damage to your vacuum may occur
and the warranty will be null and void.
• Do not pull or carry by the cord, use cord as
handle, close a door on cord, or pull cord
around sharp edges or corners. Do not run
vacuum over cord. Keep cords away from
heated surfaces.
• Do not unplug by pulling on cord. To unplug,
grasp the plug, not the cord.
• Turn off all controls before unplugging.
• Spare parts must always comply with the
technical requirements and the specica-
tions of the manufacturer. This is always
guaranteed with original spare parts from
the manufacturer.
• In the event of operational malfunctions the
vacuum must be shut down immediately.
The malfunction must be rectied before
starting the vacuum again!
Customer Service Helpline 1.800.568.3949 lovelessash.com
2
OTHER PRODUCTS AVAILABLE
(not to scale)
A1202 OM056_0815
5” Dustie
Model #D1854
5” DustBuddie
Model #D1835
Wet + Dry Dustless Vac
Model #D1603
Cougar + Ash Vac
Model #A0500
1-3/8” BitBuddie
Model #D1900
7” CutBuddie
Model #D1750
HEPA Back Pack
Model #15505
7

FREQUENTLY ASKED QUESTIONS
Pellet Stove Tool Crevice Tool
Accessory
Adaptor
Horse Hair
Brush
Outer
Pre-lter
HEPA Filter
5’ Metal Hose
9” Aluminium
Nozzle
12” Bent
Steel Nozzle
ACCESSORIES & PARTS
Question Answer
How do I avoid clogging the nozzle? Crush and break up large pieces before vacuuming, and/or use the “Tips
& Techniques” described on the previous page.
Why is ash escaping? Check lter for holes, and if necessary replace.
Why is the hose hot? Cleaning TOO WARM of ash. NEVER use gloves to compensate for a HOT hose.
Why is suction decreasing? It’s time to clean or replace the lter(s). See lter cleaning instructions.
Why is there a port on the top? This is for when you are not using the pre-lter. We suggest to use the pre-lter
at all times.
6
SERVICE
• Adjustments, servicing, and inspection
work and inspection intervals specied
in the Operating Instructions, as well as
any information on the replacement on
parts and systems of the vacuum must be
undertaken and complied with.
• These activities can only be undertaken
by qualied personnel.
• Make sure that electrical components
used for replacement purpose comply
with the original parts and are correctly
adjusted if necessary.
• Before performing any maintenance,
place the vacuum in the safety off position
which is the position of the vacuum when
it cannot generate any hazard.
SPECIFIC SAFETY RULES
• Do not allow this unit to be used for
anything other than ash removal.
• Do not store this unit immediately after
ash removal, in any enclosed or conned
area.
• Do not vacuum burning/live material
i.e. PELLETS
• Do not use to pick up ammable or
combustible liquids, such as gasoline.
• Use of accessories not recommended by
the manufacturer may cause re, electri-
cal shock, or injury.
• Do not use on wet surfaces. Do not leave
appliance when plugged. Unplug from
outlet when not in use, with damaged
cord or plug, if appliance is not working
as it should, has been dropped, dam-
aged, left outdoors or dropped into water.
• WARNING—Fire hazard—Intended for
vacuuming cold to warm ashes only.
General household or shop-vaccum use
could increase re risk by induction of
combustibles into unit prior to vacuuming
ashes. Consult operating manual before
use.
DOUBLE-INSULATED INSTRUCTIONS:
WARNING— to reduce the risk of electrical shock, this vacuum cleaner has a polarized plug
(one blade is wider than the other). This plug will t in a polarized outlet only one way. If the
plug does not t fully in the outlet, reverse the plug. If it still does not t, contact a qualied
electrician to install the proper outlet. Do not change plug in any way.
If the opening that sucks in the air or the suction pipe are blocked, you should switch off the
vacuum cleaner at once. First clear the blocked substance before you attempt to start the
vacuum cleaner again.
Special NOTE: The vacuum’s motors are equipped with thermal “overheat” protection. If the
motors run too hot then they will shut down. You must wait for motor to cool in order to re-
start vacuum. Cleaning the lter will help prevent a repeat of this condition.
3

TIPS & TECHNIQUES
The 9” aluminium nozzle has a wide 1 1/2” mouth to pick up larger pieces of debris, but large
chunks may get stuck in the hose. It is best to break up large chunks before vacuuming.
The 12” bent steel nozzle features a crimped inlet and is designed for picking up ne ash
particles. Larger pieces may cluster around the tip of the nozzle if the proper technique is not
used. Here’s what you can do:
1. Break up large chunks before vacuuming.
2. If large pieces cluster at the tip of the nozzle,
tap it on the rebrick to dislodge the pieces.
Hold the nozzle tip against the rebrick at an angle that
creates a NARROW opening that blocks large chunks, but
allows ash pickup from the bottom of the pile.
How to avoid
large chunks:
Narrow
Opening
FILTER CLEANING
The quickest and easiest way to clean
the outer Pre-lter is to sim ply “pop” the
button on the top of the lid 3-to-5 times,
this should be done while turned on then
again when the unit is turned off. Make sure
this is quick rm pops. Simply pushing the
button slow will not work at efciently. This
dislodges ash particles that may have caked
on the outside of the Pre-lter. For a more
thorough cleaning of the Pre-lter, you can
use forced air to clean it, suck the ash off
with your DUSTLESS Wet Dry Vac or bang
it against something outdoors. You may also
hand (not machine) wash the Pre-lter in
cold water. Always allow the Pre-lter to dry
thoroughly for at least 24 hours before put-
ting it back into the vacuum, and using it.
You may also use forced air (not water) to
clean the HEPA cartridge lter. The triple
layer Pre-lter will capture 99% of the ash,
greatly extending the life of your HEPA lter.
FILTER REPLACEMENT
Replace the outer Pre-lter whenever it gets
charred or damaged (has a hole in it), or
whenever repeated cleaning of it does not
improve suction/performance. We sug-
gest keeping a spare Pre-lter on hand for
convenience.
The HEPA cartridge lter is secured to the
underside of the motor housing with a tight-
tting rubber gasket. Pull and twist rmly to
remove and replace.
Replace the HEPA cartridge lter if it ever
gets damaged and/or when forced air clean-
ing does not improve suction/performance.
When new, the lter material is bright white.
As the material gets darker, and forced air
cleaning fails to lighten the color
signicantly, it’s an indicator that the lter
may need to be replaced.
Do NOT use your ngers - it may be hot!
3. Focus on the small stuff. Hold the mouth of
the nozzle against the rebrick so there is
only a sliver of an opening to allow only the
small ash particles to be picked up.
Start at the front and advance into the pile,
working in a circular motion. When done, the
large chunks can be left to burn during the next
re, or easily scooped out, without creating a
cloud of ash.
5
HOW TO USE
If you feel warmth emitting from your replace or stove, you can still use your Lynx AshVac, but
rst search for glowing embers by stirring the ash pile. If you see glowing embers, break them
up so they burn out and cool off faster. Check back again later, and use your Lynx when you’re
condent the burning embers have expired.
There is a difference between “warm” ash and “glowing hot embers.” The Lynx is not designed
for “glowing hot embers.” While the outer pre-lter is non-ammable, a red hot ember is still ca-
pable of charring it and mitigating its performance. (Replacement lters are reasonably priced
and readily available though.) The size of the ember is a contributing factor. Small “sparks”
and “reies” are typically not a problem because they burn out quickly. Larger embers have
more unburned fuel and can burn longer, with a greater likelihood of causing lter damage.
It’s always a good idea, before vacuuming, to poke around the pile of ash to check for glowing
embers and break up the pieces so they are small enough to t through the vacuum hose.
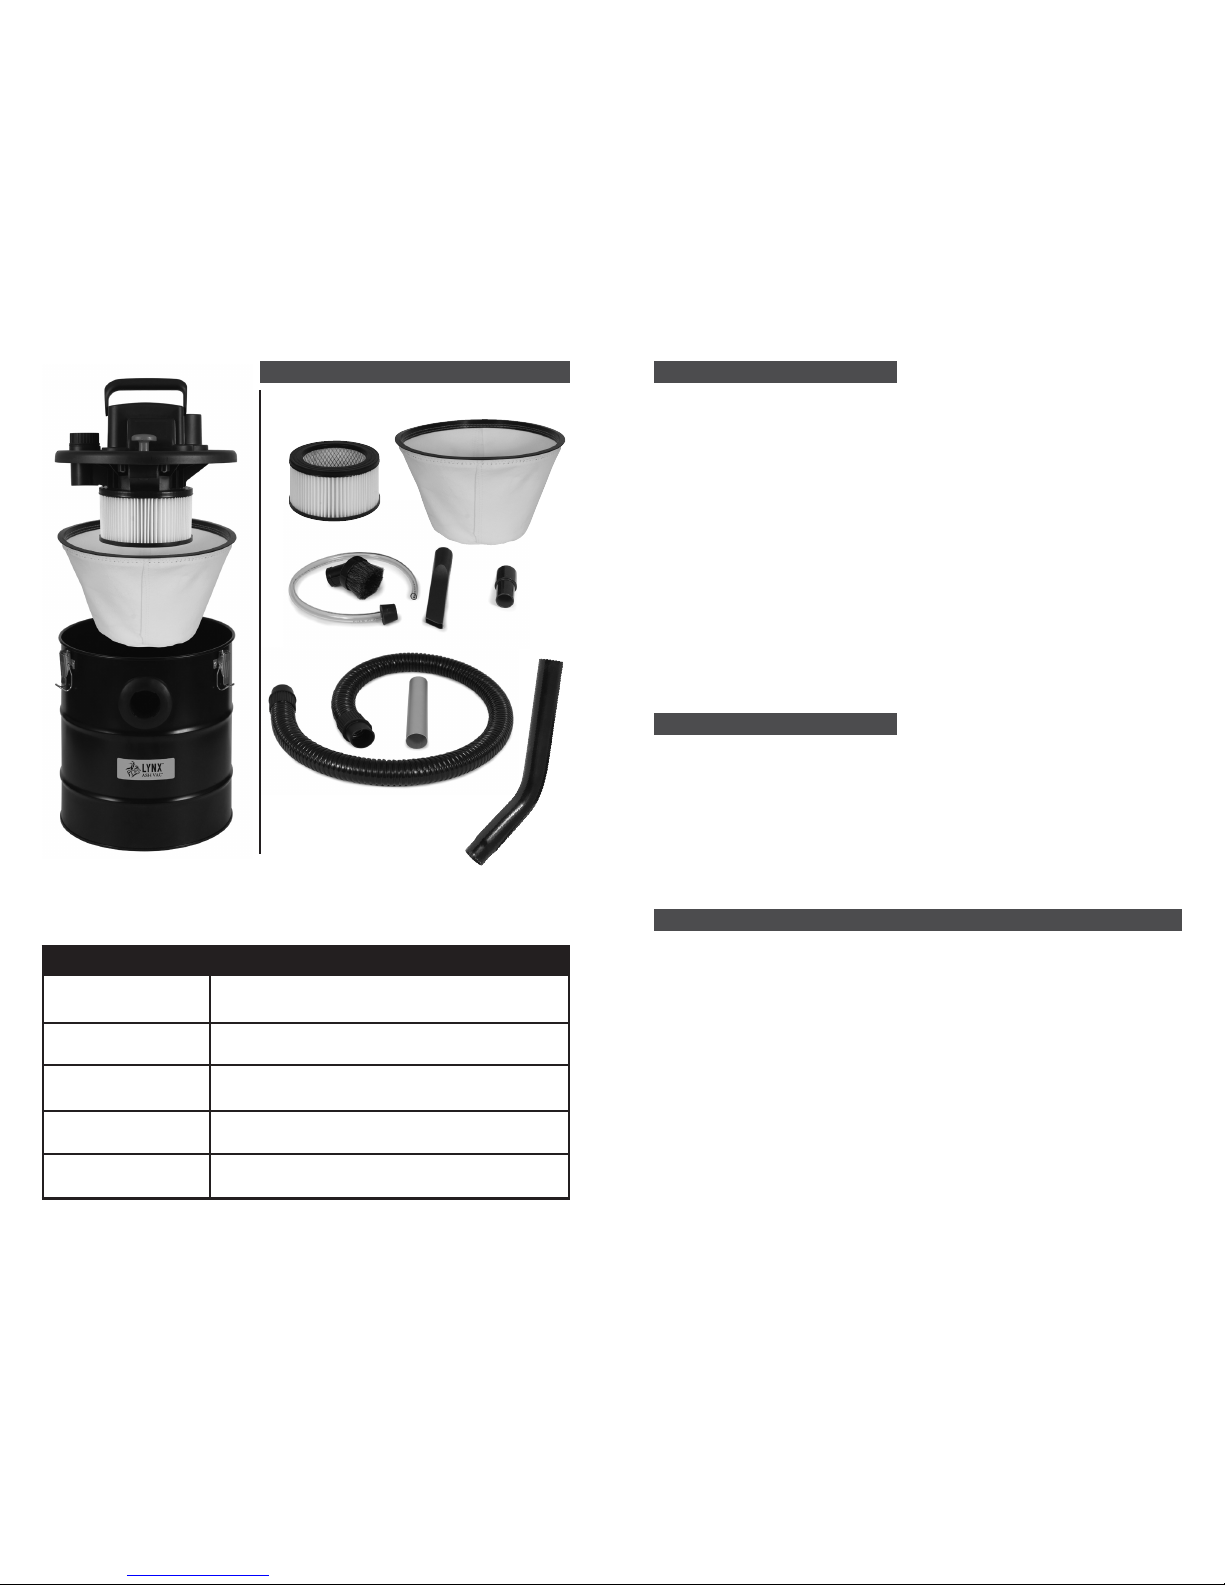
SETUP
1. Unlatch and remove the lid.
2. Remove the outer Pre-lter that’s resting on the rim of the canister.
3. Remove and discard the round wire cage in the bottom of the canister. It is just a support
that is part of the packaging. Put the outer Pre-lter back in place, resting on the rim of the
canister.
4. The round cartridge HEPA lter should be mounted to the underside of lid/motor housing.
5. Put the lid back on the canister and secure the three latches.
6. Attach the hose to the port on the FRONT of the canister. There is a port on the TOP of the
lid, this can be used if the pre-lter is not in place. Keep the cap on the top port in place at
all times.
7. Attach the 9 inch aluminium nozzle to the hose. Use the rocker switch on the top of the lid to
turn it off and on.
Accessory use:
Use the provided adaptor to attach the accessories directly to the hose.
Before each use:
1. Check that lters are in place and no holes are present.
2. Attach hose in port on FRONT of canister. The port at the TOP of the lid can be used if the
pre-lter is not in place.
Seasonally: Replace lters
Customer Service Helpline 1.800.568.3949 lovelessash.com
4
Table of contents
Other Lynx Vacuum Cleaner manuals