MACHENIKE M-GAME User manual

QUICK START GUIDE
Please read the manual carefully before using
this product and keep it for reference.
&PRO

WARRANTY
Cautions:
Operating Precautions:
Do not spray flammable insecticides and other sprays near the
gamepad.
Do not use excessive force as this can cause hand fatigue and
buttons attrition.
If you feel sore on wrists or fingers during using, Please adjust
your posture and strength or temporarily stop using it.
If your hands feeling not well during using, please stop using,
continued use may cause skin rash or other allergic reactions.
Do not put liquids on the gamepad such as water or juice! It
may cause the keys to malfunction or be damaged.
Do not plug or unplug the USB cable with wet hands.
Do not use it in humid or hot places, such as bathrooms.
Do not put it on the top of heat-generating equipment such as
heat dissipation.
Do not use it in places which are easy to fall ,dusty(beach) or
have magneticfields.

WHAT’S IN THE BOX
CARE & MAINTENANCE
1xController 1xUser Guide
1xUSB charging data cable
Please use soft duster or damp cloth to clean the gamepad.
Do not use solvent, e.g.: gas, thinner, alcohol, kitchen detergent,
chemical wipes...It may cause deformation and color fallout.
Do not use wet rag wipe this gamepad which will cause internal
damage.

BUTTONS LAYOUT
BACK button
START button
FN button
ABYX
button
Right stick (R3)
Linear Trigger LT(L2) Linear Trigger RT(R2)
M1 programmable button M2 programmable button
Left Bumper(L1) Right Bumper(R1)
TURBO button
Left stick (L3)
Directional
pad(D-pad)
HOME button

CONNECTION
The product has wake-on function, please select the correspond-
ing device mode before connecting wirelessly.
X: Wireless Xinput mode/PC mode-the name of the device:
Xbox Wireless Controller.
D: Wireless Dinput/Android mode-device name: MACHENIKE
HG510W;
S: Switch mode-the name of the device: Pro Controller;
Enter pairing mode: Press and hold the Home button for 3
seconds in the off state, and when the indicator light flashes
quickly, you will enter the pairing mode, just connect the
corresponding device name above.
Change the pairing device: Press and hold the Home button for
5 seconds to turn off the controller, then select the mode correspond-
ing to the device, and press the Home button for 3 seconds to enter
the pairing mode and pair again.
Wired connection: Use the USB cable to connect the device directly.
V: Apple IOS mode-device name: Xbox Wireless Controller;

COMPATIBILITY
Xinput mode is widely used in 3A games and latest games of Microsoft and
Steam platform.
S mode is Switch Pro, It can operate in Windows system, switch on gyroscope
function through Steam. The use experience and compatibility depend on
the adaptation of different.
Xinput Mode-Windows 8/10/11
Connection - Wireless Connection
1. When the controller is turned off, drag the “game mode switch slider” to
the X gear.
Windows operating system compatible with Xinput mode and S mode.
Connection - Wired Connection
When the power is off, directly connect the computer or mobile phone with
the data cable.
2. Press and hold the Home button for 3 seconds, until the 1# indicator
flashes, that means the device enter to pairing mode.
3. Turn on Settings in Windows OS - Bluetooth and other devices - Add
device- Bluetooth.
4. Select "Xbox Wireless Controller" in the searched Bluetooth devices, and
the controller indicator light on means the connection is successful.
5. When you do not use it please press and hold the Home button to turn it
off, or it will automatically turn off after 10 minutes.
6. The gamepad has Bluetooth memory function. When the next time you
use it, you can wake up the controller by press the Home/LB+RB button for 1
second, it will automatically connect to the computer.

COMPATIBILITY
In s mode, press and hold FN+A buttons for three seconds to switch to the
Switch controller layout.
In S mode, this device support switch, and PC to connect.
Support use HOME button to wake on controller and remote console wake on .
The controller support Gyro motion control . It needs to be turned on in the game
settings that support this feature.
Linear stoke function is not supported, due to the limitation of the Switch
platform, not a product issue.
Games that are not compatible with Switch Pro are also not compatible with this
device. It is a game limitation, not a product issue.
Switch mode-NINTENDO SWITCH
Connection - Wireless Connection
1. When the controller is turned off, drag the “game mode switch slider” to
the S gear.
Connection - Wired Connection
1. Turn on the wired mode in the Switch settings, and insert the Switch
console into the official standard multifunctional dock.
2. It directly connect to the dock and the gamepad through cable when the
controller is turned off.
2. Press and hold the Home button for 3 seconds, until the 2# indicator
flashes,that means the controller enter to pairing mode.
3. On Switch home page -turn on the gamepad- change the grip/order,
and wait for it to appear.

COMPATIBILITY
The trigger Support linear stroke function, requires game compatibility.
Support HOME button to wake-on the controller and quick connect.
Configure the controller by Keylinker app . check Keylinker introduction for
more details.
Compatible with ios15 system version. Please refer to the official iOS system
instructions for any subsequent changes to the relevant permissions.
V Mode – For iOS (For iPhone and iPad)
The trigger Support linear stroke function, requires game compatibility.
Support HOME button to wake-on the controller and quick connect.
Configure the controller by Keylinker app . check Keylinker introduction for
more details.
D mode-Android Devices (HarmonyOS phone/android phone/tablet/
smart TV/TV box)
Connections Steps—Wireless Connection
Note: This mode can only be used if the game supports gamepad operation.
1. When the gamepad is turned off, drag the “game mode switch slider” to
the V gear.
2. Press and hold the Home button for 3 seconds, until the 3# indicator
flashes, that means the device enter to pairing mode.
3.Turn on the phone settings - Bluetooth, search and connect "Xbox Wireless
Controller".
Connections Steps—Wireless Connection
Note: This mode can only be used if the game supports gamepad operation.
1. When the controller is turned off, drag the “game mode switch slider” to
the D gear.
2. Press and hold the Home button for 3 seconds, until the 4# indicator flashes,
that means the device enter to pairing mode.
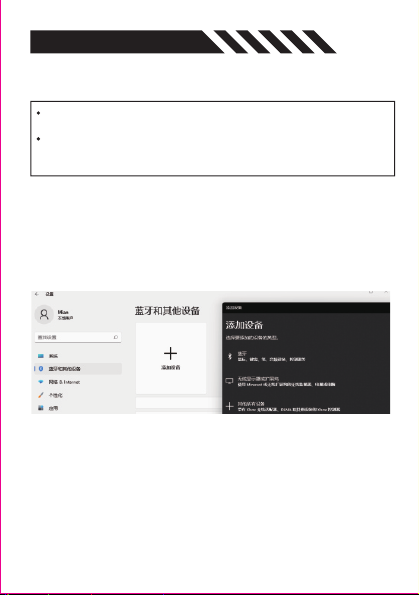
3.Turn on the phone settings - Bluetooth, search and connect "MACHENIKE
HG510W".

ABOUT KEYLINKER
Introduction
Machenike is committed to creating an awesome gaming experience for
every gamer. Since there are many platforms support gamepads, and every
gamer and even every different game may require different settings to
match the game operation. Machenike Keylinker supports custom settings
for gamepad buttons, trigger , macros and joystick etc.
Connection steps
1.After download KEYLINKER APP on the phone , when it is started at the first
time , the relevant permission application pops up and needs to be confirmed
according to the prompts.
2.Turn on the gamepad in any mode, you can search for "HG510W_APP" in
the Keylinker software homepage.
3.Click "HG510W_APP" to connect and enter the custom interface.
Download APP-Android/HarmonyOS/IOS
Download the APP and the relevant updated software
on Machenike official website.
URL: https://global.machenike.com/
Please download the Android version for HarmonyOS.

Brightness Adjustment
FEATURES
Multi-platform compatibility, PC, Switch, IOS, Android, HarmonyOS;
Press FN + D-pad ←/→ to reduce/enhance the overall light backlighting of the
controller.
Vibration Intensity Adjustment
Press Fn + D-pad ↑/↓ to lower/raise the vibration intensity of the controller,
adjustable in four steps from 0-3.
Press Fn+R3 buttons to turn on/off the motion sensor control simulation of the
right stick, which is accompanied by three blinking lights.
Battery Display
Motion Sensor Control Simulation Function
There are four indicator lights on the gamepad, which display the remaining
battery power in real time. During pairing and some function adjustments, it
will be temporarily used as a function indicator, and will return to the battery
display function after 2 seconds.
The gamepad has a built-in 600mAh lithium battery, which can last about
8-10 hours.
Press Fn+Turbo buttons to change the V-band effect, cycling through constant
light/breathing/motion/off.
Switch modes via ‘Game mode switch slider’;
Adjustable brightness & zone light settings;
Configure your controller via Keylinker APP ;
EXTENDED FUNCTIONS

TURBO Function
Buttons that support TURBO function: A/B/X/Y/Up/Down/Left/Right/L1/L2/R1/R2
TRUBO Speed Adjustment
Press and hold the TURBO button , Right stick up to speed up the rapid fire
speed , Right stick down to slow down the rapid fire speed.
Manual TURBO function:When turns on the manual TURBO, you need to press A
button to trigger the function.
Turn on the TURBO function:Press Turbo+A buttons and release. The A button
will activate the manual rapid fire function. Press Turbo+A again, and the A
button will activate the automatic rapid fire function. Press Turbo+A again to
turn it off.
EXTENDED FUNCTIONS
Programmable Button Configures Macro
Configures macro via controller
1. When the controller is connected, press the Fn + M1/M2 button at the same
time. Lights start to flow from the V-shaped indicator strip, indicating that it
has entered the macro recording state. If it does not flash, please repeat the
operation.
Configures macro via Keylinker App
1. Enter the interface in the APP, and select M1/M2 button to record.
2. Click the recording button to start the recording function. Note: The V-shaped
indicator strip of controller will not flash.
3. Set the function keys in turn, and adjust the duration of each action, and click
"Apply" to save the settings in the gamepad.
2. Setting the function buttons in sequence.
(A/B/X/Y/up/down/left/right/L1/L2/R1/R2 and left right stick)
3. 42 motions (=21 actions) can be settled. When it is completed, press M1/M2
button again to save. At this time, Lights stop to flow from the V-shaped
indicator strip.

TECH SPECS
CONTROL PART
OTHER
Executive Standarad Q/0212LSKJ0910-2019
Working Current 10-40mA
Sleep Mode Current 10uA-50uA
Vibration Current 80-130mA
Battery Capacity 3.7V/860mAh
Charging Time About 2-4hours
Using Distance Range 8M
Input Power 5.0V 500mA
Directional pad (D-pad)*1 Set This is a raised plus sign-shaped toggle that resides
between the left and right sticks.
Mechanical micro switch
Turn on the console or controller
Hall electromagnetic joystick
L1.R1.L2.R2. Three-position adjustable linear trigger
Rapid fire mode button
Custom programmable M1/M2 back button
Support screenshot, light band setting and other
function settings in different modes.
The product will go to sleep in about 5 minutes without any operation, the controller light
will go out.
A, B, X, Y buttons *4Pcs
DC In Wired Device Connected USB-A to USB-C
About 1 Meter
USB Cable Length
Home button *1Pc
Left and right stick *2Pcs
TURBO Button *1Pc
Multi-function button *1Pcs
Programmable button *2Pcs
Left and right bumper/
triggers *4Pcs

This manual suits for next models
2
Table of contents
Other MACHENIKE Video Game Controllers manuals
Popular Video Game Controllers manuals by other brands

KROM
KROM K-WHEEL QuickGuide Installation

Logitech
Logitech 963321-0403 - Cordless Precision Controller installation guide

Belkin
Belkin n52te - Nostromo SpeedPad Game Pad user manual

Hama
Hama Mini V3 Rumble Operating instruction

Fury
Fury Skipper Quick installation guide

Robotc
Robotc VEXnet Joystick Calibration instructions