MachPower TV-DVBT2 User manual

ENG
Digital Terrestrial
Receiver DVB-T / T2
TV-DVBT2
USER MANUAL

2
1. Remote Control
2. Hardware interface
3. Installation Guide
4. Main Menu
4.1 Channel Setting
5. Image Setting
5.1 Image Ratio
5.2 Resolution Setting
5.3 Output Format
5.4 Scart
5.5 OSD Setting
5.6 Front Panel Setting
6. Search
6.1 Search Mode
6.2 Encrypted Program Settings
6.3 Auto Search
6.4 Manual Search
6.5 Full Frequency Search
6.6 Main Frequency Setting
6.7 Country Setting
6.8 Antenna Power
7. Time Setting
7.1 Region and Time
7.2 Sleep Setting
7.3 Standby Time Setting
7.4 Timer Settings
7.5 Power ON/OFF
8. Options
8.1 OSD Language
8.2 EPG Language
8.3 Subtitle Language
8.4 TTX Language
8.5 First Audio Language
8.6 Second Audio Language
8.7 Digital Audio
9. System Setting
9.1 Parental Control
9.2 Set Password
9.3 Restore Factory Default
9.4 Version Information
9.5 Software Upgrade
9.6 Network Settings
9.7 Power On Control
10. USB
10.1 Media Centre
10.2 PVR Media
10.3 PVR Configuration
10.4 Network Applications
11. Programming the remote control for TV control
12. Technical Specification
...
...
...
...
...
...
...
...
...
...
...
...
...
...
...
...
...
...
...
...
...
...
...
...
...
...
...
...
...
...
...
...
...
...
...
...
...
...
...
...
...
...
...
...
...
...
...
...
...
...
3
4
4
5
5
9
9
9
10
10
10
10
11
11
11
11
12
14
14
14
15
15
15
15
16
16
17
17
17
17
17
18
18
18
19
19
19
19
20
20
20
21
21
22
22
23
24
24
26
27
INDEX

3
ENG
1. REMOTE CONTROL
1. Mute (crossed-out speaker symbol) Mute or turn on audio output
2. Info (crossed-out speaker symbol) Mute or turn on audio output
3. TTX Starts teletext display (assuming it is broadcast by the station).
4. Subtitle Select the language of the subtitles (after that it is broadcast by the
station).
5. Exit Exit the current menu and return to previous offer.
6. Ok Confirm item or option / Display station list
7. Right / Left Cursor Navigate menus / Increase or decrease the volume
8. Tv / Radio Switch between TV and Radio mode.
9. Recall Used to quickly switch between the last two monitored stations
10. Goto Select a specific time index in the playback file.
11. Prev Go to the previous multimedia file or track.
12. Next Go to the next multimedia file or footprint
13. Stop Stop playing a multimedia file.
14. Standby (red button in the first row) Turn on the set top box or switch to standby
mode
15. EPG Electronic Program Guide: Switch on
or turn off the program guide.
16. Audio (Lang) Select audio language or audio mode.
17. Top/Bottom
Cursor
Navigate menus in the menu
or select the next or previous station.
18. Menu Open the main menu
19. Favorite (Fav) Open the favorites menu stations.
20. 0-9 (n° Buttons) Select channel or setting
21. FWD Fast forward during playback multimedia file
22. Rev Rewind during multi-track playback.
multimedia file
23. Play Start or resume playback multimedia file.
24. Pause Pauses the media file.
25. Color Buttons Control various teletext functions
26. Rec Starts recording the session to a connected USB drive immediately

4
27. List Displays the list of recorded sessions on the current disc. (Also used
with USB disc playback / recording functions)
28. Timer Timer function
29. AD Audio Description: Turn on the sound description of the scene descrip-
tion in the picture for blind (If broadcast by the station).
2. HARDWARE INTERFACE
ANT IN It’s to connect DVB - C or DVB - T2 signal input cable
ANT OUT It’s to connect DVB - C or DVB - T2 signal output cable
COAXIAL It’s to connect the audio equipment with coaxial audio cable
HDMI It’s to connect the HDMI port of TV via HDMI cable
LAN It’s to connect the Ethernet cable
SCART It’s to connect the TV which support SCART via SCART cable
DC 12V The external 12 V DC power provide the power for STB via DC 12 V port
3. INSTALLATION GUIDE
When there is no TV or radio program, you will go to the install boot screen. Push the
remote control [ / ] KEY to turn off cursor movement, press [OK] or [ / ] KEY
to select or switch Settings, and press [MENU] or (EXIT] to enter the MENU menu.
Move the cursor to channel search and press [OK] to enter the automatic search
menu. In dvb-c mode, if there is no signal cable inserted or the signal cable is loose,
a small window of “Lock Failed” will pop up,if the program is successfully found, exit
the installation screen and enter the big screen to play the program.

5
ENG
4. MAIN MENU
Press the [MENU] KEY under the big screen to enter the main MENU, which has seven
Settings, press [ / ] KEY to switch Settings, and press [OK] or [ / ] KEY to move
the cursor to the selected Settings screen.
4.1 Channel Setting
4.1.1 Channel edit
There are two ways to enter into this menu:
1. Press [OK] on the big screen to display the list of channels, and then press [YELLOW
KEY] to enter into this menu.
2. In the main menu, move the cursor to the program editing bar and press [OK] to
enter the program editing menu.
When there is No TV program or radio program,it shows “No TV Channel!” .Program
editing menu press [ / ] KEY to move the cursor, [ / ] KEY to switch pro-
gram group, [OK] KEY to select the program, press [GREEN KEY] to rename the pro-
gram,press the number KEY [1-5] to enter the delete, move, skip the program, pro-
gram lock, add favorite program function, again press the number KEY [1-5] to cancel.
When the program editor is modified,press [EXITIMENU] to pop up the prompt box
“Do you want to save?” , press the [0K] KEY after selecting the ok option to save the
Settings and exit the current menu. If Cancel is selected, the edited content will not
be saved and will exit the current menu.

6
4.1.1.1 Channel Delete
Press [1] KEY to enter into delete mode, press [ / ] KEY to move the cursor, se-
lect the program to be deleted, press [OK] KEY to select, mutiple programs can be
selected, the selected programs will show delete mark, press [RED KEY] to select
all programs.
4.1.1.2 Move the programs
Press [2] KEY to enter move mode, press [ / ] KEY to move the cursor, select the
program to move, the selected program will show the move mark, press [GREEN
KEY] to mark multiple programs, now move the programs to the location you want
then press [OK].
4.1.1.3 Programs skip
Press [3] KEY to enter the program skip setting mode, press [ / ] KEY to move the
cursor, select the programs to skip, press [OK] KEY to confirm, press [RED KEY] to
select all programs, the program to be confirmed to skip will show the program skip
mark, programs set to be skipped will not appear in the saved playist.

7
ENG
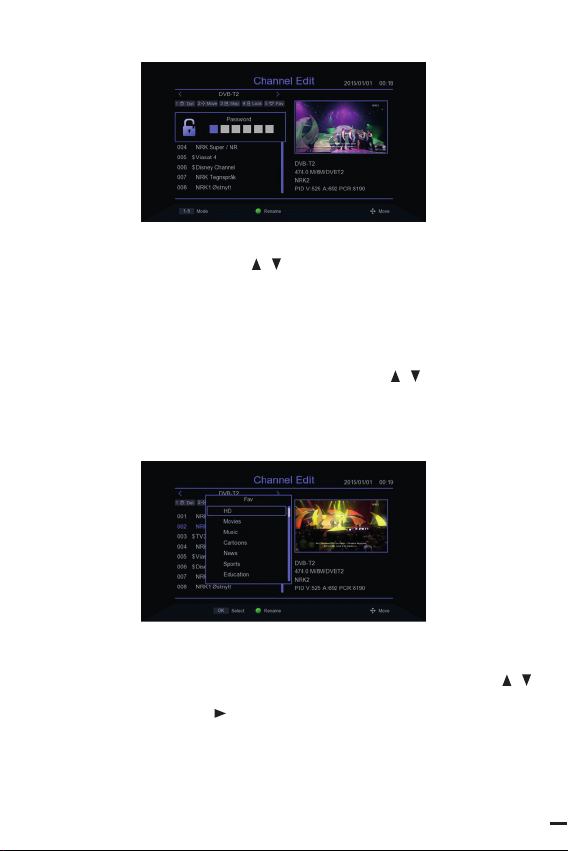
4.1.1.4 Programs lock
Press [4] KEY will pop up the password input box, enter the default password 00000
into the program lock mode, press [ / ] KEY to move the cursor, select the pro-
gram need to lock, press [OK] KEY to confirm, press [RED KEY] to select all programs,
the program confirmed to lock will show the program lock mark. When the program
is locked, a password prompt column will pop up every time when it is played. Only
after entering the correct password then the program can be played.
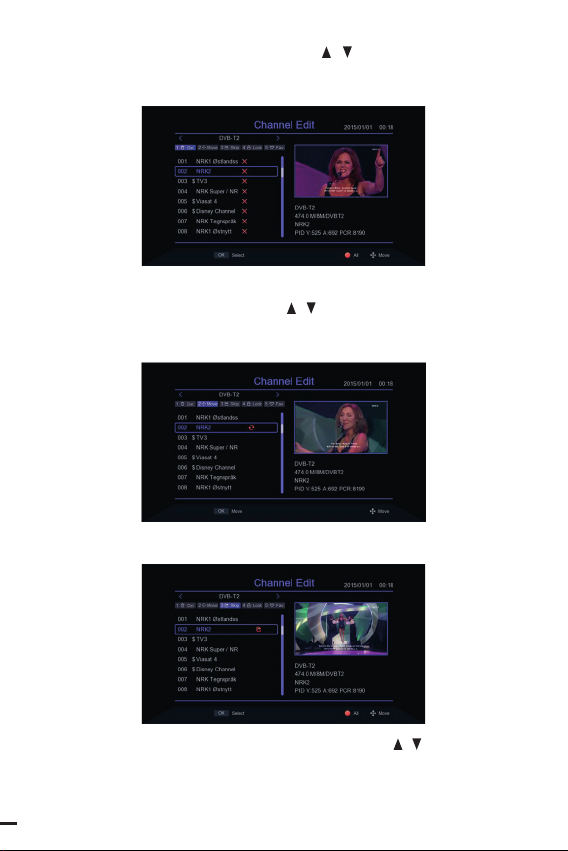
4.1.1.5 Add favorite group
Press [5] KEY to enter into add love programs mode, press [ / ] KEY to move the
cursor, move the cursor to the program which need to be added to favorite group,
press [OK] KEY to confirm that the same program can be added to different favorite
groups. Press [EXIT] KEY to EXIT the category box of favorite groups Programs that are
added to the favorites group will have a favorites flag.
4.1.2 Channel Guide
Press the EPG shortcut to enter in the large screen, or move the cursor from the main
menu to the Program Guide bar and press [OK] to enter. On EPG menu press [ /
] KEY to move the cursor to switch the current program, if the current program has
EPG information, then press [ ] KEY to move the cursor to the EPG event window
to see the program’s EPG event, press [OK] KEY to see the details of the event, press
[GREEN KEYYELLOW KEY] to switch the EPG information of different dates, save total
7 days of EPG information. When certain EPG event selected,press [RED KEY] to enter
into the book menu and select the processing of the event.

8
4.1.3 Sorting
Move the cursor to the Sort bar in the main menu and press the [ / ] KEY to switch
the Sort mode.
4.1.4 LCN
In the main menu, move the cursor to the LCN bar and press the [ / ] KEY to
switch whether to open LCN function or not.

9
ENG
4.1.5 Audio Settings
Move the cursor to the Volum Scope bar in the main menu and press the [ / ] KEY
to switch the range of volume.
5. IMAGE SETTING
5.1 Image ratio
Move the cursor to the Aspect Ratio bar from the main menu, press [ / ] KEY to
switch options or press [OK] KEY to display the list of options, press [ / ] or [P+/P-]
KEY to move the cursor, press [OK] to select settings.
5.2 Resolution setting
Move the cursor to the Resolution bar from he main menu, press [ / ] or [P+/P-]
KEY to switch Resolution options or press [OK] KEY to display the list of options [ /
] KEY to move he cursor, press [OK] select Settings.

10
5.3 Output Format
In the main menu, move the cursor to the TV Format bar and press the [ / ] KEY
to switch the output format.
5.4 Scart
Move the cursor to the Scart bar in the main menu and press the [ / ] KEY to
switch Scart mode CVBS or RGB.
5.5 OSD Settings
Move the cursor to the OSD Settings bar from the main menu and press [OK] or [
] to enter into the OSD Settings menu. Press [ / ] KEY to move the cursor, press
[/ ] KEY to switch the cursor corresponding to the parameters of the Settings.
5.6 Front Panel Settings
Move the cursor to Panel Setting from the main menu, press [OK] or [ ] to enter

11
ENG
into Pannel Settings menu, press [ / ] KEY to move the cursor, press [ / ] KEY to
switch the cursor corresponding to the parameters of the setting item.
6. SEARCH
6.1 Search mode
In the main menu, move the cursor to the Search mode bar and press the [ / ] to
switch the Search mode, DVB-T2 or DVB-C mode.
6.2 Encrypted program Settings
Move the cursor to the FAT Only bar in the main menu and press the [ / ] KEY to
turn on or off filtering of encrypted programs
6.3 Auto Search
Move the cursor to the Auto Search bar and press [OK] or [ ] to enter into the Auto
Search menu. If there are programs current, the prompt “Delete all channels to Auto
Search?” will be appear, select ok to enter into the search menu. In DVB-C mode, if
the signal cable is not inserted or the signal not good, the menu will prompt “LOCK
Failed!” press [OK] KEY to exit.

12
6.4 Manual Search
Move the cursor from the main menu to the Manual Search bar and press [OK] or [
] KEY to enter the Manual Search Settings screen.
DVB- C mode:
Press [ / ] KEY to move the cursor to the Frequency bar, press
[/ ] KEY to select the location of modify parameters, input the
number KEY [0~9] to set parameters, when the Frequency is less than 115MHz, will
pop up “Frequency error, should not less than
115.0mhz” prompt window, when the Frequency is greater than 858MHz, will pop
up “Frequency error, should not larger’” Than 858.0mhz” prompt bar, press [OK] KEY
to exit.
The cursor moves to the Symbol Rate bar, press the [ / ] KEY to select the position
to modify the parameter, and enter the number KEY [0~9] to set the parameter.
When the parameter setting is less than 2000, the prompt bar of “Symbol Rate error.
Symbol should not less than 2000” will pop up; when the parameter setting is grea-
ter than 7000, the prompt bar of “Symbol Rate error.
Symbol should not lager than” will pop up 2000 “ prompt box, press [OK] KEY to exit.
Move the cursor to the QAM bar, press the [ / ] KEY to switch options, if the signal
is locked by set-top box then the Quality progress bar will be displayed at the bottom
of the menu,if the signal Quality is good i’s going to show purple.
Move the cursor to the start bar,press [OK] to enter the search screen and begin the
search. If the signal is not locked. It will prompt “LOCK Failed!” when pressing [OK].

13
ENG
DVB-T2 Mode:
Press [ / ] KEY to move the cursor to the Channel bar, press [ / ] KEY to select
modify parameters or press [OK] to show the list, press [ / ] KEY to move the
cursor, press [OK] to select parameters and press [OK] to confirm.
Press [ / ] KEY to move the cursor to the Frequency bar, press
[/ ] KEY to select the location of the modification parameter, input the number
key [0~9] to set the parameter, when the Frequency is set less than 50MHz,it will pop
up “Frequency error, should not less than 50.0mhz” prompt bar, when the Frequency
is set more than 870MHz,it will pop up “Frequency error, should not more than 870.
0mhz” prompt bar, press [OK] to exit.
Press [ / ] KEY to move the cursor to the Bandwidth bar, and press [ / ] KEY to
select change parameters. Move the cursor to the start bar and press [OK] to enter the
search screen to begin the search.

14
6.5 Full Frequency Search
Full frequency search is only available in DVB-C mode,move the cursor to Full Search
bar, press [0K] or [ ] KEY to enter into the Full Frequency Search Settings menu,
press [ / ] KEY to move the cursor, press [ / ] KEY and number key [0 ~ 9]
to modify the attribute parameters, Start Frequency is for the Search of the lowest
Frequency, not less than 115 MHZ,End Frequency is the End Frequency of the search
Frequency spectrum, not more than 858 MHZ, the value set of Symbol Rate should
not less than 2000 ks/s or greater than 7000 ks/s, switch QAM Settings by the [ / ]
KEY. Move the cursor to Start then press the [OK] KEY,if setting parameter hyper out
of range, then the prompt column will pop up, and parameters returns to the default
value,if the parameter is set correctly,it will enter into the program search menu.
6.6 Main Frequency Setting
Main frequency setting is only available in DVB-C mode, move the cursor to the Main
Frequency bar, press [OK] or [ ] KEY to enter into Main Frequency Settings menu,
press [ / ] KEY to move the cursor, press [ / ] KEY and number key [0~9] to
modify the attribute parameters, the Main Frequency can not be less than 115 MHZ
and more than 858 MHZ,the Symbol Rate value set cannot be less than 2000 ks/s or
greater than 7000 ks/s, press (EXITIMENU] KEY to save and exit, if the parameter set-
ting with error, the prompt column will pop up, The error parameter will be restored
to the value saved last time.
6.7 Country Setting
The country option is only available in DVB-T2 mode, move the cursor to country,
press [ / ] KEY to switch countries or press [OK] to display the list of options, press
[ / ] KEY to move the cursor, press [OK] to confirm.

15
ENG
6.8 Antenna power
The Antenna Power option is only available in DVB-T2 mode. Move the cursor to An-
tenna Power and press [ / ] KEY to switch ON or OFF.
7. TIME SETTING
7.1 Region and time
Move the cursor to Region and Time, press [OK] or [ ] KEY to enter the Region and
Time setting menu, in the Region and Time setting menu, press [ / ] KEY to move
the cursor, press [ / ] KEY to switch Settings, press [EXIT/MENU] to EXIT.
7.2 Sleep Setting
Move the cursor to the Sleep bar and press [ / ] KEY to change the time. If the
parameter is set to 12 hours, the system will automatically enter into standby after
12 hours

16
\
7.3 Standby Showtime Setting
Move the cursor to Standby Showtime and press [ / ] KEY to change the Standby
whether to show the time or not.
7.4 Timer Setting
Move the cursor to the Timer Setting bar and press [OK] or [ ] KEY to enter. In
the timer setting menu, the [RED KEY] KEY is to delete the timing task of the bar
where the cursor is located; the [GREEN KEY] KEY means to add a new timing task,
will enter into the menu to add task, [ / ] KEY is to move the cursor to the option
to set, press [ / ] KEY or number KEY [0~9] to modify parameters, if the Mode
is PVR, then please check whether to insert the storage device, otherwise will not
be able to enter into the PVR; Press [EXITIMENU], it will pop up “Do you want sa-
ve?”Prompt column, select [OK] to save and exit. The [YELLOW KEY] represents to
edit the timing event in the column where the cursor is located; Press [BLUE KEY] to
delete all timing events.

17
ENG
7.5 Power ON/OFF
Move the cursor to the Power ON/OFF bar and press [OK] or [ ] KEY to enter into
thetimer setting menu of the power on/on. [ / ] KEY is to move the cursor to the
requested Settings menu, press [ / ] KEY or the number key [0~9] to modify the
parameters.
8. OPTION
8.1 OSD Language
The default Menu language Settings is English, press the [ / ] KEY to modify the
parameters.
8.2 EPG Language
The default TV guide language Settings is All, press the [ / ] KEY to modify the
parameters.
8.3 Subtitle Language
The default Subtitle language Settings is English, press the [ / ] KEY to modify
the parameters.

18
8.4 TTX Language
The default TTX language setting is Auto, press the [ / ] KEY to modify the para-
meters.
8.5 First Audio Language
The default First audio language Settings is English, press the [ / ] KEY to modify
the parameters.
8.6 Second Audio Language
The default Second audio language Settings is English, press the [ / ] KEY to
modify the parameters.

19
ENG
8.7 Digital audio
The default Digital audio Settings is Auto, press the [ / ] KEY to modify the para-
meters.
9. SYSTEM SETTING
9.1 Parents Control
Move the cursor to the Parental Guidance bar, press [OK] or [ ] KEY and a small
window will pop up. Enter the default password ‘000000’ to enter.
9.2 Set Password
Move the cursor to Set Password bar, press the [OK] or [ ] KEY to pop up a small
window. Enter the default Password” 000000 to enter the s Password setting menu.
If you accidentally forget the previous Password, you can enter the super Password”
876543’ to change the Password.

20
9.3 Restore Factory Default
Move the cursor to Restore Factory default bar, press [OK] or [ ]KEY,it will pop up a
small window. Enter the default password 00000”then will pop up “Sure to Factory
rest?” window, select ok to restore factory settings, the system will reset to the default
value and clear all added channels and other parameters, please use this feature
carefully.
9.4 Version Information
Move the cursor to Restore Factory default bar, press [OK] or [ ] KEY to enter into
the version information view menu.
9.5 Software Update
Move the cursor to the Software Update bar, press [OK] or [ ] KEY to enter into the
Software Upgrade menu, select USB Upgrade, press [OK] or [ ] KEY to enter the
USB Upgrade menu.
USB upgrade: After selecting the correct path, select the software named “.bin”, then
Other manuals for TV-DVBT2
1
Table of contents
Languages: