Mackie TT24 User manual


2
TT24 DIGITAL LIVE CONSOLE
1. Read these instructions.
2. Keep these instructions.
3. Heed all warnings.
4. Follow all instructions.
5. Do not use this apparatus near water.
6. Clean only with dry cloth.
7. Do not block any ventilation openings. Install in accordance with the
manufacturer’s instructions.
8. Do not install near any heat sources such as radiators, heat registers,
stoves, or other apparatus (including amplifiers) that produce heat.
9. Do not defeat the safety purpose of the polarized or grounding-type
plug. A polarized plug has two blades with one wider than the other.
A grounding-type plug has two blades and a third grounding prong.
The wide blade or the third prong are provided for your safety. If the
provided plug does not fit into your outlet, consult an electrician for
replacement of the obsolete outlet.
10.
Protect the power cord from being walked on or pinched particularly at
plugs, convenience receptacles, and the point where they exit from the
apparatus.
11.
Only use attachments/accessories specified by the manufacturer.
12.
Use only with a cart, stand, tripod, bracket, or table specified by the
manufacturer, or sold with the apparatus. When a cart is used, use
caution when moving the cart/apparatus combination to avoid injury
from tip-over.
13.
Unplug this apparatus during lightning storms or when unused for long
periods of time.
14.
Refer all servicing to qualified service personnel. Servicing is required
when the apparatus has been damaged in any way, such as power-
supply cord or plug is damaged, liquid has been spilled or objects have
fallen into the apparatus, the apparatus has been exposed to rain or
moisture, does not operate normally, or has been dropped.
15.
This mixer has been designed with Class-I construction and must be
connected to a mains socket outlet with a protective earthing connec-
tion (the third grounding prong).
16.
This mixer has been equipped with an all-pole, rocker-style AC mains
power switch. This switch is located on the rear panel and should
remain readily accessible to the user.
17.
This apparatus does not exceed the Class A/Class B (whichever is
applicable)
limits for radio noise emissions from digital apparatus as
set out in the radio interference regulations of the Canadian Department
of Communications.
ATTENTION — Le présent appareil numérique n’émet pas de bruits
radioélectriques dépassant las limites applicables aux appareils numériques de
class A/de class B (selon le cas) prescrites dans le réglement sur le brouillage
radioélectrique édicté par les ministere des communications du Canada.
18.
Exposure to extremely high noise levels may cause permanent hearing
loss. Individuals vary considerably in susceptibility to noise-induced
hearing loss, but nearly everyone will lose some hearing if exposed to
sufficiently intense noise for a period of time. The U.S. Government’s
Occupational Safety and Health Administration (OSHA) has specified
the permissible noise level exposures shown in the following chart.
According to OSHA, any exposure in excess of these permissible limits
could result in some hearing loss. To ensure against potentially danger-
ous exposure to high sound pressure levels, it is recommended that all
persons exposed to equipment capable of producing high sound pres-
sure levels use hearing protectors while the equipment is in operation.
Ear plugs or protectors in the ear canals or over the ears must be worn
when operating the equipment in order to prevent permanent hearing
loss if exposure is in excess of the limits set forth here.
Important Safety Instructions
WARNING — To reduce the risk of fire or
electric shock, do not expose this apparatus
to rain or moisture.
PORTABLE CART WARNING
Carts and stands - The
Component should be used
only with a cart or stand
that is recommended by
the manufacturer.
A Component and cart
combination should be
moved with care. Quick
stops, excessive force, and
uneven surfaces may cause
the Component and cart
combination to overturn.
CAUTION AVIS
RISK OF ELECTRIC SHOCK
DO NOT OPEN
RISQUE DE CHOC ELECTRIQUE
NE PAS OUVRIR
CAUTION: TO REDUCE THE RISK OF ELECTRIC SHOCK
DO NOT REMOVE COVER (OR BACK)
NO USER-SERVICEABLE PARTS INSIDE
REFER SERVICING TO QUALIFIED PERSONNEL
ATTENTION: POUR EVITER LES RISQUES DE CHOC
ELECTRIQUE, NE PAS ENLEVER LE COUVERCLE. AUCUN
ENTRETIEN DE PIECES INTERIEURES PAR L'USAGER. CONFIER
L'ENTRETIEN AU PERSONNEL QUALIFIE.
AVIS: POUR EVITER LES RISQUES D'INCENDIE OU
D'ELECTROCUTION, N'EXPOSEZ PAS CET ARTICLE
A LA PLUIE OU A L'HUMIDITE
The lightning flash with arrowhead symbol within an equilateral
triangle is intended to alert the user to the presence of uninsulated
"dangerous voltage" within the product's enclosure, that may be
of sufficient magnitude to constitute a risk of electric shock to persons.
Le symbole éclair avec point de flèche à l'intérieur d'un triangle
équilatéral est utilisé pour alerter l'utilisateur de la présence à
l'intérieur du coffret de "voltage dangereux" non isolé d'ampleur
suffisante pour constituer un risque d'éléctrocution.
The exclamation point within an equilateral triangle is intended to
alert the user of the presence of important operating and maintenance
(servicing) instructions in the literature accompanying the appliance.
Le point d'exclamation à l'intérieur d'un triangle équilatéral est
employé pour alerter les utilisateurs de la présence d'instructions
importantes pour le fonctionnement et l'entretien (service) dans le
livret d'instruction accompagnant l'appareil.
Duration Per Day Sound Level dBA, Typical
In Hours Slow Response Example
8 90 Duo in small club
6 92
4 95 Subway Train
3 97
2 100 Very loud classical music
1.5 102
1 105 Tami screaming at Adrian about deadlines
0.5 110
0.25 or less 115 Loudest parts at a rock concert

3
Owner’s Manual
Owner’s Manual
Table of Contents
Chapter 1: Introduction .....................................5
1.1 Evolution of the TT24 Console ......................................... 5
1.2 Summary of Features .......................................................... 5
1.2.1 DSP Functionality ...................................................... 5
1.3 Terminology and Conventions .........................................6
Chapter 2: Quickstart Tutorial .......................7
2.1 Connect Amplifier/Speakers ............................................ 7
2.2 Connect a Mic ...................................................................... 7
2.3 Connect a CD/Tape Device .............................................9
2.4 Aux Functions .................................................................... 10
2.5 Effects ................................................................................... 11
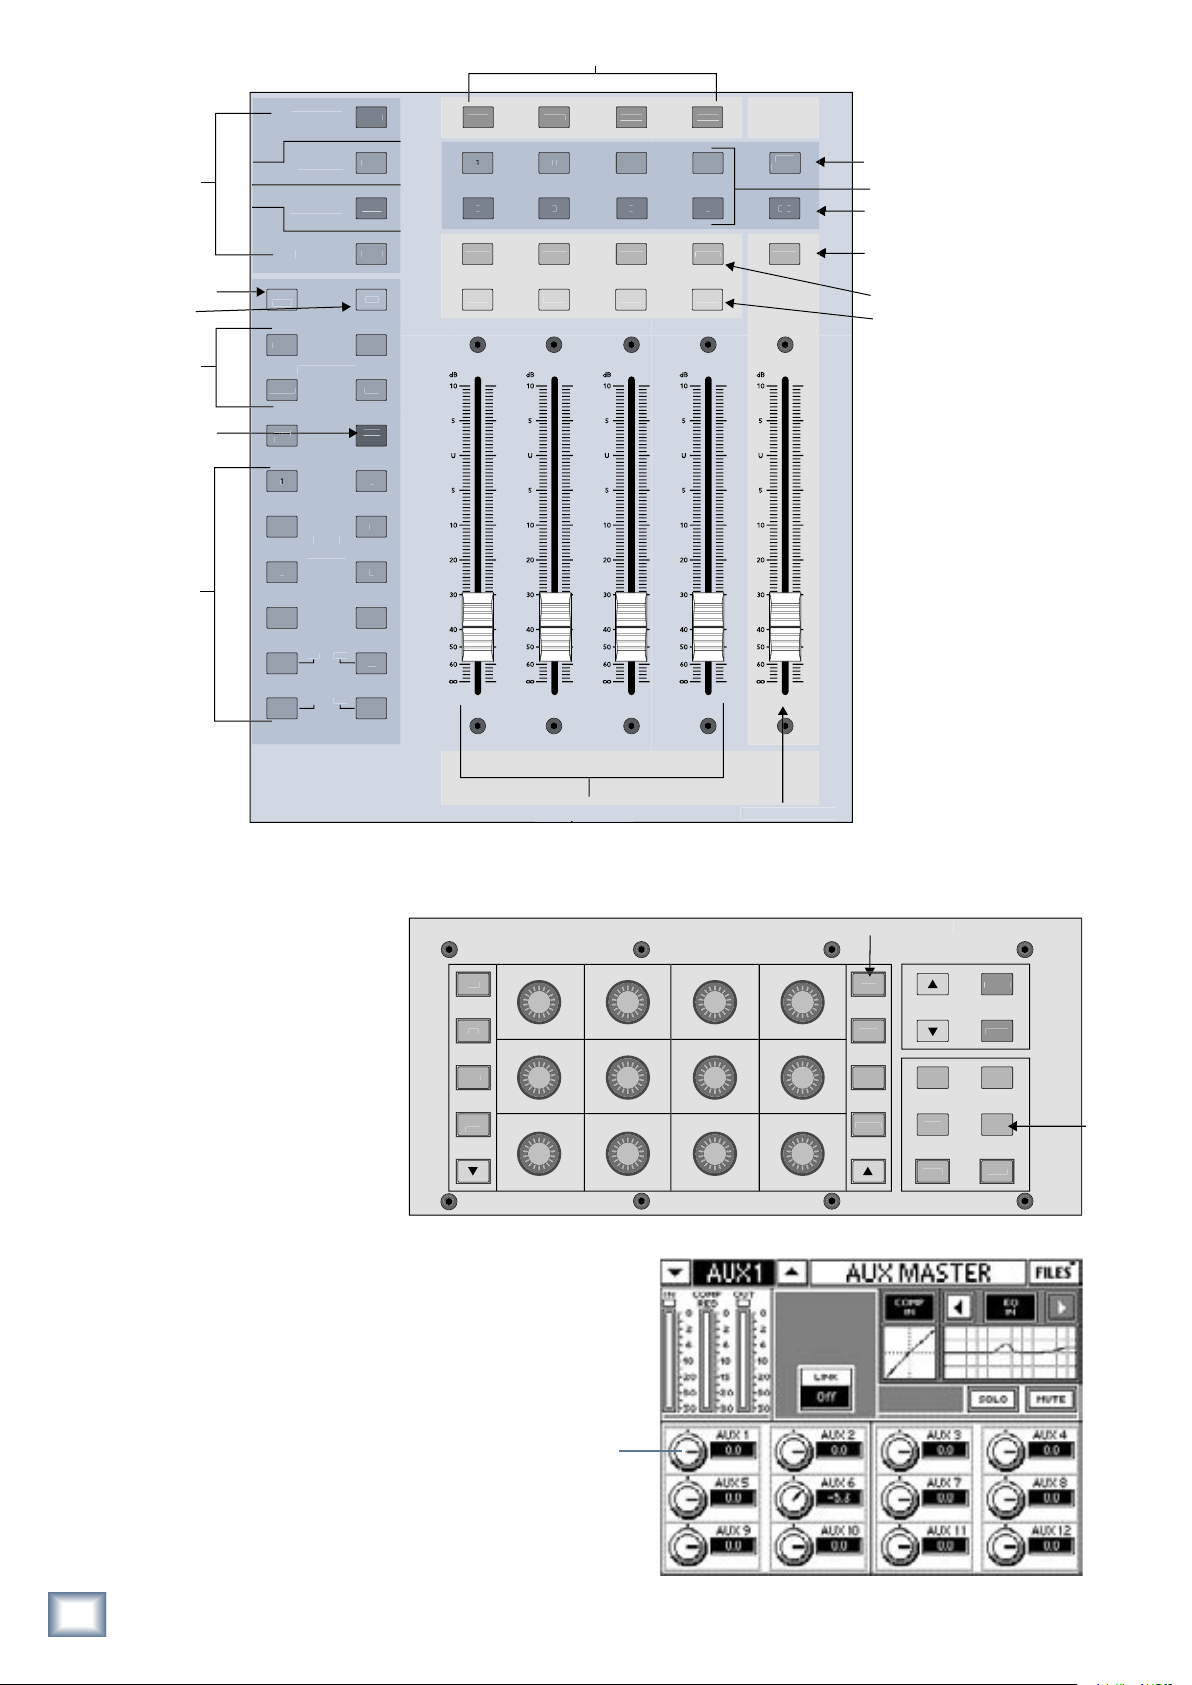
Chapter 3: Console Surface Controls .......... 12
3.1 Channel Strip .......................................................................12
3.1.1 LINE ...............................................................................12
3.1.2 48 V Phantom Power ...............................................12
3.1.3 GAIN ..............................................................................12
3.1.4 OL and SIG .................................................................12
3.1.5 V-Pot ............................................................................12
3.1.6 MUTE ...........................................................................13
3.1.7 Bank/Channel Description Area ..........................13
3.1.8 SELECT .........................................................................13
3.1.9 SOLO ............................................................................13
3.1.10 Channel Fader .........................................................13
3.2 Bank Select Area ................................................................13
3.2.1 ANALOG .....................................................................13
3.2.2 DIGITAL ......................................................................13
3.2.3 RETURNS ................................................................... 14
3.2.4 MASTER ..................................................................... 14
3.2.5 USER BANK ............................................................... 14
3.3 V-Pot Control Area ............................................................ 14
3.3.1 TRIM ............................................................................ 14
3.3.2 PAN ............................................................................. 14
3.3.3 HPF .............................................................................. 14
3.3.4 METERS ...................................................................... 14
3.3.5 AUX SENDS 1–12 .......................................................15
3.3.6 AUX PAN ....................................................................15
3.3.7 AUX MODE ................................................................15
3.4 QuickMix Area ....................................................................15
3.4.1 FAT ................................................................................15
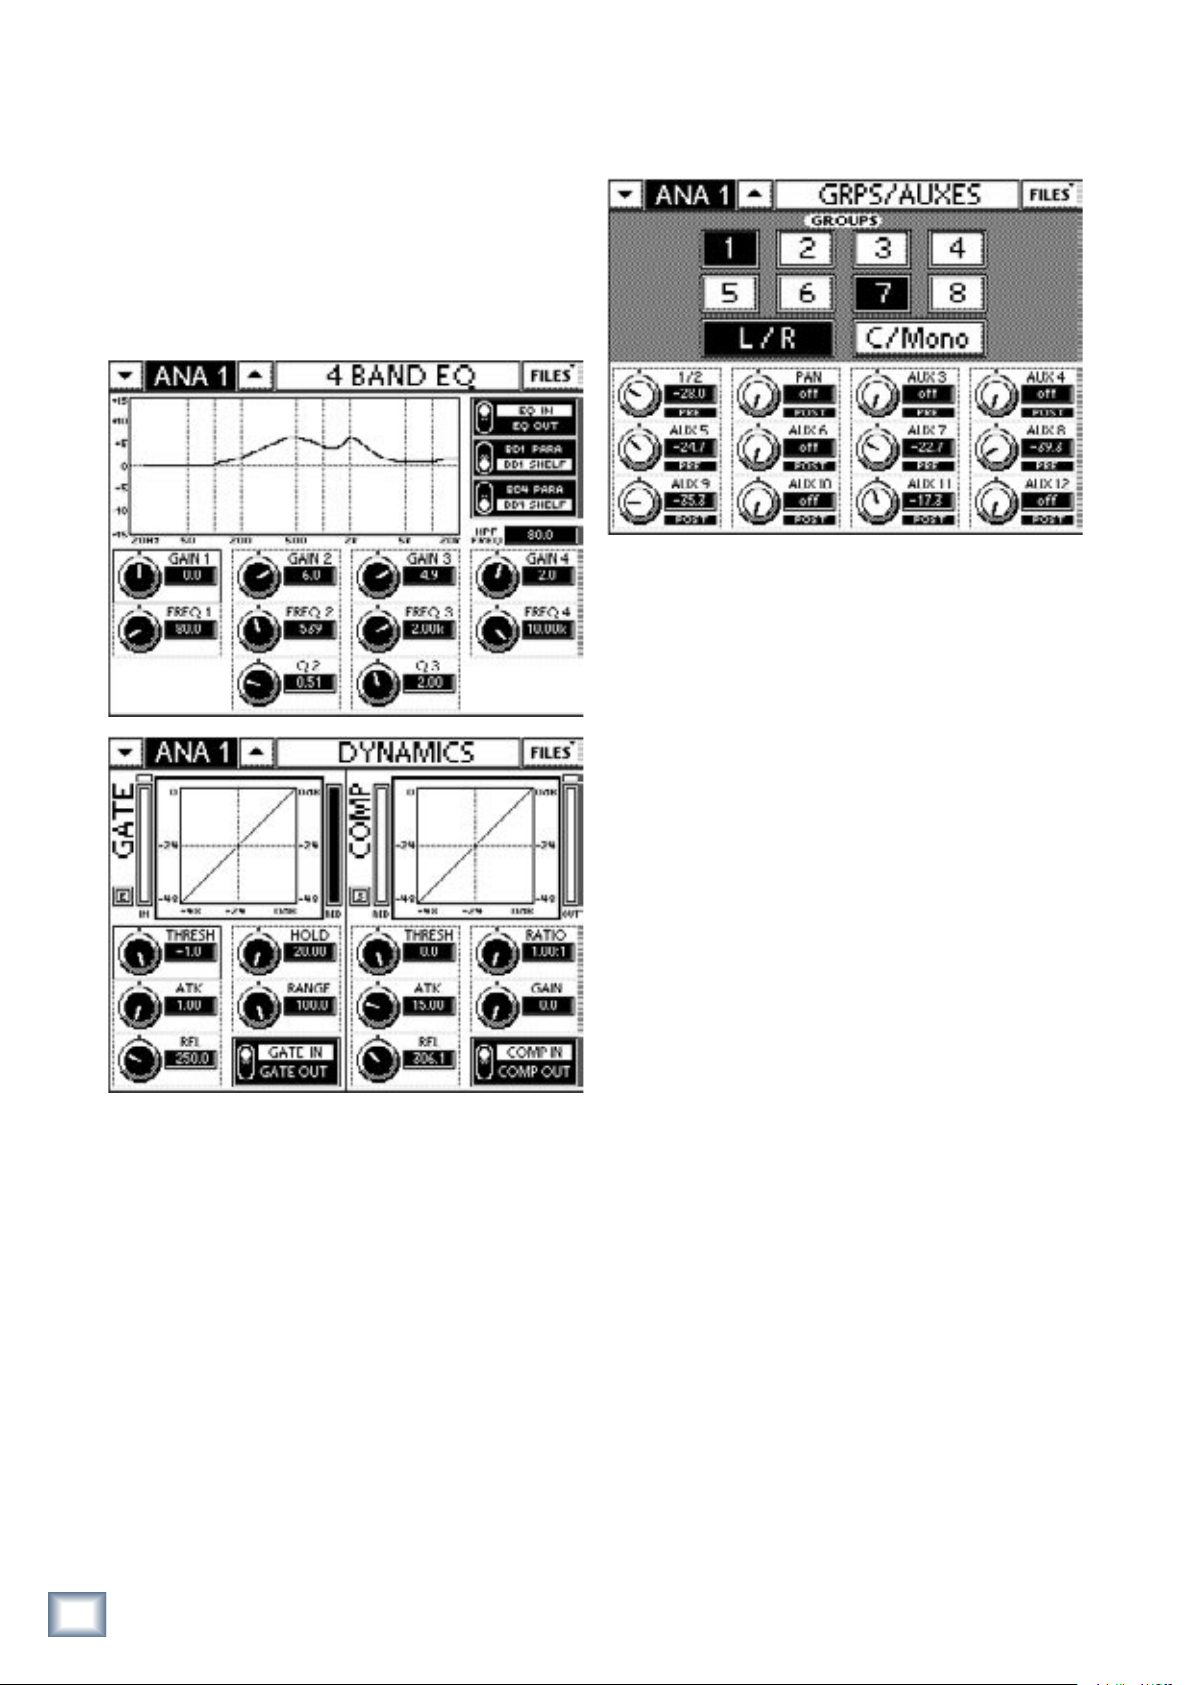
3.4.2 EQ ............................................................................... 16
3.4.3 DYN ............................................................................ 16
3.4.4 GRP/AUX ................................................................... 16
3.4.5 AUX MSTR ................................................................ 16
3.4.6 SNAP ...........................................................................17
3.4.7 EFX ...............................................................................17
3.4.8 MATRIX ......................................................................17
3.4.9 Engineer’s Utility .....................................................17
3.4.10 Main Meters and RUDE SOLO LED ...................17
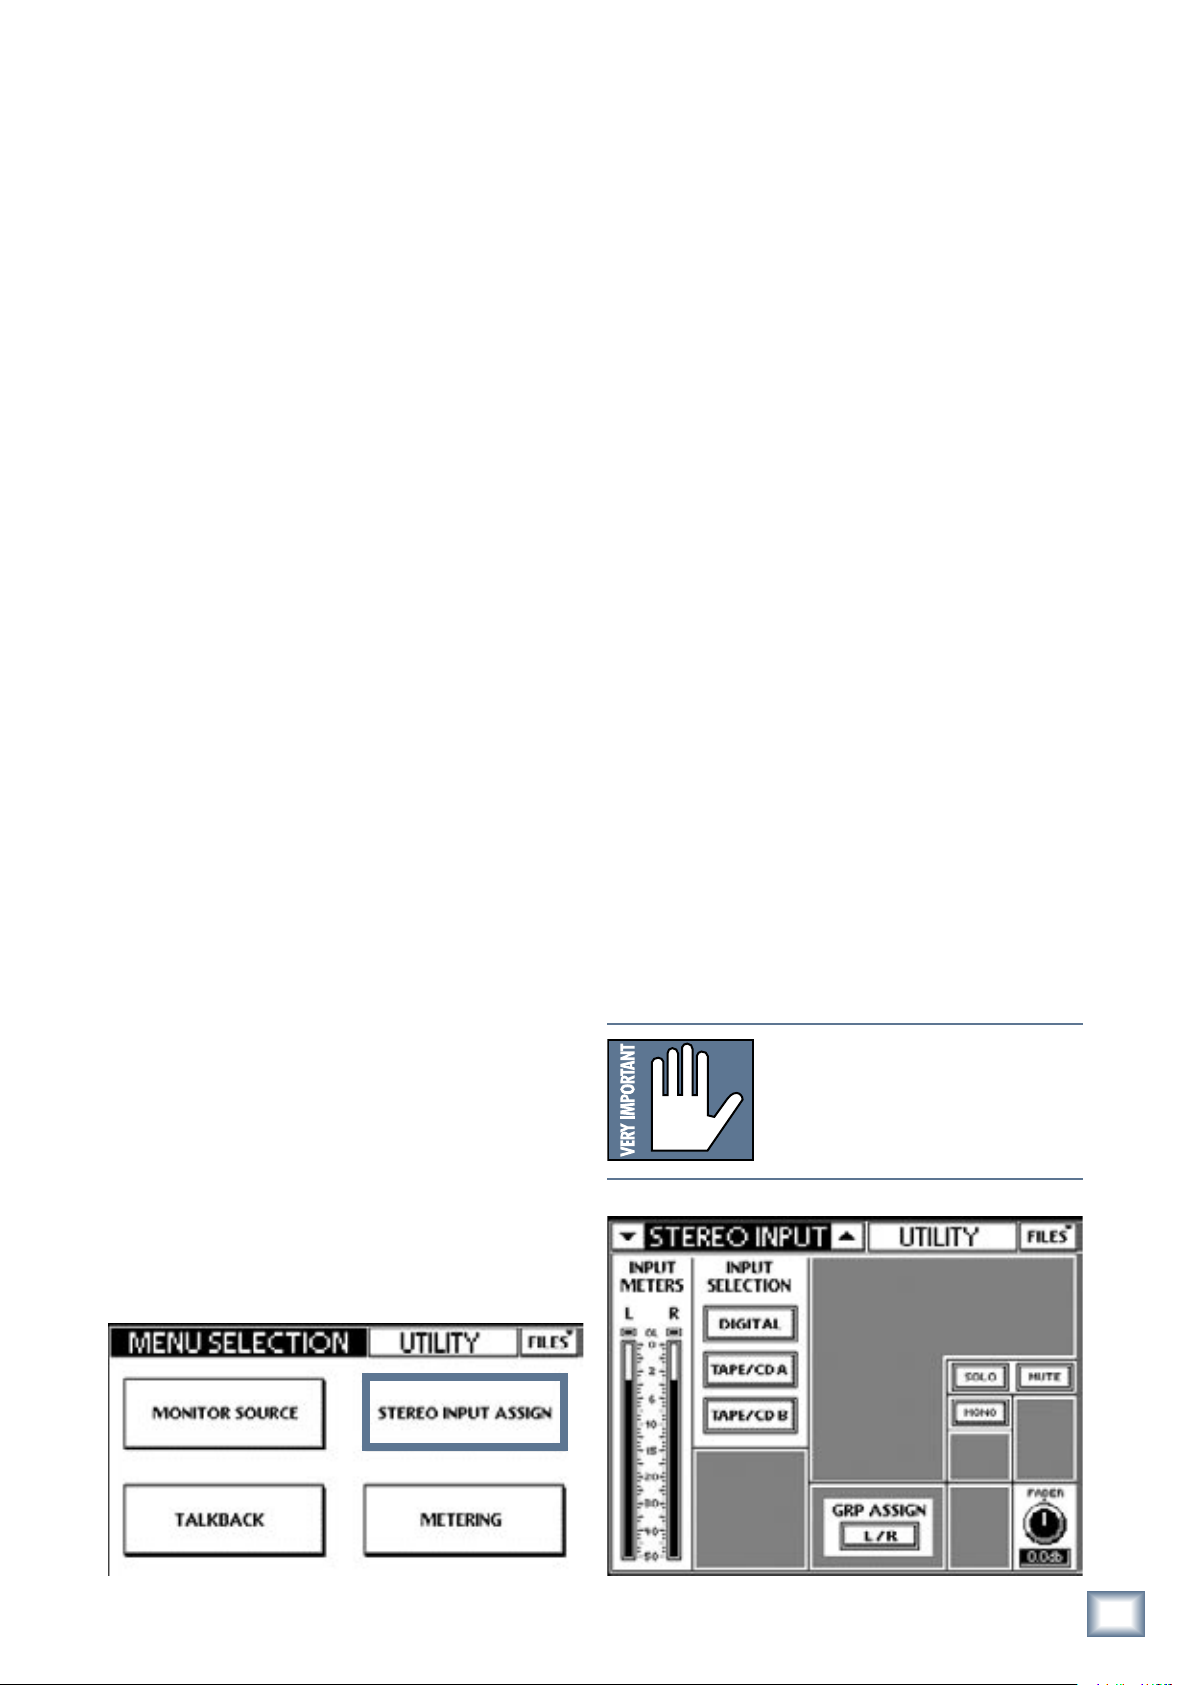
3.5 UTILITY Area ....................................................................... 18
3.5.1 TALKBACK .................................................................. 18
3.5.2 MONITOR ................................................................. 18
3.5.3 PHONES ..................................................................... 18
3.6 Snapshots ............................................................................ 18
3.7 Group and Master Controls ........................................... 19
3.7.1 Changing the Group Bank ..................................... 19
3.7.2 Group Assignment .................................................. 19
3.7.3 Group Parameter Control ..................................... 19
3.7.4 Mute Groups ............................................................ 19
3.8 Solo Area ............................................................................. 19
3.8.1 CLEAR SOLO ............................................................. 19
3.8.2 PFL .............................................................................. 19
Chapter 4: Rear Panel Connectors ............. 20
4.1 Analog I/O ......................................................................... 20
4.1.1 MIC Inputs 1–24 ...................................................... 20
4.1.2 LINE Inputs 1–24 .................................................... 20
4.1.3 INSERTS 1–24 ........................................................... 20
4.1.4 AUX SENDS ................................................................21
4.1.5 LINE INPUTS 1–8 (RETURNS) ................................21
4.1.6 MONITOR ..................................................................21
4.1.7 CD/TAPE A IN/OUT ................................................21
4.1.8 CD/TAPE B Input .....................................................21
4.1.9 TALKBACK MIC Input ..............................................21
4.1.10 MAINS OUT .............................................................21
4.1.11 GROUP/MATRIX OUT ...........................................22
4.2 Digital I/O ..........................................................................22
4.2.1 ADAT DIGITAL I/O ..................................................22
4.2.2 AES/EBU IN/OUT ..................................................23
4.2.3 SPDIF IN/OUT .........................................................23
4.2.4 WORD CLOCK IN/OUT ........................................ 23
4.2.5 MIDI IN/OUT .......................................................... 23
4.2.6 USB ............................................................................. 23
4.3 IEC Power Receptacle ..............................................23
4.4 POWER Switch ........................................................... 23
Chapter 5: DSP and Internal Effect
Allocation ...........................................................24
5.1 Analog, Digital, and Line Inputs ....................................24
5.2 Master L/R and C/Mono ...............................................24
5.2.1 L/R+Mono and LCR Modes .................................24
5.2.2 Six-Band EQ .............................................................25
5.2.3 Compressor ..............................................................25
5.2.4 Fader Position in Signal Path ...............................25

Part No. SW0135 Rev. B 11/05
©2004-2005 LOUD Technologies Inc. All Rights Reserved.
4
TT24 DIGITAL LIVE CONSOLE
5.3 Aux Send ..............................................................................25
5.3.1 Six-Band Parametric EQ .........................................25
5.3.2 Compressor ..............................................................25
5.4 Flex-Group DSP ..................................................................25
5.4.1 Flex-Group Modes ..................................................25
5.4.2 Group DSP Allocation ...........................................26
5.5 Matrix Output ....................................................................27
5.5.1 Delay ...........................................................................27
5.6 Internal Effects Processors ............................................27
5.7 Tabular Summary of DSP and Effects ..........................28
Chapter 6: Touchscreen and TT Control .... 33
6.1 TT Control Conventions .................................................. 33
6.1.1 TT Control Knob ......................................................34
6.1.2 TT Control Buttons ................................................34
6.1.3 TT Control Menus ...................................................34
6.1.4 TT Control Graphs ..................................................34
6.2 Touchscreen Conventions ..............................................34
6.2.1 Touchscreen Knobs ................................................34
6.2.2 Touchscreen Buttons ............................................ 35
6.2.3 Touchscreen Name and Channel/Function ... 35
6.2.4 Sub Screens .............................................................35
6.3 Overview Touchscreens .................................................. 35
6.3.1 Analog ........................................................................ 35
6.3.2 Digital ........................................................................36
6.3.3 Effect Return ...........................................................36
6.3.4 Line ............................................................................. 37
6.3.5 Aux ............................................................................. 37
6.3.6 Group ........................................................................ 37
6.3.7 Master .......................................................................38
6.4 Four-Band Equalizer ..........................................................38
6.5 Six-Band Equalizer .............................................................39
6.5.1 Four-Band EQ ...........................................................39
6.5.2 Kill Filters .................................................................39
6.6 31-Band Equalizer ...............................................................39
6.7 Dynamics ............................................................................. 40
6.7.1 Compressor ............................................................... 40
6.7.2 Gate/Expander ....................................................... 41
6.8 Snapshots ............................................................................42
6.8.1 FILTER EDIT ................................................................42
6.8.2 TITLE EDIT ................................................................42
6.8.1 PROTECT ...................................................................42
6.8.2 CLEAR ........................................................................43
6.8.3 STORE ........................................................................43
6.8.4 RECALL ......................................................................43
6.8.5 Snapshot Filtering .................................................43
6.9 Aux Master ..........................................................................43
6.10 Groups/Auxes ...................................................................44
6.10.1 GROUPS ...................................................................44
6.10.2 AUXES ......................................................................44
6.11 Matrix Mix ..........................................................................44
6.11.1 Delay ..........................................................................44
6.12 Effects .................................................................................45
6.13 Setup ...................................................................................45
6.13.1 Operation ................................................................46
6.13.2 General ....................................................................46
6.13.3 Digital .......................................................................46
6.13.4 MIDI Control .......................................................... 47
6.14 Utility ................................................................................49
6.14.1 MONITOR SOURCE ................................................49
6.13.2 TALKBACK ................................................................49
6.14.3 STEREO INPUT ASSIGN ........................................49
6.14.4 METERING ...............................................................50
6.14.5 USER BANK ..............................................................50
6.14.6 TEST TONES ............................................................50
6.15 File Management ..............................................................51
6.15.1 Load and Save Venue ............................................51
6.15.2 Load and Save Preset ........................................... 52
6.15.3 Backup and Restore Console ..............................52
6.15.4 Backup and Restore Files .................................... 52
6.15.5 Backup and Restore Files .................................... 53
6.15.6 Translate v1.0 Files ................................................ 53
Appendix A: Specifications ............................54
Appendix B: Snapshot Parameters Saved ..57
Appendix C: TT24 Console Surface
Quick Keys ..........................................................58
Appendix D: Configurations and
Block Diagrams ..................................................59
Appendix E: Service Information .................65
Warranty Service .....................................................................65
Troubleshooting ......................................................................65
Appendix F: Warranty Information .............67

5
Owner’s Manual
Owner’s Manual
Ch 1: Introduction
1.1 Evolution of the
TT24 Console
The professional live sound industry has been revolu-
tionized over the past few years by high-end digital con-
soles. However, mid-size digital consoles have tended
to emphasize studio applications with user interfaces
encumbered by features (i.e., DAW control) not essen-
tial for live applications. Some of these consoles conceal
their real cost by requiring the purchase of additional
cards to supplement their limited physical I/O.
The TT24 Digital Live Console is a mid-size digital
mixer with an intuitive interface optimized for live
sound applications. We have used our extensive exper-
tise and experience designing analog mixers to produce
a powerful, easy-to-use digital console for a wide range
of applications and budgets:
• theaters and houses of worship
• permanent concert installations
• professional live music touring companies
TT24 maintains an “analog mentality,” utilizing the
engineer’s experience, while providing all the advan-
tages of digital functionality. With all the features of
high-end consoles, the TT24 is extremely cost effective.
The design mandate for the TT24 console user inter-
face is simply stated:
Provide quick, intuitive access to any primary
live mixing function with no more than two
button presses, both within easy reach of the
engineer’s two hands.
Make the Touchscreen menu structure flat:
no “forward” and “back” buttons or menus to
wade through to access the desired function.
1.2 Summary of Features
• 24-bit/96 kHz mixing console designed for live
applications
• 24 mic/line inputs with 4-band EQ/comp/gate/HPF/
polarity invert (can be stereo linked)
• Eight line inputs with 4-band EQ (can be stereo
linked)
• Instant recall of 99 snapshots with filtering
• Rear panel connections: 36x28 analog I/O (24
Mic/Line Inputs, 8 Line Inputs, 4 Tape Inputs) x (8
Matrix Outputs, 3 Main Outputs, 3 Monitor Outputs,
12 Aux Sends); 28x28 digital I/O (24 ADAT optical
I/O, 2 AES/EBU I/O, 2 S/PDIF I/O)
• QuickMix section with 5.5-inch LCD Touchscreen,
12 push-button rotary encoders, and QuickMix buttons
• 29 100mm motorized faders
• 28 multi-function V-Pots
• 12 Aux sends with 6-band parametric EQ (includes
dual kill filters) and compressor/limiter
• Left-Right and CTR/Mono outputs with 6-band
parametric EQ (includes dual kill filters), 31-band
graphic EQ, and compressor/limiter
• Aux Mode enables instant monitor mixing
• 11x8 Matrix-Plus with patchable inputs
• Eight user-definable flex-groups
• Eight dedicated mute groups
• Dual-console linking for a maximum 96 input con-
sole (coming soon!)
• TT control software to control and view console
parameters via PC
1.2.1 DSP Functionality
The TT24 is loaded with DSP horsepower that is
distributed on inputs and outputs in an optimal manner
for live sound. The TT24 design team spent a great deal
of time implementing and allocating the TT24’s DSP to
satisfy the rigorous, real-time demands of live concert
applications:
24 Mic/Line Inputs
• Polarity invert
• Variable High-Pass Filter
• Gate/Expander
• Compressor/Limiter
• 4-band parametric EQ
• Stereo linking
Please write your serial number here for future
reference (i.e., insurance claims, tech support,
return authorization, etc.)
Purchased at:
Date of purchase:

6
TT24 DIGITAL LIVE CONSOLE
8 Line Inputs
• 4-band parametric EQ
• Stereo linking
Main Outputs (LEFT, RIGHT, CTR/MONO)
• Compressor/Limiter
• 6-band parametric EQ (includes dual kill filters)
• 31-band graphic EQ
• L/R + Mono or LCR modes of operation
12 Aux Sends
• Compressor/Limiter
• 6-band parametric EQ (includes dual kill filters)
• Stereo linking
8 Flex-Groups with 8 Assignable DSP Blocks
• Compressor/Limiter
• 4-band parametric EQ
• Mono, Stereo, LCR, and VCA modes of operation
8 Matrix Outputs
• 600 ms delay is available to matrix outputs
4 Internal Stereo Effects
• Reverb
• Gated Reverb
• Mono/Stereo/Ping-Pong Delay
• Chorus
• Flanger
1.3 Terminology and
Conventions
The following terms and conventions are used
throughout this manual.
• Touchscreen and console controls are represented
in bold type using their exact spelling and capital-
ization (i.e., press the ANLG bank button).
• Touchscreen and console areas are represented by
capital letters in plain type (i.e., press the PAN but-
ton in the V-POT CONTROL area).
• Activate pertains to switches/buttons that toggle
between two values and means “press the button
until it lights.”
• Deactivate pertains to switches/buttons that toggle
between two values and means “press the button
until it is not lit.”
• ADC means analog-to-digital converter
• DAC means digital-to-analog converter
• Intercancel means that pushing one button simul-
taneously selects that button and automatically
deselects the previously selected button. One but-
ton is always active. For example, the Bank Select
buttons intercancel. Radio button is another term
often used to describe this behavior, originating
from the push buttons that selected radio stations
in pre-1960s cars.
The Touchscreen is a new interface to most audio
engineers that requires some new terminology.
• Touch pertains to selection on the Touchscreen
(i.e., Touch the EQ button).
•
Select describes touching a button or checkbox such
that it is activated. This allows a single instruction
to describe this action without knowing the control’s
previous state. For example, if the control is not
selected, touching the control once selects it. If it is
already selected, no action is required.

7
Owner’s Manual
Owner’s Manual
CD
/
TAPE
A
TALKBA
CK
OUT
IN
CTR/MONO
RI
G
H
T
LEFT
M
O
NIT
O
R
MAIN
S
OUT
LINE INP
U
T
S
A
U
X
S
END
S
1
2
3
4
5
6
7
8
9
1
0
11
12
L
R
C
12 Aux
Sends
CD/Tape B
Inputs
CD/Tape A
Inputs/Outputs
Main Outputs
R
M
L
1
2
3
4
5
6
7
8
R
L
Ch 2: Quickstart Tutorial
3. Set the LINE switch to the up (mic) position.
Mute button
4.
Set the 48V switch to the down position if the mic uses
phantom power; set it to the up position otherwise.
Set the channel gain
5. Activate the PFL button (right of Figure 2-2).
6. Activate channel 1’s SOLO button (above fader) to
solo the channel.
7. Provide a representative signal to the mic, watch
the meters to the right of the Touchscreen, and
listen in phones (the phones level is in the UTILITY
area).
The solo level should be between -7 and -10 dBFS.
8. Press channel 1’s SOLO button again or CLEAR
SOLO (left of PFL) to unsolo.
Route channel 1 to Main output, Group 1, and Aux 1
9. Press and hold the L/R button in the GROUP AS-
SIGN area (Figure 2-3) and activate channel 1’s
SELECT button.
All the channel SELECT buttons light, indicating
that all channels are routed to the Main output. You
should hear your mic in the speakers connected to
MAINS OUT via the master fader.
Let’s route the mic through Group 1 instead of directly
to MAINS OUT:
10. Press and hold the L/R button in the GROUP AS-
SIGN area and deactivate channel 1’s SELECT
button (so it is not lit).
Channel 1 no longer sends signal to MAINS OUT.
11. Press and hold the Group 1 button in the GROUP
ASSIGN area and activate channel 1’s SELECT button.
The mic is now routed to Group 1.
12. Press and hold the L/R button in the GROUP AS-
SIGN area and activate Group 1’s SELECT button.
Group 1 is now assigned to LEFT and RIGHT
MAINS OUT.
Use the channel, Group, and Master fader to listen
to the mic signal in the speakers connected to
MAINS OUT.
OL
S
I
G
1
-
+
G
AI
N
U
2
0
30
4
0
6
0
1
2
5
A
UX
S
EN
D
1
LINE
I
NP
UT
SO
L
O
S
ELE
CT
M
U
T
E
LINE
4
8V
V-Pot
knob
48 V
phantom
p
ower
b
utto
n
Mic/Line
level button
Gain
knob
Overload
LED
Signal
LED
Select
button
Solo
button
Channel
fader
Mute
button
Bank/
Channel
description
R
ET
U
RN
S
MA
S
TE
R
ANAL
OG
DI
G
ITA
L
GROUP ASSIGN
/
SELEC
T
MA
S
TE
R
V-P
OT
CO
NTR
OL
A
UX
S
END
S
FX1
FX2
FX4
FX
3
ANL
G
M
U
T
E
D
G
T
L
1
RTN
S
5
M
S
T
R
S
ELE
CT
PFL
SO
L
O
M
U
T
E
2
6
S
ELE
C
T
SO
L
O
M
U
T
E
3
7
S
ELE
CT
SO
L
O
M
U
T
E
4
8
S
ELE
CT
SO
L
O
CTR
/
M
O
N
O
L
/
R
S
ELE
CT
PAN
HPF
A
UX
M
O
D
E
2
4
6
8
1
0
12
C
LEA
R
SO
L
O
TRIM
METER
S
AUX
PAN
1
3
5
7
9
11
Group Assign/Select buttons
Master Center/Mono Assign button
Master Left/Right Assign button
Master Select button
Group Select buttons
V-Pot Control
Aux Sends
Bank Select
Clear Solo and
PFL buttons
Grou
p
Fader
s
p
Group Mute buttons
M
as
t
e
r F
ader
Group Solo buttons
Aux Mode
AUX
AUX
Figure 2-2 Top of channel strip (left); Bank select, Clear
Solo, PFL, V-Pot control (right)
This Quickstart Tutorial will help you begin using
the TT24 quickly and easily by providing step-by-step
instructions for its most commonly utilized tasks. Rest
assured that our team of design engineers has verified
these instructions! It may be helpful to refer to Appen-
dix B: Configurations and Block Diagrams to see how
several useful complete systems are interconnected.
2.1 Connect Amplifier/Speakers
1. Plug in a pair of amps/speakers into the MAINS OUT
LEFT and RIGHT XLR connectors (Figure 2-1).
2. Connect an amp/speaker to AUX SEND 1.
3. Plug in headphones.
Figure 2-1 Mains and Aux Sends Outputs
2.2 Connect a Mic
This section describes how to connect a mic to chan-
nel 1, set the gain, route to groups/auxes, and engage/
adjust the variable high-pass filter.
Connect mic to channel 1
1. Plug a mic into channel 1’s XLR input (top-right of
rear panel).
2. Press the ANLG bank select button (right of
Figure 2-2).

8
TT24 DIGITAL LIVE CONSOLE
R
ET
U
RN
S
MA
S
TE
R
ANAL
OG
DI
G
ITA
L
GROUP ASSIGN
/
SELEC
T
MA
S
TE
R
V-P
OT
CO
NTR
OL
A
UX
S
END
S
FX1
FX2
FX4
FX
3
ANL
G
M
U
T
E
D
G
T
L
1
RTN
S
5
M
S
T
R
S
ELE
CT
PFL
SO
L
O
M
U
T
E
2
6
S
ELE
C
T
SO
L
O
M
U
T
E
3
7
S
ELE
CT
SO
L
O
M
U
T
E
4
8
S
ELE
CT
SO
L
O
CTR
/
M
O
N
O
L
/
R
S
ELE
CT
PAN
HPF
A
UX
M
O
D
E
2
4
6
8
1
0
12
C
LEA
R
SO
L
O
TRIM
METER
S
AUX
PAN
1
3
5
7
9
11
Group Assign/Select buttons
Master Center/Mono Assign button
Master Left/Right Assign button
Master Select button
Group Select buttons
V-Pot Control
Aux Sends
Bank Select
Clear Solo and
PFL buttons
Grou
p
Fader
s
p
Group Mute buttons
M
as
t
e
r F
ader
Group Solo buttons
Aux Mode
AUX
AUX
Figure 2-3 Aux, Group, and Master areas
DYN
EQ
GRP
/
A
UX
FAT
S
ET
UP
C
TR
L
CO
PY
HELP
U
TI
L
PA
S
T
E
S
T
O
R
E
RE
C
AL
L
EFX
S
NA
P
A
UX
M
S
T
R
MATRIX
S
NAP
S
H
O
T
S
Utilit
y
bu
tt
o
n
A
u
x M
as
t
e
r
bu
tt
o
n
Aux 1
Master Level
Figure 2-4 QuickMix area
Figure 2-5 AUX MASTER Touchscreen

9
Owner’s Manual
Owner’s Manual
13. Press AUX SENDS 1 in the V-POT CONTROL area
(Figure 2-3).
14. Increase the Aux 1 level on channel 1 using the
V-Pot.
15. Press the AUX MSTR QuickMix button (Figure 2-
4).
16. Adjust Aux 1’s master level with its correspond-
ing QuickMix knob (see the Aux Master screen in
Figure 2-5).
You should hear your mic in the monitor speaker
attached to Aux 1.
Engage and adjust the variable high-pass
filter
17. Press HPF in the V-POT CONTROL area (Figure
2-2). This assigns the high-pass filter to the channel
V-Pots.
18. Engage the high-pass filter for channel 1 by pressing
its V-Pot knob so the bottom red LED lights.
19. Rotate the V-Pot to adjust the filter in the range
20–400 Hz to remove unwanted low frequencies.
20. To view the frequency range, select channel 1 and
press the QuickMix EQ button.
The Touchscreen now displays the HPF frequency
range.
2.3 Connect a CD/Tape Device
This section illustrates how to connect a CD/tape
device to the dedicated CD/ TAPE A or B connectors
(A = RCA, B = TRS), and to channels 23/24 to demon-
strate stereo linking and channel strip processing.
Connect CD to CD/Tape input
1. Connect the CD player into CD/TAPE A or B
(Figure 2-1).
2. Press the UTIL button (Figure 2-4).
3. Touch STEREO INPUT ASSIGN on the Touch-
screen (Figure 2-6).
4. Touch TAPE/CD A or TAPE/CD B in the INPUT
SELECTION area (Figure 2-6).
5. Select L/R in the GRP ASSIGN area to route the stereo
source to the LEFT and RIGHT MAINS outputs.
6. Adjust MUTE and SOLO from the Touchscreen.
7. Adjust the stereo input fader to desired level from
its QuickMix knob.
Connect CD to channels 23 and 24
1. Move the CD to the channel 23 and 24 LINE con-
nectors.
2. Set the LINE switch to the down position (line level).
3. Press and hold channel 23 and 24’s SELECT
switches until the Link Channels dialog appears in
the Touchscreen.
4. Touch OK to approve the channel linking.
5. Press the PAN button in the V-POT CONTROL area
(Figure 2-3).
6. Turn channel 23’s V-Pot hard left. Channel 24 auto-
matically pans in the opposite direction. Pretty cool!
7. Activate the SOLO button above the fader on either
channel to solo. Because PFL is engaged, the linked
channel does not also solo.
8. Adjust the channel’s GAIN knob and watch the
meters to the right of the Touchscreen.
The level should be between -7 and -10 dBFS.
9. Repeat steps 7 and 8 for the other channel in the
linked pair.
NOTE: Stereo linking always operates on a
consecutive odd/even channel pair. The odd
channel’s parameters are copied to the even
channel except Pan, which is inversely linked
(i.e., hard left on odd channel translates to
hard right on even channel).
Figure 2-6 Stereo Input Assign

10
TT24 DIGITAL LIVE CONSOLE
Adjust EQ, Dynamics, and channel
routing
1. With channel 23 and 24 selected, press the EQ but-
ton in the QuickMix area to display the 4-BAND EQ
Touchscreen (Figure 2-7).
2. Select the EQ IN toggle switch to enable EQ.
3. Use the 12 QuickMix knobs to adjust the EQ param-
eters.
4. Press the DYN QuickMix button to display the
DYNAMICS Touchscreen (Figure 2-7).
5. Select the GATE IN and COMP IN toggle switches
on the Touchscreen to engage the processors.
6. Use the 12 QuickMix knobs to adjust the dynamics
parameters.
Touch the Gate or Compressor Touchscreen graph
to display their more detailed Touchscreen.
7. Press the GRP/AUX QuickMix button to display the
GRPS/AUXES Touchscreen (Figure 2-8).
8. Route the selected channel to Groups 1–8, L/R,
and C/Mono by selecting their buttons from the
GROUPS area in the top-half of the Touchscreen.
9. Adjust the selected channel’s Aux send levels using
the QuickMix knobs.
10. Push the QuickMix knobs to toggle each Aux send
between pre- and post-fader.
2.4 Aux Functions
This section discusses how to setup, route, and mix
the Aux buses. Each of the 12 Aux masters have their
own EQ and compressor/limiter.
1. Press the AUX MSTR button (Figure 2-4) to display
the AUX MASTER Touchscreen.
2. Select Aux master 1 by pressing the top-left Quick-
Mix knob. Figure 2-9 (right) shows Aux 1 selected.
3. Touch the EQ graph or press the EQ QuickMix but-
ton to display the 6-BAND EQ for the selected Aux
send 1 (bottom of Figure 2-9).
The EQ IN/OUT button is located on the top-right
of the Touchscreen.
The six bands have the following format:
• bands 2 and 3 are full parametric filters (GAIN,
FREQ, Q);
• bands 1 and 4 are high-and low-shelf filters, respec-
tively;
• bands 5 and 6 are kill filters to remove narrow
bands of unwanted frequencies. Push the kill filter’s
QuickMix knob to cycle through -6, -12, or -18 dB
settings. As the amount of cut increases, the filter Q
increases (i.e., bandwidth narrows). Turn the knob
to adjust the frequency.
Figure 2-7 4-Band EQ (top) and Dynamics
Touchscreens (bottom)
Figure 2-8 GRPS/AUXES Touchscreens

11
Owner’s Manual
Owner’s Manual
Press the desired Aux number in the V-POT CONTROL
area and use the channel V-Pots to set the channel Aux
send levels. All 12 Aux levels for a selected channel can
be set using the Touchscreen and QuickMix knobs by
pressing the GRP/AUX QuickMix button.
Aux Routing Examples
To send mic channel 1 to all monitors:
1. Press channel 1’s SELECT button.
2. Press the GRP/AUX QuickMix button.
3. Adjust the QuickMix knobs to set each Aux level.
To set one monitor mix:
1. Press the desired Aux number button in the AUX
SENDS area.
2. Use each channel’s V-Pots to set the mix.
2.5 Effects
Four effects processors can each use one of the fol-
lowing effects: reverb, reverb through gate, mono/stereo/
ping pong delay, chorus, and flange. The default effect
sends are Aux sends 9–12 but any Aux or Matrix sends
can be used. The effect returns are on the Returns bank.
1. Press the ANLG bank button.
2. Press AUX SENDS 9 in the V-POT CONTROL area.
3. Turn channel 1’s V-Pot to 3:00 to set channel 1’s
level to Aux 9.
4. Press the EFX QuickMix button. The INTERNAL
EFX Touchscreen opens (top of Figure 2-10).
5. Touch the Edit button next to Chorus to edit its
parameters on its own screen (right of Figure 2-10).
6. Press the RTRNS bank button.
7. Speak into the mic and increase the Returns levels
(INT EFX 1L and INT EFX 1R) to set the desired
amount of effect.
Figure 2-9 AUX MASTER (top) and
6-BAND EQ (bottom) Touchscreens
Figure 2-10 Internal Effects (top) and
Chorus (bottom) screens

12
TT24 DIGITAL LIVE CONSOLE
Ch 3: Console Surface Controls
3.1.1 LINE
Push the LINE button down to access the 1/4-inch
line input and up for the XLR mic input. For permanent
installations that require alternate access to mic and
line inputs in the same channel, connect both inputs
and toggle between them via the LINE button.
3.1.2 48 V Phantom Power
Push the 48V button down to supply 48 VDC phantom
power, required by most condenser mics, to the chan-
nel’s XLR mic input. The TT24 can provide phantom
power to all 24 mic inputs simultaneously. Push the but-
ton up for dynamic mics that do not require phantom
power. The line input is not affected by the 48V phantom
power switch.
3.1.3 GAIN
The GAIN knob controls the analog amplifier that ad-
justs the input sensitivity of the mic or line input signal.
The gain range of the mic input is 0–60 dB; the line’s
range is -20 to +40 dB. A unity gain indication for the
line input appears at the 10:00 position (unity gain for
the mic input is fully counterclockwise). Dual-concen-
tric labels surround the knob indicating the appropriate
levels (mic outside, line inside).
3.1.4 OL and SIG
The green SIG LED lights when the selected mic/line
signal exceeds -15 dBu. The red OL LED lights when the
signal is 3 dB below clipping the ADC. The SIG and OL
LEDs remain lit only while the signal level is above their
corresponding thresholds.
3.1.5 V-Pot
The V-Pot displays and controls one of
the following functions at a time: pan,
HPF, Aux send levels, Aux pan (for linked
Aux sends), digital trim, and channel
metering. The function is assigned from
the V-POT CONTROL area.
The V-Pot has 15 LEDs in a ring from
7:00 to 5:00. They light clockwise as the
signal level increases unless otherwise
noted. The V-Pot also has a bottom red
LED used to indicate different functions
including meter clip, default settings,
on/off, etc. The 12:00 LED is also sometimes used to
indicate a nominal setting (i.e., pan set to center). Each
function’s specific behavior is discussed in V-Pot Control
Area on page 14.
OL
S
I
G
1
-
+
G
AI
N
U
2
0
30
4
0
6
0
1
2
5
A
UX
S
EN
D
1
LINE
I
NP
UT
SO
L
O
S
ELE
CT
M
U
T
E
LINE
4
8V
V-Pot
knob
48 V
phantom
p
ower
b
utto
n
Mic/Line
level button
Gain
knob
Overload
LED
Signal
LED
Select
button
Solo
button
Channel
fader
Mute
button
Bank/
Channel
description
OL
S
I
G
1
-
+
G
AI
N
U
2
0
30
4
0
6
0
1
2
5
A
UX
S
EN
D
1
LINE
I
NP
UT
SO
L
O
S
ELE
CT
M
U
T
E
LINE
4
8V
V-Pot
knob
48 V
phantom
p
ower
b
utto
n
Mic/Line
level button
Gain
knob
Overload
LED
Signal
LED
Select
button
Solo
button
Channel
fader
Mute
button
Bank/
Channel
description
Figure 3-1 Channel strip: top half (left, bottom half (right)
Bottom LED
12:00 LED
Figure 3-2 V-Pot
The TT24 console surface is organized into the follow-
ing areas, each of which is discussed in this chapter:
• Channel Strips
• QuickMix
• Bank Select
• V-Pot Control
• Utility
• Flex-Groups and Master
• Solo
3.1 Channel Strip
The TT24 has 24 channel strips bounded at the bot-
tom by a fader and at the top by a LINE switch. Each
channel strip can control one input at a time from one
of four banks.
The top section of each channel strip (left of Figure
3-1) has the following analog controls that apply only
to the Analog bank: LINE mic/line input switch, 48V
phantom power switch, GAIN mic/line gain control, and
OL (overload) and SIG signal LEDs.
Below that, each channel has a virtual potentiometer
(V-Pot), MUTE, SELECT, and SOLO buttons, and a
100mm motorized fader (right of Figure 3-1).
The V-Pot knob, which performs multiple channel
functions one at a time, consists of a push-button rotary
encoder surrounded by a 15-segment LED ring (see
V-Pot Control Area on page 14).

13
Owner’s Manual
Owner’s Manual
3.1.6 MUTE
Push the MUTE button to toggle the channel between
muted (button lights) and enabled (not lit).
NOTE: Pre-fader Aux sends can be globally
changed to pre- or post-mute from the
SETUP-GENERAL Touchscreen (see page 46).
3.1.7 Bank/Channel Description Area
This area indicates the audio signal currently con-
trolled by the channel strip. Each channel strip can con-
trol one channel from one of the four banks at any given
time. For example, Figure 3-1 illustrates channel strip
1. Four channel names are listed in the Bank/Channel
Description Area:
• If the ANALOG bank is selected, strip 1 controls
analog Channel 1.
• If the DIGITAL bank is selected, strip 1 controls
digital Channel 25.
• If the RETURNS bank is selected, strip 1 controls
Line Input 1.
• If the MASTERS bank is selected, strip 1 controls
Aux Send 1.
3.1.8 SELECT
When lit, the SELECT button indicates this channel
is selected for:
• display and control of its parameters on the Touch-
screen.
• assignment to groups in conjunction with the
GROUP ASSIGN/SELECT controls (see Group and
Master Controls on page 19).
Channel Linking
Pressing and holding the SELECT buttons on an
odd/even pair of adjacent channels for two seconds
links their functions. A Touchscreen window requests
confirmation: “Link Channel X and Y?” Touch YES to
link the channels or CANCEL to abort the process. To
unlink channels, press and hold both SELECT buttons
for two seconds again. A Touchscreen window requests
confirmation: “Unlink Channel X and Y?” Touch YES to
unlink them or CANCEL to leave them linked.
After linking, the odd channel’s settings are copied to
the even channel; adjusting a setting on either channel
duplicates the setting on the other. The only exception
to this rule is panning. The pans are inversely related
between linked channels: Panning one channel fully left
pans the other fully right; panning one channel to 10:00
pans the other to 2:00.
True stereo compression applies to linked channels so
the summed signal is delivered to the stereo compressor.
3.1.9 SOLO
Press the SOLO button to solo the channel. This yel-
low backlit button lights when the channel is soloed.
The PFL/AFL global selection is done in the Solo master
section (see Solo Area on page 19).
The default Solo behavior is to allow multiple soloed
channels. However, enable EXCLUSIVE SOLO mode (in
the SETUP-GENERAL Touchscreen) to have each Solo
selection deactivate the previous one. In EXCLUSIVE
SOLO mode, pressing CTRL+SOLO solos additional
channels.
3.1.10 Channel Fader
The motorized 100mm fader controls the channel
level. Its function depends on the selected Bank (see
Bank Select Area below).
In Aux Mode (page 15), the fader controls the level
of the channel Aux sends 1–12 and depends on the Aux
selection in the V-POT CONTROL area (see page 14). It
is variable from -∞ to +10 dB in logarithmically scaled
steps.
3.2 Bank Select Area
The four Bank Select buttons (ANLG, DGTL, RTNS,
MSTR) change the mapping to the 24 channel strips
(Figure 3-3). The four buttons intercancel and one is
always active. All channels retain their settings between
Bank changes.
3.2.1 ANALOG
Press the ANLG but-
ton to select the ANALOG
bank. The button lights red
and the 24 analog mic/line
inputs are assigned to chan-
nel strips 1–24.
3.2.2 DIGITAL
Press the DGTL button to
select the DIGITAL bank.
The button lights green and
the DIGITAL inputs are as-
signed to the channel strips
1–24.
At 44.1/48 kHz, there are 24 digital inputs from three
ADAT optical connectors on the rear panel. At 96 kHz,
there are 12 digital inputs from the three built-in ADAT
optical connectors.
ANLG
DGTL
RTNS
MSTR
ANALOG
DIGITAL
RETURNS
MASTER
Figure 3-3 Bank Select buttons

14
TT24 DIGITAL LIVE CONSOLE
3.2.3 RETURNS
Press the RTRN button to select the RETURNS bank.
The button lights red and the following inputs are con-
trolled on the channel strips:
1–8: Eight analog line inputs (TRS connectors on rear
panel) 9–16: Four internal stereo effects returns 17–24:
Return channels from expansion cards
3.2.4 MASTER
Press the MSTR button to select the MASTERS bank.
The button lights green and the following inputs are
controlled on the channel strips:
1–12: Twelve Aux send masters 13–20: Eight Group
masters 22–24: Left, Right, and Center/Mono Main
outputs
NOTE: The Left and Right faders are always linked. The Left-Right
and Center/Mono faders may be linked as needed.
3.2.5 USER BANK
A customizable user bank allows you to compile a
new bank of 24 faders containing any of the channels
included in the 4 primary banks (ANLG, DGTL, RTNS,
MSTR).
To access the user bank for mixing simply press the
ANLG and DGTL bank select buttons simultaneously.
They will both illuminate and the faders will snap to
their current settings, indicating the
TT24 is in the user bank. See section
6.13.5 for more information on config-
uring the user bank.
3.3 V-Pot Control
Area
The buttons to the right of the
channel faders assign the current
function to the channel V-Pots. These
include the four V-POT CONTROL
buttons (PAN, TRIM, METERS,
HPF), AUX SENDS 1–12, and AUX
PAN (see Figure 3-4). These buttons
all intercancel so only one can be ac-
tive at a time.
AUX PAN operates for stereo-
linked Aux sends only, and does not
deselect the selected Aux send but-
ton. When selected, a single LED illu-
minates around the V-Pot to indicate
the pan position.
The AUX MODE button is discussed in this section
because of its relevance to the other Aux buttons. How-
ever, it does not intercancel with the other buttons.
3.3.1 TRIM
Digital Trim, available only to the ANALOG bank, is
used to adjust the input level just after the ADC, and
channel meter, and before the channel DSP. This allows
setting the analog gain for the optimal A/D conversion
while still having an adjustable input level to the chan-
nel DSP. This also provides a method to lower the level
of all channel outputs and sends at once: Digital Trim is
before the Aux and Group sends in the signal flow.
The Digital Trim provides ±15 dB of attenuation or
gain, adjustable in 0.1 dB increments and is indicated by
a single, lit LED. When the Digital Trim is set to unity,
the top LED (12:00 position) and the bottom V-Pot LED
illuminate.
3.3.2 PAN
Pan position is indicated by a single, lit LED. When
the pan is exactly centered, the top LED (12:00 posi-
tion) and the bottom V-Pot LED illuminate.
LR or LCR panning is available on the ANALOG, DIGI-
TAL, and RETURNS banks and the eight groups (mode
dependent) of the MASTER bank.
3.3.3 HPF
The high-pass filter can remove unwanted
low frequencies from an input channel. The
filter cutoff frequency range is 20–400 Hz; the
default frequency is 80 Hz. The HPF has a
fixed slope of 18 dB/octave. The approximate
frequency is indicated by a single lit V-Pot
LED (frequency increases clockwise). Push
the V-Pot to toggle the HPF on/off; the bottom
red LED lights when the HPF is on. Press
the SELECT button on an individual chan-
nel, then press the EQ Quick-Mix button to
see the HPF frequency range as you turn the
V-Pot.
3.3.4 METERS
The V-Pot LEDs serve as a meter (indicat-
ing left to right) for the channel’s signal level.
The bottom, red LED illuminates to indicate
digital clipping (0 dBFS).
Push the V-Pot knob to toggle the meter
to show compressor reduction: the LEDs
now illuminate counterclockwise (the knob
controls the compressor threshold setting).
The bottom, red LED lights continuously to
indicate the compressor reduction mode of
the meter. This can be activated individually
Figure 3-4 V-Pot Control Area
V-P
OT
CO
NTR
OL
A
UX
S
END
S
FX
1
FX
2
FX4
FX
3
PAN
HPF
A
UX
M
O
D
E
2
4
6
8
1
0
12
TRIM
METER
S
A
UX
PAN
1
3
5
7
9
11

15
Owner’s Manual
Owner’s Manual
per channel. Press and hold the METERS button in
the V-POT CONTROL area for two seconds to toggle the
meter modes for all channels between channel level and
compressor gain reduction.
3.3.5 AUX SENDS 1–12
The Aux send level for the channel is indicated by
multiple, lit LEDs. The level is variable from -∞ to +10
dB in logarithmically scaled steps. LEDs light from left
to right as the Aux send level increases. The maximum
Aux send level is indicated by all the V-Pot LEDs lit.
When the Aux send is set to unity (approximately 3:00),
the bottom V-Pot LED illuminates.
Rotate the V-Pot to control the selected send level for
that channel. Push the V-Pot to toggle the send pre-
/post-fader.
Press and hold consecutive Aux buttons in the V-Pot
Control area to link them for stereo operation. For ex-
ample, press and hold Aux 1 and 2, and the Touchscreen
displays “Link Aux Sends Aux 1 and Aux 2?” Touch OK to
complete the operation. Aux levels are copied from odd
to even Auxes when linking Aux sends. After linking,
adjusting one aux also adjusts the other. Pressing either
AUX SENDS button of a linked pair controls the stereo
level from the V-Pots and both AUX SENDS buttons
light. All Aux send DSP is also linked.
3.3.6 AUX PAN
Aux pan is indicated for stereo-linked Aux sends by a
single LED lit to illustrate the pan position. When the
Aux pan is set to center, the top (12:00 position) and
bottom V-Pot LEDs light.
Rotate the V-Pot to control the panning of stereo
linked Aux sends. AUX PAN does not intercancel
with the other V-Pot control knobs. When AUX PAN is
selected, the panning function corresponds with the
selected stereo Aux Sends. The pan for linked Aux sends
varies inversely: setting one to 9:00 automatically sets
the other to 3:00. If a mono Aux send is selected along
with AUX PAN, then no stereo position is displayed
on the V-Pot LEDs. Press AUX PAN again to return to
normal Aux send level operation.
3.3.7 AUX MODE
AUX MODE, the only blue button on the console,
effectively turns the TT24 into a powerful, dedicated
monitor mixer by using the 24 channel faders as chan-
nel Aux sends and the four Group faders as Aux masters.
Select an AUX SENDS button (it flashes) and each
channel fader is then used to control that channel’s Aux
send level.
In AUX MODE, the Group faders represent Aux Send
masters 1–12 in three banks:
Group
Fader 1
Group
Fader 2
Group
Fader 3
Group
Fader 4
AUX SENDS 1–4 1 2 3 4
AUX SENDS 5–8 5 6 7 8
AUX SENDS 9–12 9 10 11 12
Table 3-1 Group Faders control Aux Master Sends in
AUX MODE
For example, if AUX SENDS 3 is selected, it flashes
while AUX SENDS 1, 2, and 4 are lit solid to show their
masters are assigned to the Group faders. For linked Aux
sends, both AUX SENDS buttons flash when either button
is pressed while the other two in that bank are lit solid.
The TRIM, METERS, HPF, PAN, and AUX PAN but-
tons operate normally and still change the function of
the V-Pots.
GROUP ASSIGN buttons do not light in banks of four
in AUX MODE. However, pressing and holding a GROUP
ASSIGN button still allows Group assignment.
NOTE: See Group and Master Controls on page 19 for information
on the normal operation of the Group faders.
3.4 QuickMix Area
The QuickMix area (Figure 3-5) consists of the Touch-
screen, 12 push-button rotary encoders and eight buttons. It
also includes Snapshot control buttons, RUDE SOLO LED,
L/R and C/MONO meters, and the Engineer’s Utilities area.
It is important to note:
• The only adjustable controls on the Touchscreen
are buttons that toggle a value on/off and drop
down menus that allow a selection. All knobs rep-
resented on the Touchscreen are controlled by cor-
responding QuickMix knobs. If any of the 12 knobs
are missing from the Touchscreen, the correspond-
ing Quick-Mix knob has no function.
• Any Touchscreen knob colored white instead of
black denotes a dual function available by pushing
the corresponding QuickMix knob. The function
varies with the control.
The QuickMix buttons on the left are: FAT, EQ, DYN,
and GRP/AUX.
The QuickMix buttons on the right are: AUX MSTR,
SNAP, EFX, and MATRIX.
Each QuickMix button displays a Touchscreen for the
selected channel. If the selected channel does not contain
the selected function (i.e., Digital Inputs have no EQ), the
Touchscreen displays “This Channel Does Not Contain XX”
until another Touchscreen is accessed. The Touchscreens
are discussed in Chapter 6: Touchscreen and TT Control.
3.4.1 FAT

16
TT24 DIGITAL LIVE CONSOLE
Press the FAT button to display the selected channel’s
OVERVIEW Touchscreen with all channel settings and
meters. Although not all parameters can be adjusted
from the OVERVIEW screen, touching a non-adjustable
parameter opens its dedicated screen (i.e., touch the
EQ graph to open the EQ Touchscreen).
The specific information displayed and adjusted from
the OVERVIEW screen depends on the selected channel
type: Analog, Digital, Line, Effect Return, Group, Master,
and Aux (see Overview Touchscreens on page 35).
3.4.2 EQ
Press the EQ button to display the selected channel’s
EQ Touchscreen. Depending on the channel type, it will
be either:
• 4-BAND EQ: Four parametric EQ filters for Input
Channels and Group Masters.
See Four-Band Equalizer on page 38 for more infor-
mation.
• 6-BAND EQ: Two parametric EQ filters, high- and
low-shelf filters, and two narrow-band kill filters for
Aux Masters and Main Outputs (L/R and C/Mono).
See Six-Band Equalizer on page 39 for more infor-
mation.
• 31-BAND EQ: Three 31-band graphic EQ filter for
the Main Outputs (L/R and C/Mono).
See 31-Band Equalizer on page 39 for more infor-
mation.
3.4.3 DYN
Press the DYN button
to display the selected
channel’s DYNAMICS
(Analog channel) or
COMPRESSOR (Aux Send
Masters, Groups, and
Main Outputs) Touch-
screens. The DYNAM-
ICS Touchscreen has
the Gate/Expander and
Compressor settings and
their associated meters.
Touch the Gate or Dynam-
ics graphs to open their
dedicated Touchscreens
(although most parame-
ters can be accessed from
the DYNAMICS Touch-
screen).
See Dynamics on page
40 for complete details.
3.4.4 GRP/AUX
Press the GRP/AUX button to display the GRPS/AUX-
ES Touchscreen. Touch a GROUPS assignment button to
assign the selected channel to that Group. The Quick-
Mix knobs adjust the selected channel’s level to the 12
Aux Sends. Push a QuickMix knob to toggle that Aux
Send pre- or post-fader.
See Groups/Auxes on page 44 for more information.
3.4.5 AUX MSTR
Press the AUX MSTR button to display the AUX
MASTER Touchscreen. The 12 Aux Master Sends can be
adjusted using the QuickMix knobs. The selected Aux
Master is listed in the top left of the screen. Change
the selected Aux Master by pressing the desired Aux’s
QuickMix knob.
The top-half of the AUX MASTER Touchscreen
displays the overview information for the selected Aux
Master: metering, compression and EQ curves. Touch
the EQ or Compression displays to open their associ-
ated Touchscreens (or press the EQ or DYN QuickMix
buttons).
Each Aux Send Master also has an OVERVIEW Touch-
screen that can be displayed by selecting an Aux Master
and pressing the FAT button (see page 37).
See Aux Master on page 43 for more information.
Figure 3-5 QuickMix Section
DYN
EQ
GRP
/
A
UX
FAT
S
ET
UP
C
TR
L
CO
P
Y
HELP
U
TI
L
PA
S
T
E
S
T
O
R
E
RE
C
AL
L
EFX
S
NA
P
A
UX
M
S
T
R
MATRIX
S
NAP
S
H
O
T
S
QuickMix
section Snapshot
section
Engineer's Utility
Area

17
Owner’s Manual
Owner’s Manual
3.4.6 SNAP
Press the SNAP button to display and edit the settings
on the SNAPSHOTS TT control software screen. See
Snapshots on page 42 for a complete discussion.
See Snapshots on page 18 to learn about the console’s
Snapshot controls.
3.4.7 EFX
Press the EFX button to display effects settings on
the EFX Touchscreen. There are four internal EFX
processors.
See Effects on page 45 for more information about the
EFX Touchscreen.
Also see Internal Effects Processors on page 27 and
Tabular Summary of DSP and Effects on page 28.
3.4.8 MATRIX
Press the MATRIX button to display the MATRIX
Touchscreen. See Matrix Mix on page 44 and Matrix
Output on page 27 for more information.
3.4.9 Engineer’s Utility
The Engineer’s Utilities area consists of the clipboard
buttons (COPY and PASTE) and four green backlit but-
tons: HELP, SETUP, UTIL, and CTRL.
HELP
The HELP button displays the current firmware ver-
sion in the TT24 mixing console.
SETUP
Press the SETUP button to open the SETUP Touch-
screen, which accesses global console parameters from
the following categories: Operation, General, Digital,
and MIDI. See page 45 for details.
UTIL
Press the UTIL button to open the UTIL Touchscreen,
which accesses useful console configuration functions:
Monitor Source, Stereo Input Assign, Talkback, Meter-
ing, Test Tones, and User Bank. See page 49 for details.
CTRL
Pressing and holding the CTRL button while access-
ing some console controls provides alternate functions:
• Default Values: Press and hold the CTRL button
and touch any console parameter to restore its
default value.
For example, press and hold CTRL and turn a Pan
V-Pot to return it to its center position or turn an
EQ Gain knob to return the setting to 0.
• Multiple Solo: Press and hold the CTRL button
to select multiple SOLO buttons. This works even
when EXCLUSIVE SOLO mode is active in the
GENERAL SETUP Touchscreen (see page 46).
• Special TT Control Screens: CTRL+METERS,
CTRL+BANK (ANLG, DGTL, RTNS, or MSTR),
CTRL+MATRIX
COPY
Press the COPY button to copy the selected channel’s
parameters to the clipboard (can only contain one
channel’s parameters).
PASTE
Press the PASTE button to paste the clipboard con-
tents onto the selected channel(s). The PASTE button
has no effect until a channel is copied to the clipboard.
The parameters copied and pasted can be restricted
depending on the current Touchscreen:
• 4-and 6-BAND EQ Touchscreens: only EQ param-
eters
• COMPRESSOR Touchscreen: only compressor pa-
rameters
• GATE/EXP Touchscreen: only gate/expander param-
eters
• DYNAMICS Touchscreen: both compressor and
gate/expander parameters
• GRPS/AUXES Touchscreen: only Group and Aux
assignments
• FAT OVERVIEW Touchscreen: all parameters
3.4.10 Main Meters and RUDE SOLO LED
The main meters display
the Left, Right, and Center/
Mono outputs, depending on
the console configuration.
The meters receive the same
signal as the Main outputs.
The first red Clip LED at the
top of the meter lights when
the signal reaches -2 dBFS.
If any channel is soloed,
the RUDE SOLO LED flashes
red. The L and R meters now
display the stereo solo signal
instead of the main output.
If the solo signal is mono, it
appears on both the L and R
meters.
The CTR/MONO meter
does not display anything
2
L
R
CTR
/
MON
O
R
U
D
E
SO
L
O
S
NAP
S
H
O
T
S
4
7
1
0
1
5
2
0
2
5
30
35
4
0
50
OL
Figure 3-6 Main Meters
and RUDE SOLO

18
TT24 DIGITAL LIVE CONSOLE
when viewing solo levels. This, along with the RUDE
SOLO LED, indicates that the meter is displaying a
soloed signal.
When all solos are cleared either individually or by
pressing the global CLEAR SOLO button, the RUDE
SOLO LED stops flashing and the three meters return to
their normal operation.
3.5 UTILITY Area
At the top of the console, the UTILITY area contains
TALKBACK, MONITOR, and PHONES controls.
Figure 3-7 UTILITY area
OL
S
I
G
U
O
F
F
MAX
M
O
NIT
O
R
U
O
F
F
MAX
PH
O
NE
S
TALKBA
CK
U
+
60dB
2
0
30
4
0
U
TILIT
Y
3.5.1 TALKBACK
The TALKBACK gain knob controls the input gain
of the rear panel TALKBACK microphone input. The
gain range is 0–60 dB. A green SIG (signal) LED and a
red OL (overload) LED behave identically to those on
the channel strips (see page 12). The talkback signal
is routed via the TALKBACK Touchscreen, accessed by
pressing UTIL and then touching the TALK-
BACK button. The Talkback signal can be
routed to any Matrix or Aux bus.
3.5.2 MONITOR
The MONITOR gain knob controls the level of
the Left, Right, and Mono monitor outputs. The
gain range is from off to +10 dB. These out-
puts contain the left, right, and monitor signal
selected in the MON. SOURCE Touchscreen, ac-
cessed by pressing UTIL and then touching the
MONITOR SOURCE button. When a solo button
is pressed, the solo signal is sent to the monitor
outputs instead.
3.5.3 PHONES
The PHONES gain knob controls the head-
phone output level, a stereo output identical to
the Monitor L/R outputs. The PHONES level is
independent of the MONITOR gain control.
3.6 Snapshots
The TT24 includes a robust snapshot feature that cap-
tures and restores the state of the console. The console
snapshot controls are in the top-right of the console
beside the QuickMix buttons (Figure 3-5). These fast
and intuitive surface controls can store/recall up to 99
snapshots. See “Appendix B: Snapshot Parameters Saved”
for a list of all the TT24 parameters saved in a snapshot.
More elaborate snapshot functionality is available on
the SNAPSHOTS Touchscreen (i.e., channel and param-
eter filtering; see page 42). This section discusses only
the console’s surface controls.
The SNAPSHOTS LCD displays the selected snapshot
(bottom-right in Figure 3-6). Use the up/down arrow
buttons to scroll through existing snapshots. The current
snapshot’s number is displayed in the SNAPSHOTS LCD
field next to the Touchscreen. The snapshot number
blinks in the SNAPSHOTS display before being recalled.
Press and hold the snapshot up or down arrows to
step through three numbers and then begin increasing
or decreasing in increments of fives to allow for faster
access to a desired snapshot.
Press RECALL to recall the blinking snapshot number
displayed in the LCD. When the RECALL button is
pressed, the snapshot parameters are loaded into the
TT24 and the LCD lights continuously. Press STORE
to save the state of the console to the current snapshot
(the last snapshot recalled).
Figure 3-8 Bank Select,
Group, Aux and Master
sections
GROUP ASSIGN
/
SELEC
T
MA
S
TE
R
M
U
T
E
1
5
S
ELE
CT
SO
L
O
M
U
T
E
2
6
S
ELE
CT
SO
L
O
M
U
T
E
3
7
S
ELE
CT
SO
L
O
M
U
T
E
4
8
S
ELE
CT
SO
L
O
CTR
/
M
O
N
O
L
/
R
S
ELE
CT
Group Assign/Select buttons
Master Center/Mono Assign button
Master Left/Right Assign button
Master Select button
Group Select buttons
Grou
p
Fader
s
p
Group Mute buttons
M
as
t
e
r F
ader
Group Solo buttons

19
Owner’s Manual
Owner’s Manual
3.7 Group and Master Controls
The TT24 has four Group strips and one Master strip
(Figure 3-8). Each Group has a V-Pot to control group
pan and the Group Mode, MUTE, SELECT, SOLO but-
tons, and a fader. The four Group strips control either
Groups 1–4 or 5–8. The currently selected Group bank is
indicated by the lit GROUP ASSIGN/SELECT buttons.
3.7.1 Changing the Group Bank
Press any of the GROUP ASSIGN/SELECT buttons to
select that Group bank. The GROUP ASSIGN/SELECT
buttons illuminate 1–4 or 5–8 and cause the faders and
buttons to snap to their previous Group bank settings.
3.7.2 Group Assignment
Press and hold a GROUP ASSIGN/SELECT button
and press the channel SELECT buttons to add/subtract
channels from that Group. This method is used for all of
the GROUP ASSIGN/SELECT buttons: Groups 1–8, L/R
and CTR/Mono.
The SELECT button for channels assigned to a
group light when a GROUP ASSIGN/SELECT button
is held down.
A selected channel can also be assigned to groups by
selecting GRP/AUX in the QuickMix area to view the
Group/Aux parameters on the Touchscreen.
3.7.3 Group Parameter Control
Press a GROUP SELECT button to access that
Group’s settings and controls from the QuickMix section
just like an input channel.
3.7.4 Mute Groups
Eight dedicated mute groups are available for applica-
tions where muting groups of input channels quickly
with a single button is required. All channels from the
ANLG, DGTL, and RTNS bank can be included in a mute
group. Outputs are not available for mute groups.
The Mute groups on the TT24 use the group assign
area of the mixer’s control surface to assign channels to a
mute group as well as to activate/deactivate mute groups.
To assign input channels to a Mute Group:
Press and hold the CTRL button in the QuickMix area
and also press any one of the GROUP ASSIGN 1-8
buttons. When this is done, the Group Assign button il-
luminates and the Group Mute button blinks, indicating
the TT24 is in Mute Group Assign mode. Simply press
the channel mute button for any input to be included
in the Mute Group. You can press other Group Assign
buttons to configure any of the eight mute groups when
in this assign mode. Pressing the blinking Mute Group
MUTE button or lit Group Assign button will exit the
assignment mode.
To activate/deactivate Mute Groups:
Press the Group Mute button while holding the Group
Assign button to activate and deactivate mute groups.
All channel mutes will light when a mute group is suc-
cessfully activated.
Note: TT24 Mute Groups are unlike those on an
analog console in that they are destructive. When a
Mute Group is engaged, you can unmute an individual
channel with the channel mute button. This allows for
easier muting of groups and individual channels.
3.8 Solo Area
The Solo area (Figure 3-9) has two buttons: CLEAR
SOLO and PFL.
Figure 3-9 Solo area
V-P
OT
CO
NTR
OL
PFL
PAN
HPF
C
LEA
R
SO
L
O
TRIM
METER
S
Clear Solo PFL
3.8.1 CLEAR SOLO
Press this momentary button to clear any soloed chan-
nels. It lights yellow when any solo buttons are active as
does the RUDE SOLO LED (Figure 3-5).
3.8.2 PFL
Activate this yellow backlit button so all soloed chan-
nels are PFL (pre-fader listen). Solo selections are AFL
(after-fader listen) when the button is not lit.

20
TT24 DIGITAL LIVE CONSOLE
Figure 4-1 Analog I/O
CD
/
TAPE
A
TALKBA
CK
OUT
IN
LINE
IN
S
ER
T
LINE
IN
S
ER
T
LINE
IN
S
ER
T
LINE
I
N
S
ER
T
LINE
IN
S
ER
T
LINE
IN
S
ER
T
LINE
IN
S
ER
T
LINE
I
N
S
ERT
LINE
IN
S
ER
T
LINE
IN
S
ER
T
LINE
IN
S
ER
T
LINE
IN
S
ERT
LINE
IN
S
ER
T
LINE
IN
S
ER
T
LINE
IN
S
ER
T
1
2
3
4
5
6
7
8
9
1
0
11
12
1
3
14
15
CTR/MONO
RI
G
H
T
LEFT
M
O
NIT
O
R
MAIN
S
OUT
LINE INP
U
T
S
A
U
X
S
END
S
1
2
3
4
5
6
7
8
9
1
0
11
12
L
R
C
24 Mic, Line
and Insert
Analog
Inputs
12 Aux
Sends
8 Analog Line Inputs
Monitor
Outputs
CD/Tape B
Inputs
CD/Tape A
Inputs/Outputs
Talkback
Input
Main Outputs
R
M
L
1
2
3
4
5
6
7
8
R
L
Ch 4: Rear Panel Connectors
4.1.2 LINE Inputs 1–24
These 1/4-in TRS connectors accept a balanced or un-
balanced line level input signal from almost any source.
The LINE button on the console surface should be in
the down position when using these connectors. The
LINE inputs appear on the ANALOG bank.
A balanced line level signal must be wired as follows:
• Tip = Positive (+ or hot)
• Ring = Negative (-or cold)
• Sleeve = Shield or ground
An unbalanced signal must be wired as follows:
• Tip = Positive (+ or hot)
• Sleeve = Shield or ground
4.1.3 INSERTS 1–24
These 1/4-in TRS connectors provide each channel
an analog send and return point. Use the INSERT jacks
to connect external serial effects devices (i.e., com-
pressors, equalizers) to an individual channel. These
connectors can also be used as post gain control, unbal-
anced channel direct outputs.
The INSERT points are after the GAIN control, and
just before the ADC. The send (tip) is low-impedance
and the return (ring) is high-impedance, allowing con-
nection to virtually any device.
Cables for this type of insert send/return function
must be wired as follows:
• Tip = Send (output to effects device)
• Ring = Return (input from effects device)
• Sleeve = Common ground (connect shield to all
three sleeves)
4.1 Analog I/O
Figure 4-1 shows the rear panel analog I/O connectors
except for the Group/Matrix outputs, which are shown
in Figure 4-3.
4.1.1 MIC Inputs 1–24
The TT24 microphone preamp was based on our
extensive knowledge and experience with those used in
the Digital 8•Bus, VLZ Pro, and Onyx Series mixers, but
optimized for a digital mixer.
These female XLR connectors accept a balanced
microphone input from almost any type of microphone.
The LINE button on the channel strip should be in the
up position when using these connectors. The MIC in-
puts appear on the ANALOG fader bank. Phantom power
(48 VDC) can be switched on for condenser mics setting
the 48V button to the down position.
The XLR inputs are wired according to the AES stan-
dard:
• Pin 1 = Shield or ground
• Pin 2 = Positive (+ or hot)
• Pin 3 = Negative (- or cold)
Other manuals for TT24
7
Table of contents
Other Mackie Music Mixer manuals

Mackie
Mackie 1620 Manual

Mackie
Mackie PPM1012 User manual

Mackie
Mackie 1604-VLS PRO User manual

Mackie
Mackie SR40.8 User manual

Mackie
Mackie CFX12.mkII Technical document

Mackie
Mackie DC16 User manual

Mackie
Mackie ONYX-820i User manual

Mackie
Mackie 1402-VLZ PRO User manual

Mackie
Mackie CFX 12 Technical document

Mackie
Mackie DL806 User manual

Mackie
Mackie 802VLZ4 User manual

Mackie
Mackie PPM1012 User manual

Mackie
Mackie Onyx 2480 Manual

Mackie
Mackie VLZ4 User manual

Mackie
Mackie 1402-VLZ3 User manual

Mackie
Mackie SR24-4-VLZ PRO Setup guide

Mackie
Mackie ProDX Series Manual

Mackie
Mackie DL806 User manual

Mackie
Mackie ONYX 1640I User guide

Mackie
Mackie Onyx 820i User manual