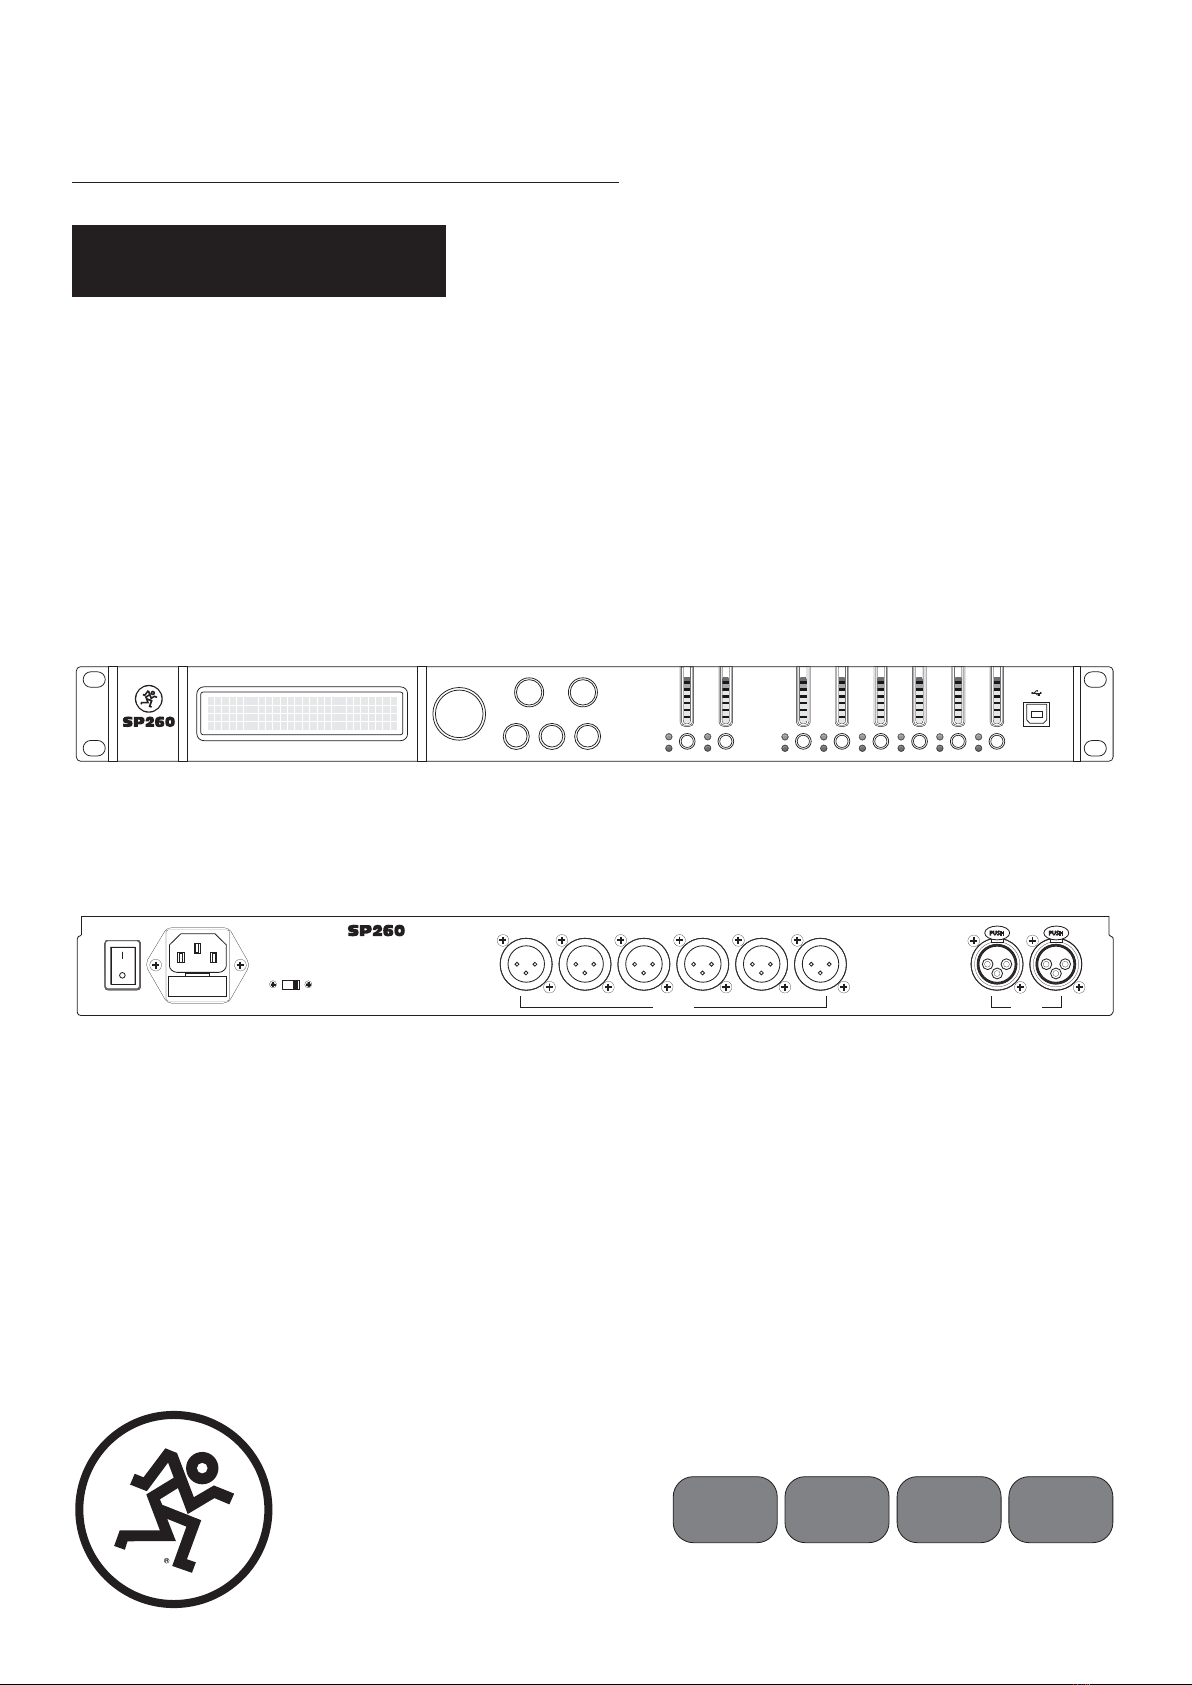
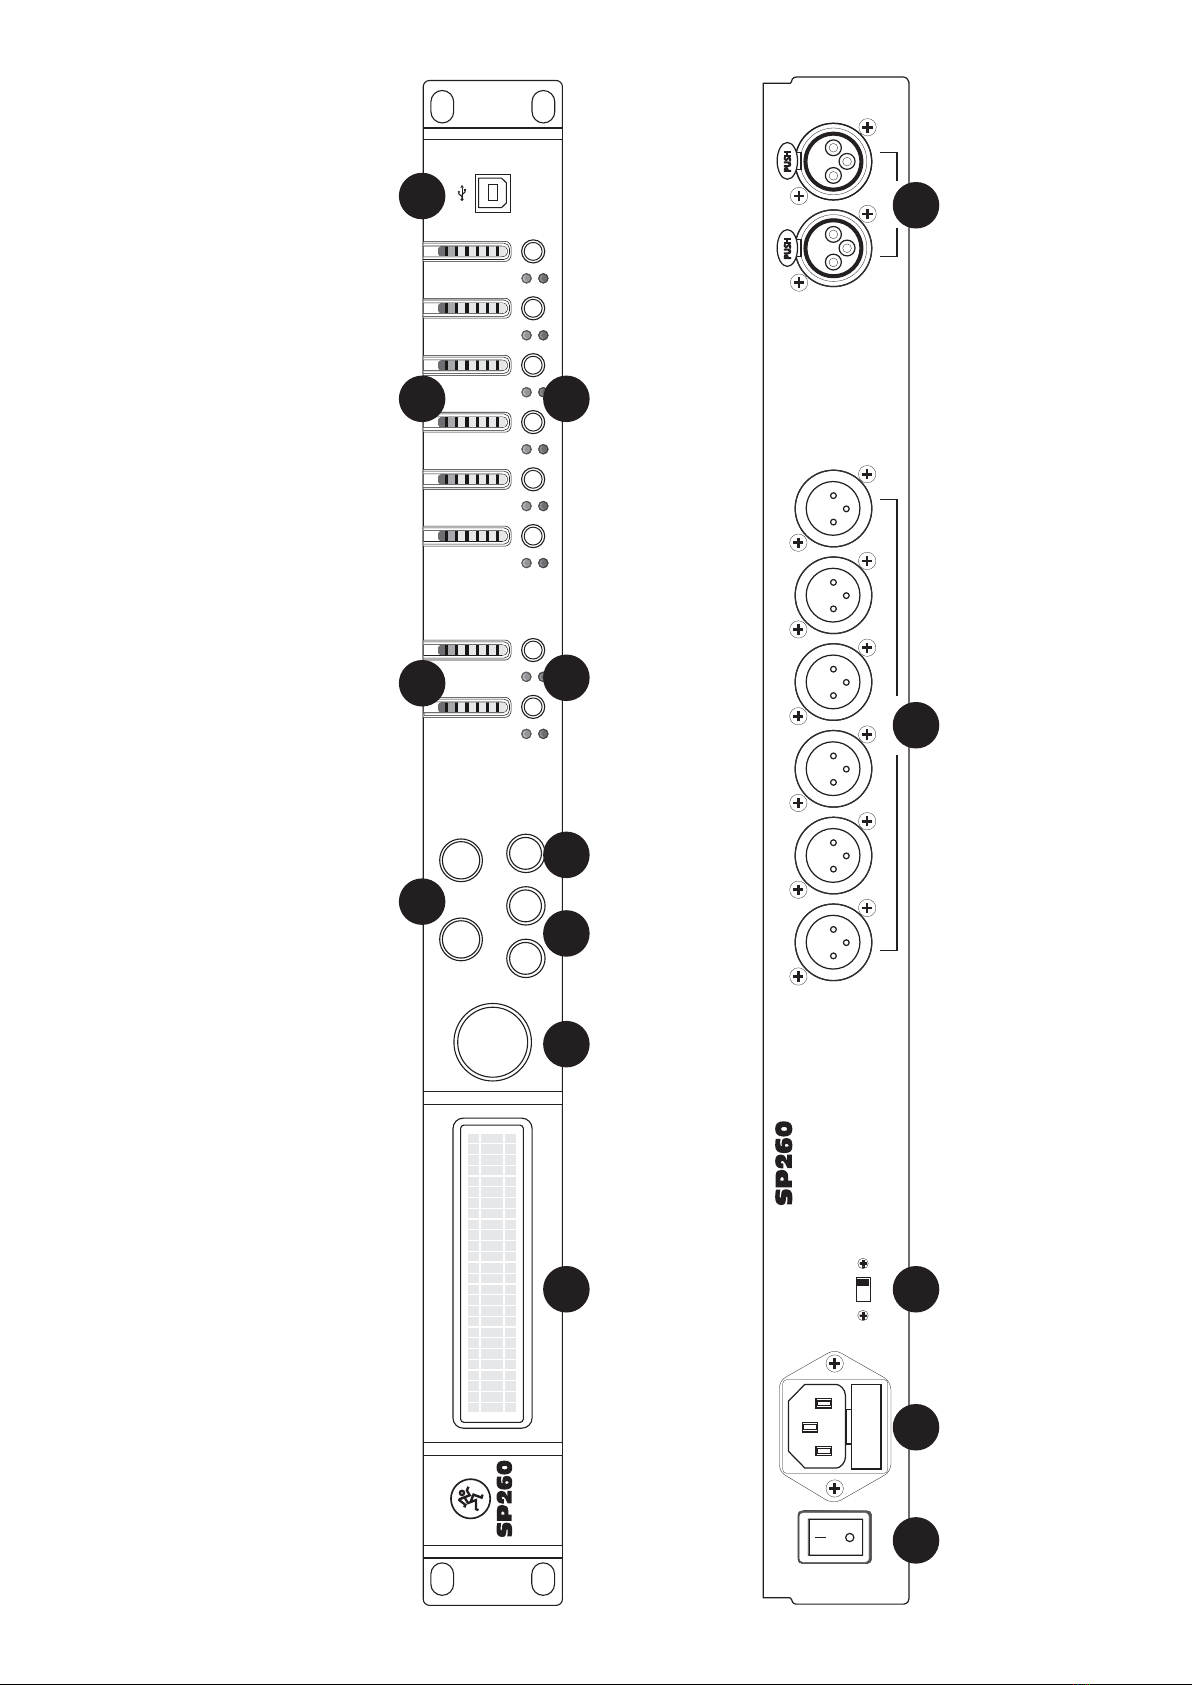
Mackie SP260 User manual

QUICK START GUIDE
2x6 Loudspeaker System Processor
SP260
EN ES FR DE
NAV/EDIT1
ENTER ESC
CLIP
+15
+9
+3
0
-10
-20
LIMIT
CLIP
+15
+9
+3
0
-15
USB
EDIT
MUTE
UTILITY
A
CLIP
+15
+9
+3
0
-10
-20
EDIT
MUTE B 1
EDIT
MUTE
LIMIT
CLIP
+15
+9
+3
0
-15
2
EDIT
MUTE
LIMIT
CLIP
+15
+9
+3
0
-15
3
EDIT
MUTE
LIMIT
CLIP
+15
+9
+3
0
-15
4
EDIT
MUTE
LIMIT
CLIP
+15
+9
+3
0
-15
5
EDIT
MUTE
LIMIT
CLIP
+15
+9
+3
0
-15
6
EDIT
MUTE
2x6 SPEAKER
PROCESSOR
EDIT2EDIT 3
PUSHPUSH
ON
OUTPUTS
MAIN
GNDLIFT
ATTENTION: RISK OF ELECTRIC SHOCK
DO NOT OPEN THE COVER
100-240 VAC
40W 50/60 Hz
FUSE: T 800mAL 250V
AB123456
INPUTS

SP260 2x6 Loudspeaker System Processor
2
SP260 2x6 Loudspeaker System Processor
1. Read these instructions.
2. Keep these instructions.
3. Heed all warnings.
4. Follow all instructions.
5. Do not use this apparatus near water.
6. Clean only with a dry cloth.
7. Do not block any ventilation openings. Install in accordance
with the manufacturer’s instructions.
8. Do not install near any heat sources such as radiators, heat registers, stoves,
or other apparatus (including amplifiers) that produce heat.
9. Do not defeat the safety purpose of the polarized or grounding-type plug.
A polarized plug has two blades with one wider than the other. A grounding-type
plug has two blades and a third grounding prong. The wide blade or the third prong
are provided for your safety. If the provided plug does not fit into your outlet,
consult an electrician for replacement of the obsolete outlet.
10.Protect the power cord from being walked on or pinched particularly at plugs,
convenience receptacles, and the point where they exit from the apparatus.
11.Only use attachments/accessories specified by the manufacturer.
12.Use only with a cart, stand, tripod, bracket, or table specified
by the manufacturer, or sold with the apparatus. When a
cart is used, use caution when moving the cart/apparatus
combination to avoid injury from tip-over.
13.Unplug this apparatus during lightning storms or when
unused for long periods of time.
14.Refer all servicing to qualified service personnel. Servicing is
required when the apparatus has been damaged in any way, such as power-supply
cord or plug is damaged, liquid has been spilled or objects have fallen into the
apparatus, the apparatus has been exposed to rain or moisture, does not operate
normally, or has been dropped.
15.This apparatus shall not be exposed to dripping or splashing, and no object filled
with liquids, such as vases or beer glasses, shall be placed on the apparatus.
16.Do not overload wall outlets and extension cords as this can result in a risk of fire
or electric shock.
17.This apparatus has been designed with Class-I construction and must be
connected to a mains socket outlet with a protective earthing connection
(the third grounding prong).
18.This apparatus has been equipped with a rocker-style AC mains power switch. This
switch is located on the rear panel and should remain readily accessible to the user.
19. The MAINS plug or an appliance coupler is used as the disconnect device,
so the disconnect device shall remain readily operable.
PORTABLE CART
WARNING
CAUTION
The lightning flash with arrowhead symbol within
an equilateral triangle is intended to alert the user
to the prescence of uninsulated “dangerous voltage”
within the product’s enclosure, that may be of significant
magnitude to constitute a risk of electric shock to persons.
RISK OF ELECTRIC SHOCK! DO NOT OPEN!
CAUTION: TO REDUCE THE RISK OF ELECTRIC SHOCK DO NOT
REMOVE COVER (OR BACK). NO USER-SERVICEABLE PARTS INSIDE.
REFER SERVICING TO QUALIFIED PERSONNEL.
The exclamation point within an equilateral triangle is
intended to alert the user of the prescence of important
operating and maintaining (servicing) instructions in the
literature accompanying the appliance.
WARNING — To reduce the risk of fire or electric
shock, do not expose this apparatus to rain or moisture.
20. NOTE: This equipment has been tested and found to comply with the limits
for a Class B digital device, pursuant to part 15 of the FCC Rules. These limits
are designed to provide reasonable protection against harmful interference
in a residential installation. This equipment generates, uses, and can radiate
radio frequency energy and, if not installed and used in accordance with the
instructions, may cause harmful interference to radio communications. However,
there is no guarantee that interference will not occur in a particular installation.
If this equipment does cause harmful interference to radio or television reception,
which can be determined by turning the equipment off and on, the user is
encouraged to try to correct the interference by one or more of the following
measures:
• Reorientorrelocatethereceivingantenna.
• Increasetheseparationbetweentheequipmentandthereceiver.
• Connecttheequipmentintoanoutletonacircuitdifferentfromthatto
which the receiver is connected.
• Consultthedealeroranexperiencedradio/TVtechnicianforhelp.
CAUTION: Changes or modifications to this device not expressly approved by
LOUD Technologies Inc. could void the user's authority to operate the equipment
under FCC rules.
21.This apparatus does not exceed the Class A/Class B (whichever is applicable)
limits for radio noise emissions from digital apparatus as set out in the radio
interference regulations of the Canadian Department of Communications.
ATTENTION — Le présent appareil numérique n’émet pas de bruits radioélectriques
dépassant las limites applicables aux appareils numériques de class A/de class B
(selon le cas) prescrites dans le réglement sur le brouillage radioélectrique édicté
par les ministere des communications du Canada.
22.Exposure to extremely high noise levels may cause permanent hearing loss.
Individuals vary considerably in susceptibility to noise-induced hearing loss, but
nearly everyone will lose some hearing if exposed to sufficiently intense noise
for a period of time. The U.S. Government’s Occupational Safety and Health
Administration (OSHA) has specified the permissible noise level exposures shown
in the following chart.
According to OSHA, any exposure in excess of these permissible limits could result
in some hearing loss. To ensure against potentially dangerous exposure to high
sound pressure levels, it is recommended that all persons exposed to equipment
capable of producing high sound pressure levels use hearing protectors while the
equipment is in operation. Ear plugs or protectors in the ear canals or over the
ears must be worn when operating the equipment in order to prevent permanent
hearing loss if exposure is in excess of the limits set forth here:
Laite on liitettävä suojakoskettimilla varustettuun pistorasiaan.
Apparatet må tilkoples jordet stikkontakt.
Apparaten skall anslutas till jordat uttag.
Correct disposal of this product: This symbol indicates that this product should not be disposed of with your household
waste, according to the WEEE directive (2012/19/EU) and your national law. This product should be handed over to
an authorized collection site for recycling waste electrical and electronic equipment (EEE). Improper handling of this type
of waste could have a possible negative impact on the environment and human health due to potentially hazardous substances
that are generally associated with EEE. At the same time, your cooperation in the correct disposal of this product will
contribute to the effective usage of natural resources. For more information about where you can drop off your waste
equipment for recycling, please contact your local city office, waste authority, or your household waste disposal service.
Duration,
per day in
hours
Sound Level dBA,
Slow Response Typical Example
8 90 Duo in small club
6 92
4 95 Subway Train
3 97
2 100 Veryloudclassicalmusic
1.5 102
1 105 Greg screaming at Troy about deadlines
0.5 110
0.25 or less 115 Loudest parts at a rock concert
Important Safety Instructions – EN
ES FR DE

Quick Start Guide
3
Quick Start Guide
1. Lea estas instrucciones.
2. Conserve estas instrucciones.
3. Preste atención a todos los avisos.
4. Siga todo lo indicado en las instrucciones.
5. No utilice este aparato cerca de agua.
6. Limpie este aparato solo con un trapo seco.
7. No bloquee ninguna de las aberturas de ventilación.
Instale este aparato deacuerdo con las instrucciones del fabricante.
8. No instale este aparato cerca de fuente de calor como radiadores, calentadores,
hornos o cualquier otro aparato (incluyendo amplificadores) que produzcan calor.
9. No anule el sistema de seguridad que supone un enchufe de corriente polarizado
o con toma de tierra. Un enchufe polarizado tiene dos bornes de distinta anchura.
Uno con toma de tierra tiene dos bornes iguales y una lámina para la conexión a
tierra. El borne ancho del primer tipo de enchufe y la lámina del otro se incluyen
para su seguridad. Si el enchufe que se incluye con la unidad no encaja en su salida
de corriente, haga que un electricista cambie su salida anticuada.
10.Coloque el cable de corriente de forma que no pueda quedar aplastado
o retorcido, especialmente allí donde estén los conectores, receptáculos
y en el punto en que el cable sale del aparato.
11.Utilice solo accesorios/complementos que hayan sido especificados
por el fabricante.
12.Utilice este aparato solo con un bastidor, soporte, trípode
o superficie especificado por el fabricante o que se venda con
el propio aparato. Cuando utilice un bastidor con ruedas, tenga
cuidado al mover la combinación bastidor/aparato
para evitar posibles daños en caso de que vuelquen.
13.Desconecte de la corriente este aparato durante las
tormentas eléctricas o cuando no lo vaya a usar durante
un periodo de tiempo largo.
14.Consulte cualquier posible avería al servicio técnico oficial. Este aparato deberá ser
revisado cuando se haya dañado de alguna forma, como por ejemplo si el cable
de corriente o el enchufe se ha roto, si se ha derramado cualquier líquido o se ha
introducido un objeto dentro de la unidad, si el aparato ha quedado expuesto a la
lluvia o la humedad, si no funciona normalmente o si se ha caído al suelo.
15.No permita que este aparato quede expuesto a salpicaduras de ningún tipo. No
coloque objetos que contengan líquidos, como jarrones, encima de este aparato.
16.No sobrecargue las salidas de corriente o regletas dado que esto puede dar
lugar a un riesgo de incendio o descarga eléctrica.
17.Este aparato ha sido diseñado como una unidad de clase 1 y debe
ser conectado a una salida de corriente con toma de tierra de seguridad
(el tercer borne o lámina exterior).
18.Este aparato está equipado con un interruptor de encendido de dos posiciones. Este
interruptor se encuentra en el panel trasero y debe colocar el aparato de forma que
siempre pueda acceder a él.
19. El enchufe de alimentación o adaptador sirve como dispositivo de desconexión, por
lo que colóquelo de forma que siempre pueda acceder a él fácilmente.
CARRETILLA PORTÁTIL
ADVERTENCIA
El símbolo de relámpago con punta de flecha dentro
de un triángulo equilátero tiene como fin alertar al usuario
de la presencia de “voltaje peligroso” no aislado dentro
del producto, lo cual puede ser de magnitud suficiente como
para constituir un riesgo de choque eléctrico a una persona.
RIESGO DE CHOQUE ELÉCTRICO! NO ABRIR!
CUIDADO: PARA REDUCIR EL RIESGO DE CHOQUE ELÉCTRICO NO REMOVER LA
COBERTURA (O PARTE TRASERA). NO HAY PARTES PARA QUE EL USUARIO REALICE
MANTENIMIENTO. PARA REALIZAR EL MANTENAMIENTO DIRÍJASE A PERSONAL CALIFICADO.
El signo de exclamación dentro de un triángulo equilátero
tiene como fin alertar al usuario de la presencia de
instrucciones importantes de funcionamiento y mantenimiento
en la literatura que acompaña al electrodoméstico.
CUIDADO
20.NOTA: Se ha verificado que esta unidad cumple con los límites de los aparatos
digitales de clase B, de acuerdo a la sección 15 de las normativas FCC. Estos
límites han sido diseñados para ofrecer una protección razonable contra las
interferencias molestas que se pueden producir cuando se usa este aparato en
un entorno no-profesional. Este aparato genera, utiliza y puede irradiar energía
de radiofrecuencia y, si no es instalado y usado de acuerdo al manual de
instrucciones, puede producir interferencias molestas en las comunicaciones de
radio. No obstante, no existen garantías de que no se produzca interferencias
en una instalación concreta. Si este aparato produce interferencias molestas en
larecepciónderadiooTV(locualpuedeserdeterminadofácilmenteapagando
y encendiendo este aparato), el usuario será el responsable de tratar de corregir
dichas interferencias adoptando una o más de las medidas siguientes:
• Reorientaroreubicarlaantenareceptora.
• Aumentarlaseparaciónentreesteaparatoyelreceptor.
• Conectaresteaparatoaunasalidaocircuitodistintoalqueesté
conectado el receptor.
• Solicitarayudaadicionalaldistribuidoroauntécnicoespecialistaen
radio/TV.
CUIDADO: Cambios o modificaciones a este dispositivo no aprobadas
expresamente por LOUD Technologies Inc. pueden anular la autoridad
del usuario para operar este equipo bajo las reglas de la FCC.
21.CUIDADO — Este aparato no sobrepasa los límites de clase A/clase B
(la que corresponda) relativas a emisiones sonoras de radio de aparatos
digitales de acuerdo a las normas de interferencia de radio del Departamento de
Comunicaciones Canadiense.
22.La exposición a niveles de ruido extremadamente altos puede causar problemas
de sordera crónica. La susceptibilidad a esta pérdida de audición inducida por
el ruido varía considerablemente de una persona a otra, pero casi cualquier
persona tendrá una cierta pérdida de audición al quedar expuestos a un ruido
intenso durante un determinado periodo de tiempo. El Departamento de Salud y
Seguridad en el Trabajo de Estados Unidos (OSHA, por sus siglas en inglés) ha
establecido unos niveles de ruido permisibles que aparecen en la siguiente tabla.
De acuerdo a la OSHA, cualquier exposición que sobrepase estos límites
permisibles puede dar lugar a un problema de sordera. Para garantizar su
audición cuando quede expuesto a niveles de presión sonora potencialmente
peligrosos, es recomendable que toda persona expuesta a equipos capaces de
producir altos niveles de presión sonora utilice sistemas de protección auditiva
mientras el equipo esté en funcionamiento. Con el fin de prevenir un problema de
sordera crónico si su exposición sobrepasa los límites establecidos a continuación,
lleve siempre tapones o protectores de oído dentro de los canales auditivos u
orejeras mientras el equipo esté en funcionamiento:
Forma correcta de eliminar este aparato: Este símbolo indica que este producto no puede ser eliminado junto con la
basura orgánica, de acuerdo a lo indicado en la Directiva de Residuos de Aparatos Eléctricos y Electrónicos (2012/19/EU)
y a la legislación vigente de su país. Este producto debe ser entregado en uno de los “puntos limpios” autorizados para
su reciclaje. La eliminación inadecuada de este tipo de residuos puede tener un impacto negativo en el medio ambiente
y la salud humana debido a las sustancias potencialmente peligrosas asociadas generalmente con este tipo de aparatos.
Al mismo tiempo, su cooperación a la hora de eliminar adecuadamente este producto contribuirá a un uso más eficaz de
los recursos naturales. Para más información acerca la correcta eliminación de este tipo de aparatos, póngase en contacto
con el Ayuntamiento de su ciudad, empresa local de recogida de basuras o con uno de los “puntos limpios” autorizados.
Duración,
diaria en
horas
Nivel sonoro
en decibelios,
respuesta lenta
Ejemplo típico
8 90 Un dúo cantando
6 92
4 95 Subterráneo
3 97
2 100 Música clásica muy fuerte
1,5 102
1 105
Greg gritándoles a Troy para saber cuándo acabarán
0,5 110
0,25 o menos
115 Partes más fuertes de un concierto de rock
CUIDADO — Para evitar el riesgo de incendios o descargas
electricas, no exponga este aparato a la lluvia o la humedad.
Instrucciones Importantes De Seguridad –
EN
ES
FR DE

SP260 2x6 Loudspeaker System Processor
4
SP260 2x6 Loudspeaker System Processor
1. Lisez ces instructions.
2. Conservez ces instructions.
3. Respectez toutes les mises en garde.
4. Suivez toutes les instructions.
5. N’utilisez pas cet appareil à proximité d’une source liquide.
6. Nettoyez-le uniquement avec un chiffon sec.
7. Ne bloquez aucune des ventilations de l'appareil. Installez-le en accord
avec les instructions du fabricant.
8. Ne l’installez pas près d’une source de chaleur, comme un radiateur
ou tout autre appareil (amplificateur inclus) produisant de la chaleur.
9. Ne modifiez pas la sécurité de la fiche polarisée (Canada) ou la mise à la terre.
Une fiche polarisée possède deux broches dont l'une plus large que l'autre.
Une fiche avec terre possède deux broches et une troisième pour la mise à la terre.
Si la fiche fournie ne convient pas à votre prise, consultez un électricien afin de
remplacer la prise obsolète.
10.Évitez de marcher ou de tirer sur le câble d’alimentation, en particulier au niveau
des prises et de l’appareil.
11.N’utilisez que des fixations/accessoires spécifiés par le fabricant.
12.N’utilisez qu’avec un chariot, un support, un trépied,
une étagère ou une table spécifiés par le fabricant
ou vendus avec l’appareil. Lorsqu’un chariot est utilisé,
prenez les précautions nécessaires lors du déplacement
du chariot afin d’éviter tout accident.
13.Déconnectez l'appareil du secteur lors des orages
ou des longues périodes d’inutilisation.
14.Coneztouteslesréparationsàunpersonnelqualié.Vousdevezfairecontrôlerce
produit s'il a été endommagé de quelque façon que ce soit, comme lorsque le câble
d’alimentation ou la prise ont été endommagés, qu’un liquide a été renversé ou que
des objets sont tombés sur ou dans l’appareil, que l’appareil a été exposé à la pluie
ou à l’humidité, qu’il ne fonctionne pas normalement, ou qu’il a subi une chute.
15.Veillezàcequel'appareilnesoitpasexposéauxprojectionsliquidesetqu'aucun
liquide ne soit renversé sur celui-ci. Ne déposez pas de récipient rempli de liquide
sur l'appareil (verre, vase, etc.).
16.Ne surchargez pas les prises secteur et les rallonges : ceci constitue un risque
d'incendie ou d'électrocution.
17.Cet appareil est un équipement électronique de Classe I et doit être connecté à une
prise secteur avec terre.
ATTENTION !
CHARIOT PORTABLE
Le symbole de l’éclair à l’intérieur d’un triangle équilatéral
est utilisé pour alerter l’utilisateur de la présence “tensions
dangereuses” non isolées à l’intérieur du produit, et
de potentiel suffisant pour consituer un risque sérieux
d’éléctrocution.
RISQUE D’ÉLECTROCUTION! NE PAS OUVRIR!
ATTENTION: POUR EVITER LES RISQUES D’ÉLECTROCUTION, NE PAS ENLE-
VER LE COUVERCLE. LE PRODUIT NE CONTIENT AUCUNE PIECE RÉPÉRABLE
PAR L’UTILISATEUR. CONFIER L’ENTRETIEN À UN PERSONNEL QUALIFIÉ.
ATTENTION: POUR EVITER TOUT RISQUE D’INCENDIE OU D’ÉLECTROCUTION,
NE PAS EXPOSER CET APPAREIL À LA PLUIE OU À L’HUMIDITÉ.
Le point d’exclamation à l’intérieur d’un triangle équilatéral
est employé pour alerter les utilisateurs de la présence
dans le mode d’emploi d’instructions importantes relatives
au fonctionnement et à l’entretien du produit.
MISE EN GARDE
18.Cet appareil est équipé d'un interruteur secteur à bascule. Il se trouve sur la face
arrière et doit demeurer accessible à tout moment.
19. La fiche SECTEUR fait office de découplage total du secteur — veillez à ce
qu'elle soit accessible à tout moment et fonctionnelle.
20.REMARQUE : Cet appareil répond aux normes sur les équipements numériques
de Classe B, alinéa 15 des lois fédérales. Ces normes présentent une protection
raisonnable contre les interférences en environnement résidentiel. Cet appareil
génère, utilise, et peut émettre des fréquences radio et, s'il n'est pas installé
correctement selon les instructions, peut causer des interférences nuisibles aux
communications radio. Ceci dit, il n'y a aucune garantie que les interférences
n'apparaîtront jamais dans une installation particulière. Si cet équipement cause
des interférences aux réceptions radio ou télévisuelles, ce qui peut être déterminé
en plaçant l'appareil sous/hors tension, essayez d'éviter les interférences en
suivant l'une de ces mesures :
• Réorientezoudéplacezl'antennederéception.
• Éloignezl'appareildurécepteurperturbé.
• Connectezl'appareilàunelignesecteurdifférentedecelledurécepteur.
• Consultezunrevendeurouuntechnicienradio/TV.
MISE EN GARDE : Les modifications apportées à cet appareil sans l'accord
de LOUD Technologies Inc. annulent votre droit à utiliser cet appareil (selon
les législations fédérales).
21.ATTENTION — Cet appareil numérique n’émet pas d'interférences
radioélectriques dépassant les limites applicables aux appareils numériques
de Classe A/de Classe B (selon le cas) prescrites dans le règlement
sur les interférences radioélectriques, édicté par le ministère des
communications du Canada.
22.L’exposition à des niveaux de bruit très élevés peut entraîner une perte
permanente de l’ouïe. La sensibilité à ces dommages varie d’un individu
à l’autre, mais tout le monde est appelé à des dommages auditifs extrêmes
en présence de niveaux sonores élevés. L’Administration de la Sécurité et de
la Santé (OSHA) du Gouvernement des États-Unis a publié les niveaux de bruit
indiqués dans le tableau ci-dessous.
Selon l’OSHA, toute exposition au-delà de ces limites entraîne des dommages
auditifs. Pour éviter toute exposition dangereuse aux niveaux sonores élevés,
il est conseillé d’utiliser des protections auditives. Ces protections placées dans
l’oreille doivent être portées lors de l’utilisation d’appareils produisant des
niveaux sonores élevés pour éviter toute perte irréversible de l’ouïe:
ATTENTION — Pour réduire les risques d’incendie
et d’électrocution, ne pas exposer ce produit à la
pluie ou à l’humidité.
Mise au rebut appropriée de ce produit: Ce symbole indique qu’en accord avecla directive WEEE (2012/19/EU) et les lois
en vigueur dans votre pays, ce produit ne doit pas être jeté avec les déchets ménagers. Ce produit doit être déposé dans un point
de collecte agréé pour le recyclage des déchets d’équipements électriques et électroniques (EEE). Une mauvaise manipulation
de ce type de déchets pourrait avoir un impact négatif sur l’environnement et la santé à cause des substances potentiellement
dangereuses généralement associées à ces équipements. En même temps, votre coopération dans la mise au rebut de ce
produit contribuera à l’utilisation efficace des ressources naturelles. Pour plus d’informations sur l’endroit où vous pouvez déposer
vos déchets d’équipements pour le recyclage, veuillez contacter votre mairie ou votre centre local de collecte des déchets.
Heures par jour Niveau sonore
en dBA, réponse
lente
Exemple type
8 90 Duo dans un piano-bar
6 92
4 95 Métro
3 97
2 100 Musique classique très forte
1,5 102
1 105 Greg hurlant sur Troy
0,5 110
0,25 ou moins 115 Moments les plus forts d'un concert de Rock
Instructions Importantes Sur La Sécurité –
EN ES
FR
DE

Quick Start Guide
5
Quick Start Guide
1. Lesen Sie diese Anleitungen.
2. Bewahren Sie diese Anleitungen auf.
3. Beachten Sie alle Warnungen.
4. Befolgen Sie alle Anleitungen.
5. Betreiben Sie dieses Gerät nicht in der Nähe von Wasser.
6. VerwendenSiezurReinigungnureintrockenesTuch.
7. Blockieren Sie keine Belüftungsöffnungen. Installieren Sie das Gerät
entsprechend den Anleitungen des Herstellers.
8. Installieren Sie das Gerät nicht in der Nähe von Wärmequellen,
wie Heiz--körpern, Wärmeklappen, Öfen oder anderen wärmeerzeugenden
Geräten(inklu-siveVerstärkern).
9. Setzen Sie die Sicherheitsfunktion des polarisierten oder geerdeten Steckers nicht
außer Kraft. Ein polarisierter Stecker hat zwei flache, unterschiedlich breite Pole.
Ein geerdeter Stecker hat zwei flache Pole und einen dritten Erdungsstift.
Der breitere Pol oder der dritte Stift dienen Ihrer Sicherheit. Wenn der vorhandene
Stecker nicht in Ihre Steckdose passt, lassen Sie die veraltete Steckdose von einem
Elektriker ersetzen.
10.VerlegenSiedasStromkabelso,dassniemanddarüberlaufenundesnichtgeknickt
werden kann. Achten Sie speziell auf Netz--stecker, Mehrfachsteckdosen und den
Kabelan-schluss am Gerät.
11.Benutzen Sie nur die vom Hersteller empfohlenen Halterungen/Zubehörteile.
12.Benutzen Sie das Gerät nur mit dem vom Hersteller
empfohlenen oder mit dem Gerät verkauften Wagen,
Ständer, Stativ, Winkel oder Tisch. Gehen Sie beim
Bewegen einer Wagen/Geräte-Kombination vorsichtig
vor,umVerletzungendurchUmkippenzuvermeiden.
13.Ziehen Sie bei Gewittern oder läng-erem Nicht--gebrauch
des Geräts den Stecker aus der Steckdose.
14.Überlassen Sie die Wartung qualifiziertem Fachpersonal. Eine Wartung
ist notwendig, wenn das Gerät auf irgendeine Weise beschädigt wurde,
z. B. Netzkabel oder Netzstecker beschädigt sind, Flüssigkeit oder Objekte
ins Gerät gelangt sind, das Gerät Feuchtigkeit oder Regen ausgesetzt war,
es nicht normal funktioniert oder fallen gelassen wurde.
15.Setzen Sie das Gerät keinen tropfenden oder spritzenden Flüssigkeiten
ausundstellenSiekeinemitFlüssigkeitgefülltenObjekte,z.B.Vasen
oder Biergläser; auf das Gerät.
16.Netzsteckdosen und Mehrfachstecker dürfen nicht überlastet werden,
da dies zu Bränden und Stromschlägen führen könnte.
17.Dieses Gerät wurde unter Class-I Konstruktionsbedingungen entwickelt und muss an
eine Netzsteckdose mit Schutzerde (der dritte Erdungsstift) ange-schlossen werden.
18.Dieses Gerät ist mit einem ganzpoligen Wipp-Netzschalter ausgerüstet. Der Schalter
befindet sich auf der Rückseite und sollte stets erreichbar sein.
19. Der NETZ-Stecker oder eine Gerätesteckvorrichtung dient als Abschalteinrichtung
und sollte jederzeit bedienbar sein.
VORSICHT BEIM
WAGENTRANSPORT
Der Blitz mit Pfeilspitze im gleichseitigen Dreieck soll
den Anwender vor Nichtisolierter “gefährlicher Spannung”
im Geräteinnern warnen. Diese kann so hoch sein, dass
die Gefahr eines Stromschlags besteht.
GEFAHR EINES STROMSCHLAGS! NICHT FEN!
VORSICHT: UM DIE GEFAHR EINES STROMSCHLAGS ZU VERRINGERN,
ENTFERNEN SIE NICHT DIE VORDERSEITE (ODER RÜCKSEITE)
DES GERÄTS. IM INNERN BEFINDEN SICH KEINE TEILE, DIE VOM
ANWENDER GEWARTET WERDEN KÖNNEN. ÜBERLASSEN SIE
DIE WARTUNG QUALIFIZIERTEM FACHPERSONAL.
Das Ausrufezeichen im gleichseitigen Dreieck soll den
Anwender auf wichtige Bedienungs- und Wartungsanleitungen
aufmerksam machen, die im mitgelieferten
Informationsmaterial näher beschrieben werden.
ACHTUNG
20.HINWEIS: Dieses Gerät wurde getestet und entspricht den
Einschränk-ungenfürClassBDigitalgeräte,gemäßPart15derFCCVorschriften.
Diese Einschränkungen sollen angemessenen Schutz vor schädlichen
Inter-ferenzen bei der Installation in Wohngebieten bieten. Dieses Gerät erzeugt,
verwendet und kann Rundfunkfrequenz-Energie ausstrahlen und kann, wenn
es nicht gemäß den Anleitungen installiert und betrieben wird, schädliche
Interferenzen bei der Rundfunkkommunikation erzeugen. Es gibt allerdings keine
Garantien, dass bei einer bestimmten Instal-la-tion keine Interferenzen auftreten.
WenndiesesGerätschädlicheInter-ferenzenbeimRadio-oderTV-Empfang
verursacht, was sich durch Aus- und Einschalten des Geräts feststellen lässt,
sollte der Anwender versuchen, die Interferenzen durch eine oder mehrere
der folgenden Maßnahmen zu beseitigen:
• DieEmpfangsantenneneuausrichtenoderneupositionieren.
• DieEntfernungzwischenGerätundEmpfängererhöhen.
• DasGerätandieSteckdoseeinesanderenStromkreisesalsdendes
Empfängers anschließen.
• EinenFachhändlerodererfahrenenRadio-/TV-TechnikerumHilfebitten.
VORSICHT:ÄnderungenoderModikationenandiesemGerät,dievonLOUD
TechnologiesInc.nichtausdrücklichgenehmigtsind,könnenzumVerlustder
BetriebserlaubnisgemäßdenFCCVorschriftenführen.
21.VORSICHT — Dieses Gerät überschreitet nicht die Class A/Class B (je nach
An-wend-barkeit) Grenzen für Rundfunkgeräusch-Emissionen von Digitalgeräten,
wiesieindenRund-funkinterferenz-VorschriftendesCanadianDepartmentof
Communications festgelegt wurden.
22.Extrem hohe Geräuschpegel können zu dauerhaftem Gehörverlust führen.
Lärm-be-dingter Gehörverlust tritt von Person zu Person unterschiedlich schnell
ein, aber fast jeder wird einen Teil seines Gehörs verlieren, wenn er über einen
Zeitraum ausrei-chend hohen Lärmpegeln ausgesetzt ist. Die Occupational Safety
and Health Admi--nis--tration (OSHA) der US-Regierung hat den zulässigen
Geräuschpegel in der folgen-den Tabelle festgelegt.
Nach Meinung der OSHA können alle Lärmpegel, die diese zulässigen Gren-zen
überschreiten, zu Gehörverlust führen. Um sich vor potentiell ge--fähr-lichen,
hohen Schalldruckpegeln zu schützen, sollten alle Personen, die hohe
Schall-druck-pegel erzeu-genden Geräten ausgesetzt sind, einen Gehörschutz
tra-gen, solange die Ge-räte betrieben werden. Wenn beim Be-trei-ben der
Geräte die hier beschriebenen Lärmpegelgrenzen überschritten werden, müssen
Ohren-stöpsel oder andere Schutz-vorrichtungen im Gehörkanal oder über den
Ohren ange-bracht werden, um einen dauerhaften Gehörverlust zu vermeiden:
ACHTUNG — Um die Gefahr eines Brandes
oder Stromschlags zu verringern, setzen Sie das
Gerät weder Regen noch Feuchtigkeit aus.
Korrekte Entsorgung dieses Produkts: Diese Symbol weist darauf hin, dass das Produkt entsprechend den WEEE
Richtlinien (2012/19/EU) und den Landesgesetzen nicht im Hausmüll entsorgt werden darf. Dieses Produkt sollte einer
autorisierten Sammelstelle zum Recyceln von unbrauchbaren elektrischen und elektronischen Geräten (EEE) übergeben
werden. Unsachgemäßer Umgang mit dieser Abfallart könnte aufgrund der in EEE enthaltenen gefährlichen Substanzen negative
Auswirkungen auf die Umwelt und menschliche Gesundheit haben. Gleichzeitig tragen Sie durch Ihre Teilnahme an der korrekten
Entsorgung dieses Produkts zu einer effektiven Nutzung natürlicher Ressourcen bei. Weitere Informationen zu Annahmestellen,
die unbrauchbare Geräte recyceln, erhalten Sie bei der örtlichen Stadtverwaltung, dem Entsorgungsträger oder der Müllabfuhr.
Dauer pro Tag in
Stunden Schallpegel
dBA, langsame
Ansprache
Typisches Beispiel
8 90 Duo in kleinem Club
6 92
4 95 Untergrundbahn
3 97
2 100 Sehr laute klassische Musik
1,5 102
1 105 Greg schreit Troy wegen Deadlines an
0,5 110
0,25 oder weniger 115 Lauteste Phasen eines Rock-Konzerts
Wichtige Sicherheitsanweisungen –
EN ES FR
DE

SP260 2x6 Loudspeaker System Processor
6
SP260 2x6 Loudspeaker System Processor
Hookup Diagrams / Diagramas de conexión
Schémas de câblage / Anschlussdiagramme
Passive Main Loudspeakers with Subwoofers and Delay Stacks
Sistema de altavoces principales pasivos con subgraves y líneas de retardo
Stacks d’enceintes passives principales avec Subwoofers et dispositif de retard
Passive Hauptlautsprecher mit Subwoofern und Delay Stacks
PUSHPUSH
ON
OUTPUTS
MAIN
GNDLIFT
ATTENTION:RISK OF ELECTRIC SHOCK
DONOT OPEN THE COVER
100-240VAC
40W 50/60 Hz
FUSE:T 800mAL 250V
AB123456
INPUTS
SPEAKER OUTPUTS SPEAKER OUTPUTS SPEAKER OUTPUTS
IMPEDANCE
8 OHMS
S518S
PASSIVE SUBWOOFER
POWER
900 WATTS
PROGRAM
SERIALNUMBER / REVISION
INPUT THRU
PARALLEL
IMPEDANCE
8 OHMS
S518S
PASSIVE SUBWOOFER
POWER
900 WATTS
PROGRAM
SERIALNUMBER / REVISION
INPUT THRU
PARALLEL
POWER
500 WATTS
PROGRAM
IMPEDANCE
8 OHMS
S512
2-WAY PASSIVE LOUDSPEAKER
SERIALNUMBER / REVISION
INPUT THRU
PARALLEL
POWER
500 WATTS
PROGRAM
IMPEDANCE
8 OHMS
S512
2-WAY PASSIVE LOUDSPEAKER
SERIALNUMBER / REVISION
INPUT THRU
PARALLEL
IMPEDANCE
8 OHMS
S525
2-WAY PASSIVE LOUDSPEAKER
POWER
1200 WATTS
PROGRAM
SERIALNUMBER / REVISION
INPUT THRU
PARALLEL
IMPEDANCE
8 OHMS
S525
2-WAY PASSIVE LOUDSPEAKER
POWER
1200 WATTS
PROGRAM
SERIALNUMBER / REVISION
INPUT THRU
PARALLEL
S512 S512 S518S S518S S525 S525
DL1608
SP260

Quick Start Guide
7
Quick Start Guide
PUSHPUSH
ON
OUTPUTS
MAIN
GNDLIFT
ATTENTION:RISK OF ELECTRIC SHOCK
DONOT OPEN THE COVER
100-240VAC
40W 50/60 Hz
FUSE:T 800mAL 250V
AB123456
INPUTS
SPEAKER OUTPUTS SPEAKER OUTPUTS SPEAKER OUTPUTS
SP260
1642VLZ4
Bi-amped Passive Full-Range Loudspeakers with Subwoofers
Altavoces biamplificados pasivos de rango completo con subwoofers
Enceintes passives Full-Range bi-amplifiées avec Subwoofers
Mit Bi-Amping betriebene passive Breitbandlautsprecher und Subwoofer
Powered Arrayable Loudspeakers and Subwoofers
Matriz de altavoces y subwoofers autoamplificados
Enceintes et Subwoofers actifs montables en Array
Aktive Array-Lautsprecher und Subwoofer
PUSHPUSH
ON
OUTPUTS
MAIN
GNDLIFT
ATTENTION:RISK OF ELECTRIC SHOCK
DONOT OPEN THE COVER
100-240VAC
40W 50/60 Hz
FUSE:T 800mAL 250V
AB123456
INPUTS
EQ
HI
12k
-15 +15
U
-15 +15
U
LOW
80Hz
-15 +15
U
MID
200 2k
800
100 8k
PAN
L R
EQ
HI
12k
-15 +15
U
-15 +15
U
LOW
80Hz
-15 +15
U
MID
200 2k
800
100 8k
EQ
HI
12k
-15 +15
U
-15 +15
U
LOW
80Hz
-15 +15
U
MID
200 2k
800
100 8k
EQ
HI
12k
-15 +15
U
-15 +15
U
LOW
80Hz
-15 +15
U
MID
200 2k
800
100 8k
EQ
HI
12k
-15 +15
U
-15 +15
U
LOW
80Hz
-15 +15
U
MID
200 2k
800
100 8k
EQ
HI
12k
-15 +15
U
-15 +15
U
LOW
80Hz
-15 +15
U
MID
200 2k
800
100 8k
EQ
HI
12k
-15 +15
U
-15 +15
U
LOW
80Hz
-15 +15
U
MID
200 2k
800
100 8k
EQ
HI
12k
-15 +15
U
-15 +15
U
LOW
80Hz
-15 +15
U
MID
200 2k
800
100 8k
EQ
HI
12k
-15 +15
U
-15 +15
U
LOW
80Hz
-15 +15
U
MID
200 2k
800
100 8k
EQ
HI
12k
-15 +15
U
-15 +15
U
LOW
80Hz
-15 +15
U
MID
200 2k
800
100 8k
EQ
HI
12k
-15 +15
U
-15 +15
U
LOW
80Hz
-15 +15
U
MID
200 2k
800
100 8k
EQ
HI
12k
-15 +15
U
-15 +15
U
LOW
80Hz
-15 +15
U
MID
200 2k
800
100 8k
EQ
HI
12k
-15 +15
U
-15 +15
U
LOW
80Hz
-15 +15
U
MID
200 2k
800
100 8k
EQ
HI
12k
-15 +15
U
-15 +15
U
LOW
80Hz
-15 +15
U
MID
200 2k
800
100 8k
EQ
HI
12k
-15 +15
U
-15 +15
U
LOW
80Hz
-15 +15
U
MID
200 2k
800
100 8k
EQ
HI
12k
-15 +15
U
-15 +15
U
LOW
80Hz
-15 +15
U
MID
200 2k
800
100 8k
FREQ FREQ FREQ FREQ FREQ FREQ FREQ FREQ FREQ FREQ FREQ FREQ FREQ FREQ FREQ FREQ
1
MUTE
PAN
L R
2
MUTE
PAN
L R
3
MUTE
PAN
L R
4
MUTE
PAN
L R
5
MUTE
PAN
L R
6
MUTE
PAN
L R
7
MUTE
PAN
L R
8
MUTE
PAN
L R
9
MUTE
PAN
L R
10
MUTE
PAN
L R
11
MUTE
PAN
L R
12
MUTE
PAN
L R
13
MUTE
PAN
L R
14
MUTE
PAN
L R
15
MUTE
PAN
L R
16
MUTE
PAD
-20dB
1
LOWCUT
100Hz
GAIN
PAD
-20dB
2
LOWCUT
100Hz
GAIN
PAD
-20dB
3
LOWCUT
100Hz
GAIN
PAD
-20dB
4
LOWCUT
100Hz
GAIN
PAD
-20dB
5
LOWCUT
100Hz
GAIN
PAD
-20dB
6
LOWCUT
100Hz
GAIN
PAD
-20dB
7
LOWCUT
100Hz
GAIN
PAD
-20dB
8
LOWCUT
100Hz
GAIN
PAD
-20dB
9
LOWCUT
100Hz
GAIN
PAD
-20dB
10
LOWCUT
100Hz
GAIN
PAD
-20dB
11
LOWCUT
100Hz
GAIN
PAD
-20dB
12
LOWCUT
100Hz
GAIN
PAD
-20dB
13
LOWCUT
100Hz
GAIN
PAD
-20dB
14
LOWCUT
100Hz
GAIN
PAD
-20dB
15
LOWCUT
100Hz
GAIN
PAD
-20dB
16
LOWCUT
100Hz
GAIN
1-2
3-4
LR
OL
-20
30
20
10
10
40
50
5
5
U
60
dB
OO
SOLO
1-2
3-4
LR
OL
-20
30
20
10
10
40
50
5
5
U
60
dB
OO
SOLO
1-2
3-4
LR
OL
-20
30
20
10
10
40
50
5
5
U
60
dB
OO
SOLO
1-2
3-4
LR
OL
-20
30
20
10
10
40
50
5
5
U
60
dB
OO
SOLO
1-2
3-4
LR
OL
-20
30
20
10
10
40
50
5
5
U
60
dB
OO
SOLO
1-2
3-4
LR
OL
-20
30
20
10
10
40
50
5
5
U
60
dB
OO
SOLO
1-2
3-4
LR
OL
-20
30
20
10
10
40
50
5
5
U
60
dB
OO
SOLO
1-2
3-4
LR
OL
-20
30
20
10
10
40
50
5
5
U
60
dB
OO
SOLO
1-2
3-4
LR
OL
-20
30
20
10
10
40
50
5
5
U
60
dB
OO
SOLO
1-2
3-4
LR
OL
-20
30
20
10
10
40
50
5
5
U
60
dB
OO
SOLO
1-2
3-4
LR
OL
-20
30
20
10
10
40
50
5
5
U
60
dB
OO
SOLO
1-2
3-4
LR
OL
-20
30
20
10
10
40
50
5
5
U
60
dB
OO
SOLO
1-2
3-4
LR
OL
-20
30
20
10
10
40
50
5
5
U
60
dB
OO
SOLO
1-2
3-4
LR
OL
-20
30
20
10
10
40
50
5
5
U
60
dB
OO
SOLO
1-2
3-4
LR
OL
-20
30
20
10
10
40
50
5
5
U
60
dB
OO
SOLO
1-2
3-4
LR
OL
-20
30
20
10
10
40
50
5
5
U
60
dB
OO
SOLO
FX
AUX5/6
PRE
PRE
FX1
FX2
PRE
1
2
+15
U
AUX
+15
U
3
4
5
6
+15
U
+15
U
+15
U
+15
U
FX
AUX5/6
PRE
PRE
FX1
FX2
PRE
1
2
+15
U
AUX
+15
U
3
4
5
6
+15
U
+15
U
+15
U
+15
U
FX
AUX5/6
PRE
PRE
FX1
FX2
PRE
1
2
+15
U
AUX
+15
U
3
4
5
6
+15
U
+15
U
+15
U
+15
U
FX
AUX5/6
PRE
PRE
FX1
FX2
PRE
1
2
+15
U
AUX
+15
U
3
4
5
6
+15
U
+15
U
+15
U
+15
U
FX
AUX5/6
PRE
PRE
FX1
FX2
PRE
1
2
+15
U
AUX
+15
U
3
4
5
6
+15
U
+15
U
+15
U
+15
U
FX
AUX5/6
PRE
PRE
FX1
FX2
PRE
1
2
+15
U
AUX
+15
U
3
4
5
6
+15
U
+15
U
+15
U
+15
U
FX
AUX5/6
PRE
PRE
FX1
FX2
PRE
1
2
+15
U
AUX
+15
U
3
4
5
6
+15
U
+15
U
+15
U
+15
U
FX
AUX5/6
PRE
PRE
FX1
FX2
PRE
1
2
+15
U
AUX
+15
U
3
4
5
6
+15
U
+15
U
+15
U
+15
U
FX
AUX5/6
PRE
PRE
FX1
FX2
PRE
1
2
+15
U
AUX
+15
U
3
4
5
6
+15
U
+15
U
+15
U
+15
U
FX
AUX5/6
PRE
PRE
FX1
FX2
PRE
1
2
+15
U
AUX
+15
U
3
4
5
6
+15
U
+15
U
+15
U
+15
U
FX
AUX5/6
PRE
PRE
FX1
FX2
PRE
1
2
+15
U
AUX
+15
U
3
4
5
6
+15
U
+15
U
+15
U
+15
U
FX
AUX5/6
PRE
PRE
FX1
FX2
PRE
1
2
+15
U
AUX
+15
U
3
4
5
6
+15
U
+15
U
+15
U
+15
U
FX
AUX5/6
PRE
PRE
FX1
FX2
PRE
1
2
+15
U
AUX
+15
U
3
4
5
6
+15
U
+15
U
+15
U
+15
U
FX
AUX5/6
PRE
PRE
FX1
FX2
PRE
1
2
+15
U
AUX
+15
U
3
4
5
6
+15
U
+15
U
+15
U
+15
U
FX
AUX5/6
PRE
PRE
FX1
FX2
PRE
1
2
+15
U
AUX
+15
U
3
4
5
6
+15
U
+15
U
+15
U
+15
U
FX
AUX5/6
PRE
PRE
FX1
FX2
PRE
1
2
+15
U
AUX
+15
U
3
4
5
6
+15
U
+15
U
+15
U
+15
U
1 2
SUBGROUPS
PUSH
TOTALK
MAIN
RIGHT
AUX1-4
SOLO
STEREO
LEFT
RIGHT
SOLO
LEFT
RIGHT
SOLO
STEREO
LEFT
RIGHT
SOLO
LEFT
1 2 3 4 MAINMIX
TALKBACK
OFF MAX
COMP
OFF MAX
COMP
OFF MAX
COMP
OFF MAX
COMP LEVEL
PHONES
TOAUX1
TOAUX2
SOLO
MONITOR
TAP
DELAY
MUTE
TOAUX1
TOAUX2
TAP
DELAY
MUTE
FXMASTERFXMASTER
TOLRTOLR
FX2
SIG/OL
FX1
SIG/OL
SOLO
SOLO
1
2
3
4
SOLO
SOLOMODE
SOLO
SOLO
SOLO
SOLO
SOLO PFL
AFL
AUX
AUX
AUX
AUX
CH1-2 CH3-4
AUX5-6
PWR
RUDESOLO
48V
USBOUT
SUBS3-4
20
10
7
4
2
0
2
4
7
10
20
30
LEVEL
SET
SUBS1-2
MAIN
TOLR
TAPE
USB
2-TRACKRETURN
SUCK
SOLO
12V
0.5A
OFF MAX
COMP
OFF MAX
COMP
OFF MAX
COMP
OFF MAX
COMP
LOWCUT
100Hz
LOWCUT
100Hz
LOWCUT
100Hz
LOWCUT
100Hz FX 1 FX2
USB
21
22
23
24
HI
12k
HI
MID
2.5k
LOW
MID
400Hz
HI
MID
2.5k
-15 +15
U
-15 +15
U
-15 +15
U
-15 +15
U
LOW
80Hz
LOW
MID
400Hz
LOW
80Hz
-15 +15
U
HI
12k
2
3
4
5
6
1
+15
U+15
U
+20
U
+15
U
+15
U
+15
U
+15
U
+15
U
+15
U
+15
U
+15
U
+15
U
+15
U
+15
U
+15
U
+15
U
+15
U
+15
U
+15
U+15
U+15
U
+15
U
+15
U
+15
U+15
U+15
U
+15
U
+15
U
+15
U
-15 +15
U
-15 +15
U
-15 +15
U
-20 +20
U
-20 +20
U
AUXMASTER
LR
STEREORETURNS
EQ
HI
12k
-15 +15
U
-15 +15
U
LOW
80Hz
-15 +15
U
FREQ
MID
200 2k
800
100 8k
EQ
HI
12k
-15 +15
U
-15 +15
U
LOW
80Hz
-15 +15
U
FREQ
MID
200 2k
800
100 8k
EQ
HI
12k
-15 +15
U
-15 +15
U
LOW
80Hz
-15 +15
U
FREQ
MID
200 2k
800
100 8k
EQ EQ EQ
HI
12k
-15 +15
U
-15 +15
U
LOW
80Hz
-15 +15
U
FREQ
MID
200 2k
800
100 8k
PAN
L R
17
MUTE
PAN
L R
18
MUTE
PAN
L R
19
MUTE
PAN
L R
20
MUTE
BAL
L R
21/22
MUTE
ALT3-4
BAL
L R
0dB=0dBu
LEFT RIGHT
1-2
3-4
LR
OL
-20
30
20
10
10
40
50
5
5
U
60
dB
OO
SOLO
1-2
3-4
LR
OL
-20
30
20
10
10
40
50
5
5
U
60
dB
OO
SOLO
1-2
3-4
LR
OL
-20
30
20
10
10
40
50
5
5
U
60
dB
OO
SOLO
1-2
3-4
LR
OL
-20
30
20
10
10
40
50
5
5
U
60
dB
OO
SOLO
1-2
3-4
LR
OL
-20
30
20
10
10
40
50
5
5
U
60
dB
OO
SOLO
1-2
3-4
LR
OL
-20
30
20
10
10
40
50
5
5
U
60
dB
OO
SOLO
FX
AUX5/6
PRE
PRE
FX1
FX2
PRE
1
2
+15
U
AUX
+15
U
3
4
5
6
+15
U
+15
U
+15
U
+15
U
FX
AUX5/6
PRE
PRE
FX1
FX2
PRE
1
2
+15
U
AUX
+15
U
3
4
5
6
+15
U
+15
U
+15
U
+15
U
FX
AUX5/6
PRE
PRE
FX1
FX2
PRE
1
2
+15
U
AUX
+15
U
3
4
5
6
+15
U
+15
U
+15
U
+15
U
FX
AUX5/6
PRE
PRE
FX1
FX2
PRE
1
2
+15
U
AUX
+15
U
3
4
5
6
+15
U
+15
U
+15
U
+15
U
FX
AUX5/6
PRE
PRE
FX1
FX2
PRE
1
2
+15
U
AUX
+15
U
3
4
5
6
+15
U
+15
U
+15
U
+15
U
FX
AUX5/6
PRE
PRE
FX1
FX2
PRE
1
2
+15
U
AUX
+15
U
3
4
5
6
+15
U
+15
U
+15
U
+15
U
23/24
MUTE
ALT3-4
30
20
10
10
40
50
5
5
U
60
dB
OO
30
20
10
10
40
50
5
5
U
60
dB
OO
30
20
10
10
40
50
5
5
U
60
dB
OO
30
20
10
10
40
50
5
5
U
60
dB
OO
30
20
10
10
40
50
5
5
U
60
dB
OO
30
20
10
10
40
50
5
5
U
60
dB
OO
17
GAIN
18
GAIN
19
GAIN
20
GAIN LINEGAIN LINEGAIN
30
-20dB +40dB
U
60U
4020
30
-20dB +40dB
U
60U
4020
30
-20dB +40dB
U
60U
4020
30
-20dB +40dB
U
60U
4020
30
-20dB +40dB
U
60U
4020
30
-20dB +40dB
U
60U
4020
30
-20dB +40dB
U
60U
4020
30
-20dB +40dB
U
60U
4020
30
-20dB +40dB
U
60U
4020
30
-20dB +40dB
U
60U
4020
30
-20dB +40dB
U
60U
4020
30
-20dB +40dB
U
60U
4020
30
-20dB +40dB
U
60U
4020
30
-20dB +40dB
U
60U
4020
30
-20dB +40dB
U
60U
4020
30
-20dB +40dB
U
60U
4020
30
-20dB +40dB
U
60U
4020
30
-20dB +40dB
U
60U
4020
30
-20dB +40dB
U
60U
4020
30
-20dB +40dB
U
60U
4020
50%
100%0%
25% 75%
HD1801
HDA x3HDA x3
SP260
2404VLZ4
HD1801

SP260 2x6 Loudspeaker System Processor
8
SP260 2x6 Loudspeaker System Processor
SP260
NAV/EDIT1
ENTER ESC
CLIP
+15
+9
+3
0
-10
-20
LIMIT
CLIP
+15
+9
+3
0
-15
USB
EDIT
MUTE
UTILITY
A
CLIP
+15
+9
+3
0
-10
-20
EDIT
MUTE B 1
EDIT
MUTE
LIMIT
CLIP
+15
+9
+3
0
-15
2
EDIT
MUTE
LIMIT
CLIP
+15
+9
+3
0
-15
3
EDIT
MUTE
LIMIT
CLIP
+15
+9
+3
0
-15
4
EDIT
MUTE
LIMIT
CLIP
+15
+9
+3
0
-15
5
EDIT
MUTE
LIMIT
CLIP
+15
+9
+3
0
-15
6
EDIT
MUTE
2x6 SPEAKER
PROCESSOR
EDIT2EDIT 3
PUSHPUSH
ON
OUTPUTS
MAIN
GNDLIFT
ATTENTION: RISK OF ELECTRIC SHOCK
DO NOT OPEN THE COVER
100-240 VAC
40W 50/60 Hz
FUSE: T 800mAL 250V
AB123456
INPUTS
1
2
3
5
4
6
7
8
9
10
10
7
11
11
12

Quick Start Guide
9
Quick Start Guide
Front & Rear Panel
Descriptions –
1. Power Connector Connect the supplied AC power cord
to this IEC jack.
2. Power Switch Turns the SP260 on and off.
3. Lift/Gnd Separates the chassis ground from the signal ground.
4. XLR Inputs Connect a balanced line-level signal from a mixer’s
main L/R output.
5. XLR Outputs Connect a balanced line-level signal to
the inputs of powered speakers and/or power amplifiers.
6. LCD Display Displays the processor information.
7. Nav/Edit Wheels Rotate to navigate the user interface,
edit parameters and select values.
8. Enter & ESC Buttons Navigate into and out of menus,
confirm operations and change settings.
9. Utility Button Adjust system, preset and security settings.
10. Mute / Edit Buttons and LEDs Press to mute or hold
to edit the corresponding input or output.
11. Meters Displays the input / output levels OR the gain
reduction amount for the corresponding input or output.
12. USB Connect to a Windows-based PC to control all
parameters and to load presets
1. Toma de corriente Conecte en esta toma IEC el cable
de alimentación incluido.
2. Interruptor de encendido Le permite encender y apagar
este SP260.
3. Lift/Gnd Separa la conexión a tierra del chasis de la señal de
toma de tierra.
4. XLR Inputs Conecte a estas entradas una señal balanceada de
nivel de línea de la salida I/D principal de una mesa de mezclas.
5. XLR Outputs Conecte desde aquí una señal balanceada de nivel
de línea para las entradas de recintos acústicos autoamplificados
y/o etapas de potencia.
6. Pantalla LCD Le muestra la información del procesador.
7. Ruedas Nav/Edit Úselas para desplazarse por el interface de
usuario, editar parámetros y elegir valores.
8. Botones Enter & ESC Le permiten entrar y salir de los menús,
confirmar operaciones y cambiar ajustes.
9. Botón Utility Permite el ajuste de valores del sistema, preset y
seguridad.
10. Botones y pilotos Mute / Edit Púlselo para anular la
señal o manténgalo pulsado para editar la entrada o salida
correspondiente.
11. Medidores Muestran los niveles de entrada/salida O la
cantidad de reducción de ganancia para la entrada o salida
correspondiente.
12. USB Conecte esta salida a un ordenador Windows para
controlar todos los parámetros y cargar presets
EN
ES FR DE
Descripción del panel frontal
y trasero –
EN
ES
FR DE
EN ES FR
DE
1. Netzanschluss Verbinden Sie das mitgelieferte Netzkabel
mit diesem IEC-Anschluss.
2. Power-Schalter Schaltet den SP260 ein/aus.
3. Lift/Gnd Trennt die Masse von der Signalerdung.
4. XLR Inputs Hier schließen Sie das symmetrische Line-Pegel-
Signal des Main L/R-Ausgangs eines Mischers an.
5. XLR Outputs Verbinden Sie das hier anliegende symmetrische
Line-Pegel-Signal mit den Eingängen von Aktivboxen und/oder
Endstufen.
6. LCD Display Zeigt Prozessor-Informationen an.
7. Nav/Edit-Rad Durch Drehen des Rads können Sie durch das
User Interface navigieren, Parameter editieren und Werte wählen.
8. Enter & ESC-Tasten Damit navigieren Sie in die und aus den
Menüs, bestätigen Verfahren und ändern Einstellungen.
9. Utility-Taste Zum Ändern von System-, Preset- und Sicherheits-
Einstellungen.
10. Mute / Edit-Tasten und LEDs Taste drücken, um den
jeweiligen Ein-/Ausgang stummzuschalten.
11. Pegelanzeigen Zeigt die Eingangs-/Ausgangspegel ODER die
Stärke der Gain-Reduzierung des jeweiligen Ein-/Ausgangs an.
12. USB Verbinden Sie diesen Port mit einem Windows-PC, um
alle Parameter zu steuern und Presets zu laden.
1. Embase d’alimentation Connectez le cordon secteur
fourni à cette embase CEI.
2. Bouton marche/arrêt Permet de placer SP260 sous/hors
tension.
3. Lift/Gnd Permet de séparer la connexion de la terre du boîtier
de celle du signal.
4. Entrées XLR Connectez-y le signal symétrique niveau ligne de
la sortie principale d’une console de mixage.
5. Sorties XLR Transmettent un signal symétrique niveau ligne
aux entrées d’enceintes actives et/ou d’amplis de puissance.
6. Écran LCD Affiche des informations sur le processeur.
7. Molettes Nav/Edit Utilisez-les pour naviguer dans l’interface
d’utilisateur, éditer les paramètres et sélectionner les valeurs.
8. Touches Enter & ESC Permettent d’entrer/de sortir des menus,
de confirmer les opérations et de modifier les paramètres.
9. Touche Utility Permet de régler les données du système, les
Presets et les paramètres de sécurité.
10. Touches et LEDs Mute / Edit Appuyez pour activer la
fonction Mute ou maintenez-les enfoncées pour configurer les
entrées ou sorties correspondantes.
11. Indicateurs Indiquent le niveaux des entrées / sorties OU la quantité
de réduction du gain appliquée à l’entrée ou sortie correspondante.
12. USB Permet la connexion à un PC équipé de Windows pour
contrôler tous les paramètres et charger des Presets.
Vorder- & Rückseite –
Description des faces
avant et arrière –
EN ES
FR
DE

SP260 2x6 Loudspeaker System Processor
10
SP260 2x6 Loudspeaker System Processor
Getting Started –
1. Read and understand the Important Safety Instructions
on page 2.
2. Make all initial connections with the power switches OFF on all
equipment. Make sure the master volume, level and gain controls
are all the way down.
3. Connect line-level outputs from the mixer (or other signal
source) to the inputs of the SP260.
4. Connect the outputs from the SP260 to the inputs of powered
loudspeakers and/or subwoofers OR to the inputs of power
amplifiers. If using power amplifiers, connect the outputs from the
power amplifier(s) to the inputs of passive loudspeakers.
5. Push the line cords securely into the IEC connectors and plug
the other ends into grounded AC outlets.
6. Turn the mixer (or other signal source) on.
7. Turn the SP260 on.
8. Select the system setup that best matches your PA.
9. Turn on the powered loudspeakers, subwoofers or amplifiers.
10. Be sure that the volume of the input on the mixer is the same
as it would be during normal use.
11. Un-mute the appropriate outputs on the SP260.
12. Slowly bring up the mixer’s main level to a comfortable
listening level.
1. Lea y tenga en cuenta las Instrucciones importantes
de seguridad de la página 3.
2. Realice todas las conexiones iniciales con todos los aparatos
APAGADOS. Asegúrese de que los controles de volumen máster,
nivel y ganancia estén al mínimo.
3. Conecte las salidas de nivel de línea del mezclador (u otra
fuente de señal) a las entradas del SP260.
4. Conecte las salidas del SP260 a las entradas de unos recintos
acústicos autoamplificados y/o subwoofers O a las entradas de
etapas de potencia. Si está usando etapas, conecte las salidas de
estas a las entradas de unos recintos acústicos pasivos.
5. Introduzca los cables de alimentación firmemente en las
entradas IEC y el otro extremo en una salida de corriente alterna
con toma de tierra.
6. Encienda el mezclador (u otra fuente de señal).
7. Encienda el procesador SP260.
8. Elija la configuración de sistema que mejor se adapte a su
sistema PA.
9. Encienda los recintos acústicos autoamplificados, subwoofers o
amplificadores/etapas de potencia.
10. Asegúrese de que el volumen de la entrada del mezclador sea
el mismo que tendrá durante el uso normal.
11. Active las salidas adecuadas del SP260.
12. Suba lentamente el nivel principal de la mesa de mezclas hasta
llegar a un nivel de escucha cómodo.
1. Lisez les instructions importantes sur la sécurité page 4
et assurez-vous de les avoir bien comprises.
2. Avant d’effectuer toute connexion, assurez-vous que tous
les appareils soient hors tension. Vérifiez que le volume général,
le niveau et le gain soient réglés au minimum.
3. Connectez les sorties niveau ligne de la console de mixage (ou
autre source) aux entrées du SP260.
4. Connectez les sorties du SP260 aux entrées d’enceintes et/ou
Subwoofers acti(ves)fs OU aux entrées d’amplis de puissance. Si
vous utilisez des amplis de puissance, connectez leurs sorties aux
entrées d’enceintes passives.
5. Poussez les cordons d’alimentation dans les embases CEI et
reliez leur autre extrémité à des prises secteur reliées à la terre.
6. Mettez la console de mixage (ou autre source) sous tension.
7. Mettez la SP260 sous tension.
8. Sélectionnez la configuration système correspondant le plus à
votre système de sonorisation.
9.
Mettez les enceintes/Subwoofers acti(ves)fs ou amplificateurs sous tension.
10. Assurez-vous que le volume d’entrée de la console de mixage soit
réglé de la même façon que lors d’une utilisation normale.
11. Activez la sortie appropriée du SP260.
12. Montez lentement le niveau principal de la console jusqu’à un
niveau d’écoute confortable.
1. Lesen und beachten Sie die „Wichtigen Sicherheitshinweise“
auf Seite 5.
2. Schalten Sie alle Geräte AUS, bevor Sie die notwendigen
Anschlüsse herstellen. Achten Sie darauf, dass die Master
Volume-, Pegel- und Gain-Regler ganz zurückgedreht sind.
3. Verbinden Sie die Line-Pegel-Ausgänge eines Mischers (oder
einer anderen Signalquelle) mit den Eingängen des SP260.
4. Verbinden Sie die Ausgänge des SP260 mit den Eingängen von
Aktivboxen und/oder Subwoofern ODER mit den Eingängen von
Endstufen. Bei der Verwendung von Endstufen verbinden Sie
deren Ausgänge mit den Eingängen von Passivboxen.
5. Stecken Sie das eine Ende der Netzkabel fest in die Netzan-
schlüsse und das andere Ende in geerdete Netzsteckdosen.
6. Schalten Sie den Mischer (bzw. andere Signalquelle) ein.
7. Schalten Sie den SP260 ein.
8. Wählen Sie das System-Setup, das am besten zu Ihrer PA passt.
9. Schalten Sie die Aktivboxen, Subwoofer oder Verstärker ein.
10. Der Pegel am Mischereingang sollte genauso hoch wie bei
normalem Gebrauch sein.
11. Deaktivieren Sie die Stummschaltung der jeweiligen SP260-
Ausgänge.
12. Erhöhen Sie die Gesamtlautstärke des Mischers langsam auf
einen angenehmen Abhörpegel.
EN
ES FR DE
Puesta en marcha –
Mise en œuvre –
Erste Schritte –
EN
ES
FR DE
EN ES
FR
DE
EN ES FR
DE

Quick Start Guide
11
Quick Start Guide
Technical Specifications / Especificaciones técnicas
Caractéristiques techniques / Technische Daten
All specifications subject to change
Todas estas especificaciones están sujetas a cambios sin previo aviso
Les caractéristiques peuvent être modifiées
Technische Änderungen und Ergänzungen vorbehalten
SRM150
Dynamic Range
Rango dinámico
Plage dynamique
Dynamikbereich
111 dB A-weighted
111 dB ponderación A
111 dB pondéré A
111 dB A-bewertet
Distortion (THD+N)
Distorsión (THD+N)
Distorsion (DHT+Bruit)
Verzerrung (Klirrfaktor+Rauschen)
(20 Hz – 20 kHz)
<0.004%
Frequency Response
Respuesta de frecuencia
Réponse en fréquence
Frequenzgang
20 Hz – 20 kHz, ±0.2 dB
AD/DA
AD/DA
AN/NA
AD/DA
Converter Type • Tipo de convertidor • Type de convertisseur • Wandlertyp: 24-bit AKM®
Dynamic Range • Rango dinámico • Plage Dynamique • Dynamikbereich: 120 dB
Sample Rate • Frecuencia de muestreo • Fréquence d’échantillonnage • Samplerate: 48 kHz
Bit Depth • Profundidad de bits • Résolution • Bit-Tiefe: 24 Bit
Maximum Levels
Niveles máximos
Niveaux maximums
Maximalpegel
Line Level Input • Entrada de nivel de línea • Entrée niveau ligne • Line-Pegel-Eingang: +20 dBu
Output • Salida • Sortie • Ausgang: +21 dBu
USB Format (Formato): USB 1.1
Power Requirements
Alimentación
Alimentation
Spannungsbedarf
100 VAC – 240 VAC, 50 – 60 Hz, 40 W
Size (H x W x D)
Tamaño (A x L x P)
Dimensions (H x L x P)
Abmessungen (H x B x T)
1.8 x 19.0 x 9.0 in
46 x 483 x 229 mm
Weight
Peso
Poids
Gewicht
5.8 lb
2.6 kg

Part No. SW1043 Rev. A 07/14 ©2014 LOUD Technologies Inc. All Rights Reserved.
16220 Wood-Red Road NE • Woodinville, WA 98072 • USA
Phone: 425.487.4333 • Toll-free: 800.898.3211
Fax: 425.487.4337 • www.720trees.com
WARRANTY AND SUPPORT
Visit WWW.720TREES.COM to:
• Identify WARRANTY coverage provided in your local market.
Please keep your sales receipt in a safe place.
• Retrieve a full-version, printable OWNER'S MANUAL for your product.
• DOWNLOAD software, rmware and drivers for your product (if applicable).
• REGISTER your product.
• CONTACT Technical Support.
EN
ES FR DE
GARANTÍA Y SOPORTE TÉCNICO
Visite la página web WWW.720TREES.COM para:
• Conocer la cobertura en periodo de GARANTÍA correspondiente a su país. Le recomendamos
que conserve su recibo de compra o factura en un lugar seguro.
• Conseguir una versión completa e imprimible del MANUAL DE INSTRUCCIONES de este aparato.
• DESCÁRGUESE lo último en software, rmware y drivers para este producto (cuando sea aplicable).
• REGISTRAR este aparato.
• PONERSE EN CONTACTO con el departamento de soporte técnico.
EN
ES
FR DE
GARANTIE ET ASSISTANCE TECHNIQUE
Consultez WWW.720TREES.COM pour:
• Connaître la couverture de la GARANTIE dans votre région. Merci de conserver vos factures
dans un lieu sûr.
• Récupérer une version complète imprimable du MODE D’EMPLOI de votre appareil.
• TÉLÉCHARGER le logiciel, le rmware et les pilotes de votre produit (le cas échéant).
• ENREGISTRER votre produit.
• CONTACTER le département d’assistance technique.
EN ES
FR
DE
GARANTIE UND SUPPORT
Besuchen Sie WWW.720TREES.COM, um:
• Die GARANTIE-Bedingungen für Ihr Land zu nden. Bitte bewahren Sie Ihren Kaufbeleg gut auf.
• Ein ausführliches druckbares BEDIENUNGSHANDBUCH für Ihr Produkt zu nden.
• Software, Firmware und Treiber für Ihr Produkt (falls anwendbar) HERUNTERZULADEN.
• Ihr Produkt zu REGISTRIEREN.
• Den Technischen Support zu KONTAKTIEREN.
EN ES FR
DE
Other manuals for SP260
4
Table of contents
Other Mackie Processor manuals