MACKISSIC MIGHTY MAG VMS25 Quick start guide

Serial No. P/N 805-0411
Read and understand this manual and all instructions before operating the Multi-Surface Vacuum.
Vacuum: Mulit-Surface
Safety & Operating Instructions
VMS25 & VMS25E

[Type text]
Table of Contents
Chapter 1: GeneralSafety Rules..........................................................................................................................................3
Chapter 2: Setting Up the Multi-Surface Vacuum................................................................................................................7
Chapter 3: Operating the Multi-Surface Vacuum..................................................................................................................14
Chapter 4: Maintaining the Multi-Surface Vacuum...............................................................................................................19
Chapter 5: VacuumKit #805-0129.......................................................................................................................................22
Chapter 6: Troubleshooting..................................................................................................................................................24
Chapter 7: Parts Lists, Schematic Diagrams and Warranty..................................................................................................26
Conventions used in this manual
This indicates a hazardous situation, which, if not avoided, will result in death or serious injury.
This indicates a hazardous situation, which, if not avoided, could result in death or serious injury.
This indicates a hazardous situation, which, if not avoided, could result in minor or moderate injury.
Thisinformationisimportantintheproperuseofyourmachine.Failuretofollowthisinstructioncouldresultindamage
toyour machine or property.
Serial Number
ASerialNumberisusedtoidentifyyourmachineandislocatedontheSerialNumberLabelonyourmachine. Foryour
convenienceandreadyreference, enter the Serial Number in the space provided on the front cover of this manual.
Additional Information and Potential Changes
MacKissic Inc.reservestherighttodiscontinue,change,andimproveitsproductsatanytimewithoutnoticeor
obligation tothepurchaser.Thedescriptionsandspecificationscontainedinthismanualwereineffectatprinting.
Equipmentdescribed within this manual may be optional. Some illustrations may not be applicable to your machine.
California Proposition 65
2 MULTI-SURFACE VACUUM

Chapter 1: General Safety Rules
Readthissafety&operatingInstructionsmanualbeforeyouusetheMULTI-SURFACE VACUUM.Becomefamiliar
withthe
operation and service recommendations to ensure the best performance from your machine. If you have any
questions or need assistance, please contact us at www.MacKissic.com or call toll-free 1-800-348-1117 and one of our
Technical
Support Representatives will be happy to help you.
Labels
YourMulti-Surface Vacuumcarriesprominentlabelsasremindersforitsproperandsafeuse.Shownbelowarecopiesof allthe
SafetyandInformationlabelsthatappearontheequipment.Takeamomenttostudythemandmakeanoteoftheir locationon
yourMulti-Surface Vacuumasyousetupandbeforeyouoperatetheunit.Replacedamagedormissingsafety and information
labelsimmediately.
Label Included with Collection Bag #805-0345
#930-0002
#805-282971
#091-0043
#930-0006
(Electric Start Models Only)
CONTACT US AT www.MacKissic.com 3

Protecting Yourself and Those Around You
Thisisahigh-poweredmachine,withmovingpartsoperatingwithhighenergyathighspeeds. Useproperclothingandsafety
gearwhenoperatingthismachinetopreventorminimizetheriskofsevereinjury. Youmustoperatethemachinesafely. Unsafe
operation can create a number ofhazards for you, aswell as anyoneelsein the nearby area. Always take the following precautions
when operating thismachine:
•
Alwayswearprotectivegogglesorsafetyglasseswithsideshieldswhileoperatingthisvacuumsystemtoprotectyoureyes
from possible foreign objects thrown from the machine.
•
Wear shoes with non-slip treads whenusing your Multi-Surface Vacuum. Ifyou have safety shoes, we
recommend
wearing them. Donot use the machine while barefoot orwearing opensandals.
•
Avoid wearing loose clothing or jewelry, which can catch on the machine’s moving parts.
•
WerecommendwearinggloveswhileusingyourMulti-Surface Vacuum.Besureyourglovesfitproperlyanddo not have
loose cuffs ordrawstrings.
•
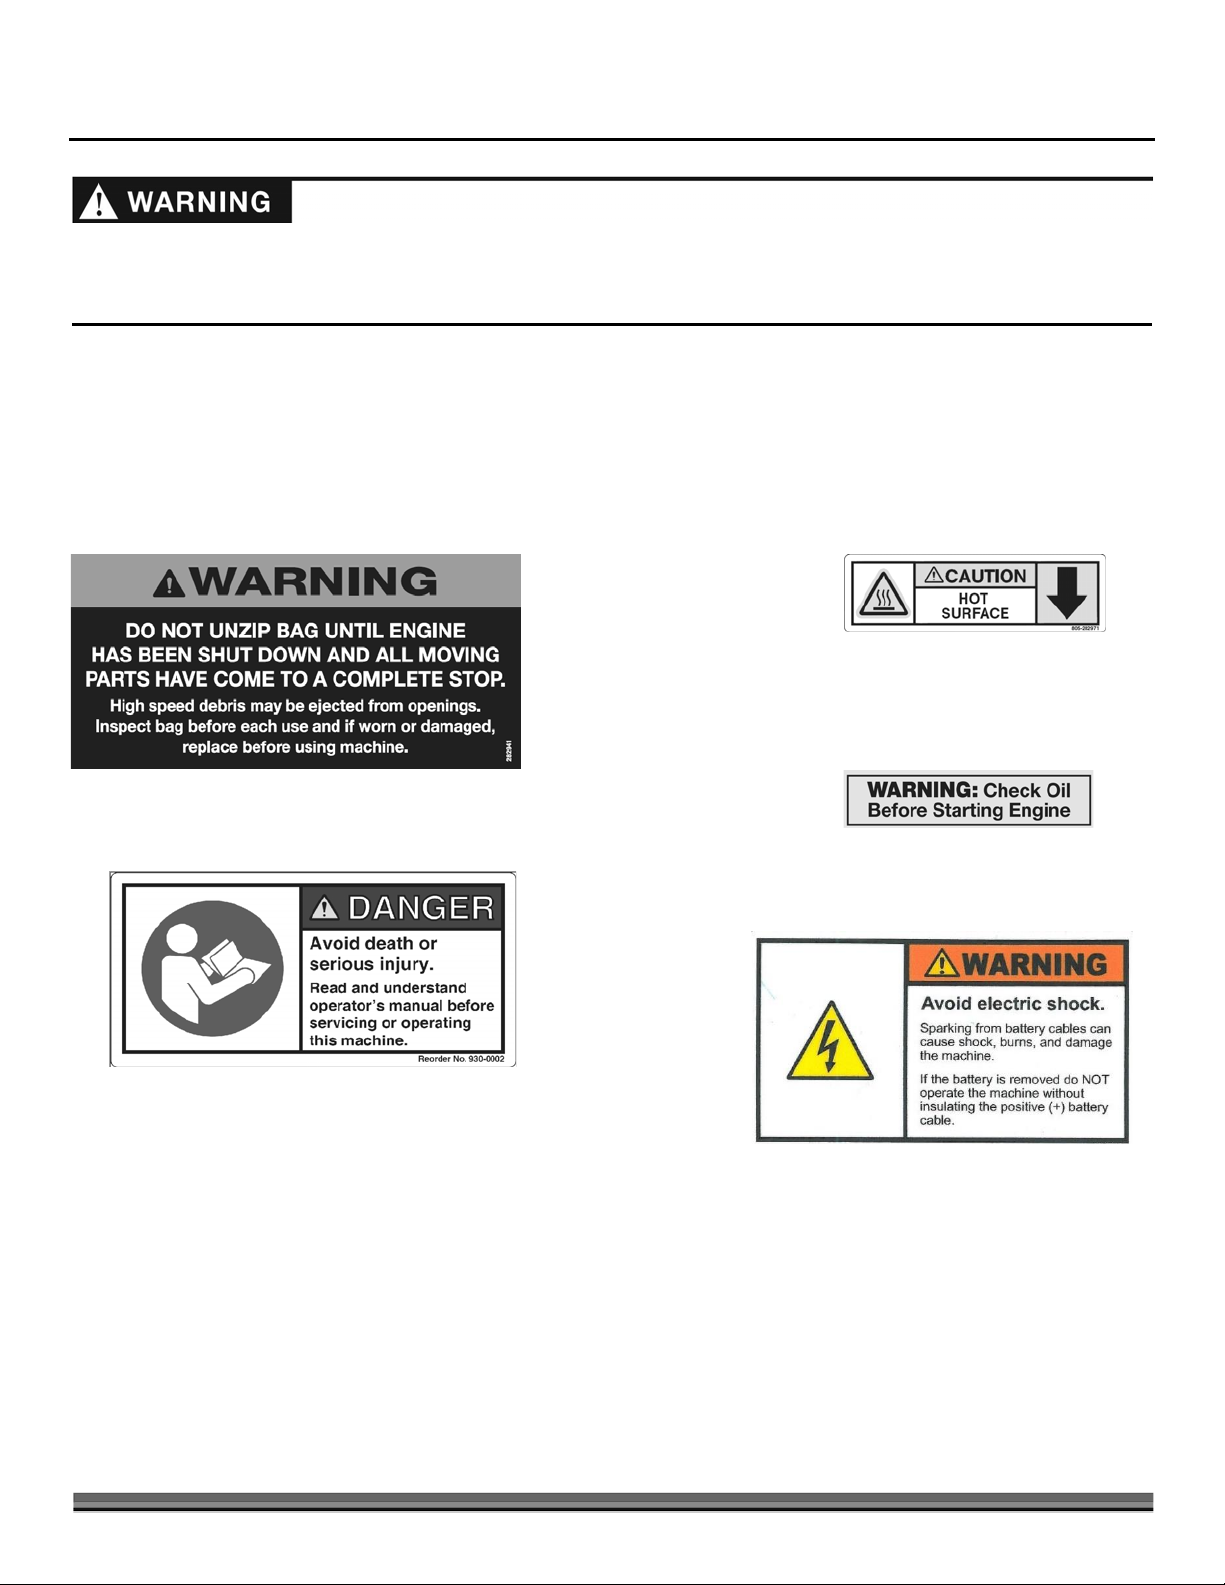
Always wear gloves when emptying the debris bag.
•
After vacuuming glass, bottles or cans, dispose ofthis waste properly, never in a compost pile.
•
We recommend changing the debris bag after vacuuming glass and other debris and before using the system to vacuum
material that may be used for compost or mulch.
•
Wear long pants while operating the machine.
•
Use ear protectors or ear plugs rated for at least 20 dba to protect your hearing.
•
Neverallowpeoplewhoareunfamiliarwiththeseinstructionstousethevacuum. Allowonlyresponsibleindividualswhoare
familiar with these rules of safe operation to use your machine.
•
Neverplaceyourhands,feet,oranypart ofyourbody nearorunderany movingpartwhilethemachineisrunning.
•
Keepbystandersawayfromyourworkareaatalltimes.Tobesafe,donotoperatethemachinenearsmallchildrenorpets,
andneverallow childrentooperatethevacuum. Stoptheenginewhenanotherpersonorpetapproaches.
•
Never use the machine with the debris bag removed.
•
Never operate the engine with the air cleaner orcover over the carburetor air-intake removed, except for adjustment. Removal
of such parts could create a fire hazard. Donot use flammable solutions toclean air filter.
•
The muffler and engine become very hot and can cause a severe burn; do not touch.
•
Cleartheworkareaofobjectssuchasrock,string-likematerial,wire,rope,orrags. Ingestingtheseobjectsintothevacuum
could damage the machine and/or cause injury.
•
Never,underanyconditions,remove,bend,cut,fit,weld,orotherwisealterstandardpartsonthemulti-surface
vacuum.Thisincludesallshieldsandguards. Modificationstoyourmachinecouldcausepersonalinjuriesandproperty
damage and will void yourwarranty.
Safety for Children and Pets
Tragicaccidentscanoccuriftheoperatorisnotalerttothepresenceofchildren.Childrenareoftenattractedtothemachineand
the vacuuming activity. Never assume that children will remain where you last saw them.
•
Keep children out of the work area and under the watchful care of a responsible adult.
•
Bealert and alwaysturnoff theMulti-Surface Vacuumengine ifchildren enterthework area.
•
Before, and while moving backwards, look behind, and down for small children.
•
Never allow children to operate the vacuum.
•
Useextracarewhenapproachingblindcorners,shrubs, trees,orotherobjects thatmayobscureyourvision.
4 MULTI-SURFACE VACUUM

Safety with Gasoline-Powered Machines
Gasolineisahighlyflammableliquid. Gasolinealsogivesoffflammablevaporthatcanbeeasilyignitedandcauseafireor
explosion. Never overlook the hazards of gasoline. Always follow theseprecautions:
•
Neverruntheengineinanenclosedareaorwithoutproperventilationastheexhaustfromtheenginecontainscarbon
monoxide, which is an odorless, tasteless, and deadly poisonous gas.
•
Storeallfuelandoilincontainersspecificallydesignedandapprovedforthispurposeandkeepawayfromheatandopen
flame, and out of the reach of children.
•
Fillthegasolinetankoutdoorswiththeengineoffandallowtheenginetocoolcompletely. Donothandlegasolineifyouor
anyonenearbyissmoking,orifyouarenearanythingthatcouldcauseittoigniteorexplode. Replacethefueltankandfuel
container caps securely.
•
Ifyouspillgasoline,donotattempttostarttheengine. Movethemachineawayfromtheareaofthespillandavoidcreating
anysourceofignitionuntilthegasvaporshavedissipated. Wipeupanyspilledfueltopreventafirehazardandproperly
dispose of thewaste.
•
AllowtheenginetocoolcompletelyandemptythedebrisbagbeforestoringtheMulti-Surface Vacuuminany
enclosure.Remember,decomposingmaterialgeneratesheatandcouldstartafire.Neverstorethemachinewithgasinthe
tank or a fuel container, near an open flame or spark such as a water heater.
•
Nevermakeadjustmentsorrepairswiththeenginerunning. Disconnectthesparkplugwireandkeepthewireawayfromthe
spark plug to prevent accidental starting.
•
Nevercheckforanignitionsparkwiththesparkplugorsparkplugwireremoved. Useanapprovedsparktester.
•
Never tamper with safety devices. Check their proper operation regularly.
•
Neverchangethe enginegovernorsettingsormodifythe enginespeed. Modificationswillvoidyourwarranty.
•
Toreduce firehazard, keeptheengineandmuffler areafree of debris build-upsuchasleaves,grass,oil,grease, orany other
combustible material. Clean the engine area after eachuse.
•
Neveroperatetheenginewithoutthemuffler. Inspectthemufflerperiodicallyandreplaceifnecessary. Ifequippedwitha
muffler deflector, inspect the deflector periodically and replace if necessary.
•
Never operate the engine with the air cleaner or the cover over the carburetor air-intake removed, except for adjustment.
Removal of such parts could create a fire hazard.
•
Always check fuel lines and fittings frequently for cracks or leaks, replace if necessary.
Safety on Slopes
Slopesareamajorfactorrelatedtoslipandfallaccidents,whichcanresultinsevereinjury. Allslopesrequirecaution. Ifyoufeel
uneasyonaslope,do notvacuumit. Always takethefollowingprecautionswhenusing thismachine onslopes:
Always:
•
Vacuumacrossthefaceofslopes;neverupanddown. Exerciseextremecautionwhenchangingdirectiononslopes.
•
Remove objects such as stones, wire, rope, or rags.
•
Watch for holes, ruts, or bumps in the landscape.
Never:
•
Never vacuum near drop-offs, ditches, or embankments;you couldlose your footing or balance.
•
Never vacuum onslopes greater than 20 degrees, or any excessively steep slopes.
•
Never vacuum on wet, or slippery slopes; reduced traction could result in slipping.
•
Never park the vacuum on a steep grade or slope.
CONTACT US AT www.MacKissic.com 5

General Safety
Operatingthisvacuumsafelyisnecessarytopreventorminimizetherisk of
deathorseriousinjury
. Unsafeoperationcancreatea
number of hazards for you. Always take the following precautions when operating this vacuum:
•
Keepinmindthattheoperatororuserisresponsibleforaccidentsorhazardsoccurringtootherpeople,theirproperty,and
themselves.
•
YourMulti-Surface Vacuumisapowerfultool,notaplaything. Exerciseextremecautionatalltimes. The design of
this machine is tovacuum debris on turf or hard surfaces. Do not use it for any other purpose.
•
Know how to stop the vacuum quickly.
•
Never allow people or pets to ride on the Multi-Surface Vacuum.
•
Never start the engine without the debris bag attached firmly to the discharge tube.
•
NeverattempttoremovethedebrisbagwhiletheMulti-Surface Vacuumengineisrunning. Debrismayexitat high
velocity out of the openings created in the seams as you unlatch the debris bag.
•
Empty the debris bagafter each useto prevent spontaneous combustion due to decaying material.
•
Do not vacuum in sandy areas where you will vacuum large quantities of sand.
•
Never operate the vacuum near hot or burning debris or any toxic or explosive materials.
•
Ifthemachineshouldstartmakinganunusualnoiseorvibration,stoptheengineandwaitfive(5)minutestocool. Vibration
isgenerallyawarningoftrouble. Disconnectthesparkplugwireandinspectforclogging,damaged,orwornimpeller,loose
impellerbolt,looseimpellerkey,orlooseenginemountingbolts. Cleanandrepairand/orreplacedamagedparts.
•
AlwaysshutofftheMulti-Surface Vacuumengine,waitfive(5)minutestocool,anddisconnectthesparkplug
wire before attempting to clear any obstructions.
•
Alwayskeeptheequipmentinagoodsafeoperatingcondition.Alwaysmakecertainnutsandboltsaretightandalwaysuse
the supplied self-locking hardware; do not substitute.
•
Use the Multi-Surface Vacuum only in daylight.
•
Whileusingthevacuum,donothurryortakethingsforgranted. Whenindoubtabouttheequipmentoryoursurroundings,
stop the machine and take the time to look things over.
•
Never leave the machine unattended with the engine running.
•
Do not operate the machine when under the influence ofalcohol, drugs, or medication.
•
See manufacturer’s instructions for proper operation and installation ofaccessories. Only use accessories approved by
MacKissic Inc.
A Note to All Users
UnderCalifornialaw,andthelawsofsomeotherstates,youarenotpermittedtooperateaninternalcombustionengineusing
hydrocarbon fuels without an engine spark arrester. This also applies to operation on US Forest Lands. All Multi-Surface Vacuum’s
shippedtoCalifornia,NewMexicoandWashingtonStateareprovidedwithsparkarresters.Failureoftheowneror operatorto
maintainthisequipmentincompliancewithstateregulationsisamisdemeanorunderCalifornialawandmaybein violationof
otherstateand/orfederalregulations.ContactyourStateParkAssociationortheappropriatestateorganizationfor specific
information in yourarea.
Additional Information and Potential Changes
MacKissic Inc.reservestherighttodiscontinue,change,andimproveitsproductsatanytimewithoutnoticeorobligation tothe
purchaser. Thedescriptionsandspecificationscontainedinthismanualwereineffectatprinting. Equipmentdescribed within
this manual may be optional. Some illustrations may not be applicable to your machine.
Nolistofwarningsandcautionscanbeall-inclusive. Ifsituationsoccurthatarenotcoveredbythismanual,theoperatormust
applycommonsenseandoperatethisMulti-Surface Vacuuminasafemanner.Contactusatwww.MacKissic.comorcall1-
800-348-1117 forassistance.
6 MULTI-SURFACE VACUUM

Chapter 2: Setting Up the Multi-Surface Vacuum
ItmaybehelpfultofamiliarizeyourselfwiththecontrolsandfeaturesofyourMulti-Surface VacuumasshowninFigure1 before
beginningtheseprocedures.Ifyouhaveanyquestionsatall,pleasefeelfreetocontactusatwww.MacKissic.com orcall1-800-
348-1117.
Multi-Surface Vacuum Controls and Features
Handle Bar
Assembly
Vacuum Housing
Safety
Switch
Vacuum Snout
Flat-Free Wheels
Collection Bag
Height Adjust
Lever
Discharge Tube
Quick
Disconnect
Latches
Safety
Switch
Electric Start
(If Applicable)
Figure 1
CONTACT US AT www.MacKissic.com 7

Specifications
Unpacking the Multi-Surface Vacuum
Tools Needed:
• UtilityKnife
1.
CutopenthetopoftheBoxwithaUtilityKnifeandremovealllooseparts
and the PolyBag.
NOTE:SomepartsmaybeunderthemachineorinbetweentheBoxdividers.
Shipping Box Contents (Figure 2 and Table Below)
Poly Bag Contents (Figure 3 and Table Below)
ITEM#
DESCRIPTION
1
Owner’s Manual
2
Engine Manual
3
Warranty Card
4
Hardware Bag
5
Safety Glasses
6
Hearing Protection
7
Work Gloves
8
Safety Key (Electric start only)
Manual Start
Electric Start
Engine
See Engine Owner’s Manual
Impeller Drive Method
Direct Drive
Direct Drive
Impeller Speed
145 MPH
145 MPH
Height Adjustment Range
5/8" to 4"
5/8" to 4"
Collection Bag Volume
4 bushels
4 bushels
Overall Length
67"
67"
Overall Height
43"
43"
Width
25.5"
25.5"
Machine ship Weight
187 Lbs.
197 Lbs.
ITEM#
DESCRIPTION
1
VMS Machine (not shown)
2
Bag Hanger Frame, Upper
3
Upper Handle Assembly
4
Bag Hanger Frame, Sides (x2)
5
Vacuum Snout
6
Discharge Tube
7
Poly Bag
8
Collection Bag
2
3
4
5
6
7
8
Figure 2
8 MULTI-SURFACE VACUUM

Hardware Bag Contents (
Figure 4 and Table Below
)
Compare the contents of the Shipping Box, Poly Bag and
Hardware Bag with
the“Contents” listsabove.Ifyou
haveanyquestionspleasecontactusat
www.MacKissic.com or call1-800-348-1117 for
assistance.
NOTE:
Assembly should be done on a clean, level surface.
DONOTtrytoliftthemachineoutofthebox,itisvery
heavyandmaycause severe injury.
2.
Usetheutilityknifetocutdownthetwocornersone
endof theBox,and then roll the machine out (Figure
5).
Assembling the Multi-Surface Vacuum
Tools Needed:
•
5/16" Wrench
•
Two 1/2" Wrenches
•
Two 7/16" Wrenches
1.
Position the two Lower Bag Hanger Frames onto the
cross member of the Lower Handle and loosely install
with two 5/16-18 x 1" Bolts and two 5/16- 18 Nylon
Locknuts using two 1/2" Wrenches (Figure 6).
2.
PositiontheUpperBagHangerFrameontothetwo
LowerBagHanger Sideswiththetopholesfacing
closertotherearofthemachine. Secure thelowertwo
setsofholesintheUpperBagHangerFrametothe
Lower BagHangerFrameswithfour5/16-18x1"Bolts
andfour5/16-18Nylon Locknutsusingtwo1/2"
Wrenches. TightentheHardwareyouinstalledin the
previousstep.
3.
TaketheUpperHandleBarAssemblyandslidetheflat
endsoftheUpperHandleinsidetheLowerHandle.
Securewithfour5/16- 18x 1" Bolts and four 5/16-18
Nylon Locknuts (Figure 7).
C
O
N
T
A
C
T
U
S
A
T
ITEM#
PART#
DESCRIPTION
QTY
1
090-0502
5/16 FENDER WASHER
6
2
805-0326
CARABINEERS
2
3
4
805-0119
BAG HANGER HOOKS
3
5
090-0088
5/16-18 X 1” HHCS
10
6
090-0418
5/16-18 WHIZ LOCKNUT
3
7
090-0460
5/16-18 NYLOCK NUT
14
8
090-0232
5/16 FLAT WASHER
2
9
090-0503
5/16-18 SELF TAPPING HHCS
4
VMS
Machin
e
1
2
3
5
9
7
Figure 5
Figure 4
Figure 6
Upper Bag
Hanger Frame
Bolts and
Locknuts
Lower
Bag
Hanger
Frame
Bolts and
Locknuts
CONTACT US AT www.MacKissic.com 9
4
6
8

4.
LocatethetwoCarabiners,threeBagHangerHooks
andfour5/16-18Wiz Nuts included in the Bolt Bag.
Mount the two upper Hooks through the upper holes
in the Handlebar Assembly with the Hooks on the
inside (Figure8). SecurewithaWizNutontheoutside
oftheUpperHandlebar.
5.
ThreadaWizNutontotheoneremaining Hookasfar
as it will go on the threads so that the flat side of the
NutisfacingawayfromtheHook(See detail).
6.
InserttheHookintotherightsideoftheBagHanger
Frameandsecurewith a Wiz Nut.
7.
InstallthetwoCarabinersontotheBagHangerFrame
withwidersidedown and clip facing the rear of the
machine.
8.
PlacetheDischargeTubeontopoftheHousing(Figure
9).Besure thedischargeopeningisdirectedtotherear
ofthemachineandbetween theHandles. Securethe
TubetothefrontoftheHousingwithtwo5/16”-18 x 3/4"
Self-TappingBolts and two5/16Fender Washers.
9.
SecuretheTubeandtwoSafetyWireHarnessCable
Clampstotherearof
theHousingwithtwo5/16”-18x5/8"BoltsandFlatWashers (not fender
washers) (Figure10).
10.
ConnecttheSafetyHarnessontotheTerminalsoftheBagSafetySwitch
(Figure11)andsecuretheCableClamptotheholeinthesideofthe
DischargeTubewiththeSelfTappingScrewusinga5/16"Wrench.
Bolt
and
Fender
Washer
Dis
charg
e
Tube
Housin
g
Discharge
Tube
Safety Switch
Harness
Screw
Cable
Clamp
Safety Switch
Terminals
Discharge Tube
Bolt
Safety Switch
an
d
Harness
Fla
tWasher
Cable
Clamp
s
Lower Bolts and
Handlebar Locknuts
Upper Handlebar
Carabiner
Bag Hanger Hook
With Wiz nut
Upper
Handlebar
Bag
Hanger
Hook
with
Two Wiz
nuts
Figure 7
Figure 8
Figure 9
Figure 10
Figure 11
10 MULTI-SURFACE VACUUM

Note:
InstallationoftheVacuumSnoutwillbeeasierifthefrontofthemachineis
raised. See“Adjusting theVacuumSnoutHeight” onpage16toraisethefrontof
the machine.
11.
PlacetheVacuumSnoutontothefrontoftheHousing(Figure12)sothe
studsarelocatedintheright-handsideofthelowerslots(DetailA). Slide
theSnouttotherightanddownsothePlungerBracketontheSnoutpushes
the Safety Switch in (Detail B).
12.
Installfour5/16-18nylon locknutswithFenderWashersontothestuds
to secure the VacuumSnout.
13.
LocatethetwoBagHangerStrapsontherear(zipperend)oftheBag.
AttachthetwoStrapstotheHooksnearthetopoftheHandlebar(Figure
13).
14.
LocatethethreeBagHangerStrapsonthefrontoftheBagandhangthem
ontheHookontherightsideandtothetwoCarabinesatleftandcenterof
the Bag HangerFrame.
15.
SliptheBagInlet Neckover theDischarge Tube(Figure 14).
16.
HookthebottomtwoLatchHooksovertheMetalRingintheBagInletand
latch them.
17.
HookthetopLatchovertheMetalRingintheBagInletandclosetheLatch
(Figure 15).
Figure 13
Figure 15
Figure 14
Bag Inlet
Neck
Discharge Tube
Bag Latches
Bag
Latch
Discharge
Tube
Bag
Inlet
Neck
Rear Bag
HangerStraps
Front Bag
HangerStraps
Detail
Detail B
Figure 12
Vacuum
Snout
Safety
Switch
5/16-18
Nylocks
Plunger
Bracket
CONTACT US AT www.MacKissic.com 11

Beforestartingengine,alwayscheckoillevel. Refertothefollowingsection
Adding the Engine Oil and Gasoline
Youmustaddoilbeforestartingtheengine. Thismachineisshippedwithout
oil.Tracesofoilmaybeinthereservoirfromfactorytesting,butyoumust
addoilbeforestartingtheengine. Fillthereservoirslowly,checkingthelevel
frequently to avoidoverfilling.
To Add Engine Oil
1.
Removetheyellowoilfillcapfromtherighthandsideoftheengine(Figure
16). Filltheenginewithoiluntiltheoillevelisabouta 1/4 inchbelowthe
top of the oil fillopening.
Note:
Addoilslowlyandwaitseveralminutesforoiltosettlebeforerecheckingoil
level.
2.
Replace and tighten the oil fill cap.
To Add Gasoline
1.
Removethecapfromthefueltank. Insertacleanfunnelintothefueltank
(Figure 17).
2.
Fillthefueltankwithfresh,cleanunleadedregularautomotivegasolineto1
inch below the bottom of the filler neck to provide space for any fuel
expansion.
3.
Reinstallthefuelfillcapsecurelyandwipeupanyspilledgasoline.
Hooking up the Battery
1. SlidetheNegative(black)BatteryWireontotheNegativeBatteryTerminal
(Figure 18).
Your machine is now ready to use.
OilFillCap
Negative
Battery Wire
Figure 16
Figure 17
Figure 18
12 MULTI-SURFACE VACUUM
Fuel
Tank
Cap

Chapter 3: Operating the Multi-Surface Vacuum
Choke
Starter Pull Handle
Choke
Fuel ShutOff
Fuel Shut Off
On/Off
Switch
Starter
Switch
Safety
Key
ItmaybehelpfultobetterfamiliarizeyourselfwiththefeaturesofyourMulti-
Surface VacuumbyreviewingFigure1inChapter2beforebeginningthe steps
outlined in this chapter. Always refer to the Engine manual for more specific
Engine information.
Starting the Engine (manual Start)
1.
MovetheChokeControlLevertothe“CHOKE” position(leaveintherun
position ifthe engine is already warm) (Figure 19A).
2.
Movethethrottlecontrolto“FULL SPEED” (rabbit)position.
3.
Turn the On/Off Switch to the ON position (if equipped)
4.
SlowlypulltheStarterCorduntilyoufeelresistance,thenpullquickly.The
Cord will recoil back into position (Figure 19A).
5.
Astheenginewarmsup,slowlyadjusttheChoketotheLefttowardsthe
“RUN” position.WaituntiltheenginerunssmoothlybeforeeachChoke
adjustment.
Starting the Engine (Electric Start)
1.
MovetheChokeControlLevertothe“CHOKE” position(leaveintherun
position ifthe engine is already warm) (Figure 19B).
2.
Movethrottlecontrolto“FULL SPEED” (rabbit) position.
3.
InserttheSafetyKeyintotheslotundertheStarterSwitch(Figure19B).
NOTE: The Engine will not start or run with the Safety Key removed.
4.
PresstheStarterSwitchfullytotheright(start)untiltheEnginestartsandlet
go of the Switch. The Switch will return to the center (run) position.
5.
Astheenginewarmsup,slowlyadjusttheChoketothelefttowardsthe
“RUN” position.WaituntiltheenginerunssmoothlybeforeeachChoke
adjustment.
Stopping the Engine (manual Start)
1.
SlowlymovetheThrottleControlLevertothe“IDLE” position.
2.
Turn the On/Off Switch tothe OFF position (Figure 19A).
Stopping the Engine (Electric Start)
1.
Slowly move the Throttle Control Lever to the “IDLE” position.
2.
Turn the Switch to the OFF position.
Choke
Starter Pull Handle
Figure 19A
Figure 19B
CONTACT US AT www.MacKissic.com 13

Installing or Emptying the Collection Bag
Use the bag at all times - failure to do this could cause serious injury.
•
Emptythebagassoonasitisfull(checkbyfeelingsidesofbag). Overfillingthebagwillcausethevacuumingperformanceto
decrease or stop completely and could lead toclogging of the discharge tube, snout, or both.
•
Empty the bag completely BEFORE storing the machine to prevent premature deterioration of the bag caused from rotting
debrisand the possibility ofa fire occurring as aresult of heat generated by decomposing debris.
Bag Maintenance
•
Keepthebagcleanbyoccasionallywashingitbyhandwithmildsoapandwater. Acleanbagimprovesairflowandresultsin
bettervacuumingperformance. Donotwashthebaginanautomaticwasher. Donotuseacleanerwhichcontainsbleach.
Allow the bag to dry thoroughly before storing.
Installation of the Bag
1.
Locatethetwobaghangerstrapsontherear(zipperend)ofthebag. Attachthetwostrapstothehooksnearthetopofthe
handlebar.
2.
LocatethethreebaghangerstrapsonthefrontofthebagandhangthemonthehookandtwoCarabinersonthefrontframe.
3.
Slip the neck over the discharge tube.
4.
HookthebottomtwoLatchesovertheMetalRingintheBagInletbutdonotclosetheLatchesatthistime.
5.
HookthetopLatchovertheMetalRingintheBagInletandclosetheLatch. ClosethebottomtwoLatches.
Emptying the Bag
1.
Shutofftheengine,disconnectthesparkplugwirefromthesparkplug,andmakesureallmovingpartshavecometoa
complete stop.
2.
Leavethebaginpositionbetweenthehandles. Unzipthebackflapandletthedebrisfallout. Youmayhavetoscoopoutthe
remaining debris with astick.
Clearing the Machine of Debris, Clogs or Jams
Aclogorjaminthemachinecancausethevacuumingandshreddingoperationstodecreaseorevenstopcompletely. Ifclogging
occurs, take the followingsteps:
1.
STOPTHEENGINEIMMEDIATELYand disconnectthesparkplugwirefromthesparkplug. Waitforallmovingpartsto
come to a completestop.
2.
Check (and clean, if necessary) the following areas in this order:
•
Check that the collection bag is not overfilled. Remove and empty it.
•
Whilethebagisremoved, checkthedischargechuteanddetermineifitisclogged. Useasticktoclear this chute.
•
Nextcheckthevacuumsnout. Removethevacuumsnoutbyremovingfour5/16-18 nylon locknuts. Ifcloggedorjammed,
useastickto remove debris.
•
Whilethevacuumsnoutisremoved,youcanseeiftheshreddingchamberisclogged. Ifclogged,removethedebriswitha
stick.
14 MULTI-SURFACE VACUUM

Adjusting the Vacuum Snout Height
1.
Theheightofthevacuumsnoutcanbeadjustedtoallowyoutovarythe
suctiontomeetthesurfaceconditions. Forshortturfwithlightleaffall,it
canbeloweredto1-1/4"offthesurface. Forlongturfandheavyleaffall,it
should be raised tothe upper setting about 2 3/4 inches.
2.
Formovingthemachinelongdistances,youwillavoiddamagetothesnout
by raising it to the highest setting.
3.
Toraise the snout: Grasp the height adjuster handle, apply pressure away
fromtheadjusterplateandBACKtowardstheoperator’sposition(Figure
20).
4.
Tolower the snout: Grasp the height adjuster handle, apply pressure away
fromtheadjusterplateandFORWARDawayfromtheoperator’s position.
Figure 20
CONTACT US AT www.MacKissic.com 15

Operating Safety
•
TheoperationofanyMulti-Surface Vacuumcanresultinforeignobjectsbeingthrownintotheeyes,whichcanresultin
severeeyedamage. AlwayswearthesafetyglassesprovidedwiththeMulti-Surface Vacuumoreyeshieldsduring use or
while performing any adjustments or repairs.
•
OnlyoperateyourMulti-Surface Vacuumfromtheoperator position. Ifitisnecessaryforanyreasonto
inspectorrepairanypartofthemachinewhereamovingpartcancomeincontactwithyourbodyorclothing,stopthe
engine,allowittocool,disconnectthesparkplugwirefromthesparkplugandmoveitawayfromthesparkplugbefore
attempting any inspection orrepairs.
Using the Vacuum
•
The multi-surface vacuum can be used on turf or on hard surfaces, such as driveways, patios, sidewalks, and parking
lots.
•
In turf applications your VMS will vacuum better on short grass. Keep the grass as short as possible for best results.
•
On hard surface applications keep the snout low. Lower it so that the snout flap lightly scrapes the surface.
•
Beforeleavesdrop,mowyourlawntotheshortestrecommendedheight.YourVMSwillvacuumbetteronshortgrass.
•
Avacuumisdesignedtobeusedfrequentlyduringperiodswhenleavesaredropping.Donotletleavesget4” ordeeper.
The drier the leaves thebetter.
•
Thethickertheleaflayerthesloweryoushouldproceed.Ifleavesarewetormatteddownitmaybenecessaryto fluff up
leaves before using the vac.
•
Snoutheightiscritical. Thesnoutshouldrideabovetheleaflayertoallowpropervacuuming… closerisnotalwaysbetter.The
snout flap should scrape the top of the grass.
•
Youshouldavoidvacuumingtwigsandbranchesintothesnout. Thiscancauseclogging.
•Avoidoverfillingthevacuumsnout. Thiswillcauseclogging. Wetandsoggymaterialwillalsocauseclogging. Asteady,
smaller flow of materials provides the most effective results.
•
Thebagshouldnotberemovedforemptying,simplyunzipanddumpleavesout.Ifyouwishtomoveorbagleaves,dumponto
a tarp.
•
Avoidcloggingwhenvacuumingloose,stringymaterialsuchashayorpinestraw,bypickingupasmallamountatatime.
Check and empty the collection bag frequently.
•
Use care when vacuuming nearplantings, ornamentals, mulches, especially stone and gravel.
Ifthemachineclogsorjams,immediatelyshutofftheengine,waitforallmovingpartstocometoacompletestop,and
disconnect the spark plug wire from the spark plug before machine inspection.

Chapter 4: Maintaining the Multi-Surface Vacuum
Regularmaintenanceisthewaytoensurethebestperformanceandlonglifeofyourmachine. Pleaserefertothismanualandthe
enginemanufacturer'sowner'smanualformaintenanceprocedures. Serviceintervalslistedinthechecklistbelowsupersede
those listed in the engine manufacturer's owner's manual.
Beforeperforminganymaintenanceprocedure,shutofftheengine,waitforallmovingpartstocometoacompletestop,and
disconnect the spark plug wire from the spark plug.
Regular Maintenance Checklist
PROCEDURE
BEFORE EACH USE
EVERY 25 HOURS
EVERY 50HOURS
Check Engine Oil Level
Check Fuel Level
Check General Equipment Condition
Clean Air Filter
Clean Engine Exterior & Cooling Fins
Change Engine Oil
1st time 5 hours
Replace Spark Plug
Replace Air Filter
Changing Engine Oil
Checkengineoillevelregularly-WHILETHEUNITISINALEVELPOSITION.
Checktheoilbeforeeachusage.Stopengineandwaitseveralminutesbefore
checkingoillevel. Withenginelevel,theoilmustbeabouta1/4inchbelowthe
top of the yellow oil fill cap opening. Change oil after the first five hours of
operationandevery25hoursthereafter.Refertotheenginemanualenclosed
with this unit for additional information on your engine.
Discharge Tube
Bag Maintenance
Keepthebagcleanbyoccasionally
washingitbyhandwithmildsoapand
water. Acleanbagimprovesairflowand
resultsinbettervacuumingperformance.
Do notwashthebaginanautomatic
washer. Donotuseacleanerwhich
contains bleach. Allow the bag to dry
thoroughly before storing.
Figure 21
5/16-18
Nylocks
Discharge
Tube
Hardware
Discharge Tube
Vacuum
Snout
16 MULTI-SURFACE VACUUM

CONTACT US AT www.MacKissic.com 17

Battery Care (electric start machines)
Propercare can extendthe lifeof a Battery. Followthese recommendations to ensure your Battery’s best performance and long
life:
•
DonotallowtheBatterychargetogettoolow. Ifthemachineisnotused,chargetheBatteryevery4–6weeks. Operatethe
Engine for at least 45 minutes to maintain proper Battery charge.
•
Store an unused Battery in a dry area that does not freeze.
•
Donot charge an already charged Battery. In theory, you cannot overcharge our Battery with a trickle Charger; however, when a
BatteryisfullychargedandtheChargerisstillon,itgeneratesheatthatcouldbeharmfultotheBattery. AfullychargedBattery
will read 12V-13.2V with aVoltmeter.
•
Do not continue to crank the Engine when the Battery charge is low.
Disposing of the Battery Responsibly
The Battery is a sealed lead-acid Battery. Recycle or dispose of it in an environmentally sound way.
•
Do not dispose of a lead-acid Battery in a fire; the Battery may explode or leak.
•
Donotdisposeofalead-acidBatteryinyourregular,householdtrash. Lawinmostareasprohibitsincinerating,disposingina
landfill, or mixing a sealed lead-acid Battery with household trash.
Charging the Battery
OperatetheEngineforatleast45minutestomaintainproperBatterycharge. IftheBatterylosesitscharge,you'llneedtousea
trickleChargertorechargeit. TheChargershouldhaveanoutputof12voltsatnomorethan2 amps.
•
At 1 amp, you may have to charge the Battery for as long as 48 hours.
•
At 2 amps, you may have to charge the Battery for as long as 24 hours.
Note:
Thechargingsystemofarunningengineisdesignedtomaintainabattery’s presentcharge. Startingamachinethathasa
significantlydischargedordeadBatteryusingtheRecoilStarterorJumperCableswillnotrechargetheBattery.
To connect a Battery Charger to your Multi-Surface Vacuum, follow the steps listed below.
1.
Detach the two (2) Battery wires going to the Battery on your Multi-Surface Vacuum.
2.
Attachtheblack(-)BatteryChargerwiretotheBatterynegative(-)terminal,andattachthered(+)BatteryChargerwiretothe
Battery positive (+) terminal.
3.
Plug the Battery Charger into an outlet.
When you are finished charging the battery, disconnect the charger from the outlet first, then disconnect the battery charger wires
fromthebattery. Ifyouleavethebatterychargerwiresconnectedtothebattery,thebatterywilldischargeitselfbackintothe
charger.
Recycling a Used Battery
Pleasedisposeofused batteriesresponsibly, according to yourlocalhazardous materialsregulations. Never throwawayused
batteries in your householdtrash.
Please dispose of your used Batteries responsibly by recycling them. Call your local Solid Waste Management District or your local waste
handlertolocatethecollectionsitenearestyou. SomecollectionsitesrecycleBatteriesyear-round;otherscollectthemperiodically.
You can also visit the Web site of Earth 911 for more information [www.earth911.org].
For a fee, you can recycle your Batteries with the International Metals Reclamation Company. Visit them at www.inmetco.com for Battery
Recycling and contactinfo.
To learn more about hazardous waste recycling, visit the Web site for Battery Council International [www.batterycouncil.org] or for the
Environmental Protection Agency[www.epa.gov].
18 MULTI-SURFACE VACUUM

5
4
6
Chapter 5: Vacuum Kit Accessory #805-0129
Shutdowntheengine,removethesparkplugwireandwait5minutesforpartstocoolbeforeperformingbeforeinstallingthe
Vacuum Kit.
3
6
4
1 2
Tools Needed:
•
5/16" Wrench
•
7/16" Wrench
•
Short Flat HeadScrewdriver
•
Wire Cutters
•
Utility Knife
1.
Cut the Tape on the Box Flaps with a Utility Knife.
2.
RemovethepartsfromtheBoxandlaythemoutonaflatcleanarea.
Shipping Box Contents (Figure 32 and Table Below)
ITEM#
DESCRIPTION
1
Hose, 6" Dia. X 8' Long
2
Adapter, Vacuum
3
Snout, Pick-up
4
Poly Bag
5
Cable Tie, 32"
6
Handle
Poly Bag Contents (Figure 33 and Table Below)
3
ComparethecontentsoftheShippingBoxandPolywiththe“Contents” lists
above.Ifyouhaveanyquestionspleasecontactusatwww.MacKissic.comor
call
1-800-348-1117 forassistance.
NOTE:
Assembly should be done on a clean, level surface.
3.
Unscrewthex4 Nylon LocknutsandremovetheVacuumSnoutfromthe
machine (Figure 24).
1
5
2
ITEM#
DESCRIPTION
1
Tether, Wire
2
Clamp, Hose, 6-1/8"
3
Grip, Handle
4
Guide, Cable
5
Screw, Machine, Rd Hd, 1/4-20 x
6
Nut, Nylon Lock, 1/4-20
5/16-18
Nylocks
Vacuum
Snout
Figure 22
Figure 23
Figure 24
CONTACT US AT www.MacKissic.com 19
This manual suits for next models
1
Table of contents