dosahu detekčního pole detekován žádný pohyb, senzor po 10s (+/- 3s) odpojí napájení
přijímače. Nastavte ovladač "LUX" do polohy min (MĚSÍC). Senzor zaznamená pohyb a
zátěž se zapne za předpokladu, že hodnota osvětlení je nižší než 3lux (noční podmínky, po
setmění). POZNÁMKA: Při testování zařízení v podmínkách denního světla nastavte polohu
regulátoru LUX do maximální polohy (SUN), jinak může být funkce snímače nesprávná!
NEJČASTĚJŠÍ PROBLÉMY: Zátěž se nezapne: a. Zkontrolujte připojení napájení a zátěže
b. Zkontrolujte stav přijímače c. Zkontrolujte úroveň intenzity osvětlení a nastavení
regulátoru soumrakového senzoru Špatná citlivost zařízení: a. Zkontrolujte, zda se před
senzorem nenacházejí nějaké předměty, které by mohly narušovat jeho činnost. b.
Zkontrolujte okolní teplotu. c. Zkontrolujte, zda se detekovaný objekt nachází v detekčním
poli senzoru. d. Zkontrolujte doporučenou montážní výšku. e. Zkontrolujte směr pohybu
předmětu. (citlivost na pohyb) Snímač nemůže automaticky odpojit zátěž:
a. V detekčním poli je vždy pohyblivý prvek. b. Doba vypnutí je příliš dlouhá.
c. Zkontrolujte napájecí napětí.
LIKVIDACE: Zařízení je označeno symbolem přeškrtnuté popelnice, v souladu
s evropskou směrnicí 2012/19 / EU o odpadních elektrozařízeních
a elektronické (WEEE). Produkty označené tímto symbolem by neměly být na konci své
životnosti recyklovány ani likvidovány s jiným domovním odpadem. Uživatel je povinen
zbavit se použitého elektrického a elektronického zařízení jeho odevzdáním do určeného
recyklačního místa. Pro informace o tom, kde a jak likvidovat použité elektrické a
elektronické zařízení způsobem bezpečným pro životní prostředí, by se měl uživatel
obrátit na příslušné místní úřady, na sběrné místo odpadu nebo na prodejní místo, kde
bylo zařízení zakoupeno.
MCE359
RO Senzor de mișcare PIR încorporat
Întrerupător multifuncțional încastrat cu senzor de mișcare, echipat cu un detector cu
infraroșu foarte sensibil. Este un dispozitiv care vă permite să economisiți energie
electrică. Produsul permite pornirea automată a încărcăturii după ce este detectată
mișcarea în câmpul de detectare, datorită senzorului cu infraroșu. Datorită senzorului
de lumină, dispozitivul poate fi setat să funcționeze doar la un anumit moment al zilei.
INFORMATII TEHNICE:
Tensiune: 110-240 V / AC
Frecvența de alimentare: 50 / 60Hz
Lumină ambientală: <3-2000LUX (reglabil)
Întârziere: minim 10 s ± 3 s
max 7 min ± 2 min
Sarcina nominala:
max: 300W 150W (220-240V / AC)
max: 150W 75W (110-130V / AC)
Interval de detectare: 360°
Distanta de detectare: max. 6m
Temperatura de lucru: -20 / + 40°C
Umiditate de lucru: <93% RH
Consum de energie: aproximativ 0,5 W
Inaltime de instalare: 2,2-4m Clasa IP: IP20
Viteza de detectare a miscarii: 0,6-1,5 m/s
Clasa de protectie impotriva socului
CARACTERISTICI: - Senzorul de lumina se poate regla in functie de necesitati: pozitia
SOARE (max) - lucru ziua si noaptea, LUNA - lucrul noaptea cu o intensitate luminoasa
orizontala de aprox 3LUX. - Reglarea timpului de activare: in functie de necesitati,
acesta poate fi setat in intervalul de la 10s ± 3s la 7 minute ± 2min. Cronometrul este
resetat de fiecare dată când dispozitivul detectează mișcare.
NOTE DE INSTALARE: Senzorul reacționează la schimbările de temperatură, de aceea
trebuie evitate următoarele situații: instalarea în apropierea surselor de căldură precum
ventilația, aerul condiționat, sursele de lumină trebuie evitate lângă perdele, plantele
înalte trebuie evitate lângă suprafețe reflectorizante, de exemplu oglinzi.
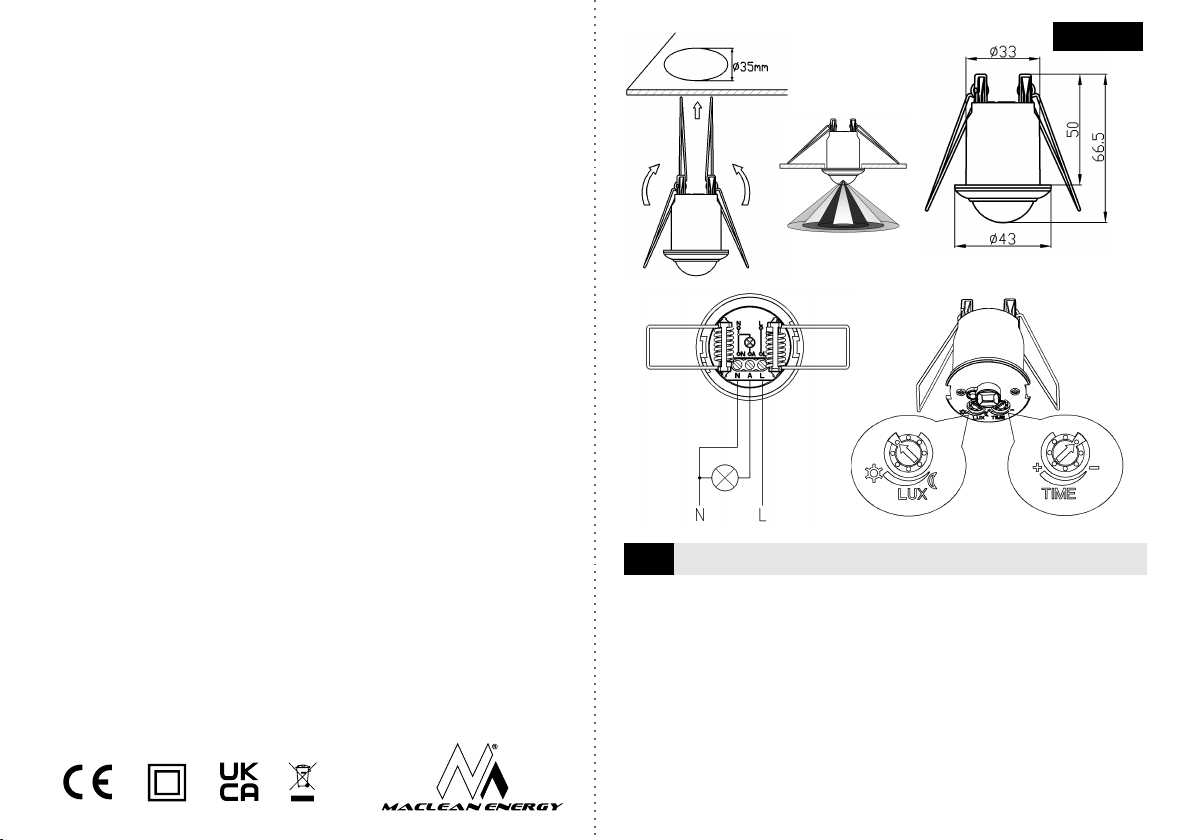
CONECTARE ATENȚIE: pericol de electrocutare, instalarea poate fi efectuată numai de o
persoană cu experiență. Deconectați sursa de alimentare înainte de a începe montajul!
Acoperiți orice fire goale. Asigurați-vă că alimentarea este oprită și nu este pornită.
Deșurubați șuruburile de la ieșirea la fire și apoi conectați firele la senzor conform
diagramei. Fixați senzorul îndoind clemele cu arc în sus și introducându-le în orificiul de
instalare. După ce îl atașați, porniți alimentarea și testați funcționarea dispozitivului.
SCHEMA DE CONEXIUNEA SENSORULUI: (ilustrare)
TEST: Setați regulatorul de intensitate a luminii „LUX” în poziția maximă (SOARE),
comutatorul „TIME” porniți regulatorul de timp în poziția minimă (10 secunde), porniți
alimentarea. Calibrare: după 30 de secunde, dispozitivul intră în modul standby - este
gata pentru munca. Când este detectată mișcare în raza câmpului de detectare, sarcina
este pornită. Când nu este detectată nicio mișcare în raza câmpului de detectare,
senzorul va deconecta sursa de alimentare a receptorului după 10s (+/- 3s).
Setați controlul „LUX” în poziția min (LUNA). Senzorul va detecta mișcarea și sarcina va
fi pornită cu condiția ca valoarea de iluminare să fie mai mică de 3 lux (condiții de
noapte, după amurg). NOTĂ: atunci când testați dispozitivul în condiții de lumină
naturală, setați poziția regulatorului LUX în poziția maximă (SOARE), altfel funcționarea
senzorului poate fi incorectă!
Cele mai frecvente probleme: Sarcina nu pornește: a. Verificați conexiunile de
alimentare și de sarcină b. Verificați starea receptorului c. Verificați nivelul intensității
luminii și setările regulatorului senzorului crepuscular
Sensibilitate slabă a dispozitivului: a. Verificați dacă în fața senzorului există obiecte care
pot interfera cu funcționarea acestuia. b. Verificați temperatura ambiantă.
c. Verificați dacă obiectul detectat se află în câmpul de detectare al senzorului.
d. Verificați înălțimea de montare recomandată. e. Verificați direcția de mișcare a
obiectului. (sensibilitate la mișcare) Senzorul nu poate deconecta automat sarcina:
a. Există întotdeauna un element în mișcare în câmpul de detectare. b. Timpul de oprire
este prea lung. c. Verificaţi tensiunea de alimentare.