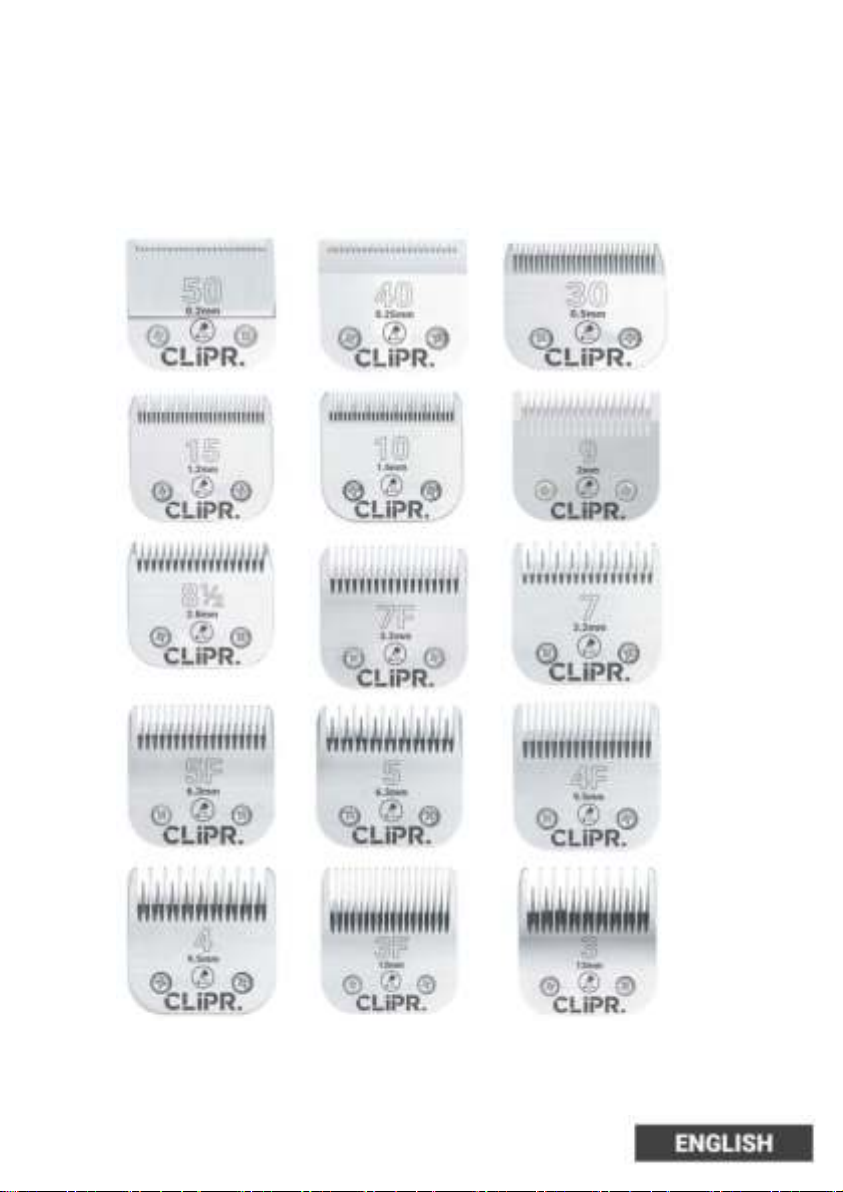
Macrovet Clipr. Ultimate 2-speed User manual

1

2

3
Please read the following instructions before using your new CLIPR. clipper. Give it the care that a fine
precision built instrument deserves and it will give you years of service.
ORIGINAL INSTRUCTIONS
This appliance is designed to be used in commercial areas.
IMPORTANT SAFEGUARDS
When using an electrical appliance, basic precautions should always be followed, including the following: Read
all instructions before using the CLIPR. Clipper. This product is not for use by children.
DANGER: To reduce the risk of electric shock:
1. Do not reach for an appliance that has fallen into water. Unplug immediately. Never use a clipper near
water.
2. Do not use while bathing or in a shower.
3. Do not place or store appliance where it can fall or be pulled into a tub or sink. Do not place in- or drop
into water or other liquid.
4. Always unplug this appliance from the electrical outlet immediately after using. Unplug by holding and
pulling on plug, not cord.
5. Unplug this appliance before cleaning-, removing-, or assembling parts.
WARNING: To reduce the risk of burns, fire, electric shock, or injury to persons:
1. An appliance should never be left unattended when plugged in.
2. This appliance can be used by children aged from 8 years and above and persons with reduced
physical, sensory or mental capabilities or lack of experience and knowledge if they have been given
supervision or instruction concerning use of the appliance in a safe way and understand the hazards
involved.
3. Children should be supervised to ensure that they do not play with the appliance.
4. Use this appliance only for its intended use as described in this manual. Do not use attachments not
recommended by CLIPR..
5. NEVER operate this appliance if it has a damaged cord or plug, if it is not working properly, if it has
been dropped or damaged, or dropped into water. Return the appliance to an CLIPR. Authorized
service station for examination and repair.
6. Keep the cord away from heated surfaces.
7. Never drop or insert any object into any opening.
8. Do not use outdoors or operate where aerosol (spray) products are being used or where oxygen is
being administered.
9. Do not use this appliance with a damaged comb or broken blade, as injury to the skin may occur.
10. To disconnect turn switch to “0” then remove plug from outlet.
11. Plug charger (adapter) directly into an AC outlet. Do not use an extension cord.
12. WARNING: During use, do not place or leave appliance where it may be (1) damaged by an animal or
(2) exposed to the weather.
13. Oil blades Frequently. Blades may come hot during use.
14. Use of a charger not sold by CLIPR. May result in a risk of fire, electric shock, or injury to person.
15. Do not disassemble charger. Incorrect reassembly may result in a risk of electric shock or fire. When
repair is required, send or take it to an CLIPR. Authorized Service Station.
16. The battery in this clipper is designed to provide maximum trouble-free live. However, like all
batteries, it will eventually wear out. Do not disassemble battery pack and attempt to replace battery.
17. Batteries can be harmful to the environment if disposed of improperly. Many communities offer
recycling or battery collection. Contact your local government about disposal practices in your area.
18. When discarding old batteries, cover battery terminals with heavy duty adhesive tape to prevent short
circuits. WARNING: Do not attempt to destroy or disassemble battery pack or

4
remove any of its components. Also, never touch both terminals with metal objects and/or body
parts, as short circuit may result. Keep away from children. Failure to comply with these warnings
could result in fire and serious injury.
19. Keep the appliance dry.
20. The appliance is intended for trimming purposes only.
SAVE THESE INSTRUCTIONS
Please read the following instructions before using your new CLIPR. clipper. Give it the care that a fine precision
built instrument deserves and it will give you years of service.
OPERATING INSTRUCTIONS
CHARGING WHIT THE AC/DC POWER ADAPTER
When charging, please plug the cord into the airframe on the back of the clipper, then plug the charger into
electrical outlet, operate 100-240 volt, 50-60 cycle AC electrical current or as noted on the unit. The lithium
battery within the airframe, the voltage of work is 7.4V-30w. Protect the damage due to over voltage and over
current cord and cordless. charging time is approximately 1-2 hours before the battery is fully charged. During
charging, a red light on the adapter is illuminated. Once the battery is fully charged a green light will illuminate.
ABOUT LITHIUM-ION BATTERIES
1. The Lithium-ion battery pack included with your clipper does not develop a “memory effect” like
nickel-metal hydride (NiMH), or nickel cadmium (NiCd) battery. You can re-plug the charger in to the
battery pack at any time for a full charge, or even use the battery before a charge cycle is complete.
Like most rechargeable batteries, lithium-ion batteries perform best when used frequently.
2. For maximum battery life, store the lithium-ion battery pack in a partially discharged condition if the
unit will be unused for several months. To discharge the battery, run your clipper for a little while
without blade.
3. The charger works most effectively when battery packs are at, or close to room temperature. A
lithium-ion battery pack plugged on to the charger verry cold or hot will take more time to completely
recharge.
4. Many factors influence lithium-ion battery pack live. A battery pack that has received heavy use or is
more than a year old may not give the same run-time performance as a new battery pack.
5. New lithium-ion battery packs, or battery packs unused for a period of time, may not accept a full
charge. This is normal and does not indicate a problem with the battery or charger. The battery will
accept a full charge after several cycles of clipper use and recharging.
6. Disconnect the charger from AC outlet if extended periods of non-use are anticipated.
7. For maximum battery life, do not store battery or charger under 10°C or over 40°C.
2-SPEED OPERATION
Your CLIPR. Clipper is equipped with two cutting speeds. The speeds are adjusted using the slide switch actuator
on the top of the unit (Figure 1). Setting “0” indicates the off position. Setting “1” indicates the low speed and is
used for most cutting needs. Use setting “2” for high speed cutting through heavy coats. NOTE: When using the
setting “2” for high speed clipping, the blades move back and forth faster, creating more heat. Therefore, use
this setting only when you need a little more power.
REMOVING BLADE SET
First make sure your clipper motor is switched “off”. Push blade release mechanism under blade hinge (figure B).
While holding down the blade release mechanism, push down on the blade, then gently pull the blade forward
(figure C) and slide it of the blade hinge. If your blade hinge should snap closed and is flush with the clipper, use
a small standard screwdriver to pry the tongue of the hinge out (figure D).

5
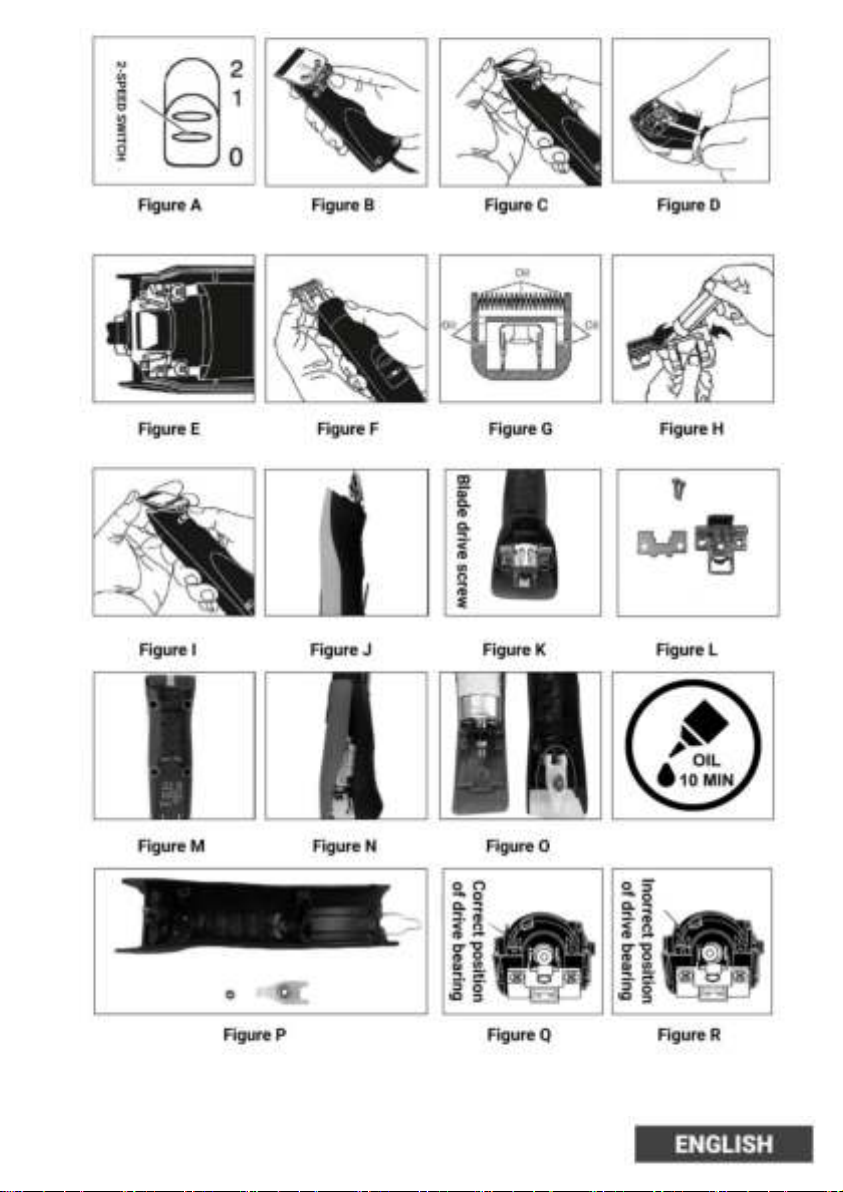
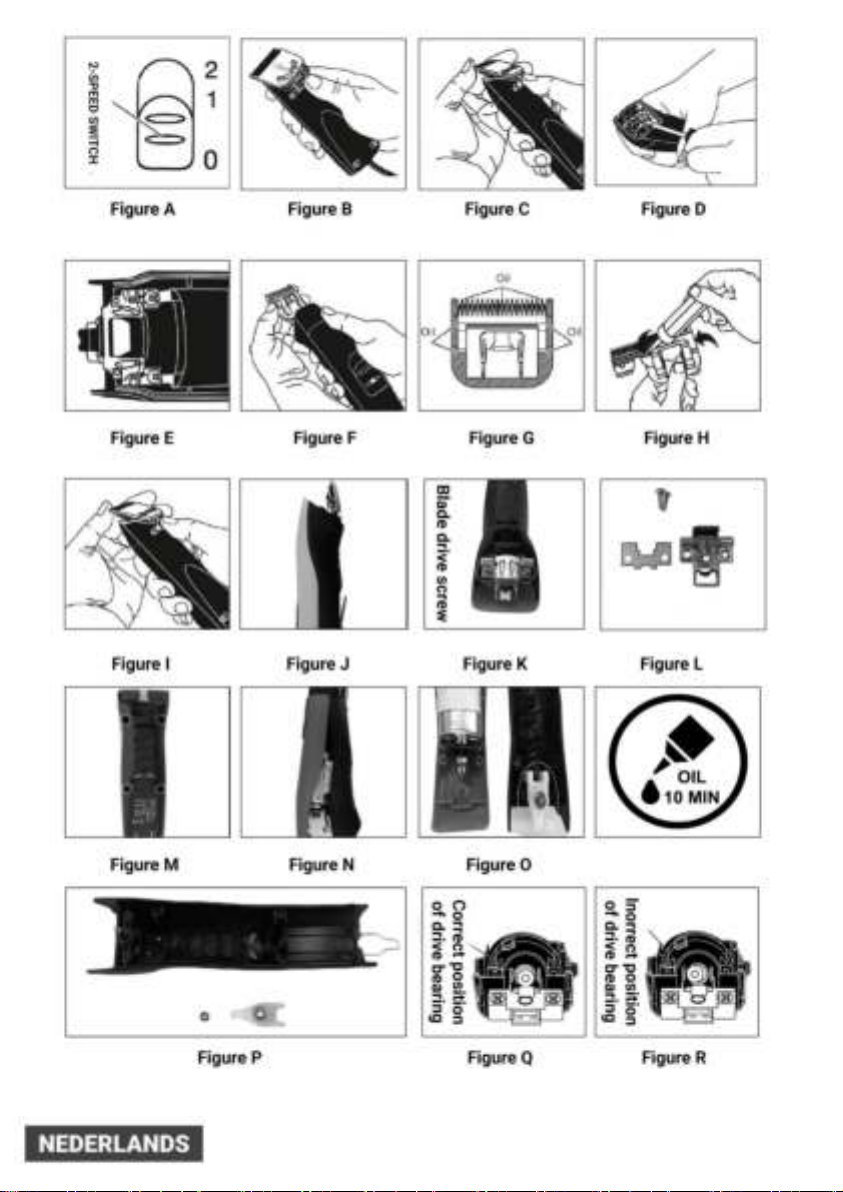
REPLACING OR CHANGING BLADE SET
To replace or changing your blade set, slide the blade bracket onto the hinge of the clipper (figure F) and with
the clipper turned “ON” (“1”), push the blade towards the clipper to lock into position.
CARE AND SERVICING OF YOUR CLIPPER BLADES
NOTE: The most important part of maintenance of your clipper is keeping your blades well lubricated at all
times. Blades should be oiled before-, during- (every 5-10 minutes) and after each use. If your clipper blades
leave streaks or slow down, it’s a sure sign blades need oil. Place a few drops of oil on the front and side of the
cutter blades (Diagram G). Wipe excess oil off blades with a soft, dry cloth. Spray lubricants contain insufficient
oil for good lubrication, but are an excellent clipper blade coolant. Always replace broken or nicked blades to
prevent injury. You can clean the excess hair from your blades by using a small brush or worn the excess hair
from your blades by using a small brush or worn out toothbrush. To clean the blades, we suggest to immerse the
blades only into a shallow pan of Clippers Oil or special blade care plus product, while the clipper is running. Any
Excess hair and dirt that has accumulated between the blades should come out. After cleaning, turn your clipper
off and dry blades with a clean dry cloth and start clipping again.
If upon cleaning your blades you find that the blades will still not cut there may be a few fine pieces of hair
trapped between the upper and lower blade. If this happens, you will need to snap the blade off the clipper.
Proceed to slide the upper blade to one side, without loosening the tension spring or moving the upper blade
completely out from under the tension spring
(See Diagram G for position of blade) . Wipe the surface between the blades clean with a dry cloth, then place a
drop of clipper oil where the upper and lower blades meet and also in the guide slot of the tension spring
(Diagram G). Now slide the upper blade to the opposite side
of the lower blade and repeat this process. After completing this procedure, slide the upper blade, centering it
over the lower blade.
NOTE: Hair may accumulate In the front cavity of the housing under the blade. If this happens, you can clean out
the hair by brushing out the cavity with a small brush or an old toothbrush while the blade is off the clipper (See
diagram D for location of cavity being referenced) replacing or changing blade set.
BLADE TEMPERATURE
Due to the high speed nature of the CLIPR. Clippers, please check for blade heat often, especially on close cutting
blades. If blades are to hot, dip the blades only into a blade care plus product or apply a cooling spray for clipper
blades to cool down and then apply new oil on the blades. With this detachable blade unit, u can change your
blade in order to maintain a comfortable temperature. Using multiple blades of the same size is ideal to switch
blades when they are overheating.
STORING YOUR CLIPPER AFTER USE
Immediately after use, clean the clippers thoroughly. Remove hair and old oil from the blades. And then grease
the blades well to prevent rust and oxidation. Fully recharge the batteries. And then store the clipper in the
supplied case in a warm dry place. When you suspect that the blades are dull it is best to have them sharpened
immediately. Go to www.clipr.nl for more information.
CHANGING THE BLADE DRIVE ASSEMBLY
If your clipper blades no longer cut properly (Be sure to try more than one blade, since the blade currently being
used may be dull), it could be that your blade drive assembly needs replacement. If you don’t have a spare, go to
www.clipr.nl for a new one.
To change blade drive assembly
1. Remove blade set (Image I)
This manual suits for next models
1
Table of contents
Languages:
Popular Commercial Food Equipment manuals by other brands

Diamond
Diamond AL1TB/H2-R2 Installation, Operating and Maintenance Instruction

Salva
Salva IVERPAN FC-18 User instructions

Allure
Allure Melanger JR6t Operator's manual

saro
saro FKT 935 operating instructions

Hussmann
Hussmann Rear Roll-in Dairy Installation & operation manual

Cornelius
Cornelius IDC PRO 255 Service manual

Moduline
Moduline HSH E Series Service manual

MINERVA OMEGA
MINERVA OMEGA DERBY 270 operating instructions

Diamond
Diamond OPTIMA 700 Installation, use and maintenance instructions

Diamond
Diamond G9/PLCA4 operating instructions

Cuppone
Cuppone BERNINI BRN 280 Installation

Arneg
Arneg Atlanta Direction for Installation and Use