MAD NR-137904-B User manual

NL Montage handleiding
GB Fitting instructions
DE Einbau Anleitung
FR Guide d'installation
VH1370790-01
NR-137904-B, NR-137904-CS,
NR-137904-R
Citroën Jumper
Fiat Ducato
Peugeot Boxer

NR-137904-B, NR-137904-CS, NR-137904-R
2
NL Inhoudsopgave
1. Voorwoord 3
2. Technische gegevens 4
3. Montage luchtveer montagebeugels en balgen 5
4. Montage NR-137904-B, Air Master Ultra Basic 12
5. Schema, Air Master Ultra Basic 12
6. Montage NR-137904-CS, Air Master Ultra Comfort 13
7. Schema, Air Master Ultra Comfort 16
8. Montage NR-137904-R, Air Master Ultra Automatic 17
9. Schema en afstelling Air Master Ultra Automatic 18
DE Dokumentinhalt
1. Vorwort 3
2. Technische Spezifikationen 4
3. Montage Luftfederung Bügel und Balgen / Schaltplan Luftfederung 5
4. Montage NR-137904-B, Air Master Ultra Basic 12
5. Schaltplan Air Master Ultra Basic 12
6. Montage NR-137904-CS, Air Master Ultra Comfort 13
7. Schaltplan Air Master Ultra Comfort 16
8. Montage NR-137904-R, Air Master Ultra Automatic 17
9. Schaltplan und Einstellung Air Master Ultra Automatic 18
GB Index
1. Introduction 3
2. Technical Specification 4
3. Fitting the air suspension brackets and bellows 5
4. Montage NR-137904-B, Air Master Ultra Basic 12
5. Diagram Air Master Ultra Basic 12
6. Montage NR-137904-CS, Air Master Ultra Comfort 13
7. Diagram Air Master Ultra Comfort 16
8. Montage NR-137904-R, Air Master Ultra Automatic 17
9. Diagram and adjustment Air Master Ultra Automatic 18
FR Index
1. Introduction 3
2. Spécifications techniques 4
3. Installation d‘une suspension pneumatique 5
4. Assemblée NR-137904-B, Air Master Ultra Basic ensemble 12
5. Schéma Air Master Ultra Basic ensemble 12
6. Montage NR-137904-CS, Air Master Standard ensemble 13
7. Schéma Air Master Standard ensemble 16
8. Montage NR-137904-R, Air Master Ultra Automatic ensemble 17
9. Schéma et réglage Air Master Ultra Automatic ensemble 18

NR-137904-B, NR-137904-CS, NR-137904-R
3
GB 1. Introduction
• Thank you for purchasing the MAD air suspension kit. Read these installation instructions carefully before
mounting.
• The installation of the auxiliary air spring kit must be done by a qualified technician. Damage due to im-
proper assembly or modifications to the product is excluded from MAD warranty.
• The auxiliary air kit can be ordered with different operating systems. The mounting brackets and bellows
for these different controls are the same. For installation of the operating system, refer to the appropriate
part of this installation manual.
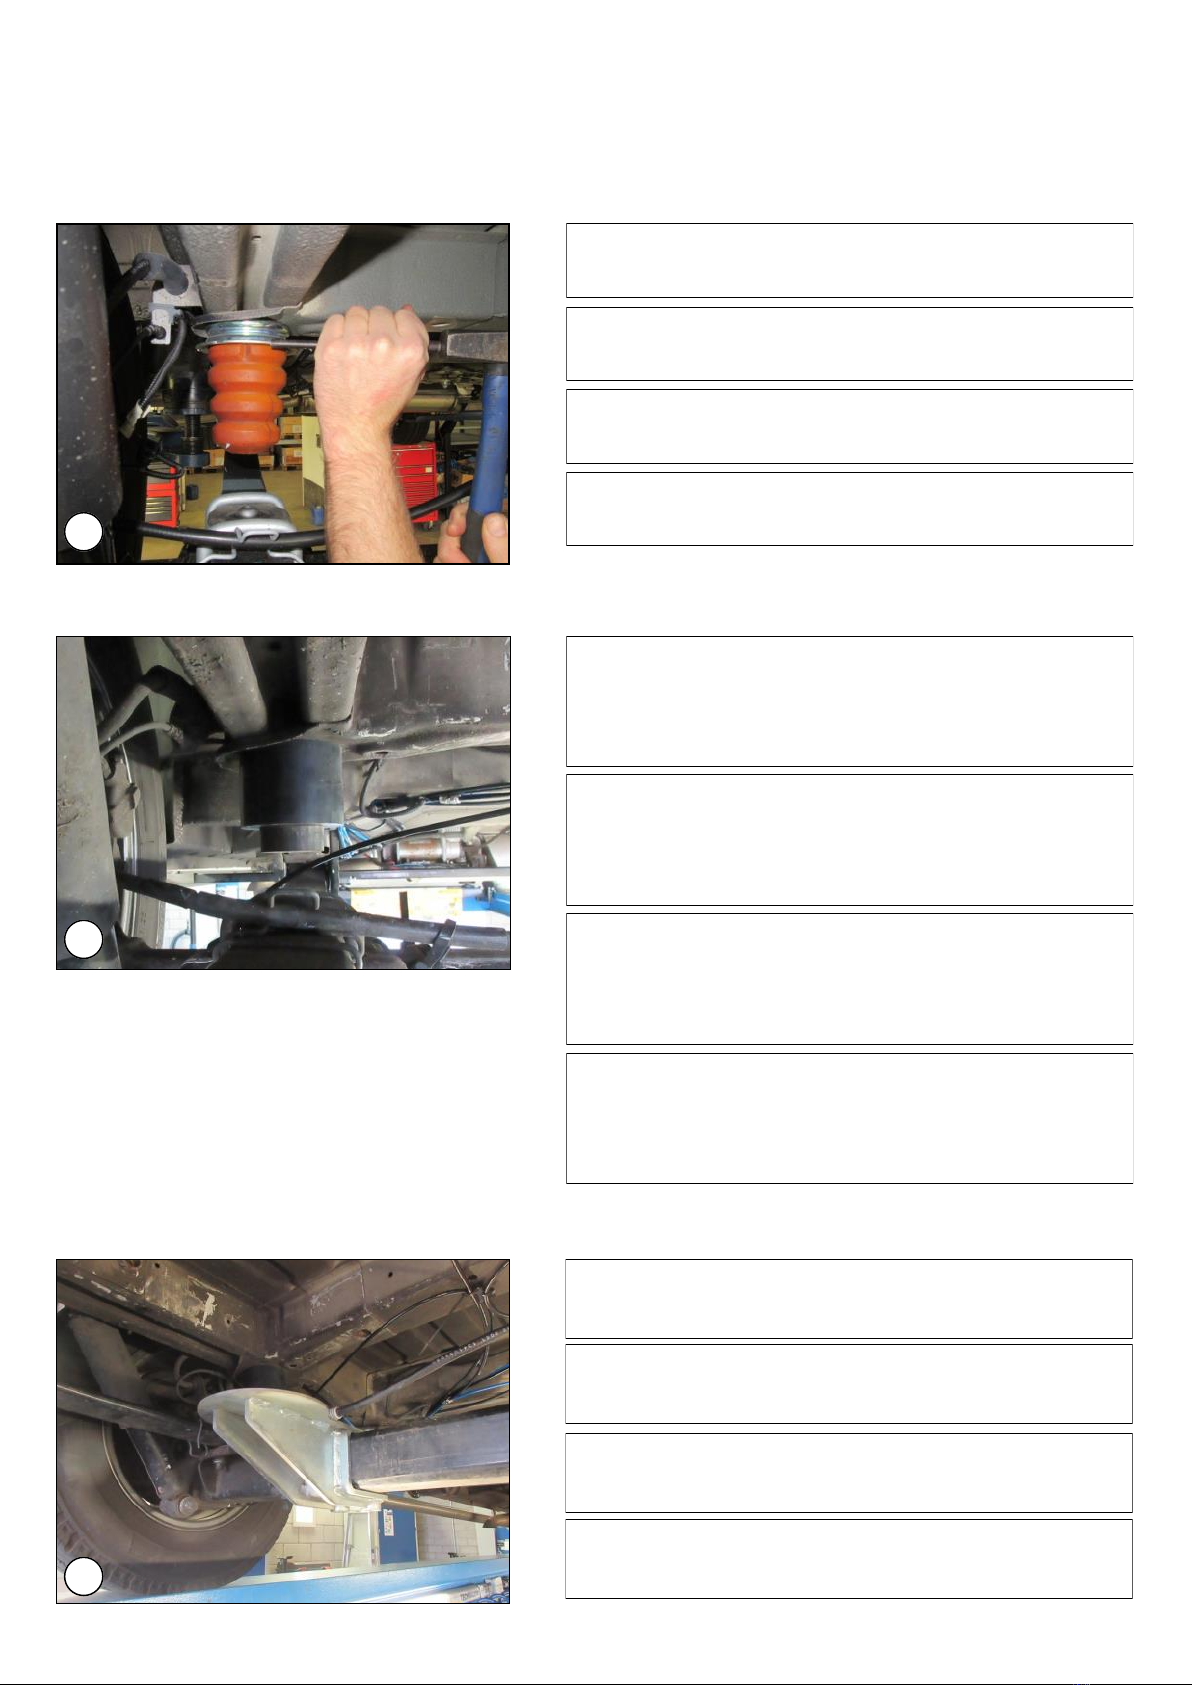
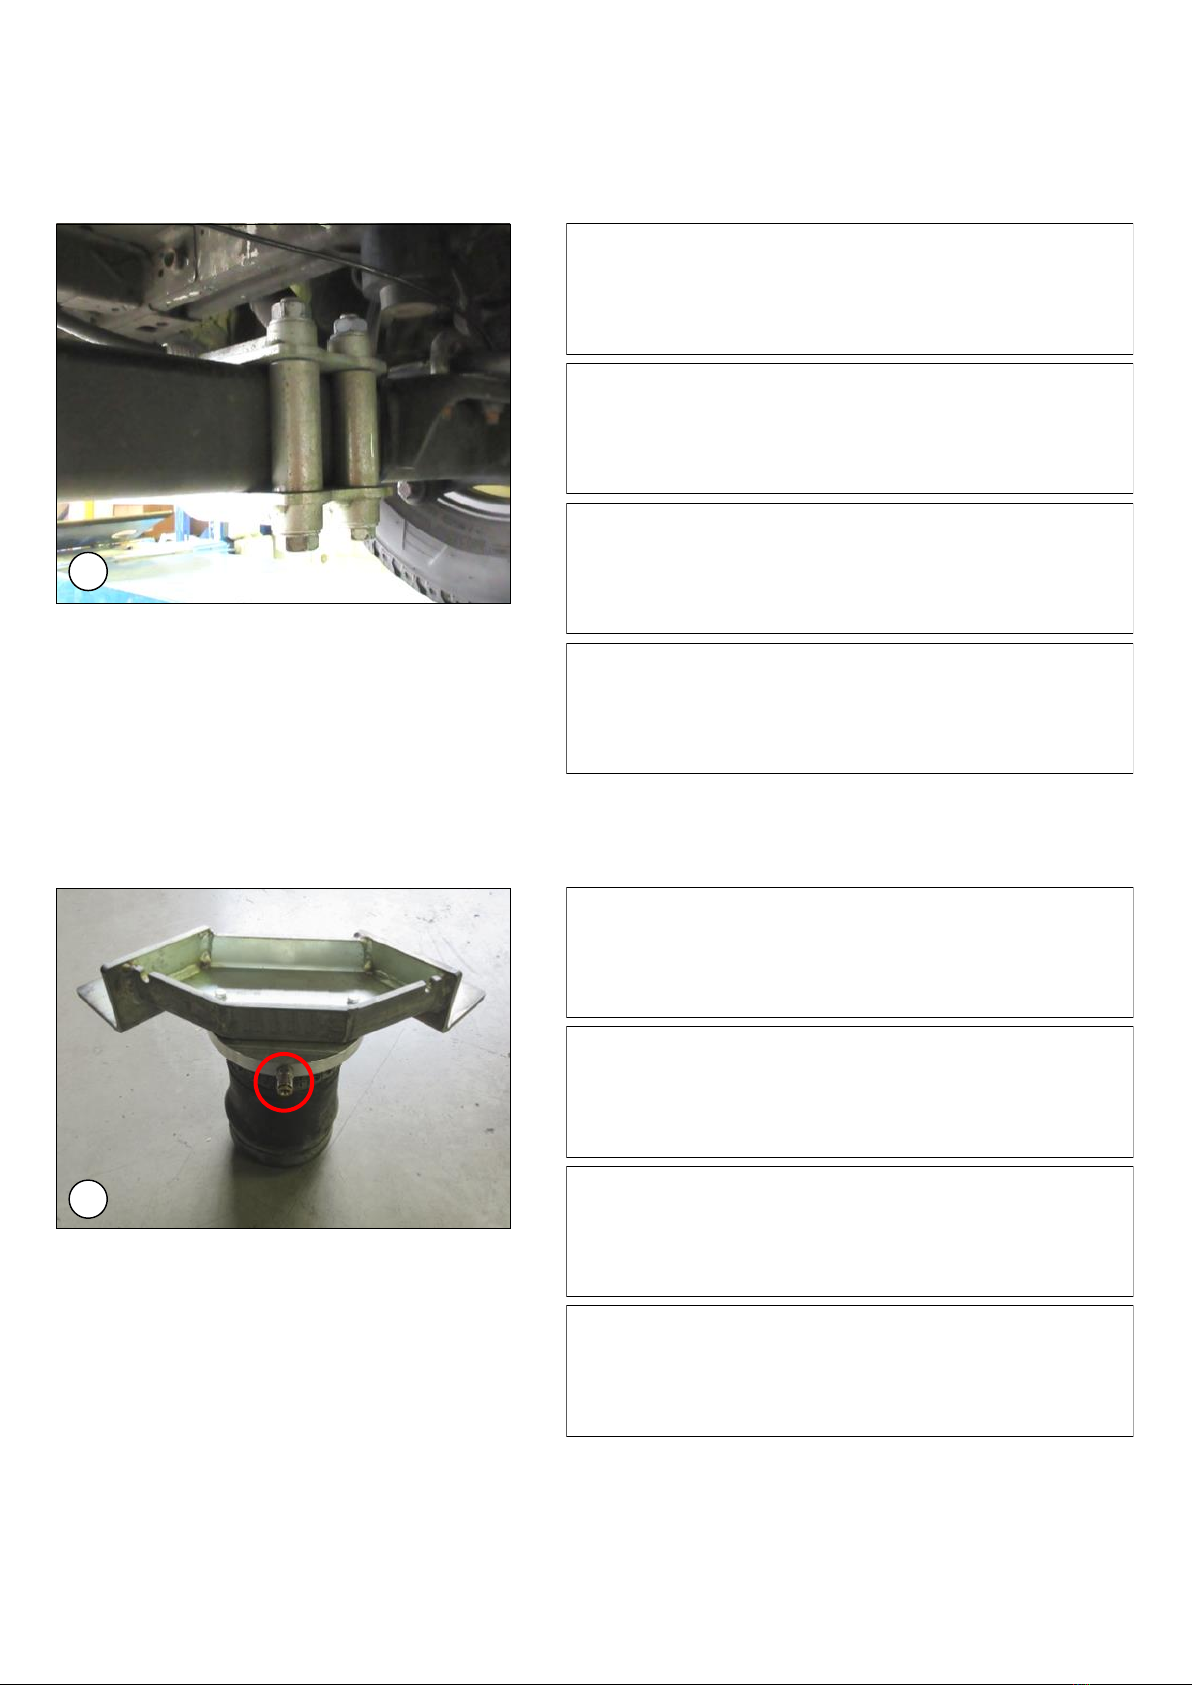
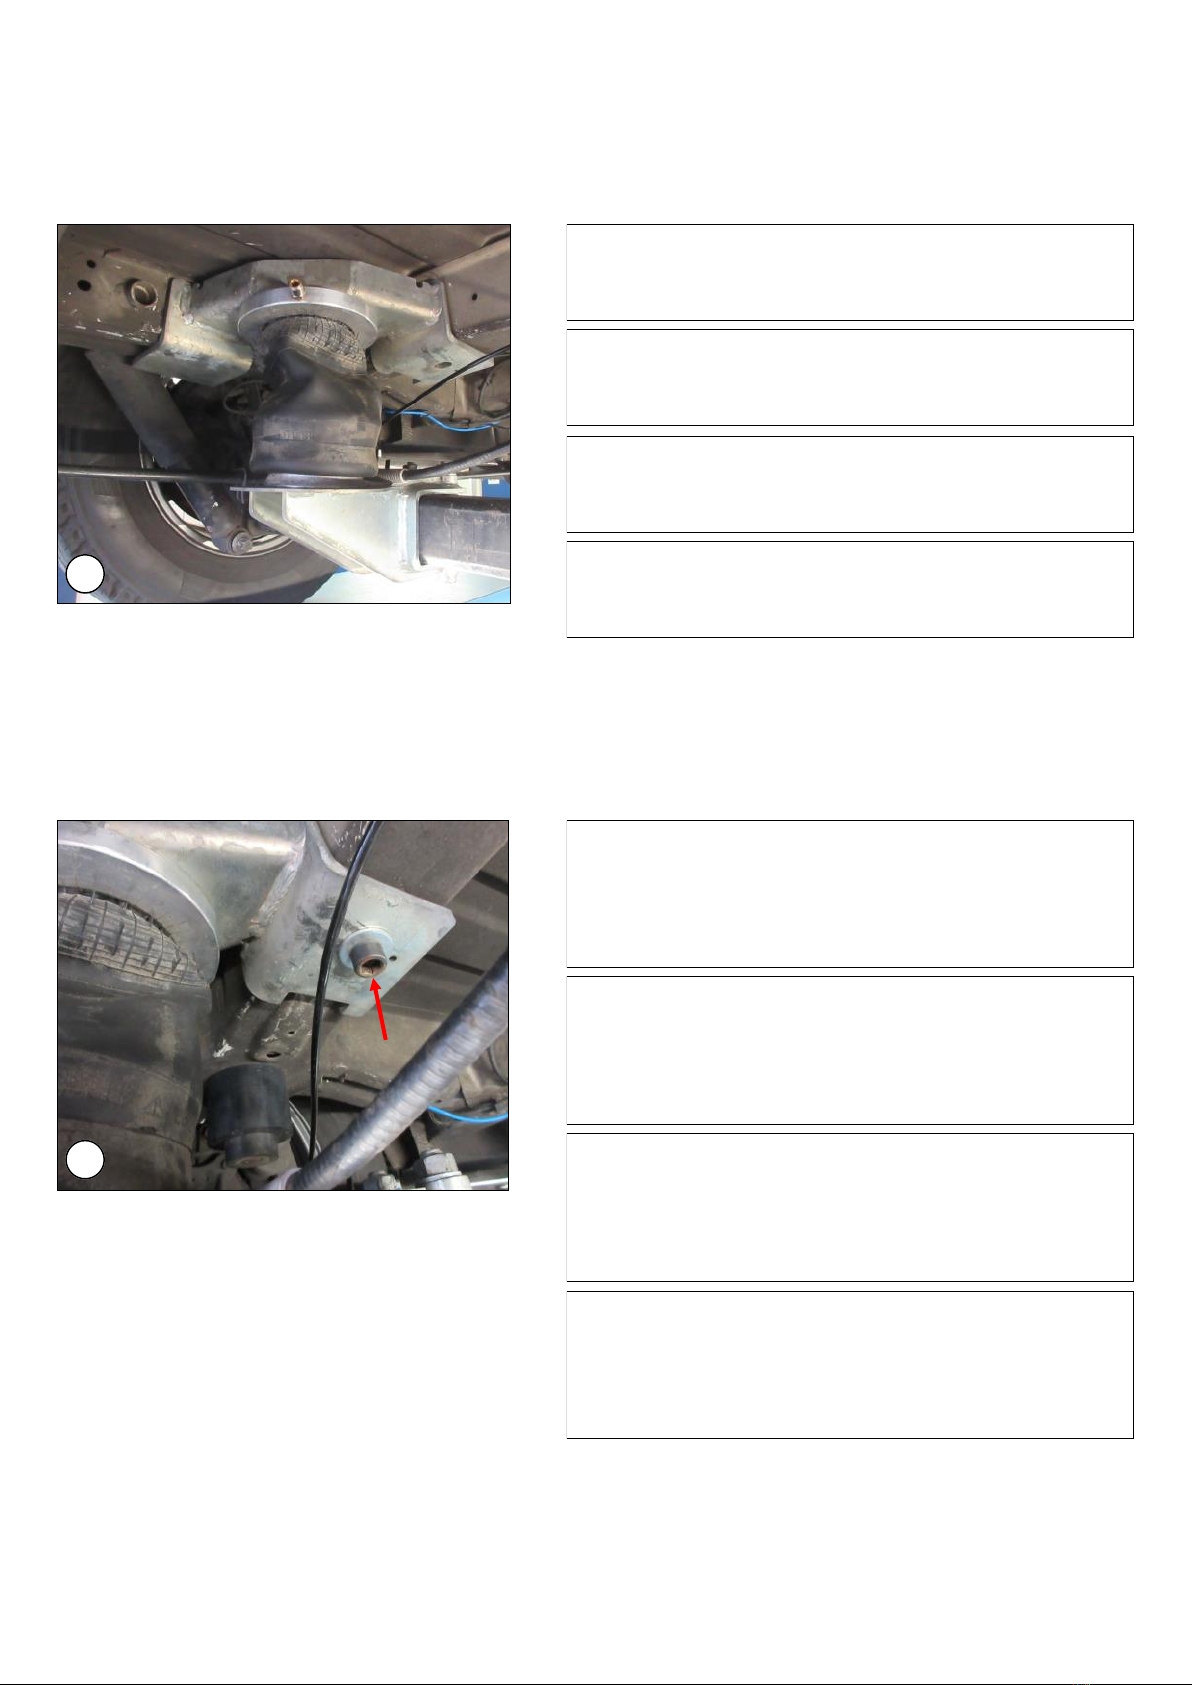
• Mount original parts of the vehicle according to the instructions in the workshop manual.
• Protect metal parts with an anti-corrosion coating.
• Check the headlight beams, readjust if necessary.
DE 1. Vorwort
• Vielen Dank für den Kauf MAD Zusatzluftfederung. Lesen Sie die Installationsanweisungen vor der In-
stallation.
• Montage des Zusatzluftfederung sollte von einem qualifizierter Mechaniker durchgeführt werden. Schä-
den durch unsachgemäße Montage oder Änderungen am Produkt sind von der MAD-Garantie ausge-
schlossen.
• Die Zusatzluftfederung kann mit unterschiedlichen Betriebssystemen bestellt werden. Die Befestigungs-
bügel und Balgen an den verschiedenen Betriebssystemen sind die gleichen. Für die Installation des Be-
triebssystems, siehe den entsprechenden Teil dieser Installationsanleitung.
• Original-Fahrzeugteile gemäß den Anweisungen im Werkstatthandbuch montieren.
• Schützen Sie Metallteile mit einer Korrosionsschutzbeschichtung.
• Kontrollieren Sie die Scheinwerferhöhe, ggf. stellen Sie die Scheinwerferhöhe neu ein.
FR 1. Introduction
• Merci d'avoir acheté le kit de suspension pneumatique MAD. Nous vous rappelons de lire attentivement
ces instructions d'installation avant le montage.
• L'installation du kit de ressort à air auxiliaire doit être effectuée par un technicien qualifié. Les dommages
causés par un montage incorrect ou des modifications du produit sont exclus de la garantie MAD.
• Le kit d'air auxiliaire peut être commandé avec différents systèmes de commande. Les supports de fixa-
tion et le soufflet pour ces différentes commandes sont identiques. Pour l'installation du système de com-
mande, reportez-vous à la partie appropriée de ce manuel d'installation.
• Monter les pièces d'origine du véhicule selon les instructions du manuel d'atelier.
• Protégez les pièces métalliques avec un revêtement anti-corrosion.
• Vérifiez le réglage de la hauteur des phares et ajustez-le si nécessaire.
NL 1. Voorwoord
• Hartelijk dank voor de aankoop van de MAD hulpluchtveerset. Lees voorafgaand de montage deze in-
bouwinstructies goed door.
• Het monteren van de hulpluchtveerset dient te gebeuren door een ter zake kundige monteur. Schade
door ondeskundige montage of door wijzigingen aan het product vallen buiten de garantie van MAD.
• De hulpluchtveerset kan worden besteld met verschillende besturingssystemen. De montagebeugels en
balgen voor deze verschillende besturingen zijn gelijk. Kijk voor de montage van het besturingssysteem
in het daarvoor bestemde deel van deze montagehandleiding.
• Monteer originele delen van de auto volgens voorschriften in het werkplaatshandboek.
• Bescherm metalen delen met een corrosie-werende coating.
• Controleer de afstelling van de koplamphoogte, en indien nodig opnieuw afstellen.

NR-137904-B, NR-137904-CS, NR-137904-R
4
NL Luchtdruk
• De minimale luchtdruk bedraagt 0,5 bar.
• De bedrijfsdruk ligt tussen de 1,0 - 4,0 bar.
• De maximale geoorloofde luchtdruk bedraagt 7,0 bar.
• De maximale luchtdruk is alleen voor de parkeerstand en tijdens het rangeren geoorloofd.
DE Luftdruck
• Der min. erforderliche Luftdruck beträgt 0,5 bar.
• Der Betriebsdruck liegt zwischen 1,0 - 4,0 bar.
• Der max. erlaubte Luftdruck beträgt 7,0 bar.
• Der max. Luftdruck ist nur für den Stand und Rangierfahrten zulässig.
GB Air pressure
• The minimum necessary air pressure is 0,5 bar.
• The operating pressure is between 1,0 - 4,0 bar.
• The maximum permitted air pressure is 7,0 bar.
• The maximum air pressure is only allowed for parking and manoeuvring the vehicle.
FR Pression d'air
• La pression d'air minimale nécessaire est de 0,5 bar.
• La pression de service est entre 1,0 - 4,0 bars.
• La pression d'air maximale autorisée est de 7,0 bars.
• La pression d'air maximale n'est autorisée que pour stationner et manœuvrer le véhicule.
2. Technical specifications

NR-137904-B, NR-137904-CS, NR-137904-R
5
Left
Right
VM1323790
VM1323790
VM1311790
VM1312790
3. Fitting the air suspension brackets and bellows

NR-137904-B, NR-137904-CS, NR-137904-R
6
3
2
5
4
14
6
1
8
7
17
13
Left
Right
9
10
11
16
15 12
18
19

NR-137904-B, NR-137904-CS, NR-137904-R
7
Bill of material: Brackets and bellows
Item Part nr Name Quantity
1M6X16 DIN933 Bolt M6x16 4
28730101 Spring washer M6 4
3M6 DIN125A Washer M6 4
4TC07018 Bolt M14x30 fine 2
5VC14014 Penny washer M14 2
6VM1311790 Upper bracket left 1
7VM1312790 Upper bracket right 1
8VB58002 Air bellow 2
9VF01009 Air line fitting 2
10 VM1323790 Lower bracket 2
11 VM1364790 Spacer 4
12 M14x120 DIN931 Bolt M14x120 DIN931 4
13 M14 DIN125A Washer M14 8
14 M14 DIN985 Lock nut M14 4
15 M10X30 DIN933 Bolt M10x30 2
16 M10 DIN127B Spring washer M10 2
17 30.10,5.1 Penny washer M10x30 2
18 VK1302790 Bump stop raiser 2
19 VR01003 Rubber bump stop D 50x20 M10x1,25x88 2

NR-137904-B, NR-137904-CS, NR-137904-R
8
NL Verwijder beide aanslagrubbers van het chassis.
GB Remove both bump stops from the chassis.
DE Entfernen Sie beide Puffern von das Chassis.
FR Retirez les deux tampons du châssis.
NL Monteer buffer VR01003 samen met bufferverho-
ger VK1302790 op de plek van de originele buf-
fers. Borg de buffers met borgmiddel.
GB Mount bump stop VR01003 together with bump
stop raiser VK1302790 at the place of the original
bump stops. Secure the bump stops with thread
locking fluid.
DE Montieren Sie den Puffer VR01003 zusammen mit
dem Kunststoff Buchse VK1302790 an der Stelle
der Originalpuffer. Sichern Sie die Puffern mit Si-
cherungsmittel.
FR Monter le tampon VR01003 avec la douille en
plastique VK1302790 à la place des tampons d'ori-
gine. Sécurisez les tampons avec du composé de
blocage.
NL Schuif de onderbeugels vanaf de achterzijde over
de as.
GB Slide the lower brackets from the backside over
the axle.
DE Schieben Sie die unteren Halterungen von hinten
über die Achse.
FR Faites glisser les supports inférieurs par l'arrière
sur l'essieu.
1
2
3

NR-137904-B, NR-137904-CS, NR-137904-R
9
NL Plaats bussen VM1364790 tussen de onderbeu-
gels. Plaats ook de M14x120 bouten, M14 sluitrin-
gen en M14 borgmoeren, maar zet het geheel nog
niet vast.
GB Place spacers VM1364790 between the lower
brackets. Also place the M14x120 bolts, M14
washers and M14 lock nuts, but do not tighten
them yet.
DE Setzen Sie Buchsen VM1364790 zwischen die un-
teren Halterungen. Setzen Sie auch die M14x120
Schrauben, Unterlegscheiben und Sicherungsmut-
tern ein, aber ziehen Sie diese noch nicht fest.
FR Placez les douilles VM1364790 entre les supports
inférieurs. Placez également les boulons
M14x120, les rondelles M14 et les écrous de blo-
cage M14, mais ne les serrez pas encore.
4
NL Plaats de bovenbeugels op de luchtbalgen zoals
weergegeven op de afbeelding hiernaast. Zet de
balgen vast met de M6x16 bouten, M6 veerringen
en M6 sluitringen.
GB Place the upper brackets onto the air bellows as
shown in the picture on the left. Secure the bellows
with the M6x16 bolts, M6 spring washers and M6
washers.
DE Platzieren Sie die oberen Halterungen auf den
Luftbälgen, wie in der Abbildung links abgebildet.
Sichern Sie den Balg mit den M6x16 Schrauben,
M6 Federringe und M6 Unterlegscheiben.
FR Placez les supports supérieurs sur les soufflets
d'air comme indiqué sur la photo de gauche. Fixez
le soufflet avec les boulons M6x16, les rondelles
élastiques M6 et les rondelles M6.
5

NR-137904-B, NR-137904-CS, NR-137904-R
10
NL Zorg ervoor dat de bovenbeugels goed tegen het
chassis zitten. Fixeer daarna de bovenbeugels met
de M14x30 bouten en M14 carrosserieringen. Borg
de bouten met borgmiddel.
GB Make sure that the upper brackets are firmly seat-
ed against the chassis. Then fix the upper brackets
with the M14x30 bolts and M14 penny washers.
Secure the bolts with thread locking fluid.
DE Stellen Sie sicher, dass die oberen Halterungen
fest am Chassis anliegen. Befestigen Sie dann die
oberen Halterungen mit den M14x30 Schrauben
und M14 Unterlegscheiben. Sichern Sie die Bolzen
mit Sicherungsmittel.
FR Assurez-vous que les supports supérieurs sont
bien en place contre le châssis. Fixez ensuite les
supports supérieurs avec les boulons M14x30 et
les rondelles M14. Sécurisez les boulons avec du
composé de blocage.
NL Plaats de bovenbeugels en de balgen tussen het
chassis en de onderbeugels.
GB Place the upper brackets and the bellows between
the chassis and the lower brackets.
DE Platzieren Sie die oberen Halterungen und die Bäl-
ge zwischen dem Chassis und den unteren Halte-
rungen.
FR Placez les supports supérieurs et les soufflets d'air
entre le châssis et les supports inférieurs.
6
7

NR-137904-B, NR-137904-CS, NR-137904-R
11
NL Zorg ervoor dat de balgen goed uitgelijnd zitten.
Zet hierna de vier M14 bouten en de twee M10
bouten van de onderbeugels vast.
GB Make sure the bellows are properly aligned. Then
tighten the four M14 bolts and the two M10 bolts of
the lower brackets.
DE Stellen Sie sicher, dass die Bälge richtig ausge-
richtet sind. Ziehen Sie dann die vier M14-
Schrauben und die zwei M10-Schraube der unte-
ren Halterungen an.
FR Assurez-vous que les soufflets d'air sont correcte-
ment alignés. Ensuite, serrez les quatre boulons
M14 et les deux boulons M10 des supports infé-
rieurs.
9
NL Fixeer de onderkant van de balgen aan de onder-
beugels met de M10x30 bouten, M10 veerringen
en M10 carrosserieringen. Zet de bouten nog niet
helemaal vast.
GB Fix the underside of the air bellows to the lower
brackets with the M10x30 bolts, M10 spring wash-
ers and M10 penny washers. Do not tighten the
bolts yet.
DE Befestigen Sie die Unterseite des Balgs mit den
M10x30 Schrauben, M10 Federscheiben und Un-
terlegscheiben an den unteren Halterungen. Zie-
hen Sie die Schrauben noch nicht vollständig an.
FR Fixez la face inférieure des soufflets d'air aux sup-
ports inférieurs à l'aide des boulons M10x30, des
rondelles élastiques M10 et des rondelles M10. Ne
serrez pas encore complètement les boulons.
8
10

NR-137904-B
12
4/5. Air Master Ultra Basic

NR-137904-CS
13
NL Het bedieningspaneel is voertuig specifiek en dient op de daarvoor bestemde plaats gemonteerd te wor-
den (zie figuur 1).
Demonteer het opbergvakje.
Verwijder de achterzijde van het opbergvakje zoals in figuur 2 (snijden of zagen).
Plaats het bedieningspaneel in het bakje en schroef deze vast met drie Parker schroeven (zie figuur 3 &
4).
Sluit de luchtleidingen en bedrading aan volgens schema.
Monteer het opbergvakje, let op dat de luchtleidingen en bedrading netjes vrij liggen van scherpe delen
(zie figuur 5).
GB The operation panel is vehicle-specific and must be mounted at the indicated place (see Figure 1).
Remove the storage tray. Remove the rear side of the storage tray as shown in Figure 2 (cutting or saw-
ing).
Place the operation panel onto the storage tray and fasten the panel with three self-tapping screws (see
Figure 3 & 4).
Connect the air lines and wiring harness according to the diagram.
Refit the assembled storage tray, make sure that the connected air lines and related wiring are free from
sharp edges (see Figure 5).
DE Das Control Panel ist fahrzeugspezifisch und sollte an der angegebenen Stelle montiert werden (siehe
Abbildung 1).
Entfernen Sie das Aufbewahrungsfachs. Entfernen Sie die Rückseite des Aufbewahrungsfachs, wie in
Abbildung 2 gezeigt (schneiden oder Sagen).
Setzen Sie das Control Panel in dem Aufbewahrungsfach und schrauben Sie ihn fest mit drei selbst-
schneidenden Schrauben (siehe Abbildung 3 und 4).
Schließen Sie die Luftleitungen und Verkabelung gemäß Diagramm.
Montieren Sie das kompletten Aufbewahrungsfachs. Bitte beachten Sie, dass die Luftleitungen und zu-
gehörige Verkabelung frei sind von scharfen Kanten (seihe Abbildung 5).
FR Le panneau de contrôle est spécifique au véhicule et doit être monté dans le lieu spécifié (voir Figure 1).
Démonter le compartiment de stockage. Enlever le côté arrière du compartiment de stockage comme
illustré sur la figure 2.
Placez le panneau de contrôle dans le compartiment et vissez-le avec trois vis auto perceuses (voir Fi-
gure 3 & 4).
Connectez les conduits d’air et le câblage selon le schéma.
Montez le compartiment de stockage, noter que les conduits d’air et le câblage associé sont exempts
d’arêtes vives (voir Figure 5).
6. Air Master Ultra Comfort

NR-137904-CS
14
Fig. 5.
Fig. 4.
Fig. 3.
Fig. 2.
Fig. 1.

NR-137904-CS
15
GB The bellows can be inflated by using the Compressor Switch. The pressure gauges will display the
pressures of both bellows separately. If a bellow has too much pressure it can be individually adjusted
by pressing the Pressure Valve.
LHD
NR-137904-CS
NL Door middel van de ´Compressor Switch´ kunnen de balgen worden opgeblazen. De manometers zul-
len de luchtdruk van beide balgen weergeven. Als er een balg teveel druk heeft kan deze afzonderlijk
aangepast worden door het ventiel ´Pressure Valve’ in te drukken.
DE Der Luftbalgen können durch den Kompressor Schalter (Compressor Switch) aufgeblasen werden. Die
Manometer wird der Druck der beiden Bälge einzeln anzeigen. Wenn ein Luftbalge zu viel Druck hat
kann er durch das Ventil (Pressure Valve) ein zu drücken individuell eingestellt werden.
FR Le soufflet être gonflés par l'interrupteur du compresseur (Compressor Switch). Le gabarit sera distinct
de la pression des deux soufflets. Quand un soufflet a trop de pression, il peut pousser à travers la
valve (Pressure Valve) pour être fixé individuellement.
Compressor switch
Left Pressure Valve Right Pressure Valve

NR-137904-CS
16
NL Sluit de luchtbalgen en elektra aan volgens schema.
Monteer het luchtfilter op een afgeschermde droge plaats.
GB Connect the airbags according the figure.
Install the air filter in a sheltered dry place.
DE Montieren Sie die Luftleitungen wie diese Figur.
Montieren Sie der Luftfilter auf ein abgeschirmtes trockene Position.
FR Connectez le soufflet au calendrier prévu.
Assembler le filtre à air à un protégé endroit sec.
+12V
FUSE
7. Diagram Air Master Ultra Comfort

NR-137904-R
17
GB Fit the magnet bracket onto the rear axle. Install the
bracket at center of the vehicle, so that the magnet
can be aligned with the sensor.
GB Fit the sensor bracket onto the chassis member
above the magnet. Use the existing bolt of the
spare tire frame.
GB Fit the compressor under the outlet support at the
left-hand side. Use the existing bolts. Connect ca-
bles and air lines according to wiring diagram.
1
2
3
NL Monteer de magneetsteun op de achteras. Plaats
de steun in het midden van het voertuig, zodat de
magneet uitgelijnd kan worden met de sensor.
DE Montieren Sie die Magnet Bracket auf der Hinter-
achse. Installieren der Träger in der Mitte des Fahr-
zeugs, so dass der Magnet mit dem Sensor ausge-
richtet werden können.
FR Monter le support aimant sur l'essieu arrière. Placer
le support dans le milieu du véhicule, de sorte que
l'aimant peut être aligné avec le capteur.
NL Monteer de sensorsteun aan de chassisbalk boven
de magneet. Gebruik hiervoor de bestaande bout
van het reservewiel frame.
DE Montieren Sie die Sensorhalterung auf das Chassis
über dem Magneten. Verwenden Sie die vorhande-
nen Bolzen von Reserverad Rahmen.
FR Monter le support détecteur sur l'élément de châs-
sis au-dessus de l'aimant. Utilisez le boulon exis-
tant de le cadre de roue de secours.
NL Plaats de compressorunit onder de uitlaatsteun aan
de linkerzijde. Gebruik de bestaande bouten. Sluit
bekabeling en luchtleidingen aan volgens aansluit-
schema.
DE Montieren Sie die Kompressor Einheit unter der
Auslassträger auf der linken Seite. Verwenden Sie
die vorhandenen Schrauben.Schließen Sie die
Kabel-und Luftleitungen auf nach Schaltplan.
FR Monter l'unité de compresseur dans le cadre du
support de sortie a vers la gauche. Utilisez les bou-
lons existants. Connectez les câbles et les con-
duites d'air selon le schéma de câblage.
8. Air Master Ultra Automatic

NR-137904-R
18
9. Diagram and adjustment Air Master Ultra Automatic
GB Connect the electrical wiring and air tubes according to this wiring diagram.
NL Sluit de bedrading en luchtleidingen aan volgens aansluitschema.
FR Connecter le câblage électrique et tubes d'air selon la ce schéma de câblage.
DE Schließen Sie den elektrischen Leitungen und Rohre Luft nach dem Schaltplan.

NR-137904-R
19
GB Adjust the Air Master Ultra Automatic system so that the distance between the sensor and magnet is
about 30-mm. Place the magnet so that it is a little above the centre off the sensor unit. It is possible to
adjust the ride height of the car by sliding the magnet over the bracket.
Switch on the ignition and wait about 25 sec. This is a time delay to avoid that the compressor reacts on
every movement of the vehicle. The vehicle is going automatically to the adjusted ride height.
NL Stel het Air Master Ultra Automatic system af zodat de afstand tussen de sensor en de magneet onge-
veer 30-mm is. Plaats de magneet zodat deze net iets boven het midden van de sensor zit. Het is mo-
gelijk om de rijhoogte aan te passen door de magneet over de steun te verplaatsen. Zet het contact aan
en wacht ongeveer 25 sec. Dit is een vertragingstijd die ervoor zorgt dat de compressor niet reageert op
elke beweging van het voertuig. Het voertuig zal automatisch naar de ingestelde rijhoogte gaan.
FR Ajuster le système Air Master Ultra Automatic de sorte que la distance entre le capteur et l'aimant est
d'environ 30-mm. Placer l'aimant de sorte qu'il est un peu au-dessus du centre de l'unité de capteur. Il
est possible d ajuster la niveau du véhicule par coulissement l'aimant sur le support.
Mettre le contact et attendre environ 25 secondes. C'est un temps de retard pour éviter le compresseur
réagit à chaque mouvement du véhicule. Le véhicule aller passer automatiquement à la hauteur ajus-
tée.
DE Stellen Sie die Air Master Ultra Automatic System, so dass der Abstand zwischen Sensor und Magnet
ca. 30-mm ist. Stellen Sie den Magneten, so dass es ein bisschen über der Mitte von der Sensoreinheit
ist. Es ist möglich, die Bodenfreiheit des Fahrzeugs durch Verschieben des Magnet über der Halterung
eingestellt werden.
Zündung einschalten und warten Sie etwa 25 Sekunden. Dies ist eine Zeitverzögerung zu vermeiden,
dass der Kompressor bei jeder Bewegung des Fahrzeugs reagiert. Das Fahrzeug wird automatisch an
den eingestellten Fahrhöhe gehen.
30 mm

9901-00
Warranty card
Garantiebewijs
1
NL Garantiebewijs
Dit garantiebewijs en de originele nota zorgvuldig bewaren. U dient ze te overleggen bij het claimen van ga-
rantie. Deze M.A.D. verenset is met de grootste zorg speciaal voor dit voertuig ontwikkeld volgens ISO-9001,
RDW en/of TÜV normen. De set bestaat uit hoogwaardige materialen. De eerste koper heeft gedurende het
gebruik de volgende fabrieksgarantie*
• Levenslang op veren en montagedelen.
• Twee jaar op schokdempers (maximaal 100.000 km.)
• Eén jaar op luchtbalgen, leidingen en accessoires.
• Eén jaar op arbeidsloon.
Garantievoorwaarden
Garantie wordt verleend op de geleverde set of onderdelen in geval van materiaal- of fabricagefouten. Uitslui-
tend geldig in landen waar M.A.D. officieel vertegenwoordigd is en na vakkundige montage door een dealer-
of garagebedrijf, volgens bijgevoegde montagehandleiding.
De garantie geldt bij normaal gebruik van de auto volgens de door de autofabrikant afgegeven typegoedkeu-
ring. Derhalve is overbelading uitgesloten voor garantieaanspraken. De voor garantie geclaimde onderdelen
moeten, indien gewenst door M.A.D., franco aan de M.A.D.-importeur worden verzonden. Bij toekenning van
de claim worden deze delen gratis en zonder verzendkosten vervangen door M.A.D.. De geclaimde delen
worden eigendom van M.A.D. Binnen 1 jaar na aankoop en montage van de set worden de- en montagekos-
ten vergoed, conform de door M.A.D. aangegeven tijden tegen de landelijk gemiddelde garage-uurtarief.
Aanspraak op vergoeding uitsluitend via dealer of garagebedrijf met indiening van dit garantiebewijs (volledig
ingevuld met stempel) en de complete originele nota. M.A.D. en haar distributeur zijn volledig gevrijwaard
EN Warranty card
Please keep this warranty card with your original invoice. In the event of a claim you must return both parts.
This M.A.D. car suspension set has been developed specifically for this vehicle according to ISO-9001, RDW
and/or TÜV standards. The sets consist of high quality materials.
The first buyer has during the use the right to following factory warrantee*
• Lifetime warrantee on springs and fitting parts.
• Two year warrantee on shock absorbers (max. 100.000 km.).
• One year warrantee on airbags, hoses and accessories.
• One year warrantee on labour costs
Warranty conditions
This warranty applies to M.A.D. components, which fail due to faulty material or manufacturing process. Va-
lidity is limited to countries in which M.A.D. is officially represented and only if fitted by a professional dealer
of workshop according to enclosed mounting instructions.
The warrantee is only valid when the vehicle is operated under normal conditions according the specifications
laid down by the vehicle manufacturer. Overloading is not permitted. The parts claimed under warrantee are
to be send free of charge to the M.A.D. importer, if deemed necessary by M.A.D.. When the claim is acknowl-
edged, the part(s) will be replaced free of any charge, The claimed parts become property of M.A.D.. Within 1
year after purchase and installation of the set garages wages are compensated in case of replacement, con-
form to the time indicated by M.A.D. and by the national average garage hour wage. Claims for compensa-
tion can exclusively be done through a garage or car dealership with submittal of this warrantee (completely
filled out with stamp) en original purchase invoice. M.A.D. and it’s distributor are exempt from all other claims
and expenses, as not indicated by law.
* All warrantee claims are valid undiminished all other rights and claims that the law awards to the buyer. Di-
rective 1999/44/EG (book 7, Civil code).
For claims please contact your local MAD dealer.
This manual suits for next models
2
Table of contents
Popular Industrial Equipment manuals by other brands

PCB Piezotronics
PCB Piezotronics ICP W353B31 Installation and operating manual

Dover
Dover DESTACO ROBOHAND DPP Series Service manual

Mennekes
Mennekes LockOUT-LET Wiring instructions

Lesco
Lesco SUPERSPOT VSM3002 Technical reference manual

ABB
ABB HT842972 Operation manual

Vetter
Vetter Gekko Mounting instructions