Madentec Tracker PRO User manual
User Guide


All rights reserved. No part of this publication and the hardware or software
described in it may be reproduced in whole or in part. This User Guide may
contain samples of names and other identication to describe the features
and capabilities of Tracker Pro and should not be construed as endorsing any
product or individual but simply to illustrate the application.
Tracker 2000, Telepathic 2000 and ScreenDoors 2000, WISP and Magic
Cursor 2000 are all trademarks of Madentec Limited. Windows 95, Windows
98, Windows NT, Windows 2000, Windows ME and Windows XP, are trademarks
of Microsoft Corporation. Apple and Macintosh are registered trademarks of
Apple Computer, Inc. All other product names are trademarks or registered
trademarks of their respective companies.
Madentec Limited
www.madentec.com
Phone: 780-450-8926
Fax: 780-988-6182
1104

United States Radio and TV Interference Regulations
The device complies with Part 15 of the FCC Rules. Operation is subject to the following two conditions:
(1) this device may not cause harmful interference, and (2) this device must accept any interference received,
including interference that may cause undesired operation.
Your Madentec Tracker Pro has been tested and found to comply with the limits for a Class B digital device,
pursuant to part 15 of the FCC Rules. These limits are designed to provide reasonable protection against
harmful interference in a residential installation.
Tracker Pro generates, uses and can radiate radio frequency energy and, if not installed and used in accordance
with the instructions, may cause harmful interference to radio communications. However, there is no guarantee
that interference will not occur in a particular installation. If this equipment does cause harmful interference
to radio or television reception, which can be determined by turning the equipment o and on, the user is
encouraged to try to correct the interference by one or more of the following measures:
- Reorient or relocate the receiving antenna.
- Increase the separation between the equipment and receiver.
- Connect the equipment into an outlet on a circuit dierent from that to which the
receiver is connected.
- Consult the dealer or an experienced radio/TV technician for help.
NOTE: Any change or modications not expressly approved by Madentec Ltd. could void the user’s authority
to operate this device
Canadian Interference-Causing Equipment Regulations
This Class B digital apparatus complies with Canadian ICES-003.
iv

Table of Contents
1. Introducing Tracker Pro
Introduction 7
What’s in the box? 9
Registering Tracker 9
2. Installing Tracker Pro
Introduction 11
Connecting Tracker Pro 13
Mounting Tracker Pro 15
USB Hubs 17
Using Alternate Clicking Devices 17
3. Setting up Tracker Pro
Introduction 19
The Sensor and Dot 19
Tracking Range 21
Conguration 21
Table of Contents v

Accelerated Cursor Speed 21
Using IntelliPoint 23
Tracker and Mouse Driver Settings 23
4. Tips & Tricks
Quick Start for Tracker Pro on a Computer: 25
vi

1. Introducing Tracker Pro
Introduction
Tracker Pro is a hands-free mouse that translates your movements into direct
movements of the computer’s mouse cursor. It imitates a standard desktop mouse
or trackball allowing hands-free control of the computer.
Tracker Pro uses a sensor that tracks a tiny, reusable reective dot that is placed
on either your forehead or glasses. When your head moves, the cursor moves.
Tracker Pro provides wireless access to your Macintosh or PC computer using the
USB port. Precise tasks such as drawing or computer drafting are accomplished
easily. Pointing actions for games, surng the net and general computer
maintenance are also easily accomplished with Tracker Pro.
Tracker Pro allows three different options to accomplish the clicking functions
of a mouse. Clicks are accomplished by using any of the following methods: Single
switch access using any standard ability switch; WISP 2000* is Madentec’s wireless
switch using either a sip/puff headset or cheek switch: or a Dwell selection
program such as Madentec’s Magic Cursor 2000 for Windows or similar software
for Macintosh.
*Sip/Puff or Cheek activation using Wisp 2000.
If you are new to Tracker, please refer to the Tips & Tricks on page 25 rst.
Introducing Tracker Pro 7
8 Tracker Pro User Guide
1. 2. 3. 4.
5. 6. 7. 8.
Illustration A.

8 Tracker Pro User Guide
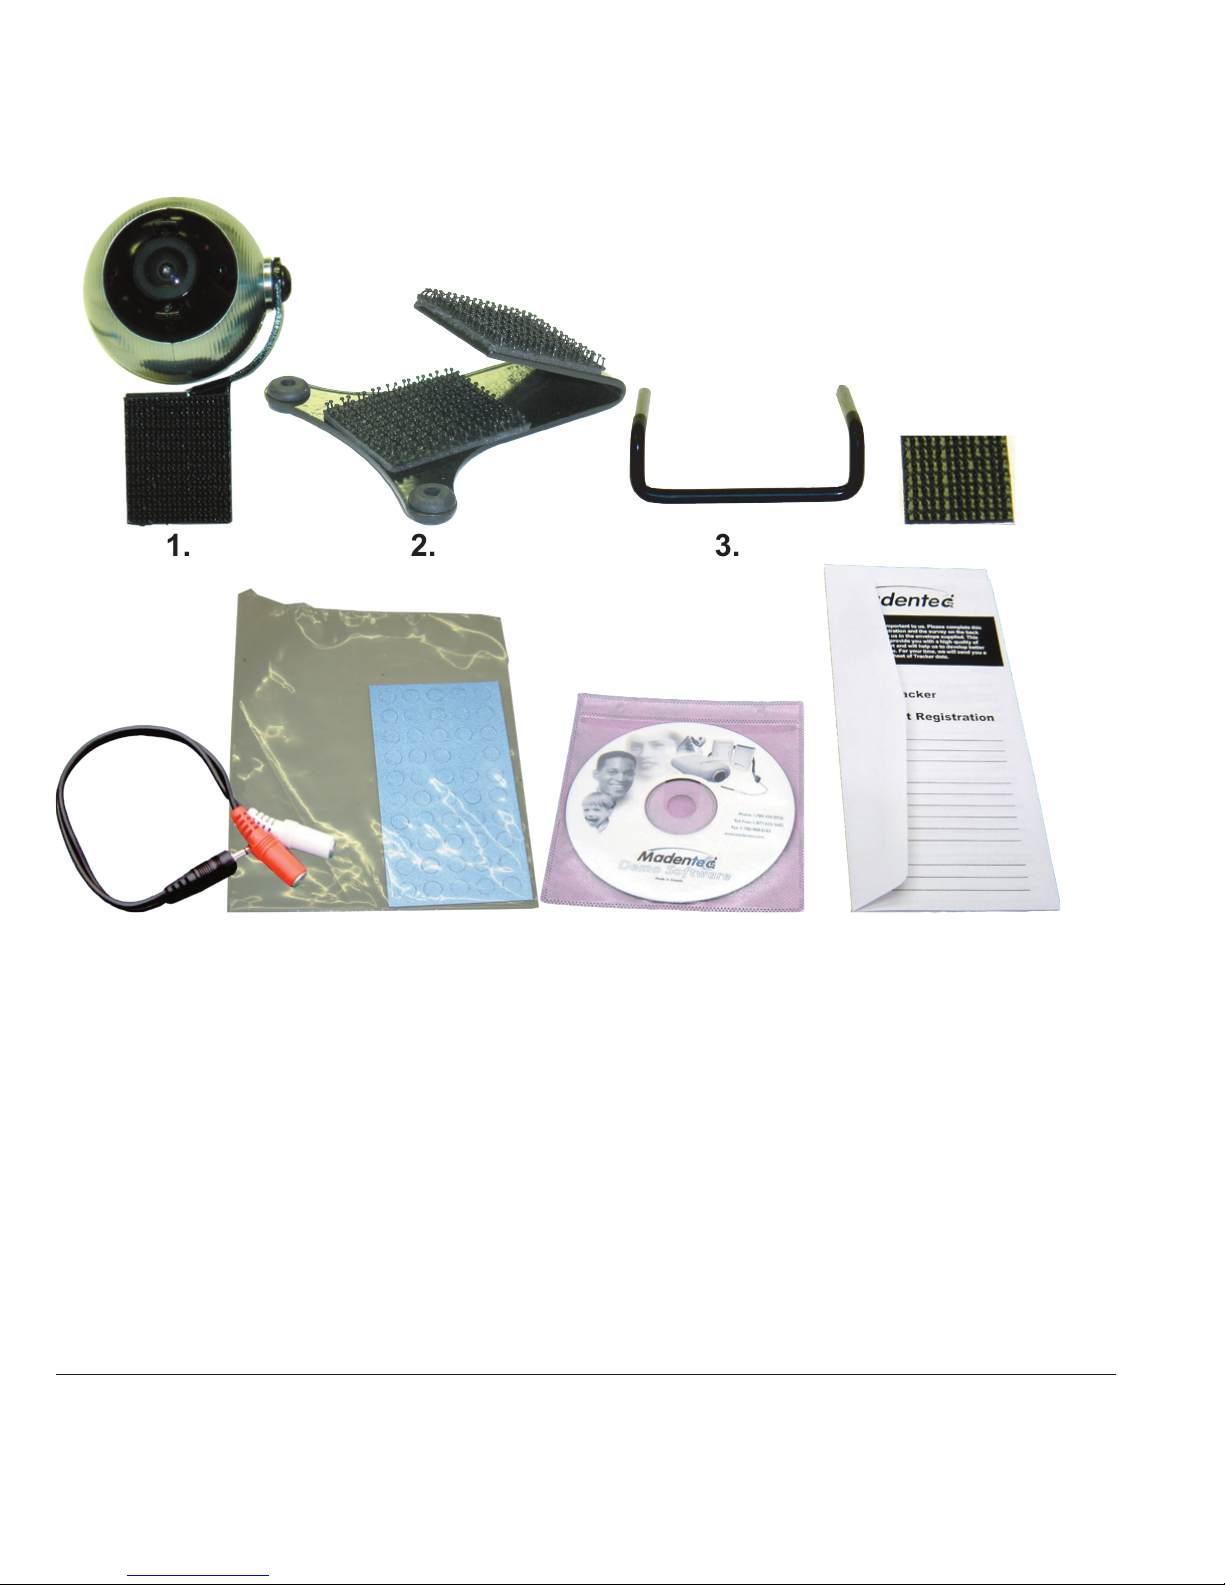
What’s in the box?
Illustration A. shows the contents of what is included in the Tracker Pro box.
1. Tracker Pro with attached cable 6. Stereo cable adapter
2. Universal Mounting bracket 7. Demo software CD
3. Standard Hook 8. Registration card
4. Extra Dual Lock for mounting 9. User guide
5. Tracker Dots
Registering Tracker
It is important to register your new Tracker Pro. Please complete the registration
card included with Tracker Pro and mail it as soon as possible. Registration entitles
you to two years free warranty support from the date of purchase.
Note In the event that you return your Tracker Pro for warranty support it is imperative
that you keep the original shipping box. This box has been designed to protect
Tracker Pro during shipping. Any damage done to Tracker Pro if returned in a box
other than the original is not covered by warranty.
Introducing Tracker Pro 9

10 Tracker Pro User Guide
Illustration B.
Table of contents


