manuals.online logo
Brands
  1. Home
  2. •
  3. Brands
  4. •
  5. MadLab
  6. •
  7. Drum
  8. •
  9. MadLab FUNKY DRUMMER User manual

MadLab FUNKY DRUMMER User manual

R5
(150R)
(brown, green, brown, gold)
R4
(470R)
(yellow, purple, brown, gold)
C1
(10u)
Battery
snap www.madlab.org
© MadLab® 2017
FUNKY DRUMMER
Identify the different components using the spotter chart.
1
Fit and solder all the resistors (R1 to R11) to the circuit board. Identify the
resistors by the coloured stripes on the body. They can be fitted either way
around.
2
Solder the ferrite bead (FERRITE) either way around.
5
Solder the chip sockets (IC1 and IC2) matching the notch in the socket to
the notch on the board. Do not solder the chips directly to the board.
3
Solder the pushbuttons (S1 to S6) either way around.
7
Solder the transistor (TR1) matching the half-circle shape of the transistor
to the half-circle shape on the board.
8
Fit and solder the electrolytic capacitors (C1, C2, C3 and C8) to the board
putting the shorter leg into the hole with the – sign. The shorter leg also
has a stripe on the side of the body. Also solder the tantalum capacitor
(C6) so that the shorter leg is by the – sign. Fit and solder the remaining
ceramic (C4, C5 and C9) and polyester (C7) capacitors either way around.
4
Solder the jack socket (AUDIO).
10
Bend the legs of the regulator (REG) at right angles and solder it such
that the metal heatsink is flat on the board and the side with the writing
is facing upwards.
9
programmable rhythm machine with 40 drum sounds
MLP114 1/9/17
REG
(LD33V)
IC2 socket
continued overleaf
Solder the light (LED) to the board putting the shorter leg into the hole
with the line. The shorter leg also has a flattened edge on the rim.
6
IC2
(dsPIC33E)
R2
(10k)
(brown, black, orange, gold)
C8
(220u)
C3
(220u)
C7
(100n)
AUDIO
IC1 socket
IC1
(MCP4921)
LED
(red)
TR1
(ZTX689B)
11 Solder the power socket (POWER). (You might find it easier to solder
the largest hole if you use a small piece of wire as a bridge.) Optionally
also fit the PP3 battery snap (BATTERY). Push the battery snap leads
up through the larger holes in the board from the metal side of the
board. Fit the metal tip of the red lead into the BATTERY + hole and
the metal tip of the black lead into the BATTERY – hole. Solder the
metal tips to the tracks on the board then pull the wire loops back.
C2
(100u)
POWER
C6
(10u)
S2S1 S3
S4 S5 S6
C9
(100n)
C4
(100n)
C5
(100n)
Carefully bend the legs of the chips inwards a little with your fingers.
Fit the chips into their sockets matching the small notch in the chip to
the notch in the socket.
12
Attach the self-adhesive rubber feet around the edge of the board.
13
R1
(10k)
(brown, black, orange, gold)
R11
(1k)
(brown, black, red, gold)
R10
(1k)
(brown, black, red, gold)
R9
(1k)
(brown, black, red, gold)
R8
(1k)
(brown, black, red, gold)
R7
(10k)
(brown, black, orange, gold)
R6
(47R)
(yellow, purple, black, gold)
R3
(100R)
(brown, black, brown, gold)
FERRITE
HOW TO USE
A particular drum sound can be associated with each of the four touch pads.
Pressing the associated pushbutton (S1 to S4) selects a touch pad (1 to 4) to
change. Then pressing the + or – pushbuttons selects a particular drum, stepping
forwards or backwards through the 40 available drum sounds. Finally pressing the
same pushbutton again fixes the association.
Pressing CONTROL + VOLUME increases the volume, SHIFT + VOLUME
decreases the volume. Pressing CONTROL + SHIFT + VOLUME toggles gain x 2
(double output voltage).
Pressing CONTROL + SHIFT + TEMPO recalibrates the touch pads. Do this when
you add external touch objects using crocodile clip leads.
Settings are saved to non-volatile memory. CONTROL + SHIFT + RESET restores
all settings to the factory defaults. Note that user rhythms are not restored though.
Funky Drummer can output an audio signal on its jack socket which has a
maximum peak-to-peak of about 2 volts. This is more than capable of producing a
loud sound in a pair of 32-ohm impedance headphones.
The sensitivity of the touch pads can be adjusted by pressing and holding down
one of the pushbuttons during power up (until after the self-test has completed).
Six settings are available and are suitable for different physical arrangements of
external touch pad connections.
Either connect a mains power supply (5-9V regulated dc, 300mA,
centre +) to the power socket or a PP3 battery to the battery snap. The
software includes a power-on self-test. The LED should flash twice if
Funky Drummer is working correctly.
14
Connect headphones or powered speakers (with a 3.5mm jack plug) to
the audio output socket. Tap the touch pads with your finger and you
should hear different drum sounds. You can connect external objects
such as pieces of fruit or vegetables to the touch pads using crocodile
clip leads. Touching the objects will then sound the drums.
15
The LED flashes at the start of the rhythm loop. Pressing any pad pushbutton (S1
to S4) stops the rhythm playing.
CONTROL + TEMPO increases the rhythm tempo (with auto repeat), SHIFT +
TEMPO decreases the tempo (with auto repeat).
CONTROL + SHIFT + DEMO plays all the preset rhythms in turn. Any pad
pushbutton (S1 to S4) exits demo mode.
Record Mode
CONTROL or SHIFT + RECORD selects record mode and allows the user rhythms
to be edited.
The LED flashes at the start of the rhythm loop and a metronome click sounds on
each beat of 4 beats. The touch pads record drum sounds at the current point in the
rhythm loop.
Recording is at one quarter speed, and a maximum of 64 drum events per beat can
be recorded.
Pressing one of the pad pushbuttons (S1 to S4) exits record mode and stores the
rhythm as one of the 4 user rhythms.
Rhythm Mode
Pressing CONTROL + RHYTHM plays the current rhythm or selects the next
rhythm if a rhythm is already playing. Pressing SHIFT + RHYTHM plays the
current rhythm or selects the previous rhythm if a rhythm is already playing. 12
preset rhythms and 4 user rhythms are available.
8beat #1 8beat #2 8beat #3 8beat #4
jazz shuffle reggae samba
disco #1 disco #2 elec pop pattern #1
user #1 user #2 user #3 user #4
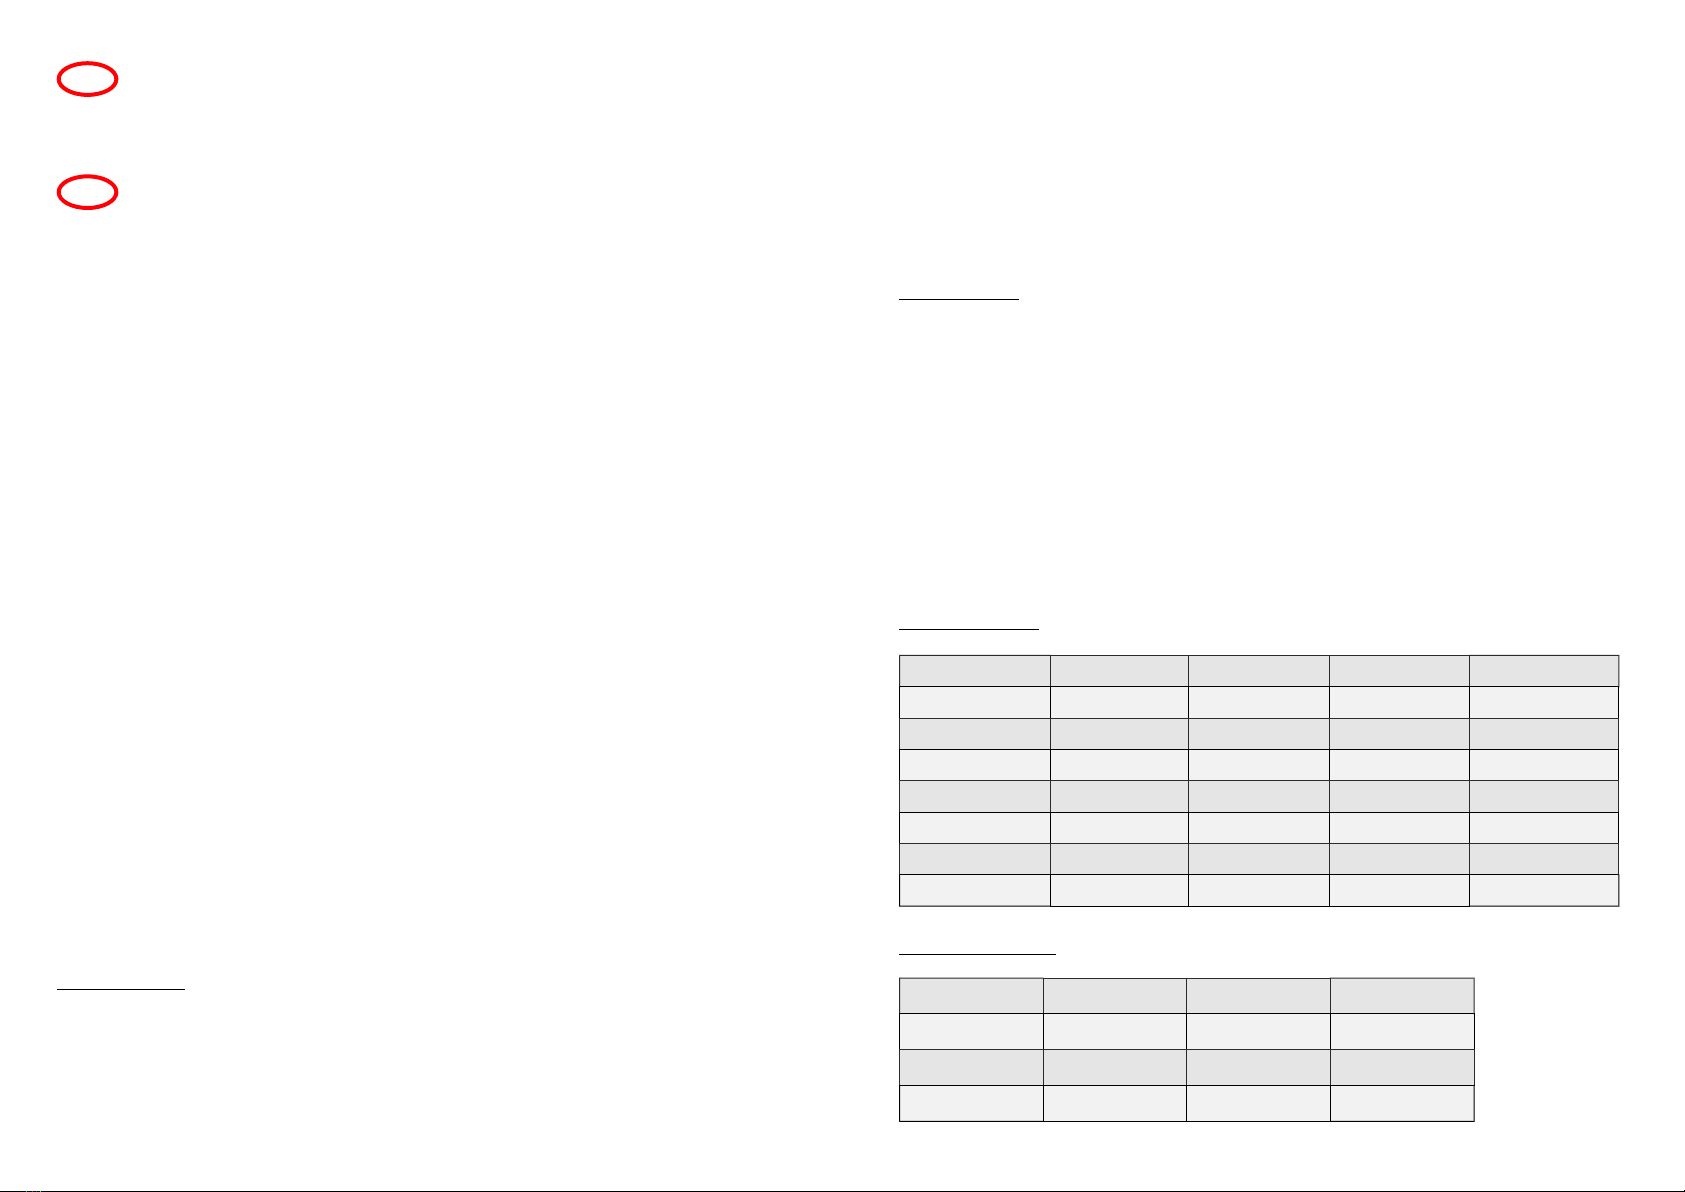
Table 2 - rhythms
closed hihat open hihat high tom #1 high tom #2 high tom #3
low tom #1 low tom #2 snare #1 snare #2 snare #3
snare #4 bass #1 bass #2 bass #3 high conga
low conga high bongo low bongo high agogo low agogo
crash cymbal taiko timpani timbale china cymbal
cabasa brush #1 brush #2 snap clap
cowbell triangle gunshot scratch whistle
kalimba rimshot chicken bubble quijada
Table 1 - drums

Other MadLab Drum manuals

MadLab FUNKY DRUMMER User manual

MadLab

MadLab FUNKY DRUMMER User manual

Popular Drum manuals by other brands

Roland PAD-80 owner's manual

Roland

Roland PAD-80 owner's manual

Alesis SR-18 quick start guide

Alesis

Alesis SR-18 quick start guide

Yamaha RS40 Assembly manual

Yamaha

Yamaha RS40 Assembly manual

thomann Millenium MPS-150X user manual

thomann

thomann Millenium MPS-150X user manual

Arturia SPARK user manual

Arturia

Arturia SPARK user manual

Yamaha HH-65 owner's manual

Yamaha

Yamaha HH-65 owner's manual

Yamaha RM-50 manual

Yamaha

Yamaha RM-50 manual

Schoenhut C1020 Assembly instructions

Schoenhut

Schoenhut C1020 Assembly instructions

Yamaha DD-5 owner's guide

Yamaha

Yamaha DD-5 owner's guide

Pyle Pro PED04 user manual

Pyle Pro

Pyle Pro PED04 user manual

thomann Startone Mat Drum quick start guide

thomann

thomann Startone Mat Drum quick start guide

Yamaha DTX KP128 owner's manual

Yamaha

Yamaha DTX KP128 owner's manual

Rossum SP-1200 manual

Rossum

Rossum SP-1200 manual

Tama RW30 user manual

Tama

Tama RW30 user manual

The Singing Machine Electronic 8-Pad Drum Set SMB-546 instruction manual

The Singing Machine

The Singing Machine Electronic 8-Pad Drum Set SMB-546 instruction manual

Roland BT-1 user manual

Roland

Roland BT-1 user manual

Roland TD-20K owner's manual

Roland

Roland TD-20K owner's manual

Alesis SR-18 Reference manual

Alesis

Alesis SR-18 Reference manual

manuals.online logo
manuals.online logoBrands
  • About & Mission
  • Contact us
  • Privacy Policy
  • Terms and Conditions

Copyright 2025 Manuals.Online. All Rights Reserved.