Magerit METRO User manual

2
¡Muchas gracias por adquirir el nuevo MageritMETRO! Para ayudar a conservar el medioambiente, todas
las guías e instrucciones de cada módulo estarán disponibles en formato digital.
El encoder ayuda a seleccionar
los diferentes parámetros o
canales. En las siguientes
páginas se explica su
funcionamiento.
Manteniéndolo pulsado, se
abre la ventana de efectos.
METRO tiene una pantalla
OLED de 1,3”. Su interfaz
minimalista ayuda a tener los
ritmos y sonidos bajo control en
todo momento
Los tres botones superiores te
dirigen al menú INSTRUMENTO,
ASIGNACIÓN y SECUENCIADOR.
Manteniéndolos pulsados se
guardan los parámetros
cambiados en dicho menú.
5 Potenciómetros
completamente asignables.
Las entradas CV están
enlazadas a sus respectivos
potenciómetros. (Rango de -5
a +5V
Tres entradas TRIGGER
asignables. (Opción de
eseteo de secuencias
incluido)
Entrada de reloj externo
(Asignable en el menú
ASSIGN)
El botón trigger ejecuta el
instrumento del canal
seleccionado.
Éste potenciómetro atenúa los
efectos cargados en el módulo
(ECO y/o REVERBERACIÓN)
Salida estéreo L y R. (Los jacks
son mono, pero en conjunto
funcionan comvo mezcla
estéreo).
16 bits de resolución.
Sample rate a 44.1 kHz.
METRO posee una anchura de 13HP y una profundidad de 25mm.
Su consumo es de ~150mA en el raíl +12V y de 5mA en el -12V.
METRO
Manual de instrucciones
Español

3
v
v
Conectar elmódulo alrack ya laalimentación. METRO tiene ambos conectores: de 16 y de 10 pines. Elige
sólo uno de los dos y presta atención a la polaridad. Al encenderlo aparecerá el logo de Magerit y la
siguiente pantalla:
En dicho menú podrás modicar varios parámetros del sonido seleccionado: Frecuencia, Decay…
Además, es posible modicar su volumen y su paneo. En algunos instrumentos, al haber demasiados
parámetros, éstos se reparten en dos pantallas. Para acceder a las diferentes pantallas, simplemente gira
el encoder. Para guardar los cambios, mantén pulsado el botón
Hay 6 slots o canales en total.
En cada uno puedes elegir un
instrumento y crear una
secuencia.
La línea del lado derecho es un
cursor. Indica si está en la
pantalla 1 o 2.
Los potenciómetros 1, 2, 3 y 4
modican los parámetros 1, 2,
3 y 4 de la pantalla
respectivamente.
41
32
El cursor indica el canal
seleccionado
Guía de uso
Menú INSTRUMENTO
Frequency
Tone
Open/Close
Decay
HAT CH: 4
82%
68%
0%
50%
Girando el encoder irás moviendo el cursor y cambiarás de canal. Cuando pulses el botón TRIG, sonará
el instrumento de dicho canal. Además, estando en esta pantalla o en la de parámetros, si mantienes
pulsado TRIG, se cambiarán los parámetros del instrumento a unos aleatorios.
Para cambiar el instrumento de un canal seleccionado, pulsa el encoder y, sin soltarlo, gíralo. METRO
no está programado para tener el mismo instrumento en dos canales diferentes. Entonces, cuando gires
el encoder, verás que se salta los instrumentos ya cargados en otros slots. Para guardar la selección de
instrumentos, mantén pulsado
En total hay 11 algoritmos diferentes: 3 bombos, 2 cajas, 2 toms, 2 metales y generador de cuerdas y
uno de palmadas.
Para editar el sonido del canal seleccionado, pulsa el botón

4
En esta sección podrás darle una función a cada potenciómetro (salvo el número 2 y 6 que están
reservados para el tempo y los efectos) y a cada entrada TRIG (gamma, delta y épsilon).
Girando el encoder pasarás por todos los parámetros de todos los instrumentos en orden (incluidos el
volumen y paneo). Después de todos los parámetros, aparecerá de nuevo el primer parámetro del primer
instrumento.(BD FM - Frequency).
En el potenciómetro 2 (tiene una nota musical dibujada) y el potenciómetro 6 no son asignables. Están
dedicados al control del tempo y de los efectos respectivamente. Conecta una señal de reloj externa a la
entrada CV 2 (nota) para reproducir las secuencias sincronizadas con cualquier otro módulo Eurorack.
También es posible navegar y seleccionar los diferentes potenciómetros y entradas TRIGGER pulsando el
encoder y, sin soltarlo, girarlo.
La respuesta TRIG simplemente reproduce el instrumento del canal elegido en este apartado a una
intensidad constante. El trigger se produce cuando se introduce una señal superior a 3.5V. Si selecciona
doble canal,(ej,TRIG 3&6), el voltaje de la señal para reproducir el canal 3 debe estar entre 3.5V y 5V. El del
canal 6 debe ser un voltaje superior a 5V.Recuerda que no debe introducir voltajes superiores a 8V en estas
entradas.
ACCENT proporciona un rango dinámico más variado según el voltaje introducido. En este modo, sólo se
puede elegir un canal,a diferencia del modo TRIG.El umbral de funcionamiento esta en los 3.5V.Apartir de
ahí,el instrumento sonará cada vez con más intensidad.
Finalmente, RESET reseteará la secuencia del canal seleccionado. Si se elige doble canal, los rangos de
voltaje de entrada serán similares a los del modo TRIG. También puedes resetear todas las secuencias a la
vez.
Para guardar los cambios en este menú,mantenga pulsado el botón
Recuerde que las asignaciones se anulan temporalmente cuando esté en el menú SEQUENCER o editando
los parámetros del instrumento.Estos potenciómetros tienen funciones concretas en ambas pantallas.En el
resto, puede hacer uso de dichas asignaciones sin ningún problema.Cuado conecte un jack a la entrada CV,
su potenciómetro pasará a ser un atenuverter de la señal introducida.
Menú ASSIGN
v
v
Haciendo click en el encoder o
el botón , cambiará el
potenciómetro a elegir.
Después del pot 5 entrarás en
el menú de asignación de las
entradas TRIG.
El potenciómetro en blanco
indica el seleccionado. La
asignación será dicho
potenciómetro (y su respectiva
entrada CV)
Podrás elegir el slot o canal a
reproducir en cada entrada
TRIGGER.
BD 2
Overdrive
TRIG
1ACC
5TRIG
3 &
6

5
Aquí se conguran los diversos patrones rítmicos de cada canal.Como hay 6 canales (o slots), hay 6 patro-
nes completamente independientes entre sí. No obstante, todos comparten el mismo TEMPO en BPM.
Magerit METRO cuenta con dos tipos de secuenciadores: uno de pasos y otro euclideano.Veremos cómo
funciona cada uno. Para alternar entre ambos tipos de secuenciadores,mantén pulsado el botón
durante más de 3 segundos.En la pantalla aparecerá parpadeando SEQ→STEP o SEQ→EUCLID.
Para guardarlos cambios (tipo de secuenciador,tempo,parámetros…),mantén pulsado el botón ,pero
no más de 3 segundos ya que si no, estaría cambiando el tipo de secuenciador y no se guardaría nada.
Pulsa brevemente para pausar o reproducir la secuencia.Si hay una señal de reloj externa, el botón no
hará efecto.
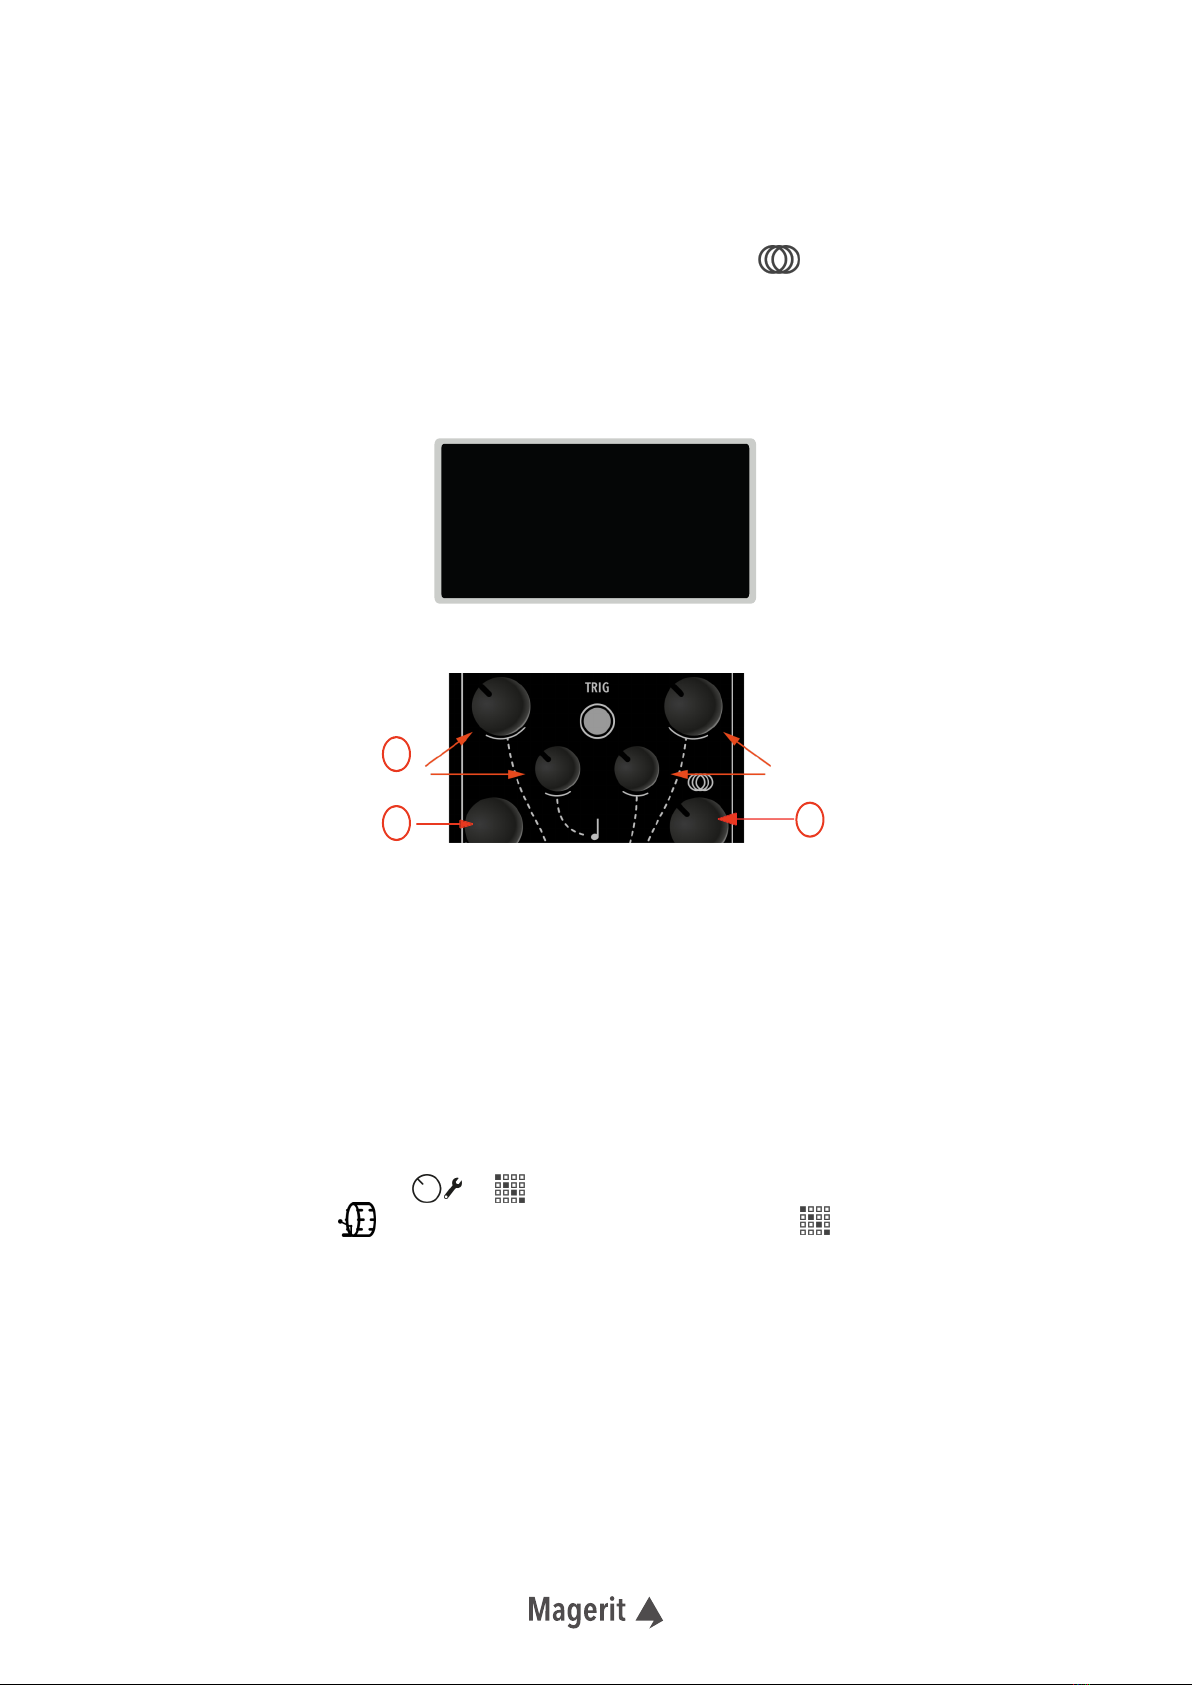
El botón TRIG resincroniza todos los ratios de las secuencias entre sí, para un comienzo más equilibrado.
Manteniendo pulsadoTRIG, resetea todas las secuencias.
El reloj externo reproduce las secuencias siguiendo el ritmo marcado por la señal introducida, proveniente
de cualquier otro módulo Eurorack.Si dicha señal se pausa, METRO lo detectará.Si además la secuencia se
para durante más de dos segundos, al volver a reproducirla se resetearán automáticamente todas las
secuencias.
- SECUENCIADOR DE PASOS
Conformado por rejillas de longitud ajustable y de pasos seleccionables. Es decir, en cada canal puedes
seleccionar una longitud de secuencia y patrón diferentes.
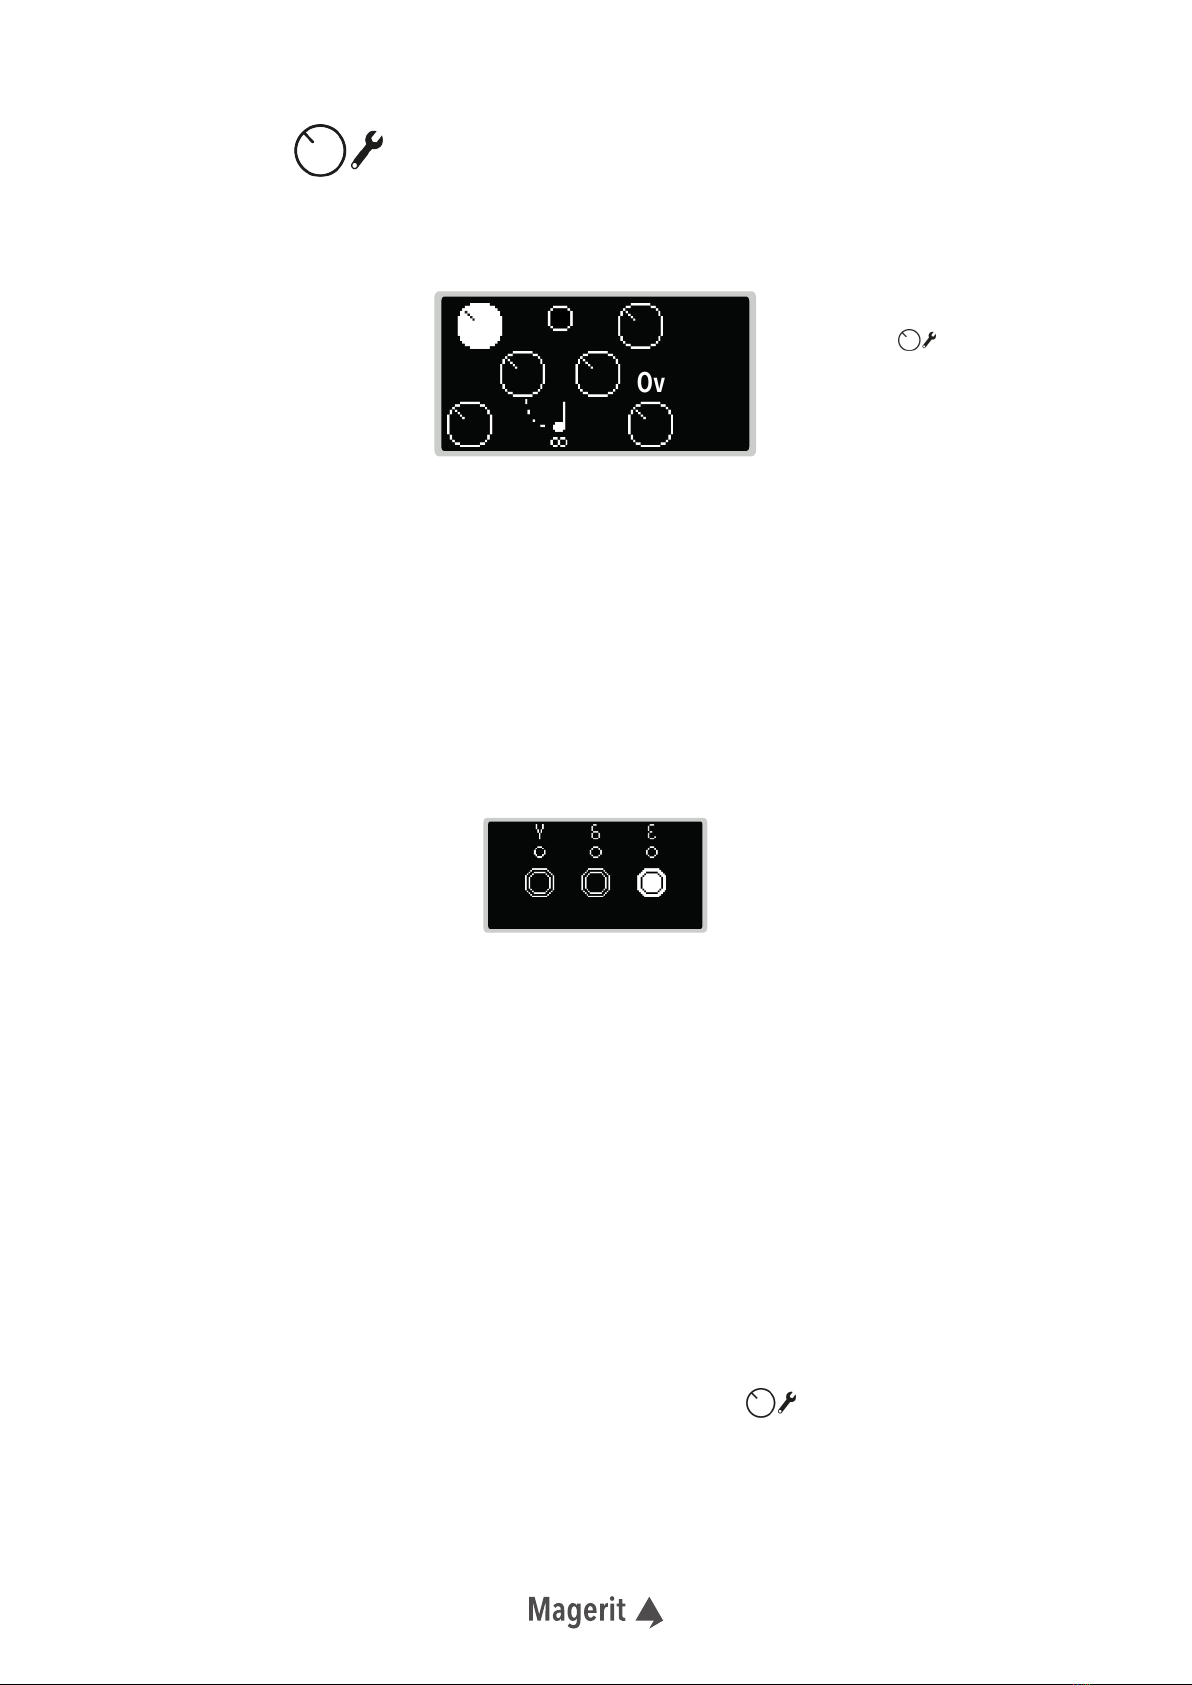
Menú SEQUENCER
v
El número indica el canal de la
secuencia. Si aparece el símbolo de
pausa, dicha secuencia no se
reproduce
Si hay un icono de reproducción en la
parte inferior de la pantalla, quiere
decir que hay una señal de reloj
externa conectada. El símbolo pausa
indica que todo el secuenciador está
parado.
Gira el encoder para moverte
horizontalmente por la rejilla.
Pulsa y no lo sueltes mientras,
gira el encoder para desplazarte
verticalmente.
Haz click en el encoder para
activar o desactivar un paso
especíco (donde está el
cursor).
Cursor de reproducción de la
secuencia
1
2
Potenciómetros:
1 - TEMPO (en BPM)
2 - Número de pasos de la secuencia
seleccionada.
3 - Ratio del canal seleccionado
4.- ON/OFF, activar o desactivar
secuencia
41
32
÷1: 120 2/24 1:2
Cursor - Posición
del encoder

6
- SECUENCIADOR EUCLIDEANO
¡Las diversas proporciones matemáticas y euclideanas han llegado a Magerit METRO! Para cambiar los
diversos atributos de dicho tipo de secuencia:
Menú SEQUENCER (cont.)
vUn círculo indica que el canal
está reproduciéndose, ON.
Una raya señala que la
secuencia está en OFF.
Gira el encoder para seleccionar
el canal.
Pulsa el encoder para activar o
desactivar dicha secuencia.
Reproducción de la secuencia -
Posición actual Cursor - Posición
del encoder
CH.
1
BPM
92 RATE
3:1
S
8P
3R
6
Potenciómetros:
1 - TEMPO (en BPM)
2 - Número de pasos de la secuencia seleccionada (“S”).
3 - Número de pulsos a repartir en la secuencia (“P”).
4.- Rotación de la secuencia (“R”).
5.- Ratio del patrón.
41
32
5

7
Manteniendo pulsado el botón del encoder, accederás a esta ventana. Podrás elegir qué efectos cargar a
la mezcla del módulo. El potenciómetro número 6, (tiene el símbolo ), amplica o atenúa los efectos
activos. Para salir de esta ventana, mantén pulsado el botón del encoder o pulsa cualquier botón para
acceder a su correspondiente menú. Los cambios se guardarán automáticamente.
Ventana de Efectos
v
Gira los potenciómetros para
cambiar cada parámetro
FX: 82%
ECHO(1)
Decay REVERB(5)
Feedback
10% 89%
Potenciómetros:
1 - ECHO Decay
5 - REVERB Feedback
6.- Atenúa de forma global los efectos (DRY/WET)
41
6
5
2
Si pulsas y mantienes los botones y y a continuación enciendes el módulo, entrarás en el menú
Reseteo de Fábrica. Pulsa para borrar todos los datos o selecciona para cancelar el proceso de
borrado. Después, METRO se reiniciará.
¡Este borrado no se puede deshacer!
Restablecimiento de fábrica
5

8
Versión Fecha
v1.0.2 16/02/22
v1.1.0 02/03/22
v1.1.2 14/03/22
v2.0.0 03/04/22
v2.5.0 27/04/22
v2.5.1 28/04/22
v2.5.5 13/05/22
v2.5.7 17/05/22
v2.6.0 25/05/22
Mejoras
Lanzamientodel rmwareydel módulo.
Nueva Entradade Reloj Externo.Nuevaopción de reseteoindividualde las
secuencias.Mejoras enla UI del secuenciador.Correcciones de erroresy
mejorageneral delrendimiento.
Correccionesde bugs puntuales. Se haeliminadoun error elcual
provocaba lecturasincorrectas delos potenciómetros al cambiarde menú.
Resuelto el problema al detectar y modicartempos dela entrada dereloj
externa. Cambios enla UIal conectarun reloj externo.Aumentadoel
rendimiento,resolucióny estabilidad del“timer” quecontrola el
secuenciador. Nueva opción dereseteo global detodoslos secuenciadores
mediante lasentradas TRIGGER(congurable enel menúASSIGN). El
volumeny paneo decada instrumentopuedeser asignadoa cada
potenciómetro y entradaCV. Menú restablecimiento deldispositivo
añadido. Corregidoerrorpor ecual elpaneoLy R funcionabanal revés.
Volumenglobal incrementado.Nuevas funcionesen elmenúefectos.
Correccionesde otros bugs puntuales.
Reescrita lasincronización con relojes externos, nuevo autoreseteo (en el
modo ExternalClock Sync), diversasmejoras enla UI,cambio en lafunción
del POTy CV 2,incluido símbolode play y pausa entodoslos menus,
mejorasde rendimiento yde guardado.Correcciones deotroserrores
puntuales.
Corregido unerrorque provocaba elautorreseteo delmóduloen elmenú
ASSIGN.
Mejorada la sincronización externa.Ahorael potenciómetro2 está
dedicado exclusivamenteal controldel tempo encualquier pantalla.
Cambiosen laUI. Correccionesde otros errores.
Corrección deerrores puntuales.
Mejorade rendimiento.Errorde guardadomúltiple corregido. Cambios
enel algoritmo de cuerdaybomboFM.Correcciónde bugspuntuales.
HISTORIAL DE MEJORAS

9
Todos los módulos Magerit han sido examinados para garantizar su correcto funcionamiento. El módulo
contiene piezas pequeñas. Por favor, manténgalo fuera del alcance de los niños.
Se recomienda el uso de una buena fuente de alimentación y evitar fuentes de proyectos DIY que no
hayan sido sometidos a estrictas pruebas de seguridad y calidad. Una mala fuente puede provocar picos
de tensión dañinos para cualquier módulo, ya sea de Magerit o de cualquier otro fabricante. Si su fuente
de alimentación presenta signos de desgaste, daños o un incorrecto funcionamiento, retírela y deséchela
de acuerdo a las medidas medioambientales.
Todos los módulos deben ser colocados en el rack mediante tornillos M3. No deje a medio atornillar
ningún panel ni los desconecte o conecte a la alimentación estando ésta encendida. No tire del cable de
alimentación.
Si desea limpiar los paneles frontales, utilice un paño suave. Puede estar ligeramente humedecido con
agua. No emplee ningúnproducto de limpieza nialcohol. Recuerde desconectar laalimentación siempre
que limpie el módulo.
ADVERTENCIA DE USO
Diseñado por
David Vijuesca y José Vijuesca
2022

10
Thank you so much for purchasing the new MageritMETRO! In order to protect the environment, all guides
and instructions will be available online.
The encoder is mainly used for
selecting the different
channels and pages. In a few
moments you will nd how
does it work. Press and hold to
open the FXs window.
METRO has a 1.3" OLED display.
Its minimalistic interface allows
you to keep the rhythms and
sounds under control at any
time.
The three buttons sends you to
the INSTRUMENT, ASSIGN and
SEQUENCER menus. Press and
hold to save the modied
parameters of the menu.
There are 5 fully assignable
potentiometers. The CV inputs
are linked to their respective
potentiometers (-5 to +5V
range).
Three assignable TRIGGER
inputs. (RESET option
included).
External clock input
(assignable via ASSIGN menu)
The TRIG button runs the
instrument of the selected
channel.
This potentiometer attenuates
the active FXs of the module
(ECHO and/or
REVERBERATION).
Stereo output: L and R. (Both
jacks are mono, but together
they work as a stereo mix).
16-bit resolution.
44.1 kHz sample rate.
METRO has a width of 13HP and a depth of 25mm.
Power consumption: ~150mA +12V, 5mA -12V.
METRO
User manual
English

11
v
v
Connect the module to the Eurorack and the PSU. METRO has both 16 and 10 pin power connectors.
Choose only one and pay special attention to the polarity. Once it is switched on, the Magerit logo and
the following screen will appear:
In this menu you will modify several parameters of the selected sound: Its frequency, decay... It is also
possible to modify its volume and panning. Some instruments have too many parameters, so they are
arranged in two screens. To navigate betweeen the different screens, just turn the encoder. Hold down
the button to save your changes.
There are 6 slots,or channels,
in total. In each one you can
choose an instrument and
create a sequence.
The line on the right side is the
cursor. It indicates whether
you are on screen 1 or 2.
Potentiometers #1, 2, 3 & 4
modify the 1st, 2nd, 3rd and
4th parameters respectively.
41
32
The cursor indicates the
selected channel
User guide
INSTRUMENT menu
Frequency
Tone
Open/Close
Decay
HAT CH: 4
82%
68%
0%
50%
By turning the encoder, you will move the cursor and change the selected channel. If you press the TRIG
button, the instrument of that channel will sound. Also, while being in this screen or in the INSTRUMENT
menu, if you click and hold the TRIG button, you will change the instrument parameters to any random
values.
In order to change the instrument of a selected channel, press the encoder and, without releasing it,
turn it. METRO is not programmed to have the same instrument on two different channels. So, when
you turn the encoder, you will see that it skips the instruments which are already loaded in other slots.
Press and hold down for saving the selection of instruments.
There are 11 different algorithms: 3 bass drums, 2 snares, 2 tom-toms, 2 hats, a string generator and a
clap one.
To edit the sound of the selected channel, press button.

12
In this section you can assign a function to each potentiometer (except number 2 & 6 which are
reserved for the tempo and effects) and to each TRIGGER input (gamma, delta and epsilon).
If you turn the encoder you will cycle through all the parameters of all the instruments in order (included the
volume and panning).After all the parameters, you will nd the TEMPO (in BPM) option and then, the rst
parameter of the rst instrument again.(BD FM - Frequency).
Potentiomerter 2 (has a quarter note drawn) and pot 6 are not assignable. They control the tempo and the
effects respectively. Connect an external clock signal to the CV 2 (quarter note drawn) input in order to
reproduce your sequences synced to any other Eurorack module.
It is also possible to navigate and select the different potentiometers and TRIGGER inputs by pressing the
encoder and, without releasing it,turning it.
The TRIG response simply reproduces the instrument of the channel chosen at a constant intensity. The
trigger happens when a signal,higher than 3.5V, is detected on the input.If you select dual channels,(e.g.,
TRIG 3&6), the signal voltage needed to play channel 3 must be between 3.5V and 5V. In order to trigger
channel number 6, it is required a voltage higher than 5V. Remember not to introduce voltages higher than
8V on these inputs.
ACCENTprovidesa varieddynamicrange dependingonthe voltageentered.Inthis mode,onlyonechannel
can be selected,unlike theTRIG mode.The operating threshold is at 3.5V. From this point on,the instrument
will sound louder and louder.
RSToptionallowsyoutoreset anychannel’ssequence.Both voltagesthresholdsandthedualchanneloption
are identicaltotheTRIGones.Youcan alsochooseaglobalRESEToption,whichresetsthe 6channelsatonce.
Press and hold down button to save the changes in this menu.
Remember that the assignments are temporarily overridden when you enter in the SEQUENCER or
INSTRUMENTmenu.Thesepotentiometershave specicfunctionsinboth screens.Intheother ones,youcan
use these assignments without any problem. When you connect a jack to the CV input, its potentiometer
works as an attenuverter of the input signal.
ASSIGN menu
v
v
By clicking on the encoder or
the button, you will
change the selected
potentiometer. After pot 5 you
will enter to the TRIGGER input
assignment menu.
The white potentiometer
indicates the selected one.You
will change its assignment.
You are able to choose the slot
or channel to play in each
TRIGGER input.
BD 2
Overdrive
TRIG
1ACC
5TRIG
3&6

13
In this menu you will create different rhythmic patterns for each channel.As there are 6 channels (or
slots),you will nd 6 patterns completely independent of each other. However, they all share the same
TEMPO in BPM.
Magerit METRO has two types of sequencers: a Step sequencer and a Euclidean sequencer. We will see
how each one works.To toggle between the two types of sequencers,press and hold button for more
than 3 seconds.The “SEQ→STEP” or “SEQ→EUCLID” will ash on the display.
To save changes (sequencer type, tempo, parameters...),press and hold button,but no longer than 3
seconds.Otherwise, the sequencer kind will change and nothing will be saved.
Make a short press on button to play or pause all sequences. If an external clock is connected, this
button won’t work.
The TRIG button resynchronizes all the ratios of the sequences between them. Press and hold TRIG to reset
all sequences.
The external clock sync mode plays the sequences at the rate set by any clock signal from any other Eurorack
module.If youpausethat clocksource,METRO willdetectitandpausethesequencer.If youalsopause your
clock generator for more than 2 seconds, once you play again it,all sequences will be reseted.
- STEP SEQUENCER
Grids of adjustable length and selectable steps. On each channel you can select a different sequence
length,pattern or ratio.
SEQUENCER menu
v
The pause symbol indicates that its
sequence is paused.
If you nd a play symbol on the
bottom side of the screen, that
means that an external clock is
connected.A pause symbol says that
the whole sequencer is paused.
Turn the encoder to scroll
horizontally. Press and hold
while turning the encoder to
move vertically.
Press the encoder to turn on or
off the specic step (where the
cursor is).
Current channel playback
position
÷1: 120 2/24 1:2
1
2
Potentiometers:
1 - TEMPO (BPM)
2 - Number of steps of the selected
sequence
3 - Ratio of the selected pattern
4.- ON/OFF, activate or deactivate
sequence
41
32
Cursor - Encoder position

14
- EUCLIDEAN SEQUENCER
The mathematical and Euclidean proportions are available on Magerit METRO! Create a continuous
rhythmic sequence by modifying some attributes:
SEQUENCER menu (cont.)
vA circle indicates that the
channel is active, ON.
A dash represents an innactive
sequence, OFF.
Turn the encoder to select the
channel
Press the encoder to activate or
deactivate the selected channel.
Current channel playback
position Cursor - Encoder position
CH.
1
BPM
92 RATE
3:1
S
8P
3R
6
Potentiometers:
1 - TEMPO (BPM)
2 - Number of steps of the selected sequence (“S”).
3 - Number of active pulses of the pattern (“P”).
4.- Rotation of the sequence (“R”).
5.- Pattern ratio.
41
32
5

15
By pressing and holding the encoder button, you will access the FXs window. You can choose which effects
to load into the module's mix. Knob number 6, (has the symbol), amplies or attenuates the active
effects. Press and hold the encoder button to exit this window or press any other button to access to its
respective menu. The changes will be stored automatically.
Effects window
If you press and hold and buttons and then turn on the module, you will enter to the Factory Reset
menu. Press to wipe all data or select to cancel the restoring process. Then, METRO will be restarted.
The wiping process can’t be undone!
Factory reset
v
Turn the potentiometers to
change the parameters
FX: 82%
ECHO(1)
Decay REVERB(5)
Feedback
10% 89%
Potentiometers:
1 - ECHO Decay
5 - REVERB Feedback
6.- Controls the amount of effects (DRY/WET)
41
6
5
2
5

16
Version Date
v1.0.2 16/02/22
v1.1.0 02/03/22
v1.1.2 14/03/22
v2.0.0 03/04/22
v2.5.0 27/04/22
v2.5.1 28/04/22
v2.5.5 13/05/22
V2.5.7 17/05/22
V2.6.0 25/05/22
Improvements
Firmware & module release.
New ExternalClockInput. Newindividualsequence Reset feature.
Sequencer UIimprovement.s Bugxesand better performance.
Bug xes. Fixed anerrorthat causedincorrect potentiometer readings
when changingmenus.
Fixed the externalclockinputtempodetectionissue.UI changeswhile
connecting anexternal clock. Increased theperformance, resolution and
stability ofthe "timer"whichcontrols thesequencer.Newglobalreset
optionfor allsequencersthrough theTRIGGER inputs (congurablevia
ASSIGNmenu).Thevolumeand panningof each instrument canbe
assigned to any knobandCV input. Added theFactory Reset menu. Fixed
inverted L &Rpanning. Global volumeincreased.New EffectsFeatures.
Other bug xes.
External clock sync rewritten, newautoreset (in ExternalClockSyncmode),
some UIchanges, POT& CV2are not assignable anymore (excusive for
tempo),new play andpauseindicators in allmenus, saving and
performanceimprovement. Other bugxes.
Fixed anerrorwhichautoresetsthemodulein ASSIGN menu.
Sync mode improved. Potentiometer2dedicatedexclusivelyto tempo
conguration(in all screens).UI changes.Otherbug xes.
Bug xes.
Performanceimprovement. Instrument saving bugxed.String & BDFM
algorithms changed.Other bugxes.
CHANGELOG

17
All Magerit moduleshavebeen testedto ensure aproperoperation.The module contains small parts. Please keep
itout ofthe reach ofchildren.
ItishighlyrecommendedtouseatrustedpowersupplyandavoidDIYPSUprojectswhichhavenotpassedany
securityevaluation.Abaddesignedpowersupplycancauseharmfulvoltagespikestoanymodule,whetherfrom
Mageritoranyothermanufacturer.Ifyourpowersupplyshowssignsofwear,damage,ormalfunction,please
removeitanddisposeitaccordingtoenvironmentalmeasures.
All modules must be placed in the rack using M3 screws. Do not leave half screwed any panel or disconnect or
connect them to the power while the PSU is on. Do not pull out the power cord.
Ifyouwanttocleanthefrontpanels,useasoftcloth.Itcanbeslightlymoistenedwithwater.Donotuseany
cleaningagentoralcohol.Remembertoalwaysturnoffthepowerwhilecleaningthemodules.
USER ADVICE
Designed by
David Vijuesca & José Vijuesca
2022
Other manuals for METRO
1
Table of contents
Languages:
Popular Synthesizer manuals by other brands

Alesis
Alesis Fusion Quick start owner's manual

Casio
Casio WK-7000 user manual

Isn’tses
Isn’tses The Fort Processor Instructions and construction details

Ploytec
Ploytec Pi Lambda squared 2 PL2 user manual

Roland
Roland VP-770 Safety guide

National Instruments
National Instruments QuickSyn FSW-0010, QuickSyn FSW-0020 user guide