Makerfarm Prusa 12" i3v User manual

Makerfarm 12" Prusa i3v

2 Makerfarm 12" Prusa i3v
Prepared for
Makerfarm LLC
Prepared by
Jacob Long, UNT
May 2015

Table of Contents iii
Table of Contents
Contents
Table of Contents ........................................................................................................................... iii
Introduction.....................................................................................................................................v
Assembly......................................................................................................................................... 3
X Motor Assembly ...................................................................................................................... 3
Required Materials .................................................................................................................. 3
X Idler Assembly......................................................................................................................... 8
Required Materials .................................................................................................................. 8
Z Nut Traps ................................................................................................................................12
Required Materials .................................................................................................................12
Y Idler.........................................................................................................................................15
Required Materials .................................................................................................................15
Y Bed .......................................................................................................................................... 17
Required Materials .................................................................................................................17
X Carriage ................................................................................................................................. 22
Required Materials ................................................................................................................ 22
Y Motor ..................................................................................................................................... 26
Required Materials ................................................................................................................ 26
Z Motor Brackets ...................................................................................................................... 29
Required Materials ................................................................................................................ 29
Frame.........................................................................................................................................31
Required Materials .................................................................................................................31
Y Axis Assembly ........................................................................................................................ 37
Required Materials ................................................................................................................ 37
X Axis Assembly........................................................................................................................ 43
Required Materials ................................................................................................................ 43
LCD Installation........................................................................................................................ 53
Required Materials ................................................................................................................ 53
Z Motors.....................................................................................................................................57
Required Materials .................................................................................................................57
Heat Bed Installation................................................................................................................ 60
Required Materials ................................................................................................................ 60
Endstop Installation ................................................................................................................. 63

iv Makerfarm 12" Prusa i3v
Required Materials ................................................................................................................ 63
Spool Holder ............................................................................................................................. 69
Required Materials ................................................................................................................ 69
Extruder ..................................................................................................................................... 71
Required Materials .................................................................................................................71
Wiring ........................................................................................................................................... 85
Power Supply ............................................................................................................................ 85
Required Materials ................................................................................................................ 85
Powering the RUMBA............................................................................................................... 86
Required Materials ................................................................................................................ 86
Wiring the RUMBA................................................................................................................... 88
Required Materials ................................................................................................................ 88
Assembling and Wiring the Hexagon Hot End ........................................................................ 89
Required Materials ................................................................................................................ 89
Extruder and Hot End Install ................................................................................................... 94
Required Materials ................................................................................................................ 94
Software ........................................................................................................................................ 99
Troubleshooting...........................................................................................................................103
My Magma is taking a long time to reach 225c to print ABS. .................................................103
My Magma gets a MAXTEMP error when I go above 235c.....................................................103
My Heat Bed is taking a long time to reach 110c to print ABS. ...............................................103
My Motors are getting hot .......................................................................................................103
My Extruder motor isn’t turning .............................................................................................103
My X, Y or Z motor is moving the wrong direction when I press home..................................103
Index ........................................................................................................................................... 104

Introduction v
Introduction
Thank you for purchasing one of our amazing Makerfarm 3D printers. Before jumping
into printing you need to follow a few steps.
First you need to follow this guide step by step. Printing out a hard copy is highly
recommended. This will ease the build process and make things go as smoothly as possible.
Second a basic knowledge of hand tools and simple electrical wiring is required. If you
have never built anything on this scale don't worry as the instructions go through every little
step.
Third you need to have lots of patients. This kit will take a minimum of 8 hours to build
if everything goes smoothly. If you run into any problems you can always call our help line Mon-
Fri 8-5.
If you just follow these simple steps then in no time you will have an outstanding 3D
printer to create anything that comes to mind!


Assembling the Printer 3
Assembly
X Motor Assembly
Required Materials
X Motor Wood Frame Pieces
M5x30mm Bolts - 3
M5x12mm Bolts - 4
M5 Washers - 4
M5 Nylon Lock Nuts - 3
M3x16mm Bolts - 6
M3 Nylon Lock Nuts - 6
Prebuilt Delrin Idler - 3
Aluminum Standoff - 2
Eccentric Spacer - 1

4 Makerfarm 12" Prusa i3v
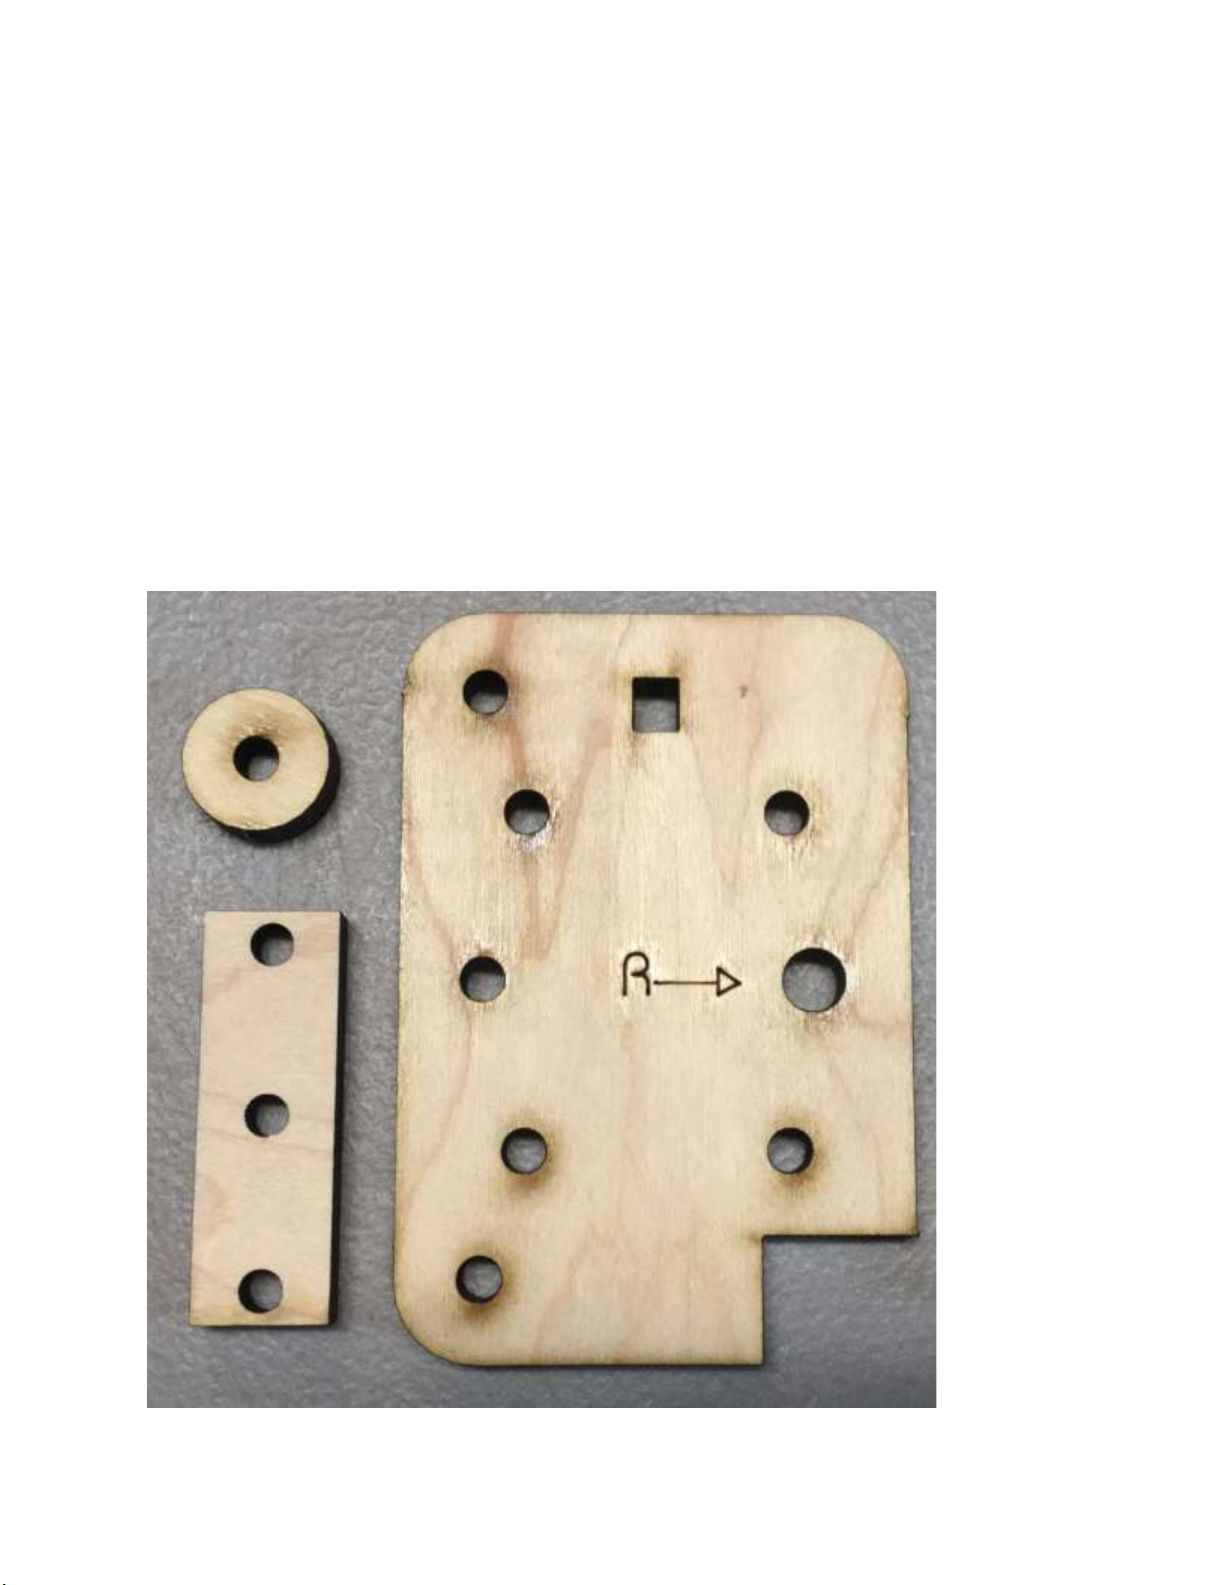
Align the two wood pieces so the R-> both point to the right and install the 4-M3x16mm bolts as
shown in the picture.
Flip the wood pieces over and install the 4-M3 Nylon Lock Nuts on the bolts and tighten them
down.

Assembling the Printer 5
Next install the 4- M5x12mm bolts from the back side then flip the wood pieces over and install
the 4-T-Slot nuts leaving them loose.
Flip the wood parts back over and install the eccentric spacer pushing it into the wood, make
sure to align the eccentric spacer for the hole is as close to the edge of the wood piece as
possible.

6 Makerfarm 12" Prusa i3v
Get 3 Pre Assembled Delrin Idlers, 3-M5x30mm bolts and two Aluminum Standoffs, install the
bolts and aluminum standoffs as shown below.
Install the Delrin assembly that does not have the Aluminum spacer in the eccentric spacer and
the other two Delrin assemblies as shown below

Assembling the Printer 7
Flip the Wood parts over and install a M5 Washer on the bolt with the Eccentric Spacer, then
install M5 Nylon Lock Nuts on the 3-M5 bolts and tighten them down. Make sure you do not
tighten the bolt with the eccentric spacer so much that the eccentric spacer gets pulled into the
wood at an angle.
8 Makerfarm 12" Prusa i3v
X Idler Assembly
Required Materials
X Idler Wood Frame Pieces
M5x30mm Bolts - 4
M5x12mm Bolts - 4
M5 Washers - 6
M5 Nylon Lock Nuts - 3
M5 Nut - 1
M3x16mm Bolts - 2
M3 Nylon Lock Nuts - 2
Prebuilt Delrin Idler - 3
Aluminum Standoff - 2
Eccentric Spacer - 1
MR125 Bearing - 2

Assembling the Printer 9
Install the 4-M5x12mm bolts from the back side then flip the wood pieces over and install the 4
T-Slot nuts leaving them loose.
Flip the wood parts back over and install the eccentric spacer pushing it into the wood, make
sure to align the eccentric spacer so the hole is as close to the edge of the wood piece as possible.

10 Makerfarm 12" Prusa i3v
Get 3 Pre Assembled Delrin Idlers, 3-M5x30mm Bolts and two Aluminum Standoffs, install the
bolts and aluminum standoffs as shown below.
Install the Delrin assembly that does not have the Aluminum spacer in the eccentric spacer and
the other two Delrin assemblies as shown in the picture below.

Assembling the Printer 11
Flip the Wood parts over and install a M5 Washer on the bolt with the Eccentric Spacer, then
install M5 Nylon Lock Nuts on the 3-M5 bolts and tighten them down. Make sure you do not
tighten the bolt with the eccentric spacer so much that the eccentric spacer gets pulled into the
wood at an angle.
Last we will assemble the Belt idler, you will assemble it starting with a M5x30mm bolt, then the
rectangular wood piece, a M5 Washer, Two MR125 Bearings, another M5 washer, the wooden
washer, and last a regular M5 bolt.

12 Makerfarm 12" Prusa i3v
Z Nut Traps
Required Materials
Z Nut Wood Frame Pieces
M5x12mm Bolts - 4
M5 Nut - 1
M3x16mm Bolts - 2
M3 Nylon Lock Nuts - 3
T-Slot Nuts - 4
Install 2-M3x16mm Bolts and 1- M5x12mm Bolt into one of the large wood pieces.

Assembling the Printer 13
Install a regular M5 nut onto the M5x12mm Bolt, then align and install the wood piece, hand
tighten the M5 bolt then install 2-M3 Nylon Lock nuts and tighten them with a wrench.
Remove the M5 Nut and bolt.

14 Makerfarm 12" Prusa i3v
Install 2-M5x12mm Bolts and 2-T-Slot Nuts as shown below.
Repeat the process for the other Z Nut trap.
Table of contents
Other Makerfarm 3D Printer manuals


