Makita BL36120A User guide

A B C D E F G H
2
1
3
9
5
7
6
8
4
1
9
2 3
GB
Battery BL36120A Original Instruction Manual

3
11 10
4 5
12
76
67
8
8
A

4
1
13
13
1
21
13
1
9
4
10 11
14
215
16
15
16
12 13

5
17 18
14 15
19
19
20
20
16 17
21
18

6
ENGLISH
SYMBOLS
A. Readinstructionmanual.
B. DOUBLEINSULATION
C.Donotshortbatteries.
D.Alwaysrecyclebatteries.
E. Donotexposebatterytowaterorrain.
F. Donotdestroybatterybyre.
G.Indooruseonly
H.OnlyforEUcountries
Donotdisposeofelectricequipmentorbatterypacktogether
withhouseholdwastematerial!
In observance of the European Directives, on Waste Electric
andElectronicEquipmentandBatteriesandAccumulatorsand
WasteBatteriesandAccumulatorsandtheirimplementationin
accordancewithnationallaws,electricequipmentandbatteries
andbatterypack(s)thathavereachedtheendoftheirlifemust
be collected separately and returned to an environmentally
compatiblerecyclingfacility.
COMPATIBILITY
Thisbatteryisintendedforusewitholiveharvester,blower,hedge
trimmer,chainsaw,hammer,andlight.
Donotusethisbatterywithcircularsaw,mitersaw,cordlessslide
compound miter saw, cultivators, lawn mowers or some of the
brushcutters/grasstrimmers.Incaseofthebrushcutters/grass
trimmers,usethebatteryonlywiththetoolswith○mark.
Themarkislocatedattool’sbatteryinsertport.(Fig. 2)
SAFETY INSTRUCTIONS FOR BATTERY
1. Before using battery, read all instructions and cautionary
markingsonbatteryandproductusingbattery.
2. Donotdisassemblebattery.
3. If operating time has become excessively shorter, stop
operating immediately. It may result in a risk of overheating,
possibleburnsandevenanexplosion.
4. If electrolyte gets into your eyes, rinse them out with clear
waterand seek medical attention right away. It may resultin
lossofyoureyesight.
5. Donotshortthebattery:
(1) Donottouchtheterminalswithanyconductivematerial.
(2) Avoidstoringbatteryinacontainerwithothermetalobjects
suchasnails,coins,etc.
(3) Donotexposebatterytowaterorrain.
A battery short can cause a large current ow, overheating,
possibleburnsandevenabreakdown.
6. Do not store the tool and battery in locations where the
temperaturemayreachorexceed50°C(122°F).
7. Donotincineratethebatteryevenifitisseverelydamagedor
iscompletelywornout.Thebatterycartridgecanexplodeina
re.
8. Becarefulnottodroporstrikebattery.
9. Donotusedroppedorstruckbattery.
Additional safety instructions:
1. Checkallthescrewsonthebattery’sstopperheadsarermly
tighten.
2. Whenswitchingonthebattery,makesuretool’sswitchisoff.
Otherwise the tool may starts unintentionally and cause
personalinjury.
3. Checkthebatteryisrmlysetontheharnessbeforeuse.
4. Donotusethebatteryathighplaces.Otherwiseitmaycause
fallingaccidents.
5. Donotusethebatterywithasafetyharness,asusedfortree
service.Itmaycausefallingaccidents.
6. Always pay attention for tool’s rotating part. In case you use
thetoolofwhichrotatingpartispossiblybeplacednearyour
body,removetheharnessandplacethebatteryontheground.
Otherwise the harness may be entangled by the tool, and
resultinpersonalinjury.
7. Duringoperation,keepthecordawayfromobstaclessuchas
branches. The cord caught by obstacles may cause serious
injury.
8. Alwaysbesurethatthebatterycartridgesareremovedbefore
attempting to perform inspection or maintenance such as
replacingashearblade.
9. For storage, keep the battery in the carton box with the
instructionmanual.
10.The battery is classied as dangerous goods by UN
Recommendations on the Transport of Dangerous Goods as
wellasthe otherregulations.Thebatterycontainslithiumion
battery.Thelithiumionbatteryandtheelectrolyteusedinthe
lithiumionbatteryaresubjecttothoseregulations.
11.Whentransportingthebatterybysurface or air,itis required
tosubmittheapplicationformfordangerousgoodsalongwith
necessary packing for the battery by the owner. In case you
transportthebattery,youwillbearresponsibilityforitas‘the
owner’.
ComplyingwithICAOTIandIATADGR,thebatterycannotbe
transportedbypassengerightsbutonlybyfreighters.
Tips for maintaining maximum battery life:
1. Neverrechargeafullychargedbattery.
2. Overchargingshortensthebatteryservicelife.
3. Charge the battery with room temperature at 10 °C – 40° C
(50°F–104°F).Letahotbatterycartridgecooldownbefore
chargingit.
4. Chargethebatteryonceineverysixmonthsifyoudonotuse
itforalongperiodoftime.
Note:
• The recycling method may differ from country to country, or
state (province) to state (province). Consult with your nearest
MakitaAuthorizedServiceCenterorDistributor.
SAFETY INSTRUCTIONS FOR BATTERY
CHARGER
CAUTION:
• THISAPPLIANCECANBEUSED
BY CHILDREN AGED FROM
8 YEARS AND ABOVE AND
PERSONS WITH REDUCED
PHYSICAL, SENSORY OR
MENTAL CAPABILITIES OR
LACK OF EXPERIENCE AND
KNOWLEDGE IF THEY HAVE
BEENGIVENSUPERVISIONOR
INSTRUCTION CONCERNING
USE OF THE APPLIANCE INA
SAFEWAYANDUNDERSTAND
THE HAZARDS INVOLVED.
CHILDREN SHALL NOT PLAY
WITH THE APPLIANCE.
CLEANING AND USER
MAINTENANCESHALLNOTBE
MADEBYCHILDRENWITHOUT
SUPERVISION.
• SAVE THESE
INSTRUCTIONS
– This manual contains important safety and operating
instructionsforbatterycharger.
• CAUTION–Toreduceriskofinjury,charge
onlyMAKITArechargeablebattery.Othertypesofbatteriesmay
burstcausingpersonalinjuryanddamage.

7
• Usetheproperchargerforthetooltobecharged.
• Handlethechargercarefully.Ifdroppedorhitagainstsomething,
thechargermaybedeformed,crackedordamaged.
• Never carry charger by cord or yank it to disconnect from
receptacle.
• Keepcordawayfromheat,oil,chemicals,andsharpedges.
• Useapowersourcewiththevoltagespeciedonthenameplate
ofthecharger.
• Do not attempt to use a step-up transformer, and engine
generatororDCpowerreceptacle.
• Donotexposechargertorainorsnow.
• Chargeawayfromvolatile,ammablematerialsuchasgasoline,
paint,gas,adhesive,etc.
• Donotdisassemblethecharger.
• The battery charger is intended for charging MAKITA internal
batterytypeproductsonly.
• Donotoperatethetoolduringcharging.
• Always unplug the supply before making or breaking
connectionstothebattery.
• Donotattempttorechargenon-rechargeablebatteries.
PARTS DESCRIPTION
(Fig. 1)
1. Adapter
2. Batterycharger
3. Batteryindicator
4. Pocket
5. Harness
6. Upperbuckle
7. Shoulderbelt
8. Lowerbuckle
9. ON/OFFswitch
FUNCTIONAL DESCRIPTION
Switch action (Fig. 3)
Toswitchonthebattery,presstheON/OFFswitchbutton(9).To
switchoffthebattery,presstheswitchbuttonagain.
Battery protection system
The battery is equipped with a protection system. This system
automaticallycutsoffpowertothetooltoextendbatterylife.
Thetoolautomaticallystopsduringoperationwhenthebatteryis
placedunderoneofthefollowingconditions:
• Overloaded:
The tool is operated in a manner that causes it to draw an
abnormallyhighcurrent.
In this situation, turn the tool off, remove the adapter from
thetool, and then stop the applicationthat caused the tool to
becomeoverloaded.
Thenattachtheadapterandturnthetoolontorestart.
• Overheated:
When the battery is overheated, the power is cut off
automatically.Thetooldoesnotoperateevenitisswitchedon.
Inthissituation,stopusingthebattery,removetheadapterfrom
thetool,andthencooldownthebattery.
• Lowbatteryvoltage:
Theremainingbatterycapacityistoolowandthetooldoesnot
operate.Inthissituation,removetheadapterfromthetooland
rechargethebattery.
The charging does not start when battery protection system
works because the battery is too hot or cold. The charging
resumeswhenthebattery’stemperaturereturnstonormal.
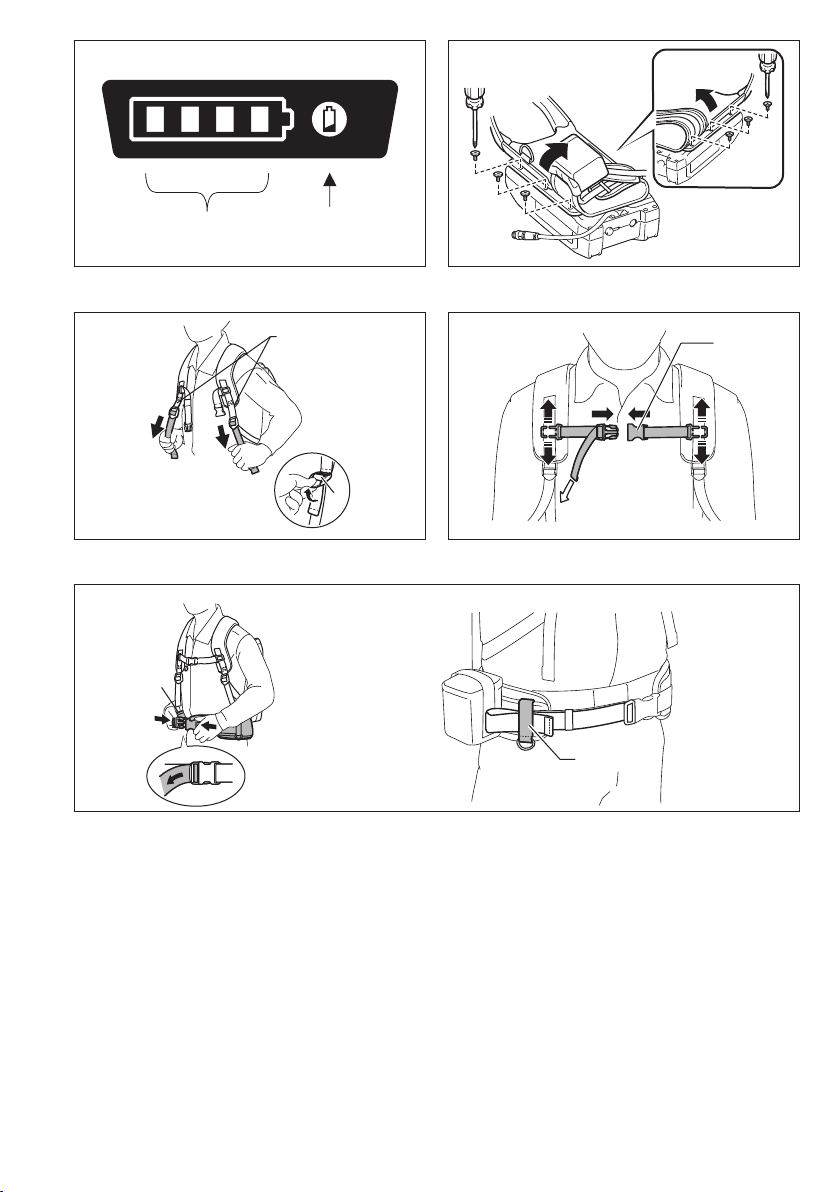
Checking the remaining battery capacity (Fig. 4)
Press the check button (10) to indicate the remaining battery
capacity.
Theindicatorlamp(11)thenlightsupforapprox.threeseconds.
Lamp indications
Indicatorlamps Remainingcharge
:On :Off :Blinking
Empty Full 70%to100%
45%to70%
20%to45%
0%to20%
Chargethebattery.
Thebatteryprotection
systemisworking.
*Seebelow.
* Thisindicationisatemporaryerrorormalfunctionofthebattery.
Inthiscase,1.switchoffthebatteryandturnitonagainthen
check if the tool works; 2. if the lamps still light alternately,
switch off the battery and switch the adapter position (when
using double type adapter only); 3. if the lamps still light
alternately,contactyourlocalMakita service centertorequest
inspectionand/orrepair.
Note:
• Whenonlythelowermostindicatorlamp blinks, or whennone
oftheindicatorlampslight,thebatterycapacityhasrunoutand
thetooldoesnotoperate.Inthesecases,chargethebattery.
• When two or more indicator lamps do not light even after
charging is complete, the battery has reached the end of its
servicelife.
• The indicated capacity may be lower than the actual level
duringuseorimmediatelyafterusingthetool.
• Depending on the conditions of use and the ambient
temperature, the remaining battery capacity may not be
displayedcorrectly.
ASSEMBLY
Installing or removing the battery to the harness
Placethebatteryonaatsurfacewheninstallingorremovingthe
battery.
To install the battery (Fig. 5)
Aligntheholes oftheharnesswiththeholesofthebattery.And
thentightenthemwithsixbolts.
CAUTION:
• Make sure that the battery sits on the harness stably after
installation.
To remove the battery
Removesixboltsandthenremovethebattery.
Adjusting the harness (Fig. 6, 7 & 8)
Makesurethattheharnessisstablyinstalledonthebatterybefore
adjustingtheharness.
Adjusttheharnessasfollows:
1. Adjusttheshoulderbelt(7).Tofastenthestrap,pulltheendof
thestrapdownwards.Toloosenthestrap,pullup the end of
thefastener(12).
2. Adjustthepositionoftheupperbuckle(6).Closeandlockthe
upperbuckleandadjustitsbeltlength.
3. Closeandlockthelowerbuckle(8),andadjustitsbeltlength.
CAUTION:
• Afteradjustingthebeltlength,runthebeltthroughtheband“A”
toavoidabeltbecomingloose.
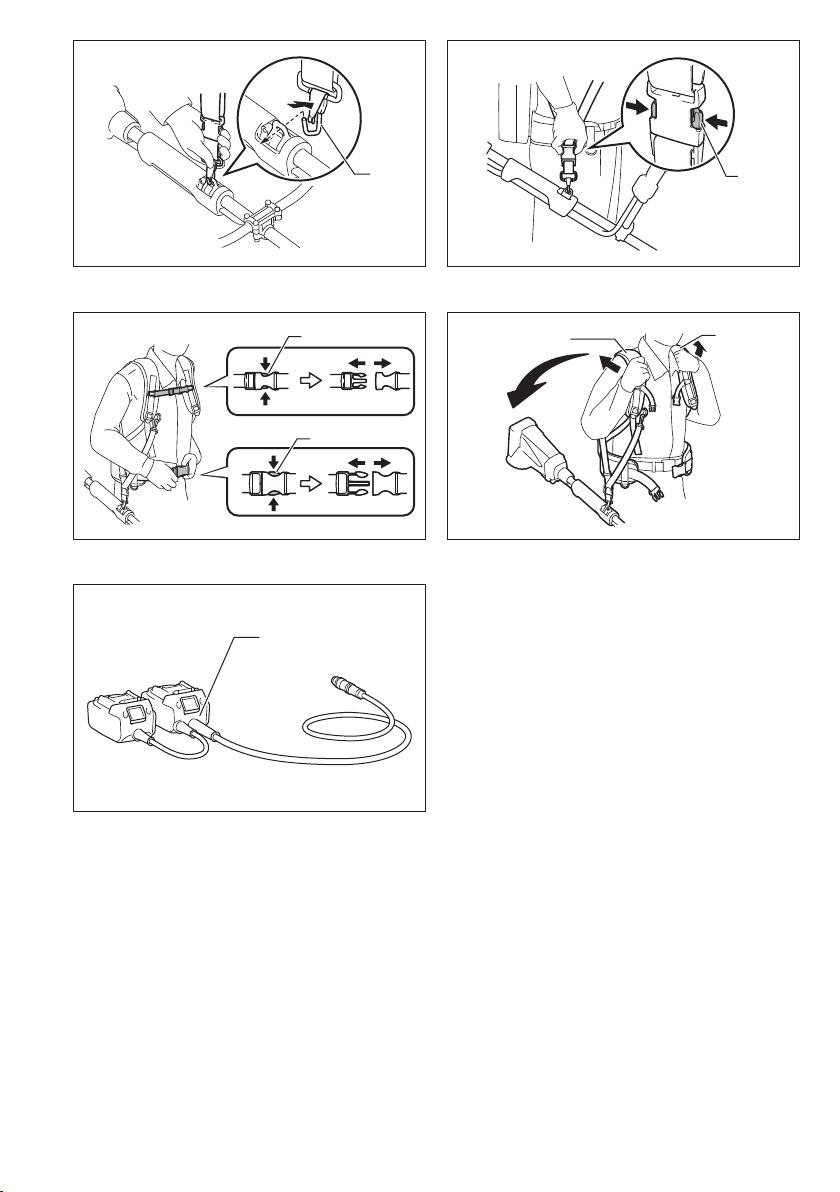
OPERATION
Connecting to the adapter (Fig. 9, 10 & 11)
Connectthesocket(13)ofthebatterytotheplugoftheadapter
(1).
Toconnectthesockets,aligntheconnectionterminalsandpress
themin,andthenturnthesockettofastenthem.
Thenconnecttheadaptertothetools.
Thepocket(4)isusefulforkeepingtheadaptertemporarily.
Note:
• Donotattachtheadapterswiththecabletothebatterypassed
over/under the cable connecting the two adapters (Fig. 10).
Incorrectattachmentresultsinstoppageofthetool.
• Ifoneendoftheadapter(21)doesnottononeoftheportof
thetool,putanotherendofit.
Charging the battery (Fig. 12)
Removethecap(14),andthenconnectthechargingplugtothe
chargingsocket,thenpluginthechargertothepowerreceptacle.
Theindicatorlamp lights during the charging.The light goes off
whenthechargingiscompleted.
Whenchargingis completed, remove the battery and return the
cap.
Thefollowingtableindicatesthetypes of battery,thenumberof
cellsandtheratedcapacitywhichcanbechargedbythebattery
charger.

8
Battery
charger
Battery
type
Voltage
(V)
Number
ofcells
Capacity
(mAh)
Charging
time
(hours)
DC3600 Li-ion 36 60 12,000 (Approx.)
3
Installing the shoulder harness (optional accessory)
for brush cutters / grass trimmers (Fig. 13, 14 & 15)
1. Attach the hooksA (15) of the shoulder harness onto the D
rings(16)ofthebattery’sharnessrespectively.
2. Hangthebrushcutters/grasstrimmersbythehookB(17).To
releasethemachine,pushthenotches(18)atbothsides.
Emergency detachment (Fig. 16 & 17)
1. Push the notches (19) at both sides to release the upper
buckleandlowerbuckle.
2. Takeofftheshoulderbands (20),anddetachthebatteryand
themachine.
MAINTENANCE
To maintain product SAFETY and RELIABILITY, repairs,
maintenance or adjustment should be performed by Makita
Authorized or Factory Service Centers, always using Makita
replacementparts.
Never use gasoline, benzine, thinner, alcohol or the like when
cleaning the battery. Discoloration, deformation or cracks may
result.
• Due to our continuing program of research and development,
thespecicationshereinaresubjecttochangewithoutnotice.
OPTIONAL ACCESSORIES
CAUTION:
• These accessories or attachments are recommended for use
withyourMakitatoolspecied in thismanual.Theuseof any
otheraccessoriesorattachmentsmightpresentariskofinjury
to persons. Only use accessory or attachment for its stated
purpose.
If you need any assistance for more details regarding these
accessories,askyourlocalMakitaServiceCenter.
• Adapter(21)(Fig. 18)
Note:
• Someitemsinthelistmaybeincludedinthetoolpackageas
standardaccessories.Theymaydifferfromcountrytocountry.
BL36120A-29L-0116
IDE
www.makita.com
Makita Europe N.V.
Makita Corporation 3-11-8, Sumiyoshi-cho,
Anjo, Aichi 446-8502 Japan
Jan-Baptist Vinkstraat 2,
3070 Kortenberg, Belgium
Other manuals for BL36120A
1
Table of contents
Other Makita Camera Accessories manuals