MAKSIWA CBC.EC User manual

1
CBC.EC
INSTRUCTION MANUAL
Edge Bander
Attention: Read this manual before using your machine.

2
Important information you should know:
• The images in this manual are illustrative and are
meant to demonstrate the correct operation of your
product, there may be small changes in relation to the
images.
On-Line Support: In our YouTube
Channel you will nd several videos
that will help you whit Maksiwa´s
machines. To use the QRCODE.
CAUTION:
WHEN DOING MAINTENANCE, REPLACE ONLY
WITH IDENTICAL PARTS. Repair or replace damaged
wiring.
• THIS EDGEBANDER MUST BE CONNECTED TO A
GROUNDED WIRING SYSTEM or to a system with
an equipment-grounding conductor. In malfunction
event, grounding provides a path of least resistance
for electric current to reduce the risk of electric
shock. This edgebander is equipped with an electric
cord having an equipment grounding conductor
and a grounding plug. The plug must be connected
into a matching outlet provided – if it will not t the
outlet; have the proper outlet installed by a qualied
electrician. Improper connection of the equipment-
grounding conductor can result in a risk of electric
shock and/or malfunction. If repair or replacement
of the electric cord or plug is necessary, do not
connect the equipment-grounding conductor to
a live terminal. Check with a qualied electrician or
service personnel if the grounding instructions are not
completely understood or if in doubt as to whether
the edgebander is properly grounded. Use only 3-wire
extension cords that have 3-prong grounding plugs
and 3-pole receptacles that accept the edgebander´s
plug.
• REPAIR OR REPLACE A DAMAGE OR WORN CORD
IMMEDIATELY. When servicing use only identical
replacement parts.
• USE PROPER EXTENSION CORD. Make sure your
extension cord is in good condition. When using an
extension cord, be sure to use one heavy enough
to carry the current your edgebander will draw.
An undersized cord will cause a drop in line voltage
resulting in loss of power and overheating. For cord
length of up to 50 feet, use a cord of 14 gauge. For a
cord length of 50 to 100 feet, use a cord of 12 gauge.
A cord length over 100 feet is not recommended. If in
doubt, use the next heavier gauge. Smaller the gauge
number, heavier the cord.
• This edgebander is intended for use on a circuit that
has an outlet similar to the one illustrated in Sketch
A. The edgebander has a grounding plug similar
to the plug illustrated in Sketch A. Make sure the
edgebander is connected to an outlet having the same
conguration as the plug. No adapter is available or
should be used with this edgebander. If the machine
must be reconnected for use on a dierent type of
electric circuit, the reconnection should be made by
qualied service personnel; and after reconnection,
the edgebander should comply with all local codes
and ordinances.
• Keep a clean work surface. Cluttered areas and work
surfaces are invite accidents.
• Do not use the Edgebander in hazardous
environments. Do not use machine in damp or wet
locations or exposed to rain. Keep well-lit work area.
• Keep children away. Visitors should be kept safe
distance from work area.
• Make the workplace childproof making use of
padlocks, master keys or removing the ignition key.
• Do not force tool. It will perform the job better and
safer for the intended use.
• Keep children away. Visitors should be kept safe
INSTRUCTION MANUAL
READ ALL INSTRUCTIONS
GROUNDING INSTRUCTIONS
SAFETY INSTRUCTIONS
FOR ALL EQUIPMENTS
WARNINGS

3
distance from work area.
• Make the workplace childproof making use of
padlocks, master keys or removing the ignition key.
• Do not force tool. It will perform the job better
and safer for the intended use.
• Use appropriate equipment. Do not wear loose
clothing, gloves, chains, rings, bracelets or other
accessories that could become caught in moving
parts.
• It is recommended wearing shoes with non-slip soles.
Use protection for the hair in order to hold them.
• Always wear safety glasses. Also use hearing
protection.
• Do not overreach on the equipment. Maintain
balance and feet in comfortable position at all times.
• Keep all tools in order. Keep tools sharp and clean for
better and safer performance. Follow the instructions
for lubricating and changing accessories.
better and safer performance. Follow the instructions
for lubricating and changing accessories.
• Unplug the machine before servicing or changing
accessories such as scissors, cutters etc.
• Reduce the risk of unintentional starting. Ensure
that the switch is in the “OFF” position (o) before
connecting the wire to the plug.
• Use recommended accessories. See the instruction
manual to check recommended accessories. Improper
use of accessories may cause risk of injury to persons.
• Never step on the machine. May occur serious
accident if the machine is dented or if parts are
accidentally touched.
• Check for damaged parts. Before continuing the use
of Edgebander, a guard or other part that is damaged
should be examined carefully to determine its proper
operation and perform its function properly. Check
the alignment of moving parts, breakage of parts,
mounting and any other condition that may aect
its operation. Any part that is damaged should be
repaired or replaced immediately. Do not use the tool
if the switch does not turn on or o.
• Never leave a running tool unattended. Turn o the
ignition key.
• The engine of this machine can emit sparks, and
explode ammable gases.
• Extension cables. Make sure your extension cord is
in good condition. When using an extension, be sure
of their ability to transmit the electrical current used
by your product. An undersized cord will cause drop
in voltage resulting in loss of power and overheating.
The following table shows the correct size to be used
depending on the cable diameter and amperage rate.
If in doubt, use a cable with a higher level of capacity.
IMPORTANT: Do not use an extension cord with
length above 20 meters.
Cable 2 wires Cable 3 wires
Ø (mm²) Amperage Ø (mm²) Amperage
0,5 90,5 8
1,0 13 1,0 12
1,5 16,5 1,5 15
2,5 23 2,5 20
Additional safety rules for Edgebander:
CAUTION: FAILURE TO ATTEND THESE WARNINGS
MAY RESULT IN PERSONAL INJURY AND SERIOUS
DAMAGE TO THE MACHINE.
• Always use safety glasses. Also use face or dust mask
if cutting operation is dusty. Everyday eyeglasses only
have impact resistant lenses, they are NOT safety
glasses.
• Keep guards in place and working order.
• Protect the electric power supply line with at least a
20 amp fuse or a circuit breaker switch.
• Make sure that the advance is turning in the right
direction.
• Make sure that the knobs and screws are properly
tightened and safe before starting any operation.
• Keep sharp tools.
• Keep vents free of chips or dirt engines.
• Keep hands away from moving or sharp parts.
• Turn o the machine and unplug the power cord
before maintenance or adjustments of the tool.
• Support long pieces with a clamping device for
wood.
ALWAYS USE PROPER PROTECTIVE
EQUIPMENTS TO OPERATE THIS
MACHINE.

4
parts and will need to know where they are.
Especications
Power: 1.500 W
Tape Thickness: 0,3 a 2,0 mm
Max. Tape Width: 80 mm (3’’)
Min. Worpiece Length: 120 mm (4 3/4’’)
Feeder Speed: 5,5 m/min (18 ft/min)
Temperature Range: 120°C to 220°C (248°F to 428°F)
Voltage: 110V – 1 phase
Net Weight: 52 Kg (115 pounds)
Transport and Installation
By ergonomic issues, this equipment must be carried
by at least two people, holding by the handles located
on the sides of the box.
For packaging purposes, the machine is not fully
assembled. If you notice any damage caused by
transportation, while you open the package, notify
your supplier immediately. Do not operate the
machine.
Dispose the packaging in a friendly way with the
environment.
The Edgebander is designed to operate indoors and
should be placed on a rm, stable and level surface.
CAUTION: To prevent the machine from moving and
causing lack of precision, ensure that the base where
it is supported is not uneven.
• Do not attempt to operate the machine in another
voltage beyond designated.
• Do not use larger or smaller tools than recommended.
• Do not apply lubricant to the tools during use.
• Do not operate without some parts of the machine.
• Do not put your hands less than 4in from the shaft.
• Do not put your hands in closed parts of the machine
unless it is turned o and unplugged.
• Do not use lubricants or cleaners (particularly sprays
and aerosols) in the vicinity of the plastic guard. The
polycarbonate material used in the guard is sensitive
to certain chemicals.
WARNING: Some dust created by the act of sanding,
cutting, grinding, drilling and other construction-
related activities contains chemicals that can cause
cancer, birth defects or other reproductive harm.
Some examples of these products are: Lead-based
paint; crystal silica bricks, concrete and other masonry
products; and arsenic and chromium from chemically
treated wood.
CAUTION: Do not connect the unit to the power outlet
until all instructions have been read and understood.
Always tighten the adjustment tabs before using the
machine. Think: “I can prevent accidents”.
Do not operate the machine unless the guards are in
their proper places. Always use protective goggles.
Electrical connection
The Edgebander CBC.E MAKSIWA has engine 1-phase
110V. To avoid burning risk, check the voltage of your
outlet before starting the machine. If necessary make
the change of your power with the help of a specialist.
Ensure that your power supply is in accordance with
the designated on the board.A 10% decrease in voltage
or more will cause loss of power and overheating. All
equipment MAKSIWA are tested at the factory. If this
machine does not work, check the electricity supply.
Check the compatibility of your outlet and plug the
machine. Do not do patches and adaptations.
To avoid electrical shock and damage to the equipment
always ground the machine.
Familiarization
Put the machine on a smooth and at surface. Check
the pictures and watch the descriptions to familiarize
yourself with its components. The next section will
deal with the necessary adjustments for the proper
functioning of the machine. You should know these

5
UNPACKING AND ASSEMBLY
Due to modern mass production techniques, it is
unlikely that Edgebander CBC.E MAKSIWA is faulty
or have parts missing. If you nd anything wrong, do
not use the machine until the parts are replaced or
the fault is corrected. By doing this you are avoiding
serious injury.
Step 01: Open box and tip on to it’s back.
Step 02: Slide machine out using plastic wrap.
Remove inner plastic wrap.
Step 03: Flip legs down and install cross bars – Note
tapered ends.
Step 04: Add rubber feet.
Step 05: Lift machine onto feet, install angled
extension plate on rear corner.
Step 06: Plug machine in to test power.

6
ADJUSTMENTS
The following shown adjustments must be made
before using your Edgebander CBC.E for the rst
time or when some kind of change is made as thick
tape or thickness of the wood.
CAUTION: ANY ADJUSTMENT NEEDS TO BE MADE
WITH THE MACHINE OFF AND DE-ENERGIZED
(unplugged).
1. GLUE
The glue to be used in your Edgebander CBC.E
MAKSIWA is granulated glue type Hot Melt.
Always check the amount of glue on your machine.
Because of factory tests, their CBC.E can go with a
certain amount of glue.
If necessary insert adequate glue to the color of panel
wood and tape that you are using.
Do not put too much glue, because when it melt and
during operation of the machine may overow and
cause leaks. Let also not miss glue in the glue pot
because this can cause failures in the collage.
WARNING: TURN THE MACHINE IN 110V SINGLE
PHASE.
If will need a extension Cord, utilize a cable with 3
wires with 1,5mm² (or more).
ADJUSTMENTS
NOTE: The brand and quality of the glue is
fundamental. The MAKSIWA recommends glues that
work in the range of 160°C to 190°C. On top of that,
high temperature and melt glues can damage the
tape.
GLUE EXCHANGE: If you change the color of your tape
or the color of the wood panel, you may change the
glue on your Edgebander. To change the glue follow
these steps, but rst read the rest of this manual to be
familiar with all operations:
- Turn on the machine and set the temperature
controller to 70°C (158°F) (see this manual to program
the controller).
- At this temperature, the glue is not too hot (soft)
or too cold (hard). So you can remove the entire glue
without much diculty.
- Use a trowel or piece of wood, avoiding scrape the
walls of collared, damaging the same.
- After removing all the glue, put the new glue.
- Set the temperature controller according to the
specication of the glue again.
GLUE INDICATIONS: With this machine we
recommend the following glue brands:
• Artecola - 160ºC a 180ºC - Ivory-Color. Cod. 1820
White. Cod. 1821
• Durante Duditerm - 160ºC a 180ºC - White. Cod.
715/15
• Jowat - 150ºC a 180ºC - Ivory-Color. Cod. 282.20
White. Cod. 282.21
• Proadec - 160ºC a 180ºC - Ivory-Color. Cod. 5707
• Kleiberit - 150ºC a 180ºC - Ivory-Color. Cod. 788.3/20
White. Cod. 788.3/10
2. TAPE (EDGEBAND)
The Edgebander CBC.E MAKSIWA is designed to work
with PVC tape, ABS, paper and wood that do not have
glue, only straight parts. Use tapes approximately
4mm wider than the wood panel.
It is necessary to regulate the Edgebander according
to the thickness of the tape. That is, when changing
the thickness of the tape, it is necessary to adjust the
machine again. For this setting, follow these steps:
- Cut a piece of tape to be used.
- Loosen (without removing) the two screws shown in
the following gure, using a wrench 13:

7
- Insert the cut piece of tape behind the aluminum
guide, between the guide and the Allen screws,
according to the same gure above.
- Push the guide against the tape, without forcing
much so that the tape does not bend.
- Tighten the screws. The distance of the guide is
already adjusted according to the thickness of the
tape.
- Do not remove the piece of tape.
- With a piece of wood, make sure the guide is aligned
with the glue axis. To make this movement push the
wood against the aluminum guides entry sliding to
contact the glue axis. The glue axis must move slightly
(right of 0.5 to 1 mm) so that, when operating, passes
the glue without hitting brusquely in the glue axis.
Just touch lightly, passing the glue on the panel.
TAPE PLACEMENT: To place your tape correctly,
follow these steps:
- Put the tape roll on the tape support previously
installed that already came with the machine.
- Insert the tape into the tape guide as shown in the
gure below, adjusting the knob A, so that the stops
only guide the tape at its height, without locking it.
Make sure, pulling and pushing the tape, you can
move freely.
- Position the tape to the zero point, in other words, at
the point where the wood touches the tape, taking it
with a little left over to be cutted.
- Your tape is regulated.
The operations made by the Edgebander CBC.E,
as well as any other machine, can pose risks to the
operator if the instructions in this section are not
taken into account.
These instructions are written with the understanding
that the operator has the knowledge and skills
necessary to operate this machine. If at any time you
feel diculty performing any operation, stop using
the machine. If you are an inexperienced operator, we
recommend that you read books, technical papers, or
seeks training from an experienced operator before
performing any operation unknown. The machine
must operate with all the protections and security
systems that comes standard.
Above all, your safety must come rst.
1. STARTING AND CONTROL
To turn on your CBC.E MAKSIWA proceed as follows:
- Connect the previously installed outlet at 110V single
phase supply.
- On the control panel you will nd dierent commands.
Get to know each of them and their functions:
1. Turn the main switch (1). This key energizes the
machine’s panel, without turning it on.
2. Emergency Button (2) (red mushroom): When
triggered, instantly shuts down all machine controls.
To release it, just rotate clockwise.
machine, activates other commands and starts the
process of heating the glue. If the machine does not
turn on and the light does not turn on when you press
this button, make sure the main switch has been
turned on and the emergency button is not activated.
4. O Button (4) (red): This button turns o the
machine by turning o all the functions, including
heating the glue.
5. Feeder Switch (5): This button activates the feeder
(rubber and glue axis). But this button will only be
released after the glue reaches the set temperature.
6. Temperature controller (6): It has two displays - the
upper display indicates the actual temperature of the
glue (red numbers) and the lower display shows the
OPERATIONS

8
temperature adjustable (green in numbers) - and the
following keys: SET - LEFT ARROW - DOWN ARROW
- UP ARROW.
Follow these instructions to change the temperature
controller.
- Turn on the power button 3 (green).
- Select the temperature according to the specication
of the glue. To change the working temperature press
the LEFT ARROW key, making it possible to change
parameters (press this button until the digit you
want to change). Then press the DOWN ARROW or
UP ARROW keys to change the temperature. At the
end, press the SET button, which will save the change,
continuing the temperature change.
NOTE: The feeder process is activated only when
the temperature is below 10°C or 10°C above the
set temperature. Outside this range, the process is
disabled.
NOTE: The CBC.E temperature controller is
programmable to a maximum temperature of
220°C (428°F), for near and above this temperature
MAKSIWA do not recommended work with glues for
high temperature because they can melt the tape.
- Once connected and adjusted with the temperature,
CBC.E takes some 20 to 30 minutes to reach set
temperature, starting from room temperature.
- Upon reaching the set temperature, the feeder
switch 5 is ready to be turned on, activating the axes.
Your Edgebander is ready to start the rst tests. At
this point it is important to use pieces of wood just
for testing, until you are acquainted with all functions
of the machine.
FIRST TESTS
Just skip this point if you read the entire manual and
has the safety to operate the equipment. If necessary,
contact the manufacturer. With all adjustments made,
the set and the correct working temperature machine,
you can start the rst working tests. To do this, use
pieces of wood that will not be used (aps) to ensure
full condence operator / machine.
- To start, hold the wood panel pushing against the
aluminum guides and directing it against the feeder
axis. See gure below:
CAUTION: Crushing and cutting risk. Do not bring
your hands within 10cm (4’’) manual cutter. Do not
wear loose clothing or gloves when operating this
equipment.
In case the wood is too long, support on the sides of
the machine to prevent warping it of.
NOTE: You will notice that the CBC.E can cut the
tape close to the wood panel, allowing a better nish
edges.
GLUE THICKNESS
According to the rst tests you will nd an ideal
amount of glue that must pass the panel. In case you
notice that the tape is easily released from the wood,
the cause may be lack of glue. Or if not, there may be
glue excess, with glue excess on the sides of the tape.
To adjust the glue thickness, do the following:
- On the glue axis, locate and loosen the A screw on
the glue axis, as the following gure:
- If you want to decrease the glue thickness, slightly
rotate the B knob counter-clockwise. If you want
to increase the thickness of glue, turn the knob B
clockwise. Note that small changes (approximately
1/4 turn) have already cause a considerable change
in thickness of the glue. Find the optimum amount,
which can vary according to the type and brand tape,
glue and the temperature being worked. It is normal
after the end of the process small quantities of glue
are left around the tape. If this happens, remove this
glue excess with a cloth with paint thinner, kerosene
or even with a stylus, being careful not to scratch the

9
wood or the tape.
IMPORTANT:
All maintenance or cleaning on the machine must be
made with the same OFF and unplugged from the
outlet to prevent accidental discharges.
GENERAL
Periodic maintenance on your Edgebander CBC.E
MAKSIWA will ensure optimum performance. Make it
a habit to inspect your edgebander every time you
use it.
This section covers the service adjustments or
common procedures that may need to be made
during the life of your machine.
Verify if the following conditions for repair or
replacement are needed:
• Loosen screws.
• Switches or buttons damaged.
• Cables, plugs or sockets worn or damaged.
• Transmission chain damaged.
• Dirt Glue axis or glue pot. The dust coming from
saw machines can lock the axis. Keep your CBC.E as
distantly as possible of saw machines.
• Any other condition that could adversely aect the
safe operation of the equipment.
CLEANING
Clean your Edgebander CBC.E is relatively easy. Use
a vacuum cleaner to remove the tape remains, and
dusting with a dry cloth. If there is any glue residue
use a resin remover and a clean cloth to remove it.
Keep the table clean after each use.
Periodically (and always with the machine o) it
is important to do all the cleaning of the machine,
removing glue residue that could aect the proper
functioning of the equipment. Clean the guides, the
axes and the main cutter carefully.
To maintain quality of the cutter, it is very important
to keep the scissors free of glue residue or tape. To
clean it, use a cloth with thinner or kerosene, gently
wipe the cutter, removing all the glue residue.
LUBRIFICATION
Once all bearings are shielded and have permanent
lubrication, just leave them like this until it is need
to be replaced. Do not lubricate them. For the other
items on this machine, an occasional application of
micro-electric machine oil is needed in the hinge that
moves the glue pot and manual cutter scissors.
Before lubricating, try cleaning the areas to be
lubricated, eliminating the accumulation of dirt.
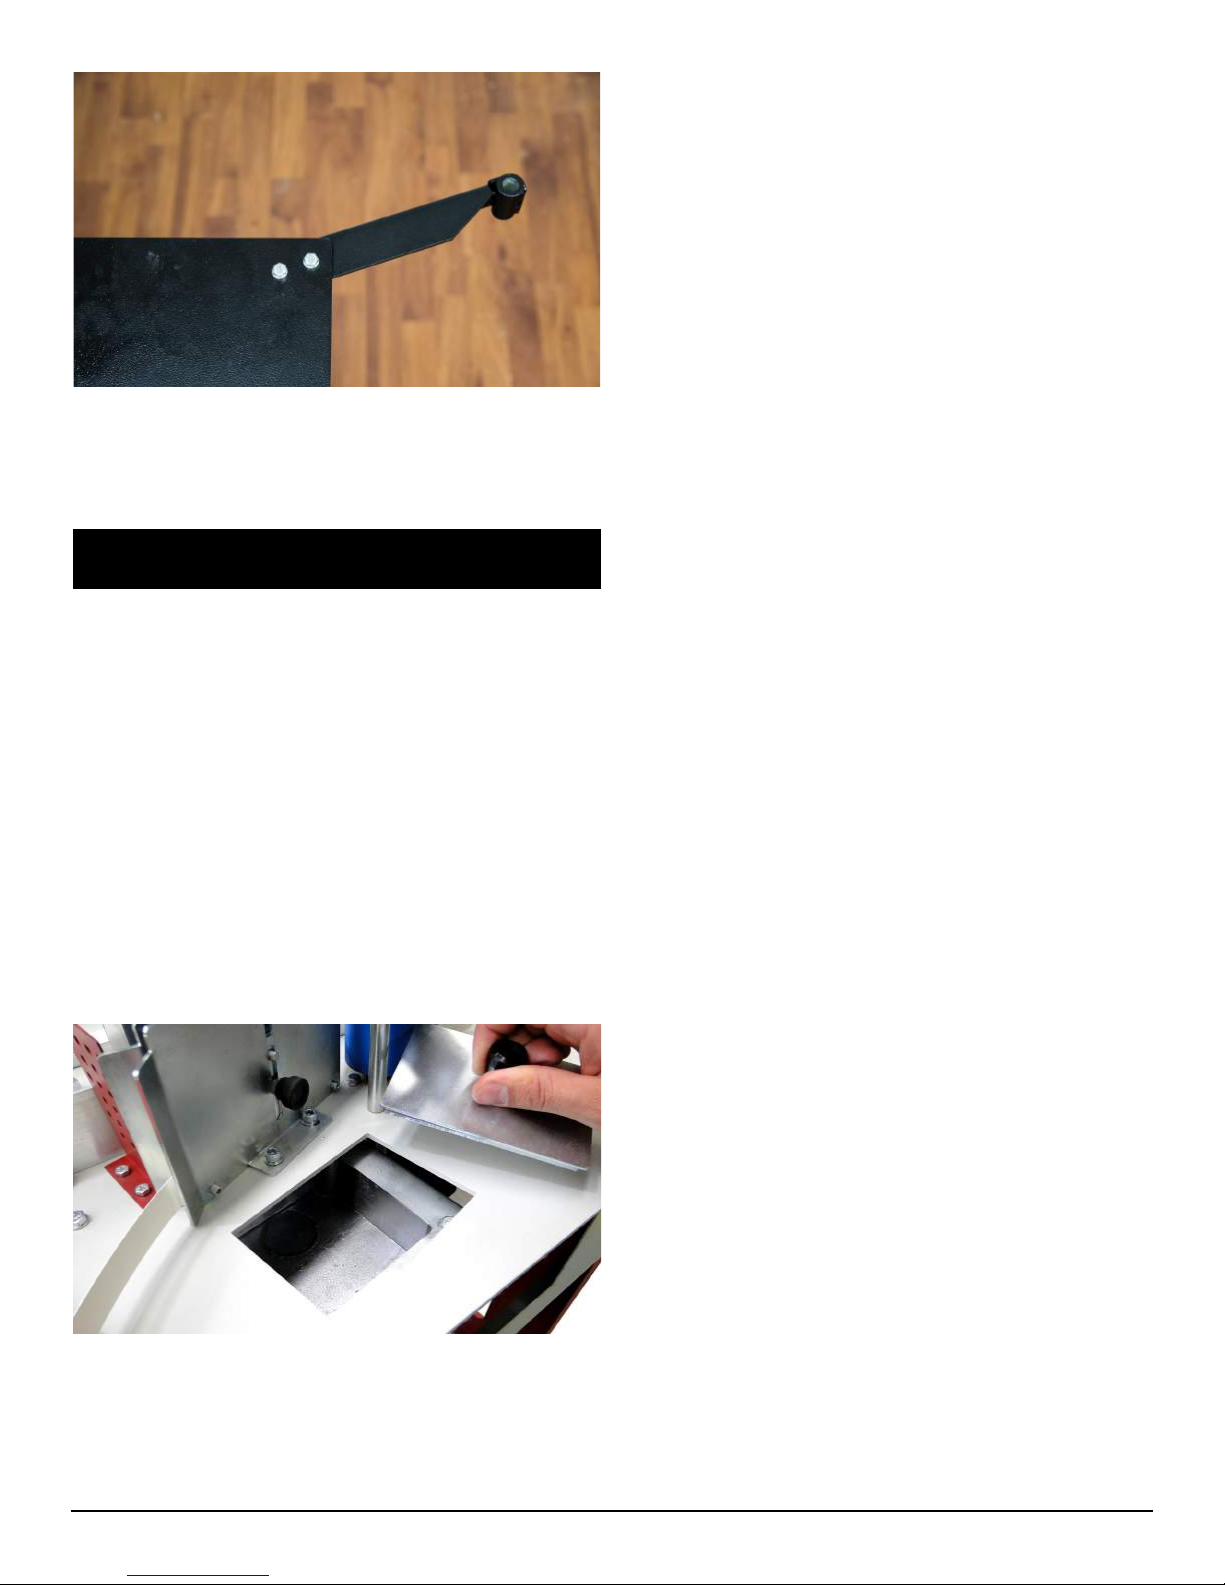
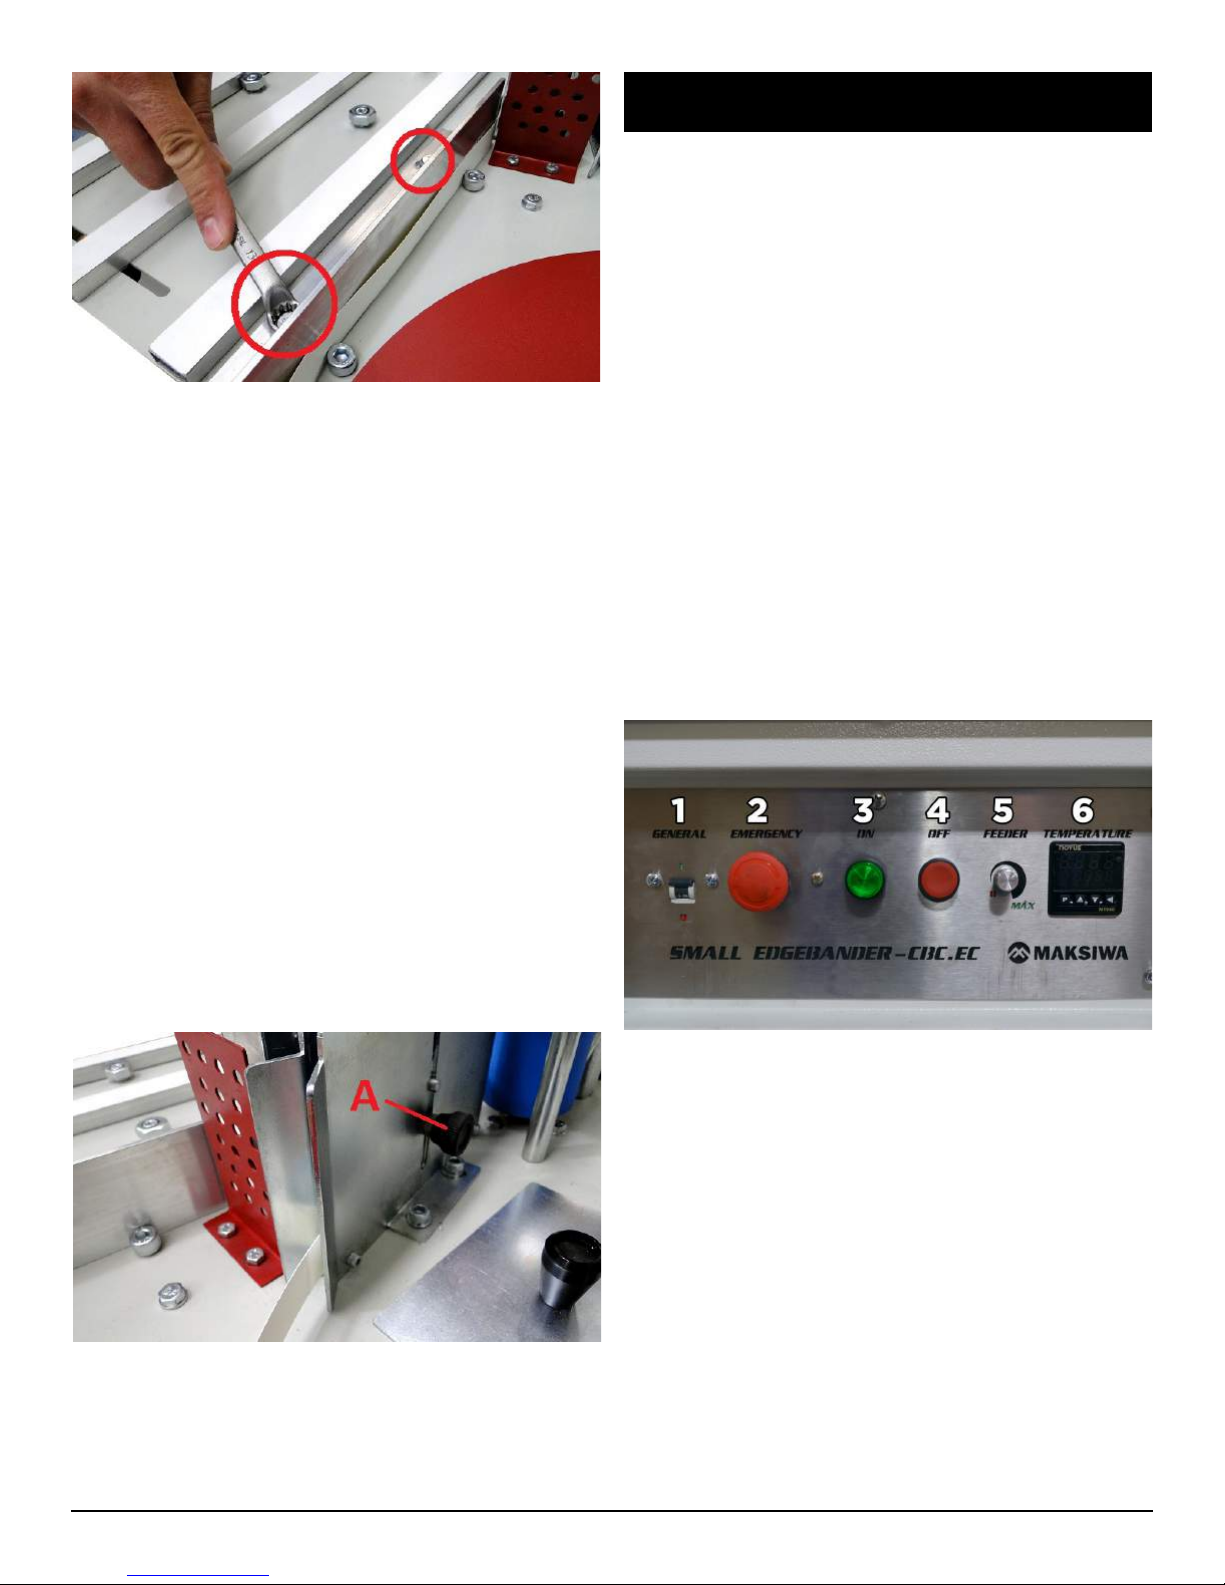
MAINTENANCE
BRACKET
Due to transport and even during use, it may be that
the glue axis turn out of bracket.
The fact that the glue axis is out of bracket causes
incorrect application of glue in the wood paneling,
applying impartial glue or not even applying any glue
on the wood.
If the glue axis of your Edgebander is out of the
bracket, you can regulate it easily by following these
steps:
- Clean the glue axis, removing glue excess. For
this heat the machine until melt point of the glue,
facilitating the glue axis cleaning. Once the glue is
melted, turn o the machine, stopping the axis in
order to clean it and check the bracket.
- Support the side of a bracket on the table tabs,
leaning against the glue axis.
- If any point of the bracket face is not touching the
glue axis, you must do the following setting:
- If the top of the axis is tilted to the back of the
machine, loosen the Allen screws 5mm at point B (see
gure below) and press (about 1/4 turn) the hex bolts
also from the point B. Check the bracket again. If it is
corrected, tighten the Allen screws.
- If the top of the axis is tilted to the front of the
machine, loosen the Allen screws at point A and
tighten (about 1/4 turn) the hex screws. Check out
the bracket again. If it is corrected, tighten the Allen
screws; if not, repeat the procedure.
MAINTENANCE SCHEDULE
Daily:
• Aspirate all dust on top and around the machine.
• Clean the guides, rubberized axis and manual cutter,
freeing of all glue residue.
• Check the level of glue on the glue pot.
Weekly:
• Clean dust accumulation inside the back cover,
around the glue axis and glue pot of the machine.
• Check for wear or damage to the buttons and cord.

10
• Check wear manual cutters.
ELETRIC PANEL
NEVER MOVE OR DO MAINTENANCE ON THE
ELECTRIC PANEL WITH MACHINE ON OR
CONNECTED ON THE POWER SUPPLY. LOOK FOR
SERVICE AUTHORIZED MAKSIWA WHEN YOU NEED
TO HANDLE THE ELECTRIC PANEL.
Attached follows the wiring diagram of Edgebander
CBC.E for possible maintenance.
WARRANTY TERM
The MAKSIWA assures the owner of his equipment,
identied by the date of issue of the purchase invoice,
a warranty of one (1) year, as follows:
1. The warranty period begins on the date of the
commercial invoice.
2. Within the warranty period, the hand labor and the
components replaced by manufacturing defect will be
provided for free as long as duly proved by Maksiwa
Service.
3. Third-party manufacturing equipment that makes
up the MAKSIWA equipment (such as motors,
electrical equipment, belts etc.) are subject to the
terms and conditions of warranty of their respective
manufacturers.
4. In case of exchange for the warranty, please return
the defective part for the manufacturer urgently.
5. Costs and risks of transport will be by the machine
owner.
6. Equipment installation expenses and workplace
adaptations are due to the machine owner.
7. When you notice any defect or malfunction when
receiving the equipment, get in touch immediately
with the manufacturer or resale. Do not turn it on.
8. Not included in this warranty technical visits aimed
at cleaning or adjustments caused by wear, resulting
from normal use of the equipment.
9. The warranty does not cover problems caused by
mistreatment, carelessness, misuse or inappropriate
use of the functions designed for this equipment in
this manual, as well as poorly executed operations by
untrained operators to operate it.
TECHNICAL ASSISTENCE
10. The MAKSIWA is not responsible for lost
productivity, direct or indirect damages caused to
the owner of the equipment or to third parties, or any
other expense, including lost prots.
11. Even under warranty, you may lose its validity as
follows:
a) Application of non-original components;
b) Alteration of its original features;
c) Lack of proper maintenance;
d) Improper use of the equipment;
e) Change in equipment or electronic connections;
f) Damage caused by mechanical shock or exposure to
unsuitable conditions (humidity, salt spray, corrosive
agents, etc.);
g) Damage caused by bad weather (oods, ooding,
lightning, power outages etc.).
For your safety, trust the repairs, maintenance and
adjustments (including inspection and replacement)
for technical assistance recommended by MAKSIWA,
always use genuine spare parts and accessories,
reassembling to its original Edgebander the same
way.
Manufactured by:
Maksiwa Industria e Comercio de Maquinas LTDA.
St Nelson Argenta, 436
Colombo – Parana – Brazil
Zipcode: 83402-220
CNPJ: 76.670.215/0001-81
www.maksiwa.com

11
SOLUTION GUIDE
PROBLEM CAUSE SOLUTION
Machine is not turn on
Plug disconnected or connected
improperly.
Check the connection and the voltage
of your power supply.
Main switch o. Turn on the Main switch.
ON switch o. Turn on the ON switch (green).
Emergency switch activated. Rotate clockwise to release.
Circuit breaker o.
Check the voltage of your Power
supply (110V) and turn on the breaker
inside of panel.
The glue is not heating
Temperature Controller unregulated. Adjust the temperature settings.
Burned resistance. Contact the Maksiwa Service to change
the resistance.
The tape is not gluing
The glue is not at the correct
temperature.
Check the glue temperature
specication.
Missing glue at the glue axis. Complete the glue pot with more glue.
The glue is inadequate to this
equipment.
Check the directions about glue brands
in this manual.
The thickness of the glue is incorrect. Adjust the thickness of the glue (check
this manual).
The glue axis is out of bracket (square). Adjust the bracket of the glue axis
(check this manual).
The edge of the panel is out of square. Check the square of your panelyou’re
your panel saw.

12
EDGEBANDER EXPLODED VIEW CBC.EC

13

14

15

16

17

18
WARNING LABELS:
Warning labels are mounted on the right and back sides of the edgebander. Some of the
warms on those labels may be additional to the warnings listed above. Be sure to read the
warning labels before using the machine. Copies of the English text of the warning labels
are reproduced below:
Table of contents
Popular Lathe manuals by other brands

Grizzly
Grizzly G0773 owner's manual

Record Power
Record Power DML320-EP Original instruction manual

HOLZMANN MASCHINEN
HOLZMANN MASCHINEN LBM 220 user manual

OVERBECK MACHINE
OVERBECK MACHINE LT-1BR owner's manual

Rikon Power Tools
Rikon Power Tools Woodfast 70-450 owner's manual

Jet
Jet GH-1440ZX operating instructions