Malloca WQP6-87CP User manual

USER MANUAL
HƯỚNG DẪN SỬ DỤNG
Model: WQP6-87CP

General dish rack design.
Designed for different
dishes.
All-round spray system
360° complete
removal of dirt.
Drawer-type design.
Drawer-type structure design, facilitating the installation and maintenance .
Fashion appearance
Match with the kitchen
style freely
More applicable to the
demands of different
users, and more
convenient to arrange
the dishes.
BLDC motor, low power
consumption, high
hydraulic force, and
capable of removing
all the dirt.
Owing to the drawer-type design, this product has the more reasonable
installation space, is more convenient to install, and is easy and convenient to
repair and maintenance as a whole.
Please read this manual carefully in order to help the safe and comfortable use of the product.
For the safe use of the product, the safety precautions and other instructions in this manual
must be read carefully before operating the product.
The dishwasher appearance
is featured by the modern
and fashion shape and the
decent color.
Outstanding cleaning effect.
Perfect high-temperature
and clean washing.
The dishwasher is good
at eliminating the animal
fat that is hard to clear.
The oil stains are cleared
easily with the special
dish washing powder
and the powerful water
flow of high spray height
after the fat is melted with
high-temperature water.

This Operation Manual is supplied together with the “Installation Manual”.
Important note!
These operation instructions must be properly kept.
Catalog
Safety and Warning...............................................2
Dish Maintenance.................................................5
Product size specifications ...............................................6
Part name ............................................................7
Product Specifications ..........................................9
Installation Precautions .......................................10
Installation Guidelines ....................................11-15
Instructions ........................................................16
Cutlery basket ....................................................19
Basket and Cup holder...................................20、21
Place the dishes in the drawer...............................22
Water hardness is introduced................................23
Washing procedure is introduced...........................24
Adding of Washing Agent......................................25
Adding of Rinse aid.............................................. 29
Water Softener.....................................................30
Cleaning and Maintenance....................................32
Troubleshooting...................................................36
Failure Diagnosis.................................................40
Data of Washing Program.....................................42
Technical Data.....................................................43
1

The well-designed dishwasher can operate safely during the normal use.
The following operating methods must be kept in mind during the use of dishwasher.
Warning!- During the use of dishwasher, the basic precautions, including but not limited to the
following principles, must be observed:
●Read this manual completely before operating the dishwasher.
Abide by the instructions in this manual, and minimize the fire or explosion risks in order to avoid property
damage or personal injury.
●The dishwasher is just used for the purpose for which this user guide and quick guidance is intended.
●The dishwasher just applies to home use and following similar situations:
-Kitchens of shops, office areas or other work environment; Farm houses;Guests living in the hotels,
motels or other living environment.
●Knives and other utensils with sharp points must be loaded in the basket with their points down or placed in
a horizontal position.
●The household dishwasher shall just use the suggested washing agent and rinse aid which must be placed
out of reach of any child. Every time after washing, it is required to check if the washing agent feeder is
drained completely.
●To place the dishes in the dishwasher, it is forbidden to scratch the inner cover of dishwasher with the sharp
dishes, and the handles of sharp handles must be kept upward in order to avoid hand cutting.
●During and after washing, the strainer (at the bottom of drawer) must not be touched by hand in order to
avoid hand burn.
●The dishwasher must not be operated before all the control panels are closed.
●The control button must not be modified without permission.
●It is forbidden to use the dishwasher for other purposes, or seat or stand on the drawer or dish rack of the
dishwasher.
●The door should not be left in the open position since this could present a tripping hazard.
●The foldable cup tray is used to carry tea cups, glass cups and kitchenware. When the foldable cup tray is
placed in the dishwasher, it is forbidden to lean on the tray, or use the tray to support the body weight.
●In order to reduce the personal injury risk, the children are forbidden to play in or above the dishwasher.
●The dishwasher door must be dismantled before the old dishwasher is disassembled or abandoned.
●Some washing agents of dishwasher are strongly basic. The unexpected swallowing of washing agent may
be very hazardous. Skins and eyes shall be protected from washing agent. When the dishwasher is opened,
the children must be far away from the dishwasher. Every time after washing, it is required to check if the
washing agent feeder is drained completely.
●The maximum number of place settings to be washed: 6 sets.
●If the supply cord is damaged, it must be replaced by the manufacturer, its service agentor similarly
qualified persons in order to avoid a hazard.
●After installation, Appliance can be unplug easily.
●Correct Disposal of this product:This marking indicates that this product should not be
disposed with other household wastes throughout the EU. To prevent possible harm to
the environment or human health from uncontrolled waste disposal, recycle it responsibly
to promote the sustainable reuse of material resources. To return your used device,
please use the return and collection systems or contact the retailer where the product
was purchased. They can take this product for environmental safe recycling.
the installation manual. If your dishwasher is not provided with installation manual, please call
the after-sales service phone. Our after-sales personnel will offer the assistance.
●The installation and repair of dishwasher must be performed by the professional technicians.
●The power wire that is damaged shall be replaced by the professional technicians.
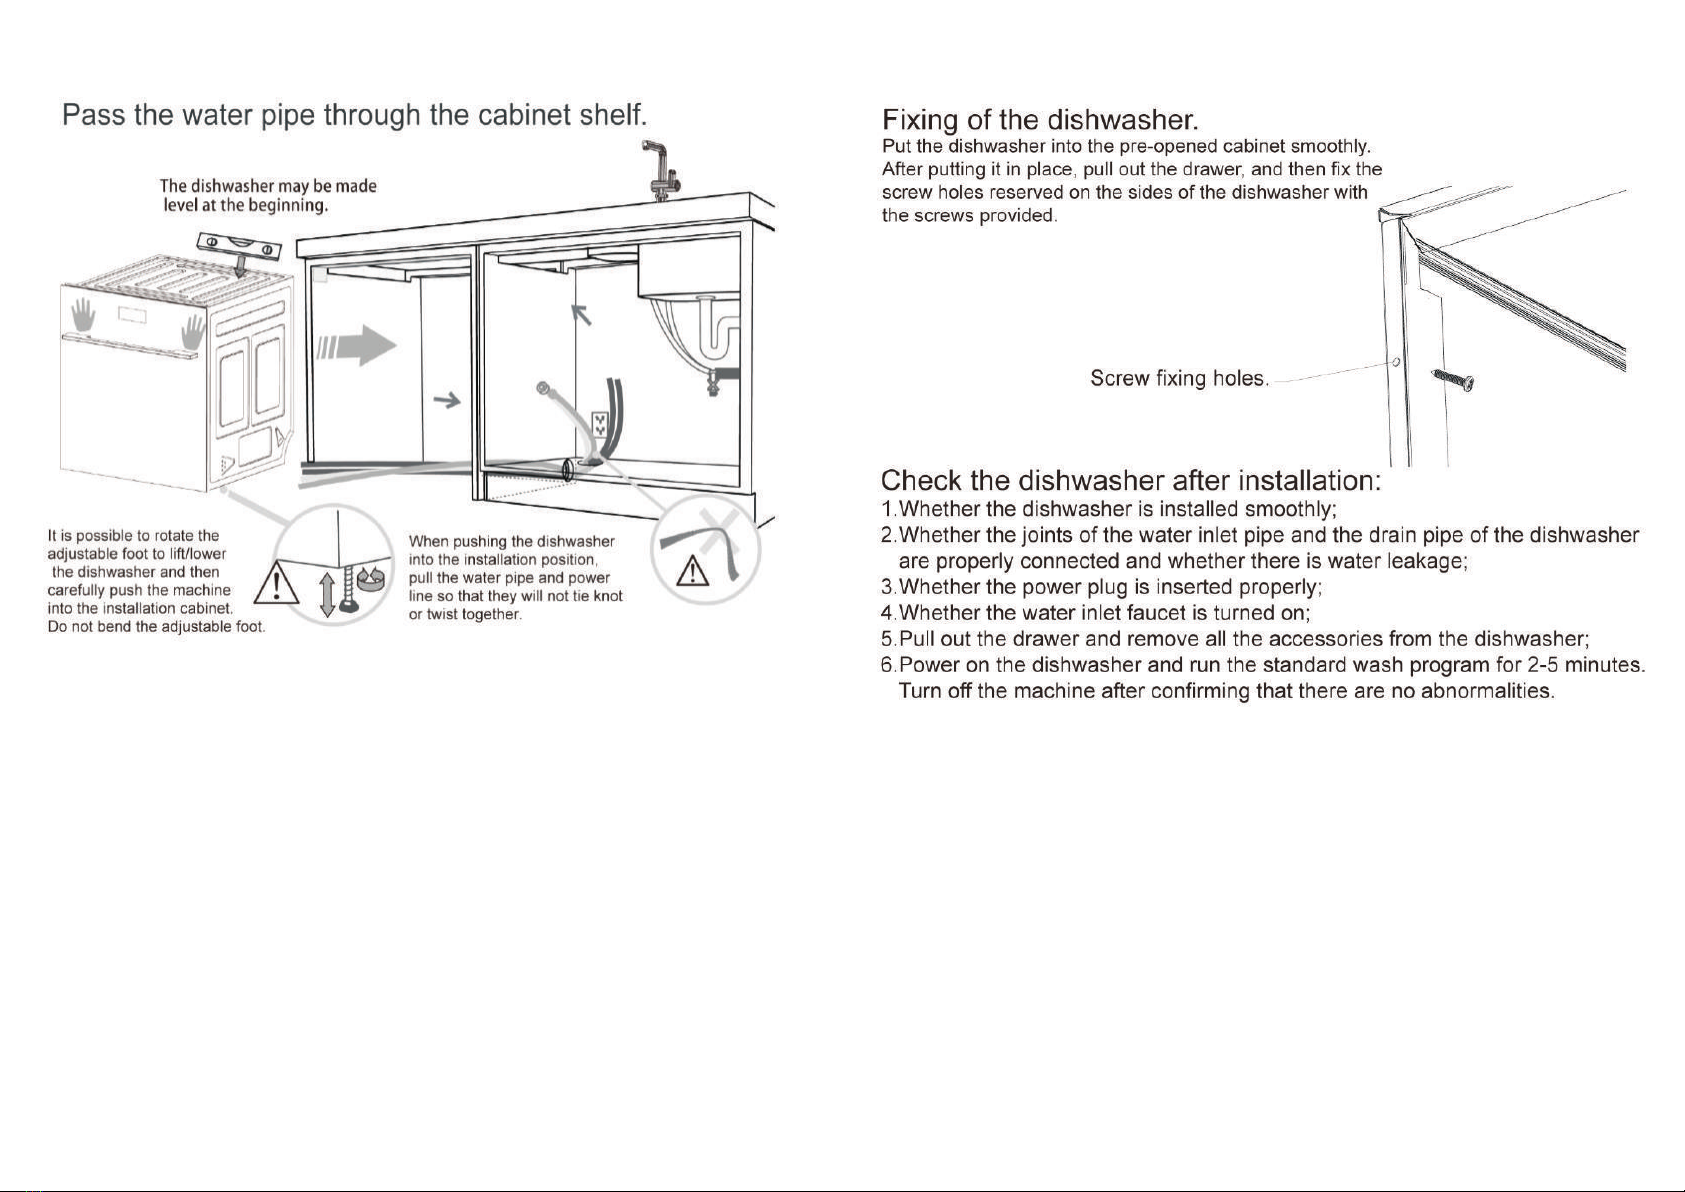
●The dishwasher must be fastened with screws in the cabinet. The dishwasher that is not
fastened may shake, which may result into dishwasher damage or personal injury.
●If the dishwasher is damaged or fails, any component is dismantled, any part is missing or
damaged, or any power wire or plug is damaged, the dishwasher must not be used any more.
●Never store gasoline or other flammable gas or fluid in any dishwasher accessory.
●The dishwasher shall be connected to the power source with suitable rated voltage and earthing
protection in order to prevent the circuit from overloading.
●The power wire must be fastened at the designated place in order to prevent the power wire
from damage or carrying any load due to treading or stumbling.
●The dishwasher must not be installed or stored in the place or outdoors at temperature below 0°.
●The dishwasher must not be connected to the power source with power extension wire or
portable power socket (such as multi-hole socket).
●The dishwasher must be provided with earthing protection. In case of failure or damage, the
earthing protection provides a current leaking patch with minimum resistance so that the electric
shock risk is reduced obviously. The plug must be inserted into the reliably earthed socket that is
installed according to the local laws and regulations. Warning- The electric shock may be caused
if the equipment earthing wire is not connected properly. If you doubt the reliable earthing of
dishwasher, please contact the experienced electrician or after-sales service personnel
for site test. The power plug of dishwasher must not be modified without permission. If the plug
does not match the socket, please contact the experienced electrician to install the suitable socket.
●If the dishwasher is installed as a permanently connected equipment: Earthing instructions- The
dishwasher must be connected to the permanent metal earthing wire or the earthing wire must be
connected to the equipment earthing terminal or connector on the dishwasher through the
electric wire.
●When installing, the power cord socket must be installed where the power cord is easily accessible.
●There is an air outlet under the door of the dishwasher, so the bottom of the door should not be
blocked by the carpet.
●Before operating the dishwasher, it is necessary to install the dishwasher in accordance with
■Important safety instructions
◆Installation
23

■Important installation instructions
Dish maintenance
■Dish maintenance
◆Installation
◆Operating precautions
●The drawer must not be opened when the dishwasher is operating.
●The dishwasher can be used only when the motor, strainer, filter and spray arm are installed in
place. Please read the pictures in the section “User’s Maintenance Instructions” to know those
components.
●To place the dishes in the dishwasher, much care shall be taken to avoid closing failure of top
cover because the dishes support the top cover. The dishes placed in the dishwasher must not
be higher than the drawer, or be pressed forcefully for fear of damage.
●This appliance can be used by children aged from 8 years and above and persons with reduced
physical,sensory or mental capabilities or lack of experience and knowledge if they have been
given supervision or instruction concerning use of the appliance in a safe way and understand the
hazards involved. Children shall not play with the appliance. Cleaning and user maintenance shall
not be made by children without supervision.
●The cleaning and maintenance must not be performed by the unsupervised children.
●The children are prohibited to play in the dishwasher, seat on the dishwasher, or play in the
abandoned dishwasher.
●If the cleaning agent of dishwasher is used, it is suggested to add the dish washing powder and
apply one washing program immediately after cleaning in order to prevent the washing agent from
damaging the dishwasher.
●The dishwasher is intended for ordinary household dishes, and must not be used to clean the dishes
polluted with gasoline, paint, rust, corrosive or acid or basic chemical.
If the dishwasher is not used in a long period, the power source and water faucet of dishwasher shall
be turned off.
●The dishwasher must not be used to clean the plastic dishes except for those marked with
“Dishwasher allowed” or other equivalent sign. For the plastic dishes without such sign, please refer
to the manufacturer’s suggestions.
●Before the dishwasher is cleaned or repaired, the power plug of dishwasher must be unplugged.
To power off the dishwasher, the power plug must be disconnected in order to avoid damage.
It is forbidden to pull the power wire or the connection between the power wire and the socket.
●Unless specially stipulated in this user guide, it is forbidden to repair or replay any part of dishwasher,
or try to repair the dishwasher. When necessary, please contact the after-sales service department
for repair, or refer to the section “Repair and Service” for relevant information.
●The floor around the dishwasher shall be kept clean and dry in order to avoid hazard due to slipping.
●The flammable materials must not be stored around or under the dishwasher, such as lint, paper,
duster clothes or chemicals.
When the dishwasher is used to clean the dishes, the mixture of high-temperature water
and dish washing powder may damage the dishes. Please keep in mind that if you have
any doubt about dish cleaning with dishwasher, please read the manual supplied by the
product manufacturer, or wash the dishes by hands.
◆
All the knives, forks and silver dishes shall be cleaned immediately after use in order to
prevent any food from drying on their surface; in such case, the washing program is allowed.
The sliver dishes must not contact the stainless steel dishes; otherwise, stains may appear
on their surfaces. The sliver dishes must be taken out from the dishwasher and wiped dry
immediately after the washing program finishes.
Knives, forks and silver dishes
◆
The use of dish washing powder may reduce the surface gloss of aluminum dishes. The
gloss change degree depends on the product quality.
Aluminum dishes
◆Other metal dishes
The iron and cast iron dishes may become rusty, and leave stains on other dishes. Similarly,
copper, tin-lead alloy and brass dishes may have stains on their surfaces.
◆
The wooden dishes are sensitive to heat and water, and the frequent washing with
dishwasher may affect the quality of dishes adversely. In case of any doubt about this,
please wash the wooden dishes by hands.
Wooden dishes
◆
Most of glassware can be cleaned with dishwasher. However, crystal, carved and antique
glassware may be etched, and become not transparent. Therefore, you may be prone to
hand washing for such glassware.
Glassware
◆
Some plastic dishes may be distorted or discolored in case of contact with hot water. Before
cleaning the plastic dishes, the manufacturer’s instructions shall be read. The plastic dishes
that can be cleaned with dishwasher shall be placed at the bottom of dishwasher so that
they will not be turned over, filled with water or fall in the course of washing.
Plastic dishes
◆
Most of modern chinaware can be cleaned with dishwasher. However, the chinaware with
patterns, golden edges and hand drawings are more sensitive to the washing of dishwasher.
In case of any doubt about this, please wash the them by hands.
Ornaments
◆
When the adhesive dishes are washed with dishwasher, some adhesives must be softened
or dissolved. In case of any doubt about this, please wash the them by hands.
Adhesive dishes
45

Part Name
Product size specifications
67

Part Name Product Specifications
Electrical schematic diagram
Product name
Drawer dishwasher
Rated Voltage
220-240~
Voltage Range
50Hz
Rated Power
1850W
Rated volume
87L
Laundry guide
Spray type
Drying method
After-temperature
drying
Inlet water pressure
0.04-1.0 Mpa
Capacity
6 sets
Display
LED
Control
Touch control
Installation
Built-in
Product Size
595*595*569mm
Package (W*H*D)
660*660*660mm
89

10 11
Installation Precautions Product Installation Guidelines

12 13
Water inlet connection to dishwasher:
Connection method of drain pipe:
●The outlet end of the drain pipe can be inserted into the upright sewer,Or
connect to the turning joint of the sink sink.The drainage pipe must be fastened
with a clamp and the screws must be tightened.
●When connecting the drain pipe, pay attention that the highest part of the drain
pipe cannot exceed the highest height of the dishwasher.
●In order to prevent the backflow of sewage, the outlet of the drainage pipe
cannot be immersedin water, and the drainage pipe is not bent and concaved.
●It is best to install the dishwasher near the drain pipe. The length of the
dishwasher drain pipe is about 1.5 meters. If it is far away, users need to purchase
adapters and drain pipes by themselves, but the total length should not exceed
4 meters, otherwise it will affect washing.
Installation Guidelines

Installation Guidelines Installation Guidelines
14 15

16 17
■Instructions ■Touch instructions
■Start
◆The operation interface
If it is the very first initialization for the dishwasher, then the Choose Program screen is shown:
“ ”
◆Lid motor operation
1. When press the "stop/start" button to boot, the top motor will drive the top drawer downward
seal, and then the program will start.
2. The program is running mode, press the "stop/start" button to suspend the program runs.
Within the prescribed period of time, the top motor driveUpward, completely release the machine
head, a buzzer two sounds to inform lid seal has been released.
3. After the start the program or in the process of the program is running, not to pull out the drawer,
have to press the "stop/start" button,
Such as roof upward in place after the buzzer two to pull out the drawer.
By pushing ( ) with “OFF” selection, the time delay is cancelled and Program Selection
mode is set back.
●By pushing ( ) with any other selection, the time delay is set and Time delay starts
counting down every minute.
●During Time Delay Counting mode, after the time delay is exhausted the washing program
is started in the standard operation way (see Program running mode).
Note: Once Time Delay mode is set, the door must be sealed through the Lid motors. So,
If the user needs to access the basket, this mode must be cancelled first.
Settings can be configured by using a button combination during Start or Program Selection
mode. By pushing ( ) + ( ) (for 2 seconds), the settings menu is entered.
If ( ) is pressed with “back” selection, it returns back to Program Selection mode.
By pressing ( ) it switches between settings.
By pressing ( ) while any setting is selected, the corresponding setting submenu is entered
in order to change the preferences.
It is possible to activate a time delay for the washing program to start.
The time delay can be activated by pushing ( ) + ( ) keys for 3 seconds during Program
Selection mode.
During Time Delay Selection mode, time delay changes in 1 hour steps (counting up) by
pressing ( ). The time delay at a maximum can be 9 hours: “+ 9”.
The complete sequence while pressing ( ) is:
◆Time Delay
◆Settings
1.Dark after Welcome-letters ;
2.After Welcome-letters passing: (Choose Program);
3.Continuous Welcome-letters.
●After pushing “ ”(program) button, program selection is started.
●For the next starts, the last program used, should be pre-selected, so that display shows the
last run program and can be started immediately by pushing “Start/Pause”.
●By Pushing “ ” (Program button), you can choose the washing program/ profile.
The Washing profile name is shown in the display and is shown in a short form:
●Alternating to the program name (short form) at display the related
program time segments are displayed. This alternating/ switching
between program name and related program time (e.g. every
2seconds) ends by pushing “Start/Pause” to start the program.
From there on only the program time is displayed and counted
down based on the profile definition.
●After the program is started, only the program time is displayed and starts to count down as
long as the program is in progress. Time values are display steadily, the dots in between are
displayed with flash.
●By pushing the Start/Pause button during the program is running, the program is paused.
At display the related program time is displayed flashing. The dots in between are displayed
steadily. When the “ ”button is pushed again, program continues. Remaining time display
continues counting down.
◆Operating Mode

18 19
■Touch instructions Cutlery basket
◆Knife and fork barrel
◆Knife and fork barrel cover and cleaning
If there are dirty things in the basket or large pieces of dirt must
clean up, can open the basket to clean.
◆Settings
◆Settings
●The following table shows visualization for each setting:
●Settings can be configured by using a button combination during Start or Program
Selectionmode. By pushing ( ) + ( ) (for 2 seconds), the settings menu is entered.
●In order to reduce the risk of injury, your are suggested to place the sharp edges of
knives, forks and other sharp dishes downward.
●If the spoons are mixed with knives and forks, the contact faces may not be rinsed
with water so you are suggested to place the spoons and the knives and forks
separately, to ensure the complete water rinsing (of dishes).
●The stainless steel dishes must not be placed together with sliver dishes, in order
to avoid stains on the sliver dishes.
●There are two ways of managing Childlock:
1、Childlock can be automatically activated for every start after selecting a program
and pressing ( ) if “Permanent activation of Childlock at start” is configured as “ON”
as a preference in settings menu.
2、Otherwise, to activate childlock mode: press ( ) for 3 seconds during Program
Running mode. If the activation is successful, the 7-segment shows:
●While Childlock is activated all other touch area functions are disabled and remains
ON.By touching any button, the Childlock activated screen is shown for 2 sec
(see above table).
●To unlock / deactivate Childlock, ( ) has to be pressed again for 3 seconds. When
deactivation was successful, the indicator symbol is not lighted any more and all other
touch areas are enabled again.

20 21
Basket Cup holder
◆Tableware layout (reference):
◆Cup bracket placement diagram (reference):

22 23
Place the dishes in the drawer Water hardness is introduced
◆Examples of wrong dish arrangement
◆ Place the dishes in the drawer. Please make sure that:
●The arrangement of dishes must ensure that the water sprayed by spray arm can reach
any zone where the dishes are placed (the improper arrangement of dishes may result in
bad washing effect).
●No dish shall obstruct the water sprayed by spray arm from reaching the dishes placed
on the foldable cup tray.
● Keep the glassware and other fragile dishes stable to prevent the glassware from being
destroyed by the water flow sprayed by spray arm.
◆What’s the water hardness?
The hard water indicates the water with a high content of calcium, magnesium and other
minerals. The content of such minerals in the soft water is lower. The water in the different
region has a different hardness.
Please contact the local water supply company to know the hardness of your tap water.
◆What impact does the hard water have on the washing effect?
●The hard water has adverse impacts on the washing effect. The long-period use of hard
water may reduce the transparency of glassware, and form the white scale on the surface
of bowl. The long-period use of high-hardness water may damage the internal components
of dishwasher.
●If the dosage of washing agent is suitable, the natural soft water and artificially softened
water have no adverse impact on the washing effect. If the excessive amount of washing
agent is used in the hot water, the glassware may be etched permanently. The etching
starts in the form of rainbow film; if the etching continues, the glassware may become
non-transparent for ever.
●The dosage of washing agent shall not be too much. The suggestions about dosage
of washing agent given on the last pages shall be followed.
●Ensure that the drawer is not filled too fully so that all the dishes can be washed
with water.
◆How is the impact of adverse factor reduced?
◆If your water is the natural soft water or softened water…
◆If your water is the hard water, and your dishwasher is not equipped with internal water
softener…
Please follow the suggestions about dosage of washing agent given on the last pages.
●If possible, the washing agent with a high content of phosphate can used because the
phosphate can soften the water and thus improve the washing effect. If it is impossible
to use the washing agent with a high content of phosphate, the multi-function washing
block is suggested.
●Use of rinse aid: It is suggested to adjust the dosage of rinse aid to “5” in order to
improve the washing effect.
●The dishwasher shall be washed regularly with cleaning or anti-scaling agent. The
dishwasher in which the scale is found shall be washed immediately with cleaning or
anti-scaling agent.
Important note!
You are suggested to add the water softener in your water supply pipeline. If the
hardness of your water is above 250ppm, the water softener must be installed to
ensure the acceptable washing effect.
●
●Water cannot reach some dishes before
too many dishes are contained.
●The openings of tea cups, glass cups and
bowls must face down.
●Ensure that the dishes are not pressed forcefully
into the drawer, or higher than the drawer;
otherwise, the dishwasher may be damaged
because the drawer seal cover is not closed
tightly. In such case, the site repair by the
repairer is required.
●The sharp dishes must be arranged reasonably
in order to avoid personal injury or damaging
the inner wall and seal cover of drawer.
●Check the bottom of knife and fork barrel, and
ensure that the rotation of spray arm is not
obstructed because the sharp knifes extend from
the barrel bottom.
●Ensure that the rotation of spray arm is not
obstructed because the knifes and forks fall
out from the barrel.
The improper arrangement of large bowls may
obstruct the water sprayed by spray arm from
reaching the dishes placed on the foldable tray.
●The large and loose dishes shall be placed
on the adjustable cup rack to prevent the
rotation of spray arm from being obstructed
because the dishes are scattered by water.
●The sharp dishes must be arranged horizontally,
or the shape tips must face down in order to
avoid personal injury.
●If the dishes are overlapped, the water
sprayed by the sprinkler cannot pass
through the dishes (the dishes cannot
be washed).
●Ensure that the knives and forks are not
overlapped. The knives and forks must be
scattered evenly.

24 25
Washing procedure is introduced Adding of Washing Agent
■Adding of dish washing powder
Notice: You can see the washing agent with similar washing effect sold in the supermarket,
know and observe the use suggestions of washing agent manufacturer.
Pour the dish washing
powder into the washing
agent chamber
Washing agent chamber
◆Pour the dish washing powder into the washing agent feeder
1.Press the buckle to open the washing agent feeder.
2.First check if the washing agent feeder box is empty and dry, and then pour in the dish
washing powder (never add the blocky washing agent into the washing agent feeder).
The Rinse program does not need any washing agent.
3.Close the feeder till the buckle is fastened. The dish washing powder may fall into the
bottom of dishwasher drawer.
Notice: When the dishes to be cleaned are very dirty and the used water has a high
hardness, a suitable amount of washing agent shall be added to improve the washing
effect.
◆Note:
If no dispenser model configuration, then put the detergent directly into
the dishwasher;
If the block is put in the dishwasher, take the blocks on the knife and
fork basket gap position.
● First know the hardness of your water, and then determine the necessary dosage of washing
agent according to the following form. Meanwhile, please refer to the section “Water Softener”.
Please read “Quick Guidance” to know the program to be selected.
The dosage of washing agent has been marked on the washing agent feeder. Please refer to
the section “Adding of Washing Agent”.
*If the water softener is installed in your home, please refer to the suggested dosage
for the water with hardness below 100ppm (regardless of local water hardness).
Notice:
If the hardness of your water is above 625ppm, the washing effect of dishwasher may
be reduced.
Water hardness
Percent concentration (ppm)
British concentration (gpg)
Dosage of washing agent
Washing program
<100PPM Heavy
Daily
Eco
Short
Delicate
Rinse
— —
— —
1/3
1/3
2/3 27g
27g
13.5g
13.5g
Dosage marking on
washing agent feeder
Dosage

26 27
■Adding of washing block ■Inapplicable washing agent
◆Dosage of washing agent
Notice: You can see the washing agent with similar washing effect sold in the supermarket,
know and observe the use suggestions of washing agent manufacturer.
The following washing agents are inapplicable to the dishwasher, and may damage
the dishwasher and result in loss of warranty.
●Important note!
●The following washing agents must not be used in the dishwasher:
●Washing fluid
●Laundry soap powder
●Liquid soap
●Soap
●Sanitizer
For the dish washing powder, please refer to the last section “Introduction to Washing
Program”, and add the dish washing powder according to the local water hardness.
A suitable amount of washing agent shall be filled according to the adding mark.
Other washing agents shall be added according to the manufacturer’s suggestions.
If the knife and fork barrel is not used during washing, the washing block can be
placed directly at the drawer bottom (around the fine filter, at the lower position on the bottom).
Add the washing block into the washing block
box on the knife and fork barrel
Was hin g bl o ck

28 29
◆Use instructions of washing block
◆How to add the rinse aid
◆When to add the rinse aid
If the washing block is used, the manufacturer’s suggestions on the packing bag shall be
observed. Some washing blocks may not be applicable to all the washing programs.
The use of washing block in the region with hard water can improve the washing effect.
Ensure that the washing block does not contact the dishes, knives or forks directly.
If the used washing block contains any rinse aid, you are suggested to lower or disable
the function of rinse aid. Please read the introductions in “Quick Guidance” for details.
Important note!
Washing agents of dishwasher are strongly basic. The unexpected swallowing of washing
agent may be very hazardous. Skins and eyes shall be protected from washing agent.
When the dishwasher is opened, the children and the weaker people must be far away
from the dishwasher. After washing, it is required to check if the washing agent feeder
box is drained completely.
In order to improve the drying effect of dishes, the use of rinse aid is suggested.
The rinse aid can remove the water stains on the glassware and chinaware, and prevent
the metallic products from loss of gloss.
The rinse aid feeder is located inside the drawer and under the washing agent feeder.
About 50ml rinse aid can be added into the rinse aid feeder.
It is normal to hear the abnormal sound when the rinse aid feeder is operating.
Note:If there is no distributor model, cannot add the rinse,
Combination of washing the dishes is recommended to be used.
1.Counterclockwise rotate and remove the plug.
2. Add the rinse aid into the round hole. Notice to prevent the
rinse aid from splashing outward the feeder.
Important note!
The spilled rinse aid, if any, must be wiped off; otherwise, much
bubbles may be produced, resulting in damage to dishwasher
and loss of warranty.
3.Refit the plug, and then clockwise rotate the plug in place.
Important note!
Ensure that the plug is tightened, and the plug handle is vertical.
The dosage of rinse aid for every washing process shall be
adjusted between “0” (min.) and “5” (max.) according to the
local water hardness. Please refer to the section “Preferred
Options” in “Quick Guidance” for details.
●If there are many bubbles after washing, the dosage
setting of rinse aid shall be decreased.
●If the dish drying effect is not good, the dosage setting
of rinse aid shall be increased.
●If you live in the hard-water region where no water softener
is installed in the water supply pipeline, it is suggested to adjust
the dosage setting of rinse aid to “5”.
●If the lack of rinse aid is detected, the above sign will be shown after the machine starts.
●The sign will flash for three times every minute, to warn the user of adding the rinse aid.
●If the rinse aid indicator lamp does not go on, it is unnecessary to add the rinse aid, and
the existing rinse aid is enough for the washing program.
●Notice: Compared with the rinse aid with darker color, the dimming level of indicator
lamp is less if the rinse aid with lighter color is used.

30 31
Water softener
■Setting of Water Softener
(If there is no water softener models, then ignore the content)
◆Water softener
◆Salt lack indicator lamp
The water softening function is valid only when there is salt in the water softener.
No matter when the salt lack indicator lamp goes on, the salt shall be added into the
water softener before the dishwasher is used.
If the lack of salt is detected, the 7-seg nixie tube will show “SALT” and flash for
3 times every minute after the machine starts, indicating no salt in the water softener
and warning the user of adding the salt.
◆Determination of local water hardness
The following information can be obtained from the local water supply company. The setting
of water softener shall be determined according to the following water hardness table. For
example, when the local water hardness is 500ppm, the water softener shall be set at “4”.
Please refer to the section “Preferred Options” in “Quick Guidance” to know how to adjust the
setting of water softener.
Important note!
The dishwasher salt shall be added into the water softener. The use of edible salt, rock
salt or ball salt is not suggested because such salt contains sundries and may damage
the water softener and shorten the service life of water softener.
Important note!
Never add the washing agent or rinse aid into the water softener because the washing
agent and rinse aid may damage the water softener.
●When the local water hardness is above 625ppm, you are suggested to add the rinse aid
fully for all the washing programs except for the Rinse program, and set the rinse aid at “5”.
If the local water hardness is above 625ppm, the washing effect of dishes may be decreased.
●It is normal to hear the abnormal sound when the water softener is operating.
◆How to add the salt
1. Open the drawer.
2.Counterclockwise rotate and remove the water softener cover.
3.Pour the salt into the salt cup, and then into the water softener through the salt cup.
The water softener can contain about 0.5kg regenerated salt at most.
4. Refit and clockwise screw down the water softener cover.
5.If the dishes are not washed immediately after the salt is added, please start the Rinse
program to rinse off the salt water or the residual salt around the salt port.
Notice:
Notice to prevent the water from spilling from water softener when adding the salt into
the water softener.
Notice :
Notice to prevent the water from spilling from water softener when adding the salt into the
water softener.

32 33
Cleaning and Maintenance
Important note!
The dishwasher must be powered off during cleaning and maintenance (unplug the power
wire of dishwasher, or turn on the fuse).
Cleaning of strainer and filter
■Important note!
Rotate leftward or rightward
■Removal and cleaning of flat filter and fine filter
●If the cleaning or anti-scaling agent of dishwasher is used, one washing program shall be
applied after washing to prevent the cleaning agent from damaging the dishwasher.
●When the dishwasher is used, the strainer, filter and spray arm must be installed in place.
●To use the dishwasher, it is suggested to fasten the rack at the correct position by the
right hand.
1.Push in the foldable rack on the dish barrel, and then lift it up so that the flat filter and other
components under the foldable rack can be removed for cleaning without taking out the
whole barrel (counterclockwise rotate the lifting cup, and when the flat filter becomes loose,
take out the flat filter), facilitating the operation.
2.After cleaning, refit the filtration system: first place the fine filter in the water cup, then install
the flat filter, and next refit the lifting cup and clockwise screw down the lifting cup; at last,
refit the foldable rack on the dish barrel.
◆Holiday maintenance
◆Cleaning of dishwasher surface
1.Wipe the dishwasher surface of clean wet cloth, and notice not to wet the control panel.
2.Wipe the surface dry with clean lint-free cloth.
◆Cleaning of strainer, spray arm and filter
●In case of normal use, it is suggested to clean the strainer and filter at least once every
month or when the food residues are found on the strainer or filter.
●In case of normal use, the spray arm does not need frequent washing.
Important note!
You are suggested no to wash the dishwasher by the following methods
because they may damage the dishwasher:
● Plastic or stainless steel wiping pad;
● Abrasive agent, organic solvent or household cleaning agent;
● Acid or basic cleaning agent;
● Liquid soap or soap;
● Stainless steel cleaning or polishing agent;
● Laundry soap powder or sanitizer.
If the dishwasher is not used in a long period, you are suggested to clean and unload the
dishwasher, open the drawer to circulate the air inside, and turn off the power source and
water faucet of dishwasher.
Before the dishwasher that has been out of service for a long period is reused, it is
suggested to add 3 cups of water into the dishwasher, in order to moisturize the parts that
become dry due to long-period no use.

34 35
Removal and cleaning of strainer and filter
3.Lift up and remove the filter. It is normal if there is water under the filter.
4.As shown on the picture, rotate the filter cap and handle, and lift up the
filter cap at the filter cap notch to separate the cap from the handle.
Notice: Never try to separate the filter cap from the handler from both
sides at the same moment; otherwise, the filter may be damaged.
5.First rinse the strainer with hot soap water, and then wash it with clean water.
6.Take out the handle carefully. Remove all the dirt from one side, rinse the
handle with soap water, then wash it with clean water, and next wipe it clean
with wet cloth.
Refitting of filter cap and handle
7.Arrange the filter cap carefully in place, and ensure that the
filter cap is clamped at the fixed position.
8.Re-fasten the filter:
A.Combine the filter cap with the handle.
B.Rotate the filter cap till the lifting cup on the handle is aligned
with the fine filter mesh, and next rotate it clockwise to clamp
them tightly.
C.Rotate the lifting cup till the lifting cup slot and water tank
buckle are fastened.
D.Rotate the filter till the clamping sound of slot is
heard and the filter cannot be rotated any more; now,
the installation of filter completes.
9. No matter whether the whole lower dish rack (which has
been removed) or the moveable bracket is installed, ensure
that they are refitted correctly. (As described above, the moveable
bracket shall be clamped onto the fixing buckle of lower rack).
10. Install the bracket door.
Place the bracket door on the lower dish rack,
and then install the knife barrel.
Rotate the lifting cup till the lifting cup
slot and water tank buckle are fastened
Installation steps
of strainer:
1. Place the fine filter
in the water tank.
2. Properly install the flat strainer according
to the shape corresponding to the flat strainer. 3. Rotate the lifting cup till the lifting cup
slot and water tank buckle are fastened.
■Cleaning of spray arm
1.Power off the dishwasher, or unplug the power wire plug.
2.Lift up the glass cup bracket from the bracket iron wires (if the bracket is folded), lift up all
the tea cup trays, and ensure that they are vertical and close to the drawer top.
3.Remove the dish rack carefully: lift up the rear part of lower rack, and during this course,
notice to prevent the front end of rack from colliding with the feeder box or rinse aid box.
4.Take out the spray arm, and remove all the residues in the spray arm.
Wash the spray arm with clean water, and then wipe it dry with wet cloth.
5.Insert the spray arm onto the support.
6.Properly install the lower dish rack, and notice to first install the front end of lower dish rack
in place.
7.Push in the drawer, and power on the dishwasher.
Notice: The broken glass or tea cup debris in the drawer must be removed completely and
carefully for fear of damaging the dishwasher.
Spray arm
Table of contents
Languages:
Other Malloca Dishwasher manuals