Malloca MAF-06 User manual

USER MANUAL
HƯỚNG DẪN SỬDỤNG
MALLOCA AIR FRYER
NỒI CHIÊN KHÔNG DẦU
MODEL: MAF-06
Power voltage: 220V-240V~
Rated frequency: 50/60Hz
Rated input power: 1700W
Capacity: 6L

2
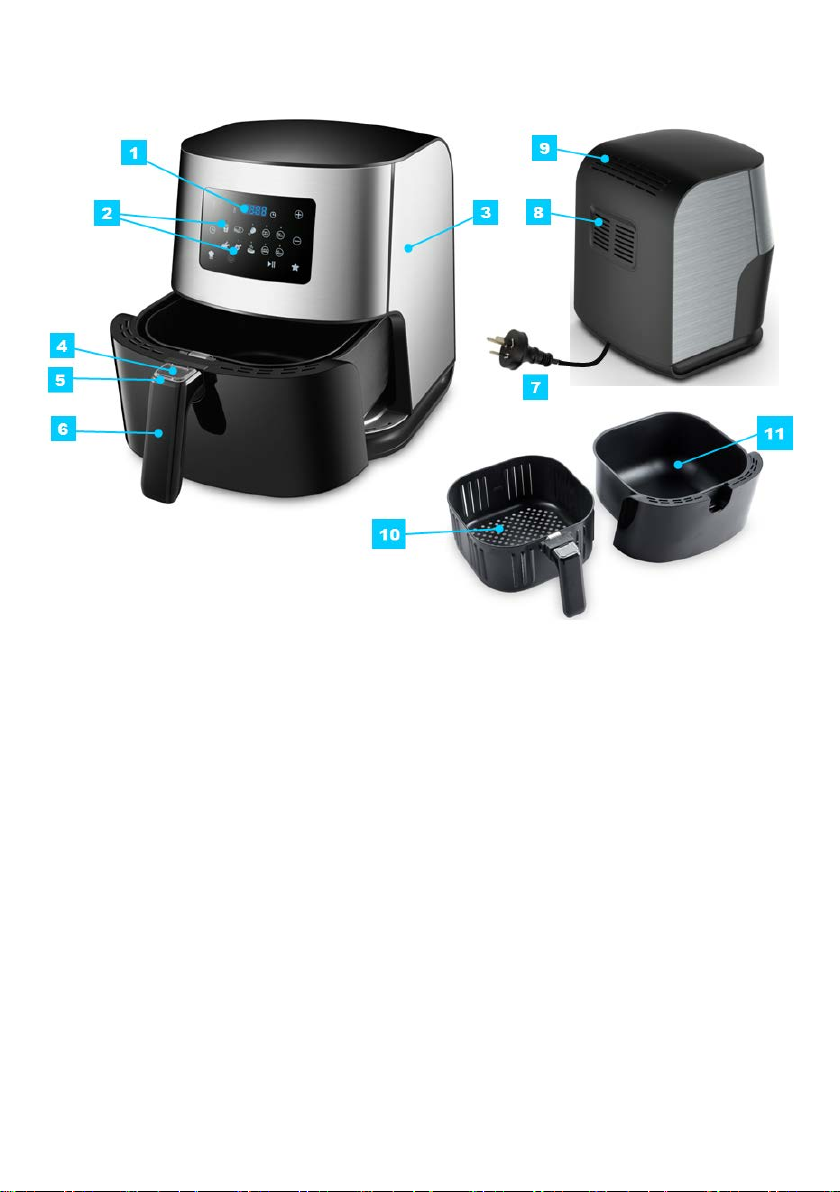
A-1 Product Introduction
1. LED display 2. Sensor touch control panel 3. Body
4. Basket release button cover 5. Basket release button 6. Frying basket handle
7. Mains power cord 8. Air outlet & oil smoke filter 9. Air inlet
10.Frying basket 11. Frying pot
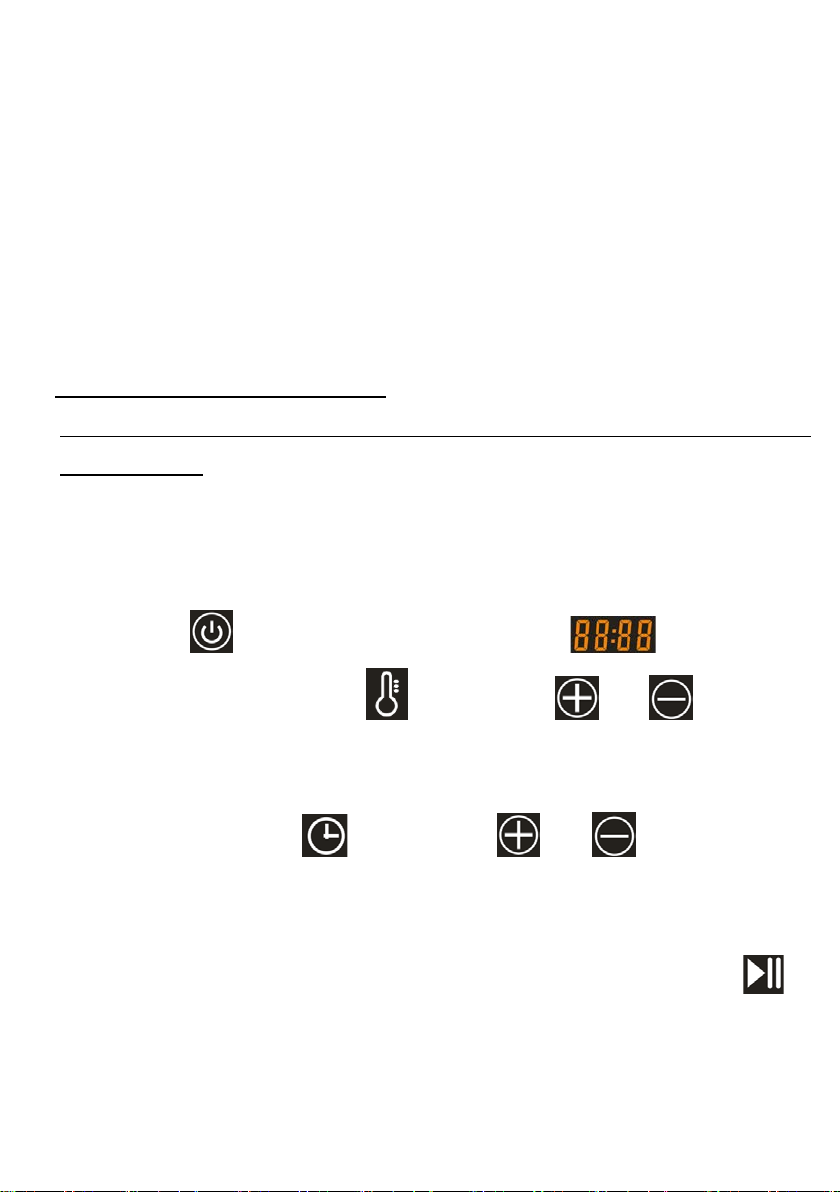
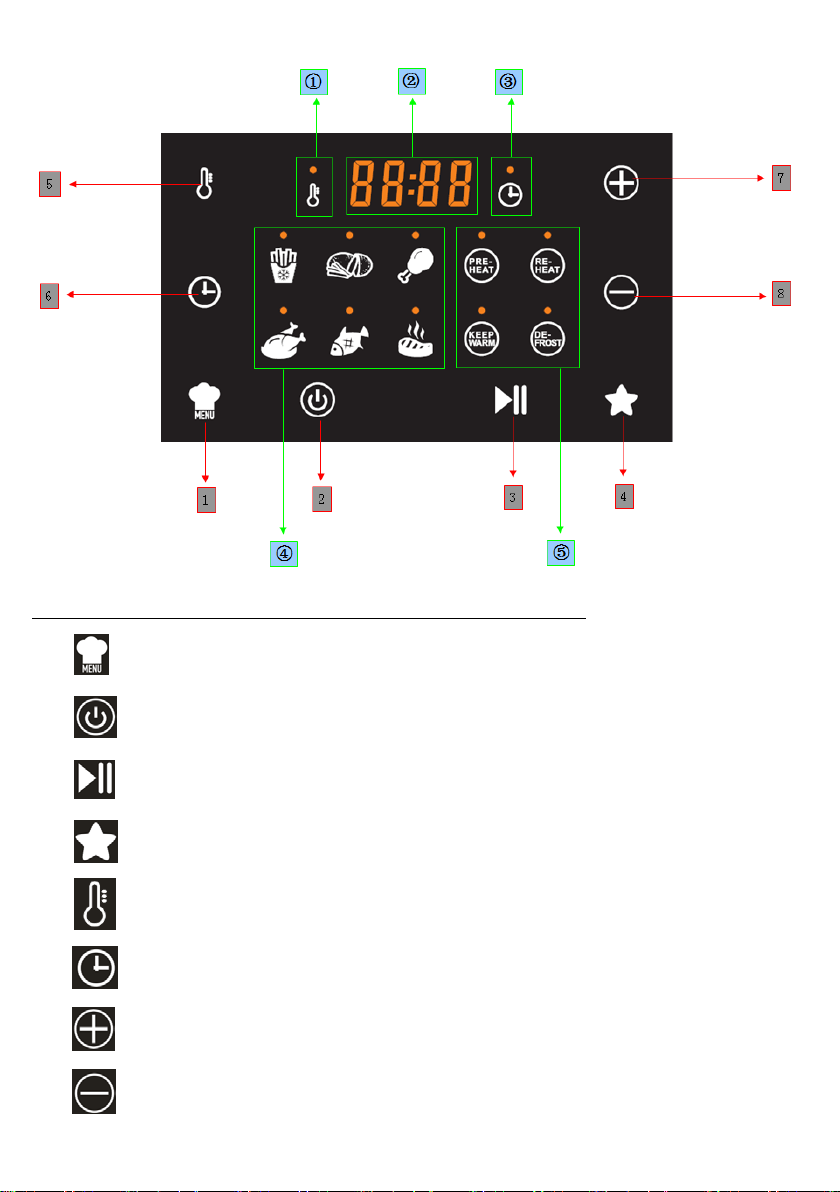
A-2 Sensor touch control panel
Fast review, turn to “C-1” for operation details.

3
Touch sensitive control buttons(Can be operating) 1 →8:
1: - Pre-set cooking menu function
2: - Power
3: - Start / Pause
4: - Fast boot function
5: - Temperature adjust button
6: - Timer adjust button
7: - Add Temperature(5 ℃ or 10 ℉ / press) or Time (1 min / press)
8: - Reduce Temperature(5 ℃ or 10 ℉ / press) or Time (1 min / press)

4
Indicator Icons(Can not be operating)
①
→
⑤:
①: - Temperature icon (press button 5, when above light lighten up, use button 7 & 8
to adjust the temperature).
②: - To indicator the selected temperature / working temperature or selected cooking
time / remaining time.
③: - Time icon (press button 6, when above light lighten up, use button 7 & 8 to adjust
the temperature).
④: - Pre-set cooking menu icons(press button 1 to select each of the cooking menu,
when above light lighten up, means that menu was selected)
⑤: - Fast boot function icons(press button 4 to select each of the function, when above
light lighten up, means that function was selected)
Danger:
·Never immerse the housi
ng, which contains electrical components and the heating elements in
water nor rinse the unit under the tap.
·Avoid any liquid entering the appliance to prevent electric shock or short-circuit.
· Keep all ingredients in the basket or prevent any contact from heating elements.
·Do not cover the air inlet and the air outlet when the appliance is working.
· Do not fill the pot with oil as this may cause a fire hazard.
· Don't touch the inside of the appliance while it is operating.

5
B-1 Warning
1- For your safety, this appliance complies with the safety regulations and directives in effect at the
time of manufacture (Low-voltage Directive, Electromagnetic Compatibility, Food Contact Materials
Regulations, Environment…).
2- Check that the power supply voltage corresponds to that shown on the appliance (alternating
current).
3- Given the diverse standards in effect, if the appliance is used in a country other than that in
which it is purchased, have it checked by an approved service centre.
4- This appliance is designed for domestic use only. In case of professional use, inappropriate use
or failure to comply with the instructions, the manufacturer accepts no responsibility and the
guarantee will be void.
5- Read and follow the instructions for use. Keep them for future use.
6- Do not operate any appliance with a damaged cord or plug or after the appliance malfunctions,
or has been dropped or damaged in any manner. Return the appliance to your point of purchase. Do
not take the appliance apart yourself.
7- Do not use an extension lead. If you accept liability for doing so, only use an extension lead
which is in good condition and is suited to the power of the appliance.
8- Do not leave the cord hanging.
9- Do not unplug the appliance by pulling on the cord.
10- Always unplug the appliance immediately after use ; when moving it ; prior to any cleaning or
maintenance.
C-1 Before the first use
1- Remove all packaging materials.
2- Remove any stickers or labels from the appliance. (Except the rating label!)
3- Thoroughly clean the basket and the pot with hot water, some washing-up liquid and a
non-abrasive sponge.

6
*Note: You can also clean these parts in the dishwasher.
4- Wipe the inside and outside of the appliance with a moist cloth. This appliance works on hot air.
Do not fill the basket with oil or frying fat.
5- Use on a flat and stable, heat resistant work surface, away from any water splashes or any
sources of heat.
6- When in operation, never leave the appliance unattended.
7- This appliance is not designed to be used by people (including children) with a physical,
sensory or mental impairment, or people without knowledge or experience, unless
they are supervised or given prior instructions concerning the use of the appliance by someone
responsible for their safety.
8- Children must be supervised to ensure that they do not play with the appliance.
9- This electrical appliance operates at high temperatures which may cause burns. Do not touch
the hot surfaces of the appliance (pot, air outlet…).
10- Do not switch on the appliance near flammable materials (blinds, curtains…) or close to an
external heat source (gas stove, hot plate…etc.).
11- In the event of fire, never try to extinguish the flames with water. Unplug the appliance. Close
the electric brake, if it is not dangerous to do so. Smother the flames with a damp cloth.
12- Do not move the appliance when it is full of hot food.
13- Never immerse the appliance in water!
CAUTION:
Do not fill the pot with oil or any other liquid.
Do not put anything on top of the appliance.
This disrupts the airflow and affects the hot air frying result.
7
C-2 Using the appliance
The air fryer can be used to prepare a large range of ingredients. The recipe booklet included serves
as a guide to using the appliance better.
Part 1
1- Carefully pull the pot out of the fryer horizontally, and put the ingredients into the basket.
Note: Never fill the basket exceed the amount indicated in the table, as this could affect the
quality of the end result.
2- Slide the pot back into the fryer.
Never use the pot without the basket in it.
Warning: Do not touch the pot during and some time after use, as it gets very hot. Only hold the
pot by the handle.
3- Standby mode: connect the mains plug to an earthed wall socket, then hear chord ringtone
notice, the display will show “----“. After finish cooking or without any operation for 1min, the
fryer will turn to standby mode automatically.
4- Unlock: press “ ” for 3s to unlock, then display will light on“ ”.
5- Temperature setting: Press button 5“” and use button 7“” or 8 “ ” to increase or
decrease the temperature, temperature“±5℃” with every press or long press to the wanted
temperature. *Max: 200℃, Min: 60℃.
6- Time setting: Press button 6“” and use button 7“” or 8 “ ” to adjust the working
time from 10min, time will “±1min” with every press or long press to the wanted time. *Max:
60min, Min: 1min.
7- Start cooking: after finishing setting of temperature and time, then press button 3 “ ” to
start cooking, pre-set temperature and remaining time will shows on display alternately.
8- Adjustable: during cooking, you are able to adjust the temperature and time if wanted.

8
9- Stop/Pause: press button 3 “ ”, the fryer stop working, press again to continue.
10- Finish cooking: when cooking time out, can hear chord ringtone notice, display shows “---”
and stop heating, then turn to standby mode automatically.
11- Fast cooking: press button 3 “ ” to have fast cooking, cooking start with 180℃ and 10min
acquiescently, you can adjust the temperature and time as point 5 & point 6.
12- Pre-set menu function: press “ ” to select the pre-set cooking program from the total 6
programs,press orderly to select each of them.
01 Frozen fries
02 Home Made fries
03 Drumstick
04 Chicken
05 Fish
06 Steak
13- Fast boot functions: press “ ” to select the fast boot function from the total 4 programs,
press orderly to select each of them.
01 Pre-Heat
02 Re-Heat
03 Keep Warm

9
04 De-Frost
14- Always to use Pre-Heat function when the appliance is cold, or you can use Fast Cooking for
3~4 minutes..
15- Some ingredients require shaking halfway through the preparation time. To shake or turn over
the ingredients, pull the pot out of the appliance by the handle and shake it or turn over the
ingredients by fork (or tongs). Then put the pot back into the fryer.
Caution: Do not press the basket release button during shaking or turn over the ingredients.
16- After finishing cooking, pull the pot out of the appliance and place it on a heat-resistant surface.
And check if the ingredients are ready. If the ingredients are not ready yet, simply slide the pot
back into the appliance and set the timer to a few extra minutes.
17- To remove the ingredients, press the basket release button and lift the basket out of the pot.
The frying basket and the ingredients are hot. You can use a fork (or tongs) to take out the
ingredients. To remove large or fragile ingredients, use a pair of tongs to lift the ingredients out
of the basket. Empty the basket into a bowl or onto a plate.
C-3 Secure switch
This appliance is equipped with a secure switch. When pulling the pot out of the fryer during it’s
working, the fryer will stop heating and timer on hold automatic until the pot is put back.
Suggestion: It’s better to pull out the pot not longer than 30s, to make sure the stable temperature
inside the pot to have better result.

10
C-4 Part 2
This table below helps you to select the basic settings for the ingredients you want to prepare,
please refer to the recipe book for more different ingredients.
Note: Keep in mind that these settings are indications. As ingredients differ in origin, size, shape as
well as brand, we cannot guarantee the best setting for your ingredients.
Table : Menu
Type Min to Max
(g)
Time
(mins)
Tem p
(℃) Remark
Frozen chips
200-800 12-26 200 Shake
Home
–made chips
200-800 16-32 180
add 1/2 spoon of oil, Shake
Breadcrumbed
cheese snacks
200-800 8-22 190
Chicken Nuggets
100-800 10-20 200
Fillet of Chicken
200-800 18-30 200 Turn over if needed
Drumsticks
200-800 20-30 180 Turn over if needed
Steak
200-800 8-16 180 Turn over if needed
Pork chops
200-800 10-22 180 Turn over if needed
Hamburger
200-800 12-30 180 add 1/2 spoon of oil
Frozen fish fingers
100-800 6-17 200 add 1/2 spoon of oil
Cup cake
8 units 15-18 200

11
C-5 Tips for cooking
1- Smaller ingredients usually require a slightly shorter preparation time than larger ingredients.
2- A larger amount of ingredients only requires a slightly longer preparation time, a smaller amount
of ingredients only requires a slightly shorter preparation time.
3- Shaking smaller ingredients halfway through the preparation time optimises the end result and
can help prevent unevenly fried ingredients.
4- Add some oil to fresh potatoes for a crispy result. Fry your ingredients in the fryer within a few
minutes after you added the oil.
5- Do not prepare extremely greasy ingredients such as sausages in the fryer.
6- Snacks that can be prepared in an oven can also be prepared in the fryer.
7- The optimal amount for preparing crispy fries is 500 grams.
8- Use pre-made dough to prepare filled snacks quickly and easily. Pre-made dough also requires a
shorter preparation time than home-made dough.
9- You can also use the fryer to reheat ingredients. To reheat ingredients, set the temperature to
150°C/302℉ for up to 10 minutes.
D-1 Care & Cleaning
Clean the appliance after every use.
The pot, basket and grill net(optional) have a coating. Do not use metal kitchen utensils or abrasive
cleaning materials to clean them, as this may damage the coating.
1- Remove the mains plug from the wall socket and let the appliance cool down.
Note: Remove the pot to let the fryer cool down more quickly.
2- Wipe the outside of the appliance with a moist cloth.
3- Clean the pot, basket with hot water, some washing-up liquid and a non-abrasive sponge. You
can use a degreasing liquid to remove any remaining dirt.
Note: The pot and basket are dishwasher-proof.
Tip: If dirt is stuck to the basket, or the bottom of the pot, fill the pot with hot water with some

12
washing-up liquid. Put the basket in the pot and let the pot and the basket soak for approximately 10
minutes.
4- Clean the inside of the appliance with hot water and a non-abrasive sponge.
5- Clean the heating element with a cleaning brush to remove any food residues.
6- Make sure all parts are clean and dry.
7- Remove the power cord and store it with the fryer.
E-1 SPECIFICATION:
MODEL: MAF-06
Rated voltage: 220-240V
Rated frequency: 50-60Hz
Rated input power: 1700W
13
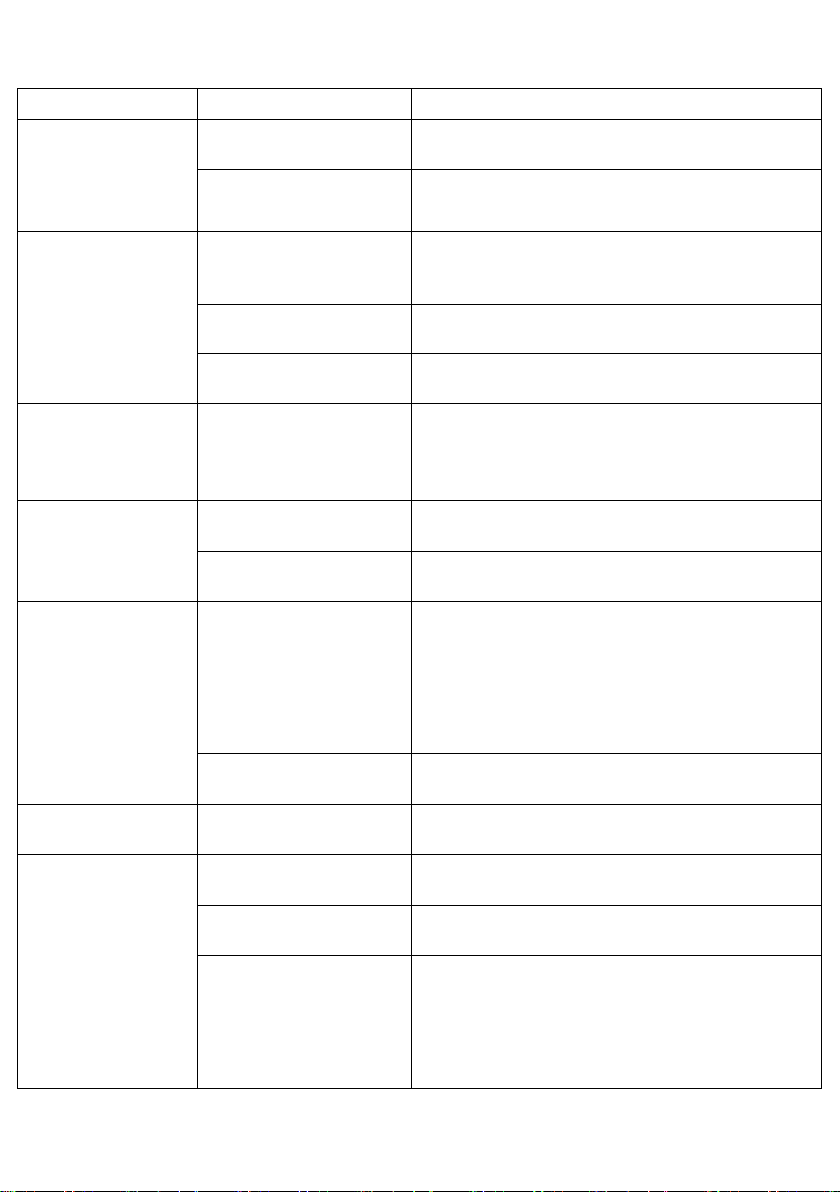
Troubleshooting Guide
Problem
Potential Cause
Possible Solution
The Air Fryer will not
turn ON
The Air Fryer is not
plugged in correctly.
Plug the Air Fryer in to the mains power source and
switch ON.
A circuit breaker has been
tripped. Check and reset the circuit breaker.
The food has not been
cooked thoroughly
Food capacity has been
exceeded.
Remove some of the food and cook again in separate
batches. This will cook food more evenly and
thoroughly.
The temperature was set
too low.
Manually increase set temperature.
The cooking time was not
long enough.
Manually increase set cooking time.
The food has been
cooked unevenly
Certain types of food may
need to be shaken mid-way
through the cooking
process.
Refer to the cooking guidelines section and if require
shake food mid-way through the cooking process.
The Pan Assembly
will not slide back into
the housing properly
Too much food in the
basket.
If there is too much food in the basket, please remove
some of the food and retry.
Pan not aligned correctly. Correctly align the pot with the grooves located on the
inside of the Air Fryer housing.
White smoke is being
emitted during
cooking
The food contained within
may be quite greasy or
fatty.
Greasy or fatty food will emit fat/oil into the pot of the Air
Fryer and when heated it may emit a white smoke. Try
to avoid cooking greasy/fatty foods in the Air Fryer. The
white smoke does not affect the cooking process.
The pot may still contain
fat/oil from previous use.
Ensure that the pot is thoroughly cleaned after each
use.
Chips are not cooking
evenly in the Fryer
Chips were not rinsed
adequately before cooking.
Rinse chips thoroughly (to remove starch) and allow
them to dry before cooking.
Chips are not crispy
There may be a lack of oil
or too much water.
Ensure chips are dried after rinsing with water. Possibly
add a little more oil to the chips before cooking.
Chip size may be too large. Try cutting the potato into smaller pieces for a crispier
result.
You may be using incorrect
type of potato.
When making home-made chips/fries, the best type of
potato to use are the floury varieties (Kennebec, King
Edward, Golden Delight or Sebago).
14
A-1 Giới thiệu sản phẩm
1. Màn hình LED 2. Bảng điều khiển cảm ứng 3. Thân máy
4. Chụp nút tháo rổ 5. Nút tháo rổ 6. Tay nắm rổ
7. Dây cấp nguồn 8. Đường thoát không khí và lọc dầu 9. Đường không khí vào
10.Rổ chiên 11. Nồi chiên
A-2 Bảng điều khiển cảm ứng
Đánh giá nhanh, chuyển sang phần “C-1” để xem chi tiết vận hành.
15
Chạm vào các phím điều khiển cảm ứng (Có thể vận hành) 1 → 8
1:- Chức năng nấu được cài đặt sẵn
2:- Mở/Tắt nguồn (nhấn 1 lần để Mở/Tắt nguồn)
3:- Bắt đầu / Tạm dừng
4:- Chức năng khởi động nhanh
5:- Phím điều chỉnh nhiệt độ
6: - Phím điều chỉnh thời gian
7: - Tăng nhiệt độ (nhấn / 5 ℃ hoặc 10 ℉) hoặc thời gian (nhấn / 1 phút)
8: - Giảm nhiệt độ (nhấn / 5 ℃ hoặc 10 ℉) hoặc thời gian (nhấn / 1 phút)

16
Các biểu tượng chỉ báo (Không thể vận hành) ①→⑤ :
①: - Biểu tượng nhiệt độ (nhấn phím 5, khi đèn sáng, sử dụng phím 7 và 8
để điều chỉnh nhiệt độ).
②:- Để chỉ báo nhiệt độ lựa chọn / nhiệt độ làm việc hoặc thời gian lựa chọn / thời
gian nấu.
③:- Biểu tượng thời gian (nhấn phím 6, khi đèn sáng, sử dụng phím 7 và 8 để điều
chỉnh thời gian).
④:- Các biểu tượng cài đặt sẵn (nhấn phím 1 để lựa chọn từng menu nấu, khi đèn
sáng nghĩa là menu đó đã được lựa chọn).
⑤:
khi đèn
- Biểu tượng chức năng khởi động nhanh (nhấn phím 4 để lựa chọn từng chức năng,
Nguy hiểm:
nghĩa là menu đó đã được lựa chọn).
- Không để các bộ phận điện hoặc các bộ phận nhiệt ngâm trong nước cũng như
rửa dưới vòi nước.
- Tránh các chất lỏng xâm nhập vào bên trong thiết bị để ngăn ngừa điện giật hoặc
ngắn mạch.
- Giữ các thành phần trong rổ hoặc ngăn chặn bất kỳ tiếp xúc từ các yếu tố làm
nóng.
- Không che đậy cửa vào và thoát khí khi thiết bị đang hoạt động.
- Không đổ dầu vào nồi vì có thể gây hỏa hoạn.
- Không chạm vào bên trong thiết bị khi thiết bị đang hoạt động.

17
B-1 Cảnh báo
1- Vì sự an toàn của bạn, thiết bị này tuân thủ các quy định và chỉ thị an toàn có hiệu lực tại thời
điểm sản xuất. (Chỉ thị điện áp thấp, Tương thích điện từ, Quy định về vật liệu tiếp xúc với thực
phẩm, môi trường…)
2- Kiểm tra điện áp nguồn tương ứng với điện áp được nêu trên thiết bị (dòng điện xoay chiều).
3- Với các tiêu chuẩn đa dạng có hiệu lực, nếu thiết bị được sử dụng ở một quốc gia khác ngoài
quốc gia đã mua, hãy kiểm tra bởi trung tâm dịch vụ được phê duyệt.
4- Thiết bị này được thiết kế chỉ để sử dụng trong nước, trong trường hợp sử dụng chuyên
nghiệp, sử dụng không phù hợp hoặc không tuân thủ các hướng dẫn, nhà sản xuất không chịu
trách nhiệm và bảo hành bị vô hiệu hóa.
5- Đọc và làm theo hướng dẫn sử dụng. Giữ chúng để sử dụng trong tương lai.
6- Không vận hành bất kỳ thiết bị nào có dây hoặc phích cắm bị hỏng hoặc sau khi thiết bị gặp
trục trặc, hoặc bị rơi hoặc hư hỏng theo bất kỳ cách nào. Trả lại thiết bị cho nơi bạn đã mua
hàng. Không tự ý tháo rời thiết bị.
7- Không sử dụng cầu chì mở rộng. Nếu bạn chịu trách nhiệm cho việc đó, chỉ sử dụng dây dẫn
mở rộng trong tình trạng tốt và phù hợp với công suất của thiết bị.
8- Không để dây điện ở trạng thái treo.
9- Không rút phích cắm bằng cách kéo dây.
10- Luôn rút phích cắm thiết bị ngay sau khi sử dụng; khi di chuyển, trước khi vệ sinh hoặc bảo
trì.
C-1 Trước khi sử dụng lần đầu tiên
1- Tháo tất cả các vật liệu bao gói.
2- Tháo các nhãn dán từ thiết bị. (Trừ tem thông số)
3- Làm sạch toàn bộ rổ và nồi bằng nước nóng, một ít nước xà phòng và bọt biển không mài
mòn.

18
*Lưu ý: Bạn cũng có thể làm sạch các bộ phận bằng máy rửa chén.
4- Lau bên trong và bên ngoài thiết bị bằng khăn ẩm. Thiết bị này hoạt động dựa trên không khí
nóng. Không đổ đầy rổ với dầu hoặc mỡ chiên.
5- Sử dụng trên bề mặt làm việc bằng phẳng và ổn định, chịu nhiệt, tránh xa nguồn nước và
nguồn nhiệt.
6- Khi vận hành, không bao giờ để thiết bị ngoài tầm kiểm soát.
7- Thiết bị này không được thiết kế để sử dụng cho những người (bao gồm trẻ em) bị suy yếu về
thể chất, cảm giác hoặc tinh thần hoặc những người không có kiến thức hoặc kinh nghiệm, trừ khi
họ được giám sát hoặc đưa ra hướng dẫn trước về việc sử dụng thiết bị bởi người chịu trách
nhiệm cho sự an toàn của họ.
8- Trẻ em phải được giám sát để đảm bảo rằng chúng không chơi với thiết bị.
9- Thiết bị này hoạt động ở nhiệt độ cao, do đó có thể gây phỏng. Không chạm vào bề mặt nóng
của thiết bị (nồi, lỗ thông hơi,...)
10- Không bật thiết bị khi đặt gần các vật liệu dễ cháy (rèm, màn cửa,...) hoặc gần các
nguồn nhiệt bên ngoài (bếp gas, nơi có nhiệt độ cao,...)
11- Trong trường hợp hỏa hoạn, không cố gắng dập tắt ngọn lửa bằng nước. Rút phích cắm của
thiết bị. Đóng cầu dao điện, nếu không làm như vậy nguy hiểm sẽ xảy ra. Dập tắt ngọn lửa bằng
vải ẩm.
12- Không di chuyển thiết bị khi nó đầy thức ăn nóng.
13- Không ngâm thiết bị trong nước!
THẬN TRỌNG: Không đổ dầu hoặc bất kỳ các chất lỏng nào khác vào nồi.
Không đặt bất kỳ vật gì lên trên thiết bị.
Điều này làm cản trở và giảm hiệu quả của việc làm nóng không khí.

19
C-2 Sử dụng thiết bị
Nồi chiên không dầu có thể được sử dụng để chuẩn bị một loạt thức ăn. Sổ tay công thức giúp
phục vụ cho việc sử dụng thiết bị một cách tốt hơn.
Phần 1
1- Cẩn thận kéo nồi ra khỏi nồi chiên theo chiều ngang, và đặt thức ăn vào rổ.
Lưu ý: không đặt thức ăn quá số lượng được quy định trong bảng vì điều này có thể làm
ảnh hưởng đến chất lượng cuối cùng của món ăn.
2- Trượt nồi lại vào trong nồi chiên.
Không bao giờ được sử dụng nồi khi không có rổ bên trong.
Cảnh báo: Không chạm vào nồi trong một khoảng thời gian sau khi vừa mới sử dụng, vì nó
rất nóng, chỉ giữ nồi bằng tay nắm.
3- Chế độ chờ: kết nối nguồn điện chính với dây nối đất, sau đó nghe thông báo chuông,
màn hình sẽ hiển thị "---" . Sau khi nấu xong hoặc không có thao tác nào trong vòng 1 phút,
nồi chiên sẽ tự động chuyển sang chế độ chờ.
4- Mở nguồn: nhấn “ ” trong 3 giây để mở khóa, sau đó màn hình sẽ sáng đèn.
5- Cài đặt nhiệt độ: Nhấn phím 5“ ” và sử dụng phím 7 “ ” hoặc 8 “ ” để tăng
hoặc giảm nhiệt độ, nhiệt độ“±5℃” với mỗi lần nhấn hoặc nhấn giữ đến nhiệt độ mong muốn.
*Tối đa: 200℃, Tối thiểu: 60℃.
6- Cài đặt thời gian: Nhấn phím 6 “ ” và sử dụng phím 7 “ ” hoặc 8 “ ” để
điều chỉnh thời gian làm việc từ 10 phút, thời gian “±1 phút” với mỗi lần nhấn hoặc nhấn giữ đến
thời gian mong muốn. *Tối đa: 60 phút, Tối thiểu: 1 phút.
7- Bắt đầu nấu: sau khi cài đặt nhiệt độ và thời gian, sau đó nhấn phím 3 “ ” để bắt đầu nấu,
nhiệt độ đã cài đặt và thời gian còn lại sẽ hiển thị trên màn hình.
8- Điều chỉnh: trong khi nấu, bạn có thể điều chỉnh nhiệt độ và thời gian nếu muốn.

20
9- Dừng/Tạm dừng: nhấn phím 3 “ ”, nồi chiên tạm dừng, nhấn lần nữa để hoạt động trở lại.
10- Kết thúc nấu: khi hết thời gian nấu, có thể nghe thấy âm thanh thông báo, màn hình hiển thị "---"
và dừng làm nóng, sau đó tự động chuyển sang chế độ chờ.
11- Nấu nhanh: nhấn phím 3 “ ” để nấu nhanh, bắt đầu với 200℃ và 10 phút một cách nhanh
chóng, bạn có thể điều chỉnh nhiệt độ và thời gian như ở điểm 5 và điểm 6.
12- Chức năng menu được cài đặt sẵn: nhấn “ ” để lựa chọn chương trình từ tất cả 6
chương trình, nhấn theo thứ tự để chọn chương trình.
01 Khoai tây đông lạnh
02 Khoai tây tươi
03 Đùi tỏi gà
04 Gà
05 Cá
06 Thịt miếng
13- Chức năng khởi động nhanh: nhấn “ ”để lựa chọn chương trình từ tất cả 4 chương
trình, nhấn theo thứ tự để chọn chương trình.
01 Làm nóng trước
02 Làm nóng lại
03 Giữ ấm
Table of contents
Languages:
Other Malloca Fryer manuals


