Buffalo f/1.0L USM User manual

Friteuse
Handleiding
Friteuse
Mode d'emploi
Fritteuse
Bedienungsanleitung
Friggitrice
Manuale di istruzioni
Freidora
Manual de instrucciones
Fritadeira
Manual de instruções
Fritös
Bruksanvisning
Frituresteger
Instruktionsvejledning
Stekegryte
Brukerhåndbok
Rasvakeitin
Ohjekirja
NL
FR
DE
IT
ES
PT
S
DK
N
FIN
Fryer
Instruction manual
Model •Modèle •Modell •Modello •Modelo •Malli:
L370/P107/L484/L485/L490/L495/L300/L301

Table of Contents
Safety Tips . . . . . . . . . . . . . . . . . . . . . . . . . . . . . . . . . . . . . . . . . . . . . . . . . . . . . . . . . . . . . . . . . 1
Product Description . . . . . . . . . . . . . . . . . . . . . . . . . . . . . . . . . . . . . . . . . . . . . . . . . . . . . . . . . 1
Introduction . . . . . . . . . . . . . . . . . . . . . . . . . . . . . . . . . . . . . . . . . . . . . . . . . . . . . . . . . . . . . . . . 1
Pack Contents . . . . . . . . . . . . . . . . . . . . . . . . . . . . . . . . . . . . . . . . . . . . . . . . . . . . . . . . . . . . . . 1
Operation . . . . . . . . . . . . . . . . . . . . . . . . . . . . . . . . . . . . . . . . . . . . . . . . . . . . . . . . . . . . . . . . . 2
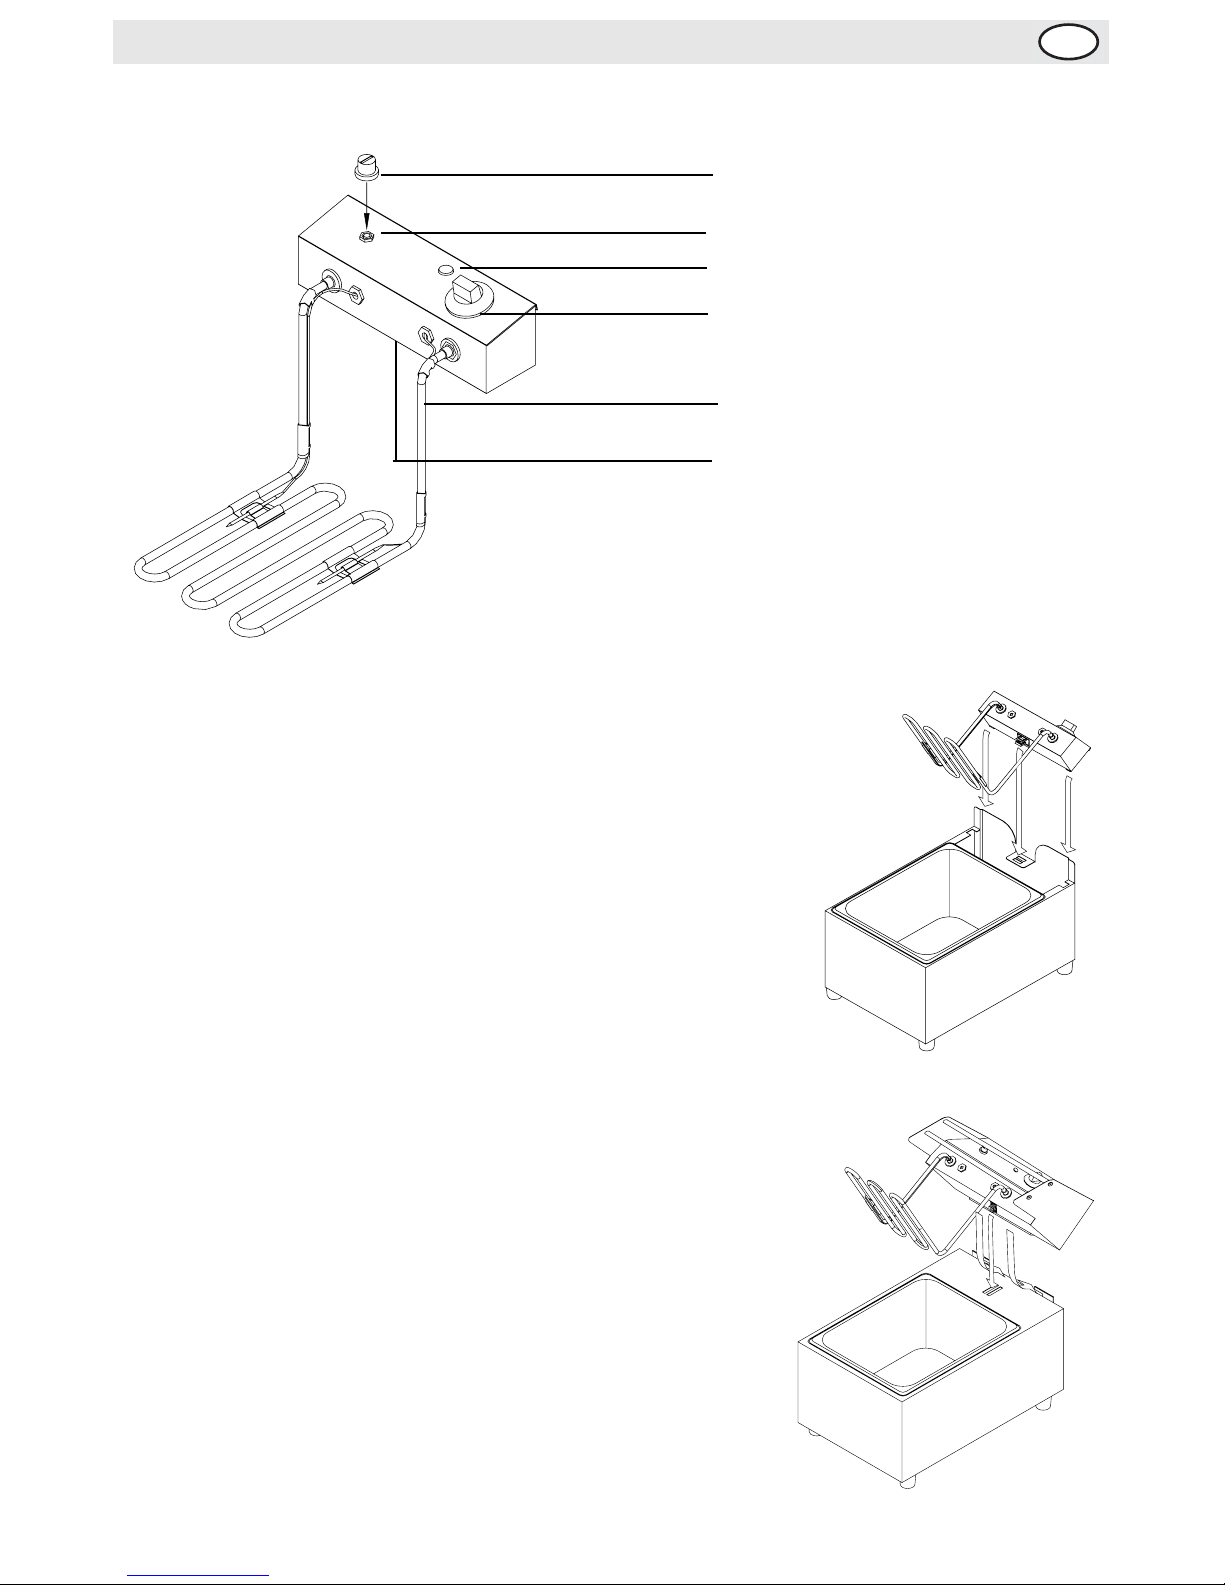
Connecting the Element/Control Panel (L370/P107/L484/L485) . . . . . . . . . . . . . . . . 2
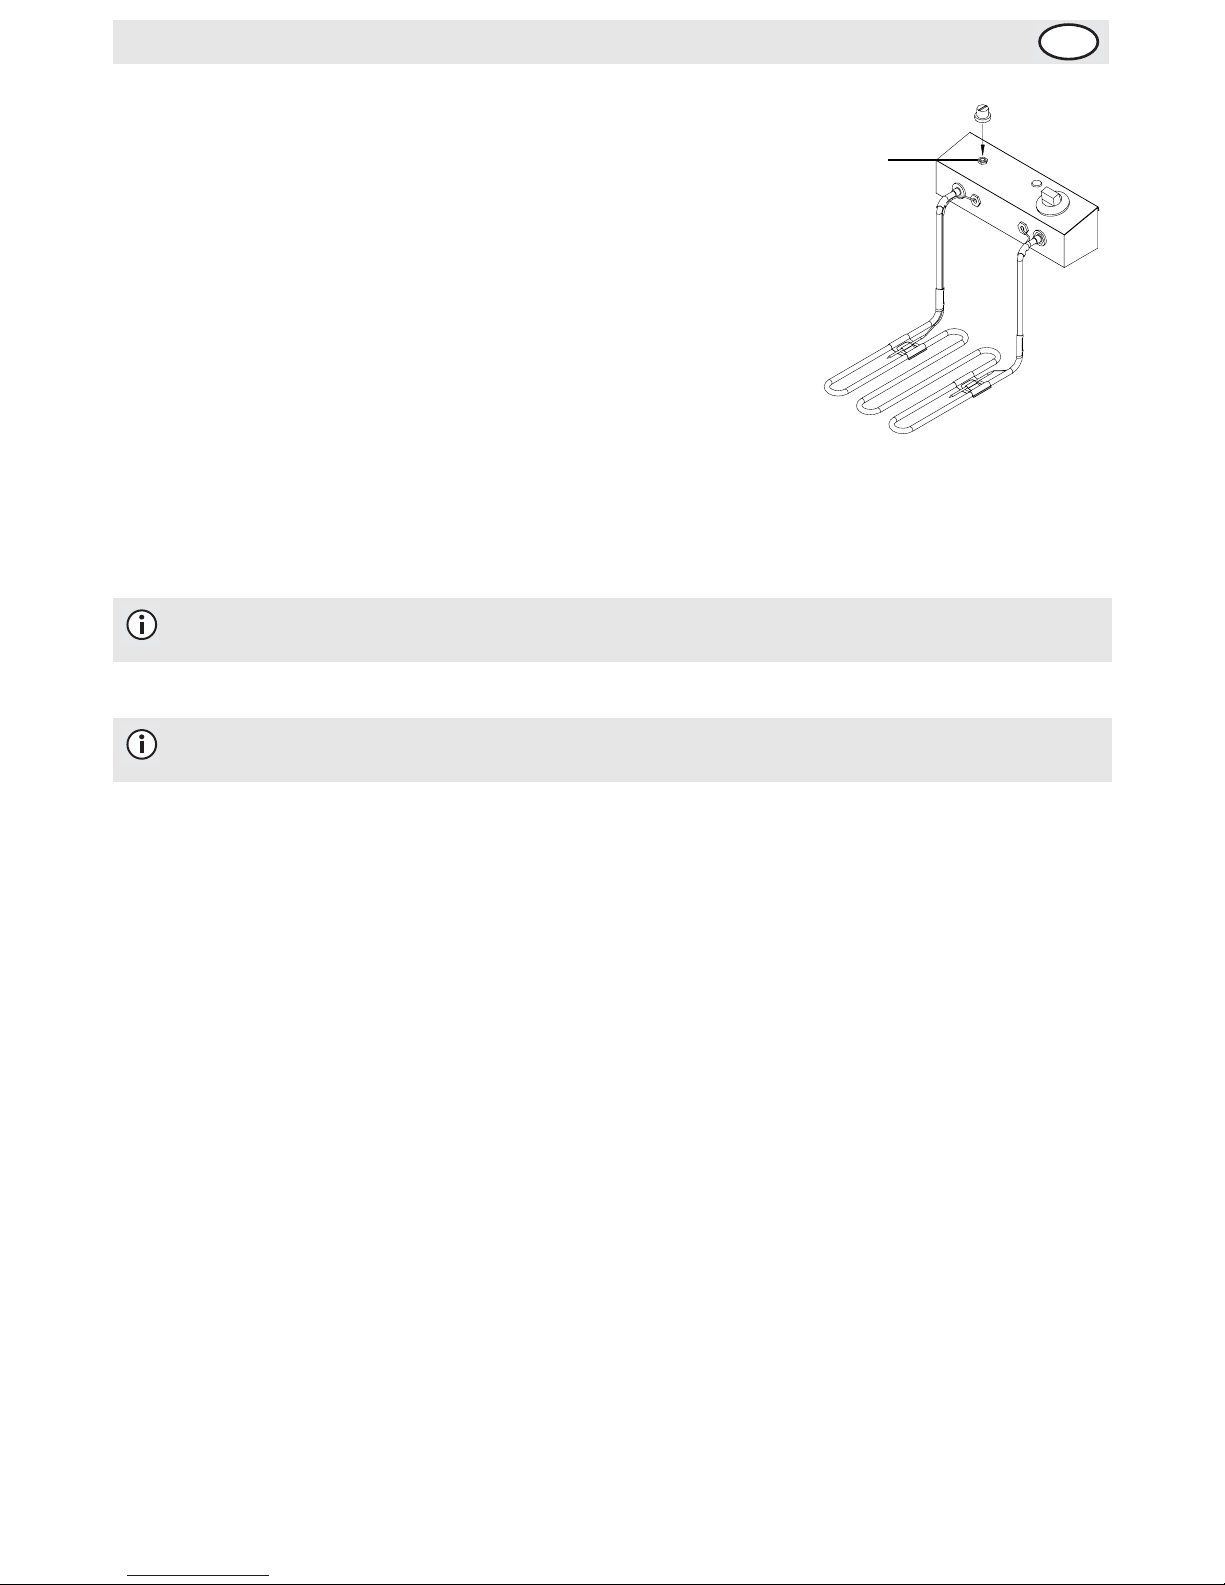
Connecting the Element/Control Panel (L490/L495/L300/L301). . . . . . . . . . . . . . . . . 2
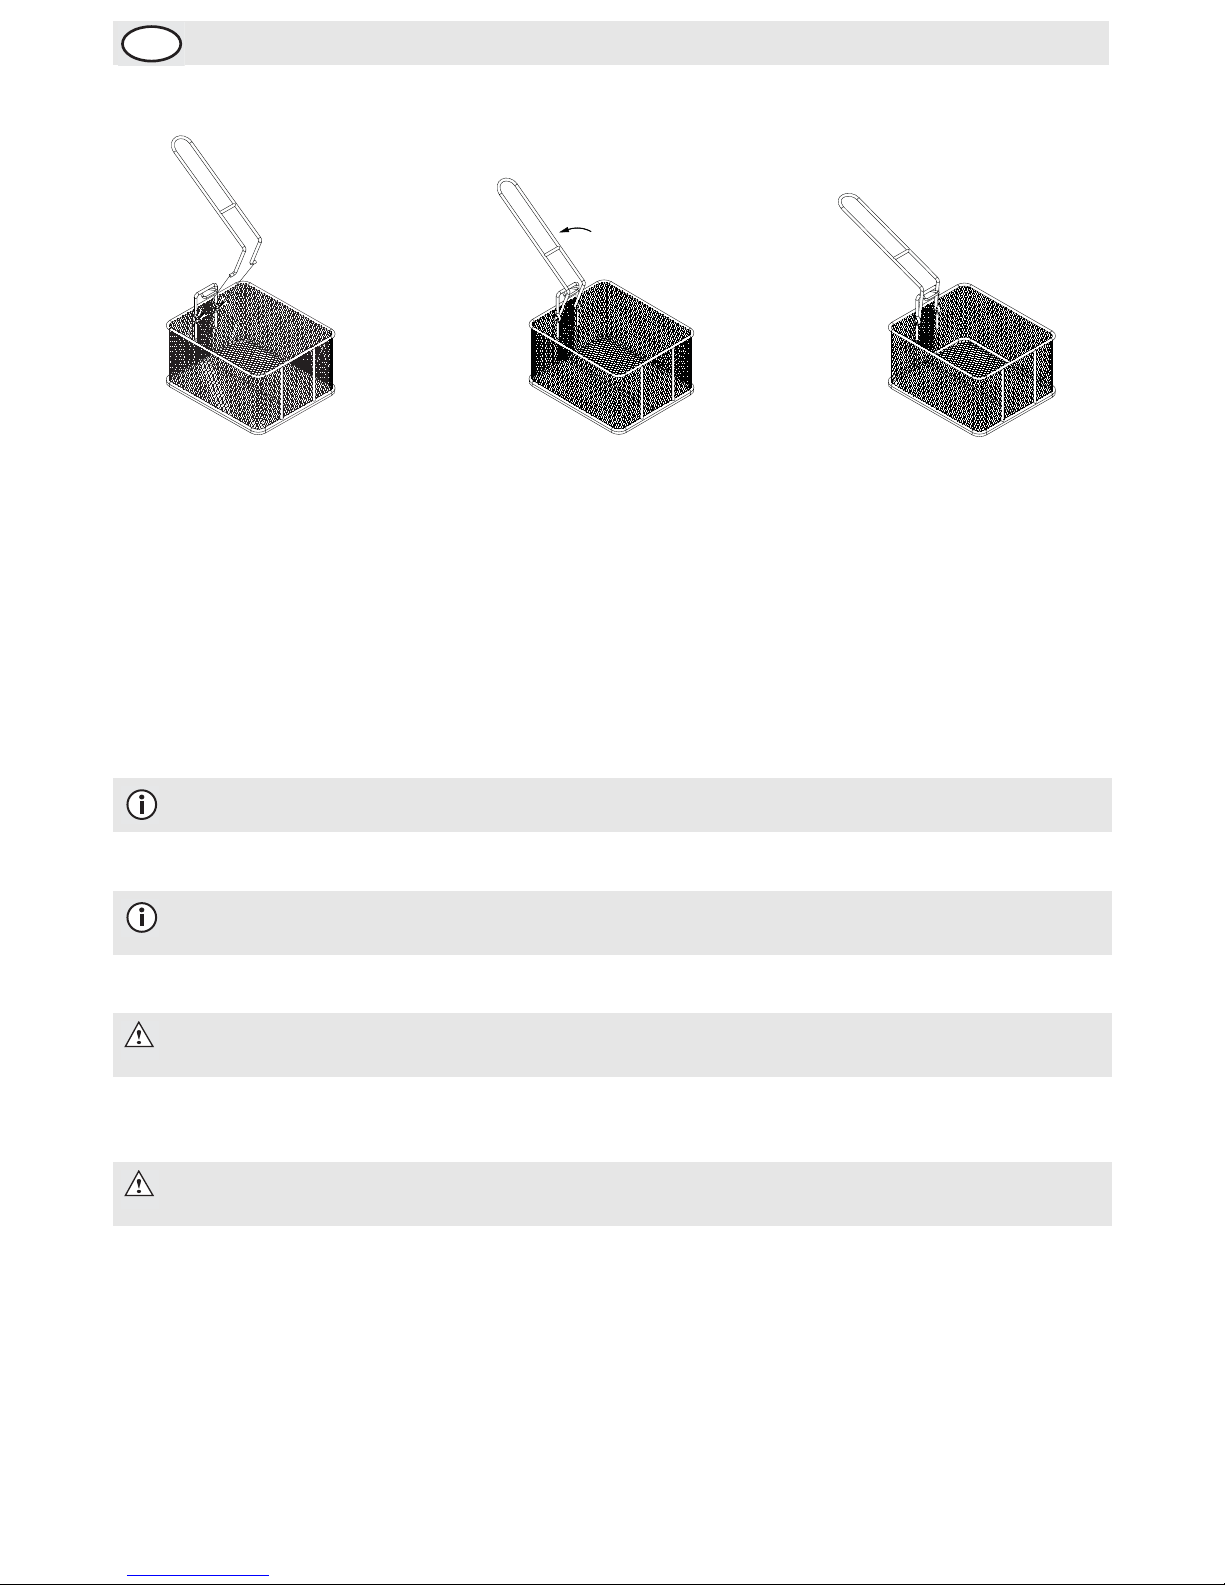
Connecting the Basket Handle (L370/P107/L484/L485) . . . . . . . . . . . . . . . . . . . . . . . 3
Cooking . . . . . . . . . . . . . . . . . . . . . . . . . . . . . . . . . . . . . . . . . . . . . . . . . . . . . . . . . . . . . 3
Thermal Cut-Out Reset . . . . . . . . . . . . . . . . . . . . . . . . . . . . . . . . . . . . . . . . . . . . . . . . 4
Cleaning, Care & Maintenance . . . . . . . . . . . . . . . . . . . . . . . . . . . . . . . . . . . . . . . . . . . . . . . . . 4
Troubleshooting . . . . . . . . . . . . . . . . . . . . . . . . . . . . . . . . . . . . . . . . . . . . . . . . . . . . . . . . . . . . 5
Technical Specifications . . . . . . . . . . . . . . . . . . . . . . . . . . . . . . . . . . . . . . . . . . . . . . . . . . . . . . . 5
Electrical Wiring . . . . . . . . . . . . . . . . . . . . . . . . . . . . . . . . . . . . . . . . . . . . . . . . . . . . . . . . . . . . 6
Compliance . . . . . . . . . . . . . . . . . . . . . . . . . . . . . . . . . . . . . . . . . . . . . . . . . . . . . . . . . . . . . . . . 6
Inhoudsopgave
Veiligheidstips . . . . . . . . . . . . . . . . . . . . . . . . . . . . . . . . . . . . . . . . . . . . . . . . . . . . . . . . . . . . . . 7
Productbeschrijving . . . . . . . . . . . . . . . . . . . . . . . . . . . . . . . . . . . . . . . . . . . . . . . . . . . . . . . . . . 7
Inleiding . . . . . . . . . . . . . . . . . . . . . . . . . . . . . . . . . . . . . . . . . . . . . . . . . . . . . . . . . . . . . . . . . . . 7
Verpakkingsinhoud . . . . . . . . . . . . . . . . . . . . . . . . . . . . . . . . . . . . . . . . . . . . . . . . . . . . . . . . . . 7
Werking . . . . . . . . . . . . . . . . . . . . . . . . . . . . . . . . . . . . . . . . . . . . . . . . . . . . . . . . . . . . . . . . . . . 8
Element/bedieningspaneel aansluiten (L370/P107/L484/L485) . . . . . . . . . . . . . . . . . . 8
Element/bedieningspaneel aansluiten (L490/L495/L300/L301) . . . . . . . . . . . . . . . . . . . 9
Friteusehandvat bevestigen (L370/P107/L484/L485)) . . . . . . . . . . . . . . . . . . . . . . . . . 9
Koken . . . . . . . . . . . . . . . . . . . . . . . . . . . . . . . . . . . . . . . . . . . . . . . . . . . . . . . . . . . . . . 9
Thermische uitschakelingsschakelaar . . . . . . . . . . . . . . . . . . . . . . . . . . . . . . . . . . . . . . 10
Reiniging, zorg & onderhoud . . . . . . . . . . . . . . . . . . . . . . . . . . . . . . . . . . . . . . . . . . . . . . . . . . . 10
Oplossen van problemen . . . . . . . . . . . . . . . . . . . . . . . . . . . . . . . . . . . . . . . . . . . . . . . . . . . . . 11
Technische specificaties . . . . . . . . . . . . . . . . . . . . . . . . . . . . . . . . . . . . . . . . . . . . . . . . . . . . . . . 11
Elektrische bedrading . . . . . . . . . . . . . . . . . . . . . . . . . . . . . . . . . . . . . . . . . . . . . . . . . . . . . . . . 12
Productconformiteit. . . . . . . . . . . . . . . . . . . . . . . . . . . . . . . . . . . . . . . . . . . . . . . . . . . . . . . . . . 12
Sommaire
Conseils de sécurité . . . . . . . . . . . . . . . . . . . . . . . . . . . . . . . . . . . . . . . . . . . . . . . . . . . . . . . . . 13
Description du produit . . . . . . . . . . . . . . . . . . . . . . . . . . . . . . . . . . . . . . . . . . . . . . . . . . . . . . . 13
iNTRODUCTION . . . . . . . . . . . . . . . . . . . . . . . . . . . . . . . . . . . . . . . . . . . . . . . . . . . . . . . . . . . 13
Contenu de l'emballage . . . . . . . . . . . . . . . . . . . . . . . . . . . . . . . . . . . . . . . . . . . . . . . . . . . . . . . 14
Operation . . . . . . . . . . . . . . . . . . . . . . . . . . . . . . . . . . . . . . . . . . . . . . . . . . . . . . . . . . . . . . . . . 14
Montage de l'ensemble Élément chauffant & Panneau de commande
(L370/P107/L484/L485) . . . . . . . . . . . . . . . . . . . . . . . . . . . . . . . . . . . . . . . . . . . . . . . . 14
Montage de l'ensemble Élément chauffant & Panneau de commande
(L490/L495/L300/L301) . . . . . . . . . . . . . . . . . . . . . . . . . . . . . . . . . . . . . . . . . . . . . . . . . 15
Montage de la poignée du panier (L370/P107/L484/L485) . . . . . . . . . . . . . . . . . . . . . 15
Cuisson . . . . . . . . . . . . . . . . . . . . . . . . . . . . . . . . . . . . . . . . . . . . . . . . . . . . . . . . . . . . . 15
Coupe-circuit thermique . . . . . . . . . . . . . . . . . . . . . . . . . . . . . . . . . . . . . . . . . . . . . . . 16
Nettoyage, entretien et maintenance . . . . . . . . . . . . . . . . . . . . . . . . . . . . . . . . . . . . . . . . . . . . 16
Dépannage . . . . . . . . . . . . . . . . . . . . . . . . . . . . . . . . . . . . . . . . . . . . . . . . . . . . . . . . . . . . . . . . . 17
Spécifications techniques . . . . . . . . . . . . . . . . . . . . . . . . . . . . . . . . . . . . . . . . . . . . . . . . . . . . . . 17
Raccordement électrique . . . . . . . . . . . . . . . . . . . . . . . . . . . . . . . . . . . . . . . . . . . . . . . . . . . . . 18
Conformité . . . . . . . . . . . . . . . . . . . . . . . . . . . . . . . . . . . . . . . . . . . . . . . . . . . . . . . . . . . . . . . . . 18
UK
NL
FR

Inhalt
Sicherheitshinweise . . . . . . . . . . . . . . . . . . . . . . . . . . . . . . . . . . . . . . . . . . . . . . . . . . . . . . . . . . 19
Produktbeschreibung . . . . . . . . . . . . . . . . . . . . . . . . . . . . . . . . . . . . . . . . . . . . . . . . . . . . . . . . . 19
Einführung . . . . . . . . . . . . . . . . . . . . . . . . . . . . . . . . . . . . . . . . . . . . . . . . . . . . . . . . . . . . . . . . . 19
Lieferumfang . . . . . . . . . . . . . . . . . . . . . . . . . . . . . . . . . . . . . . . . . . . . . . . . . . . . . . . . . . . . . . . 20
Betrieb . . . . . . . . . . . . . . . . . . . . . . . . . . . . . . . . . . . . . . . . . . . . . . . . . . . . . . . . . . . . . . . . . . . . 20
Heizelement/Bedienungsfeld anschließen (L370/P107/L484/L485) . . . . . . . . . . . . . . . 20
Heizelement/Bedienungsfeld anschließen (L490/L495/L300/L301). . . . . . . . . . . . . . . . 21
Korbgriff anbringen (L370/P107/L484/L485) . . . . . . . . . . . . . . . . . . . . . . . . . . . . . . . . 21
Frittieren . . . . . . . . . . . . . . . . . . . . . . . . . . . . . . . . . . . . . . . . . . . . . . . . . . . . . . . . . . . . 21
Reset nach Notstopp . . . . . . . . . . . . . . . . . . . . . . . . . . . . . . . . . . . . . . . . . . . . . . . . . . 22
Reinigung, Pflege und Wartung . . . . . . . . . . . . . . . . . . . . . . . . . . . . . . . . . . . . . . . . . . . . . . . . . 22
Störungssuche . . . . . . . . . . . . . . . . . . . . . . . . . . . . . . . . . . . . . . . . . . . . . . . . . . . . . . . . . . . . . . 23
Technische Spezifikationen . . . . . . . . . . . . . . . . . . . . . . . . . . . . . . . . . . . . . . . . . . . . . . . . . . . . 23
Elektroanschlüsse . . . . . . . . . . . . . . . . . . . . . . . . . . . . . . . . . . . . . . . . . . . . . . . . . . . . . . . . . . . 24
Konformität . . . . . . . . . . . . . . . . . . . . . . . . . . . . . . . . . . . . . . . . . . . . . . . . . . . . . . . . . . . . . . . . 24
Indice
Suggerimenti per la sicurezza . . . . . . . . . . . . . . . . . . . . . . . . . . . . . . . . . . . . . . . . . . . . . . . . . . 25
Descrizione del prodotti . . . . . . . . . . . . . . . . . . . . . . . . . . . . . . . . . . . . . . . . . . . . . . . . . . . . . . 25
Introduzione . . . . . . . . . . . . . . . . . . . . . . . . . . . . . . . . . . . . . . . . . . . . . . . . . . . . . . . . . . . . . . . 25
Contenuto della confezione . . . . . . . . . . . . . . . . . . . . . . . . . . . . . . . . . . . . . . . . . . . . . . . . . . . 26
Funzionamento . . . . . . . . . . . . . . . . . . . . . . . . . . . . . . . . . . . . . . . . . . . . . . . . . . . . . . . . . . . . . 26
Collegamento dell'elemento/pannello di controllo (L370/P107/L484/L485) . . . . . . . 26
Collegamento dell'elemento/pannello di controllo l (L490/L495/L300/L301) . . . . . . . 27
Collegamento dell'impugnatura del cestello (L370/P107/L484/L485) . . . . . . . . . . . . . 27
Cottura . . . . . . . . . . . . . . . . . . . . . . . . . . . . . . . . . . . . . . . . . . . . . . . . . . . . . . . . . . . . . 27
Blocco termico . . . . . . . . . . . . . . . . . . . . . . . . . . . . . . . . . . . . . . . . . . . . . . . . . . . . . . . 28
Pulizia e manutenzione . . . . . . . . . . . . . . . . . . . . . . . . . . . . . . . . . . . . . . . . . . . . . . . . . . . . . . . 28
Risoluzione dei problemi . . . . . . . . . . . . . . . . . . . . . . . . . . . . . . . . . . . . . . . . . . . . . . . . . . . . . . 29
Specifiche tecniche . . . . . . . . . . . . . . . . . . . . . . . . . . . . . . . . . . . . . . . . . . . . . . . . . . . . . . . . . . 29
Cablaggi elettrici . . . . . . . . . . . . . . . . . . . . . . . . . . . . . . . . . . . . . . . . . . . . . . . . . . . . . . . . . . . . 30
Conformità . . . . . . . . . . . . . . . . . . . . . . . . . . . . . . . . . . . . . . . . . . . . . . . . . . . . . . . . . . . . . . . . . 30
Índice
Consejos de Seguridad . . . . . . . . . . . . . . . . . . . . . . . . . . . . . . . . . . . . . . . . . . . . . . . . . . . . . . . 31
Descripción del Producto . . . . . . . . . . . . . . . . . . . . . . . . . . . . . . . . . . . . . . . . . . . . . . . . . . . . . 31
Introducción . . . . . . . . . . . . . . . . . . . . . . . . . . . . . . . . . . . . . . . . . . . . . . . . . . . . . . . . . . . . . . . 31
Contenido del Conjunto . . . . . . . . . . . . . . . . . . . . . . . . . . . . . . . . . . . . . . . . . . . . . . . . . . . . . . 32
Funcionamiento . . . . . . . . . . . . . . . . . . . . . . . . . . . . . . . . . . . . . . . . . . . . . . . . . . . . . . . . . . . . . 32
Conexión del Elemento/Panel de control (L370/P107/L484/L485) . . . . . . . . . . . . . . . 32
Collegamento dell'elemento/pannello di controllo (L490/L495/L300/L301) . . . . . . . . 33
Conexión del mango de la cesta (L370/P107/L484/L485) . . . . . . . . . . . . . . . . . . . . . . 33
Cocción . . . . . . . . . . . . . . . . . . . . . . . . . . . . . . . . . . . . . . . . . . . . . . . . . . . . . . . . . . . . . 33
Reinicio del corte térmico . . . . . . . . . . . . . . . . . . . . . . . . . . . . . . . . . . . . . . . . . . . . . . 34
Limpieza, Cuidado y Mantenimiento . . . . . . . . . . . . . . . . . . . . . . . . . . . . . . . . . . . . . . . . . . . . . 34
Resolución de problemas . . . . . . . . . . . . . . . . . . . . . . . . . . . . . . . . . . . . . . . . . . . . . . . . . . . . . 35
Especificaciones Técnicas . . . . . . . . . . . . . . . . . . . . . . . . . . . . . . . . . . . . . . . . . . . . . . . . . . . . . 35
Cableado Eléctrico . . . . . . . . . . . . . . . . . . . . . . . . . . . . . . . . . . . . . . . . . . . . . . . . . . . . . . . . . . 36
Cumplimiento . . . . . . . . . . . . . . . . . . . . . . . . . . . . . . . . . . . . . . . . . . . . . . . . . . . . . . . . . . . . . . 36
DE
IT
ES

Índice
Conselhos de segurança . . . . . . . . . . . . . . . . . . . . . . . . . . . . . . . . . . . . . . . . . . . . . . . . . . . . . . 37
Descrição do produto . . . . . . . . . . . . . . . . . . . . . . . . . . . . . . . . . . . . . . . . . . . . . . . . . . . . . . . . 37
Introdução . . . . . . . . . . . . . . . . . . . . . . . . . . . . . . . . . . . . . . . . . . . . . . . . . . . . . . . . . . . . . . . . . 37
Conteúdo da embalagem . . . . . . . . . . . . . . . . . . . . . . . . . . . . . . . . . . . . . . . . . . . . . . . . . . . . . 38
Funcionamento . . . . . . . . . . . . . . . . . . . . . . . . . . . . . . . . . . . . . . . . . . . . . . . . . . . . . . . . . . . . . 38
Ligação do Elemento/Painel de Controlo (L370/P107/L484/L485) . . . . . . . . . . . . . . . 38
Ligação do Elemento/Painel de Controlo (L490/L495/L300/L301) . . . . . . . . . . . . . . . 39
Ligação da Pega do Cesto (L370/P107/L484/L485) . . . . . . . . . . . . . . . . . . . . . . . . . . . 39
Cozinhar . . . . . . . . . . . . . . . . . . . . . . . . . . . . . . . . . . . . . . . . . . . . . . . . . . . . . . . . . . . . 39
Reset térmico de corte . . . . . . . . . . . . . . . . . . . . . . . . . . . . . . . . . . . . . . . . . . . . . . . . 40
Limpeza, cuidados & manutenção . . . . . . . . . . . . . . . . . . . . . . . . . . . . . . . . . . . . . . . . . . . . . . . 40
Resolução de problemas . . . . . . . . . . . . . . . . . . . . . . . . . . . . . . . . . . . . . . . . . . . . . . . . . . . . . . 41
Especificações técnicas . . . . . . . . . . . . . . . . . . . . . . . . . . . . . . . . . . . . . . . . . . . . . . . . . . . . . . . 41
Cablagem eléctrica . . . . . . . . . . . . . . . . . . . . . . . . . . . . . . . . . . . . . . . . . . . . . . . . . . . . . . . . . . 42
Conformidade. . . . . . . . . . . . . . . . . . . . . . . . . . . . . . . . . . . . . . . . . . . . . . . . . . . . . . . . . . . . . . . 42
Innehållsförteckning
Säkerhetsråd . . . . . . . . . . . . . . . . . . . . . . . . . . . . . . . . . . . . . . . . . . . . . . . . . . . . . . . . . . . . . . . 43
Produktbeskrivning . . . . . . . . . . . . . . . . . . . . . . . . . . . . . . . . . . . . . . . . . . . . . . . . . . . . . . . . . . 43
Inledning . . . . . . . . . . . . . . . . . . . . . . . . . . . . . . . . . . . . . . . . . . . . . . . . . . . . . . . . . . . . . . . . . . . 43
Förpackningsinnehåll . . . . . . . . . . . . . . . . . . . . . . . . . . . . . . . . . . . . . . . . . . . . . . . . . . . . . . . . . 44
Drift . . . . . . . . . . . . . . . . . . . . . . . . . . . . . . . . . . . . . . . . . . . . . . . . . . . . . . . . . . . . . . . . . . . . . . 44
Ansluta elementet/kontrollpanelen (L370/P107/L484/L485) . . . . . . . . . . . . . . . . . . . . 44
Ansluta elementet/kontrollpanelen (L490/L495/L300/L301) . . . . . . . . . . . . . . . . . . . . 45
Sätta fast korgens handtag (L370/P107/L484/L485) . . . . . . . . . . . . . . . . . . . . . . . . . . . 45
Tillagning . . . . . . . . . . . . . . . . . . . . . . . . . . . . . . . . . . . . . . . . . . . . . . . . . . . . . . . . . . . . 45
Värmesäkring . . . . . . . . . . . . . . . . . . . . . . . . . . . . . . . . . . . . . . . . . . . . . . . . . . . . . . . . 46
Rengöring, omvårdnad och underhåll . . . . . . . . . . . . . . . . . . . . . . . . . . . . . . . . . . . . . . . . . . . . 46
Felsökning . . . . . . . . . . . . . . . . . . . . . . . . . . . . . . . . . . . . . . . . . . . . . . . . . . . . . . . . . . . . . . . . . 47
Tekniska specifikationer . . . . . . . . . . . . . . . . . . . . . . . . . . . . . . . . . . . . . . . . . . . . . . . . . . . . . . 47
Elektriska kablar . . . . . . . . . . . . . . . . . . . . . . . . . . . . . . . . . . . . . . . . . . . . . . . . . . . . . . . . . . . . 48
Tillmötesgående . . . . . . . . . . . . . . . . . . . . . . . . . . . . . . . . . . . . . . . . . . . . . . . . . . . . . . . . . . . . . 48
Indholdsfortegnelse
Sikkerhedstips . . . . . . . . . . . . . . . . . . . . . . . . . . . . . . . . . . . . . . . . . . . . . . . . . . . . . . . . . . . . . . 49
Produktbeskrivelse . . . . . . . . . . . . . . . . . . . . . . . . . . . . . . . . . . . . . . . . . . . . . . . . . . . . . . . . . . 49
Indledning . . . . . . . . . . . . . . . . . . . . . . . . . . . . . . . . . . . . . . . . . . . . . . . . . . . . . . . . . . . . . . . . . . 49
Pakkens indhold . . . . . . . . . . . . . . . . . . . . . . . . . . . . . . . . . . . . . . . . . . . . . . . . . . . . . . . . . . . . . 50
Drift . . . . . . . . . . . . . . . . . . . . . . . . . . . . . . . . . . . . . . . . . . . . . . . . . . . . . . . . . . . . . . . . . . . . . . 50
Montering af varmelegeme/styrepanel (L370/P107/L484/L485) . . . . . . . . . . . . . . . . . 50
Montering af varmelegeme/styrepanel (L490/L495/L300/L301) . . . . . . . . . . . . . . . . . . 51
Montering af kurvhåndtag (L370/P107/L484/L485) . . . . . . . . . . . . . . . . . . . . . . . . . . . 51
Tilberedning . . . . . . . . . . . . . . . . . . . . . . . . . . . . . . . . . . . . . . . . . . . . . . . . . . . . . . . . . 51
Nulstilling af termoafbryder . . . . . . . . . . . . . . . . . . . . . . . . . . . . . . . . . . . . . . . . . . . . . 52
Rengøring, pleje og vedligeholdelse . . . . . . . . . . . . . . . . . . . . . . . . . . . . . . . . . . . . . . . . . . . . . 52
Fejlfinding . . . . . . . . . . . . . . . . . . . . . . . . . . . . . . . . . . . . . . . . . . . . . . . . . . . . . . . . . . . . . . . . . . 53
Tekniske specifikationer . . . . . . . . . . . . . . . . . . . . . . . . . . . . . . . . . . . . . . . . . . . . . . . . . . . . . . 53
El-kabler . . . . . . . . . . . . . . . . . . . . . . . . . . . . . . . . . . . . . . . . . . . . . . . . . . . . . . . . . . . . . . . . . . . 54
Overensstemmelseserklæring . . . . . . . . . . . . . . . . . . . . . . . . . . . . . . . . . . . . . . . . . . . . . . . . . . 54
PT
S
DK

Innhold
Sikkerhetstips . . . . . . . . . . . . . . . . . . . . . . . . . . . . . . . . . . . . . . . . . . . . . . . . . . . . . . . . . . . . . . . 55
Produktbeskrivels . . . . . . . . . . . . . . . . . . . . . . . . . . . . . . . . . . . . . . . . . . . . . . . . . . . . . . . . . . . 55
Innledning . . . . . . . . . . . . . . . . . . . . . . . . . . . . . . . . . . . . . . . . . . . . . . . . . . . . . . . . . . . . . . . . . . 55
Pakkeinnhold . . . . . . . . . . . . . . . . . . . . . . . . . . . . . . . . . . . . . . . . . . . . . . . . . . . . . . . . . . . . . . . 55
Bruk . . . . . . . . . . . . . . . . . . . . . . . . . . . . . . . . . . . . . . . . . . . . . . . . . . . . . . . . . . . . . . . . . . . . . . 56
Kople til elementet/kontrollpanelet (L370/P107/L484/L485) . . . . . . . . . . . . . . . . . . . 56
Kople til elementet/kontrollpanelet (L490/L495/L300/L301) . . . . . . . . . . . . . . . . . . . 57
Kople til kurvhåndtaket (L370/P107/L484/L485) . . . . . . . . . . . . . . . . . . . . . . . . . . . . . 57
Matlaging . . . . . . . . . . . . . . . . . . . . . . . . . . . . . . . . . . . . . . . . . . . . . . . . . . . . . . . . . . . . 57
Tilbakestilling for termisk utkopling . . . . . . . . . . . . . . . . . . . . . . . . . . . . . . . . . . . . . . . 58
Rengjøring, stell og vedlikehold . . . . . . . . . . . . . . . . . . . . . . . . . . . . . . . . . . . . . . . . . . . . . . . . . 58
Feilsøking . . . . . . . . . . . . . . . . . . . . . . . . . . . . . . . . . . . . . . . . . . . . . . . . . . . . . . . . . . . . . . . . . . 59
Tekniske spesifikasjoner . . . . . . . . . . . . . . . . . . . . . . . . . . . . . . . . . . . . . . . . . . . . . . . . . . . . . . 59
Elektrisk tilkopling . . . . . . . . . . . . . . . . . . . . . . . . . . . . . . . . . . . . . . . . . . . . . . . . . . . . . . . . . . . 60
Samsvar . . . . . . . . . . . . . . . . . . . . . . . . . . . . . . . . . . . . . . . . . . . . . . . . . . . . . . . . . . . . . . . . . . . 60
Sisällysluettelo
Turvallisuusvihjeitä . . . . . . . . . . . . . . . . . . . . . . . . . . . . . . . . . . . . . . . . . . . . . . . . . . . . . . . . . . . 61
Tuoteluettelo . . . . . . . . . . . . . . . . . . . . . . . . . . . . . . . . . . . . . . . . . . . . . . . . . . . . . . . . . . . . . . . 61
Johdanto . . . . . . . . . . . . . . . . . . . . . . . . . . . . . . . . . . . . . . . . . . . . . . . . . . . . . . . . . . . . . . . . . . . 61
Pakkauksen sisältö . . . . . . . . . . . . . . . . . . . . . . . . . . . . . . . . . . . . . . . . . . . . . . . . . . . . . . . . . . . 62
Käyttö . . . . . . . . . . . . . . . . . . . . . . . . . . . . . . . . . . . . . . . . . . . . . . . . . . . . . . . . . . . . . . . . . . . . 62
Elementin/ohjauspaneelin liittäminen (L370/P107/L484/L485) . . . . . . . . . . . . . . . . . . 62
Elementin/ohjauspaneelin liittäminen (L490/L495/L300/L301) . . . . . . . . . . . . . . . . . . . 63
Korin kahvan liittäminen (L370/P107/L484/L485) . . . . . . . . . . . . . . . . . . . . . . . . . . . . 63
Matlaging . . . . . . . . . . . . . . . . . . . . . . . . . . . . . . . . . . . . . . . . . . . . . . . . . . . . . . . . . . . . 63
Ylikuumenemissuojan nollaus . . . . . . . . . . . . . . . . . . . . . . . . . . . . . . . . . . . . . . . . . . . . 64
Puhdistus, hoito & huolto. . . . . . . . . . . . . . . . . . . . . . . . . . . . . . . . . . . . . . . . . . . . . . . . . . . . . . 64
Vianetsintä . . . . . . . . . . . . . . . . . . . . . . . . . . . . . . . . . . . . . . . . . . . . . . . . . . . . . . . . . . . . . . . . . 65
Tekniset tiedot . . . . . . . . . . . . . . . . . . . . . . . . . . . . . . . . . . . . . . . . . . . . . . . . . . . . . . . . . . . . . 65
Sähköjohdot . . . . . . . . . . . . . . . . . . . . . . . . . . . . . . . . . . . . . . . . . . . . . . . . . . . . . . . . . . . . . . . . 66
Vaatimustenmukaisuus . . . . . . . . . . . . . . . . . . . . . . . . . . . . . . . . . . . . . . . . . . . . . . . . . . . . . . . 66
N
FIN

1
UK
Safety Tips
• Position on a flat, stable surface.
• A service agent/qualified technician should carry out installation and any repairs if required. Do not
remove any components on this product.
• Consult Local and National Standards to comply with the following:
• Health and Safety at Work Legislation
• BS EN Codes of Practice
• Fire Precautions
• IEE Wiring Regulations
• Building Regulations
• ALWAYS ensure oil levels are within the ‘MIN’ and ‘MAX’ levels. Failure to do so could result in fire.
• ALWAYS use a suitable cooking oil.
• ALWAYS remove excess moisture/water from food before frying to avoid excess foaming and spitting
of the oil.
• Change oil regularly. The flashpoint of oil (the point at which it ignites) gradually reduces the more it
is used.
• DO NOT cover the oil pan when frying.
• DO NOT immerse the appliance in water.
• Some surfaces become hot during operation - take care when using the appliance.
• Always switch off and disconnect the power supply to the appliance when not in use.
• Not suitable for outdoor use.
• Keep all packaging away from children. Dispose of the packaging in accordance to the regulations of
local authorities.
• If the power cord is damaged, it must be replaced by a BUFFALO agent or a recommended qualified
technician in order to avoid a hazard.
Product Description
Introduction
Please take a few moments to carefully read through this manual. Correct maintenance and operation of
this machine will provide the best possible performance from your BUFFALO product.
Pack Contents
The following is included:
BUFFALO prides itself on quality and service, ensuring that at the time of packaging the contents are
supplied fully functional and free of damage.
Should you find any damage as a result of transit, please contact your BUFFALO dealer immediately.
•L370 - Single 3 litre fryer
•P107 - Twin 3 litre fryer
•L484 - Single 5 litre fryer
•L485 - Double 5 litre fryer
•L490 - Single 5 litre fryer
•L495 - Double 5 litre fryer
•L300 - Single 8 litre fryer with tap
•L301 - Double 8 litre fryer with tap
•BUFFALOFryer
• Basket (P107/L485/L495/L301 x 2)
• Handle (P107/L485 x 2)
• Element guard (L490/L300 x 1, L495/L301 x 2)
• Lid (P107/L485/L495/L301 x 2)
• Instruction manual

2
UK
Telephone Helpline: 0845 146 2887 (United Kingdom)
Operation
Connecting the Element/Control Panel
(L370/P107/L484/L485)
The Element and Control Panel are supplied as a single detachable
part to aid in cleaning the appliance.
To connect to the body of the appliance:
1. Locate the lugs on the rear of the appliance with the tabs on the
rear of the element/panel unit.
2. Ensure the safety switch is aligned with the slots on the
appliance [A].
3. Lower the unit onto the appliance, ensuring the tabs are located
inside the lugs on the rear of the appliance [B].
Connecting the Element/Control Panel
(L490/L495/L300/L301)
The Element and Control Panel are supplied as a single detachable
part to aid in cleaning the appliance.
To connect to the body of the appliance; with the element/panel unit
tipped backwards:
1. Slot the tab on the rear of the element/panel unit under the lugs
on the main body of the appliance.
2. Lower the unit onto the appliance [A], ensuring the safety
switch is aligned with the slots in the body of the appliance [B].
Thermal Cut-out reset cover
Thermal Cut-out reset switch
Power indicator light
Thermostat
Element
Safety switch
[B]
[A]
[B]
[A]

3
UK
Connecting the Basket Handle (L370/P107/L484/L485)
Care must be taken to ensure that the handle is correctly located, and securely pulled back in to position
before being used.
1. Squeeze the two ends of the handle together.
2. Slot the ends of the handle in to the basket.
3. Lower the handle so that it slots over the frame of the basket.
Cooking
1. Connect the appliance to the mains power supply.
2. Set the thermostat to the desired temperature. The amber power indicator light turns On.
3. The appliance begins to heat the oil.
4. Once the oil is at the set temperature lower the food into the oil using the basket supplied.
5. Remove the basket from the oil once the food is cooked. Shake gently above the oil pan to remove
any excess oil.
Note: 170°C to 180°C is suitable for general cooking.
Note: The red Heat indicator light turns On during heat-up. When the oil is at the set
temperatures the light turns Off.
WARNING: Ensure the basket is securely located on the basket mounts. These are
located towards the front of the oil pan on L370/P107/L484/L485.
WARNING: The food and oil are very hot! Take care when removing the basket as oil may
drip.

4
UK
Telephone Helpline: 0845 146 2887 (United Kingdom)
Thermal Cut-Out Reset
Buffalo Fryers are fitted with a Thermal Cut-Out safety feature. Should
the temperature exceed safe levels the appliance will automatically cut
power.
To reset the appliance aftera sufficient cool-down period:
1. Unscrew the cover of the Safety Cut-Out reset switch.
2. Press the small reset switch down until it clicks, using a blunt
pointed instrument.
3. The appliance is now reset and can be used as normal.
Cleaning, Care & Maintenance
• Always turn Off the appliance and disconnect from the power supply before cleaning.
• Always allow the appliance and oil to cool before cleaning.
• For best performance, BUFFALO recommend that the appliance is cleaned after each day of operation.
• Empty the oil to clean the appliance thoroughly.
• If the oil is to be reused then filtering it before refilling the pan will extend the oils cooking life.
• Use warm, soapy water and a damp cloth to clean the exterior of the appliance.
•Drythoroughlyafter cleaning.
• A BUFFALO dealer or qualified technician should carry out repairs if required.
Note: Failure to clean the appliance regularly may result in premature activation of the
thermal cut-out switch.
Note: L300/L301 Fryers come with a tap at the front of the appliance to drain the oil
from the pan.
Reset
Switch

5
UK
Telephone Helpline: 0845 146 2887 (United Kingdom)
Troubleshooting
If your BUFFALO appliance develops a fault, please check the following table before making a call to the
Helpline.
Technical Specifications
Fault Probable Cause Action
The appliance is not working The appliance is not switched on Check the appliance is plugged in correctly
and switched on
Plug and lead are damaged Call BUFFALO agent or qualified technician
Fuse in the plug has blown Replace the plug fuse
Power supply Check power supply
Internal wiring fault Call BUFFALO agent or qualified technician
Thermal cut-out activated Reset thermal cut-out
Safety switch not located properly Refit control/element unit
Appliance does not reach set
temperature Faulty thermostat Call BUFFALO agent or qualified technician
Faulty element Call BUFFALO agent or qualified technician
Build-up of fat on the element Clean the appliance
Appliance heats up but indicator light
does not come on Indicator light has expired Call BUFFALO agent or qualified technician
Power indicator light comes on but
appliance does not heat up Faulty element Call BUFFALO agent or qualified technician
Faulty thermostat Call BUFFALO agent or qualified technician
Thermostat set incorrectly Check thermostat
Appliance slow to heat up Faulty element Call BUFFALO agent or qualified technician
Build-up of fat on the element Clean the appliance
Model Voltage Power Current Capacity
(litres)
Maximum
single load
(kg)
Dimensions
h x w x d (mm)
Weight
(kg)
L370 230V 50Hz 2000W 8.7A 3 1.2 300 x 180 x 400 4.2
P107 230V 50Hz 2 x 2000W 2 x 8.7A 2 x 3 2 x 1.2 300 x 360 x 400 8.2
L484 230V 50Hz 2800W 12.2A 5 2 300 x 270 x 400 5.8
L485 230V 50Hz 2 x 2800W 2 x 12.2A 2 x 5 2 x 2 300 x 540 x 400 10.8
L490 230V 50Hz 2800W 12.2A 5 2 300 x 283 x 450 7.7
L495 230V 50Hz 2 x 2800W 2 x 12.2A 2 x 5 2 x 2 352 x 550 x 454 14
L300 230V 50Hz 2900W 12.6A 8 3 402 x 283 x 520 8.5
L301 230V 50Hz 2 x 2900W 2 x 12.6A 2 x8 2 x 3 400 x 550 x 500 15.2

6
UK
Telephone Helpline: 0845 146 2887 (United Kingdom)
Electrical Wiring
This appliance is supplied with a 3 pin, moulded, BS1363 plug and lead, with a 13 amp fuse as standard.
The plug is to be connected to a suitable mains socket.
This appliance is wired as follows:
• Live wire (coloured brown) to terminal marked L
• Neutral wire (coloured blue) to terminal marked N
• Earth wire (coloured green/yellow) to terminal marked E
This appliance must be earthed, using a dedicated earthing circuit.
If in doubt consult a qualified electrician.
Electrical isolation points must be kept clear of any obstructions. In the event of any emergency
disconnection being required they must be readily accessible.
Compliance
The WEEE logo on this product or its documentation indicates that the product must
not be disposed of as household waste. To help prevent possible harm to human
health and/or the environment, the product must be disposed of in an approved and
environmentally safe recycling process. For further information on how to dispose of
this product correctly, contact the product supplier, or the local authority responsible
for waste disposal in your area.
BUFFALO parts have undergone strict product testing in order to comply with
regulatory standards and specifications set by international, independent, and federal
authorities.
BUFFALO products have been approved to carry the following symbol:
All rights reserved. No part of these instructions may be produced or transmitted in any form or by any means,
electronic, mechanical, photocopying, recording or otherwise, without the prior written permission of BUFFALO.
Every effort is made to ensure all details are correct at the time of going to press, however, BUFFALO reserve the
right to change specifications without notice.

7
NL Klantenondersteuning: 050 – 609999 (België)
Veiligheidstips
• Plaatsen op een vlakke en stabiele ondergrond.
• De installatie en eventuele reparaties zijn door een servicetechnicus/vaktechnicus uit te voeren.
Verwijder geen componenten of servicepanelen van dit product.
• Raadpleeg en volg de plaatselijke en nationale regelgeving op m.b.t. tot het volgende:
• Wetgeving van gezondheid en veiligheid op de werkplaats
• Werkregels
• Brandpreventie
• IEE bekabelingsnormen
• Bouwverordeningen
• ALTIJD controleren of het olieniveau tussen 'MIN' en 'MAX' staat. Anders kan er brand ontstaan.
• ALTIJD geschikte kookolie gebruiken.
• Bij het frituren ALTIJD overtollig vocht/water van het voedsel halen om schuimvorming en het
spetteren van olie te voorkomen.
• Vervang regelmatig de olie. Het valmpunt van olie (het punt waarop olie vlamvat) wordt bij het
hergebruik van de olie steeds lager.
• Oliepan tijdens het frituren NIET afbedekken.
• Dit apparaat NIET in water dompelen.
• Bepaalde oppervlakken worden tijdens gebruik heet - let hierop wanneer u het apparaat gebruikt.
• Schakel het apparaat altijd uit en haal de steker uit het stopcontact wanneer u het apparaat niet gebruikt.
• Niet geschikt voor gebruik buitenshuis.
• Laat verpakkingsmateriaal niet binnen handbereik van kinderen. Verpakkingsmateriaal in
overeenstemming met de regelgeving van de plaatselijke overheden als afval laten verwerken.
• Indien de stroomkabel beschadigd raakt, dient men deze door een BUFFALO technicus of aanbevolen
vaktechnicus te laten vervangen om gevaarlijke situaties te verhinderen.
Productbeschrijving
Inleiding
Neem de tijd en lees deze handleiding aandachtig door. Een correct gebruik en onderhoud van deze
machine waarborgt de beste prestatie van uw BUFFALO product.
Verpakkingsinhoud
De verpakking bevat het volgend:
•L370 - Single friteuse 3 liter
•P107 - Twin friteuse 3 liter
•L484 - Single friteuse 5 liter
•L485 - Double friteuse 5 liter
•L490 - Single friteuse 5 liter
•L495 - Double friteuse 5 liter
•L300 - Single friteuse 8 liter met aftapkraan
•L301 - Double friteuse 8 liter met aftapkraan
• BUFFALO Friteuse
• Friteusemandje (P107/L485/L495/L301 x 2)
• Handvat (P107/L485 x 2)
• Elementbescherming (L490/L300 x 1, L495/
L301 x 2)
• Deksel (P107/L485/L495/L301 x 2)
•Handleiding

8
NL
Klantenondersteuning: 040 – 2628080 (Nederland)
BUFFALO is trots op de haar productkwaliteit en dienstverlening en controleer de inhoud van de
verpakkingen, tijdens de verpakkingsfase, op functionaliteit en schade.
Mocht u product door transport zijn beschadigd, neem dan onmiddellijk contact op met uw BUFFALO dealer.
Werking
Element/bedieningspaneel aansluiten
(L370/P107/L484/L485)
Het element en bedieningspaneel worden geleverd als een te
verwijderen deel voor extra reinigingsgemak van het
apparaat.
1. Aansluiten op de friteusebak van het apparaat:
2. Plaats de bevestigingspunten aan de achterzijde van het
element/paneel gelijk met de uitsteeksels aan de
achterzijde van het apparaat.
3. Controleer of de veiligheidsschakelaar op lijn is
geplaatst met de slots van het apparaat [A].
4. Laat het paneel op het apparaat zakken en controleer
dat de uitsteeksels in de bevestigingspunten aan de
achterzijde van het apparaat [B] zitten.
Thermische uitschakelingsdeksel
Thermische uitschakelingsschakelaar
Stroomlampje
Thermostaat
Element
Veiligheidsschakelaar
[B]
[A]

9
NL Klantenondersteuning: 050 – 609999 (België)
Element/bedieningspaneel aansluiten
(L490/L495/L300/L301)
Het element en bedieningspaneel worden geleverd als een te
verwijderen deel voor extra reinigingsgemak van het
apparaat.
Aansluiten op de friteusebak; met het element/paneel licht
naar achter gekanteld:
1. Steek het uitsteeksel aan de achterzijde van het
element/paneel onder de bevestigingsopeningen van de
friteusebak van het apparaat.
2. Laat de unit op het apparaat [A] zakken en controleer of
de veiligheidsschakelaar op lijn is geplaatst met de slots
van de friteusebak van het apparaat [B].
Friteusehandvat bevestigen (L370/P107/L484/L485))
U dient voor gebruik altijd er op te letten dat de hendel correct aansluit en volledig veilig in de achterste
stand zit.
1. Knijp de twee uiteinden van het handvat samen.
2. Plaats de uiteinden van het handvat in de vergrendeling van het friteusemandje.
3. Laat het handvat zakken zodat deze op het frame van het friteusemandje aansluit.
Koken
1. Steek de steker van het apparaat in het stopcontact.
2. Zet de thermostaat op de gewenste instelling. Het geeloranje stroomlampje gaat aan.
3. Het apparaat begint de olie te verwarmen.
4. Heeft de olie eenmaal de ingestelde temperatuur bereikt laat dan het voedsel in het meegeleverde
friteusemandje in de olie zakken.
Opmerking: een geschikte algemene kooktemperatuur is 170°C tot 180°C.
Opmerking: het rode hittelampje gaat tijdens de verhitting aan. Zodra de ingestelde
temperatuur is bereikt gaat het lampje uit.
WAARSCHUWING: Controleer of het mandje goed op de mandbevestigingspunten zit.
Bij de L370/P107/L484/L485 zitten deze aan de voorzijde van de friteusebak.
[B]
[A]

10
NL
Klantenondersteuning: 040 – 2628080 (Nederland)
5. Is het voedsel gefrituurd, haal dan het mandje uit de olie. Schud voorzichtig het mandje boven de
oliebak om overtollige olie te verwijderen.
Thermische uitschakelingsschakelaar
De Buffalo friteuses zijn voorzien van een thermische veiligheidsfunctie.
Wanneer de temperatuur de veiligheidsniveaus van het apparaat
overschrijdt, wordt de stroomtoevoer automatisch uitgeschakeld.
Om het apparaat na een toereikende afkoelperiode te resetten:
1. schroef de deksel van de veiligheidsschakelaar.
2. Druk de kleine resetschakelaar met een bot, puntig voorwerp in,
totdat deze klikt.
3. Het apparaat is nu gereset en weer klaar voor gebruik.
Reiniging, zorg & onderhoud
• Alvorens het apparaat te reinigen dient men altijd het apparaat uit te schakelen en de steker uit het
stopcontact te halen.
• Laat het apparaat afkoelen voordat u met het schoonmaken begint.
• Voor de beste prestaties, raadt BUFFALO aan om het apparaat na elke gebruiksdag te reinigen.
• Leeg de oliebak om het apparaat grondig te reinigen.
• Bij hergebruik van de olie verlengt de filtering de gebruiksduur van de olie.
• Gebruik warm zeepwater en een vochtige doek om de buitenkant van het apparaat te reinigen.
• Na reiniging goed drogen.
• Eventuele reparaties moeten door een BUFFALO vertegenwoordiger of een vaktechnicus worden
uitgevoerd.
WAARSCHUWING: Het voedsel en de olie zijn heel heet! Wees voorzichtig bij het
verwijderen van het friteusemandje om geen olie te morsen.
Opmerking: een niet regelmatige reiniging van het apparaat kan een voortijdige
activering van de thermische uitschakelingsschakelaar veroorzaken.
Opmerking: L300/L301 friteuses zijn aan de voorzijde van het apparaat voorzien van
een aftapkraan om de olie uit de oliebak te laten lopen.
Reset-
schakelaar

11
NL Klantenondersteuning: 050 – 609999 (België)
Oplossen van problemen
Indien er een storing van uw BUFFALO product optreedt, dient u de onderstaande tabel te raadplegen
alvorens contact op te nemen met uw BUFFALO dealer of de Hulplijn te bellen.
Technische specificaties
Probleem Mogelijke oorzaak Handeling
Het apparaat werkt niet Het apparaat staat uit Controleer of de stroomkabel van het
apparaat is aangesloten en of het apparaat
is ingeschakeld
Steker en kabel zijn beschadigd Laat een BUFFALO technicus of een
vaktechnicus komen
De zekering in de steker is gesprongen Vervang de zekering in de steker
Stroomvoorziening Controleer de stroomvoorziening
Storing interne bedrading Laat een BUFFALO technicus of een
vaktechnicus komen
Thermische uitschakeling geactiveerd Reset de thermische uitschakeling
Het apparaat bereikt de
ingestelde temperatuur niet Defecte thermostaat Laat een BUFFALO technicus of een
vaktechnicus komen
Defect verwarmingselement Laat een BUFFALO technicus of een
vaktechnicus komen
Opbouw van vet op het element Reinig het apparaat
Het apparaat wordt warm maar
het indicatielampje gaat niet aan Indicatorlampje vervangen Laat een BUFFALO technicus of een
vaktechnicus komen
Het lampje van de
stroomindicator gaat aan maar
het apparaat wordt niet op
temperatuur gebracht
Defect verwarmingselement Laat een BUFFALO technicus of een
vaktechnicus komen
Het lampje van de
stroomindicator gaat aan maar
het apparaat wordt niet op
temperatuur gebracht
Defecte thermostaat Laat een BUFFALO technicus of een
vaktechnicus komen
Thermostaat verkeerd ingesteld Controleer de thermostaat
Apparaat wordt heel langzaam
warm Kookoppervlak is niet schoon Reinig het kookoppervlak
Opbouw van vet op het element Reinig het apparaat
Model Voltage Vermogen Stroom Inhoud
(liters)
Maximale
enkele belasting
(kg)
Inhoud
h x b x d mm
Gewicht
(kg)
L370 230V 50Hz 2000W 8,7A 3 1,2 300 x 180 x 400 4,2
P107 230V 50Hz 2 x 2000W 2 x 8,7A 2 x 3 2 x 1,2 300 x 360 x 400 8,2
L484 230V 50Hz 2800W 12,2A 5 2 300 x 270 x 400 5,8
L485 230V 50Hz 2 x 2800W 2 x 12,2A 2 x 5 2 x 2 300 x 540 x 400 10,8
L490 230V 50Hz 2800W 12,2A 5 2 300 x 283 x 450 7,7
L495 230V 50Hz 2 x 2800W 2 x 12,2A 2 x 5 2 x 2 352 x 550 x 454 14
L300 230V 50Hz 2900W 12,6A 8 3 402 x 283 x 520 8,5
L301 230V 50Hz 2 x 2900W 2 x 12,6A 2 x8 2 x 3 400 x 550 x 500 15,2

12
NL
Klantenondersteuning: 040 – 2628080 (Nederland)
Elektrische bedrading
Men dient de steker op een geschikt stopcontact aan te sluiten.
De bedrading van dit apparaat is als volgt:
• Stroomkabel (bruin) naar de aansluitklem gemarkeerd met L
• Neutraalkabel (blauw) naar de aansluitklem gemarkeerd met N
• Aardekabel (groen/geel) naar de aansluitklem gemarkeerd met E
Dit apparaat moet worden geaard met behulp van een adequaat aardingscircuit.
Bij twijfels raadpleeg een vakkundige elektricien.
De elektrische isolatiepunten mogen niet worden geblokkeerd. In geval van een nooduitschakeling moeten
de isolatiepunten direct toegankelijk zijn.
Productconformiteit
Het WEEE-logo op dit product of bijbehorende documentatie geeft aan dat het product
niet onder huisvuil valt en als zodanig ook niet mag worden verwerkt. Ter preventie
van mogelijke gevaren voor de gezondheid van personen en/of voor het milieu, dient
men dit product in overeenstemming met het voorgeschreven en milieuveilige
recyclingproces als afval te verwerken. Raadpleeg uw productleverancier of uw
plaatselijk afvalverwerkingsbedrijf voor meer informatie over de juiste
afvalverwerking van dit product.
De onderdelen van BUFFALO producten hebben strenge producttesten ondergaan om
te voldoen aan wettelijke regels en specificaties die door internationale,
onafhankelijke en landelijke overheden worden voorgeschreven.
BUFFALO producten zijn goedgekeurd en voorzien van het volgende symbool:
Alle rechten voorbehouden. Het is verboden om deze handleiding, hetzij volledig of gedeeltelijk, elektronisch of
mechanisch te reproduceren, kopiëren, op opslagmedia op te slaan of op enigerlei wijze over te dragen, zonder
voorafgaande goedkeuring van BUFFALO.
Wij hebben er alles aan gedaan om er zeker van te zijn dat op publicatiedatum van de handleiding alle details correct
zijn, desondanks, behoudt BUFFALO het recht voor om specificaties zonder aankondiging te wijzigen.

13
FR Standard d'assistance téléphonique: 050 – 600006 (Belgique)
Conseils de sécurité
• Placez l'appareil sur une surface plane, stable.
• L'installation et les éventuelles réparations doivent être confiées à un dépanneur / technicien qualifié.
Ne retirez aucun composant ou cache de ce produit.
• Consultez les normes locales et nationales pour vous conformer aux :
• lois sur l'hygiène et la sécurité au travail ;
• codes de bonnes pratiques BS EN ;
• précautions contre le risque d'incendie ;
• réglementations sur les branchements électriques IEE ;
• règlements sur la construction.
• Vous devez TOUJOURS vérifier que le niveau d'huile est entre les repères MIN et MAX. Un niveau
d'huile inapproprié peut poser des risques d'incendie.
• Choisissez TOUJOURS une huile de cuisson adaptée.
• Éliminez TOUJOURS l'excédent d'humidité ou d'eau sur les aliments avant de les frire pour éviter les
éclaboussures d'huile et la formation de mousse.
• Changez régulièrement l'huile. Plus une huile est utilisée, plus son point d'inflammation baisse
progressivement (le point d'inflammation est température à laquelle elle prend feu).
• Ne couvrez jamais la friteuse pendant la cuisson.
• NE PAS immerger l'appareil.
• Ne soulevez les plaques qu'à l'aide des poignées noires.
• Certaines surfaces chauffent en service - prenez les précautions qui s'imposent.
• Veillez à toujours éteindre l'appareil et à le débrancher de la prise d'alimentation secteur hors service.
• Cet appareil est réservé exclusivement à une utilisation à l'intérieur.
• Gardez les emballages hors de portée des enfants. Débarrassez-vous des emballages conformément
aux règlements des autorités locales.
• Un cordon d'alimentation endommagé doit être remplacé par un agent BUFFALO ou un technicien
qualifié recommandé, pour éviter tout danger.
Description du produit
Nous vous invitons à consacrer quelques instants à la lecture attentive de ce manuel. L'entretien et
l'utilisation appropriés de cet appareil vous permettront de tirer le meilleur de votre produit BUFFALO.
Introduction
Nous vous invitons à consacrer quelques instants à la lecture attentive de ce manuel. L'entretien et
l'utilisation appropriés de cet appareil vous permettront de tirer le meilleur de votre produit BUFFALO.
•L370 - Friteuse à cuve simple 3 litres
•P107 - Friteuse à cuve double 3 litres
•L484 - Friteuse à cuve simple 5 litres
•L485 - Friteuse à cuve double 5 litres
•L490 - Friteuse à cuve simple 5 litres
•L495 - Friteuse à cuve double 5 litres
•L300 - Friteuse à cuve simple 8 litres avec
robinet
•L301 - Friteuse à cuve double 8 litres avec
robinet

14
FR
Standard d'assistance téléphonique: 01 64 89 73 61 (Français)
Contenu de l'emballage
Eléments fournis de série :
BUFFALO attache une grande importance à la qualité et au service et veille à fournir des produits en parfait
état opérationnel, parfaitement intacts au moment de l'emballage.
Nous vous prions de contacter votre revendeur BUFFALO immédiatement si vous constatez un dommage
quelconque survenu pendant le transport du produit.
Operation
Montage de l'ensemble Élément chauffant &
Panneau de commande
(L370/P107/L484/L485)
L'élément chauffant et le panneau de commande constituent
un ensemble démontable qui facilite le nettoyage de la
friteuse.
Installation sur la friteuse :
1. Alignez les cosses à l'arrière de la friteuse sur les
connecteurs situés à l'arrière de l'ensemble Élément-
Panneau de commande.
2. Vérifiez que l'interrupteur de sécurité est aligné sur les
emplacements correspondants de la friteuse. [A].
3. Engagez l'ensemble Élément-Panneau dans la friteuse
en vous assurant que les connecteurs entrent dans les cosses à l'arrière de la friteuse [B].
•FriteuseBUFFALO
• Panier (P107/L485/L495/L301 x 2)
• Poignée (P107/L485 x 2)
• Protection (L490/L300 x 1, L495/L301 x 2)
• Couvercle (P107/L485/L495/L301 x 2)
• Manuel d'utilisation
Couvercle du coupe-circuit thermique
Interrupteur du coupe-circuit
thermique
Voyant de contrôle
Thermostat
Élément chauffant
Interrupteur de sécurité
[B]
[A]

15
FR Standard d'assistance téléphonique: 050 – 600006 (Belgique)
Montage de l'ensemble Élément chauffant &
Panneau de commande
(L490/L495/L300/L301)
L'élément chauffant et le panneau de commande constituent
un ensemble démontable qui facilite le nettoyage de la
friteuse.
Installation, l'ensemble Élément-Panneau étant incliné vers
l'arrière :
1. Alignez la broche à l'arrière de l'ensemble Élément-
Panneau sous les cosses de la friteuse.
2. Introduisez l'ensemble Élément-Panneau dans la
friteuse [A], en vérifiant que l'interrupteur de sécurité
est aligné sur les emplacements correspondants de la
friteuse [B].
Montage de la poignée du panier (L370/P107/L484/L485)
Avant toute utilisation, il est important de vérifier que la poignée est bien en place et correctement
enclenchée en la tirant dans son emplacement.
1. Serrez les deux extrémités de la poignée l'une contre l'autre.
2. Engagez-les dans le panier.
3. Abaissez la poignée jusqu'à ce qu'elle traverse la structure du panier.
Cuisson
1. Branchez l'appareil à la prise d'alimentation secteur.
2. Réglez le thermostat à la température voulue. Le voyant de contrôle orangé s'allume. .
3. La friteuse commence par chauffer l'huile.
Remarque : Une température comprise entre 170°C et 180°C convient à la plupart des
aliments.
Remarque : Le voyant de contrôle rouge s'allume pendant cette phase de chauffage.
Lorsque l'huile est à la température choisie, le voyant de contrôle s'éteint.
[B]
[A]
This manual suits for next models
8
Table of contents
Languages:
Other Buffalo Fryer manuals

Buffalo
Buffalo GH124 User manual

Buffalo
Buffalo CE223 User manual

Buffalo
Buffalo FC374 User manual

Buffalo
Buffalo CP793 User manual

Buffalo
Buffalo 600 Series User manual

Buffalo
Buffalo CD274 User manual

Buffalo
Buffalo FC255 User manual

Buffalo
Buffalo DC319-P Owner's manual

Buffalo
Buffalo DL891-A User manual

Buffalo
Buffalo L490 User manual