Mamiya/Sekor MSX 500 Operation manual

mami
ya/sekor
MSX
500
owners
operating
manual

CONTENTS
Description
of
parts
...
................
..
......
.........
..
.......
..
...
.............
...
.....
..............
.....
2
Specifications
.............................................
..
.....
..
..
...
.
..
.......
..
..
........
.....
............. 4
Short course
of
instructions .
..
.
..
..................
...
..
................
..
............................ 6
Inserting the battery ......
..........
.........................
..
........
..
.
..
.
....
.......
..
...
...
........... 8
Loading the film ..........................................................
.....
..
.
......
..
.................
..
...
9
Setting the film
speed
....................................
..
.
...
..
................
....
.........
...
........
11
Selecting
the shutter
speed
..............
..
........
...
.
..
......
..
.
..
.
...
.
..
...
........................12
Focusing and viewing
..
....
..
....
..
.
..
.
..
.
..
.
..
.
...
..
...
.................................................13
Infra-red
photography
......
..
............................................................................13
Setting the
exposure
....
..................................................................................:
14
Depth
of
field
...
..
...
..........
..
.
....
..............
....
...........····
··
·······································16
Changing lenses
.....
..............
....
...........................................
··
.·····.·····
..
·.··..........18
Holding
the
camera
..........
..
...............
..
.
..
......
..
....................
...
.......
..
..
..
..
.
..
..
.
..
.
...
19
.
Flash
photography
.........
..
...............................................................................20
Rewinding the film .......................................
...
......
..
..........
..
....
..
.
..
..........
..
.
..
.
...
22
Multiple
exposures
......................................
..
..............
..
.
...
..
.
..
........,.....
..
....
..
...
22
Stopped
down
aperture operation ..............................
....
................
....
..
....
...
23
Trouble
shooting ......
...
..
.
...
..
.........................
..
.................
...
.....
.....................
...
24
Lens
comparison
chart
.........
....
..
....
.................................................................26
Accessories
..................
...
..
..............................................
..
.
..
.
...
.
..
.........
..
..........
28
Helpful hints
...
...............
...
.................................................................................32
'.
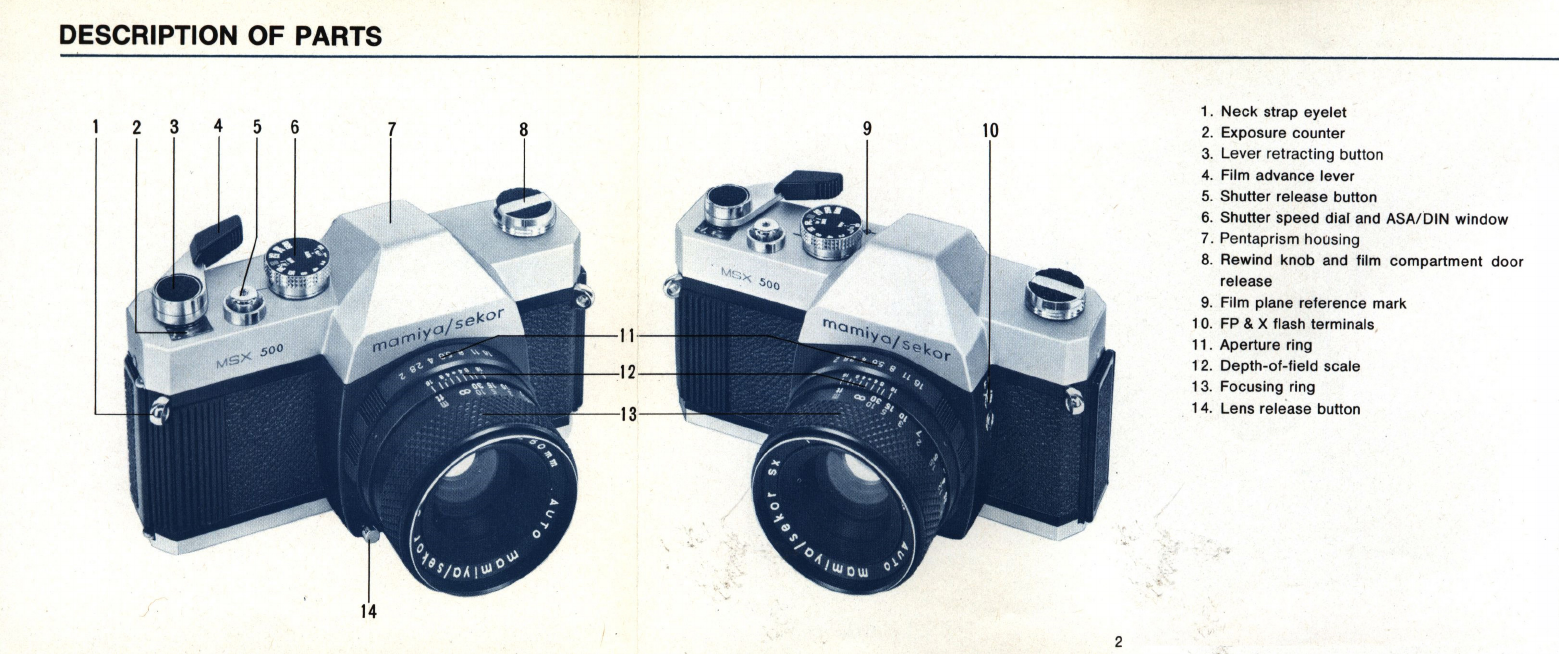
DESCRIPTION OF PARTS
4 5 6 9
14
2
1.
Neck
strap eyelet
2.
Exposure counter
3. Lever retracting button
4.
Film advance lever
5.
Shutter release button
6. Shutter speed
dial
and ASA/DIN window
7. Pentaprism hoosing
8. Rewind knob and film compartment door
release
9.
Film plane reference mark
10.
FP
& X flash terminals
11
. Aperture ring
12
. Depth-of-field scale
13
. Focusing ring
. 14. Lens release button
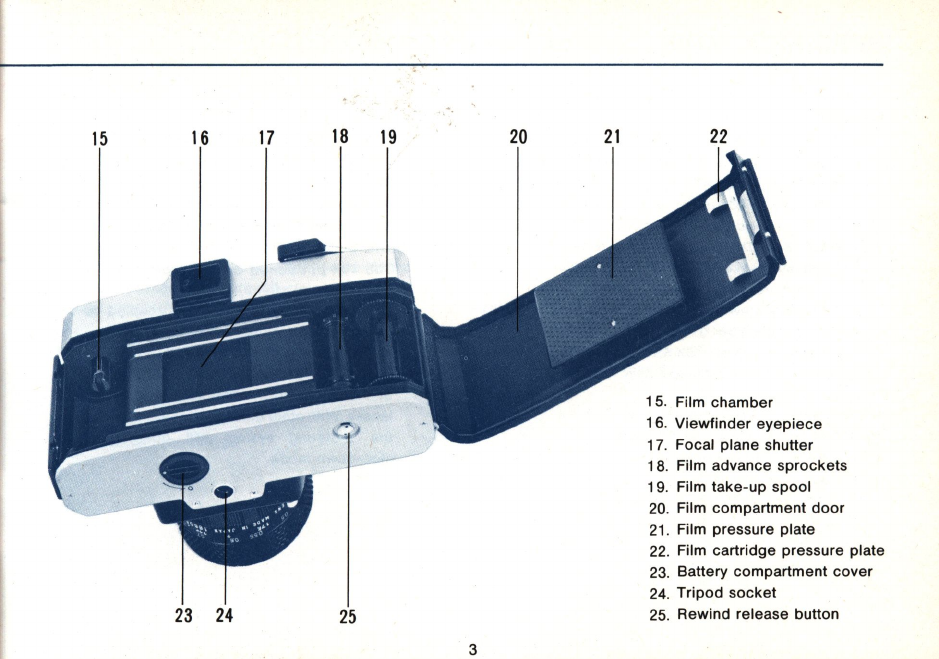
16
17
18
19
20
21
22
15
. Film chamber
16
.
Viewfinder
eyepiece
17. Focal plane shutter
1
8.
Film advance
sprockets
19
. Film
take-up
spool
20. Film
compartment
door
21
. Film pressure plate
22
. Film cartridge pressure plate
23
. Battery
compartment
cover
24.
Tripod
socket
23
24
25
25. Rewind release button
3
SPECIFICATIONS:
mamiyal
sekor
MSX 500
CAMERA TYPE:
35mm Single Lens Reflex with behind-the-Iens,
spot
readings, full aperture metering system .
FILM SIZE AND CAPACITY:
Perforated 35mm film in standard 20 or 36 ex-
posure cartridges.
STANDARD AUTOMATIC LENSES:
mamiyd
/
sekor
SX
55mm
f/1.4
7 elements
in
5 groups
Angle
of
view: 43 ·
Accessory size:
52
mm
mamiya
/
sekor
SX
55mm
fl1.8
6
elements
in 5 groups
Angle
of
view: 43·
Accessory size: 52 mm
mamiya
/
sekor
SX
50mm
f/2
6 elements in 4 groups
Angle
of
view: 47·
Accessory size:
52
mm
4
LENS
MOUNT
:
Universal thread mount (42mm) with locking
pin.
SHUTTER :
Focal plane with speeds from 1
to
11
500
second
and B for time exposures.
EXPOSURE CONTROL:
CdS celi
positioned
on the back
of
the reflex
mirror (spot system) .
The
metering
system is cross coupled
to
the
shutter
speed
. control, film speed dial, and
diaphragm mechanism on all automatic
SX
lenses.This system accurately measures light
at full aperture
withmamiya
/
sekor
SX
lenses.With other universal thread mountlenses,
the
metering
system will operate
in
the
stop-down
mode.

METER SENSITIVITY:
ASA 25 to 3200 DIN 15 to 36
VIEWFINDER:
Pentaprism type with micro-diaprism center
spot
on Fresnel screen
for
rapid focusing. Brackets
visible in finder indicate location
of
spot
meter
reading area
(10%
of
fieI9).
Exposure needle and reference pOints indicate
necessary exposure adjustments.
FLASH SYNCHRONIZATION:
Two separate flash contacts are provided,
marked "
FP
" and "X". Proper selection
of
terminals allows correct synchronization
for
all
types
of
flash pictures.
REFLEX MIRROR:
Instant return type
5
FILM ADVANCE:
Ratchet type·film advance lever transports film,
cocks
shutter, and advances exposure counter
in a single stroke (1600
)or
by anumber
of
shorter
strokes.
EXPOSURE COUNTER:
Progressive type, reads from "S" (start) to 36.
Counter automatically resets to "S" when film
compartment
door
is
opened.
DIMENSIONS:
Width : 5 31/32
in
.
(151
.5mm)
Height : 3
3/4
in.
(95
mm)
Thickness: With 55mm f/1 .4 lens 3
61/64
in.
(100
.5mm)
With 55mm f/1.8 lens 3
25/32
in.
(96mm)
With 50mm
112
lens: 3 3/
4in
. (95mm)
WEIGHT:
With 55mm f/1.4 lens: 33 oz. (9359)
With 55mm f/1 .8 lens:
31
3/16
oz. (885g)
With 50mm
f/2
lens: 30 5/16 oz.
(860g)
SHORT COURSE OF INSTRUCTIONS
Insert an Eveready
5-76
silver oxide
battery (or equivalent)
Load the film.
Pull up the rewind
knob
to
open the film
compartment
door,
drop
in the film cartridge
and push
down
the knob, turning
it
until it
drops
into
place
. Insert the end
of
the ·film
leader into the film
take-up
spool, making
sure the perforations along the film
edge
are
hooked
onto
the teeth
of
the sprocket.
Close the film
compartment
door
and
ad-
vance the film and press the shutter button
repeatedly until the number "
1"
appears in
the Exposure
Co
vnter Window.
6
Set the film speed.
Pull up the outer ring
of
the film speed dial
and turn it until the ASAIDIN number (or re-
presentative reference mark)
of
the film you
are using appears in the window opposite
the white index mark. .
Set the shuHer speed.
When outdoors
in
bright
or
hazy sunlight,
1/
125
second is generally suitable for most
photographs.When indoors in a well lit room
1/60 second should be sufficient to capture
your subject, depending upon th.e film you
are using.
Focus on your subject
by rotating the focusing ring until the image
in
the center
of
the viewfinder screen ap-
pears sharp.
7
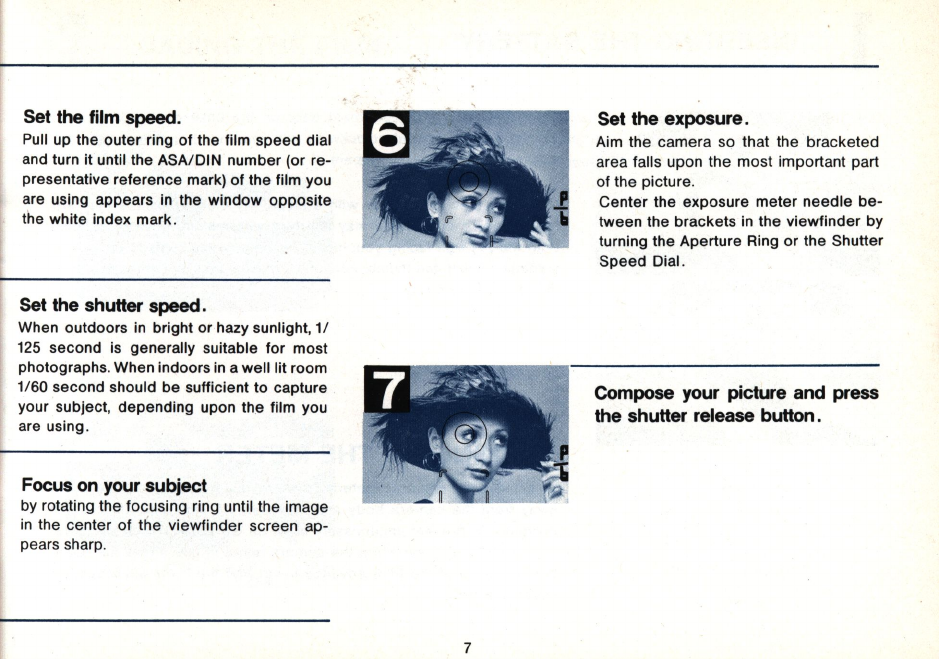
Set the exposure.
Aim the camera so that the bracketed
area falls upon the most important part
of the picture.
Center the exposure
meter
needle
be-
tween the brackets in the viewfinder by
turning the Aperture Ring
or
the Shutter
Speed Dial.
Compose your picture and press
the shuHer release buHon.

1 INSERTING THE BATTERY
l J
8
Open the battery compartment
door
on the base
of
the camera by
turning the
cover
counterclockwise with your thumb until the white
dot
aligns with the
letter
"0
" (open).
Clean the battery contacts with a clean, dry cloth
to
assure they are
free
of
oil
or
dust which may interfere with making positive contact.
With the
(+)
sign facing you, insert the battery and replace the cover,
. tightening it with the thumb, turning it a one-quarter turn
in
the
opposite
direction
of
the arrow.
TURNING ON THE METER
To activate the cameras metering system, pull the Film Advance Lever
away from the camera
body
approximafely 1/2 inch until it clicks into
position. To
prevent
unnecessary drain on the battery,
lock
the
meter
in the
"OFF'
-position when the camera is not
in
use. Press the "OFF"
button on
top
of
the
Film Advance Lever and the lever will retract
to-
wards the
body.
8

2 LOADING THE FILM
A. Open the film compartment
door
by pulling up the Rewind Knob.
Drop the film cartridge into the compartment and rotate the Rewind
Knob until it drops down and locks the cartridge in place.
B. Insert the film
leader
into one
of
the slots in the Take-up
Spool.
9

C. Slowly advance the film by stroking the Film Advance
Lever
as far
to
the right as
it
will
go
. If the
lever
stops midway, press
the
Shutter
Release Button
to
free
it for another stroke. Be sure that the holes
on both sides
of
the film are caught by the teeth on the Film Trans-
port
Sprockets
.
NOTE: The film must pass under the Take-up Spool when advanced.
D. Gently turn the Rewind Knob
clockwise
to take up the slack in the
film .
E.
Close the Film
Compartment
Door
and advance the film several
times until the
number
"
1"
appears in the Exposure Counter
Window
.
As
the film is advanced through the camera the knob will turn in a
counterclockwise
direction, indicating the film is advancing
properly
.
As the film is advanced the shutter will
be
cocked
automatically. Your
camera is
now
loaded
and ready to
go
.
NOTE: AVOID DIRECT LIGHT WHEN LOADING AND
UNLOADING
THE FILM.
10
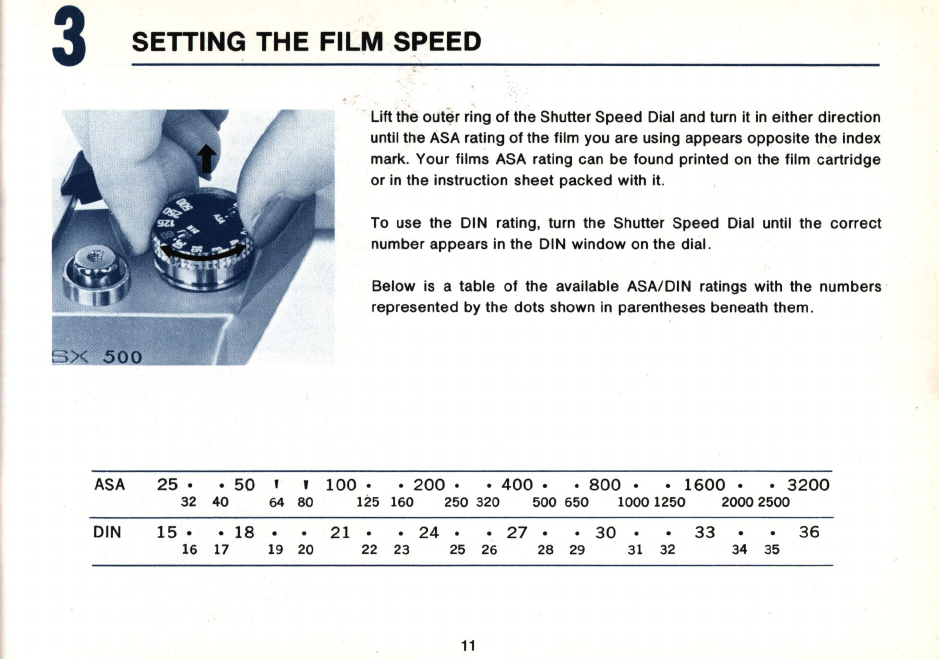
3 SETTING THE FILM SPEED
. Lift the
out
~
r
ring
of
the Shutter
Speed
Dial and turn it in either
direction
until the ASA rating
of
the film you are using appears
opposite
the index
mark. Your films ASA rating can
be
found printed on the film
cartridge
or
in the instruction
sheet
packed
with it.
To use the DIN rating, turn the Shutter
Speed
Dial until
the
correct
number appears in the DIN
window
on the dial.
Below
is a
table
of
the available ASAIDIN ratings with the numbers
represented by the
dots
shown
in
parentheses beneath them.
ASA
25·
•
50
, ,
100·
•
200·
•
400·
•
800·
•
1600·
•
3200
32
40
64
80
125
160
250
320
500
650
1000
1250
20002500
DIN
15·
•
18
•
21
•
24·
•
27
30 33 36
16 17 19
20 22
23
25 26
28
29 31
32
34 35
11
4 SELECTING THE SHUTTER SPEED
The shutter controls the length
of
time light is allowed
to
strike the film.
The
speed
at which the
two
shutter curtains pass across the film is
measured
in
fractions
of
a second that
correspond
to
the numbers on
the Shutter
Speed
Dial. (250 is 1/250 second. 2 is 1/2 second.
etc
.)
The
number
"1"on the dial represents one full
second
exposure. When
set on
the"S"
setting. the shutter will remain open as long
as
the Shutter
Release Sutton is
depressed
. When using
the"
S"
setting. and for ex-
posures
longer
than
1130
second. a cable release and
tripod
should
be
used
to
minimize camera movement.
To
select
a shutter
speed
. turn the Shutter
Speed
Dial until the desired
speed
lines up with the index mark.
NOTE: Shutter
speeds
may
be
set
before
or
after the film is advanced.
but
be
careful not
to
pull up on the Shutter
Speed
Dial. You may
inadvertently change the film
speed
setting.
12
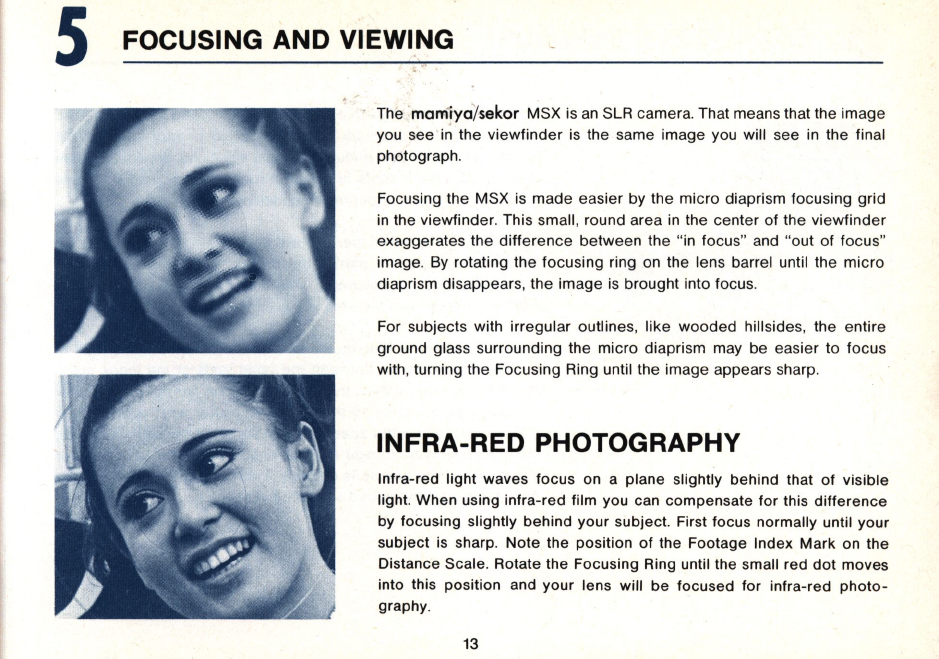
5 FOCUSING AND VIEWING
The
mom!yo
i
sekor
MSX is
an
SLR camera. That means that the
image
you see in the
viewfinder
is the same image you will see in the final
photograph.
Focusing the MSX is
made
easier
by the
micro
diaprism focusing grid
in the viewfinder. This small, round area in the
center
of
the
viewfinder
exaggerates the
difference
between
the "in focus" and
"out
of focus"
image. By rotating the focusing ring on the lens barrel until the
micro
diaprism disappears, the
image
is brought into focus.
For subjects with irregular outlines,
like
wooded
hillsides, the entire
ground glass surrounding the micro diaprism may
be
easier
to
focus
with, turning the Focusing Ring until
the
image appears sharp.
INFRA-RED PHOTOGRAPHY
Infra-red light waves focus on a plane slightly behind that
of
visible
light. When using infra-red film you can compensate for this
difference
by focusing slightly behind your subject. First focus normally until your
subject is sharp. Note the position
of
the Footage Index
Mark
on the
Distance Scale. Rotate the Focusing Ring until the small red
dot
moves
into this position and your lens will
be
focused for infra-red
photo-
graphy.
13

6 SETTING THE EXPOSURE
1. Turn the Shutter
Speed
Dial until the shutter speed you wish to use
lines up with the index mark. Outdoors
in
bright or hazy sunlight1/
125
second should
be
fast enough for most situations, depending upon
the film you use. Indoors
in
a well lit room, 1/60 second or slower
should be sufficient under most conditions.
2.
Look through the viewfinder and aim the camera so the brackets fall
on the most important part of the picture. For the most accurate
reading be sure the bracketed area doesn't include objects much
lighter or darker than
the
area you want to measure.
3. Rotate the Aperture Ring on the lens until the needle to the right of
the finder is centered between the open ends of the index mark.
When the needle centers, the exposure will be correct. If the meter
needle does not
come
to
the center no matter what aperture you
choose, change shutter speeds. When the needle is
on
the (+ ) side,
the picture is overexposed and you need to select a faster shutter
speed. When the
needle
is on the (- ) side, the picture is underex-
posed and a slower speed should be chosen.
14

Expos
ur
e Meter Needle
Ar
ea
Measured by Spot Meter
Index
of
Measuring Ra
ng
e
Micro Diaprism
NOTE:
You
may reverse the procedu"re if you wish to use a certain
aperture.
In
this case,
select
the aperture and center the
meter
needle by rotating the Shutter Speed Dial.
When using
SX
lenses
it
is not necessary to push the Film
Advance Lever toward the camera body to take a
meter
read-
ing. This action is taken only to view depth-of-field.
In
general photography the meter requires no special calcu-
lations
or
compensation
to
obtain correct exposures even
if
filters or
close-up
accessories such
as
auto-bellows
or
auto
extension tubes are used.
Meter
readings taken with the normal
lens alone and then with accessories attached may not
~e
the
same due
to
the properties of the accessories, but the ex-
PQsures will
be
correct. In close-up photography the
meter
reading must be taken after the final focus, since exposure in
this instance is affected by the distance between lens and film.
15

7 DEPTH OF FIELD
When
the
camara
is
focused
on
an
object
,
an
area in front
of
and
be-
hind the
object
will also
be
in
acceptably
sharp focus.
The distance
between
the nearest and farthest
objects
in
focus is called
Depth-of-Field.
Each
time
the aperture is changed,
depth-of-field
changes also.
As
the
lens is
stopped
down
towards
f/16
,
depth
-
of-field
increases, and
as
the
lens is
opened
towards
f/2
, it
decreases
.
Knowing h
ow
to
use
depth-of
-field allows the
photographer
to
use the
principles
of "
selective
focus" to eliminate unwanted foreground and
background
objects
from his photographs, and could mean the differ-
ence
between
a snapshot and a successful
photograph
.
To
view
the
depth-of-field
in your
photograph
with the MSX, bring your
subject
into sharpest
focus
and press the Film Advance
Lever
in towards
the
camera
body
. This causes the lens diaphragm
to
"stop down"
(become
smaller).
The
exposure
meter
needle
may deviate from
the
center
of
the index mark, but
do
not readjust the exposure setting.
The lens is
now
at the aperture at which the picture will
be
taken.
NOTE: When taking
exposure
meter
readings with SX lenses, DO
NOT
press the Film Advance
Lever
for
meter
reading.
16
THE AUTOMATIC LENS
The
depth-
'
of-field
will
appear
in
the viewfinder exactly as it will
appear
in the finished picture. By changing the focus while
the
lens diaphragm
is .
stopped
down you can
select
the area
of
sharpness in your
photo-
graph. When using preset
or
non-automatic lenses the diaphragm must
be
set manually, but the same results are achieved.
You may also
determine
the depth-cif-field by
checking
the scale on
the lens barrel. Numbers representing lens apertures
appear
at the
near and far limits
of
depth for any given focus
distance
and lens
open-
ing.
For example, if the standard lens is focused at
15
feet
,
one
of
the marks
representing
f/11
appears at the
10
foot
mark
and the
other
at the 30
foot
mark. This means that
in
a photograph
focused
at
15
feet
and the
diaphragm
set
at
f/11,
everything between
10
and 30
feet
will
be
in ac-
ceptably sharp focus.
The
mamiya/sekor
standard lens features
an
automatic diaphragm
to
let
you view the scene at the lens maximum aperture. When you press
the Shutter Release Button the lens will automatically "stop
down"
to
the aperture you
selected
and re-open
immediately
.
17
8 CHANGING LENSES
CAUTION : PLEASE READ THIS SECTION CAREFULLY BEFORE
AT
-
TEMPTING TO REMOVE
OR
INSTALL A LENS.
To remove an automatic lens from your camera, first press the lever
retracting button. Hold.the camera securely with one hand and press
the Lens Release Button. With the other hand, firmly grasp the lens
and rotate it
counterclockwise
until ali the threads have been dis-
engaged.
To mount the lens, screw the lens threads into the lens mount on the
camera body, rotating the lens clockwise until it stops and locks into
place with a sharp
click
. While mounting the lens, never press the lens
release button.
Always be sure. the film advance lever is retracted and that the
threads are
properly
engaged
. If t.he lens
is
difficult
to
screw
in
,
remove it and inspect the threads for dirt or other foreign matter.
Do not touch the reflex mirror
in
the camera body after removing the
IEInS
. Dust particles can be removed with a blower
or
soft camels hair
brush.
IMPORTANT:
Protect your camera
body
and lens by using lens and body caps.
18

9 HOLDING THE CAMERA
Support
the-
camera
in the palm
of
the
left
hand, with the thumb and
forefinger
gripping
the focusing ring. The palm
of
the right hand should
fit against the right
side
of
the
camera
body
with the
forefinger
resting
near the Shutter Release Button and the thumb on the
camera
back
.
Look
through the
viewfinder
with the camera resting against the
fore-
head
to
help
steady it, and the
left
elbow
held
in against the
body.
As a
general
rule, the
camera
should not
be
hand
held
at shutter
speeds
slower
than 1/60
second
. This
becomes
particularly
important
when
using lenses
of
longer
than normal focal length,
where
it may
be
neces-
sary
to
use even faster
speeds
to
eliminate
camera
movement.
At
speeds
slower
than 1/60, a
tripod
is a must
for
the
sharpest
photographs
.
IMPORTANT: When attaching the camera
to
a
tripod
that has a
long
attachment
screw
, adjust the
screw
to
less than
1/4
inch
(6.35mm)
to
prevent
damage
to
the
interior
of
the
camera
body
.
19
Table of contents
Other Mamiya/Sekor Digital Camera manuals


