Manhattan 525664 User manual

11N Mini Wireless AP
User Manual
Version 1.0 | 2/11/2014

11N Mini Wireless AP
1
CONTENTS
Chapter 1 Introduction................................................................................................................3
1.1 Features............................................................................................................... 3
1.2 System Requirement ........................................................................................... 3
1.3 Environment......................................................................................................... 3
1.4 Package Contents................................................................................................ 3
Chapter 2 Hardware Installation...............................................................................................5
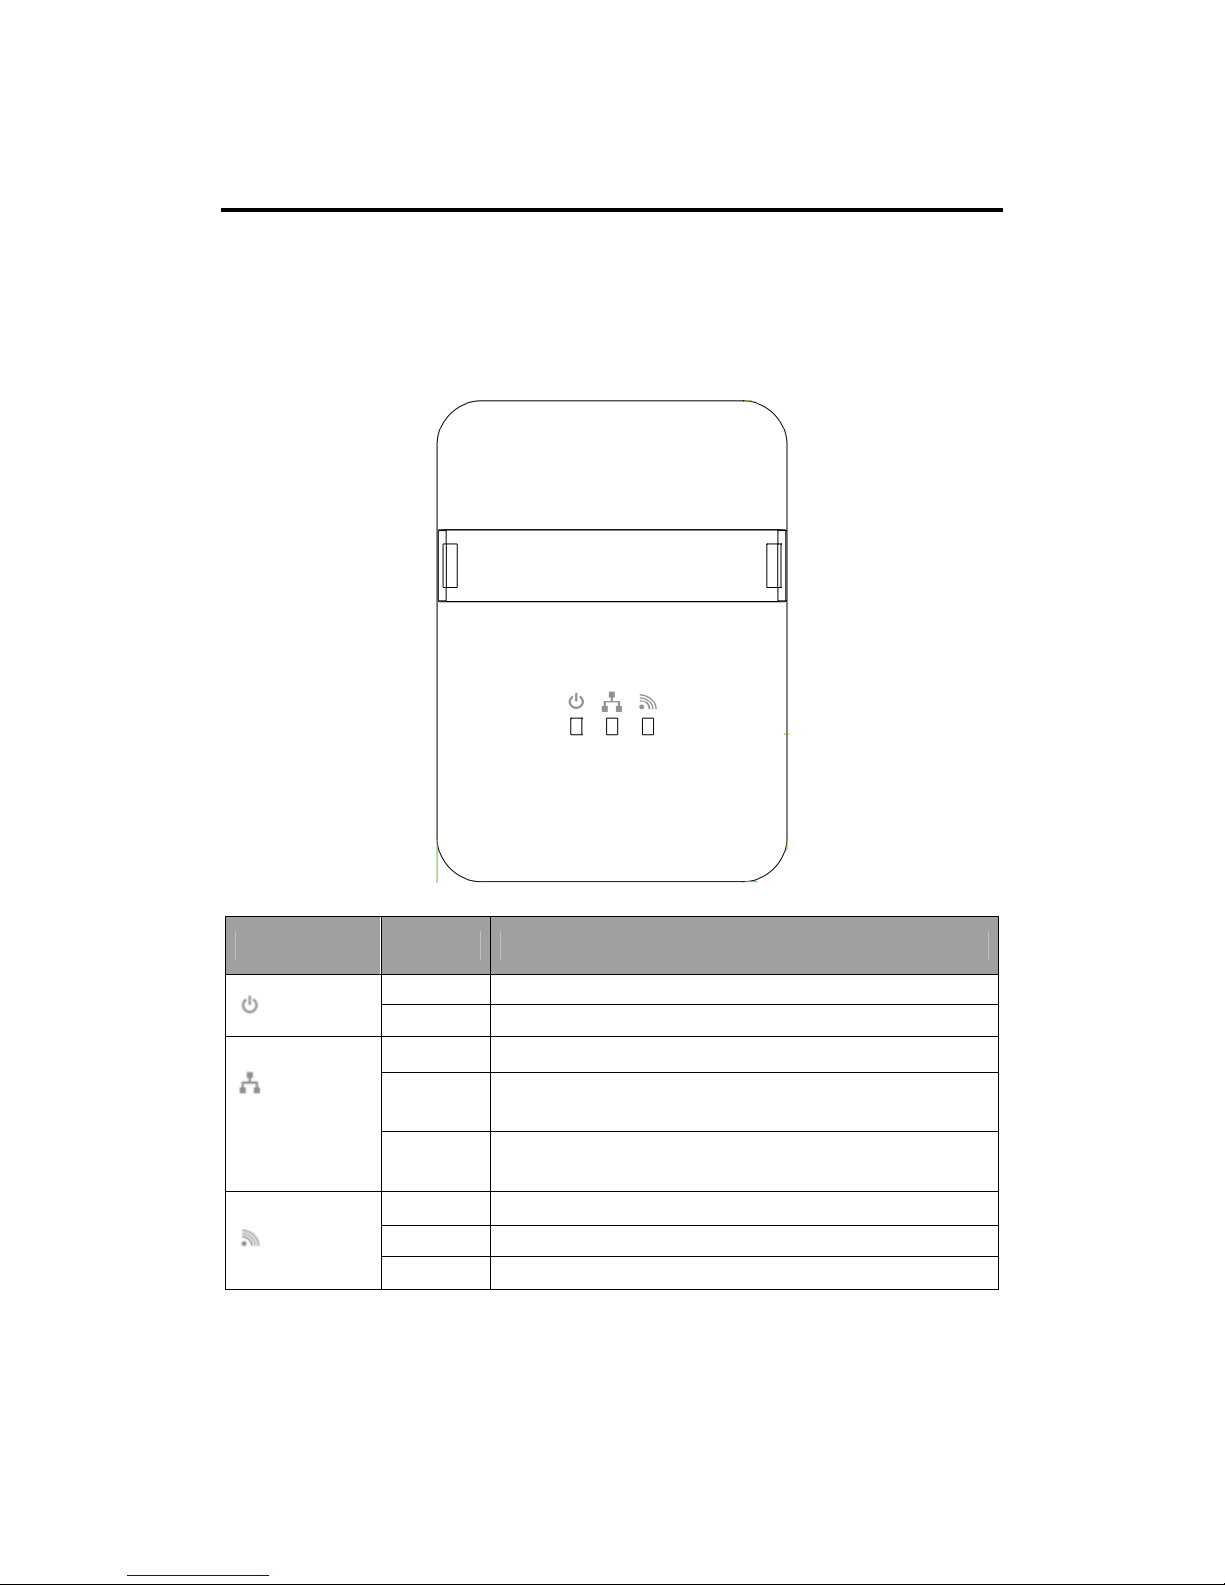
2.1 Front Panel .......................................................................................................... 5
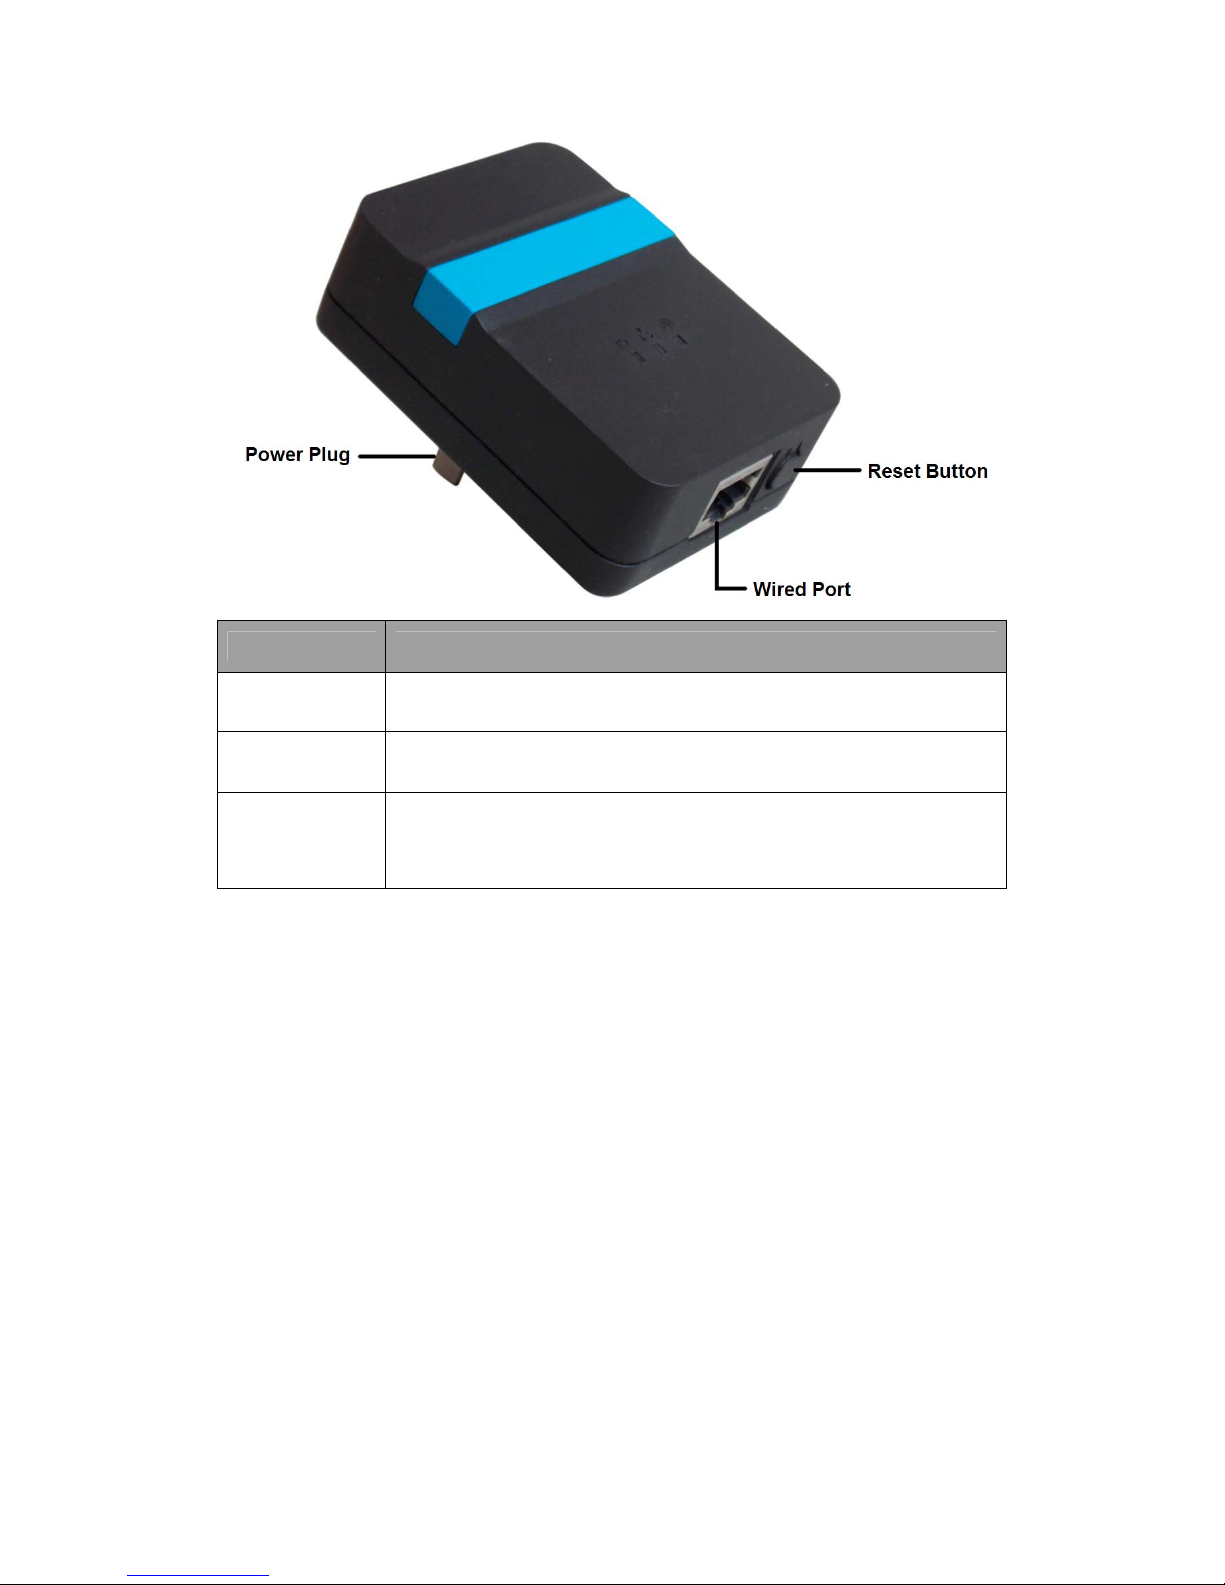
2.2 Physical Interface................................................................................................. 5
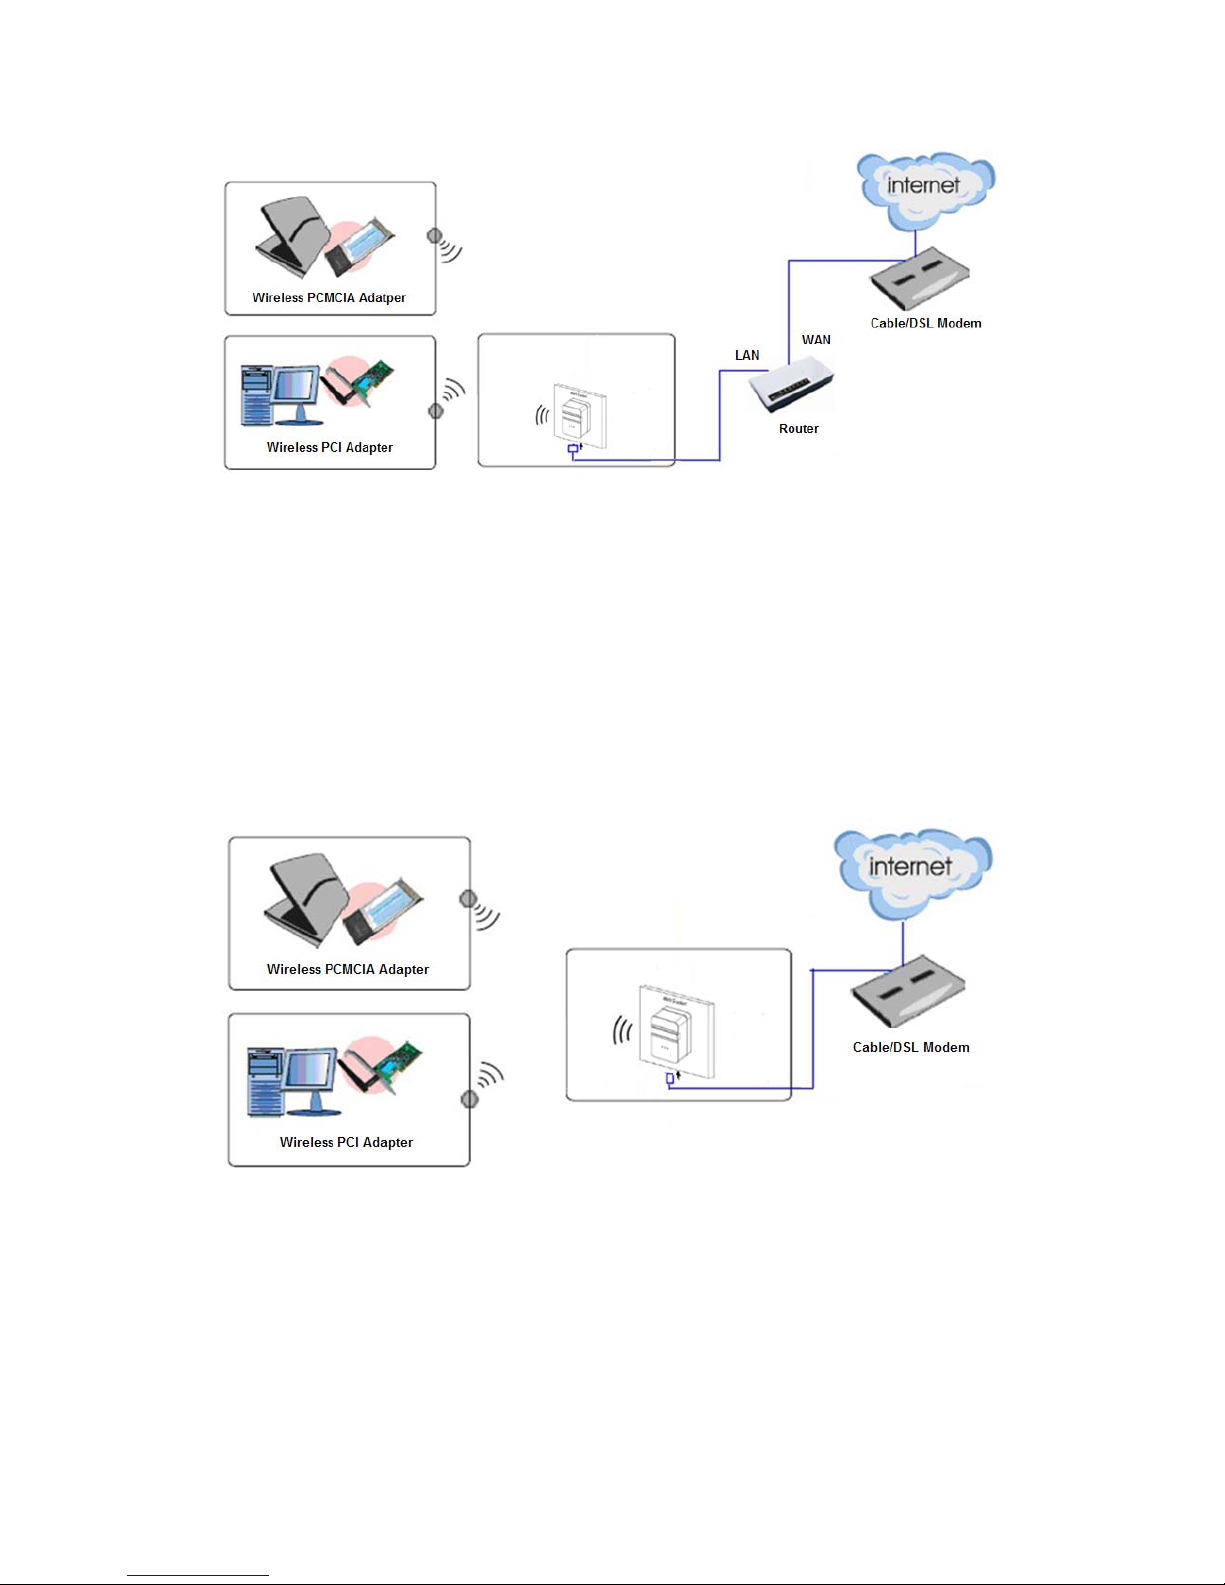
2.3 Typical install........................................................................................................ 6
Chapter 3 TCP/IP Configuration...............................................................................................9
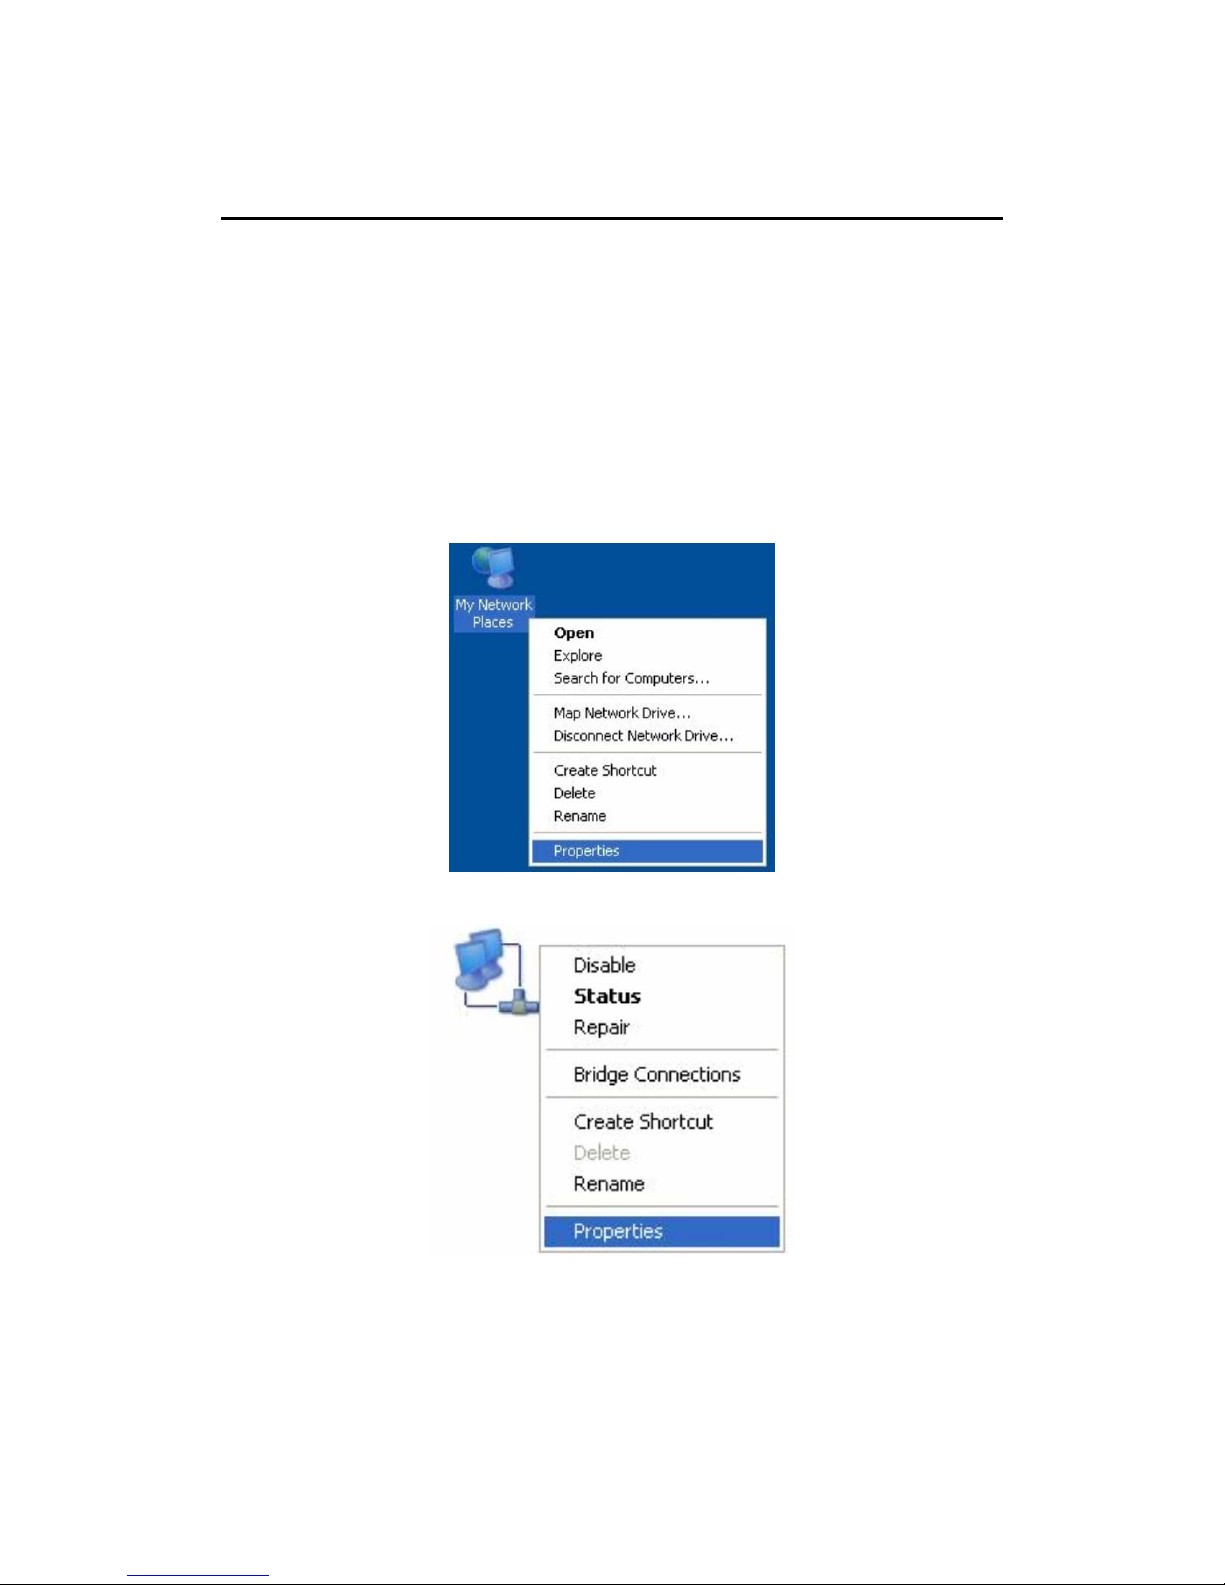
3.1 Set the Network Configurations ........................................................................... 9
3.2 Getting Started....................................................................................................11
Chapter 4 Configuring the AP.................................................................................................12
4.1 Operating Mode................................................................................................. 12
4.2 WAN Interface.................................................................................................... 12
4.2.1 WAN Interface.....................................................................................................12
4.2.2 DDNS...................................................................................................................16
4.3 LAN Interface..................................................................................................... 17
4.3.1 LAN Interface......................................................................................................17
4.3.2 Static DHCP ........................................................................................................18
4.3.3 DHCP Client........................................................................................................19
4.4 Wireless Setup................................................................................................... 19
4.4.1 Site Survey..........................................................................................................20
4.4.2 Basic.....................................................................................................................20
4.4.3 Security................................................................................................................21
4.4.4 Access Control....................................................................................................22
4.4.5 WDS.....................................................................................................................23
4.4.6 WPS......................................................................................................................23
4.4.7 Schedule..............................................................................................................24
4.5 Server Setup...................................................................................................... 25
4.5.1 Port Forwarding..................................................................................................25
4.5.2 DMZ......................................................................................................................25
4.6 Security.............................................................................................................. 26
4.6.1 Port Filtering........................................................................................................26
4.6.2 IP Filtering............................................................................................................27
4.6.3 URL Filtering .......................................................................................................27
4.6.4 MAC Filtering ......................................................................................................28
4.7 QoS Setup ......................................................................................................... 28
4.8 System............................................................................................................... 29
4.8.1 Time Zone............................................................................................................29

11N Mini Wireless AP
2
4.8.2 Upgrade Firmware..............................................................................................30
4.8.3 Save/Reload Settings........................................................................................30
4.8.4 Password.............................................................................................................30
4.8.5 Reboot..................................................................................................................31
4.8.6 Language.............................................................................................................31
4.9 Status................................................................................................................. 31
4.9.1 Status....................................................................................................................31
4.9.2 Statistics...............................................................................................................32
4.9.3 System Log..........................................................................................................32
4.10 Logout.............................................................................................................. 33

11N Mini Wireless AP
3
Chapter 1 Introduction
Congratulations on your purchase of this outstanding 11N Mini Wireless AP. The Wireless
AP is a 150M Mini Wireless AP/Repeater, fully complies with 802.11b/g/n specifications,
adopting 1T1R architecture, up to 150Mbps data rate, you can connect notebook
computer to a wireless network and access high-speed Internet connection which is
beneficial for the such as HD video streaming and online gaming applications. The default
mode is repeater which is especially useful for a large space to eliminate signal-blind
corners.It is good choice for Large house, office, warehouse or other spaces where the
existing wireless signal is weak. Instructions for installing and configuring this product can
be found in this manual. Before you install and use this product, please read this manual
carefully for full exploiting the functions of this product.
1.1 Features
zCompatible with IEEE 802.11b/g/n
zWireless speed up to 150Mbps
zInternal power supply
zTravel-sized design, Ideal for home or travel use
zSupport WPA and WPA2 to safeguard wireless network access security
zSupports AP, Router, Repeater operation modes
1.2 System Requirement
zAn Ethernet-Based Cable or DSL modem
zAn wireless network card on PC
zTCP/IP network protocol for each PC
zRJ45 Twisted-pair
zMicrosoft IE (or Firefox or Netscape)
1.3 Environment
Operating Temperature: 0 ~40℃℃
Storage Temperature: -10 ~70℃℃
Operating Humidity: 10%~90% non-condensing
Storage Humidity: 5%~95% non-condensing
1.4 Package Contents
Please make sure you have the following in the box, if anything is missing, please contact
your vendor.

11N Mini Wireless AP
4
¾11N Mini Wireless AP
¾User Manual
¾RJ-45 Network Cable
¾Warranty Card

11N Mini Wireless AP
5
Chapter2HardwareInstallation
2.1 Front Panel
The front panel provides LED’s for device status. Refer to the following table for the
meaning of each feature.
2.2 Physical Interface
There are three physical interfaces on this AP.
Name Status Indication
Off Power is off.
POWER On Power is on.
Off There is no device linked to the corresponding port.
On There is a device linked to the corresponding port but
there is no activity.
ETH
(LAN/WAN)
Flashing There is an activity device linked to the corresponding
port.
Off The Wireless function is disabled.
On The Wireless function is enabled.
WLAN Flashing Data is received or sent through the Wireless.

11N Mini Wireless AP
6
Interface Description
Power Plug A Power Plug for connecting the AP to a 100V~240V AC power
socket.
Wired Port A 10/100Mbps LAN/WAN Port for connecting the AP to the PC or the
broadband device with a network cable.
Reset(WPS)
Button
The Reset Button has two functions, WPS and Factory Default.
When press it less than 2 seconds, it is WPS function, more than 5
seconds, the AP will restore to factory default.
2.3 Typical install
AP Mode:
As the supplement of wired LAN, Wireless AP enables the wired LAN to connect to the
Internet wirelessly.
The default mode of Wireless AP is AP. Plug the power plug of Wireless AP in electrical
wall socket and connect the Ethernet cable correctly, you can surf the Internet by
connecting your PC(s) to The Router wirelessly.
To avoid the conflict of DHCP service with front-end devices, the DHCP server is default to
be closed on this mode. If you want to login in the management page, please set your
computer’s IP address manually.
As below picture, under this mode, wired port works as LAN, connects wired signal
directly and turns the wired into wireless via AP device for the using of terminal wireless
equipment.

11N Mini Wireless AP
7
1. Connect the LAN port of Wireless AP to the wired network port with and Ethernet cable.
2. Plug the power plug of Wireless AP in electrical wall socket.
3. Power on the PC(s) and notebook(s).
Router Mode:
As a wireless router, Wireless AP enables multi-user to share Internet via DSL/Cable
Modem.
As below picture, under this mode, wired port works as WAN, which can access network
by using WI-FI Network, Cable/DSL Modem to be used by the lower extreme wireless
device. DHCP server is default opened and it is recommended that the IP address and
DNS server address obtained automatically.
1. Connect the WAN port of Wireless AP to the LAN port on the DSL/Cable Modem.
2. Connect the WAN port on the DSL/Cable Modem to the wired Internet.
3. Plug the power plug of Wireless AP in electrical wall socket.
4. Power on the DSL/Cable Modem, PC(s) and notebook(s).
Wireless ISP Mode:
The Wireless AP is used as a wireless network card to connect the wireless network
signal or wireless router.
As below picture, the only wired port works as LAN. Computer could connect to the device

11N Mini Wireless AP
8
by wired way.
1. Connect the PC to the LAN port of Wireless AP with an Ethernet cable.
2. Plug the power plug of Wireless AP in electrical wall socket.
3. 3. Power on the PC.

11N Mini Wireless AP
9
Chapter3TCP/IPConfiguration
3.1 Set the Network Configurations
Under AP mode, you can proceed configuration by using the mode of wireless access or
wired access.
Under Router mode, you can access device to process configuration by using the mode of
wireless access.
After connecting device, operate according to below steps:
1. On your computer desktop right click "My Network Places" and select "Properties".
2. Right click "local Area Network Connection" and select "Properties".
3. Select "Internet Protocol (TCP/IP)" and click "Properties".

11N Mini Wireless AP
10
4. Select "Obtain an IP address automatically" or select "Use the following IP
address(S)".
A. Select "Obtain an IP address automatically" and "Obtain DNS server address
automatically". Click "OK".
B. "Use the following IP address (S)"
IP Address: 192.168.10.XXX :( XXX is a number from 2~254)
Subnet Mask: 255.255.255.0
Gateway:192.168.10.254
DNS Server: You need to input the DNS server address provided by you ISP.
Otherwise, you can use the AP's default gateway as the DNS proxy server. Click
"OK" to save the configurations.
Note: When your wireless AP is in AP mode, the equipment system DHCP function

11N Mini Wireless AP
11
will be automatic to shut down, you need to press the B method and set the IP.
Click "OK" to save the configurations.
3.2 Getting Started
To access the configuration pages, open a
web-browser such as Internet Explorer and
enter the IP address of theAP
(192.168.10.254).
The Default User/Password: admin
If succeed, you can see the follow page.

11N Mini Wireless AP
12
Chapter4ConfiguringtheAP
This chapter will show each Web page’s key functions and the configuration way.
4.1 Operating Mode
The Wireless AP supports three operation modes, Gateway,Bridge and Wireless ISP.
And each mode is suitable for different use, please choose correct mode.
4.2 WAN Interface
There are two submenus under the WAN Interface menu: WAN Interface, DDNS. Click
any of them, and you will be able to configure the corresponding function.
4.2.1 WAN Interface
This page is used to configure the parameters for Internet network which connects to the
WAN port of your Access Point. Here you may change the access method to Static IP,
DHCP Client, PPPoE, PPTP or L2TP by click the item value of WAN Access type.

11N Mini Wireless AP
13
1. If you ISP provides a static or fixed IP Address, Subnet Mask, Gateway and DNS
setting, select Static IP option. The Static IP settings page will appear:
IP Address / Subnet Mask: This is the AP's IP Address and Subnet Mask as seen by
external users on the Internet (including your ISP). If your Internet connection requires a
static IP address, then your ISP will provide you with a Static IP Address and Subnet
Mask.
Gateway: Your ISP will provide you with the Gateway IP Address.
MTU Size: The normal MTU (Maximum Transmission Unit) value for most Ethernet
networks is 1500 Bytes. It is not recommended that you change the default MTU Size
unless required by your ISP.
DNS: Your ISP will provide you with at least one DNS IP Address.

11N Mini Wireless AP
14
Clone Mac Address: You can configure the MAC address of the WAN.
2. If your ISP provides the DHCP service, please select DHCP Client option, and the AP’s
will automatically get IP parameters from your ISP. You can see the page as follows:
Host Name: This option specifies the Host Name of the AP.
MTU Size: The normal MTU (Maximum Transmission Unit) value for most Ethernet
networks is 1500 Bytes. It is not recommended that you change the default MTU Size
unless required by your ISP.
Set DNS Manually: If your ISP gives you one or two DNS addresses, select Set DNS
Manually and enter the primary and secondary addresses into the correct fields.
Otherwise, the DNS servers will be assigned dynamically from your ISP.
Clone Mac Address: You can configure the MAC address of the WAN.
3. If your ISP provides a PPPoE connection, select PPPoE option. And you should enter
the following parameters:

11N Mini Wireless AP
15
User Name / Password: Enter the User Name and Password you use when logging onto
your ISP through a PPPoE connection.
Service Name(AC): The service name and AC (Access Concentrator) name should not
be configured unless you are sure it is necessary for your ISP. In most cases, leaving
these fields blank will work.
Connection Type: There you can select Continuous, Connect on Demand or Manual.
Idle Time: You can configure the AP to disconnect from your Internet connection after a
specified period of inactivity.
4. If your ISP provides a PPTP connection, select PPTP option. And you should enter the
following parameters:
Dynamic IP (DHCP): Choose the IP address information provided by automatic
acquisition ISP, or manual input.
Default Gateway: Enter the gateway IP provided by your PPTP Server.
User Name / Password: Enter the User Name and Password you use when logging onto
your ISP through a PPTP connection.
5. If your ISP provides L2TP connection, please select L2TP option. And you should enter
the following parameters:

11N Mini Wireless AP
16
Dynamic IP (DHCP): Choose the IP address information provided by automatic
acquisition ISP, or manual input.
Default Gateway: Enter the gateway IP provided by your L2TP Server.
User Name / Password: Enter the User Name and Password you use when logging onto
your ISP through a L2TP connection.
4.2.2 DDNS
Dynamic DNS is a service that provides you with a valid, unchanging, internet domain
name (an URL) to go with that (possibly ever changing) IP-address.

11N Mini Wireless AP
17
Service Provider: Select one from the drop-down menu, such as DynDNS, OrayDDNS or
TZO.
Domain Name: Enter the domain name (Such as host.dyndns.org).
User Name/Email: Enter the user name or email the same as the registration name.
Password/Key: Enter the password you set.
4.3 LAN Interface
There are three submenus under the LAN Interface menu: LAN Interface, Static DHCP,
DHCP Client. Click any of them, and you will be able to configure the corresponding
function.
4.3.1 LAN Interface
This page is used to configure the parameters for local area network which connects to
the LAN port of your Access Point. Here you may change the setting for IP address,
subnet mask, DHCP, etc..

11N Mini Wireless AP
18
IP Address: Enter the IP address of your AP (factory default: 192.168.10.254).
Subnet Mask: An address code that determines the size of the network. Normally use
255.255.255.0 as the subnet mask.
Default Gateway: Enter the gateway IP address.
DHCP: Enable or Disable the DHCP server. If you disable the Server, you must have
another DHCP server within your network or else you must configure the computer
manually.
DHCP Client Range: Specify IP address for the DHCP Client Range.
DHCP Lease Time: The DHCP Lease Time is the amount of time a network user will be
allowed connection to the AP with their current dynamic IP address. Enter the amount of
time, in minutes, that the user will be "leased" this dynamic IP address.
Clone MAC Address: Input your MAC address should be cloned.
4.3.2 Static DHCP
This page allows you reserve IP addresses, and assign the same IP address to the
network device with the specified MAC address any time it requests an IP address.

11N Mini Wireless AP
19
IP Address: Enter the IP address which needs to be bound.
MAC Address: Enter the MAC address of the computer you want to assign the above IP
address.
Comment: You can add some comment for this item.
Click “Apply” to add the entry in the list.
4.3.3 DHCP Client
This table shows the assigned IP address, MAC address and time expired for each DHCP
leased client.
4.4 Wireless Setup
There are seven submenus under the Wireless Setup menu: Site Survey, Basic,
Security, Access Control, WDS, WPS, Schedule. Click any of them, and you will be
able to configure the corresponding function.
Other manuals for 525664
2
Table of contents
Other Manhattan Repeater manuals