Maquina S-1300 User manual

SNOW MACHINE
MODEL:S-1300
Please read the user
manual before use the machine
manual before use the machine
Safety Information
WARNING -
FOR YOUR OWN SAFETY, PLEASE READ THIS USER
MANUAL CAREFULLY BEFORE
YOUR INITIAL START
• Before your initial start-
up, please make sure that there is no damage caused
during transportation.
•
Should there be any damage, consult your dealer and do not use the
equipment.
•
To maintain the equipment in good working con
operation, it is necessary for the user to follow the safety instructions and warning
notes written in this manual.
•
Please note that damages caused by user modifications to this equipment are
not subject to warranty.
CAUTION:
Take care using this equipment!
High voltage-
risk of electric shock!
IMPORTANT:
The manufacturer will not accept liability for any resulting damages caused
by the non-
observance of this manual or any unauthorised modification to
the equipment.
• Never
let the power cable come into contact with other cables.
Handle the power cable and all mains voltage connections with particular caution!
•
Never remove warning or informative labels from the unit.
•
Do not open the equipment and do not modify the unit.
•
Do not switch the equipment on and off in short intervals, as this will reduce
the system’s life.
• Only use the equipment indoors.
•
Do not expose to flammable sources, liquids or gases.
FOR YOUR OWN SAFETY, PLEASE READ THIS USER
YOUR INITIAL START
-UP!
up, please make sure that there is no damage caused
Should there be any damage, consult your dealer and do not use the
To maintain the equipment in good working con
dition and to ensure safe
operation, it is necessary for the user to follow the safety instructions and warning
Please note that damages caused by user modifications to this equipment are
Take care using this equipment!
risk of electric shock!
The manufacturer will not accept liability for any resulting damages caused
observance of this manual or any unauthorised modification to
let the power cable come into contact with other cables.
Handle the power cable and all mains voltage connections with particular caution!
Never remove warning or informative labels from the unit.
Do not open the equipment and do not modify the unit.
Do not switch the equipment on and off in short intervals, as this will reduce
Do not expose to flammable sources, liquids or gases.
1

• Always disconnect the power from the mains when equipment is not in use or
before cleaning! Only handle the power-cable by the plug.Never pull out the plug by
pulling the power-cable.
• Make sure that the available mains supply voltage is same as unit back side
voltage.
• Make sure that the power cable is never crimped or damaged.Check the
equipment and the power cable periodically.
• If the equipment is dropped or damaged, disconnect the mains power supply
immediately and have a qualified engineer inspect the equipment before operating
again.
• If your product fails to function correctly, stop use immediately.
Pack the unit securely (preferably in the original packing material), and return it to
your dealer for service.
• Only use fuses of same type and rating.
• Repairs, servicing and power connection must only be carried out by a
qualified technician. THIS UNIT CONTAINS NO USER SERVICEABLE PARTS.
• This fixture is for professional and suitable for household use. The product
must be installed by a qualified technician in accordance with local territory
regulations. The safety of the installation is the responsibility of the installer. The
fixture presents risks of severe injury or death due to fire hazards, electric shock and
falls.
2
Disclaimers
We are excludes liability for unsafe situations, accidents and damage that are
the result of:
• Disregard for the warnings or in this documentation.
• Use for other purposes or under other circumstances than those set out in this
documentation.
• Alterations to the machine. This also includes the use of replacement parts
other than the original ones.
• Insufficient maintenance.
• Unauthorised removal of safety caps and/or safeguards.
• Incompetent operation of the machine.
• That is not liable for any consequential loss in the event of a machine
breakdown.
OPERATING CAUTION
• If this equipment is operated in any other way, than those described in this
manual, the product may suffer damage and the warranty becomes void. Incorrect
operation may lead to danger e.g: short-circuit, burns and electric shocks etc.
• Do not endanger your own safety and the safety of others!
• Incorrect installation or use can cause serious damage to people and/or
property.
• Operate the unit only after you have familiarised yourself with its functions. Do
not permit operation by persons not qualified for operating the unit and use the
original packaging if the unit is to be transported.
3

1. Product Information
The snow machine is a very powerful. It uses snow liquid and output realistic
snowflakes up into the air. The machine is equipped with a powerful air blower
which makes the perfect for theatres and TV shows, and create a magical
winter wonderland.
Specifications
Power supply: 220~240V/50Hz
Power consumption: 945W (±10%)
Fuse: T5A 250V
Tank capacity: 5L
Consumable Consumption: 420ML/min (Output on 100%)
Control: Wire control, DMX control and Remote control
Weight: 9.85KG
Dimensions: L580 x W 372 x H 319 mm
Notice: Design and product specifications can be changed without prior
notification.
Delivery Contents
- 1pc x Machine
- 1pc x Wire controller
- 1set x Remote controller
- 1pc x Power cable
- 1pc x User Manual
Notice:
If the product shows any mishandling ( box or the contents been damaged) from
shipping, notify the carrier, not products, in order to validate your claim immediately.
4
2. Product illustration
A
B
C
D
E
F
G
A: LED display and buttons
B: Wire control connector
C: Remote control connector
D: DMX Output / Input
E: Power switch ON/OFF
F: Direct switch Air blower to Min-Max
G: Power input
5

3. Installation
3.1 Set-Up:
Installation of the device must be handled by a familiar with the
hazards and the relevant regulations qualified persons.
Only authorised persons may carry out work with the machine.
Do not use the machine if there are people or animals in the direct output
Make sure there are no objects in the direct output that can be damaged by the
machine. (e.g. by getting wet).
Make sure that children unauthorised people can animals do not obtain access to the
machine.
Do not connect more units to a single electrical circuit than the installed fuse is able to
handle.
Do not remove any safeguards, safety caps and safety symbols.
All required safety devices must be in good condition and function properly.
Ensure sufficient lighting of the surroundings.
Keep the workplace clean.
3.2 The machine must be used in surroundings that:
Have a stable temperature of between 0 to 50 .℃ ℃
Have a relative humidity degree between 20% to 90% (non condensing)
Are free of dust, corrosive gases and high concentrations of organic vapours.
Are not situated in the vicinity of a source of vibration.
3.3 The machine is designed for indoor and outdoor use.( The machine is designed for
outdoor use and use in well-ventilated indoor spaces.)
WARNING
The machine can not be used in rain or other wet conditions.
Always create a safety zone of 3 m in front of the machine when the snow comes
direct from the snow output.
CAUTION
Walk carefully when approaching the machine. The floor can be slippery due to
spilled snow liquids.
6
3.4 INSTALL THE MACHINE
Install the machine on a firm surface with the supplied bracket the machine can be
placed under an angle.
Mount the bracket using the supplied bolts and spacers.
Place the machine under and angle by rotating the bracket to the bottom side of the
machine and tighten the knobs on the both sides.
4. Operation instructions
4.1 CONNECT POWER
1) Make sure that the power switch is off.
2) Connect a power cable to the Power input.
3) Connect the other end of the cable to the Power supply.
CAUTION: Do not connect more units to a single electrical circuit that the installed fuse
is able to handle.
4.2 PLACE THE BOTTLE WITH SNOW LIQUID.
1) Always follow the instructions as noted on the snow liquid bottle.
2) Place a bottle with snow liquid in the machine and remove the original lid.
3) Connect the snow lid with hose on the bottle.
4.3 POWER ON.
1) Make sure that the direct output is free from persons and objects.
2) When it’s time to snow, switch the power on.
3) LED Display panel, it is located on the backside of the snow machine.
It will displays .
4) To select control mode to operation machine to output snowflake.
WARNING
To achieve the maximum service life of the blower you must be must be stop 10
minutes after running 20 minutes.
7
4.4 WIRE CONTROL MODE
1) Connect wire controller to connector, it is located on the backside of the machine.
Whilst connect machine the Red LED (POWER) on the control box will illuminate.
2) Turn the key switch(SNOW ON/OFF) on the control box to ON, the Green
LED (IN USE) on the control box will be illuminate, the unit is ready to working. The
LED display will show “oUt”.
3) Adjust the potentiometer knob(OUTPUT VOLUME) on the control box to control the
volume of the snowflake.
4) Turn the switch (AIR VOLUME SWITCH) located on the backside of the machine,
to adjust the rev of the air pump. min.and max.rev (MIN,MAX) available.
5) Turn the key switch(SNOW ON/OFF) on the control box to OFF, the unit will stop
output.
4.5 REMOTE CONTROL MODE
1) Connect remote controller receiver to connector, it is located on the backside of
the machine.
2) Press the lock button of “ ” on the remote for operation, the machine will auto
output. And LED display shows .
And then use the “ ”and “ ” buttons to choose the output snowflake volume
from “P1”to “P10”, then press the “ENTER” button to confirm.
Press“ ”button ENTER Output Snowflake
to confirm volume
3) Turn the switch (AIR VOLUME SWITCH) located on the backside of the machine,
to adjust the rev of the air pump. min.and max.rev(MIN,MAX) available.
4) Press the lock button of “ ” on the remote for operation, the machine stop
output.
8
4.6 DMX MODE
1) Operating in a DMX control mode environment gives the user the greatest flexibility
when it comes to customising or creating a show. In this mode you will be able to
control each individual trait of the fixture and each fixture independently.
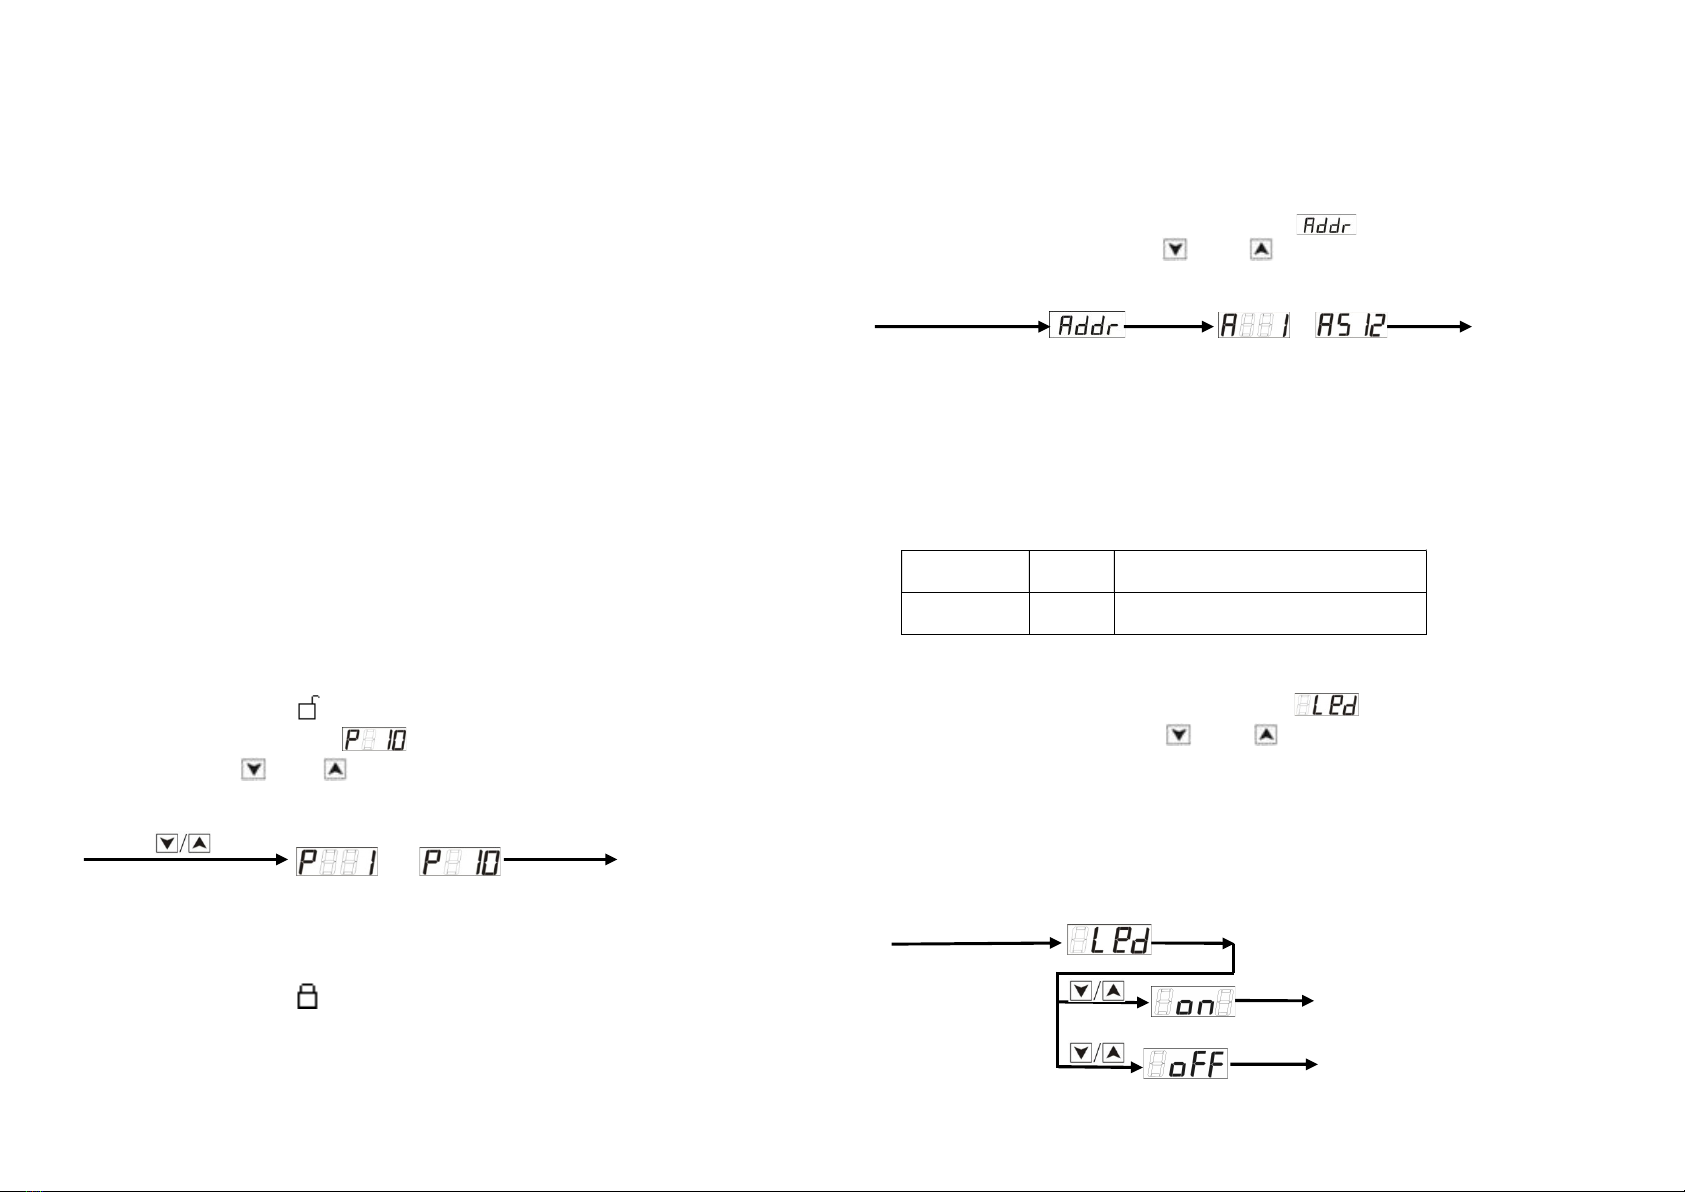
2) DMX address setting:
Press the “FUNC” button on the unit to show on the LED display. Press the
“ENTER” button then use the “ ”and “ ” buttons to choose the required DMX
address, then press the “ENTER” button to confirm.
Press”FUNC” button ENTER ENTER Enter
Set DMX address confirm to confirm DMX address
Note: This unit is designed so the DMX control takes priority. When a DMX controller is
connected the machine, the wire control function and the wireless remote control
function will both be disabled.
3) Connect DMX controller to operation.
4) DMX function
Channel Value Function
CH1
0-255 Snowflake from 0% to 100%
4.7 Set LED display panel indicator function:
Press the “FUNC” button on the unit to show on the LED display. Press the
“ENTER” button then use the “ ”and “ ” buttons to choose the display panel
indicator ON or OFF, then press the “ENTER” button to confirm.
NOTE:
Once confirm to “on”, the LED display will always on bright.
Once confirm to “oFF”, the LED display will close after 15 seconds. But will activation
after press any buttons on display panel.
Press “FUNC” button ENTER
confirm
ENTER The LED display panel
confirm always on bright.
ENTER The LED display panel
confirm will closed after 15 seconds.
9

5. SWITCHING OFF
Note: Walk carefully when approaching the machine. The floor can be slippery due to
spilled snow liquids.
To switch off the machine, take the following steps:
1) Before switching off, the machine must be Clean up!
Place a bottle filled with water in the machine and switch the power on to clean the
nozzle and liquid hoses. Do this for about one minute.
2) Disconnect the power cable, place the empty tank into machine.
3) Wipe down the machine with hand warm water and a cloth.
6.MAINTENANCE
To achieve the maximum service life of the machine you must be regularly clean the
machine and test if it is functioning correctly.
Contact dealer if the machine is not functioning correctly.
DANGER
Do not replace parts yourself, always consult dealer.
7. TROUBLESHOOTING
Always contact dealer if any malfunctions or errors occur that cannot be solved with the
instructions as described in this manual.
10
Table of contents


