Marantz SR6006 User manual

MODEL: SR6006
Model Information
INTEGRATED NETWORK AV RECEIVER
MI121316E3-1
I/R Codes
Product Specifications
Upgrades/Updates
Accessories
Reset Procedure
Warranty
Remote Control
Rear Panel
Front Panel
NOTE:
This edition is missing the link to the IR codes…………………………………………………………………….. 12/13/2016
Model Information
Index
Protection History
Display Mode
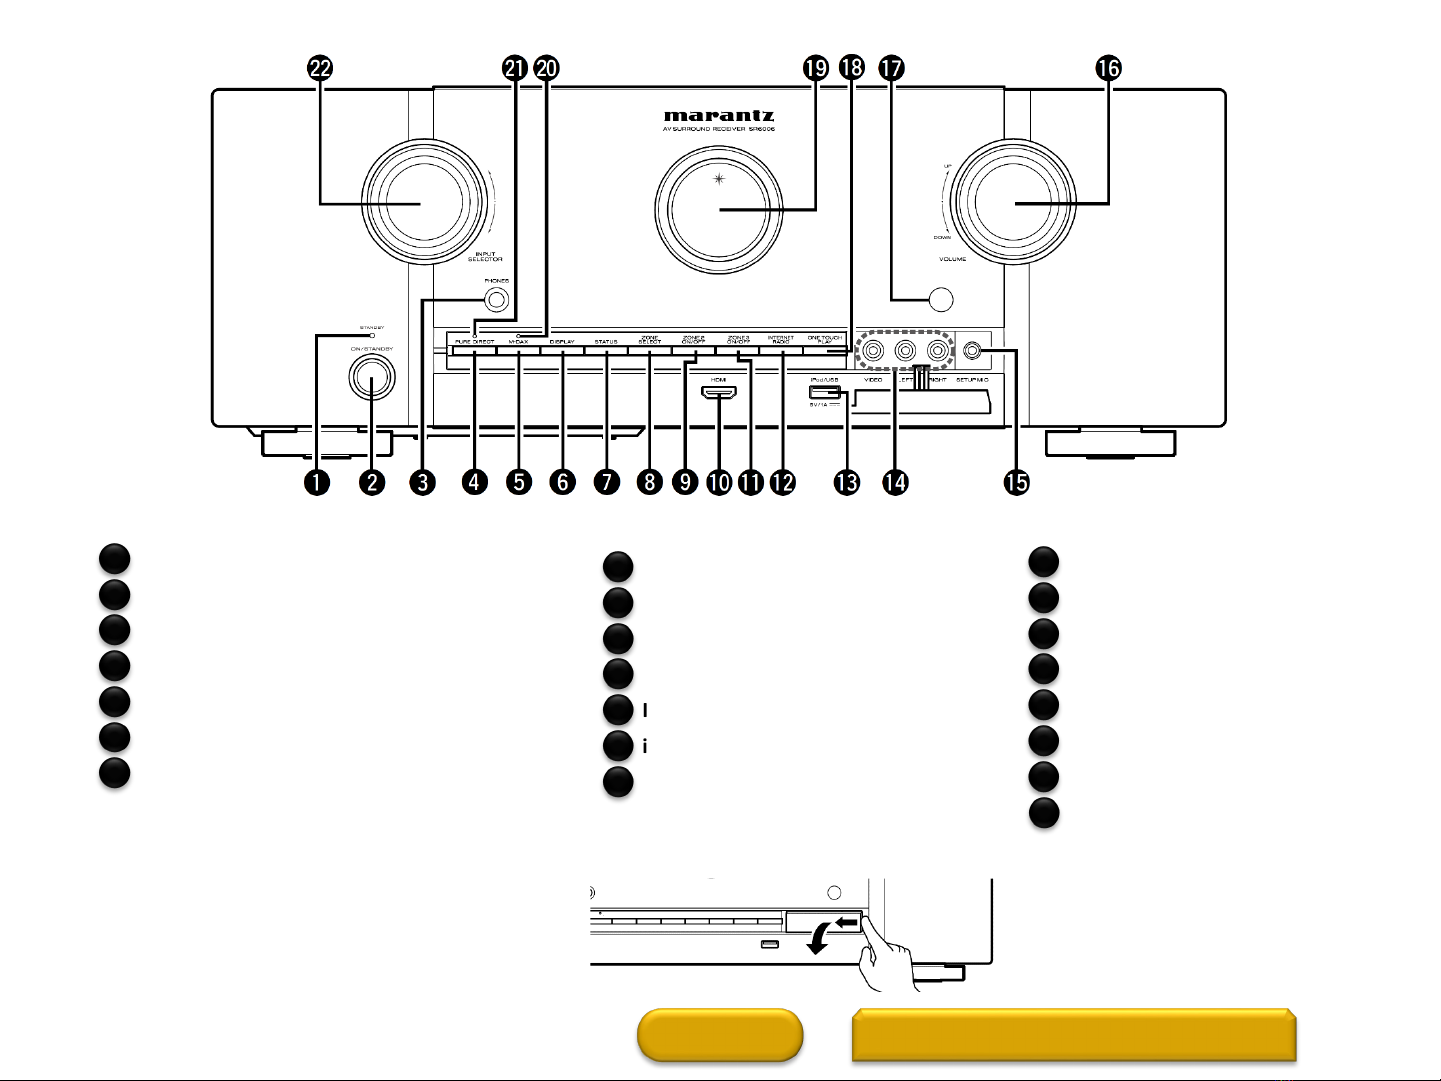
Front Panel
Power indicator (STANDBY)
Power operation button (ON/STANDBY)
Headphones jack (PHONES)
PURE DIRECT button
M-DAX button
DISPLAY button
STATUS button
HOME MAIN DISPLAY 2
ZONE SELECT button
ZONE2 ON/OFF button
HDMI connector
ZONE3 ON/OFF button
INTERNET RADIO button
iPod/USB port
AUX1 INPUT connectors
Remove the cap covering the
connectors when you want to use
them.
4
5
6
7
1
2
3
22
SETUP MIC jack
MASTER VOLUME control knob
Remote control sensor
ONE TOUCH PLAY button
Display
M-DAX indicator
PURE DIRECT indicator
INPUT SELECTOR knob
11
12
13
14
8
9
10
18
19
20
21
15
16
17
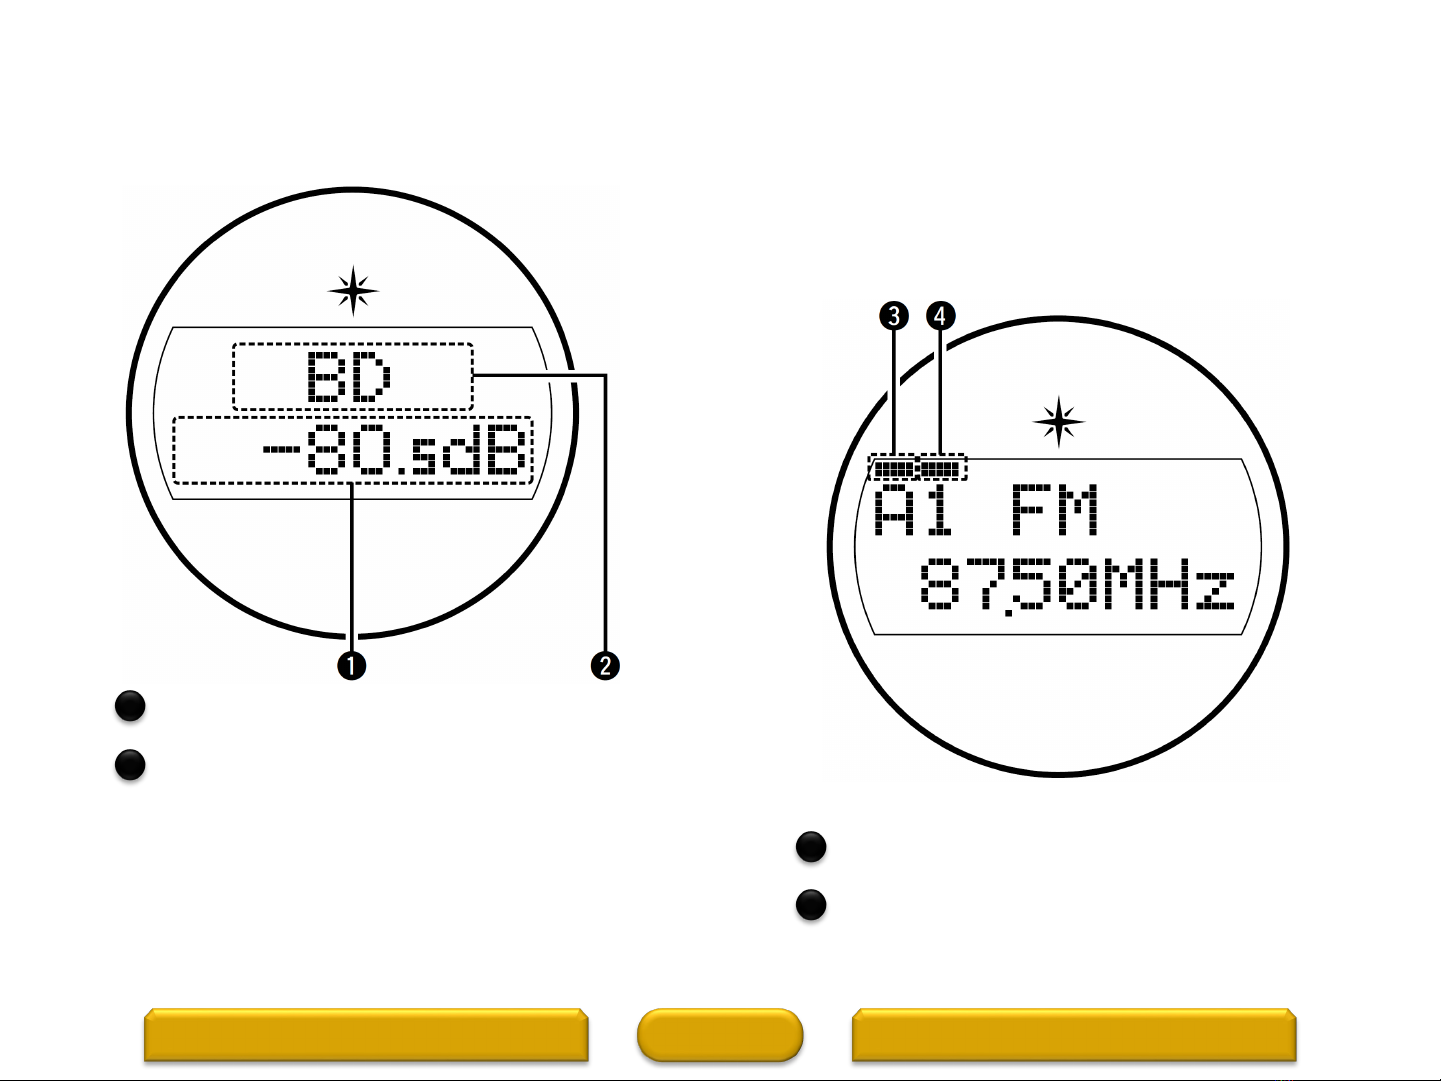
Main Display (1 of 2)
HOME MAIN DISPLAY (2 of 2)FRONT PANEL 3
Master volume indicator
Input source indicator
The currently selected input source name is displayed.
If the input source name has been changed using “SOURCE
SELECT” –“Rename” in the menu, the input source name
after the change is displayed.
Standard display Tuner display
These light according to the reception conditions
when the input source is set to “TUNER”.
Lights up when the broadcast is properly tuned in.
In the FM mode, this lights up when receiving stereo
broadcasts.
Main display
The input source name, sound mode, setting values and other information are displayed here.
1
2
3
4

Main Display (2 of 2)
HOME REAR PANELMAIN DISPLAY (1 of 2) 4
This lights when the sleep mode is selected.
ZONE2 power on displaySleep timer indicator
This lights up when ZONE2 (separate room) power
is turned on.
This lights up when ZONE3 (separate room) power
is turned on.
When the power is switched on in ZONE2 or
ZONE3, item #6 and item #7 light.
56
7
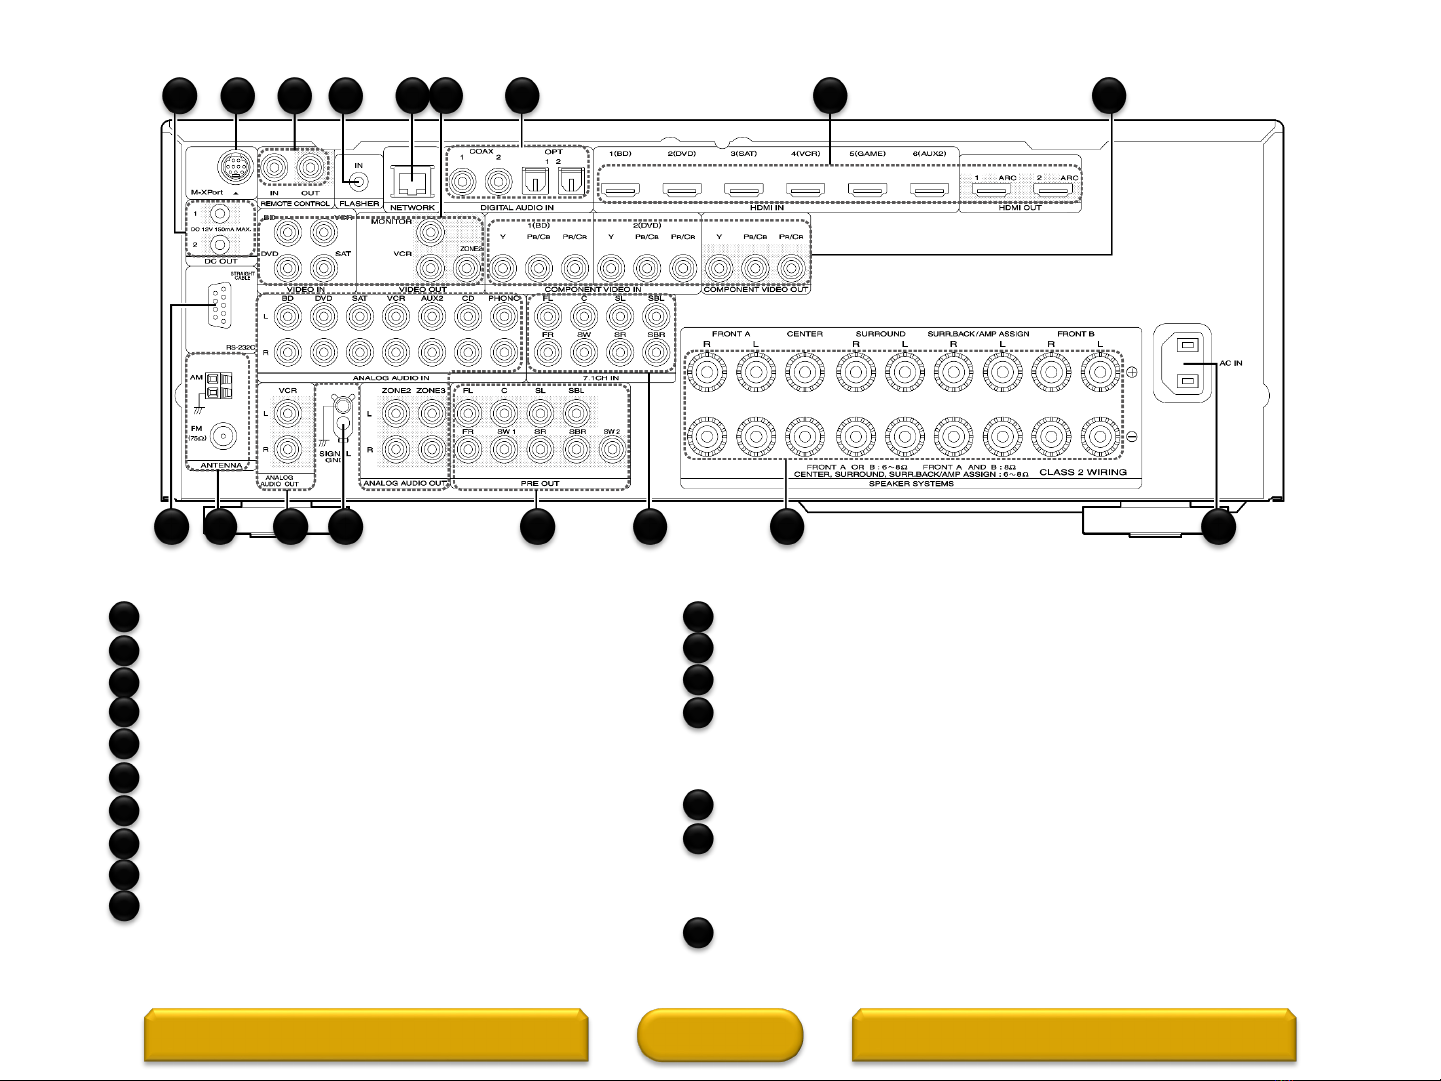
Rear Panel
HOME
RS-232C connector
HD RADIO antenna terminals
Analog audio connectors
SIGNAL GND terminal
PRE OUT connectors
7.1ch input connectors (7.1CH IN)
Speaker terminals (SPEAKER SYSTEMS)
AC inlet (AC IN)
Component video connectors
HDMI connectors
REMOTE CONTROLMAIN DISPLAY (2 of 2) 5
1
7
8
9
Digital audio connectors
Video connectors (VIDEO IN/VIDEO OUT)
Network connector (NETWORK)
FLASHER IN jack
Used when using a control BOX or other such control devices to
control this unit.
REMOTE CONTROL connectors
M-XPort connector
Do not touch the inner pins of the connectors on the rear panel.
Electrostatic discharge may cause permanent damage to the unit.
DC OUT jacks
10
2
3
4
5
6
1 2 3 4 5 6 7 8
910111213
141516
17
11
16
17
12
13
14
15
HOME
Remote Control (1 of 2)
REMOTE CONTRO (2 of 2)REAR PANEL 6
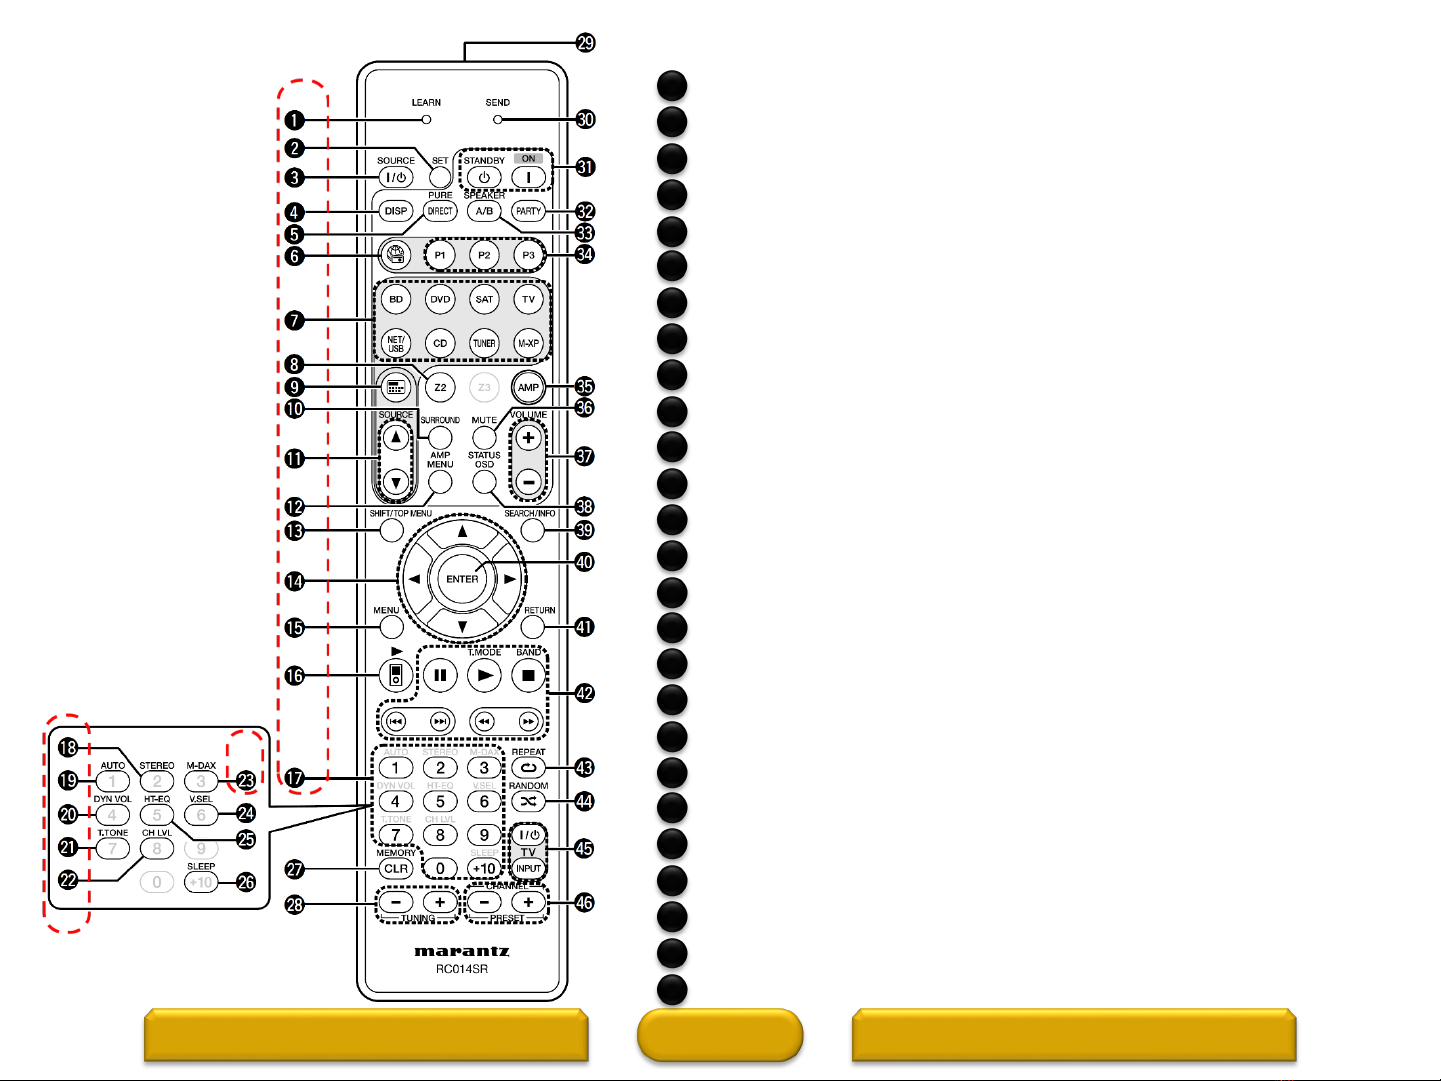
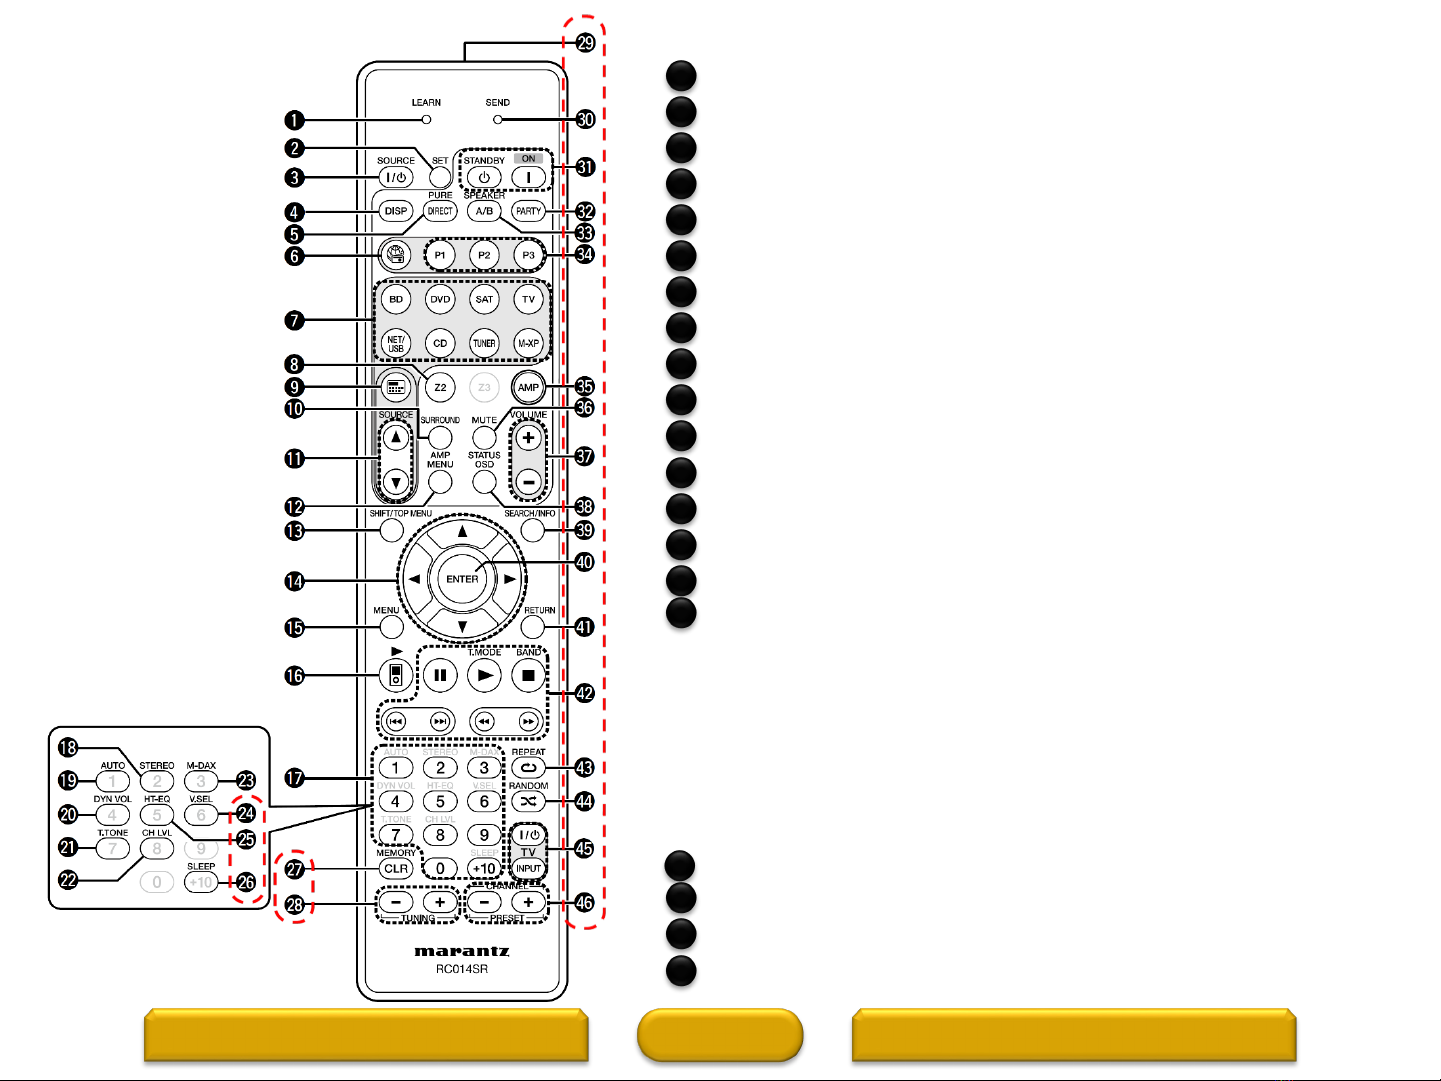
LEARN indicator
SET button
SOURCE power button
Display button (DISP)
PURE DIRECT button
Internet radio button
Input source select buttons
Zone mode buttons (Z2, Z3)
Source select menu button
SURROUND button
Source select buttons (SOURCE )
AMP MENU button
SHIFT/TOP MENU button
Cursor buttons ()
MENU button
iPod play button
Number buttons
STEREO button
AUTO buttons
Audyssey Dynamic Volume® button (DYN VOL)
Test tone button (T.TONE)
Channel level button (CH LVL)
M-DAX button
Video select button (V.SEL)
HT-EQ button
SLEEP button
1
3
4
5
2
6
8
9
10
7
11
13
14
15
12
16
18
19
20
17
21
23
22
21
23
22
HOME
Remote Control (2 of 2)
WARRANTY (1 of 2)REMOTE CONTROL (1 of 2) 7
Clear (CLR)/MEMORY button
TUNING buttons (+, –)
Remote control signal transmitter
SEND indicator
Power buttons (ON, STANDBY
PARTY button
SPEAKER A/B button
Preset channel buttons (P1 – P3)
AMP button
Muting button (MUTE)
Volume control buttons (VOLUME +, –)
STATUS OSD button
SEARCH/Information (INFO) button
ENTER button
RETURN button
System buttons
• Pause button (II)
• Play button ()
• Stop button ()
• Skip buttons ()
• Search buttons ()
Tuner system buttons
• FM/AM band switching button (BAND)
• Tuning mode button (T.MODE)
REPEAT button (0)
RANDOM button (1)
TV operation buttons (TV Z / X / INPUT)
CHANNEL/PRESET buttons (+, –)
NOTE: The Z3 button cannot be used.
27
29
30
31
28
32
34
35
36
33
37
39
40
41
38
42
43
45
44
46

MARANTZ USA LIMITED WARRANTY (1 of 2)
This warranty will be honored only in the U.S.A.
Length of Non-Transferable Warranty
This warranty on your Marantz product which is distributed and warranted by Marantz America Inc. remains in effect for the
following periods from the date of the original consumer purchase from an AUTHORIZED DENON ELECTRONICS (USA), LLC
DEALER.
MARANTZ AMERICA, Inc.
(a D&M Holdings Company)
100 Corporate Drive
Mahwah, NJ 07430-2041
(201) 762-6666
www.usa.Marantz.com
MARANTZ FACTORY SERVICE by PANURGY OEM
701 Ford Road (South Dock)
Rockaway, NJ 07866-2053
(973) 625-4056
(973) 625-9489 Fax
http://www.panurgyoem.com/Denon/Denonrepair.html
See the next page for more information about the Marantz limited warranty
HOME
3 year warranty for both Parts & Labor, from the original purchase date
1 year for refurbished (B-Stock) units
WARRANTY (2 of 2)REMOTE CONTROL 8

Warranty (2 of 2)
What is covered and what is not covered
Except as specified below, this warranty covers parts and labor to correct all defects in materials and workmanship. The following are not covered by the
warranty.
1. Damage, deterioration, malfunction or failure to meet performance specifications resulting from:
Accident, acts of nature, misuse, abuse, neglect or unauthorized product modification.
Improper installation, removal or maintenance, or failure to follow instructions supplied with the product.
Repair or attempted repair by anyone not authorized by Marantz to repair the product.
Any shipment of the product (claims must be presented to the carrier).
Any cause other than a product defect.
2. Cleaning, initial set-up, check-ups with no defects found, or charges incurred for installation, removal or reinstallation of the product.
3. Any product on which the serial number has been defaced, modified or removed.
4. Batteries.
5. Accessories, including but not limited to, batteries, cables, mounting hardware and brackets, cleaning accessories, antenna and detachable power cords.
6. Warranty is void if purchase was made from anyone other than an authorized Marantz dealer.
Who may enforce the warranty?
This warranty may be enforced only by the original purchaser.
What we will pay for
We will pay for all labor and material expenses for items covered by the warranty. Payment of shipping charges is discussed in the next section of this
warranty.
How you can get service
If your unit needs service, contact Marantz customer service by calling 201-762-6666. We will advise you of the name and location of one or more
authorized Marantz service stations from which service can be obtained. Please do not return your unit to the factory without prior authorization.
You must pay any shipping charges if it is necessary to ship the product for service. However, if the necessary repairs are covered under warranty, we
will pay the return shipping charges to any destination within the United States, its possessions or territories.
Whenever warranty service is required, you must present the original dated sales receipt or other proof of date of purchase.
Limitations of implied warranties
All implied warranties, including warranties of merchantability and fitness for a particular purchase, are limited in duration to the length of this warranty.
Exclusion of damages
Marantz liability for any defective product is limited to repair or replacement of the product at Marantz’s option. Marantz shall not be liable for damage to
other products caused by any defects in Marantz products, damages based upon inconvenience or loss of use of the product, or any other damages,
whether incidental, consequential, or otherwise.
How the law relates to the warranty
Some states do not allow limitations on how long an implied warranty lasts and/or do not allow the exclusion or limitation of incidental or consequential
damages, so the above limitations or exclusions may not apply to you.
This warranty gives you specific legal rights, and you may also have other rights which vary from state to state.
HOME RESETWarranty (1 of 2) 9

Reset
HOME
Reset procedure:
With the power off, press and hold the
“DISPLAY” button, “ZONE SELECT” button, and
“POWER” button simultaneously on the AVR for
a few seconds until the AVR’s display starts
flashing at intervals of about 1 second.
•A jolt of static electricity
•Current surge through an input
Before resetting the microprocessor;
•Check all connections carefully
•Check for setup errors
Note: If you had an installer setup your system, please first contact your installer to see if they can reset and then setup your system again
as there may be specific EQ calibrations (Audyssey) that the installer will need to perform.
ACCESSORIESWARRANTY 2 10
Resetting the micro is a procedure used to "reboot" the microprocessor to restore its
normal operation when it temporarily freezes, locks up, or behaves erratically. Resetting
the microprocessor, erases any saved settings you may have previously programmed
into the unit Issues that can affect the performance of the microprocessor:
Power/Standby
button
“DISPLAY” button “ZONE SELECT”
button
Other manuals for SR6006
4
Table of contents
Other Marantz AV Receiver manuals


 Service manual")


