Marantz CD-17mkIII User manual

Model CD-17mkIII User Guide
Compact Disc Player
CLASS 1 LASER PRODUCT
LUOKAN 1 LASERLAITE
KLASS 1 LASERAPPARAT
R

ENGLISH
WARRANTY
For warranty information, contact your local Marantz distributor.
RETAIN YOUR PURCHASE RECEIPT
Your purchase receipt is your permanent record of a valuable purchase.
It should be kept in a safe place to be referred to as necessary for
insurance purposes or when corresponding with Marantz.
IMPORTANT
When seeking warranty service, it is the responsibility of the consumer
to establish proof and date of purchase. Your purchase receipt or in-
voice is adequate for such proof.
FOR U.K. ONLY
This undertaking is in addition to a consumer's statutory rights and does
not affect those rights in any way.
FRANÇAIS
GARANTIE
Pour des informations sur la garantie, contacter le distributeur local
Marantz.
CONSERVER L'ATTESTATION D'ACHAT
L'attestation d'achat est la preuve permanente d'un achat de valeur. La
conserver en lieu sur pour s'y reporter aux fins d'obtention d'une
couverture d'assurance ou dans le cadre de correspondances avec
Marantz.
IMPORTANT
Pour l'obtention d'un service couvert par la garantie, il incombe au cli-
ent d'établir la preuve de l'achat et d'en corroborer la date. Le reçu ou
la facture constituent des preuves suffisantes.
DEUTSCH
GARANTIE
Bei Garantiefragen wenden Sie sich bitte an Ihren Marantz-Händler.
HEBEN SIE IHRE QUITTING GUT AUF
Die Quittung dient Ihnen als bleibende Unterlage für Ihren wertvollen
Einkauf Das Aufbewahren der Quittung ist wichtig, da die darin
enthaltenen Angaben für Versicherungswecke oder bei Korrespondenz
mit Marantz angeführt werden müssen.
WICHTIG!
Bei Garantiefragen muß der Kunde eine Kaufunterlage mit Kaufdatum
vorlegen. Ihren Quittung oder Rechnung ist als Unterlage ausreichend.
NEDERLANDS
GARANTIE
Voor inlichtingen omtrent garantie dient u zich tot uw plaatselijke Marantz.
UW KWITANTIE, KASSABON E.D. BEWAREN
Uw kwitantie, kassabon e.d. vormen uw bewijs van aankoop van een
waardevol artikel en dienen op een veilige plaats bewaard te worden
voor evt, verwijzing bijv, in verbend met verzekering of bij
correspondentie met Marantz.
BELANGRIJK
Bij een evt, beroep op de garantie is het de verantwoordelijkheid van
de consument een gedateerd bewijs van aankoop te tonen. Uw
kassabon of factuurzijn voldoende bewijs.
ESPAÑOL
GARANTIA
Para obtener información acerca de la garantia póngase en contacto
con su distribuidor Marantz.
GUARDE SU RECIBO DE COMPRA
Su recibo de compra es su prueba permanente de haber adquirido un
aparato de valor, Este recibo deberá guardarlo en un lugar seguro y
utilizarlo como referencia cuando tenga que hacer uso del seguro o se
ponga en contacto con Marantz.
IMPORTANTE
Cuando solicite el servicio otorgado por la garantia el usuario tiene la
responsabilidad de demonstrar cuá¥do efectuó la compra. En este caso,
su recibo de compra será la prueba apropiada.
ITALIANO
GARANZIA
L’apparecchio è coperto da una garanzia di buon funzionamento della
durata di un anno, o del periodo previsto dalla legge, a partire dalla data
di acquisto comprovata da un documento attestante il nominativo del
Rivenditore e la data di vendita. La garanzia sarà prestata con la
sostituzione o la riparazione gratuita delle parti difettose.
Non sono coperti da garanzia difetti derivanti da uso improprio, errata
installazione, manutenzione effettuata da personale non autorizzato o,
comunque, da circostanze che non possano riferirsi a difetti di
funzionamento dell’apparecchio. Sono inoltre esclusi dalla garanzia gli
interventi inerenti l’installazione e l’allacciamento agli impianti di
alimentazione.
Gli apparecchi verranno riparati presso i nostri Centri di Assistenza
Autorizzati. Le spese ed i rischi di trasporto sono a carico del cliente.
La casa costruttrice declina ogni responsabilità per danni diretti o indiretti
provocati dalla inosservanza delle prescrizioni di installazione, uso e
manutenzione dettagliate nel presente manuale o per guasti dovuti ad
uso continuato a fini professionali.
PORTUGUÊS
GARANTIA
Para informações sobre a garantia, contactar o distribuidor Marantz lo-
cal.
GUARDAR O RECIBO DE COMPRA
O recibo é o registo permanente da compra que fez. Deve ser guardado
num local seguro, para ser apresentado em questões relacionadas com
o seguro ou para quando tiver de contactar a Marantz.
IMPORTANTE
Quando procurar assisténcia técnica ao abrigo da garantia, é da
responsabilidade do consumidor estabelecer a prova e data de compra.
O recibe é prova adequada.
SVENSKA
GARANTI
För information om garantin, kontakta Marantz lokalagent.
SPAR KVITTOT
Kvittot är ett inköpsbevis på en värdefull vara. Det skall förvaras säkert
och hänvisas till vid försäkringsfall eller vidkorrespondens mod Marantz.
VIKTIGT
Fö att garantin skall gälla är det kundens sak att framställa bevis och
datum om köpet. Kvitto eller faktura är tillräokligt bevis fö detta.
DANSK
GARANTI
Henvend dem til Deres MARANTZ-forhandler angående inrformation om
garantien.
GEM DERES KVITTERING
Deres købskvittering er Deres varige bevis på et dyrt køb. Den bør
gemmes godt og anvendes som bevis, hvis De vil tegne en forsikring,
eller hvis De kommunikerer med Marantz.
VIGTIGT
Det påhviler forbrugeren at skaffe bevis for købet og købsdatoen, hvis
han eller hun ønsker garantiservice. Deres købskvittering eller faktura
er et fuldgyldigt bevis herpå.

1
ENGLISH
FOREWORD
This section must be read before any connection is made to the mains
supply.
Warnings
Do not expose the equipment to rain or moisture.
Do not remove the cover from the equipment.
Do not insert anything into the equipment through the ventilation
holes.
Do not handle the mains lead with wet hands.
Do not cover the ventilation with any items such as tablecloths,
newspapers,curtains,etc.
No naked flame sources,such as lighted candles,should be
placed on the equipment.
When disposing of used batteries, please comply with
governmental regulations or environmental public instruction’s
rules that apply in your country or area.
CE marking
The CD-17mkIII conforms with the EMC directive and low-
voltage directive.
EQUIPMENT MAINS WORKING SETTING
Your Marantz product has been prepared to comply with the household
power and safety requirements that exist in your area.
This product can be powered by 230 V AC only.
COPYRIGHT
Recording and playback of any material may require consent. For
further information refer to the following:
— Copyright Act 1956
— Dramatic and Musical Performers Act 1958
— Performers Protection Acts 1963 and 1972
— any subsequent statutory enactments and orders
PRECAUTIONS
The following precautions should be taken when operating the equip-
ment.
GENERAL PRECAUTIONS
When installing the equipment ensure that:
– the ventilation holes are not covered.
– air is allowed to circulate freely around the equipment.
– it is placed on a vibration-free surface.
– it will not be exposed to excessive heat, cold, moisture or dust.
– it will not be exposed to direct sunlight.
– it will not be exposed to electrostatic discharges.
In addition, never place heavy objects on the equipment.
If a foreign object or water does enter the equipment, contact your
nearest dealer or service center.
Do not pull out the plug by pulling on the mains lead; grasp the plug.
It is advisable when leaving the house for an extended period, or during
a thunderstorm, to disconnect the equipment from the mains supply.
PRECAUTIONS IN CONNECTION
• Be sure to unplug the power cable from the AC outlet or turn off the
POWER switch before proceeding with any connection.
• Connect one cable at a time observing the “input” and “output”.
This will avoid any cross connection between channels and signal
inputs and outputs.
• Insert the plugs securely. Incomplete connection may result in noise.
• Prior to connecting other audio equipment to the CD-17mkIII, please
read its owner’s manuals.

2
ENGLISH
COMPACT DISCS
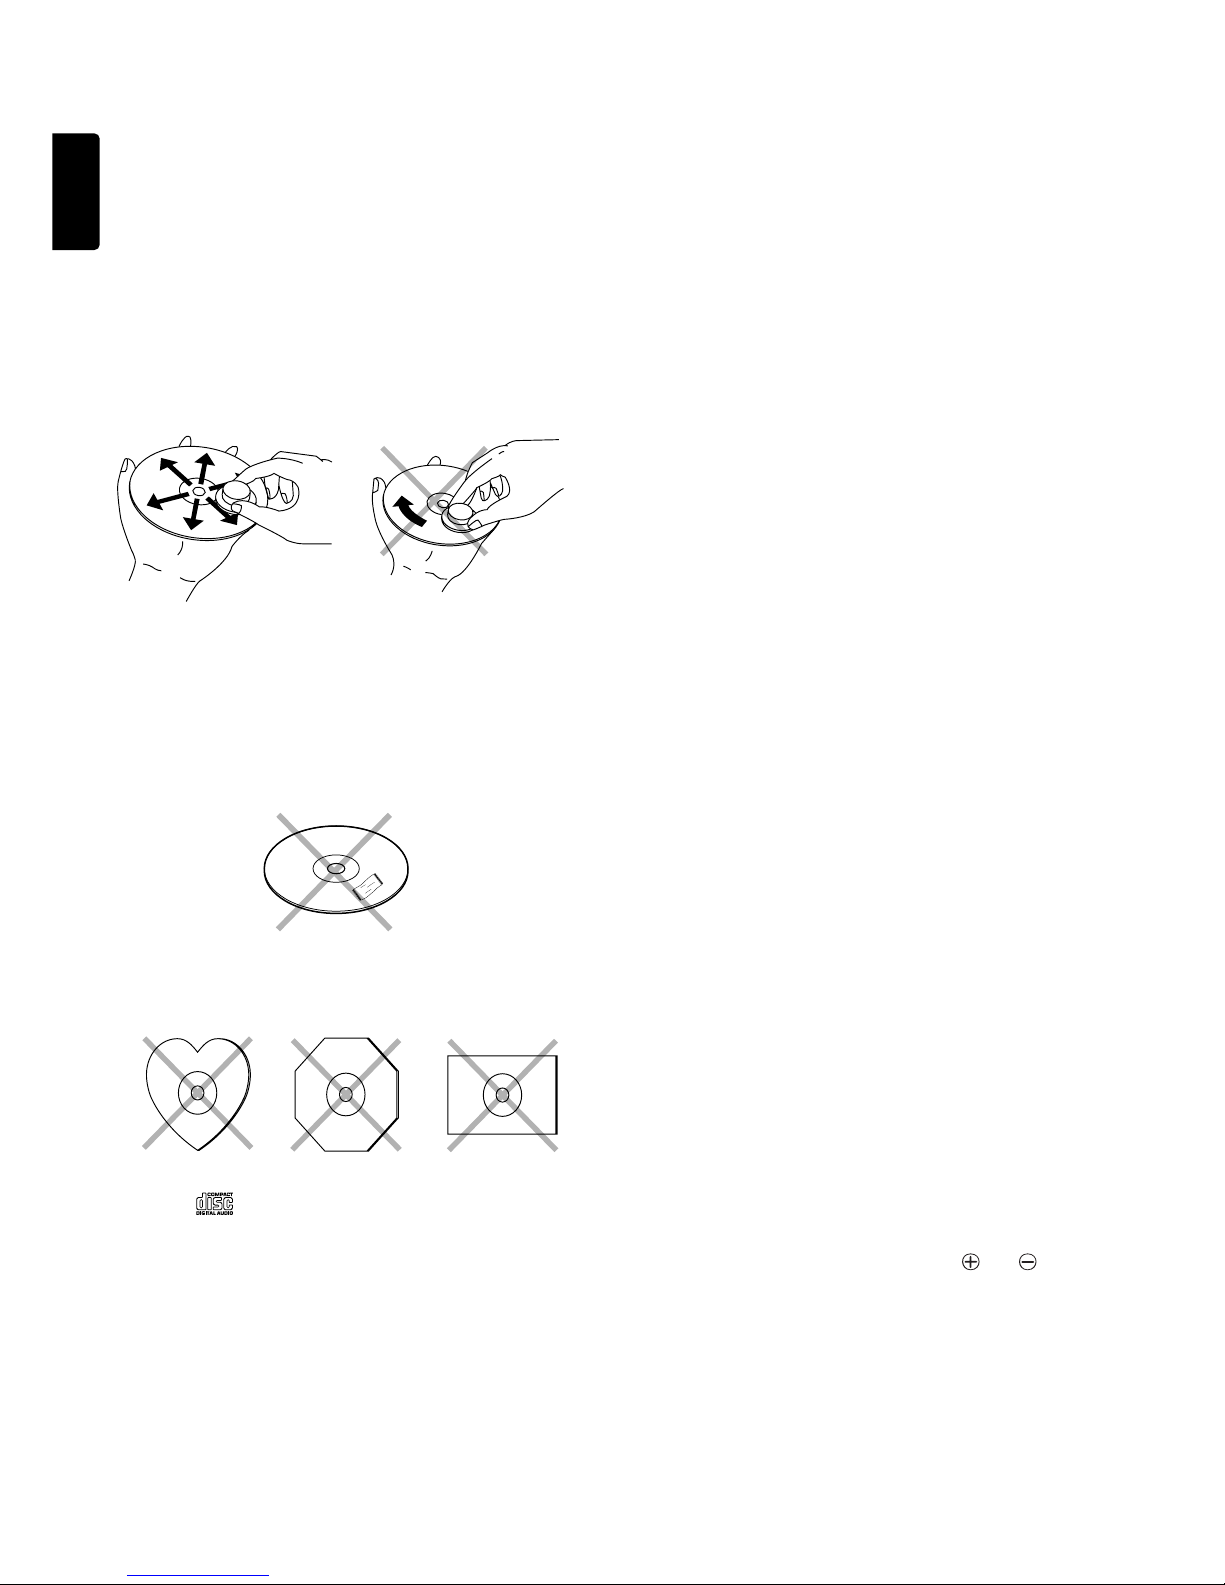
The glossy side shining like a rainbow is the front side of the disc, and
the side on which the label is printed is the back.
Unlike conventional turntables for playing analog discs, the CD-17mkIII
Compact Disc Player reads the information recorded on the disc from
underneath without contacting it using a beam of laser light. Therefore,
the performance of a compact disc will not degrade like conventional
analog records.
Handle discs carefully so as not to damage or scratch the front side.
To protect the disc, avoid placing it in the following locations:
–In direct sunlight or near a source of heat like a heater.
–In a place which is damp or dirty.
–In a place which could be exposed to rain, such as near a window.
Always keep the disc surface clean.
Up to six billion data units are recorded on the front side of the disc.
When cleaning the disc surface, always be sure to use a special
compact disc cleaner and wipe as shown below.
•Do not use conventional record cleaner for analog records, as this will
adversely affect the disc surface.
Store discs properly by placing them in their disc cases.
•Do not attach a piece of paper or sticker on the label side of disc.
When a disc has a piece of plastic tape or rental CD label with paste
protruded from the edge or when a disc has a trace of such a sticky
object, do not attempt to play the disc. If such a disc is played on the
CD player, impossibility of taking out the disc or other malfunction may
result.
•Do not use a disc with a special shape.
Do not attempt to play a disc with a special shape such as a heart-
shaped disc or octagonal disc. Otherwise the equipment malfunction
may result.
•Use discs which satisfy the CD standards such as those with the “CD
logo”or “”mark on their disc label surfaces.
No guarantees are made for playback if discs which do not satisfy the
appropriate CD standards are used.
Similarly, no guarantees are made for their sound quality even if it is
possible to play such discs.
Wipe in a radial direction. Do not wipe in circumferential direction.
OPERATING PRECAUTIONS
•In the winter you may notice that condensation forms on the window
of a well-heated room.
Condensation may also occur inside the CD player in the following
situations:
–When the listening room is first heated.
–When the humidity in the room is high.
–When the unit is moved from a cold environment to a warm room.
•If condensation occurs, the number of tracks cannot be read and the
CD player may not function properly. If this happens, leave the power
ON and wait for about 30 minutes before operating the unit.
•The CD player may interfere with the reception of your tuner or TV set.
If this occurs, place the CD player farther away from the tuner or TV.
•The CD player features very little noise compared to analog records,
and the noise before actual playback begins is almost inaudible.
Therefore, be careful not to set the volume control of the amplifier too
high, otherwise other audio components such as the speakers may be
damaged when actual playback starts.
CLEANING OF EXTERIOR SURFACES
With proper care and cleaning, the exterior finish of your equipment will
last indefinitely. Never use scouring pads, steel wool, scouring powders
or harsh chemical agents (e.g. lye solution), alcohol, thinners,benzine,
insecticide or other volatile substances, as these will mar the finish of the
cabinet. Likewise, never use cloths containing chemical substances. If
the equipment becomes dirty, wipe the external surfaces with a soft, lint-
free cloth.
If the cabinet becomes heavily soiled:
–dilute some washing-up liquid in water, in a ratio of one part detergent
to six parts water;
–dip a soft, lint-free cloth in the solution and wring the cloth out until it
is damp;
–wipe the equipment with the damp cloth;
–dry the equipment by wiping it with a dry cloth.
REPAIRS
Only the most competent and qualified service technicians should be
allowed to service the equipment. The Marantz company and its factory-
trained warranty station personnel have the knowledge and special
facilities needed for the repair and calibration of this precision equip-
ment. After the warranty period has expired, repairs will be performed for
a charge if the equipment can be restored to normal operation.
In the event of difficulty, consult your dealer or write directly to the nearest
location to you that is listed on the Marantz Authorized Service Station
list. Please quote the model and serial number of the equipment and give
a full description of what you think is abnormal about the equipment’s
behaviour.
CAUTIONS ON HANDLING BATTERIES
Misuse of the batteries can result in electrolyte leakage, rupturing,
corrosion, etc.
Bear in mind the following points when using batteries.
•Remove the batteries from the remote control unit if the unit is not going
to be used for a prolonged period (a month or more).
•Do not use an old battery together with a new one.
•Insert the batteries while ensuring that their and poles are
properly aligned with the corresponding markings on the remote
control unit.
•Batteries with the same shape may have different voltages. Do not use
different types of batteries together.
•If electrolyte has leaked, thoroughly wipe the inside of the battery
compartment, and then insert new batteries.
•When batteries which are no longer required are to be discarded,
follow the directions (regulations) laid down by the local authorities in
the area concerned for their disposal.

3
ENGLISH
FEATURES
•CD-TEXT compatibility.
•CD-RW (ReWritable) playback capability.
•Latest VAM1201 pickup mechanism.
•Two digital filter characteristics can be selected to provide delicate
tone variation.
•Last memory function stores the time display mode, filter position,
analog output level, etc. even after the power is switched off.
•A differential circuit which utilizes two type 2-channel D/A convert-
ers is used.
•High audio quality parts including the MARANTZ-original HDAM
circuitry.
•Highly rigid, stylish design with extensive use of aluminum blocks.
•Stylish wireless remote control unit with aluminum top.
About CD-TEXT
The CD-TEXT is a new type of music CD featuring the recording of
character information on the performer names, album name, track
names, etc., in addition to the audio information contained in music CD.
The character information is recorded in an area which has not been
utilized by previous music CDs. This means that the CD-TEXT discs can
be played back in the same way as ordinary music CD discs on any CD
player and that a CD-TEXT compatible player such as this unit can view
the character information in them as well as the audio.
This unit detects the CD-TEXT compatibility of each disc automatically
and displays the result in the display panel.
By operating the provided remote control unit, the display can show the
character information including the album name, track names, per-
former names, verse writer names, music composer names, arranger
names, message and music genre. However, note that the content of the
character information is variable depending on discs.
* For detailed operating procedures for displaying the character infor-
mation in the CD-TEXT, read the description in the main text of this
manual.
•The display of this unit can display up to 12 characters at a time. If the
character information in a disc is longer, the characters are scrolled
from the left to the right on the display.
* Scrolling refers to a method of displaying characters by moving
them. This unit is capable of smooth scrolling by feeding characters
bit by bit.
•Some of the CD-TEXT compatible discs also contains the recording of
the highlight sections of its tracks. This unit is capable of playing only
the highlight sections one after another, and this feature is referred to
as HIGHLIGHT SCAN.
Main unit display
Lights up when the loaded disc is CD-TEXT compatible.
Playing CD-RW discs
This unit can play back the CD-RW (ReWritable) discs as well as ordinary
music CD and CD-R (Recordable) discs.
•The CD-R and CD-RW discs should contain properly-recorded TOC
information so that they can be played back. With the CD recorder
system, writing the TOC information in a disc is referred to as finalizing
the disc. A disc cannot be recognized as a CD disc and played back
unless it has been finalized properly. For details, please read the
instruction manual provided with a CD recorder.
* TOC stands for Table Of Contents and contains information such as
the total number of tracks and total playing time of the disc.
•This unit can play only the discs recorded in the CD-DA format
designed for music reproduction. Do not attempt to play a disc
containing other data, such as a CD-ROM for PCs, on this unit.
•As the playback of a CD-RW disc necessitates partial change of the
player setup, it may take longer time for reading the TOC information
than when a music CD or CD-R disc is played.
About Digital Filter
This unit allows the selection of filter characteristics (coefficients) used
in playback. (→FILTER button on page 4)
The filter characteristics affects the way the source is played, such as the
presence, atmosphere, feeling of speed and sometimes the mellow-
ness, according to the music genre such as vocal, orchestra and pops
and to the recording method. Select the filter characteristic that can
make the played music source sound more satisfactory to your ears.
(1) FILTER-1 (Sharp roll-off)
The pre-echo and after-echo characteristics in the impulse response are
even. This tone can be treated as a reference tone regardless of the
source.
(2) FILTER-2 (Slow roll-off)
Both the pre-echo and after-echo characteristics in the impulse re-
sponse are small.The tone sounds smooth and features rich expression
of reverberations.
About Last memory
This unit incorporates the last memory function which stores the last
operating status of the unit even after the power is switched off. The last
memory function stores the following settings in memory at the moment
the power is switched off:
Text/time display modes, analog output level, filter position, and pro-
grammed tracks.
However, the tracks programmed for program playback are stored in
memory only when the power is switched off with the disc left in the unit.
The defaults (factory settings) of the above items are as listed below.
Text display priority : When a CD-TEXT disc is played,
the text display mode is activated in
priority.
Time display mode : Elapsed play time display.
Analog output level : Maximum value (0 dB).
Filter position : Filter 1
* When the STOP button is held depressed for more than 5 seconds in
stop mode, all stored items are cleared and return to the defaults.
TEXT 1 2
TTL TTL TIME
3 4 5 6 7 8 9 10 1112 1314 1516 1718 1920
CD TEXT
TEXT

4
ENGLISH
CONTROLS, CONNECTIONS
AND INDICATORS
Please read the following instructions referring to the illustration on page
.
FRONT
zz
zz
zPOWER switch
Press to switch power ON, and press again to switch OFF.
xx
xx
xDISC TRAY
Place a disc with the label side up.
cc
cc
cDisplay
Shows information such as the power ON/OFF state, track number,
playing time and current operation mode.
qq
qq
qTIME/TEXT information
Shows the time information when an ordinary music CD is played,
and shows the text information when a CD-TEXT compatible disc
is played.
ww
ww
wTEXT (CD-TEXT) indicator
Lights up when a CD-TEXT compatible disc is loaded.
ee
ee
eTrack number indicator
When a disc is placed on the tray and the tray is closed, the TOC*
is read and the numbers of all the tracks on the disc are displayed
“”lights up if there are more than 20 tracks on the disc. In
program mode only the track numbers of the programmed tracks
light up.
The track numbers go out in turn as each track finishes playing.
* TOC is the disc’s “Table Of Contents”and contains non-audio
data such as the track numbers and playing times of all the
tracks on the disc.
rr
rr
rOutput level indicator
Shows the analog output level as a relative reference.
tt
tt
tDISC indicator
Blinks during TOC readout.
yy
yy
yTTL (Total) indicator
Lights up when the total number of tracks in a disc is displayed.
uu
uu
uRNDM (Random) indicator
Lights up in the random play mode.
ii
ii
iPROG (Program) indicator
Lights up in the programming or delete programming mode.
oo
oo
oTRK (Track) indicator
Lights up when the track number being played is displayed.
!0!0
!0!0
!0 EDIT indicator
Lights up when the player is in edit mode.
!1!1
!1!1
!1 A-B indicators
Both indicators light up in the A-B repeat mode or one of them
lights up during playback of tape side A or B in the edit mode.
!2!2
!2!2
!2 INDX (Index) indicator
Lights up when the index number being played is displayed.
!3!3
!3!3
!3 RPT (Repeat) indicators
RPT: Lights up during all-track repeat mode, which plays all the
tracks on the disc repeatedly. Also lights up during program
repeat mode, which plays all the programmed tracks repeatedly.
RPT 1: Lights up during 1-track repeat mode, which repeatedly
plays a single track repeatedly.
!4!4
!4!4
!4 PEAK indicator
Lights up during peak search, and flashes during playback of the
peak.
!5!5
!5!5
!5 (Pause) indicator
Light up in the pause mode.
!6!6
!6!6
!6 TTL (Total) indicator
Indicates the remaining playing thme of the entire disc. In program
mode, this indicator shows the remaining playing of the current
program.
!7!7
!7!7
!7 (Play) indicator
Light up during CD playback.
!8!8
!8!8
!8 TIME indicator
Lights up in the time display mode.
!9!9
!9!9
!9 FILTER indicator
Lights up selected filter position.
vv
vv
v
OPEN/CLOSE
button
Pressing the
OPEN/CLOSE
button opens the disc tray. Place a compact
disc on the tray with the label side facing up. Gently press the front of the
disc tray to close.
bb
bb
bREMOTE SENSOR
This window receives signals transmitted from the remote control unit.
nn
nn
n
PLAY
button
Press to start playback.
mm
mm
m
STOP
button
Press to stop playback. This button is also used for deleting a program.
,,
,,
,
PAUSE
button
Press to interrupt playback temporarily. The indicator lights up during
pause. When pressed again, the indicator goes out and playback
resumes from the same position.
..
..
., (Track Previous/Next) buttons
When the button is pressed during playback, play re-starts at the
beginning of the current or a previous track.
When the button is pressed, play re-starts at the beginning of the
next or a subsequent track.
Hold down or button to find a particular passage in a
backward or forward direction.
The selected track number is shown on the display.
These buttons can also be used to select a desired track from which to
start playback.
These buttons are also used in program mode to select tracks for
programming.
⁄0⁄0
⁄0⁄0
⁄0 FILTER button
This unit allows the selection of filter characteristics (coefficients) used
in playback.
RNDM PROG EDIT A – B RPT 1
DISC
TEXT 1 2
TTL TRK INDX PEAK TTL TIME
3 4 5 6 7 8 9 10 1112 1314 1516 1718 1920
1
2
FILTER

5
ENGLISH
USING THE REMOTE CONTROL UNIT
1. Remote control
Operate the remote control unit (RC-DA17CD) within a distance of
approx. 5 m from the infrared signal reception window (remote sensor)
on the front of the CD player.
Remote control operation may not be possible if the remote control unit’s
transmitter is not pointing in the direction of the remote sensor or if there
is an obstruction between the transmitter and the remote sensor.
Remote control operating range
2. Loading batteries
Batteries in this remote control unit have a life of approximately 1 year
under normal operating conditions. If the remote control unit is not going
to be used for an extended period of time, remove the batteries. Also, if
you notice that the batteries are starting to run down, replace them as
soon as possible.
qRemove the battery cover.
wInsert the batteries with correct +/– orientation.
eClose the battery cover until it clicks shut.
60°
Approx. 5m
CD player
Remote control unit (RC-DA17CD)
Two AAA-size (R03) batteries
Remote control unit (RC-DA17CD)
Rear side
REAR
AA
AA
AANALOG OUTPUT jacks
Connect to the CD or AUX input jacks of a preamplifier.
BB
BB
BDIGITAL OUTPUT OPTICAL output jack
The digital signal can transmitted in the form of light through an optical
fiber cable and photocoupler. The optical signal transmission features
low signal loss due to cables and complete isolation of the ground loop
so that the very high quality can be reproduced without any digital noise
Connection method:
Connect this jack to aD/A converter, digital sound processor or an
amplifier equipped with a Digital Optical input jack. Remove the caps
from the DIGITAL OUTPUT OPTICAL jack and the Optical input jack of
the connected component and connect the two jacks through an optical
fiber cable.
* Do not bend the optical fiber cable.
* Leave the cap attached when the OPTICAL jack is not used.
CC
CC
CDIGITAL OUTPUT COAXIAL output jack
By connecting this jack to a digital audio component (D/A converter,
digital sound processor, etc.), digital signals from compact discs can be
transmitted directly from the player without first being converted to
analog.
DD
DD
DREMOTE CONTROL IN/OUT jacks
By connecting this CD player to another Marantz audio component
using a D-BUS remote control cable, you can operate the components
remotely as a single system.
•When connecting to a component with a remote sensor, connect the
REMOTE CONTROL IN jack of this unit to the REMOTE CONTROL
OUT jack of the component with the remote sensor.
•When connecting to a component which is not equipped with a remote
sensor, connect the component to the REMOTE CONTROL OUT jack
of this unit.
For the D-BUS cable connection, use a commercially available RCA-
type pin lead.
•By connecting this CD player to a Marantz auto reverse cassette deck
(such as the SD4050), automatic recording from the CD player to the
cassette deck can be carried out.
EE
EE
EREMOTE switch
When using this unit independently, set this switch to INTERNAL. When
using this unit in a system incorporating a Marantz tuner or timer
equipped with a remote sensor, set the switch to EXTERNAL.
NOTE
Always set this switch to INTERNAL unless the unit is connected with
other MARANTZ equipment through a system connection. When this
switch is set to EXTERNAL, the main unit cannot be controlled from
the provided remote control unit.
FF
FF
FAC POWER INPUT jack
Using the provided AC cord, connect to a household AC power outlet.

6
ENGLISH
REMOTE CONTROL UNIT RC-DA17CD
When the power to the CD player is ON and a disc is loaded on the disc
tray, the remote control unit (RC-DA17CD) can be used to operate the
player’s various functions. However, the power to the CD player must be
switched ON/OFF using the POWER switch on the main unit.
vv
vv
v
OPEN/CLOSE
button
nn
nn
n
PLAY
button
mm
mm
m
STOP
button
,,
,,
,
PAUSE
button
These buttons have the same functions as the buttons with the same
names on the main unit front panel. See the corresponding descriptions
on page 4.
..
..
., buttons
When the button is pressed during playback, play re-starts at the
beginning of the current or a previous track.
When the button is pressed, play re-starts at the beginning of the
next or a subsequent track.
The selected track number is shown on the display.
These buttons can also be used to select a desired track from which to
start playback.
These buttons are also used in program mode to select tracks for
programming.
* The and (Track Previous/Next) buttons on the remote
control do not start a search.
Use the and (Search Reverse/Forward) buttons to conduct
a search.
⁄1⁄1
⁄1⁄1
⁄1 CD button
With the CD-17mkIII, this button is invalid.
⁄2⁄2
⁄2⁄2
⁄2, ⁄3⁄3
⁄3⁄3
⁄3 DIGITAL 1, 2 button
With the CD-17mkIII, this button is invalid.
⁄4⁄4
⁄4⁄4
⁄4 DIMMER button
Press to adjust the display illumination brightness. The illumination at its
the brightnest when the power is switched ON. Each time this button is
pressed, the brightness dim until the fourth press, after which the
illumination returns to the original brightness.
⁄5⁄5
⁄5⁄5
⁄5 TIME button
Switches the time shown on the display to the remaining time of the
current track or the remaining time of the entire disc.
With a CD-TEXT disc, this switch is also used to switch the displayed
information from the text display mode to the time display mode.
⁄6⁄6
⁄6⁄6
⁄6 REPEAT button
Press to select 1-track repeat, all-track repeat or program repeat
playback mode.
⁄7⁄7
⁄7⁄7
⁄7 A-B button
Used to set the starting and stopping points of a passage for repeated
playback.
⁄8⁄8
⁄8⁄8
⁄8 CANCEL button
Used to delete specified track numbers from a program.
Also used when creating programs by deleting any tracks which you do
not want to listen to (delete programming).
⁄9⁄9
⁄9⁄9
⁄9 EDIT button
Press to engage the editing function, which helps record a disc onto a
tape by playing the tracks according to the tape length and leaving a
non-recorded blank of 4 seconds between every track.
¤0¤0
¤0¤0
¤0 VOLUME buttons
Press to vary the ANALOG OUTPUT volume between 0 and –30 dB. The
level when the power is turned on is 0 dB (maximum volume).
¤1¤1
¤1¤1
¤1 PROG button
Press to activate program play, so that only the selected tracks from the
disc loaded on the disc tray will be played.
¤2¤2
¤2¤2
¤2 Numeric (0 to 9) buttons
When used during playback, these buttons allow you to specify the
number of another track you want to play.
When used during stop mode, these buttons allow you to specify the
number of a track from which to start playback.
These buttons are also used to select tracks for programming.
¤3¤3
¤3¤3
¤3 INDEX buttons
: Press during playback to return to the next index.
: Press during playback to advance to the next index.
*These buttons are valid when playing a disc in which index have been
recorded.
¤4¤4
¤4¤4
¤4 , (Search Reverse/Forward) buttons
: When pressed during playback, this button fast-reverses the
play position.
: When pressed during playback, this button fast-forwards the
play position.
¤5¤5
¤5¤5
¤5 RANDOM button
When this button is pressed, the player enters random play mode (tracks
on the disc are selected and played in a random order). When pressed
again, random play is cancelled.
¤6¤6
¤6¤6
¤6 AMS (Automatic Music Scan)/HIGHLIGHT S.(Highlight
Scan) button
When this button is pressed, the player automatically plays the first 10-
second part of each track in the disc.
If the loaded disc is a CD-TEXT disc containing the highlight information,
the first press of the button initiates the Highlight Scan operation and the
second press initiates the normal AMS operation as described above.
¤7¤7
¤7¤7
¤7 RECALL/SCROLL button
Press this button to display the programmed track numbers and program
numbers (the order the tracks are programmed) in sequence.
If the loaded disc is a CD-TEXT disc, press this button while the text
information is displayed to scroll the characters.
¤8¤8
¤8¤8
¤8 CD-TEXT button
When playing a CD-TEXT disc, press this button to switch the time
display to the text information display.
* If this button is pressed when the loaded disc is not a CD-TEXT
compatible disc, the display shows "No Text" then returns to the time
display.
CD 1 2
DIGITAL
DIMMER TIME
REPEAT A - B VOLUME
CANCEL EDIT PROG
1 2 3
4 5 6
7 8 9
OPEN/CLOSE
RANDOM
RECALL AMS
CD TEXT SCROLL
TEXT
HIGHLIGHT S.
0
RC-DA17CD
TEXT
Invalid with the
CD-17mkIII

7
ENGLISH
Normal playback operation
■CD player playback
qPress the
POWER
switch to turn on the power.
wPress the
OPEN/CLOSE
button.
When the disc tray opens, place a disc on the tray with the label side up.
eGently press the front of the disc tray or press the
OPEN/CLOSE
button to close the tray.
rPress the
PLAY
button.
When the button is pressed, the
PLAY
indicator lights up.
While the disc is playing, the display shows the track number and
elapsed playing time of the track currently playing, along with the
numbers of the tracks still to be played or playing.
To stop playback:
Press the
STOP
button.
To remove the disc:
Open the disc tray by pressing the
OPEN/CLOSE
button, remove the
disc, then close the tray by lightly pressing its front edge. Always keep
the disc tray closed even when the CD player is not being used.
To pause playback:
Press the
PAUSE
button.
The PAUSE indicator lights up and playback pauses at the position
where the button was pressed. To resume playback from the pause
position, press the
PAUSE
button again.
To switch the time display:
Press the
TIME
button.
Each time the
TIME
button is pressed, the time display changes in the
following order: Elapsed playing time of the currently playing track →
Remaining playing time of the current track →Total remaining time in the
disc →Elapsed playing time of the current track.
Display indications
OPEN/CLOSEPOWER
ON/OFF
PLAY STOP PAUSE
FILTER
CD PLAYER CD-17mkIII
TEXT
TTL TRK INDX TIME
6 7 8 9 10 11 12 13 14 15 16 17 18 19 20
Index number
Remaining track numbers
Total number of tracks
Nunber of current track
Seconds
Minutes
Refer to the figures on the pages at the back of this user’s guide. The callout numbers on the figures correspond to those found in the text.
•Some of the operations described in this user’s guide can only be operated from the remote control unit. In the description of controls, the
names of the buttons which are available on both the main unit and the remote control unit are enclosed in , and the names of the buttons
which are available only on the remote control unit are enclosed in .

8
ENGLISH
SEARCHING/SKIPPING
Direct search (specifying a desired track number)
Specify the track number using numeric buttons 0 to 9.
For track number 3, press
3
.
For track number 12, press
1
, then, within 1.5 seconds, press
2
.
If the first of two digits pressed is not one of the digits on the CD, it is
interpreted as 1 digit and the search will start after about 0.5 second.
If you make a mistake when pressing the numeric buttons:
Press the right buttons to enter the correct track number.
•If you specify a track number which does not exist on the disc, “No
Track”will appear on the display. Enter the correct number.
Track Skip
If the loaded disc is a CD-TEXT disc and the display is presently in the
text display mode, press the
TIME
button to switch it to the time display
mode.
Next (skipping to a desired track located after the
currently playing track)
Press the button the necessary number of times to skip to the
desired track.
Previous (skipping to a desired track located
after the currently playing track)
When pressed during playback, the CD player returns to the beginning
of the current track and plays the track again.
To skip to the previous track to the current track, press the button
twice. To skip to a track located before the previous track, press the
button for the necessary number of times to skip to the desired
track.
•Pressing the button twice in the middle of the first track in a disc
skips to the last track, and pressing the button in the middle
of the last track skips to the first track.
Index Skip ( )
This is a convenient function which allows to search the desired index
during playback of a track with indexes recorded in it (see the descrip-
tion of the INDEX buttons on page 6).
•When an index number that does not exist in the disc selected, the
display shows “No Index”and playback restarts from the begining of
the original index.
AMS (Listening to the first part of each track)
1. Press the
AMS/HIGHLIGHT S.
button during stop or playback.
The first part (first 10 seconds) of each track in the disc will be played in
the order in which the tracks are recorded.
2. When you find a track you want to listen to, press the
AMS/HIGHLIGHT S.
button again. (The PLAY indicator stops blinking and starts to light
steadily.)
•If the or button is pressed during AMS operation, the
CD player increases or decreases the played track number for the
same number of times as the number of times the button was pressed,
but the AMS operation is not canceled.
Highlight Scan
When the loaded disc is a CD-TEXT disc containing the recording of
highlight information, pressing the
AMS/HIGHLIGHT S.
button initiates
the Highlight Scan operation in precedence over the AMS operation.
Pressing the
AMS/HIGHLIGHT S.
button during Highlight Scan initiates
the AMS operation.
REPEAT PLAY
1-track repeat
(repeated playback of one track only)
While the track you want to repeat is playing, press the
REPEAT
button
twice.
The “RPT”and “1”indicators light up and the current track will be played
repeatedly.
To cancel 1-track repeat play:
Press the
REPEAT
button once.
All-track repeat
(repeated playback of all tracks on the disc)
During playback, press the
REPEAT
button once.
The “RPT”indicator lights up and all the tracks on the disc are played
repeatedly.
Even if the
REPEAT
button is pressed in stop mode, playback will start
and repeat playback will be carried out.
To resume normal playback:
Press the
REPEAT
button twice. The “RPT”indicator goes out, repeat
mode is cancelled and normal playback resumes.
A-B repeat
(repeated playback of a specified passage)
1. During playback, press the remote control unit’s
A– B
button at the
starting point of the passage you want to repeat.“A”(starting point)
indicator lights up.
2. Press the
A–B
button again at the end of the passage you want to
repeat. “B”(stopping point) indicator lights up.
The designated passage A-B will be played repeatedly.
To cancel A-B repeat play:
Press the
A–B
button, The “A”and “B”indicator goes out, A-B repeat
is cancelled and normal playback resumes.
Blinks.
12
TTL TRK
34 56 78 910 1112 1314 15
TEXT 1 2 3 4 5 6 7 8 9 10 11 12 13 14 15

9
ENGLISH
PROGRAM PLAY
Programming (To play the desired tracks in a
certain order)
■Programming when the display is in the time
display mode
If the loaded disc is a CD-TEXT disc, press the
TIME
button to switch
it to the time display mode.
(Example: To program track No. 15 first, then track No. 7 in a 15-track disc)
1. Press the
PROG.
button in stop mode. The PROG indicator flashes.
2. Specify the first track to be programmed using the numeric buttons or
the or button.
(Display example: The first programmed track is track number 15 with
a playing time of 4 minutes 30 seconds)
3. Then program another track by repeating the procedure in step 2
above. Up to 30 tracks can be programmed in this way.
(Display example: The second programmed track is track No. 7 and
the total playing time of track Nos. 15 and 7 is 7 minutes 50 seconds.)
4. After having programmed all the desired tracks, press the
PROG.
button or
STOP
button.
The PROG indicator status changes from flashing to continuously lit,
indicating that the program is completed.
5. Press the
PLAY
button, The programmed tracks will be played in the
programmed order.
RANDOM PLAY
In this mode, the CD player automatically selects and plays tracks in
random order. All tracks are played once.
Press the
RANDOM
button.
Random playback begins in about 4 seconds.
•During random playback, tracks are separated by an interval of about
4 seconds.
•The
RANDOM
button can be pressed either during playback or in
stop mode.
If the
RANDOM
button is pressed while the disc tray is open with a
disc on the tray, the disc tray automatically closes and random
playback begins.
•To stop random playback and resume normal playback:
Press the
RANDOM
button again.
•If the button is pressed during random playback:
Each time one of these buttons is pressed, the CD player selects a
track at random and starts playing that track.
•If the or button is pressed during random playback:
Searching is carried out within the current track. The search operation
will not cross over into the previous or next track.
•To repeatedly play tracks at random:
Press the
REPEAT
button once. All tracks are repeatedly played in
random order, with the order being changed each time the disc is
played.
NOTE
•A-B repeat playback is not available during random playback.
•When the
RANDOM
button is pressed after the programming
operation (page 9) or delete programming operation (page 10),
random playback of the tracks selected with the programming or
delete programming operation starts.
34 56 78 910
12
TTL TIME
34 56 78 910 1112 1314 15
TTL
PROG
TTL TTL TIME
Flashes.
PROG
TTL TRK TTL TIME
15
Only the numbers of programmed
tracks light up.
Flashes.
PROG
TTL TRK TTL TIME
715
Total playing time of
programmed tracks
Total programmed tracks
Last programmed track
PROG
TTL TTL TIME
715
Light up continuously

10
ENGLISH
■Programming when the display is in the text
display mode
If the loaded disc is a CD-TEXT disc, tracks can also be programmed by
referring to the track titles.
If the display is not in the text display mode, press the
CD-TEXT
button
to put it to the text display mode.
(Example: To program track Nos. 15 and 7)
1. Press the
PROG.
button in stop mode. The PROG indicator flashes.
2. Specify the first track to be programmed using the numeric buttons or
the or button.
The track title of the selected track scrolls. In about 1 second after the
completion of scrolling, the track is automatically programmed. If you
do not want to program the track, select another track using the
numeric buttons or the or button before the automatic
programming takes place.
(Display example: The first programmed track is track No. 15 with a
track title of "Phoenix".)
3. Then program another track by repeating the procedure in step 2
above.
(Display example: The second programmed track is track No. 7 with
a track title of "Moonlig..".)
4. After having programmed all the desired tracks, press the
PROG.
button or
STOP
button.
5. Press the
PLAY
button, The programmed tracks will be played in the
programmed order.
Delete programming (Listening only to the de-
sired tracks by omitting unwanted tracks)
•Ordinary music CD: Delete programming is possible only when the
display is in the time display mode.
•CD-TEXT disc: Delete programming is possible whether the display is
in the time display mode or text display mode.
■Delete programming when the display is in the
time display mode
If the loaded disc is a CD-TEXT disc, press the
TIME
button to switch
it to the time display mode.
(Example: To program the tracks on a 15-track disc with the exception
of track numbers 11, 3 and 7)
1. Press the
PROG.
button in stop mode and, when the PROG indicator
starts to flash, press the
CANCEL
button. The total number of tracks
and total playing time of the disc will be displayed.
(Display example: The total playing time is 65 minutes 32 seconds)
2. Select the unwanted tracks using the numeric buttons or the
or button. Up to 30 tracks can be selected and omitted in this
way.
(Display example: Track No. 11 is selected first and the total playing
time of the remaining tracks is 60 minutes 12 seconds.)
3. After having selected and deleted all of the unwanted tracks, press the
PROG.
button or
STOP
button.
The PROG indicator status changes from flashing to continuously lit,
indicating that the program is completed.
(Display example: The total playing time of the 12 tracks, omitting
track numbers 3, 7 and 11, is 51 minutes 22 seconds)
4. Press the
PLAY
button, The tracks except for the deleted tracks will
be played in the order of the track numbers.
TEXT 1 2 3 4 5 6 7 8 9 10 11 12 13 14 15
TEXT
PROG
TEXT
TTL
Alubm Title
In Stop mode
Alubm TitleFlashes.
PROG
TEXT
TTL TRK
15
PROG
TEXT
TTL TRK
715
PROG
TEXT 7 15
Track 15 title
Only the numbers of programmed
tracks light up.
Track title of track No. 7
Last programmed track
Total programmed track
Alubm TitleLights up continuously
TEXT 1 2 3 4 5 6 7 8 9 10 11 12 13 14 15
PROG
TEXT 1 2
TTL TTL TIME
34 56 78 910 1112 1314 15
Flashes.
PROG
TEXT 1 2
TTL TRK TTL TIME
34 56 78 910 12 1314 15
The number of the deleted track goes out.
Lights up continuously
PROG
TEXT 1 2
TTL TTL TIME
4 56 8 91011 131415
TEXT 1 2
TTL TTL TIME
34 56 78 910 1112 1314 15

11
ENGLISH
■Delete programming when the display is in the
text display mode
If the loaded disc is a CD-TEXT disc, tracks can also be omitted by
referring to the track titles.
If the display is not in the text display mode, press the
CD-TEXT
button
to put it to the text display mode.
(Example: To omit track Nos. 11, 7 and 3)
1. Press the
PROG.
button in stop mode and, when the PROG indicator
starts to flash, press the
CANCEL
button. The total number of tracks
and alubm title of the disc will be displayed.
2. Select the unwanted tracks using the numeric buttons or the
or button.
The track title of the selected track scrolls. In about 1 second after the
completion of scrolling, the track is automatically omitted. If you do not
want to omit the track, select another track using the numeric buttons
or the or button before completion of the scrolling. Up
to 30 tracks can be omitted in this way.
(Display example: The first selected track to be omitted is track No. 11
with a track title of "Graduat...".)
•By selecting a previously selected and omitted track again during
delete programming, the delete programming operation can be
suspended temporarily.
3. After having selected and deleted all of the unwanted tracks, press the
PROG.
button or
STOP
button.
The PROG indicator status changes from flashing to continuously lit,
indicating that the program is completed.
(Display example: The total 12 tracks, omitting track numbers 3, 7 and
11 and album title of disc.)
4. Press the
PLAY
button, The tracks except for the deleted tracks will
be played in the order of the track numbers.
NOTES
* Take note of the following points when programming tracks by
programming or delete programming.
* When selecting track numbers 1 to 9 using numeric buttons from
a disc containing 10 or more tracks (when selecting track number
3 after track number 2, for example), press 3 more than 1.5
seconds after pressing 2.
* When using numeric buttons to select track number 10 or higher on
a disc containing 10 or more tracks (for example when selecting
track number 13), press 3 within 1.5 seconds of pressing 1.
* When using numeric buttons to select track numbers on a disc
containing no more than 9 tracks (when selecting track number 5
after track number 4, for example), press 5 more than about 0.5
second after pressing 4.
* When programming track numbers using the and
buttons, press buttons with intervals of less than 1 second.
To check the programmed contents:
Press the
RECALL/SCROLL
button during programming or program
playback.
If it is pressed during “programming”, the programmed track numbers
will be displayed sequentially in the order they have been programmed.
If it is pressed during “delete programming”, the deleted track numbers
will be displayed.
To erase some of the programmed tracks:
1. Press the
RECALL/SCROLL
button to display the programmed track
numbers sequentially in the order in which they have been pro-
grammed.
2. When the track number to be erased from the program is displayed,
press the
CANCEL
button immediately.
The track number indicator of the track erased from the program goes
out.
To re-incorporate in the program a track which has been deleted in
“delete programming”:
1. Press the
RECALL/SCROLL
button during delete programming to
display the deleted track numbers sequentially in the order in which
they were deleted.
2. When the track number to be added to the program is displayed,
press the
CANCEL
button immediately.
The track number indicator of the track added to the program lights
up.
To erase the entire program:
During program playback, press the
STOP
button twice. In stop
mode, press the
STOP
button once.
•The program is also erased by pressing the
OPEN/CLOSE
button to
open the disc tray.
To add tracks to the program:
In stop mode with the program stored in the memory (that is, with the
PROG indicator lit up), press the
PROG.
button. The PROG indicator
starts flashing and more tracks can be added to the program.
Q&A
•How many tracks is it possible to program?
Up to 30 tracks can be included in the program. With delete
programming, up to 30 tracks can be omitted from the program.
•Is it possible to change from programming to delete programming
or vice versa?
No.
•How do you play programmed tracks repeatedly?
Press the
REPEAT
button once. The REPEAT indicator lights up
and the program playback will be repeated.
•How do you play programmed tracks in a random order?
Press the
RANDOM
button during program playback or in stop
mode.
•The display cannot be switched between the time display and text
display modes during programming or delete programming.
Be always sure to select either display mode before starting the
programming or delete programming operation.
TEXT 1 2 3 4 5 6 7 8 9 10 11 12 13 14 15
Alubm Title
In Stop mode
TEXT 1 2 3 4 5 6 7 8 9 10 11 12 13 14 15
PROG
TEXT 1 2
TTL
34 56 78 910 1112 1314 15
Alubm TitleFlashes.
PROG
TEXT 1 2
TTL
34 56 78 910 12 1314 15
Track title of track No. 11
Only the number indicators of
the omitted tracks go out.
PROG
TEXT 1 2 4 5 6 8 9 10 12 13 14 15
Alubm TitleLights up continuously

12
ENGLISH
EDITING
When recording from a compact disc to a tape, use this function to match
the tape length to the playing time of the tracks to be recorded and to
create 4-second intervals between the tracks.
Auto peak level search
If the cassette deck recording level is adjusted in relation to the peak
level on the disc, it is possible to avoid distortion and noise in recording.
This facility allows the peak over the entire disc or in the programmed to
be detected tracks before proceeding to editing.
Simple edit
This operation fits tracks into a specified tape length while keeping the
tracks in their original order.
1. Press the
EDIT
button in stop mode to light up the EDIT indicator.
(Example: When a disc with 28 tracks is loaded)
This example shows that, when the tape recording time is 90 minutes,
track 15 is the last track on tape side A and track 28 the last track on
tape side B. In other words, by using a 90-minute tape, all of the 28 disc
tracks can be accommodated by assigning tracks 1 to 15 on tape side
A and tracks 16 to 28 on tape side B.
2. To change the tape recording time, specify the new tape recording
time using the numeric buttons (0 to 9) or the or button.
•When numeric buttons are used to specify a C-46 tape, for example,
press
4
then
6
.
This display example shows that, with a 46-minute tape, tracks 1 to 8
will be recorded onto tape side A and tracks 9 to 16 will be recorded
onto tape side B.
The blinking arrow on the right end of the character display shows that
tracks 17 and after cannot be recorded on the tape.
•Use of and buttons
Each press of the button allows you to change the recording
time in the order 90 →46 →54 →60 →74 →90.
Each press of the button allows you to change the recording
time in the order 90 →74 →60 →54 → 46 →90.
Each press of the button allows you to increase the recording
time by 1 minute.
Each press of the button allows to decrease the recording time
by 1 minute.
3. Press the
PLAY
button. The PEAK indicator lights up and the auto
peak level search operation starts from track number 1.
4. After the auto peak level search of the last track has finished, the
passage of about 6 seconds centered around the peak position will be
played 4 times. Adjust the recording level of the cassette deck during
this period. For the adjustment procedure, refer to the instruction
manual supplied with your cassette deck.
5. After the peak passage has been played 4 times, the CD player enters
pause mode to stand by for the edit play of tape side A.
6. Press the
PAUSE
button to start edit play for tape side A.
7. After edit play for tape side A has been completed, the CD player
automatically enters pause mode to standby for the edit play of tape
side B.
8. To start edit play for side B, press the
PAUSE
button.
EDIT
TEXT 1 2 3 4 5 6 7 8 9 10 11 12 13 14 15 16 17 18 19 20
Blinks. Lights up.
Last track on tape side B
Last track on tape side A
The tape recording time display (90) appears.
EDIT
5 6 13 14
EDIT
TEXT 1 2 3 4 5 6 7 8 9 10 11 12 13 14 15 16 17 18 19 20
Flashes.
EDIT
TEXT 1 2
TTL TRK INDX PEAK TIME
3 4 5 6 7 8 9 10 1112 1314 1516 1718 1920
Lights up.
Lights up.
EDIT A –
TEXT 1 2
TTL TTL TIME
34 56 78 910 1112 1314 15
Lights up. Lights up.
Total number of tracks on side A
Total playing time of side A
Number indicators of tracks assigned to side A light up.
EDIT
TEXT 1 2
TTL TTL TIME
34 56 78 910 1112 1314 15
A –
EDIT B
TEXT
TTL TTL TIME
16 17 18 19 2012
Number indicators of tracks
assigned to side B light up.
Total playing time of side B
Total number of tracks on side B
EDIT A –B
TEXT 1 2
TTL TRK INDX PEAK TIME
3 4 5 6 7 8 9 10 1112 1314 1516 1718 1920

13
ENGLISH
Program edit
This procedure allows you to record tracks in any desired order while
fitting the tracks into a specified tape length.
1. Program tracks according to the programming procedure in section
“PROGRAM PLAY”(page 9).
2. The rest of the program edit procedure is the same as step 1 to 8 in
the simple edit procedure.
Delete program edit
When recording from a disc to a tape, this procedure allows you to omit
the tracks you do not want to record, while fitting the tracks into a
specified tape length.
1. Program tracks according to the “delete programming”procedure in
the “PROGRAM PLAY”section (page 10).
2. The rest of the delete program edit procedure is the same as step 1
to 8 in the simple edit procedure.
NOTES
•As a CD may contain several peaks, a different peak may be found
every time the auto peak level search operation is performed.
•During simple edit play, program edit play and delete program edit
play operations other than the STOP, OPEN/CLOSE, DIMMER,
VOLUME, RECALL and TIME control operations are defeated.
This is intended to prevent mistakes in recording due to erroneous
operation.
•The display is always in the time display mode during edit play. It is
not possible to switch to the text display mode.
•If you want to skip the auto peak level search:
In step 3 of the simple edit procedure, press the
PLAY
button
again. The PAUSE indicator lights up and the CD player enters the
pause mode. When the
PAUSE
button is pressed later on, the edit
play for tape side A will start immediately, without the auto peak
level search operation.
Synchro Recording
This function starts the recording of the cassette deck automatically in
synchronism with the start of edit play of the CD player.
•Synchro recording can be started only when a Marantz autoreverse
cassette deck (ex. SD4050 etc.) with synchro recording compatibility
is connected to the CD player.
•Synchro recording is performed through the remote line connection
(rear panel jacks).
1. Set up the cassette deck for synchro recording. For the detailed
operations, please refer to the User Guide of the cassette deck.
2. When the pause button of the CD player is pressed to start the edit play
for tape side A, the cassette deck also starts automatically.
NOTE
When a tape with shorter length than the set tape recording time, the
CD player stops playback of tracks assigned for tape side A at the
moment recording of side A has completed. When recording of tape
side B starts, the CD player also starts playback of the tracks assigned
for side B.
CD-TEXT information display
The text information on CD-TEXT discs is displayed in the order shown
below each time the CD-TEXT button on the remote control unit is
pressed. However that the included information differs from disc to disc,
so not all this information will necessarily be displayed. With this set,
items for which no text information is recorded on the disc are automati-
cally skipped.
The displayed text can be scrolled by pressing the
RECALL/SCROLL
button.
•During playback
The displayed information switches in the order below each time the
CD-TEXT
button is pressed. During playback, most of the displayed
information is for the currently playing track.
•In the stop mode
The displayed information switches in the order below each time the
CD-TEXT
button is pressed.
Title of currently playing track
↓
Album Title (album title)
↓
xx Title (title of track number xx)
↓
xx Artist (artist of track number xx)
↓
xx Songwriter (songwriter of track number xx)
↓
xx Composer (composer of track number xx)
↓
xx Arranger (arranger of track number xx)
↓
xx Message (message for track number xx)
↓
Disc ID (album identification number)
↓
Genre (album’s music category)
↓
xx Info. End (end of information for track number xx)
Album Title
↓
Album Title (album title)
↓
-- Title (title of -- track)
↓
Artist (album’s artist)
↓
-- Artist (artist of -- track)
↓
Songwriter (album’s songwriter)
↓
-- Songwriter (songwriter of -- track)
↓
Composer (album’s composer)
↓
-- Composer (composer of -- track)
↓
Arranger (album’s arranger)
↓
-- Arranger (arranger of -- track)
↓
Message (album’s message)
↓
-- Message (message for -- track)
↓
Disc ID (album identification number)
↓
Genre (album’s music category)
↓
All Info. End (end of all text information)

14
ENGLISH
TROUBLE SHOOTING
If you think a malfunction has occurred, first check the points listed
below, The problem is likely to have been caused by a simple operational
error or a connection problem. If the problem cannot be corrected even
after carrying out the following checks, consult your dealer or nearest
Marantz sales office or service counter.
•The disc fails to rotate.
1. Is the mains lead plugged in properly?
2. Is the POWER switch ON?
3. Is the disc placed in the correct position on the disc tray?
4. Is the disc placed properly with the label side facing up?
5. Is the disc dirty?
6. Is the disc scratched?
7. Is the disc warped?
•The disc is rotating but no sound is heard.
1. Are the amplifier and speakers connected properly?
2. Is the amplifier switch ON?
3. Is the amplifier’s volume control set at the minimum level?
4. Is the amplifier’s selector switch set to the correct input (“CD”or
“AUX”, whichever corresponds to the input jacks the CD player is
connected to)?
•The disc stops in mid-operation.
1. Is the disc dirty?
2. Is the disc scratched?
3. Is the disc warped?
•The sound drops out or noise is heard.
1. Is the disc dirty?
2. Is the disc scratched?
3. Is the disc warped?
•Remote control operation is not possible.
1. Is the remote control unit’s transmitter pointed correctly at the remote
sensor on the front of the CD player?
Or is there an obstruction between the transmitter and the remote
sensor?
2. Are the batteries in the remote control unit exhausted?
3. Is there another strong light (from a window, etc.) striking the CD
player’s remote sensor?
4. Is an RCA-type pin-plug lead connected to the “REMOTE CONTROL
IN”jack on the CD player’s rear panel?
•A CD-R/CD-RW disc cannot be played.
1. Is the disc placed upside down?
2. Is the disc contains properly written TOC?
3. Is the recorded information in an audio (CD-DA) format?

1
FRANÇAIS
PRECAUTIONS
Respecter les précautions suivantes à l’emploi de l’appareil.
PRECAUTIONS GENERALES
Lors de l’installation de l’appareil, vérifier que:
– Les orifices d’aération ne sont pas obstrués.
– L’air peut circuler librement autour de l’appareil.
– Il est posé sur une surface non soumise à des vibrations.
– Il n’est pas exposé à des températures excessives, à de l’humidité
ou à de la poussière.
– Il n’est pas en plein soleil.
– Il ne subira pas de décharges électrostatiques.
Ne jamais déposer d’objets pesants sur l’appareil.
Si un liquide ou un solide pénètre à l’intérieur du coffret, contacter le
distributeur ou le service après-vente le plus proche.
Débrancher le cordon d’alimentation en le saisissant par sa fiche et ne
pas tirer sur le cordon proprement dit.
Il est conseillé de débrancher l’appareil au niveau de sa prise secteur
avant une longue période d’inutilisation ou en cas d’orage.
PRECAUTIONS LORS DE LA CONNEXION
• S’assurer de débrancher le câble d’alimentation de la prise CA ou
inactiver le commutateur POWER avant d’effectuer les connexions.
• Connecter un seul câble à la fois en respectant “l’entrée” et la “sortie”.
Cela évitera de croiser les connexions entre les canaux et entre les
entrées et les sorties de signaux.
• Insérer fermement les prises. Une connexion incomplète risque de
provoquer des bruits.
• Avant de raccorder tout autre appareil audio au CD-17mklll, veuillez
lire son mode d’emploi.
INTRODUCTION
Toujours bien lire cette section avant d’effectuer les raccordements sur
le secteur.
AVERTISSEMENTS
Ne pas exposer l ’appareil à la pluie ni à l ’humidité.
Ne pas essayer de retirer le boîtier de l ’appareil.
Ne rien insérer dans l ’appareil par les orifices de ventilation.
Ne pas manipuler le cordon d ’alimentation avec les mains
mouillées.
Ne pas recouvrir les ouïes de ventilation avec un objet
quelconque comme une nappe,un journal,un rideau,etc.
Ne placer aucune source de flamme nue,comme une bougie
allumée,sur l'appareil.
Pour mettre au rebut les piles usées,respecter les lois
gouvernementales ou les règlements officiels concernant
l'environnement qui s'appliquent à votre pays ou région.
Marquage CE
Le CD-17mkIII est conforme à la directive EMC et à la directive
sur les basses tensions.
BRANCHEMENT ELECTRIQUE DE L’APPAREIL
Votre appareil Marantz a été conçu pour s’adapter à l’alimentation
domestique et aux exigences de sécurité en vigueur dans votre région.
L’alimentation de ce produit doit être de 230 V CA uniquement.
DROITS D’AUTEUR
L’enregistrement et la reproduction de tout élément peuvent être soumis
à un accord préalable. Se reporter aux indications suivantes pour de
plus amples détails.
— Copyright Act 1956 (Acte sur les droits d’auteur de 1956)
— Dramatic and Musical Performers Act 1958 (Acte sur les
auteurs dramatiques et musicaux de 1958)
— Performers Protection Acts 1963 and 1972 (Actes de protection
des auteurs de 1963 et 1972)
— Tous actes et ordres statutaires postérieurs

2
FRANÇAIS
LES DISQUES COMPACTS
La face brillante couleur arc-en-ciel est la face avant du disque; celle
portant une étiquette est la face arrière.
A la différence des platines-disques conventionnelles pour disques
analogiques, le lecteur de disque compact CD-17mkIII lit les informa-
tions enregistrées sur le disque par le dessous et sans aucun contact à
l’aide d’un faisceau laser. Par conséquent, les performances d’un
disque compact ne se détériorent pas par des lectures successives
comme les disques analogiques.
Manipuler les disques avec soin de manière àne pas endommager ni
rayer leur face avant.
Pour leur protection, éviter de placer les disques dans les endroits
suivants:
–En plein soleil ou près d’une source de chaleur comme un radiateur.
–Dans un endroit humide ou sale.
–Dans un endroit exposéàla pluie, comme près d’une fenètre.
Propretéde la surface du disque
Quelque six milliards d’informations sont parfois enregistrées sur la face
avant d’un disque. Pour le nettoyer, utiliser un nettoyeur spécial pour
disques compacts et le frotter comme illustréci-après.
•Ne pas utiliser de produits de nettoyage pour disques analogiques,
car ils endommageraient la surface de lecture.
Ranger soigneusement les disques dans leur étui.
•Ne posez aucun autocollant sur la face du disque portant l’étiquette.
Si un morceau de ruban adhésif ou une étiquette de location sont
collés sur le disque, ou encore si le disque porte une trace de colle,
ne tentez pas de lire le disque. En effet, dans le cas contraire, il
pourrait être impossible de retirer le disque ou bien une anomalie de
fonctionnement pourrait survenir.
•N’utilisez aucun disque ayant une forme spéciale.
Ne tentez pas d’utiliser un disque ayant une forme autre que circulaire,
par exemple un disque en forme de coeur ou un disque octogonal.
Ces disques peuvent provoquer une anomalie de fonctionnement.
•Utiliser des disques répondant aux normes CD comme ceux
comportant le “logo CD”ou la marque “”sur la surface.
La lecture n’est pas garantie si des disques ne répondant pas aux
normes CD sont utilisés.
De plus, la qualitédu son n’est pas non plus garantie même si de tels
disques peuvent être lus.
Frotter du centre vers
l’extérieur.
Ne pas frotter dans le sens
circulaire.
PRECAUTIONS D’UTILISATION
•En hiver, vous avez peut-être remarquéque la fenêtre d’une pièce
bien chauffée se remplit de buée. Ce phénomène est appeléconden-
sation.
A l’intérieur du lecteur de CD également, de la condensation se forme
parfois dans les situations suivantes :
–Lorsque la pièce d’écoute vient d’être chauffée.
–Lorsque l’humiditédans la pièce est élevée.
–Lorsque l’appareil est transportéd’un environnement froid àun
environnement plus chaud.
•Si de la condensation se forme, les plages ne peuvent être lues et
l’appareil ne peut fonctionner correctement. Dans ce cas, laissez-le
sous tension et attendez environ 30 minutes avant de le faire fonctionner.
•Le lecteur de CD peut interférer avec la réception de votre syntoniseur
ou de votre téléviseur. Dans ce cas, éloignez le lecteur de CD du
syntoniseur ou du téléviseur.
•Le lecteur de CD produit très peu de bruit par rapport aux
enregistrements analogiques et le bruit présent avant que la lecture
ne commence est àpeu près inaudible. De ce fait, veillez àne pas
régler la commande de volume de votre amplificateur sur un niveau
trop élevé, autrement d’autres éléments audio, tels que vos haut-
parleurs, pourraient être endommagés lorsque la lecture commence.
NETTOYAGE DES SURFACES EXTERIEURES
La finition extérieure de votre appareil durera indéfiniment tant que vous
l’entretiendrez correctement. N’utilisez jamais de tampons àrécurer, de
la paille de fer, des poudres àrécurer ou de puissants agents chimiques
(comme des produits de lessive), de l’alcool, des diluants, de la benzine,
des insecticides ou autres substances volatiles étant donnéqu’elles
peuvent altérer la finition du boîtier. De la même manière, n’utilisez
jamais de chiffons imbibés de substances chimiques. Si l’appareil est
sale, nettoyez les surfaces extérieures avec un chiffon doux non
pelucheux.
Si le boîtier est fortement sali :
–diluer un peu de liquide de vaisselle dans de l’eau, àsavoir une part
de produit détergent pour six parts d’eau ;
–tremper un chiffon doux, non pelucheux dans la solution et tordre le
chiffon jusqu’à ce qu’il soit humide :
–nettoyer le boîtier àl’aide du chiffon humide ;
–essuyer l’appareil en le frottant avec un chiffon sec.
REPARATIONS
Seuls des techniciens compétents et qualifiés doivent être autorisés à
réparer votre appareil. Marantz et son personnel forméen usine ont les
connaissances et l’équipement spécial nécessaires aux réparations et
réglages de cet instrument de précision.
Dans le cas d’un problème, appeler le numéro de téléphone gratuit dont
la liste se trouve sur la page de la garantie pour obtenir le nom et
l’adresse du centre de service Marantz autoriséle plus proche de votre
domicile. Dans de nombreux cas, le concessionnaire chez lequel vous
avez achetéte votre appareil Marantz sera équipépour vous offrir ce
service. Veuillez inclure le numéro de modèle et de série de votre
appareil ainsi qu’une copie de votre reçu d’achat et une description
complète de ce que vous pensez être anormal dans le fonctionnement.
PRÉCAUTIONS LORS DE LA
MANIPULATION DES PILES
Une mauvaise utilisation des piles peut provoquer une fuite d’électrolyte,
une rupture, de la corrosion, etc.
Lors de l’utilisation de piles, ne pas oublier les points suivants.
•Retirer les piles de la télécommande si elle n’est pas utilisée pendant
de longues périodes (un mois ou plus).
•Ne pas utiliser une pile ancienne avec une neuve.
•Insérer les piles en s’assurant que les pôles et sont alignés
avec les marques correspondantes sur la télécommande.
•Des piles de même forme peuvent avoir des tensions différentes.
Ne pas utiliser différents types de piles simultanément.
•En cas de fuite d’électrolyte, essuyer soigneusement l’intérieur du
compartiment des piles et insérer de nouvelles piles.
•Lorsque des piles hors d’usage doivent être éliminées, se conformer
aux consignes (réglementations) des autorités locales pour
l’élimination.

3
FRANÇAIS
Lecture d’un CD-RW
Cet appareil est prévu pour la lecture des CD-RW (ReWritable), des CD-
R (Recordable) et des CD ordinaires.
•Le CD-R et le CD-RW doivent contenir une table des matières
convenable pour que leur lecture soit possible. L’opération consistant
àécrire la table des matières sur un CD enregistrable (CD-R) est dite
opération d’achèvement de l’enregistrement. Un disque ne peut pas
être reconnu comme étant un CD, et donc ne peut pas être joué, s’il
n’a pas fait l’objet de cette opération. Pour de plus amples détails
concernant cette question, veuillez vous reporter au mode d’emploi
de l’enregistreur sur CD.
* La table des matières (TOC, en anglais) contient diverses informa-
tions concernant le disque telles que sa durée et le nombre de
plages musicales.
•Cet appareil ne peut lire que les disques enregistrés selon le format
CD-DA qui est celui des disques de musique. Il est inutile de tenter la
lecture d’un disque de données, par exemple un CD-ROM destinéà
un ordinateur personnel, au moyen de ce lecteur.
•La lecture d’un CD-RW exige que la configuration du lecteur soit
modifiée; il n’y a donc rien de surprenant àce que la lecture de la table
des matières demande un peu plus de temps que lorsqu’il s’agit d’un
CD ou d’un CD-R.
Le filtre numérique
Sur cet appareil il est possible de sélectionner les caractéristiques
(coefficients) de filtrage pour la lecture. (→Touche FILTER, page 4)
Les caractéristiques de filtrage affectent la façon dont la source est lue,
en termes notamment de présence, d’atmosphère, d’impression de
vitesse et parfois de douceur, suivant le genre de musique (vocale,
d’orchestre ou pop) et la méthode d’enregistrement. Sélectionnez, pour
une source donnée, la caractéristique de filtrage qui vous semble la plus
agréable àl’oreille.
(1) FILTRE 1 (coupure nette)
Les caractéristiques pré-écho et post-écho de la réponse impulsionnelle
sont égales. Cette tonalitépeut être traitée comme une tonalitéde
référence quelle que soit la source.
(2) FILTRE 2 (coupure lente)
Les caractéristiques pré-écho et post-écho de la réponse impulsionnelle
sont petites. La tonalitéest douce et caractérisée par expression riche
des réverbérations.
La dernière mémoire
Cet appareil comporte une fonction de dernière mémoire, qui enregistre
le dernier état de fonctionnement de l’appareil même après qu’il a été
éteint. Lorsque vous éteignez l’appareil, la fonction de dernière mémoire
enregistre les réglages suivants :
Modes d’affichage du texte/temps, niveau de sortie analogique, position
de filtre et plages programmées.
Les plages spécifiées pour la lecture programmée ne sont toutefois
enregistrées en mémoire que si vous éteignez l’appareil en y laissant le
disque.
Les valeurs par défaut (réglages d’usine) des éléments ci-dessus sont
tels que listés ci-dessous.
Prioritéd’affichage du texte : Lors de la lecture d’un disque avec
TEXTE CD, le mode d’affichage du
texte est activéen priorité.
Mode d’affichage du temps :
Affichage du temps de lecture écoulé.
Niveau de sortie analogique : Valeur maximale (0 dB).
Position du filtre : Filtre 1
* Lorsque la touche STOP est maintenue enfoncée pendant plus de 5
secondes en mode d’arrêt, tous les éléments enregistrés en mémoire
sont effacés et les valeurs par défaut sont rétablies.
Afficheur de l’appareil
TEXT 1 2
TTL TTL TIME
3 4 5 6 7 8 9 10 1112 1314 1516 1718 1920
Ceci s’éclaire lorsque le disque introduit dans l’appareil est un CD-TEXT.
PARTICULARITES
•Appareil compatible CD-TEXT.
•Possibilitéde lecture des CD-RW (écritures multiples).
•Mécanisme de lecteur VAM1201 de dernière génération.
•Deux caractéristiques de filtrage numérique sont disponibles pour
obtenir une variation subtile de tonalité.
•La fonction de dernière mémoire enregistre le mode d’affichage du
temps, la position du filtre, le niveau de sortie analogique, etc., et les
conserve en mémoire même si vous éteignez l’appareil.
•Un circuit différentiel qui utilise deux convertisseurs N/A 2 canaux de
type ∑∆ est utilisé.
•Composants audio choisis pour leur qualitéet comprenant le circuit
original MARANTZ HDAM.
•Conception assurant une grande rigiditéde l’appareil sans pour
autant négliger son apparence, et faisant un usage intensif de
modules en aluminium.
•Boîtier de télécommande élégant, avec panneau supérieur en alu-
minium.
Quelques mots sur le CD-TEXT
Le CD-TEXT est un nouveau type de disque compact qui, outre les
données musicales, contient des informations textuelles concernant
l’album, les exécutants, le nom des plages musicales, etc.
Ces données alphanumériques sont enregistrées dans une zone du
disque qui, jusqu’à présent, n’était pas utilisée. Cela veut dire qu’un
disque CD-TEXT peut être jouépar un appareil traditionnel, mais que
l’affichage de ces données écrites n’est possible que si le disque est lu
par un lecteur spécialement conçu pour les CD-TEXT.
Cet appareil-ci reconnaît automatiquement la nature du disque et, si
celui-ci est un CD-TEXT, il affiche les informations que contient le disque
sur l’écran de la face avant.
Au moyen de la télécommande fournie, il est possible de faire apparaître
sur l’afficheur les différentes informations qui peuvent être le nom de
l’album, le nom de chaque plage musicale, le nom des exécutants, le
nom des paroliers, le nom des compositeurs, le nom des arrangeurs, les
messages et les genres musicaux. Bien entendu, les informations
gravées sur le disque varient d’un disque àl’autre.
* Pour de plus amples détails concernant la manière d’afficher les
informations du CD-TEXT, reportez-vous àla section de ce mode
d’emploi qui est consacrée àcette question.
•A un moment donné, l’afficheur de cet appareil ne peut présenter que
12 caractères. Si le texte est plus long, les caractères défilent de la
gauche vers la droite.
* Le défilement est une manière d’afficher les caractères. Cet appareil
est capable d’effectuer un défilement très régulier car chaque
caractère est produit bit par bit.
•Certains disques CD-TEXT portent également l’enregistrement de
morceaux choisis sur les plages musicales du disque. Cet appareil
est capable de lire ces morceaux choisis l’un après l’autre; cette
fonction est appelée “Examen des morceaux choisis”.
CD TEXT
TEXT

4
FRANÇAIS
COMMANDES, BRANCHEMENTS ET
TEMOINS
Veuillez lire les instructions qui suivent et qui se rapportent àl’illustration
de la page .
AVANT
zz
zz
zTouche POWER
Appuyer sur cette touche pour mettre l’appareil sous tension et ensuite
ànouveau sur cette touche pour le mettre hors tension.
xx
xx
xTiroir pour le disque
Placez le disque dans ce tiroir, face portant l’étiquette tournée vers le
haut.
cc
cc
cAfficheur
Affiche des informations telles que la mise sous/hors tension de l’appareil,
le numéro de plage, la durée de lecture et le mode de fonctionnement
choisi.
qq
qq
qAfficheur TIME/TEXT
Dans le cas d'un CD ordinaire, les informations de temps s'affichent ici;
dans le cas d'un CD-TEXT, ce sont les informations alphanumériques.
ww
ww
wTémoin TEXT (TEXTE CD)
Il s'éclaire lorsque le disque mis en place est un CD-TEXT.
ee
ee
eTémoins de numéro de plage
Lorsqu’un disque est insérédans le tiroir et que celui-ci est
refermé, la Tdm* est lue et les numéros de toutes les plages du
disque sont affichés. “ ” s’allume si le disque contient plus de
20 plages. En mode de programmation, seuls les numéros des
plages programmées s’allument.
Les numéros de plages éclairés s’éteignent au fur et àmesure
que leur lecture se termine.
* Tdm signifie “Table des matières”du disque et comprend des
données autres que audio, comme les numéros de plages et les
durées de lecture de toutes les plages du disque.
rr
rr
rIndicateur de niveau de sortie
Le niveau de sortie analogique est donnéici àtitre de référence
relative.
tt
tt
tTémoin DISC
Ce témoin clignote pendant la lecture de la table des matières.
yy
yy
yTémoin TTL (Total)
Ce témoin s'éclaire lorsque le nombre total des plages musicales
du disque est affiché.
uu
uu
uTémoin RNDM
Ce témoin s'éclaire pendant la lecture au hasard.
ii
ii
iTémoin PROG
Ce témoin s'éclaire pendant la programmation des plages
musicales àlire ou des plages musicales àne pas lire.
oo
oo
oTémoin TRK (Plage)
Ce témoin s'éclaire lorsque le numéro de la plage musicale en
cours de lecture est affiché.
!0!0
!0!0
!0 Témoin EDIT
S’allume lorsque le lecteur se trouve en mode edit.
!1!1
!1!1
!1 Témoins A-B
Ces deux témoins s'éclairent pendant la répétition de la lecture de
l'intervalle A-B; un de ces témoins s'éclaire pendant que s'effectue
la lecture pour montage sur la face A ou sur la face B d'une
cassette.
!2!2
!2!2
!2 Témoin INDX (Index)
Ce témoin s'éclaire lorsque le numéro de l'index en cours de
lecture est affiché.
!3!3
!3!3
!3 Témoins RPT
RPT: S’allume pendant le mode de répétition de toutes les plages
et lit sans cesse toutes les plages du disque. Ce témoin s’allume
également pendant le mode de répétition du programme qui lit
sans cesse toutes les plages programmées.
RPT 1: S’allume pendant le mode de répétition d’une plage et lit
sans cesse la même plage.
!4!4
!4!4
!4 PEAK indicator
S’allume lors de la recherche des crêtes et clignote pendant la
lecture de la position de crête.
!5!5
!5!5
!5 Témoin (Pause)
S’allume en mode de pause.
!6!6
!6!6
!6 Indicateur TTL (Total)
Il fournit la valeur du temps restant avant la fin du disque. Pendant
la lecture programmée, il donne le temps restant avant la fin de la
plage musicale en cours de lecture.
!7!7
!7!7
!7 Témoin (Lecture)
S’allume pendant la lecture du CD.
!8!8
!8!8
!8 Témoin TIME
Ce témoin s'éclaire lorsque les indications de temps sont affichées.
!9!9
!9!9
!9 Témoin de FILTER
La position du filtre sélectionnés’allume.
vv
vv
vTouche
OPEN/CLOSE
Une pression sur la touche
OPEN/CLOSE
button opens the disc tray.
Place a compact disc on the tray with the lab commande l’ouverture du
tiroir du lecteur. Disposer un disque compact dans le plateau, l’étiquette
dirigée vers le haut.
Appuyer doucement sur la partie frontale du tiroir du lecteur afin de le
refermer.
bb
bb
bTEMOIN POUR TELECOMMANDE
Ce capteur reçoit les signaux transmis par la télécommande et le témoin
s’allume lorsqu’un signal est capté.
nn
nn
nTouche
PLAY
Appuyer sur cette touche pour débuter la lecture.
mm
mm
mTouche
STOP
Appuyer sur cette touche pour interrompre la lecture. Elle sert également
àeffacer le programme.
,,
,,
,Touche
PAUSE
Appuyer sur cette touche pour interrompre momentanément la lecture.
Le témoin s’allume pendant la pause. Si l’on appuie ànouveau sur cette
touche, le témoin s’éteint et la lecture reprend depuis la position
interrompue.
..
..
.Touches , (Plage précédente/suivante)
Si vous appuyez sur la touche pendant la lecture, la lecture
reprend au début de la plage musicale en cours de lecture ou de la plage
musicale précédente. Si vous appuyez sur la touche pendant la
lecture, la lecture reprend au début de la plage musicale suivante ou de
la plage musicale qui suit la suivante.
Appuyez de manière continue sur la touche ou pour
trouver un passage donnévers l’arrière ou l’avant.
Le numéro de la plage sélectionnée apparaît sur l’afficheur.
Ces touches peuvent également être utilisées pour sélectionner une
plage désirée àpartir de laquelle la lecture débute.
En mode de programmation, elles peuvent également sélectionner les
plages àprogrammer.
⁄0 Touche FILTER
Sur cet appareil il est possible de sélectionner les caractéristiques
(coefficients) de filtrage pour la lecture.
RNDM PROG EDIT A – B RPT 1
DISC
TEXT 1 2
TTL TRK INDX PEAK TTL TIME
3 4 5 6 7 8 9 10 1112 1314 1516 1718 1920
1
2
FILTER
Table of contents
Languages:
Other Marantz CD Player manuals

Marantz
Marantz CC4300N User manual

Marantz
Marantz CD7300 User manual

Marantz
Marantz CC3000 User manual

Marantz
Marantz CD6005 User manual

Marantz
Marantz CD5003 User manual

Marantz
Marantz CC4003 User manual

Marantz
Marantz CC3000 User manual

Marantz
Marantz CD5004 User manual

Marantz
Marantz CD17MK3 User manual

Marantz
Marantz CD5400 User manual

Marantz
Marantz CDR-630 User manual

Marantz
Marantz SA-11S3 User manual

Marantz
Marantz CD5004 User manual

Marantz
Marantz SA-12S1 User manual

Marantz
Marantz CD6003 User manual

Marantz
Marantz CD-5000 User manual

Marantz
Marantz HD-CD1 User manual

Marantz
Marantz CD6006 User manual

Marantz
Marantz 74CD60 User manual

Marantz
Marantz CD6005 User manual