Marco MRCVH095ZD-TE Operating instructions

INSTALLATION INSTRUCTIONS AND RECOMMENDATIONS FOR USING
AND MAINTAINING
CERAMIC HOT PLATES TOUCH CONTROL
MRCVH095ZD-TE

2

1
Presentation

2
Minimum distances
Installation
Units in mm
A B C D
900 510 860 490

3
STANDARD INSTALLATION SYSTEM FAST-CLICK SYSTEM
Minimum distances
Installation
Units in mm
EN
4
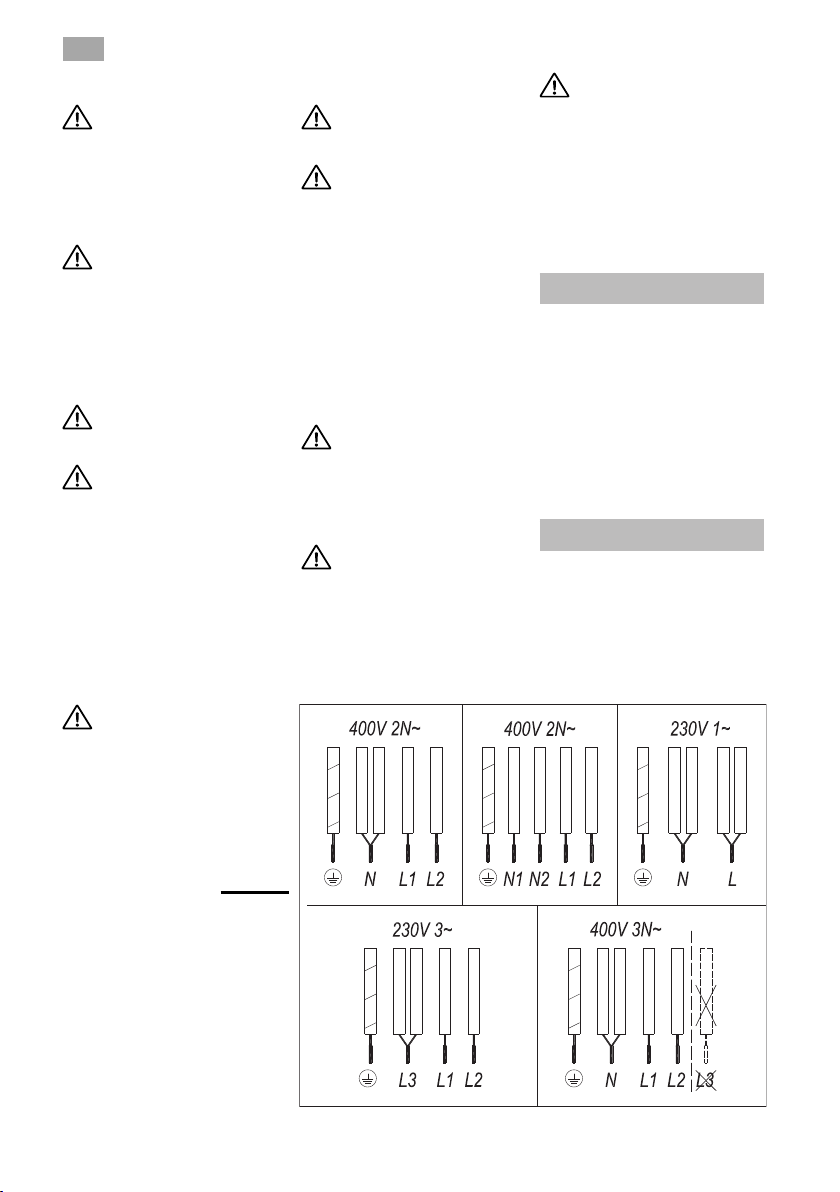
green-yellow
blue
brown
grey
black
green-yellow
blue
brown
grey
black
green-yellow
blue
brown
grey
black
green-yellow
blue
brown
grey
black
green-yellow
blue
brown
grey
black
g. 1
DO NOT USE L3
Safety warnings:
If the ceramic
glass breaks or
cracks, immediately
unplug the stovetop
to avoid electric
shocks.
This appliance is
not designed to work
with an external timer
(not built into the
appliance) or a
separate remote
control system.
Do not steam
clean this device.
The device and its
accessible parts may
heat up during
operation. Avoid tou
ching the heating
elements. Children
younger than 8 years
old must stay away
from the hob unless
they are permanently
supervised.
This device may
solely be used by
children 8 years old
or older, people with
impaired physical,
sensory or mental
abilities, or those who
lack experience and
knowledge, ONLY
when supervi- sed or
if they have been
given adequate
instruction on the use
of the device and
understand the
dangers its use
involves. User clea-
ning and maintenan-
ce may not be done
by unsupervised
children.
Children must not
play with the device.
Caution. It is
dangerous to cook
with fat or oil without
being present, as
NEVER try to extin-
guish a fire with
water! In this event
disconnect the
device and cover the
flames with a lid, a
plate or a blanket.
Do not store any
object on the cooking
areas of the stovetop.
Prevent a possible
Do not stare at
halogen lamps
directly on hob
Caution: The
cooking process has
to be supervised. A
short term cooking
process has to be
supervised
continuously.
Installation
Emplacement with cutlery drawer
Electrical connection
EN
5
Warning:
service can handle or repair the
appliance, including replacement
of the power cable.
cate or the technical data sheet
together with the instructions
manual throughout the product's
service life. These contain impor-
tant technical information.
Use and
Maintenance
User instructions of the
Touch Control
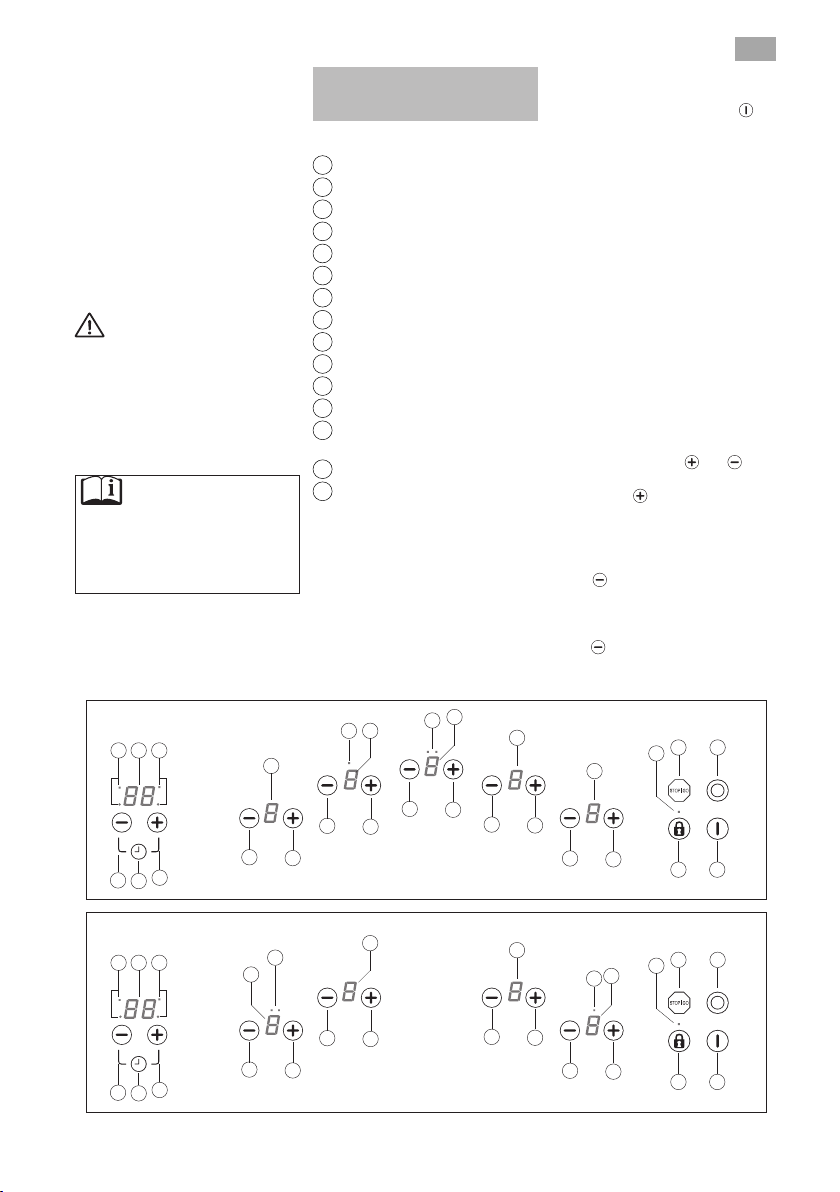
HANDLING ELEMENTS
SWITCHING THE APPLIANCE ON
ACTIVATING THE HOT PLATES
8 9 8
10
10
10
2 1
3
4
3
4
3
4
3
4
3
4
657
11 12 13
1014 15 10
8 9 8
10
10
10
2 1
3
4
3
4
3
4
3
4
657
11 12 13
10
15
14
Fig. 2
Fig. 3

EN
6
SWITCHING THE HOT PLATES OFF
RESIDUAL HEAT display
Warning: If while the H is still
displayed there is a power cut and
the power returns immediately, the
residual heat displays will not light
up again, even though the cooking
surfaces are still hot. Bear this in
mind.
SWITCHING THE APPLIANCE OFF
Double and Triple Burner
Hot Plates
CONNECTING / SWITCHING THE
DOUBLE BURNER HOT PLATE ON
DISCONNECTING/SWITCHING THE
DOUBLE BURNER HOT PLATE OFF
CONNECTING / SWITCHING THE
TRIPLE BURNER HOT PLATE ON
DISCONNECTING / SWITCHING
THE TRIPLE BURNER HOT PLATE
OFF
STOP function
Activating the Stop function
Deactivating the Stop function
Table 1
Selected
power
Maximum operating time
(in minutes)
1600
2300
3300
4240
5180
6120
7120
8120
960
Automatic cook start
Table 2

EN
7
Selected
power
Automatic Cook Start
Function (Time in seconds)
150
290
3150
4220
5320
6540
7150
8240
9
SWITCHING THE AUTOMATIC
COOK START FUNCTION ON
Example:
CHANGING THE POWER LEVEL
DURING AUTOMATIC COOK START
Example:
DISCONNECTING THE AUTOMATIC
COOK START FUNCTION
Stopwatch function
Timer function
Timing ONE hot plate.
Setting the timer for more than one
hot plate.
Changing the programmed time.
EN
8
Locking the hot plate
touch buttons
Power surges
The touch control detects these
power surges whenever the
appliance is connected to the
mains, even if it is not being used at
that moment. The alarm described
above might therefore be activated
even when the touch control is
Unusually high power surges
can damage the control system (like
with any electrical appliance).
Tips for using ceramic
hot plates
Try not to spill sugar or
products containing sugar on the
glass because while the surface is
hot they could damage it.
Cleaning and maintenance
Warning:
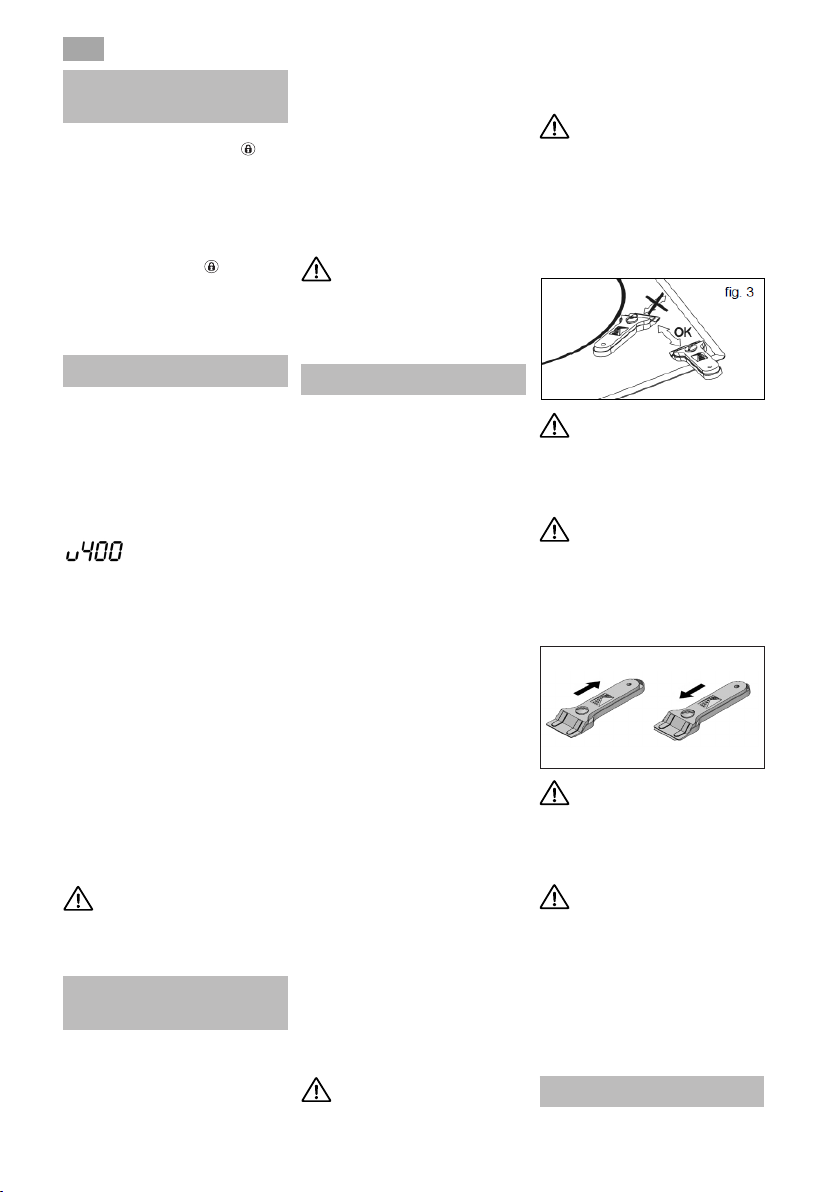
Handle the glass scraper
carefully. The blade could cause
injury!
If you use the scraper inco-
rrectly, the blade could break and a
fragment could get caught between
the surrounding trim and the glass.
If this happens, do not try to remo-
ve it using your hands, carefully
Only use the blade on the
ceramic surface, avoiding the scra-
per casing coming into contact with
the glass because this could
scratch it.
Use blades in perfect condi-
tion. Immediately replace the blade
if it is damaged in any way.
scraper, withdraw the blade and
fig. 4
Blade protected Blade unprotected
Using the scraper
A pot or pan may become stuck
to the glass due to a product having
melted between them. Do not try to
cold! This could break the glass.
Do not step on the glass or
lean on it as it could break and cau-
se injury. Do not use the glass as a
surface for placing objects.
Marco
Environmental aspects

EN
9
The symbol on the product or
packaging means that this product
cannot be treated like usual
household waste. This product
must be taken to a recycling
collection point for electrical and
electronic appliances. By ensuring
that this product is disposed of
correctly, you will avoid harming
the environment and public health,
which could happen if this product
is not handled properly. For more
detailed information about recycling
this product, please contact your
local authority, household waste
service or the store where you
purchased the product.
The packaging materials used are
environmentally-friendly and can
be recycled completely. Plastic
components are marked >PE<, LD<,
>EPS<, etc. Dispose of packaging
materials, like household waste, in
your local container.
Malfunctioning
The appliance does not work:
The pot sticks to the glass:
warning:
Continuous beep, control
disconnected and
symbol on display:
A hot plate disconnects and
message E2 appears on the display:

AR
10
green-yellow
blue
brown
grey
black
green-yellow
blue
brown
grey
black
green-yellow
blue
brown
grey
black
green-yellow
blue
brown
grey
black
green-yellow
blue
brown
grey
black
g. 1
DO NOT USE L3
8
20
3

AR
11
)2
1
1
0
10
010
100
3
1
4
4
0
9
4
0
H
1
10
8 9 8
10
10
10
2 1
3
4
3
4
3
4
3
4
3
4
657
11 12 13
1014 15 10
8 9 8
10
10
10
2 1
3
4
3
4
3
4
3
4
657
11 12 13
10
15
14
Fig. 2
Fig. 3

AR
12
911
10
2
1413
1
1413
13
15
1
1513
10
1
122
10
121
10
10
1
1
1600
2300
3300
4240
5180
6120
7120
8120
960
0
2
2
150
290
3150
4220
5320
6540
7150
8240
9
91
9
6
6
6
39
9
4
6
5409
6
6540
31
3
501
2204
20020
20220
10
41
1
)
0092
8
)3
AR
13
0
00
)
)
1
)2
0093
8
4
5
1 )
)6 99
51
30
)1
2
)8
)7
00
2
2
11

AR
14
(
fig. 4
(5
fig. 5 Using the scraper
Blade protected Blade unprotected
.Marco
LDPE
EPS
E2


P22104R00
Table of contents
Languages:
Other Marco Cooktop manuals


