MARMON ANGELO PO COMBISTAR FX User manual

1
Rev. 0

Copyright by Servizio Clienti ANGELO PO Spa
2
CONTENTS
1. COMMERCIAL MODEL NUMBER.............................................................6
1.1. Connection diagram electric and gas.....................................................................9
1.2. Water characteristics ...........................................................................................11
1.3. Instruction to reduce width...................................................................................12
2. FUNCTIONAL DIAGRAM COMBI OVEN.................................................14
2.1. Open valve operation...........................................................................................15
2.2. Closed valve operation ........................................................................................16
2.3. Drain cooldown / steam condensing operation.....................................................18
2.4. Steam producing operation (injectors code).........................................................19
3. ELECTRONIC BOARDS, INVERTER, FUSES, OVERLOAD RELAYS..20
3.1. Electronic boards level 3 general layout...............................................................20
3.2. “Service” menu ....................................................................................................26
3.3. Explanation table .................................................................................................38
3.4. Emergency Software Recover Procedure ............................................................39
3.5. Inverter ................................................................................................................39
3.5.1. Warning on electric hazard........................................................................................40
3.5.2. Inverter Alarm Table ..................................................................................................40
3.5.3. Service Communication 2017_02 of 30/03/2017......................................................43
3.6. Fuses description FX Level 3:..............................................................................45
3.7. Electronic boards (LIV.1/2)...................................................................................47
3.8. New Model Lev2 - SPECIAL................................................................................54
3.8.1. Alarm log....................................................................................................................54
3.8.2. Inverter for Level2......................................................................................................54
3.9. Explanation table .................................................................................................56
3.10. Fuses description FX Level 2...............................................................................57
3.11. Reset Board to Default Parameter.......................................................................58
3.12. Level 1, 2 and BX electric ovens motor overload relays table ..............................59
3.13. Level 1, 2 and BX gas ovens motor overload relays table....................................59
3.14. Service Communication 2017_03 of 17/07/2017..................................................60
4. GAS SYSTEM - OPERATE TEST ADJUST INSTALL REPORT ............62
4.1. System operation.................................................................................................62

Copyright by Servizio Clienti ANGELO PO Spa
3
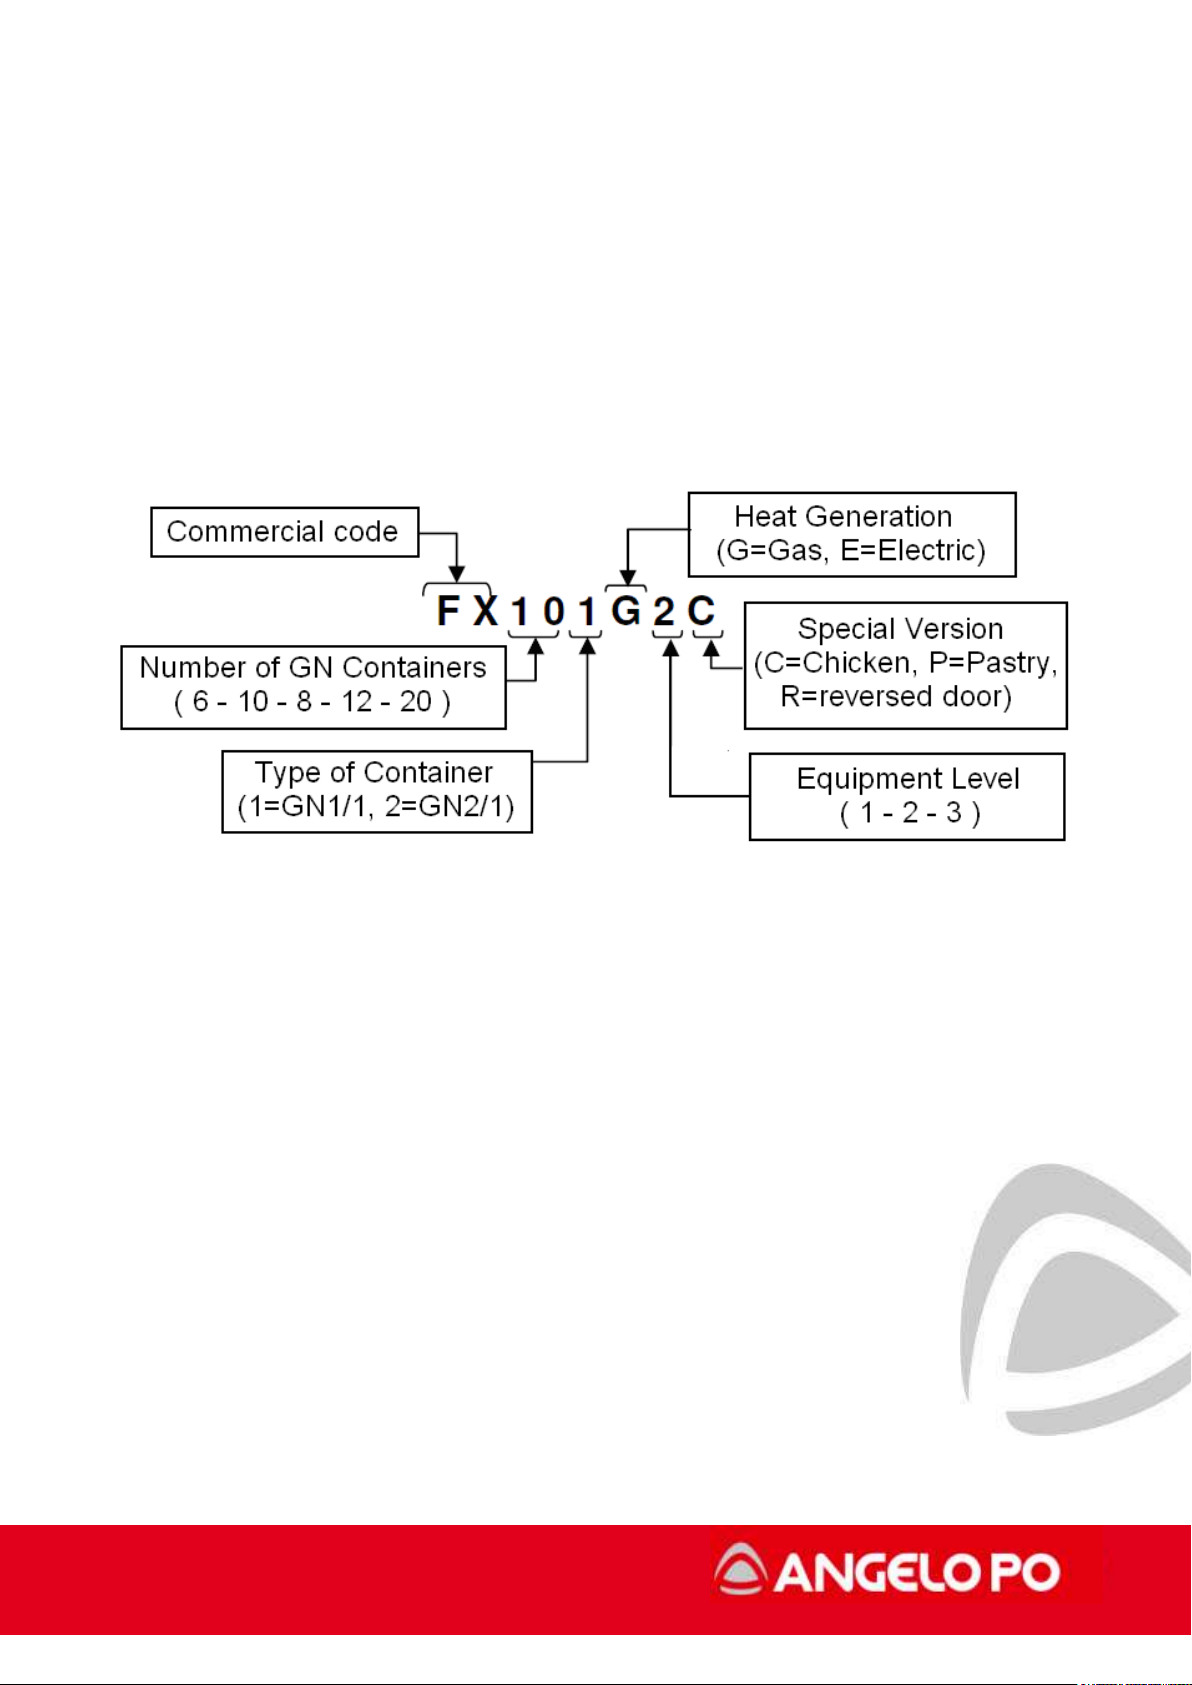
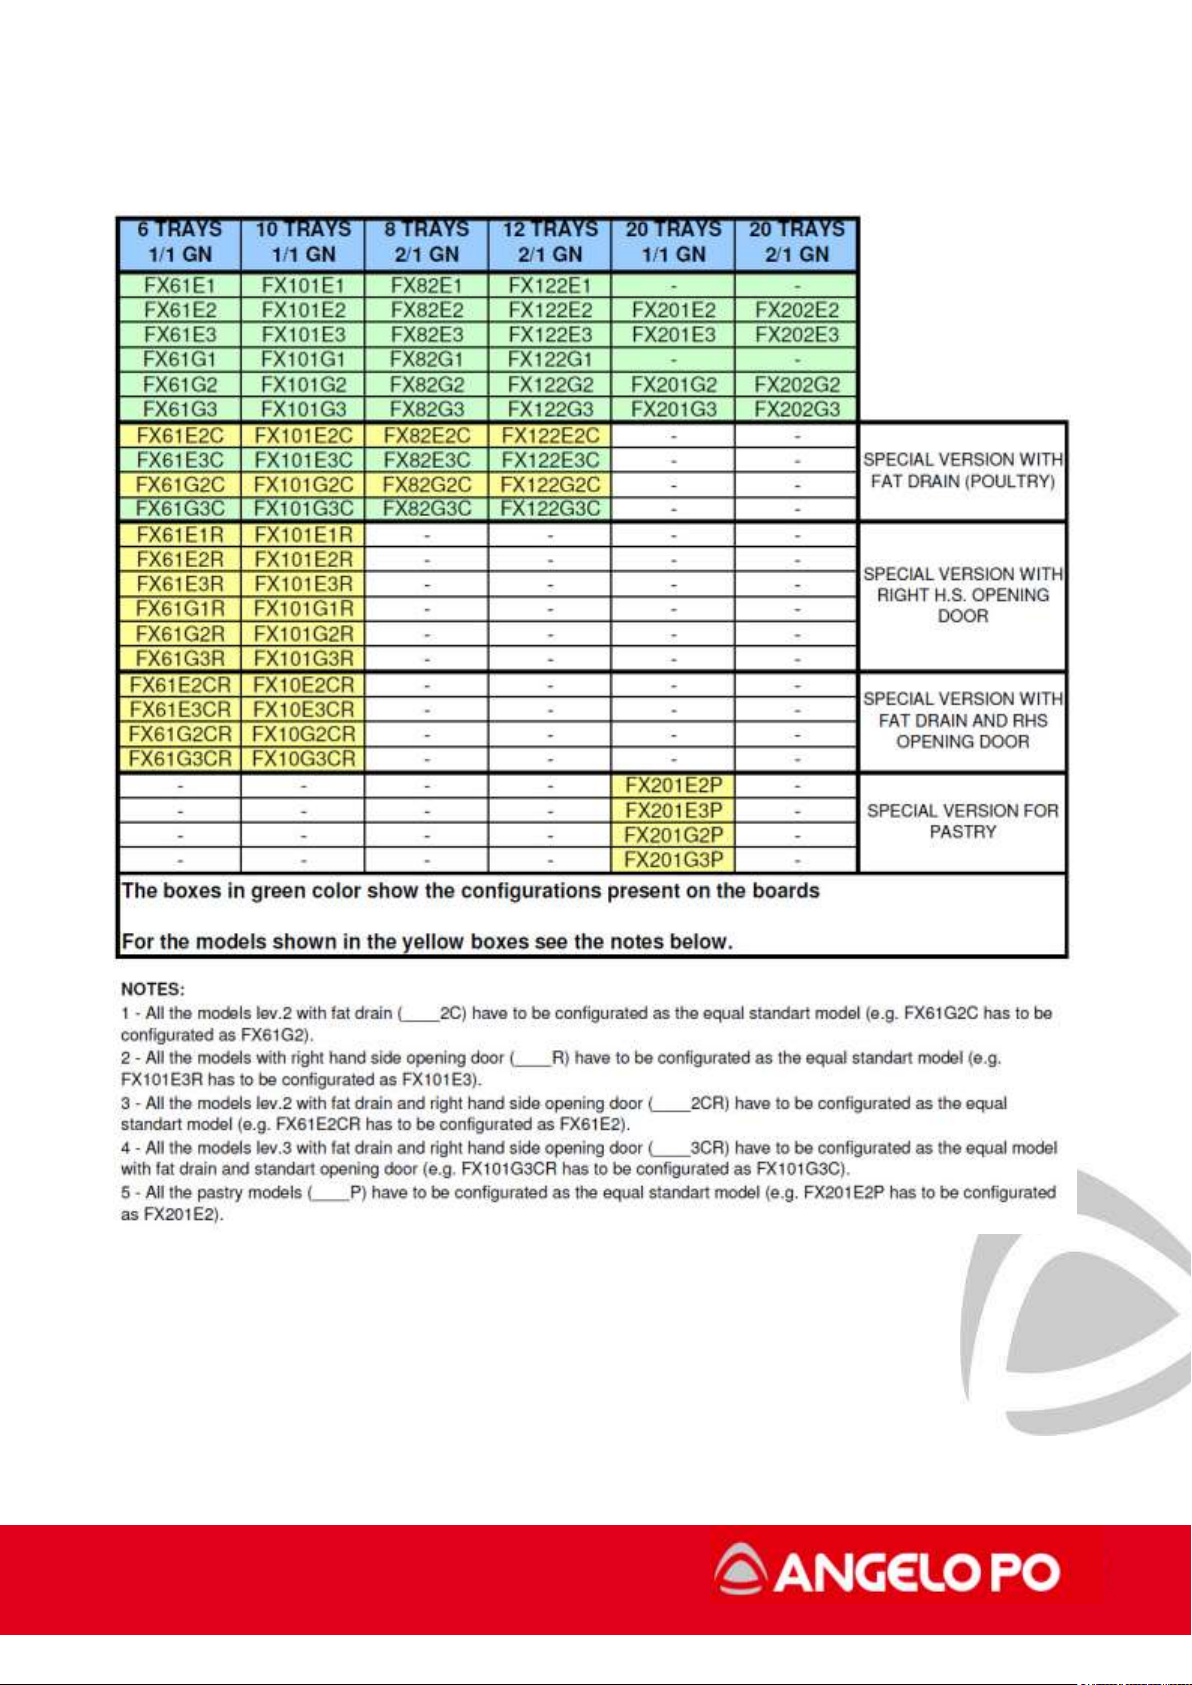
4.1.1. Premixed system general principles..........................................................................62
4.1.2. Power schemes..........................................................................................................63
4.1.3. General functional diagram........................................................................................65
4.2. System components ............................................................................................66
4.2.1. The gas valve.............................................................................................................68
4.2.2. Mixer...........................................................................................................................70
4.2.3. Blower ........................................................................................................................71
4.2.4. Blower (FX/BX 2018).................................................................................................72
4.2.5. Combustion control board..........................................................................................73
4.2.6. Combustion Control Board (FX/BX2018)..................................................................75
4.2.7. Remote igniter............................................................................................................78
4.2.8. Spark plug and flame detector kit..............................................................................79
4.2.9. The burner standard and FX/BX2018........................................................................80
4.2.10. Heat exchanger..........................................................................................................81
4.2.11. Exhaust extraction kit.................................................................................................82
4.3. Combustion control board: logic operation...........................................................83
4.3.1. Ignition standard cycle...............................................................................................85
4.3.2. Standard ignition cycle (FX2018) ..............................................................................86
4.3.3. GAS alarm: E12:F4: flame missing ...........................................................................87
4.3.4. Gas alarm E12:F4: flame missing (FX/BX2018).......................................................88
4.4. Gas Test..............................................................................................................89
4.4.1. Setup gas (level 3).....................................................................................................89
4.4.2. Recommended values of combustion .......................................................................92
4.4.3. Recommended value of combustion (FX/BX 2018)..................................................95
4.4.4. Adjustment during the test.........................................................................................98
4.5. Problems during the test setup wizard ...............................................................101
4.6. Gas flue analysis ...............................................................................................102
4.7. Installation report ...............................................................................................103
4.8. Gas alarms ........................................................................................................105
4.9. Gas conversion..................................................................................................107
4.10. Gas test level 1 & 2............................................................................................109
4.11. Periodic gas flue analysis...................................................................................113
5. WASHING CYCLES LEVELS 3..............................................................114
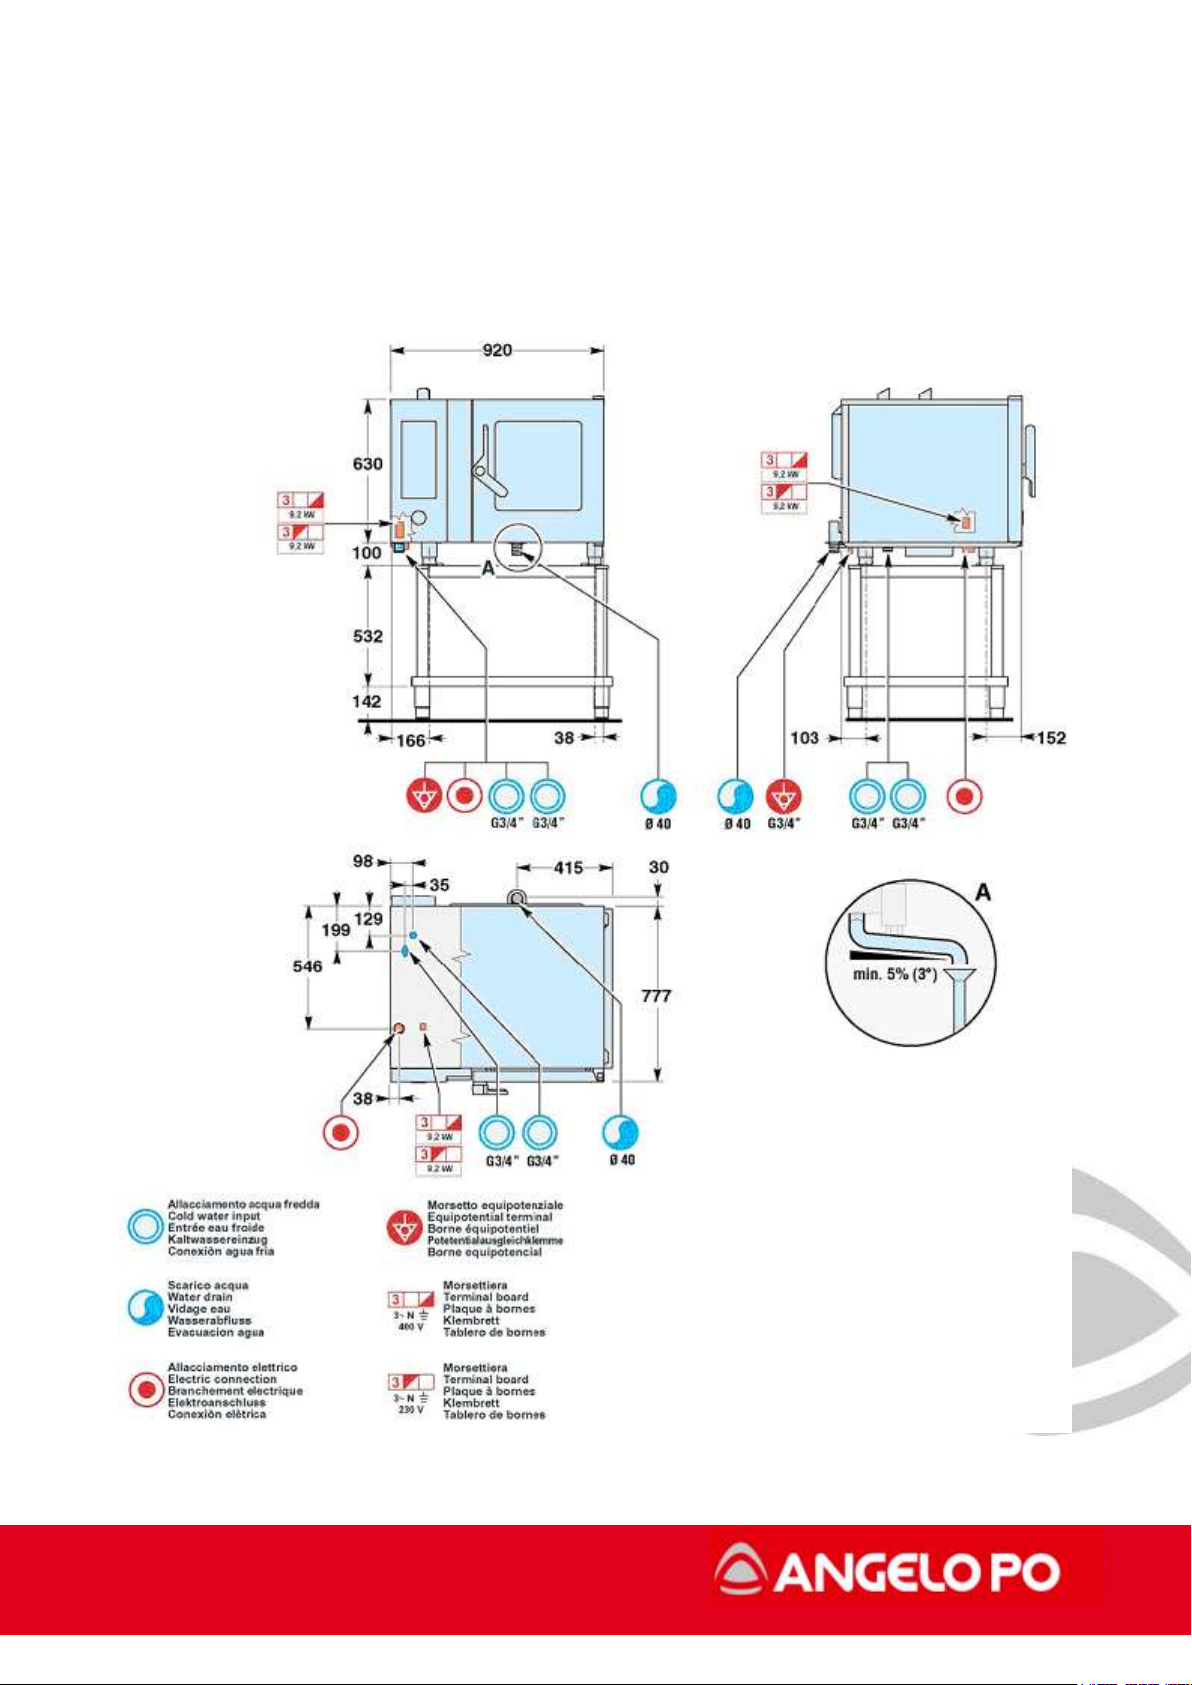
5.1. Washing circuit operating and components........................................................114
5.2. Functional Diagram of Washing circuit...............................................................115

Copyright by Servizio Clienti ANGELO PO Spa
4
5.3. Clean test ..........................................................................................................118
5.3.1. Recommended procedure.......................................................................................119
5.4. Washing Interruption..........................................................................................120
5.5. Washing alarms table ........................................................................................122
5.6. Cleaning consumption table...............................................................................125
5.7. Cleaning warning and cleaning blockage...........................................................126
5.8. Warning descaling .............................................................................................128
5.9. Additional for FX Level 3 Ovens.........................................................................129
5.9.1. Washing warning......................................................................................................129
5.9.2. Descaling Warning...................................................................................................129
5.10. Washing circuit operating and components Liv2 ................................................130
6. DISMANTLE AND REASSEMBLY COMPONENTS..............................132
6.1. Encoder .............................................................................................................132
6.2. Motor .................................................................................................................133
6.3. Door micro-switch..............................................................................................134
6.4. Door glass frame disassembly...........................................................................135
6.5. Component compartment cooling system ..........................................................136
6.5.1. NEV AIR FILTER ON MODELS MY2016................................................................137
6.6. Door adjustment ................................................................................................140
6.7. Core probe.........................................................................................................142
6.8. Humidity probe...................................................................................................143
6.9. Halogen bulb replacement.................................................................................144
6.9.1. New system of fixing bulb........................................................................................144
6.9.2. Bulb replacement with the new system...................................................................145
6.10. Lock dismantling................................................................................................146
6.10.1. Complete door latch.................................................................................................146
6.10.2. Spring replacement..................................................................................................148
6.11. Lock dismantling 20 trays models......................................................................150
6.12. Spark plug replacement.....................................................................................152
6.13. Blower fan replacement .....................................................................................153
6.14. CPU and display LCD boards (Lev.3) replacing.................................................155
6.14.1. CPU board Replacing (1st Version) .........................................................................156
6.14.2. Flat cable connection on the LCD display...............................................................157
6.14.3. Flat cable connection on the LED board and keyboard (1st version)......................158

Copyright by Servizio Clienti ANGELO PO Spa
5
6.14.4. LCD display replacing..............................................................................................158
6.14.5. CPU board Replacing (2nd version)........................................................................160
6.14.6. KIT CPU for updating ovens 1st version ..................................................................161
6.15. Roll-In adjustment RX201 - RX202 ....................................................................162
6.16. NEW GASKETS Service Circular 2016_02 of 03/10/2016 .................................164
6.17. Scheduled recommended maintenance.............................................................166
7. ALARMS..................................................................................................167
7.1. Alarm table.........................................................................................................167
7.2. Alarm table blast chiller (optional)......................................................................173
8. Chicken Star Version...............................................................................175
8.1. General Features...............................................................................................175
8.2. The valve in the Chickenstar..............................................................................175
8.3. Pictures..............................................................................................................177

Copyright by Servizio Clienti ANGELO PO Spa
6
1. COMMERCIAL MODEL NUMBER

Copyright by Servizio Clienti ANGELO PO Spa
7
FX Models table

Copyright by Servizio Clienti ANGELO PO Spa
8
FX (FX2018) –FM POWER COMPARISON
TYPE OF POWER
6x1/1
10x1/1
20x1/1
8x2/1 -
7x2/1
12x2/1
20x2/1
FX GAS POWER (KW)
14
19,5 (20)
40
27
32,5(32)
55
FM GAS POWER
(KW)
12
18
32
24
28
48
DELTA %
16,7%
8,3%
25,0%
12,5%
16,1%
14,6%
FX ELECTRICAL
POWER
(KW)
10,1
17,3
34,3
19,8
27,5
55,5
FM ELECTRICAL
POWER
(KW)
9,2
17,3
34,3
17,3
24,8
49,4
DELTA %
9,8%
0,0%
0,0%
14,5%
10,9%
12,3%

Copyright by Servizio Clienti ANGELO PO Spa
9
1.1. Connection diagram electric and gas
OVEN CONNECTION DIAGRAM (FX 61 E3)

Copyright by Servizio Clienti ANGELO PO Spa
10
OVEN CONNECTION DIAGRAM (FX 61 G3)

Copyright by Servizio Clienti ANGELO PO Spa
11
1.2. Water characteristics
The appliance must be supplied with drinking water having the characteristics shown in the
table. If these characteristics are not complied with, the appliance might suffer damage; a
water treatment device should therefore be installed.

Copyright by Servizio Clienti ANGELO PO Spa
12
1.3. Instruction to reduce width
FX61, FX101
The smallest dimension (depth) of the 61-101 models is about 900mm.
It is possible to reduce it by:
Option A - 20mm - removing the T protection from the oven drain.
Option B - 66mm - removing the T-protection from the oven drain, the T-pipe from the
drain and the cooling fan protection at the back.
Option C - 56mm - disassembling the handle / lock assembly and handle.
By combining options B and C the minimum oven measurement is approximately 778mm.
FX82, FX122
The smallest dimension (depth) of models 82-122 is about 1093mm. It is possible to
reduce it by:
Option A - 20mm - removing the T protection from the oven drain.
Option B - 68mm - removing the T-protection from the oven drain, the T-pipe from the
drain and the cooling fan protection at the back.
Option C - 56mm - disassembling the handle / lock assembly and handle.
By combining options B and C the minimum oven measurement is approximately 970mm.
Option D (valid only for FX82) - As follows:
- disassemble the oven body from the support (the screws to be removed are at the top of
the 4 uprights and on the inside of the base where the two support bars are).
- lift the oven body and make it pass through the narrower part.
- Reassemble the oven body on the support.
The minimum oven measurement possible is about 905mm.

Copyright by Servizio Clienti ANGELO PO Spa
13
FX201
The smallest dimension (depth) of the 201 model is about 920mm. It is possible to reduce
it by:
Option A - 18mm - removing the T protection from the oven drain.
Option B - 68mm - removing the T-protection from the oven drain, the T-pipe from the
drain and the cooling fan protection at the back.
Option C - 15 mm - disassembling only the handle.
By combining options B and C the minimum oven measurement is approximately 837mm.
FX202
The smallest dimension (depth) of model 202 is about 1104mm. It is possible to reduce it
by:
Option A - 18 mm - removing the T protection from the oven drain.
Option B - 68 mm - removing the T-protection from the oven drain, the T-pipe from the
drain and the cooling fan protection at the back.
Option C - 15 mm - disassembling only the handle.
By combining options B and C the minimum oven measurement is approximately 837mm.

Copyright by Servizio Clienti ANGELO PO Spa
14
2. FUNCTIONAL DIAGRAM COMBI OVEN
6
7
10
1
9
5
11
12
13
14
15

Copyright by Servizio Clienti ANGELO PO Spa
15
The system works in two distinct ways depending on whether the motorised valve is
opened or closed.
2.1. Open valve operation
The rotation of the fan creates a vacuum effect in the local area behind his disk back
where it faces the suction pipe/exhaust 5. When the butterfly valve 7 is open to this effect
a vacuum sucking air flow entering through the pipe 5. Simultaneously the moist air inside
the cooking chamber is induced to leave through the vent tube 6, aided by a flow diverter
(not shown) placed inside the chamber at the exit hole. Through the injector 12 is sprayed
water into the vent pipe - especially at high temperatures - in order to cool and condense
the flow of moist air coming out. The condensate is collected on the bottom of the pipe to
siphon 6 and conveyed through the rubber hose 14.

Copyright by Servizio Clienti ANGELO PO Spa
16
2.2. Closed valve operation
With the valve closed, the steam can’t escape from the vent pipe 6, or from the tube 5 at
least until the pressure inside the cooking chamber is not sufficient to overcome the effect
of decompression generated by the rotation of the fan (usually 1,5-2,0mBar). But when the
pressure chamber exceeds the decompression generated by the fan, the steam excess is
expelled through the tube 5. The system operates as a closed system, where the
overpressure valve (overpressure valve in the FM ovens) is dynamically replaced by the
effect of decompression generated by the fan. Even in this mode, water is sprayed by the
injector 12 in order to maintain the siphon full.
Note that, unlike than the FM, the condensate tube 14 is connected upstream of the swing
of the siphon, as with the motorised valve closed the vent pipe 6 and the drain tube 14 are
at the same pressure of the cooking chamber.

Copyright by Servizio Clienti ANGELO PO Spa
17
The two modes of operation described above are used in different modes of cooking in the
following way:
Convection cooking: means the user can determine the % the vent valve is open
according to the diagram below.
0% - vent completely open (bar on the display all red)
from 10 to 90% - the valve opens and closes in timed mode, the value shown on the
display is the % of time that remains closed.
100% - vent completely closed (bar on the display all grey)
Combi cooking mode: the user can set the desired % of steam - the opening and closing
of the vent valve is controlled automatically by the oven, based on values detected from
the opposite humidity probe.
Steam cooking: valve remains closed.

Copyright by Servizio Clienti ANGELO PO Spa
18
2.3. Drain cooldown / steam condensing operation
The inlet water assembly 11 feeds the cooling water injector 12. The opening of the water
solenoid valve is timed based on the mode of operation (convection, combi or steam),
chamber temperature and the temperature detected by temperature sensor 9.
The inlet water assembly 11 is different depending on the levels:
Level 3
It consists of:
- Non return valve EN1717 (for washing)
- Pressure reducer (for washing)
- Double water solenoid valve (one is for washing)
- Pressure switch on the drain cooldown line
- Pressure switch and manometer on the washing water line
Note: the water pressure adjustment should be done during a washing cycle.
Level 2
It consists of:
- Double water solenoid valve (one is for cleaning)
- Pressure switch on the drain cooldown line
- Pressure switch on the washing water line (not for BX MY2016)
- Pressure reducer (only models FX201-202)
Level 1
It consists of:
- Single water solenoid valve

Copyright by Servizio Clienti ANGELO PO Spa
19
2.4. Steam producing operation (injectors code)

Copyright by Servizio Clienti ANGELO PO Spa
20
3. ELECTRONIC BOARDS, INVERTER, FUSES, OVERLOAD
RELAYS
3.1. Electronic boards level 3 general layout
The electronic boards system comprises:
1. panel group:
oCPU board 1a
odisplay LCD board 1b
okeyboard (glued to the glass panel) 1c
oLED board 1d
2. power PCB
3. combustion control PCB (only gas model)
4. inverter
5. USB connector
6. transformer
7. on/off switch
This manual suits for next models
72
Table of contents
Other MARMON Oven manuals