Martha Stewart MTS-EWC15 User manual

1
© 2020 by Snow Joe®, LLC
All rights reserved. Original instructions. SAVE THESE INSTRUCTIONS
Model MTS-EWC15 Form No. SJ-MTS-EWC15-880E-MR1
OPERATOR’S MANUAL
ELECTRIC WOOD CHIPPER + SHREDDER
15-AMP | 17:1 REDUCTION RATIO
IMPORTANT!
Safety Instructions
All Operators Must Read These
Instructions Before Use
Always follow these safety guidelines. Failure to do so may
result in serious bodily injury or death.
General Safety WARNINGS!
You and any other operator of this wood chipper + shredder
must read, understand, and follow these instructions in
their entirety. Failure to follow these instructions may result
in ELECTRIC SHOCK, FIRE, and/or serious PERSONAL
INJURY.
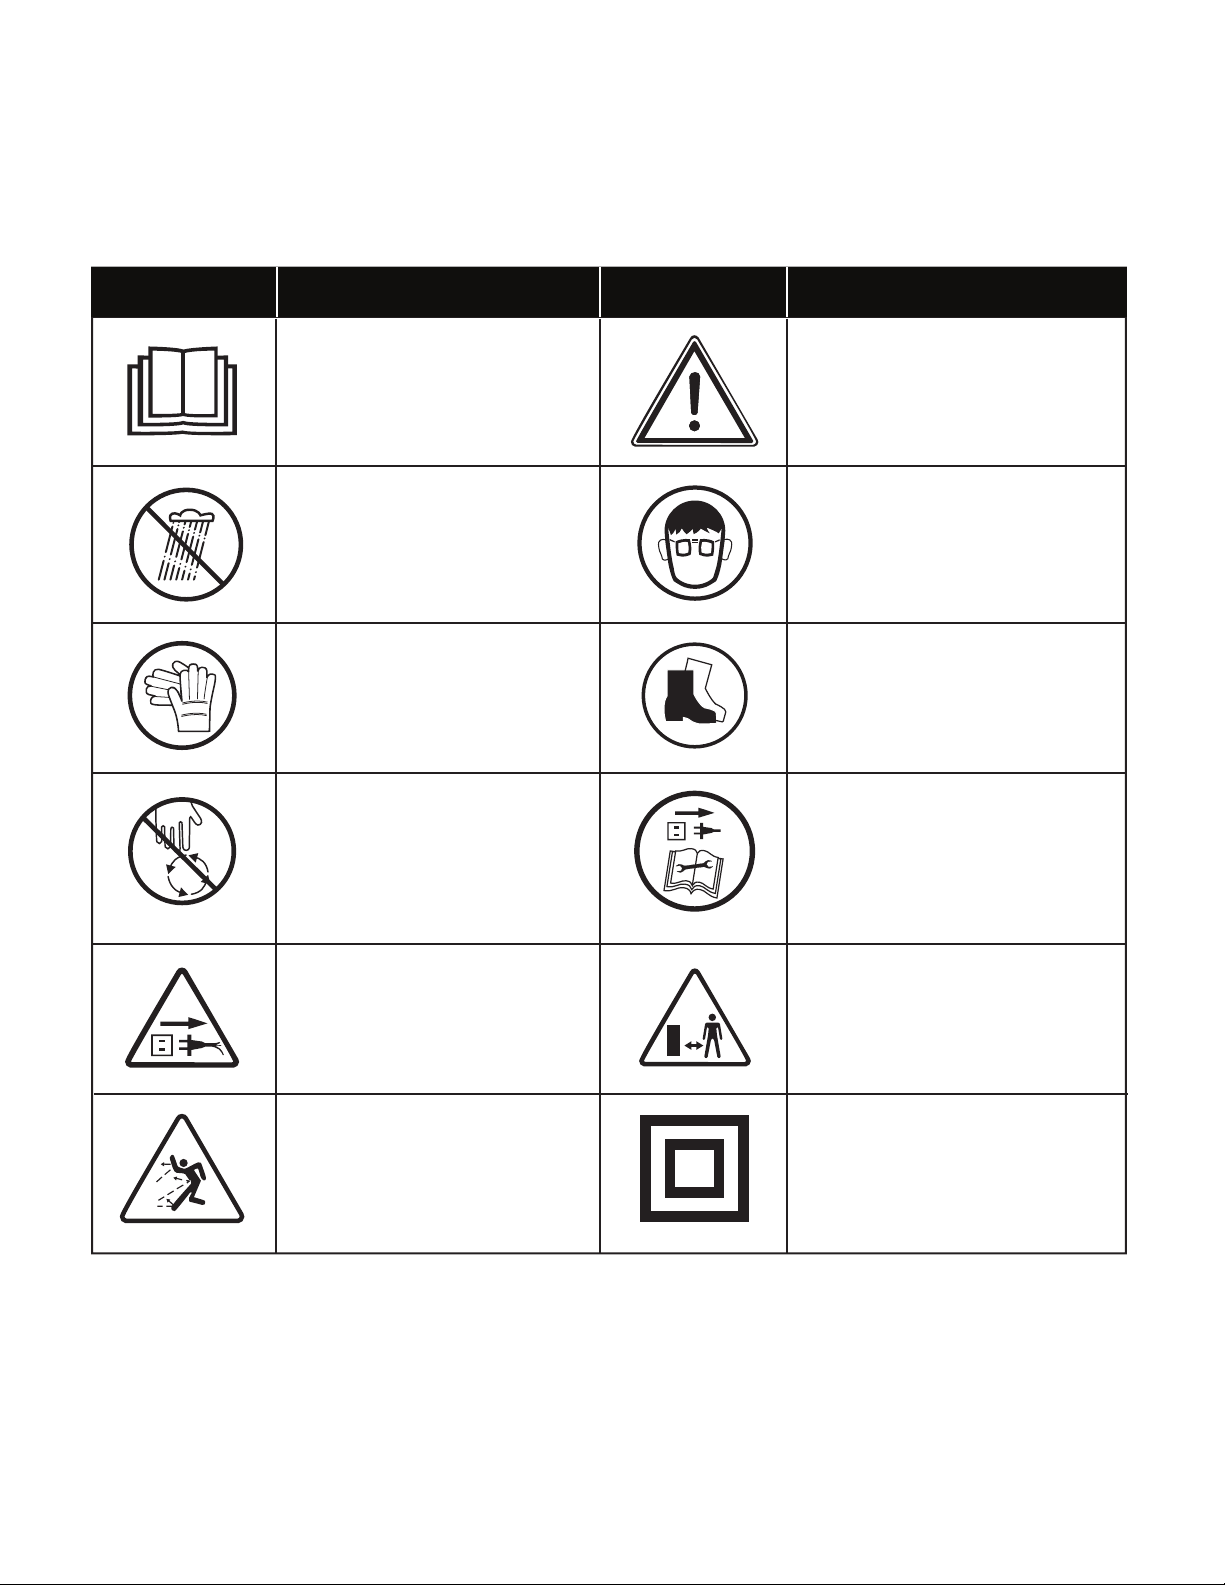
Notice the personal safety alert symbol mused in this
manual to draw your attention to a WARNING given along
with the particular operating instruction. This means that
the operation requires special ATTENTION, CAUTION, and
AWARENESS.
mWARNING! Wear appropriate personal hearing
protection during use. Under some conditions and duration of
use, noise from this product may contribute to hearing loss.
mWARNING! The rotating blades can cut you. Keep
hands and feet away from the hopper and the discharge chute.
Before using the wood chipper + shredder, familiarize yourself
with the controls, especially how to stop the unit in an
emergency. The only individuals who should use the wood
chipper + shredder are those who thoroughly understand
these instructions and know how to properly operate the unit.
Children should never be allowed access to the wood chipper
+ shredder.
Retain this manual for future reference and reread it at the start
of each chipping season.
General Safety
1. Avoid dangerous environments – Do not use the wood
chipper + shredder in rain or in damp or wet locations. Do
not operate the unit in gaseous or explosive atmospheres
or use the unit near ammable or combustible liquids.
Motors in these tools normally spark, and the sparks
might ignite fumes.
2. Dress properly – Do not wear loose clothing or jewelry as
such articles can become caught in moving parts. Wear
a protective covering to contain long hair. Wearing rubber
gloves and substantial non-slip footwear is recommended
when working outdoors.
3. Use safety glasses – Also use dust mask, safety
footwear, snug-tting clothing, protective gloves, hearing,
and head protection.
4. Extension cords – To prevent electric shock, use only
with an extension cord suitable for outdoor use.
5. Disconnect the tool – Disconnect the wood chipper +
shredder from the power supply when it is not in use,
before servicing it, when changing accessories, and when
performing any other maintenance task.
6. Do not abuse the cord – Never carry the wood chipper
+ shredder by the cord or yank the cord to disconnect it
from the receptacle. Keep the cord away from heat, oil,
and sharp edges.
7. Stay alert – Watch what you are doing. Use common
sense. Do not operate the wood chipper + shredder when
you are tired or under the inuence of drugs, alcohol, or
other medication.
8. Store idle tool indoors – When not in use, the wood
chipper + shredder should be stored indoors in a dry and
high or locked-up place out of the reach of children.
9. Maintain the wood chipper + shredder with care –
Keep the cutting edges sharp and clean for optimal
performance and to reduce the risk of injury. Inspect the
extension cord periodically and immediately replace it
if damaged. Keep the handles dry, clean, and free from
oil and grease. Follow the additional recommendations
described in the Care + Maintenance section of this
manual.
10. Check for damaged parts – Before further use of the
appliance, a part that is damaged should be carefully
checked to determine that it will operate properly and
perform its intended function. Check for alignment of
moving parts, binding of moving parts, breakage of parts,
mounting, and any other condition that may aect its
operation. A part that is damaged should be properly
repaired or replaced. Contact the Snow Joe®+ Sun Joe®
customer service center at 1-866-SNOWJOE
(1-866-766-9563) for assistance.
11. Lighting – Only operate your wood chipper + shredder in
daylight or good articial light.

2
12. Do not overreach – Keep proper footing and balance at
all times.
13. Never leave a running tool unattended – Turn the
wood chipper + shredder o and wait until it comes to a
complete stop before leaving the work area.
14. Avoid accidental starting – Do not carry the wood
chipper + shredder with your nger on the switch. Make
sure the switch is o before plugging in or unplugging the
unit.
15. Use the right tool – Do not use this machine for any job
except that for which it was intended.
16. Keep children, bystanders, and pets away – All
spectators, including pets, should be kept a safe distance
away from the work area.
Personal Safety
1. Before starting the wood chipper + shredder, make sure
that the hopper inlet is empty.
2. Keep your face and body away from the opening.
3. Do not allow hands or any other part of the body or
clothing near the hopper or discharge chute.
4. Never put your hands into the hopper while the wood
chipper + shredder is running. Always use the paddle
supplied with your wood chipper + shredder to push
items into the hopper.
5. Do not try to force objects larger than the recommended
diameter of 1-1/2" into the hopper.
6. Always stand clear of the discharge zone when operating
the wood chipper + shredder. Never reach under the unit
until it has come to a complete stop.
7. When feeding material into the wood chipper + shredder,
be careful to remove pieces of metal, rocks, bottles, cans
or other foreign objects that may damage the blades.
8. If the cutting mechanism strikes a foreign object or if the
wood chipper + shredder should start making any unusual
noise or vibration, turn it o and allow it to come to a
complete stop. Disconnect from power supply and take
the following steps:
– Inspect for damage;
– Check for and tighten any loose parts.
mWARNING! Never reach into the hopper until the
wood chipper + shredder has come to a complete stop and
is unplugged. The blades will continue to rotate for a few
seconds after the unit is turned o.
9. Do not allow processed material to build up in the
discharge zone; this may prevent proper discharge and
can result in kickback of material through the hopper.
mWARNING! Never put your hands near the
discharge chute. Failure to heed the warning could result in
serious injury.
10. If the wood chipper + shredder becomes clogged, turn it
OFF and disconnect from power supply before clearing
debris. Keep the power source clear of debris and other
accumulations to prevent damage to the power source.
Remember that the starting mechanism on engine
powered tools will cause the cutting mechanism to move.
11. Keep all guards and deectors in place and in good
working condition.
12. Do not operate the wood chipper + shredder on a paved
or gravel surface where ejected material could cause
injury.
13. Turn o the wood chipper + shredder and disconnect it
from the power supply whenever you leave the work area.
14. Do not tilt the wood chipper + shredder while it is running.
15. Never reach into the hopper until the wood chipper +
shredder has come to a complete stop and has been
disconnected from the power supply.

3
Electric Safety
1. Ground fault circuit interrupter (GFCI) protection should
be provided on the circuit(s) or outlet(s) to be used for
this electric wood chipper + shredder. Receptacles are
available having built-in GFCI protection and may be used
for this measure of safety.
2. To prevent electric shock, use only with an extension cord
suitable for outdoor use, such as SW-A, SOW-A, STW-A,
STOW-A, SJW-A, SJOW-A, SJTW-A, or SJTOW-A.
Before use, check that the extension cord is in good
condition. When using an extension cord, make sure to
use one heavy enough to carry the current to the product.
An undersized cord will cause a drop in line voltage
resulting in loss of power and overheating.
3. To reduce the risk of electric shock, this appliance has
a polarized plug (i.e. one blade is wider than the other).
Use this appliance only with a polarized UL-, CSA-, or
ETL-listed extension cord recommended for outdoor,
all-weather use, such as the Snow Joe®+ Sun Joe®
SJTW-A 14-gauge 50-foot extension cord with lighted
end (Model PJEXT50-B). Visit snowjoe.com to purchase
this extension cord online or, to order by phone, call
1-866-SNOWJOE (1-866-766-9563).
The appliance plug will t into a polarized extension
cord only one way. If the appliance plug does not t
fully into the extension cord, reverse the plug. If the plug
still does not t, obtain a correct polarized extension
cord. A polarized extension cord will require the use of a
polarized wall outlet. The extension cord plug will t into
the polarized wall outlet only one way. If the plug does
not t fully into the wall outlet, reverse the plug. If the plug
still does not t, contact a qualied electrician to install
the proper wall outlet. Do not modify the appliance plug,
extension cord receptacle, or extension cord plug in any
way.
4. To prevent the appliance cord from disconnecting from the
extension cord during operation, make a knot with the two
cords as shown in Table 1.
5. Power tool plugs must match the outlet. Never modify
the plug in any way. Do not use any adapter plugs with
earthed (grounded) power tools. Unmodied plugs and
matching outlets will reduce risk of electric shock.
6. Avoid body contact with earthed or grounded surfaces,
such as pipes, radiators, ranges and refrigerators. There is
an increased risk of electric shock if your body is earthed
or grounded.
7. If the supply cord is damaged, it must be replaced by an
electrician or a power tool repairer.
8. When operating a power tool outdoors, use an extension
cord suitable for outdoor use. Use of a cord suitable for
outdoor use reduces the risk of electric shock.
9. If operating a power tool in a damp location is
unavoidable, use a residual current device (RCD)
protected supply. Use of an RCD reduces the risk of
electric shock.
10. Have your tool repaired by an electrician or a qualied
service center. This power tool complies with relevant
safety requirements. To avoid danger, electrical appliances
must only be repaired by qualied personnel using original
spare parts; otherwise this may result in considerable
damage to the user.
mWARNING! m
Electric shock may cause SEVERE INJURY or
DEATH. Heed these warnings:
• Do not allow any part of the wood chipper + shredder
to make contact with water while it is in operation. If
the appliance becomes wet while turned o, wipe dry
before starting.
• Use only a UL-, CSA- or ETL-rated extension cord for
outdoor, all-weather use.
• Do not use an extension cord over 100 ft (30 m).
• Do not touch the appliance or its plug with wet hands
or while standing in water. Wearing rubber boots
oers some protection.
EXTENSION CORD CHART
Cord Length:
Min. Wire Gauge (A.W.G.):
Up to 50 ft
(15 m)
14
+50 ft - 100 ft
(+15 m - 30 m)
12
(B) Connect plug and receptacle
Cord set Appliance cord
(A) Tie cord as shown
Table 1. Method of Securing Extension Cord

4
Double-Insulated Appliances
In a double-insulated appliance, two systems of insulation
are provided instead of grounding. No grounding means is
provided on a double-insulated appliance, nor should a means
for grounding be added to the appliance. Servicing a double-
insulated appliance requires extreme care and knowledge
of the system, and should be performed only by qualied
service personnel at an authorized Snow Joe®+ Sun Joe®
dealer. Replacement parts for a double-insulated appliance
must be identical to the parts they replace. A double-insulated
appliance is marked with the words “Double Insulation” or
“Double Insulated.” The symbol (square within a square)
may also be marked on the appliance.
DOUBLE-INSULATED: GROUNDING NOT
REQUIRED. WHEN SERVICING, USE ONLY
IDENTICAL REPLACEMENT PARTS.
This wood chipper + shredder is double-insulated, eliminating
the need for a separate grounding system. Use only identical
replacement parts. Read the instructions before servicing
double-insulated appliances. Use this electric wood chipper +
shredder only as described in this manual.

5
Safety Symbols
The following table depicts and describes safety symbols that may appear on this product. Read, understand, and follow all
instructions on the machine before attempting to assemble and operate.
SAFETY ALERT – Indicates a
precaution, a warning, or a danger.
Symbols SymbolsDescriptions Descriptions
READ THE OPERATOR'S
MANUAL(S) – Read, understand,
and follow all instructions in the
user manual(s) before attempting to
assemble and operate.
WARNING! Do not expose the unit
to rain or wet conditions.
WEAR EYE AND HEARING
PROTECTION – For protection
against injury, wear ear defenders
and safety goggles.
Wear protective gloves when using
the machine and handling debris.
SWITCH OFF! Remove plug from
outlet before cleaning or conducting
maintenance checks.
DANGER! ROTATING BLADES
–Keep hands and feet away from
openings while the unit is running.
Keep bystanders a safe
distance away from the work
area.
SWITCH OFF! Remove plug from
outlet immediately if the cord is
damaged or cut.
Double Insulation.
Wear foot protection when using
the machine and handling debris.
Thrown objects and rotating
blade can cause severe injury.

6
Know Your Electric Wood Chipper + Shredder
Read the owner’s manual and safety instructions carefully before operating the electric wood chipper + shredder. Compare the
illustration below to the electric wood chipper + shredder in order to become familiar with the location of the various controls and
adjustments. Save this manual for future reference.
Technical Data
Motor.....................................................................................15A
Rated Voltage........................................................ 120V ~ 60 Hz
Feed Type........................................................................ Manual
No Load Speed ................................................4100 ± 10% rpm
Cutting Diameter Max ......................................... 1.57 in. (4 cm)
Decibel Rating ................................................................. 113 dB
Wheel Size............................................................ 6 in. (15.2 cm)
Reduction Ratio.................................................................... 17:1
Hopper Dimensions.....................2 in. x 5 in. (5.1 cm x 12.7 cm)
Net Weight........................................................25.6 lbs (11.6 kg)
1. Paddle
2. Hopper
3. Main body
4. Shredder stand assembly
5. Wheel axle
6. Wheels (2)
7. Paddle holder
8. Appliance cord
9. Motor
10. Reset button
11. Removable safety switch
12. Hopper locking knob
1
2
3
4
7
6
8
9
10 11
12
5

7
Unpacking
Carton Contents
• Electric wood chipper + shredder main body with hopper
• Electric wood chipper + shredder stand assembly
• Paddle holder
• Paddle
• Wheel axle with hardware
• Wheels (2)
• Shredder stand assembly washers and screws (2)
• Wrench
• Hex key
• Manual with registration card
1. Carefully remove the electric wood chipper + shredder and
check to see that all of the above items are supplied.
2. Inspect the product carefully to make sure no breakage or
damage occurred during shipping. If you nd damaged or
missing parts, DO NOT return the unit to the store. Please
call the Snow Joe®+ Sun Joe®customer service center at
1-866-SNOWJOE (1-866-766-9563).
NOTE: Do not discard the shipping carton and packaging
material until you are ready to use the electric wood
chipper + shredder. The packaging is made of recyclable
materials. Properly dispose of these materials in
accordance with local regulations or save the packaging
for long-term product storage.
IMPORTANT! The equipment and packaging material are
not toys. Do not let children play with plastic bags, foils,
or small parts. These items can be swallowed and pose a
suocation risk!
Assembly
Wheels Fitting
NOTE: The hardware for the wheels are already assembled on
the wheel axle.
1. Remove all the wheel spacers and nuts on the wheel axle,
and remove the shaft sleeve and support cover on one
side of the wheel axle (Fig. 1).
2. Insert the wheel axle into the shredder stand assembly,
and re-assemble the shaft sleeve and the support cover
(Fig. 2).
3. Remove the wheel cover from the wheel (Fig. 3).
4. Assemble the wheel on the end of the wheel axle, x it
with the spacer and the nut (Fig. 4).
5. Press the wheel cover into the wheel to cover the end of
the axle. You may use a hammer to seat them securely
over the axle. There may be some clearance between the
wheel and the wheel cover, it is not necessary to press it
to the bottom (Fig. 5).
Fig. 1
Shaft sleeveSpacer
Nut
Spacer
NutWheel axle
OFF
ON
REMOVE
TO LOCK
Fig. 2
Wheel axle
Stand
assembly
Shaft sleeve
Shaft
sleeve
Fig. 3 Wheel
Wheel cover
Fig. 4
Wheel axle
Wheel
Nut
Spacer

8
6. Repeat the steps 2 – 4 to assemble the other wheel.
Stand Assembly Fitting
1. Turn the wood chipper + shredder main body upside
down, insert the two ends of the stand assembly into the
housing (Fig. 6).
2. Align the holes on the main body housing and stand
assembly, insert the washer into the screw and install into
the stand assembly on both sides (Fig. 7).
Fitting the Paddle Holder and the Paddle
1. Stand the unit up, and clip the paddle holder to the
standing assembly (Fig. 8).
2. Clip the paddle into the paddle holder (Fig. 9).
NOTE: Be sure to place the paddle in the paddle holder every
time after using.
Operation
Starting + Stopping
mWARNING! Before starting, ensure that the feed inlet
is empty.
mWARNING! The wood chipper + shredder will not run
if the hopper is open or not closed tightly. Always close the
hopper tightly by turning the hopper locking knob clockwise
before starting the machine (Fig. 10).
Fig. 5
Wheel cover
Wheel
Fig. 6
Main body
Stand
assembly
Fig. 7
Washer
Screw
Fig. 8
Paddle holder
Standing
assembly
Fig. 9
Paddle
holder Paddle

9
1. Make sure the removable safety switch is in the OFF
position. Plug the wood chipper + shredder's appliance
cord using an approved extension cord, making a knot
with the two cords (Fig. 11).
2. Push the removable safety switch to the ON position to
power the wood chipper + shredder on (Fig. 12).
3. To power the wood chipper + shredder o, push the
removable safety switch to the OFF position. To disable
the machine, remove the safety switch completely
(Fig. 13).
NOTE: As a safety precaution, the removable safety switch
can be removed when you are not using the wood chipper +
shredder to prevent children from starting it accidentally. The
unit cannot be started when the safety switch is removed.
Make sure to replace the removable safety switch before
operation.
Basic Shredding Procedure
mWARNING! Always wear ear and eye protection and
wear gloves during operation.
1. Connect the wood chipper + shredder to a proper power
source and switch on the unit; the wood chipper +
shredder will start to work. Insert the shredding material
inside the hopper through the feeding funnel to shred
them (Fig. 14).
OFF
ON
REMOVE
TO LOCK
C
I
R
C
U
I
T
B
R
E
A
K
E
R
P
R
E
S
S
T
O
R
E
S
E
T
Fig. 10
Hopper
locking
knob
Fig. 11
Extension
cord
Appliance
cord
OFF
ON
REMOVE
TO LOCK
C
I
R
C
U
I
T
B
R
E
A
K
E
R
P
R
E
S
S
T
O
R
E
S
E
T
Fig. 12
Removable
safety
switch
Fig. 13
Removable
safety switch
Fig. 14
Feeding
funnel
Insert the
shredding
material

10
2. Use the paddle to push the material inside the hopper if
needed (Fig. 15).
mWARNING! Never put your hands into the hopper
while the wood chipper + shredder is running. Always use the
paddle supplied with your shredder to push items into the
hopper.
3. Only insert as much material as needed to prevent
blockage of the feeding funnel. Chop garden waste that
has been stored for a few days and is wilted and damp
alternately with dry branches. This prevents the cutting
blades from blocking up. Branches with leaves must be
completely chopped before new material is fed. Make sure
that the chopped material can fall freely from the ejection
slot.
4. Keep hold of branches while feeding them into the wood
chipper + shredder until they are automatically drawn in.
5. Keep to the working speed of the wood chipper +
shredder and do not overload it.
6. To protect the wood chipper + shredder from clogging,
shred wilted garden waste that has been left to dry for a
few days and shred thin twigs alternately with branches.
7. Before you shred roots, remove any remaining soil and
stones from them.
8. Do not shred soft, damp material such as kitchen waste;
take it straight to be composted.
9. Keep a few dry branches for the end, as they will help
clean the wood chipper + shredder.
10. Only switch the wood chipper + shredder o after all of
the shredding material has passed through the discharge
chutes. Otherwise, the discharge chutes may jam the next
time the shredder is turned on.
Overload Protection
Your electric wood chipper + shredder is designed with
overload protection. If the shredder is clogged during
shredding, the overload protection will cut the power
automatically to protect your shredder. Wait at least 1 minute
before restart the unit when the power is cut.
1. To restart the wood chipper + shredder, rst press the
reset button (Fig. 16).
2. Then, push the removable safety switch to ON position to
restart the wood chipper + shredder (Fig. 12).
Care + Maintenance
mATTENTION! Before performing any cleaning or
maintenance, disconnect the unit from the power supply.
mWARNING! Always wear gloves when cleaning and
maintaining.
Cleaning
1. Use only a warm damp cloth and a soft brush to clean
your wood chipper + shredder.
2. Never spray water on the wood chipper + shredder or
wash it with water. Do not use detergents or solvents as
these could cause irreparable damage to your shredder.
3. Make sure the ventilation slots are always kept clean and
are free of debris.
4. Open the hopper to clean the inside of the unit. Unscrew
the hopper locking knob counterclockwise, and remove
the hopper (Fig. 17).
Fig. 15
Paddle
OFF
ON
REMOVE
TO LOCK
C
I
R
C
U
I
T
B
R
E
A
K
E
R
P
R
E
S
S
T
O
R
E
S
E
T
Fig. 16
Reset
button

11
5. Clean the cutting blades and the discharge area. Remove
wood sticks or objects that may clog the blades. Check
the blades for damage.
6. After cleaning the inside of the wood chipper + shredder,
replace the hopper and lock the hopper locking knob by
turning it clockwise (Fig. 18).
Cutting Blade Replacement
The wood chipper + shredder has two reversible blades that
are attached to a rotary plate with two bolts. Before any
maintenance or cleaning is done on the blades, always turn
the switch o and disconnect the plug from the outlet.
mWARNING! Be sure to wear protective gloves when
handling the blades.
IMPORTANT: Only use original replacement parts specied for
this wood chipper + shredder.
You can purchase a replacement blade (Model CJ601E-RBLD) and
other genuine replacement parts by ordering online at snowjoe.com
or, to order by phone, contact Snow Joe®+ Sun Joe®customer
service at 1-866-SNOWJOE (1-866-766-9563). The use of
parts that do not meet the original equipment specications
may lead to improper performance of the wood chipper +
shredder, may compromise operator safety, and will void the
manufacturer's warranty.
1. Stop the motor and disconnect the unit from the power
supply.
2. Unscrew the hopper locking knob counterclockwise to
open the hopper (Fig. 17).
3. Align the cutting head past the splash guard so that the
blade bolts can be removed; secure the cutting head
from rotating by inserting a rod (e.g. a screwdriver) or rag
between the cutting head and body. Unscrew the blade
bolts using the supplied hex key, and remove the blade
(Fig. 19).
4. Reverse the direction of the original blade, or install a new
blade. Align the slots on the blade with the grooves on the
cutting head. Tighten the bolts with the supplied hex key
(Fig. 19).
5. Repeat step 3 and 4 to replace the other blade.
6. Replace the hopper; tighten the hopper locking knob by
turning it clockwise.
Fig. 17
Hopper
locking knob
OFF
ON
REMOVE
TO LOCK
C
I
R
C
U
I
T
B
R
E
A
K
E
R
P
R
E
S
S
T
O
R
E
S
E
T
Fig. 18
Hopper
locking
knob
Fig. 19
Bolts
Blade
Splash
guard

12
Storage
Follow the steps below to prepare the electric wood chipper +
shredder for storage:
1. Disconnect the power supply to the wood chipper + shredder.
2. Clean the wood chipper + shredder with a damp cloth or
hand brush.
3. Inspect the wood chipper + shredder carefully for worn,
loose, or damaged parts. Check connections and screws
and tighten if necessary. Pay special attention to the blade
and replace if it shows signs of wear. Refer to the Care +
Maintenance section.
4. Store the wood chipper + shredder indoors in a dry, clean,
and cool area out of the reach of children. Do not store the
unit next to corrosive materials, such as fertilizer and rock
salt.
5. Wipe the extension cord to remove any foreign
substances, such as oil or stains. Replace the extension
cord immediately if it is cut or damaged in any way.
6. Do not cover the wood chipper + shredder with a solid
plastic sheet. Plastic coverings trap moisture around the
shredder, which can damage the unit.
Service + Support
If your Martha Stewart®MTS-EWC15 electric wood chipper +
shredder requires service or maintenance, please call the Snow
Joe®+ Sun Joe®customer service center at 1-866-SNOWJOE
(1-866-766-9563).
Model + Serial Numbers
When contacting the company or reordering parts, you will
need to provide the model and serial numbers of your product.
These are found on the decal axed to the housing or handle
of your electric wood chipper + shredder. Copy these numbers
into the space provided below.
Record the following numbers from the housing or handle of your
new product: Model #:
Serial #:
M T S - E W C 1 5

13
Troubleshooting
Motor does not run
Chipping material is not
being pulled in
Blades cutting
ineciently
• Reverse the blades or replace with new
blades.
Problem Remedy
Possible Cause
• Power failure/unit not plugged into a
working receptacle.
• The overload protection has
responded.
• The hopper is opened.
• Check to make sure unit is plugged into a
working outlet. Make sure extension cord is
not damaged.
• Remove any chips and press the reset
button. Wait one minute before pressing the
ON/OFF switch to restart the unit.
• Check to make sure the hopper is secured
and the hopper locking knob is tightened.
• The material is jammed in the feed
inlet.
• The cutting blades are blocked.
• The discharge chute is blocked.
• Examine the cutting head and remove any
blocked material. Replace the hopper.
• Disconnect the power supply and open
the hopper. Open the blade cover. Remove
the blocked material and replace the blade
cover and hopper.
• Disconnect the power supply and open the
hopper. Open the plate of the discharge
chute to clear the blocked material.
Replace the plate and hopper.
• Blade edges are worn.
Only a company specialist may be able to correct faults that cannot be rectied with the aid of this table. Please call the
Snow Joe®+ Sun Joe®customer service center at 1-866-SNOWJOE (1-866-766-9563).

14
Optional Accessories
mWARNING! ALWAYS use only authorized Snow Joe®+ Sun Joe®replacement parts and accessories. NEVER use
replacement parts or accessories that are not intended for use with this tool. Contact Snow Joe®+ Sun Joe®if you are unsure
whether it is safe to use a particular replacement part or accessory with your tool. The use of any other attachment or accessory
can be dangerous and could cause injury or mechanical damage.
NOTE: Accessories are subject to change without any obligation on the part of Snow Joe®+ Sun Joe®to provide notice of such
changes. Accessories can be ordered online at snowjoe.com or via phone by contacting the Snow Joe®+ Sun Joe®customer
service center at 1-866-SNOWJOE (1-866-766-9563).
ModelAccessories Item
1
2
3
Electric wood chipper + shredder
replacement blade
Electric wood chipper + shredder paddle
CJ601E-RBLD
CJ601E-1
PJEXT50-B
Snow Joe®+ Sun Joe®SJTW-A 14-gauge
50-foot extension cord with lighted end

R4_01282020
SNOW JOE®+ SUN JOE®CUSTOMER PROMISE
OUR WARRANTY:
Snow Joe warrants new, genuine, powered and non-powered Products to be free from defects in material or workmanship when used
for ordinary household use for a period of two years from the date of purchase by the original, end-user purchaser when purchased
from Snow Joe or from one of Snow Joe’s authorized sellers with proof of purchase. Because Snow Joe is unable to control the quality
of its Products sold by unauthorized sellers, unless otherwise prohibited by law, this Warranty does not cover Products purchased from
unauthorized sellers. If your Product does not work or there’s an issue with a specic part that is covered by the terms of this Warranty,
Snow Joe will elect to either (1) send you a free replacement part, (2) replace the Product with a new or comparable product at no
charge, or (3) repair the Product. How cool is that!
This Warranty gives you specific legal rights, and you may also have other rights which vary from State to State.
PRODUCT REGISTRATION:
Snow Joe strongly encourages you to register your Product. You can register online at snowjoe.com/register, or by printing and
mailing in a registration card available online from our website, or calling our Customer Service Department at 1-866-SNOWJOE
(1-866-766-9563), or by e-mailing us at [email protected]. Failure to register your Product will not diminish your warranty
rights. However, registering your Product will allow Snow Joe to better serve you with any of your customer service needs.
WHO CAN SEEK LIMITED WARRANTY COVERAGE:
This Warranty is extended by Snow Joe to the original purchaser and original owner of the Product.
WHAT IS NOT COVERED?
This Warranty does not apply if the Product has been used commercially or for non-household or rental applications. This Warranty also
does not apply if the Product was purchased from an unauthorized seller. This Warranty also does not cover cosmetic changes that do
not aect performance. Wearing parts like belts, augers, chains and tines are not covered under this Warranty, and can be purchased
at snowjoe.com or by calling 1-866-SNOWJOE (1-866-766-9563).
ABOVE ALL ELSE, Snow Joe, LLC (“Snow Joe”) is dedicated to you, our customer. We strive to make your experience as pleasant as
possible. Unfortunately, there are times when a Snow Joe®, Sun Joe®, or Aqua Joe®product (“Product”) does not work or breaks under
normal operating conditions. We think it’s important that you know what you can expect from us. That’s why we have a Limited Warranty
(“Warranty”) for our Products.
15
EN


17
© 2020 Snow Joe®, LLC
Derechos reservados. Instrucciones originales. GUARDE ESTAS INSTRUCCIONES
Modelo MTS-EWC15 Forma Nº SJ-MTS-EWC15-880S-MR1
MANUAL DEL OPERADOR
ASTILLADORA + TRITURADORA DE
RAMAS ELÉCTRICA
15 A | 17:1 TASA DE REDUCCIÓN DE
¡IMPORTANTE!
Instrucciones de seguridad
Todos los operadores deberán leer
estas instrucciones antes del uso
Siga siempre estas normas de seguridad. No hacerlo podría
resultar en lesiones corporales severas, o incluso la muerte.
¡ADVERTENCIAS generales de
seguridad!
Usted y cualquier otro operador de esta astilladora +
trituradora de ramas eléctrica deben leer, entender y obedecer
en su totalidad estas instrucciones. No seguir todas las
instrucciones puede causar un CHOQUE ELÉCTRICO,
INCENDIO y/o DAÑOS PERSONALES GRAVES.
Preste atención al símbolo mde alerta de seguridad
personal usado en este manual para enfocar su atención a una
ADVERTENCIA dada junto a una instrucción de operación
particular. Esto signica que dicha operación requiere
ATENCIÓN,PRECAUCIÓN yCAUTELA ESPECIALES.
m¡ADVERTENCIA! Utilice protección auditiva
adecuada al utilizar la herramienta. Bajo ciertas condiciones
y tiempo de uso, el ruido producido por este producto puede
contribuir a la sordera.
m¡ADVERTENCIA! Las cuchillas giratorias
pueden causarle cortes. Mantenga las manos y pies lejos de la
tolva y del área de descarga.
Antes de usar la astilladora + trituradora de ramas eléctrica,
familiarícese con los controles, sobre todo con la forma
de detener la unidad en caso de emergencia. Las únicas
personas que deben usar la astilladora + trituradora de ramas
eléctrica son aquellas que entienden al pie de la letra estas
instrucciones y saben cómo operar correctamente dicho
artefacto. Los niños nunca deben tener acceso a la astilladora
+ trituradora de ramas eléctrica.
Conserve este manual para futuras referencias y vuélvalo a
leer al inicio de cada temporada de astillado.
Seguridad general
1. Evite entornos peligrosos: no utilice la astilladora +
trituradora de ramas eléctrica bajo la lluvia o en lugares
mojados o húmedos. No opere la unidad en atmósferas
gaseosas o explosivas, ni la use cerca de líquidos
inamables o combustibles. Los motores en estas
herramientas normalmente echan chispas, y las chispas
pueden encender los gases.
2. Vístase adecuadamente: no use vestimenta suelta o
joyería, ya que dichos objetos pueden engancharse en
las partes móviles. Utilice una cubierta protectora para
contener cabellos largos. Se recomienda usar guantes
de hule y calzado anti-deslizante protector al trabajar en
exteriores.
3. Use gafas protectoras: use también una máscara anti-
polvo, calzado protector, ropa que se ajuste a su cuerpo,
guantes protectores, protección auditiva y protección para
su cabeza.
4. Cables de extensión: para prevenir choques eléctricos,
use esta máquina únicamente con un cable de extensión
adecuado para uso en exteriores.
5. Desconecte la herramienta: desconecte la astilladora +
trituradora de ramas eléctrica de la fuente de alimentación
cuando no esté siendo usada, antes de ser reparada, al
cambiarle accesorios y al realizar cualquier otra tarea de
mantenimiento.
6. No abuse del cable: nunca jale la astilladora + trituradora
de ramas eléctrica por su cable ni tire bruscamente de
éste para desenchufarla del tomacorriente. Mantenga el
cable alejado del calor, aceites y bordes losos.
7. Manténgase alerta: vea lo que está haciendo. Utilice su
sentido común. No opere la astilladora + trituradora de
ramas eléctrica si está cansado o bajo la inuencia del
alcohol, drogas o medicamentos.
8. Guarde la herramienta inactiva en interiores: cuando
no esté en uso, la astilladora + trituradora de ramas
eléctrica debe almacenarse bajo techo, en un lugar seco,
alto o bajo llave, lejos del alcance de los niños.
9. Cuide la astilladora + trituradora de ramas eléctrica:
manténgala limpia para un óptimo rendimiento y para
reducir el riesgo de lesiones. Inspeccione periódicamente
el cable de extensión y reemplácelo inmediatamente si
está dañado. Mantenga los mangos secos, limpios y sin
aceites o grasas. Siga las recomendaciones adicionales
descritas en la sección de cuidado + mantenimiento de
este manual.

18
10.Veriquesihaypartesdañadas: antes de seguir
utilizando el artefacto, cualquier parte que esté dañada
debe ser examinada cuidadosamente para determinar si
funcionará correctamente o no. Verique el alineamiento
de las partes móviles, las junturas de las partes móviles,
roturas de las partes, monturas y cualquier otra condición
que pueda afectar su funcionamiento. Una parte que esté
dañada debe ser correctamente reparada o reemplazada.
Comuníquese con la central de servicio al cliente
Snow Joe®+ Sun Joe®llamando al 1-866-SNOWJOE
(1-866-766-9563) para asistencia.
11. Iluminación: opere su astilladora + trituradora de ramas
eléctrica solo a la luz del día o bajo luz articial apropiada.
12. No se sobreextienda: mantenga con sus pies balance y
posición adecuados todo el tiempo.
13. Nunca deje sin atender una herramienta funcionando:
apague la astilladora + trituradora de ramas eléctrica
y espere a que se detenga por completo antes de
abandonar el área de trabajo.
14. Evite los encendidos accidentales: no transporte la
astilladora + trituradora de ramas eléctrica con su dedo
sobre el interruptor. Asegúrese de que el interruptor esté
apagado antes de enchufar o desenchufar la unidad.
15. Use la herramienta adecuada: no utilice esta máquina
para ningún otro trabajo excepto para el cual ha sido
diseñada.
16.Mantengaalejadosalostranseúntes,niñosy
mascotas: todos los espectadores, incluyendo mascotas,
deberán estar a una distancia segura del área de trabajo.
Seguridad personal
1. Antes de encender la astilladora + trituradora de ramas
eléctrica, asegúrese de que la entrada de la tolva esté
vacía.
2. Mantenga su rostro y cuerpo lejos del área de corte.
3. No permita que sus manos o cualquier otra parte de
su cuerpo o vestimenta estén cerca de la tolva o del
conducto de descarga.
4. Nunca coloque sus manos dentro de la tolva mientras
la astilladora + trituradora de ramas eléctrica esté
funcionando. Utilice siempre la paleta suministrada con su
astilladora + trituradora de ramas eléctrica para empujar
los materiales dentro de la tolva.
5. No intente forzar dentro de la tolva objetos de diámetros
más grandes que el recomendado de 1.5 plg.
6. Siempre párese lejos de la zona de descarga al operar la
astilladora + trituradora de ramas eléctrica. Nunca toque
la parte inferior de la astilladora + trituradora de ramas
eléctrica hasta que ésta se haya detenido por completo.
7. Al colocar material dentro de la astilladora + trituradora de
ramas eléctrica, tenga cuidado al retirar partes de metal,
rocas, vidrios, latas u otros objetos extraños que puedan
dañar las cuchillas.
8. Si el mecanismo de corte de la astilladora + trituradora
de ramas eléctrica golpea un objeto extraño, o si ésta
empieza a producir un ruido o vibración inusual, apáguela
y deje que se detenga por completo. Desenchufe el cable
de alimentación y lleve a cabo los siguientes pasos:
– Inspeccione la unidad para encontrar daños; y
– Verique y ajuste cualquier parte que esté suelta.
m¡ADVERTENCIA! Nunca meta las manos
dentro de la tolva hasta que la astilladora + trituradora
de ramas eléctrica se haya detenido por completo y esté
desenchufada. Las cuchillas continuarán girando por algunos
segundos después de que la unidad haya sido apagada.
9. No permita que el material procesado se acumule en
la zona de descarga; esto puede impedir una descarga
adecuada y puede resultar en un contragolpe de material
a través de la tolva.
m¡ADVERTENCIA! Nunca coloque sus manos
cerca del conducto de descarga. No seguir estas advertencias
podría causar lesiones graves.
10. Si se obstruye la astilladora + trituradora de ramas
eléctrica, APÁGUELA y desconéctela de la fuente de
alimentación antes de limpiar los escombros. Mantenga
la fuente de alimentación limpia de escombros y
otras acumulaciones para evitar daños a la fuente de
alimentación.
Recuerde que el mecanismo de encendido en
herramientas con motores eléctricos hará que el
mecanismo de corte se mueva.
11. Mantenga los protectores y deectores en su lugar y
funcionando correctamente.
12. No opere la astilladora + trituradora de ramas eléctrica en
una supercie pavimentada o de grava donde el material
lanzado pueda causar lesiones.
13. Apague la astilladora + trituradora de ramas eléctrica y
desconéctela de la fuente de alimentación siempre que
usted se retire del área de trabajo.
14. No incline la astilladora + trituradora de ramas eléctrica
mientras esté funcionando.
15. Nunca meta las manos dentro de la tolva hasta que
la astilladora + trituradora de ramas eléctrica se haya
detenido por completo y esté desenchufada de la fuente
de alimentación.
Seguridad eléctrica
1. Un interruptor de circuito de falla de conexión a
tierra (GFCI) deberá proteger al(a los) circuito(s) o
tomacorriente(s) a ser utilizado(s) con la astilladora
+ trituradora de ramas eléctrica. Hay receptáculos
disponibles con protección incorporada GFCI y pueden
ser utilizados para esta medida de seguridad.

19
2. Para evitar un choque eléctrico, use solo cables de
extensión adecuados para uso en exteriores, tales como
SW-A, SOW-A, STW-A, STOW-A, SJW-A, SJOW-A,
SJTW-A ó SJTOW-A.
Antes del uso, verique que el cable de extensión esté
en buenas condiciones. Al usar un cable de extensión,
asegúrese de que sea lo sucientemente fuerte para
poder transportar la corriente hacia el producto. Un
cable de extensión demasiado no causará una caída de
tensión en la línea, produciendo pérdida de potencia y
recalentamiento.
3. Para reducir el riesgo de un choque eléctrico, este
artefacto posee un enchufe polarizado (es decir, una pata
es más ancha que la otra). Use este artefacto solo con
un cable de extensión polarizado aprobado por UL, CSA
o ETL y recomendado para uso en exteriores y todo tipo
de clima, tal como el cable de extensión de 50 pies y
calibre 14 SJTW-A de Snow Joe®+ Sun Joe®con extremo
iluminado (modelo PJEXT50-B). Visite snowjoe.com para
comprar este cable de extensión, o pídalo llamando por
teléfono al 1-866-SNOWJOE (1-866-766-9563).
El enchufe del artefacto encajará en el receptáculo del
cable de extensión polarizado de una sola manera. Si el
enchufe del artefacto no entra por completo dentro del
receptáculo del cable de extensión, invierta las clavijas
del enchufe. Si el enchufe aún no encaja, obtenga un
cable de extensión polarizado correcto. Un cable de
extensión polarizado requerirá el uso de un tomacorriente
polarizado. El enchufe del cable de extensión encajará
en el tomacorriente polarizado de la pared de una sola
manera. Si el enchufe no entra por completo dentro del
tomacorriente polarizado de la pared, invierta las clavijas
del enchufe. Si el enchufe aún no encaja, contacte a un
electricista calicado para la instalación del tomacorriente
de pared apropiado. No modique el enchufe del
artefacto, ni el receptáculo del cable de extensión ni el
enchufe del cable de extensión en forma alguna.
4. Para evitar que el cable del artefacto se desconecte del
cable de extensión al usarlo, haga un nudo con los dos
cables tal como se muestra en la Tabla 1.
5. El enchufe de la herramienta eléctrica debe encajar
en el tomacorriente. Nunca modique el enchufe de
ninguna manera. No use ningún enchufe adaptador con
herramientas eléctricas puestas a tierra (que tengan
conexión a tierra). El uso de enchufes no modicados
y tomacorrientes equivalentes reducirá el riesgo de un
choque eléctrico.
6. Evite el contacto de su cuerpo con supercies puestas a
tierra tales como tuberías, radiadores, cocinas eléctricas y
refrigeradoras. Hay un mayor riesgo de choque eléctrico si
su cuerpo está conectado a tierra.
7. Si el cable de alimentación está dañado, debe ser
reemplazado por un electricista o reparador de
herramientas eléctricas.
8. Cuando opere una herramienta eléctrica en exteriores,
utilice un cable de extensión adecuado para uso en
exteriores. Usar un cable adecuado para exteriores reduce
el riesgo de choques eléctricos.
9. Si operar una herramienta eléctrica en una ubicación
mojada es inevitable, utilice una fuente de alimentación
protegida por un Dispositivo de Corriente Residual (RCD
por sus siglas en inglés). El uso de un RCD reduce el
riesgo de un choque eléctrico.
m¡ADVERTENCIA! m
UnchoqueeléctricopuedecausarDAÑOSSEVEROS
o MUERTE. Tenga en cuenta estas advertencias:
• No deje que ninguna parte de la astilladora +
trituradora de ramas eléctrica haga contacto con
agua mientras esté funcionando. Si el artefacto
se moja mientras está apagado, séquelo antes de
encenderlo.
• Use solo un cable de extensión aprobado por UL,
CSA o ETL y recomendado para uso en exteriores y
todo tipo de clima.
• No use un cable de extensión de más de
100 pies (30 m).
• No toque el artefacto o su enchufe con las manos
húmedas, o mientras esté parado sobre agua. Usar
botas de hule le dará algo de protección.
TABLA DE CABLES DE EXTENSIÓN
Longitud de
cable:
Calibre de alambre
mínimo (AWG):
Hasta 50 pies
(15 m)
14
+50 pies a 100 pies
(+15 m a 30 m)
12
(B) Conecte el enchufe y el receptáculo
Cable de
extensión
Cable del
artefacto
(A) Ate el cable como se indica
Tabla 1. Método para asegurar el cable de extensión

20
10. Haga que su herramienta sea reparada por un electricista
o en un centro de servicio calicado. Esta herramienta
eléctrica cumple con los requisitos de seguridad
relevantes. Para evitar peligros, los artefactos eléctricos
deben ser reparados solo por personal calicado usando
partes de repuesto originales, de otro modo puede haber
daños considerables para el usuario.
Artefactos de doble aislamiento
En un artefacto de doble aislamiento se proporcionan dos
sistemas de aislamiento en lugar de una conexión a tierra. Un
artefacto de doble aislamiento no posee conexión a tierra, y
no debe agregársele ninguna. La reparación de un artefacto
de doble aislamiento requiere sumo cuidado y conocimiento
del sistema, y solo debe ser realizada por personal técnico
calicado en un centro de servicio autorizado por
Snow Joe®+ Sun Joe®. Las partes de reemplazo de un
artefacto de doble aislamiento deben ser idénticas a las partes
originales. Un artefacto de doble aislamiento está marcado con
las frases “Double Insulation” (“doblemente aislado”) o “Double
Insulated” (“doble aislamiento”). El símbolo (un cuadrado
dentro de otro) puede también estar marcado en el artefacto.
DOBLE AISLAMIENTO: NO SE REQUIERE
CONEXIÓN A TIERRA. AL REPARAR, USE SOLO
PARTES REPUESTO IDÉNTICAS.
Esta astilladora + trituradora de ramas eléctrica tiene doble
aislamiento y elimina la necesidad de un sistema separado
de conexión a tierra. Use solo partes de repuesto idénticas.
Lea las instrucciones antes de reparar artefactos de doble
aislamiento. Use esta astilladora + trituradora de ramas
eléctrica solo como se describe en este manual.
Table of contents
Languages:
Other Martha Stewart Paper Shredder manuals