Martha Stewart MTS-SBLD1 User manual

Model MTS-SBLD1 Form No. SJ-MTS-SBLD1-880E-M
OPERATOR’S MANUAL
SHARPERBLADE ELECTRIC TRIMMER +EDGER
12.6-INCH | 4.5-AMP | STRINGLESS
© 2017 by Snow Joe®, LLC
All rights reserved. Original instructions. SAVE THESE INSTRUCTIONS
1
IMPORTANT!
Safety Instructions
All Operators Must Read These
Instructions Before Use
mCAUTION!
Before using this electric tool, carefully read and observe the
safety rules and instructions listed below. Before starting work,
make sure that you know how to stop the machine in case of
an emergency. The incorrect use of this machine could cause
serious injury. Keep these instructions in a safe place and on
hand so that they can be consulted when required.
mCAUTION!
The electric grass trimmer + edger should only be used for
cutting lawns and for trimming along the borders of ower
beds. Other uses of the trimmer + edger that are not indicated
in these instructions could damage the trimmer + edger or
seriously injure the operator.
GENERAL Safety Rules
mWARNING! When using the electric grass trimmer
+ edger basic safety precautions should always be followed
to reduce the risk of re, electric shock, and personal injury,
including the following:
A) FOR ALL DOUBLE–INSULATED APPLIANCES
1. Replacement parts – When servicing, use only identical
replacement parts.
2. Polarized appliance connections – To reduce the risk
of electric shock, this appliance has a polarized plug (i.e.
one blade is wider than the other) and will require the use
of a polarized extension cord. The appliance plug will t
into a polarized extension cord only one way. If the plug
does not t fully into the extension cord, reverse the plug.
If the plug still does not t, obtain a correct polarized
extension cord. This plug will t into the polarized wall
outlet only one way. If the plug still does not t fully into
the wall outlet, reverse the plug. If the plug still does not
t, contact a qualied electrician to install a proper wall
outlet. Do not change the appliance plug, extension cord
receptacle, or extension cord plug in any way.
B) FOR ALL APPLIANCES
1. Avoid dangerous environments – Do not use appliances
in damp or wet locations. Do not use in rain.
2. Keep children and bystanders away – Children and
other spectators, including pets, should be kept at least
50 feet (15 meters) away from the work area. When the
grass is cut, stones and debris contained in the grass can
be picked up by the trimmer + edger and dispersed into
the air. These ying projectiles can cause blindness or
other bodily injury.
3. Dress properly – Always wear suitable clothing when
using the trimmer + edger to prevent head, hand, or feet
injuries. Do not wear loose clothing or jewelry. They can
get caught in moving parts.
4. Use safety glasses – Also use safety footwear,
snug-tting clothing, protective gloves, hearing and head
protection.
5. Use the right tools – Do not use tools for any job except
that for which they are intended.
6. Avoid unintentional starting – Do not carry plugged-in
tool with nger on the trigger. Make sure the switch is o
before plugging in the tool.
7. Do not abuse the cord – Never carry the tool by the cord
or yank the cord to disconnect it from the receptacle.
Keep cord away from heat, oil, and sharp edges.
8. Do not force the tool – It will do the job better and with
less likelihood of injury if it is used at the rate for which it
was designed.
9. Do not overreach – Keep proper footing and balance at
all times.
10. Stay alert – Watch what you are doing. Use common
sense. Do not operate the trimmer + edger when you are
tired, or under the inuence of alcohol or drugs.
11. Disconnect the tool – Turn the trimmer + edger o and
disconnect the plug when: the trimmer + edger is not in
use; it is left unattended; it is being examined because it is
not working correctly; the power supply cable is damaged;
the trimmer line is being removed or changed or when
the trimmer + edger is being moved from one place to
another.
12. Store idle tools indoors – When not in use, tools should
be stored indoors in a dry and high or locked-up place out
of the reach of children.
13. Maintain tools with care – Keep cutting edges sharp
and clean for best performance and to reduce the risk
of injury. Follow instructions for lubricating and changing

2
accessories. Inspect the trimmer + edger periodically and
replace if damaged. Repair the trimmer + edger only at an
authorized service facility. Keep handles dry, clean, and
free from oil and grease.
14. Checked for damaged parts – Before continuing to use
the trimmer + edger, a guard or other part that is damaged
should be carefully checked to determine that it will
operate properly and perform its intended function. Check
for the alignment of moving parts, binding of moving parts,
breakage of parts, mounting, and any other condition that
may aect the trimmer + edger’s operation. A guard or
other part that is damaged should be properly repaired or
replaced by an authorized service center unless indicated
elsewhere in this manual.
C) ADDITIONAL SAFETY INSTRUCTIONS FOR GRASS
TRIMMER + EDGER
1. Keep guards in place and in working order.
2. Keep hands and feet away from the cutting area.
mWARNING! Never use steel blades or other devices.
Use of any other accessories or attachments will increase the
risk of injury.
mCAUTION!
The safety guard is critical to the safety of the operator and the
safety of people standing within a safe distance of the trimmer
+ edger. The safety guard keeps the trimmer + edger in good
working order and must always be in place during operation.
• Do not try to stop the cutting device (SharperBlade™) with
your hands. Always let it come to a stop by itself.
mWARNING! After switching o the tool, the cutting
device (SharperBlade™) continues to rotate for a few
seconds.
• Only use the original type of SharperBlade™. Do not under
any circumstances use metal line or nylon line instead of
SharperBlade™.
• Do not use the tool to cut grass which is not on the ground.
For example, do not cut grass growing on walls or rocks.
• Do not switch on the tool in an enclosed or poorly ventilated
space or in the presence of ammable and/or explosive
substances such as liquids, gases and powders.
• Only cut during broad daylight or with adequate articial
light.
• Check that all grass cuttings and dirt have been removed
from the ventilation vents.
• Do not cross roads or gravel paths while the tool is still
running.
• When the tool is not in use, store it in a dry place and out of
reach of children.
• After use, disconnect the tool from the power supply and
check for damage. If you have the slightest doubt about the
condition of the tool, contact an authorized service center.
• Only use the tool according to the instructions given in this
manual.
• Check regularly that the screws are tight.
• Do not try to repair the tool or access internal parts. Contact
an authorized service center.

3
Electrical Safety
1. Ground fault circuit interrupter (GFCI) protection should
be provided on the circuit(s) or outlet(s) to be used for
this electric trimmer + edger. Receptacles are available
having built-in GFCI protection and may be used for this
measure of safety.
2. To prevent electric shock, use only with an extension cord
suitable for outdoor use, such as SW-A, SOW-A, STW-A,
STOW-A, SJW-A, SJOW-A, SJTW-A, or SJTOW-A.
Before use, check that the extension cord is in good
condition. When using an extension cord, make sure to
use one heavy enough to carry the current your product
will draw. For lengths more than 50 ft (15 m), a No.14 AWG
(or greater) extension cord should be used. An undersized
cord will cause a drop in line voltage resulting in loss of
power and overheating.
3. To reduce the risk of electric shock, this appliance has
a polarized plug (i.e. one blade is wider than the other).
Use this appliance only with a polarized UL-, CSA-, or
ETL-listed extension cord recommended for outdoor,
all-weather use, such as the Snow Joe® + Sun Joe®
SJTW-A 14-gauge 50-foot extension cord with lighted
end (Model PJEXT50-B). Visit snowjoe.com to purchase
this extension cord online or, to order by phone, call
1-866-SNOWJOE (1-866-766-9563).
The appliance plug will t into a polarized extension
cord only one way. If the appliance plug does not t
fully into the extension cord, reverse the plug. If the plug
still does not t, obtain a correct polarized extension
cord. A polarized extension cord will require the use of a
polarized wall outlet. The extension cord plug will t into
the polarized wall outlet only one way. If the plug does
not t fully into the wall outlet, reverse the plug. If the plug
still does not t, contact a qualied electrician to install
the proper wall outlet. Do not modify the appliance plug,
extension cord receptacle, or extension cord plug in any
way.
4. To prevent the appliance cord from disconnecting from
the extension cord during operation, use the onboard
extension cord restraint hook and/or make a knot with the
two cords as shown in Table 1.
5. Do not abuse the cord. Never pull the trimmer + edger
by the cord or yank the cord to disconnect it from the
receptacle. Keep the cord away from heat, oil, and sharp
edges.
Double-Insulated Appliances
In a double-insulated appliance, two systems of insulation
are provided instead of grounding. No grounding means is
provided on a double-insulated appliance, nor should a means
for grounding be added to the appliance. Servicing a double-
insulated appliance requires extreme care and knowledge
of the system, and should be performed only by qualied
service personnel at an authorized Snow Joe® + Sun Joe®
dealer. Replacement parts for a double-insulated appliance
must be identical to the parts they replace. A double-insulated
appliance is marked with the words “Double Insulation” or
“Double Insulated.” The symbol (square within a square)
may also be marked on the appliance.
DOUBLE-INSULATED: GROUNDING NOT
REQUIRED. WHEN SERVICING, USE ONLY
IDENTICAL REPLACEMENT PARTS.
This electric trimmer + edger is double-insulated, eliminating
the need for a separate grounding system. Use only identical
replacement parts. Read the instructions before servicing
double-insulated appliances. Use this electric trimmer + edger
only as described in this manual.
mWARNING m
Electric shock may cause SEVERE INJURY or
DEATH. Heed these warnings:
• Do not allow any part of the electric trimmer + edger
to make contact with water while it is in operation. If
the appliance becomes wet while turned o, wipe dry
before starting.
• Use only a UL-, CSA-, or ETL-rated extension cord
for outdoor, all-weather use.
• Do not use an extension cord over 100 ft (30 m).
• Do not touch the appliance or its plug with wet hands
or while standing in water. Wearing rubber boots
oers some protection.
EXTENSION CORD CHART
Extension Cord
Length
Wire Gauge (A.W.G.):
Up to 50 ft
(15 m)
+50 ft - 100 ft
(+15 m - 30 m)
16 14
(B) Connect plug and receptacle
Cord set Appliance cord
(A) Tie cord as shown
Table 1. Method of Securing Extension Cord

4
Safety Symbols
The following table depicts and describes safety symbols that may appear on this product. Read, understand, and follow all
instructions on the machine before attempting to assemble and operate.
READ THE OPERATOR'S
MANUAL(S) – Read,
understand, and follow
all instructions in the user
manual(s) before attempting to
assemble and operate.
SAFETY ALERT – Indicates
a precaution, a warning, or
a danger.
Immediately remove the plug
from the mains if the power
cable is damaged, frayed, or
entangled. Always keep the
power cable away from heat,
oil and sharp edges.
DANGER! Beware of thrown
objects to bystanders. Keep
bystanders at least 15 m (50 ft)
away from the machine.
DOUBLE INSULATION –
When servicing, use only
identical replacement parts.
WARNING! Do not expose the
unit to rain or wet conditions.
WEAR EYE AND HEARING
PROTECTION – For protection
against injury, wear ear
defenders and safety goggles.
Keep bystanders and children
a safe distance away.
Symbols SymbolsDescriptions Descriptions
Wear safety gloves during
use to protect hands.
Wear non-slip footwear that will
protect your feet and improve
your footing on slippery surfaces.
Beware of ying objects
and debris.
WARNING! Turn the machine
OFF and disconnect it from the
power supply before inspecting,
cleaning, changing accessories,
or conducting any other
maintenance task.

5
1. Adjustable auxiliary handle
2. Safety lock button
3. Rear handle
4. ON/OFF trigger switch
5. Extension cord restraint hook
6. Handle knob
7. Twist-N-Groom™locking collar
8. Telescopic shaft adjustment knob
9. Appliance cord
10. Motor housing
11. Edger guide + ower guard
12. SharperBlade™ (Model# SB601RB)
13. Safety guard
4
3
1
8
7
10
12
13
11
9
2
5
6
Know Your Electric Grass Trimmer + Edger
Read the owner’s manual and safety instructions carefully before operating the electric grass trimmer + edger. Compare the
illustration below to the electric trimmer + edger in order to familiarize yourself with the location of the various controls and
adjustments. Save this manual for future reference.
Technical Data
Rated Voltage 120 V ~ 60 Hz
Power 4.5 A
No Load Speed 7,700 rpm
Cutting Swath 12.6 in. (32 cm)
Rotor SharperBlade™ (Model# SB601RB)
Telescopic Shaft 8.3 in. to 21.6 in. (21 cm to 55 cm)
2 Tools In 1 Twist-N-Groom™rotating head
Weight 5.6 lbs (2.5 kg)

6
Unpacking
Carton Contents
• Grass trimmer + edger
• Safety guard
• Auxiliary handle
• Handle knob and bolt
• Edger guide + ower guard
• SharperBlade™ (Model# SB601RB)
• Manual with registration card
1. Carefully remove the electric grass trimmer + edger and
check to see that all of the above items are supplied.
2. Inspect the product carefully to make sure no breakage or
damage occurred during shipping. If you nd damaged or
missing parts, DO NOT return the unit to the store. Please
call the Snow Joe® + Sun Joe®customer service center at
1-866-SNOWJOE (1-866-766-9563).
NOTE: Do not discard the shipping carton and packaging
material until you are ready to use the electric grass
trimmer + edger. The packaging is made of recyclable
materials. Properly dispose of these materials in
accordance with local regulations or save the packaging
for long-term product storage.
IMPORTANT! The equipment and packaging material are not
toys. Do not let children play with plastic bags, foils, or small
parts. These items can be swallowed and pose a suocation
risk!
Secrets to a Long Lasting
SharperBlade™
CONGRATULATIONS! You are about to experience a faster,
easier, way of grooming your lawns edge and managing
weeds.
First, you will notice that there are obvious dierences between
your SharperBlade™and string line, among which are size and
shape. These dierences require you to operate your trimmer +
edger slightly dierent:
1. Use MINIMAL pressure when edging against concrete,
brick, or stone. Since the SharperBlade™is more ridged
than string, you may feel the need to put pressure on the
blade while edging. The more pressure you apply, the
FASTER the blade will wear. In contrast, the less pressure
you apply against hard surfaces, the LONGER the blade
will last! The SECRET is to keep the blade just o the hard
surface.
2. NEVER FORCE your SharperBlade™. High speed, along
with an impact against any hard surface, may cause
the blade to buckle near the center hub, and tear. The
SECRET is to allow the SharperBlade™to do ALL the work
without extra eort.
Assembly
Before using the SharperBlade™electric grass trimmer + edger,
follow these instructions to assemble:
Fitting Auxiliary Handle
1. Remove the trimmer + edger and parts from the box.
2. Adjust the handle to the most comfortable position.
3. Assemble the auxiliary handle by inserting the handle bolt
into the auxiliary handle, and installing and tightening the
handle knob provided (Fig. 1).
Edger Guide + Flower Guard
1. Insert the steel edger guide + ower guard into the lower
motor cover and lock in place (Fig. 2).
Pressure = LONG
LASTING
Auxiliary handle
Handle knob
Bolt
Fig. 1
Edger guide +
Flower guard
Fig. 2

7
Fitting the Safety Guard
mWARNING! The safety guard must be properly installed.
The safety guard provides partial protection from the risk of
thrown objects to the operator and other bystanders.
1. Place the safety guard over the blade shaft and snap into
place (Fig. 3).
2. Now the diameter of the protection area is 9 in. (23 cm).
3. If needed, you can ip up the steel edger guide + ower
guard onto the motor cover. This will allow you maximum
use of the SharperBlade™.
mCAUTION! Be careful when operating the machine
while steel ower guard is removed or raised.
Adjusting the Telescopic Shaft
1. Loosen the telescopic shaft adjustment knob (Fig. 4).
2. Pull and adjust the shaft to a comfortable height (Fig. 4).
3. Tighten the knob once the desired length is achieved
(Fig. 4).
Application
Installing + Changing Blade
1. Disconnect the main plug.
2. Remove screw knob and the washer (Fig. 5).
3. Assemble the SharperBlade™to the electric grass trimmer
+ edger (Fig. 6).
4. Place the washer on the SharperBlade™ and tighten with
the screw knob (Fig. 7).
Safety guard
Fig. 3
Telescopic shaft
adjustment knob
Twist the knob
clockwise to
tighten
Twist the
knob counter-
clockwise to
loosen
Fig. 4
Screw knob Washer
Fig. 5
SharperBlade™
Fig. 6
Washer Screw knob
SharperBlade™
Fig. 7
8
Operation
The electric grass trimmer + edger is designed to cut grass
and weeds under bushes, and on slopes and edges that
cannot be reached with the lawn mower. The trimmer + edger
must be used outdoors only, at an ambient temperature
between 32ºF (0ºC) and 113ºF (45ºC).
mWARNING! Remove stones, small sticks and other
objects from the cutting area. The SharperBlade™continues to
rotate for a few seconds after the trimmer + edger is switched
o. Let the motor come to a complete stop before switching
the trimmer + edger back on. Do not rapidly switch the trimmer
+ edger o and on.
mWARNING! Rocks or debris may ricochet or be thrown
into eyes and face, cause blindness, or other serious injury.
Never lean over the trimmer head and always wear eye
protection.
When operating the machine, check for the following:
• Wear eye protection and heavy clothing.
• Hold the rear handle with one hand and auxiliary handle
with the other hand.
• Keep the trimmer + edger below your waist level.
• Cut only from your right to your left to ensure debris is
thrown away from you. Without bending over, keep the
trimmer + edger near and parallel to the ground.
mWARNING! Use only SharperBlade™electric trimmer
+ edger replacement blade. Other products will not work
properly and will result in improper cutting head function or
can cause serious injury. Do not use other materials such as
steel blades, wire, string, rope, etc. Other materials can break
o during cutting and become a dangerous missile that can
cause serious injury.
ON + OFF Switch
1. To switch the grass trimmer + edger ON, press and hold
the safety lock button, then squeeze the ON/OFF trigger
switch and release the safety lock button (Fig. 8).
2. To switch OFF, release the ON/OFF trigger switch (Fig. 8).
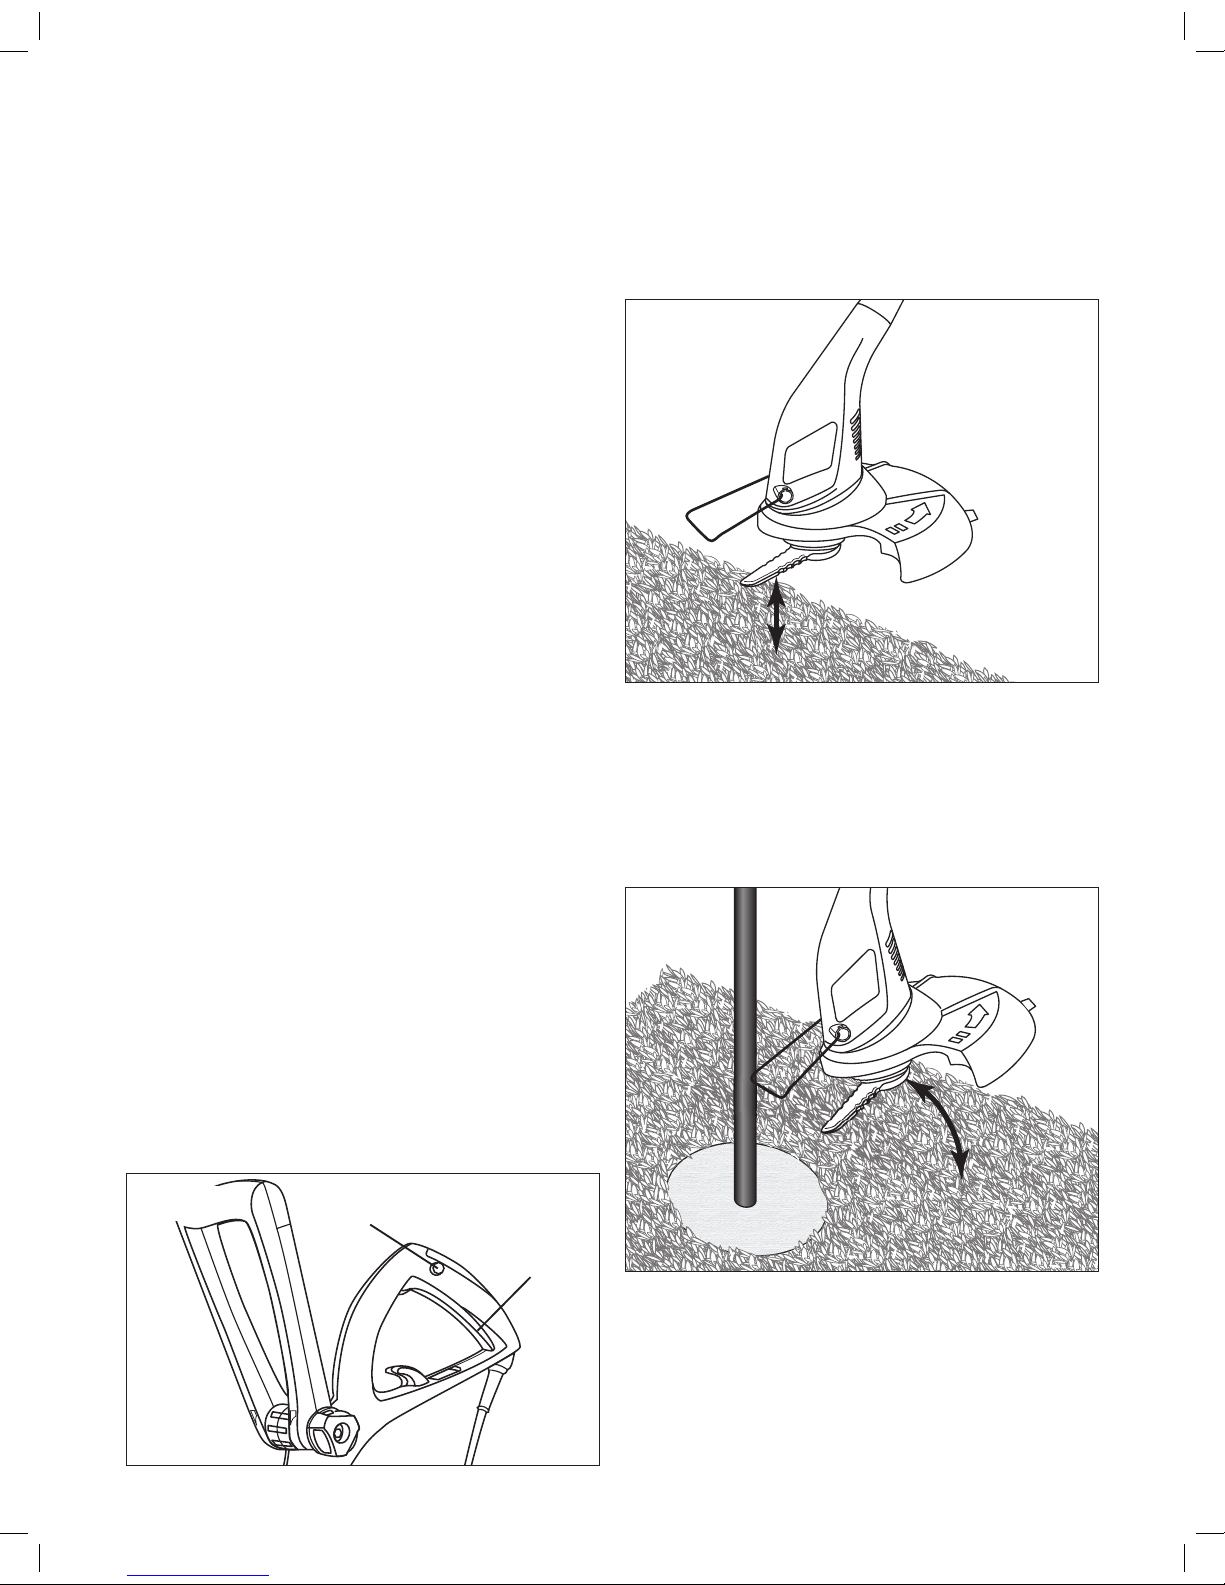
Trimming
Hold the bottom of the trimmer head above the ground and
at an angle if desired. Allow only the SharperBlade™ to make
contact. Do not force SharperBlade™ into work area (Fig. 9).
Scalping
The scalping technique removes unwanted vegetation down to
the ground. Hold the bottom of the trimmer head about 3 in.
(8 cm) above the ground and at an angle. Allow the tip of
the SharperBlade™to strike the ground around trees, posts,
monuments, etc. This technique increases SharperBlade™
wear (Fig. 10).
Fig. 8 Safety lock button
ON/OFF
trigger switch
Fig. 9
SharperBlade™above
the ground
Fig. 10

9
Mowing
Your trimmer is ideal for mowing in places conventional lawn
mowers cannot reach. In the mowing position, keep the
SharperBlade™parallel to the ground. Avoid pressing the head
into the ground as this can scalp the ground and damage the
tool (Fig. 11).
Sweeping
Fanning action can be used for quick and easy clean up. Keep
the SharperBlade™parallel to and above the surfaces being
swept and move the tool from side to side (Fig. 12).
Edging
To convert your SharperBlade™trimmer into an edger, slide the
Twist-N-Groom™locking collar downward and twist the handle
clockwise while holding the pole to adjust the trimmer head
to an angle of 180°. Ensure the locking collar snaps into place
(Fig. 13).
To convert your edger back to a trimmer, hold the handle, slide
the Twist-N-Groom™locking collar downward and twist the
handle counterclockwise while holding the pole to adjust the
trimmer head to an angle of 0°. Ensure the locking collar snaps
into place (Fig. 13).
Maintenance
mWARNING! Before performing any maintenance task,
cut o the electric power supply by disconnecting the plug
from the extension cord.
mWARNING! Always wear protective gloves during
maintenance tasks. Do not carry out maintenance when the
engine is running or hot.
• Regular cleaning and maintenance of you grass trimmer
+ edger will ensure eciency and prolong the life of your
machine.
• After each cutting operation, take apart and clean out the
grass and soil from the whole trimmer + edger and guard.
• During operation, keep the air vents clean and free from
grass.
• Only use a cloth soaked with hot water and a soft brush to
clean the grass trimmer + edger.
• Do not spray or wet the appliance with water.
• Do not use detergents or solvents as these could ruin
the trimmer. The plastic parts can easily be damaged by
chemical agents.
Fig. 11
Fig. 12
0
°
1
8
0
°
Fig. 13
Twist-N-Groom™
locking collar

10
Troubleshooting
Always disconnect the electric power supply before conducting maintenance or troubleshooting.
Problems Possible Solution
Grass trimmer + edger vibrates
Grass trimmer + edger
does not start
• Remove the SharperBlade™and clean the slots, carefully remove any grass and
weeds and so forth.
• If vibration persists after reassembly, replace the SharperBlade™with a new one.
• In the evert of the problem not disappearing, have the trimmer + edger checked
at an authorized service center.
• Check all the electrical connections; make sure the safety circuit-breaker has not
been activated.
• Check if a fuse has blown in your electrical system.
• Take the trimmer + edger to an authorized service center if the trimmer + edger
does not start after completing the checks.
• If the SharperBlade™no longer cuts or breaks, have this
replaced by contacting an authorized service center.
mCAUTION! The SharperBlade™ can inict deep cuts.
Handle with care; use with caution.
• For repairs which have not been explained in these
instructions, contact an authorized service center at
1-866-SNOWJOE (1-866-766-9563)
Storage
Follow these recommendations for storing the grass trimmer +
edger.
• Clean the grass trimmer + edger thoroughly before storing.
• Store the trimmer + edger in a stable and safe location out
of the reach of children. Keep the trimmer + edger in a dry
place where the temperature is not too hot or too cold.
• Do not store the grass trimmer + edger resting against the
oor. Hang it by the upper handgrip so that the guard does
not touch anything. If the guard rests against a surface, its
shape and dimensions could be permanently altered, and
could render the machine unsafe to use.
Service + Support
If your Martha Stewart MTS-SBLD1 Electric trimmer + Edger
requires service or maintenance, please call the Snow Joe®+
Sun Joe® customer service center at 1-866-SNOWJOE
(1-866-766-9563).
Model + Serial Numbers
When contacting the company, reordering parts, or arranging
service from an authorized dealer, you will need to provide the
model and serial numbers, which can be found on the decal
located on the housing of the unit. Copy these numbers into
the space provided below.
Record the following numbers from the housing or handle of your
new product:
M T S - S B L D 1
Model #:
Serial #:

11
Optional Accessories
mWARNING! ALWAYS use only authorized Snow Joe® + Sun Joe® replacement parts and accessories. NEVER use
replacement parts or accessories that are not intended for use with this electric trimmer + edger. Contact Snow Joe® + Sun Joe®
if you are unsure whether it is safe to use a particular replacement part or accessory with your electric trimmer + edger. The use
of any other attachment or accessory can be dangerous and could cause injury or mechanical damage.
NOTE: Accessories are subject to change without any obligation on the part of Snow Joe® + Sun Joe®to provide notice of such
changes. Accessories can be ordered online at snowjoe.com or via phone by contacting the Snow Joe® + Sun Joe®customer
service center at 1-866-SNOWJOE (1-866-766-9563).
Snow Joe® + Sun Joe® SJTW-A 14-gauge
50-foot extension cord with lighted end
Snow Joe® + Sun Joe®universal wall bracket
SharperBlade™replacement blade
PJEXT50-B
SJWB
SB601RB
ModelAccessories Item
1
2
3

12
NOTES

13
NOTES

14
NOTES

15
SNOW JOE®+ SUN JOE®CUSTOMER PROMISE
PRODUCT REGISTRATION:
Snow Joe®, LLC (“Snow Joe® + Sun Joe®”) strongly encourages
you to register your purchase. You can register online at
snowjoe.com/ProductRegistration. Failure to register your
product purchase will not diminish your warranty rights. However,
registering your purchase will allow Snow Joe® + Sun Joe®to
better serve you with any of your customer service needs.
WHO CAN SEEK WARRANTY COVERAGE?
This Warranty is extended by Snow Joe® + Sun Joe®to the owner
of this Machine (a “Machine” consists of a product powered by
a motor) for residential and personal household use only. This
Warranty does not apply to products used for commercial, rental
or re-sale purposes. Should ownership of this machine change
during the 2-year period, please update the Machine’s owner
information at snowjoe.com/ProductRegistration.
WHAT IS COVERED?
Snow Joe® + Sun Joe® warrants to the owner that if this Machine
fails within 2 years from the date of purchase due to a defect in
material or workmanship or as a result of normal wear and tear
from ordinary household use, Snow Joe® + Sun Joe®will send a
replacement part or product, as needed, free of charge and with
free shipping to the original purchaser.
If, in Snow Joe® + Sun Joe®’s sole discretion, the failed Machine
cannot be repaired with a part, Snow Joe® + Sun Joe®will elect to
either (A) send a new Machine at no charge and with free shipping
or (B) refund the full purchase price to the owner.
WHAT IS NOT COVERED?
This Warranty does not apply to the Machines that have been used
commercially or in non-household applications. This Warranty
does not cover cosmetic changes that do not aect performance.
This Warranty is only valid if the Machine is used and maintained
in accordance with the instructions, warnings and safeguards
contained in the owner’s manual. Snow Joe® + Sun Joe®will not
be responsible for the cost of any unauthorized warranty repairs.
This warranty does not cover any cost or expense incurred by
the purchaser in providing substitute equipment or service during
reasonable periods of malfunction or non-use of this product
while waiting for a replacement part or unit under this warranty.
Wearing parts like belts, augers, chains and tines are not covered
under this warranty, and can be purchased at snowjoe.com or
by calling 1-866-SNOWJOE (1-866-766-9563). Batteries are
covered in full for 90-days from the date of purchase.
Repair, replacement or refund of the purchase price are the
exclusive remedies of purchaser and the sole liability of Snow Joe®
+ Sun Joe®under this warranty. No employee or representative
of Snow Joe® + Sun Joe®is authorized to make any additional
warranty or any modication to this warranty which may be
binding upon Snow Joe® + Sun Joe®. Accordingly, purchaser
should not rely upon any additional statements made by any
employee or representative of Snow Joe® + Sun Joe®. In no event,
whether based on contract, indemnity, warranty, tort (including
negligence), strict liability or otherwise, shall Snow Joe®+
Sun Joe®be liable for any special, indirect, incidental, or
consequential damages, including, without limitation, loss of
prot or revenue.
Some states do not allow limits on warranties. In such states, the
above limitations may not apply to you.
Outside the USA, other warranties may apply.
ABOVE ALL ELSE, Snow Joe® + Sun Joe®are dedicated to you, our customer. We strive to make your experience as pleasant
as possible. Unfortunately, there are times when a product does not work or breaks under normal operating conditions. We
think it’s important that you know what you can expect from us. That’s why we created the Snow Joe® + Sun Joe®promise.
OUR PROMISE: Snow Joe® + Sun Joe®warrant new products for two years from the date of purchase. If your product does
not work, or there’s an issue with a specic part, we will x this by either sending you a free replacement part or by sending
you a new or comparable product at no charge. How cool is that! Before you know it, you’ll be back in action cutting,
sawing, mowing, washing and…?

mWARNING! This product or its power cord contains chemicals, including lead, known to the State of California
to cause cancer and birth defects or other reproductive harm. Wash hands after handling. For more information go to
www.P65Warnings.ca.gov.
mWARNING! Some dust created by power sanding, sawing, grinding, drilling, and other construction activities
contains chemicals known [to the State of California] to cause cancer, birth defects, or other reproductive harm. Some
examples of these chemicals are:
• lead from lead-based paints,
• crystalline silica from bricks and cement and other masonry products, and
• arsenic and chromium from chemically-treated lumber.
Your risk from these exposures varies, depending on how often you do this type of work. To reduce your exposure to
these chemicals: work in a well ventilated area, and work with approved safety equipment, such as those dust masks
that are specically designed to lter out microscopic particles. For more information go to www.P65Warnings.ca.gov.
Table of contents
Other Martha Stewart Trimmer manuals


