Ozito PXCLTK-218U User manual

WARRANTY
0218
CORDLESS GRASS
TRIMMER KIT
ORIGINAL INSTRUCTIONS
SPECIFICATIONS
Voltage: 18V
Battery: 2.0Ah Li-ion
Charge Time: 2.5 Hours
No Load Speed: 8,500/min
Cutting Diameter: 240mm
Weight: 2.2kg
PXCLTK-218U
WHAT’S IN THE BOX
Grass Trimmer
ozito-diy.co.uk
Blades x 10
2.0Ah Battery & Eco Charger
*
OZITO UK Unit 9 Stadium Court, Wirral International Business Park, Plantation Road, Bromborough, Wirral, CH62 3QG
All of our products undergo strict quality checks to ensure that they reach you in perfect
condition. In the unlikely event that your device develops a fault, please contact our service
department at the address shown on this guarantee card. You can also contact us by
telephone using the customer service number shown. Please note the following terms under
which guarantee claims can be made:
1. These warranty terms regulate additional warranty services, which the manufacturer
mentioned below promises to buyers of its new products in addition to their statutory
guarantee claims are not affected by this guarantee. Our guarantee is free of charge to you.
2. The warranty services only covers defects due to material or manufacturing faults on
a product which you have bought from the manufacturer mentioned below are limited to
either the rectication of said defects on the product or the replacement of the product,
whichever we prefer.
Please note that our devices are not designed for use in commercial, trade or professional
applications. A guarantee contract will not be created if the device has been used by
commercial, trade or industrial business or has been exposed to similar stresses during the
guarantee period.
3. The following are not covered by our guarantee:
- Damage to the device caused by a failure to follow the assembly instructions or due to
incorrect installation, a failure to follow the operating instructions (for example connecting
it to an incorrect mains voltage or current type) or a failure to follow the maintenance and
safety instructions or by exposing the device to abnormal environmental conditions or by
lack of care and maintenance.
- Damage to the device caused by abuse or incorrect use (for example overloading the
device or the use or unapproved tools or accessories), ingress of foreign bodies into the
device (such as sand, stones or dust, transport damage), the use of force or damage caused
by external forces (for example by dropping it).
- Damage to the device or parts of the device caused by normal or natural wear or tear or by
normal use of the device.
4. Your Product is guaranteed for a period of 60 months from the original date of purchase
and is intended for DIY (Do It Yourself) use only. Lithium Ion batteries and chargers are
covered by a 12 month warranty. Warranty excludes consumable parts. Guarantee claims
should be submitted before the end of the guarantee period within two weeks of the defect
being noticed. No guarantee claims will be accepted after the end of the guarantee period.
The original guarantee period remains applicable to the device even if repairs are carried
out or parts are replaced. In such cases, the work performed or parts tted will not result
in an extension of the guarantee period, and no new guarantee will become active for the
work performed or parts tted. This also applies if an on-site service is used.
IN ORDER TO MAKE A CLAIM UNDER THIS WARRANTY YOU MUST RETURN THE PRODUCT TO
THE PLACE OF PURCHASE WITH YOUR REGISTER RECEIPT.
Please refer to the restrictions of this warranty concerning wearing parts, consumables and
missing parts as set out in the service information in these operating instructions.
CUSTOMER SERVICE HELPLINE
GB: 0151 294 4488
IRL: 1850 882711
Ozito-diy.co.uk
EH-Art. No.: 34.111.89 I-No.: 11027
Caution! Read the instruction
manual before starting!
Caution! Wear goggles and
ear muffs!
Caution! Protection from
moisture!
Keep other people
out of area!
The equipment
continues to rotate!
The reprinting or reproduction by any other means,
in whole or in part, of documentation and papers
accompanying products is permitted only with the
express consent of the iSC GmbH.
Subject to technical changes.

ONLINE MANUAL
Scan this QR Code with your mobile
device to take you to the online
manual.
15 16 17 18 19
KNOW YOUR PRODUCT
1. ASSEMBLY
SETUP & PREPARATION
WARNING! ENSURE THE TOOL IS SWITCHED
OFF AND BATTERY DISCONNECTED BEFORE
PERFORMING ANY OF THE FOLLOWING TASKS.
CORDLESS GRASS TRIMMER
1
10
2
11
3
12
4
13
5
6
7
8
9
1. Telescopic Shaft
2. Shaft Adjustment Collar
3. Adjustable Handle Lever
4. Adjustable Handle
5. Lock-off Switch
6. Rear Handle
7. On/Off Trigger
8. Battery Seating
9. Head Tilt Button
10. Edging Guide
11. Cutter Head
12. Safety Guard
13. Cutting Blade
14. Blade Storage
ACCESSORIES
20
15. Battery Release Tab
16. Battery Charge LED’s
17. Battery Charge Indicator Button
18. Charger
19. Charger LED
20. Blades x 10
*
Fitting the Adjustable Handle
1. Fit the handle mounting bracket
onto the upper section of the shaft.
Note: You will need to carefully ex
the mounting bracket just enough to
slip over the shaft. Do not over ex as
this can damage or break the mounting
bracket.
2. Place the adjustable handle on
the mounting bracket, then pass
the screw with washer through
the mounting bracket and onto the
adjustable handle lever.
Fitting the Safety Guard
WARNING! NEVER USE THE GRASS TRIMMER
UNLESS THE SAFETY GUARD IS PROPERLY FITTED.
1. Align the tabs of the safety guard
with the recess in the back of the
cutter head.
2. Slide in until it clicks
into place.
1. Place the Spindle Plate onto the
spindle and secure in place with
screw provided.
Fitting the Spindle Plate
14

2. ADJUSTING THE TRIMMER
1. Release the adjustable handle
lever.
1. Place the big hole in the blade
onto the blade mount on the
bottom of the spindle plate.
3. To remove the blade push the
blade towards the centre of the
spindle and then slide off.
1. Press and hold the head tilt
button.
2. Tilt the cutter head to the desired
angle.
2. Rotate the head into the desired
position.
3. Ensure the head has clicked
into a secure position before
operating.
3. Ensure the head has clicked
into a secure position before
operating.
1. Pull the telescopic shaft away
from the cutter head.
The grass trimmer head has 2 adjustments to allow for the optimal angle and
position for grass trimming or edging.
1. Loosen the shaft adjustment
collar.
2. Rotate the handle into
the desired position and
then lock in place with
the lever.
2. Pull the blade outwards
so that the small hole is
tted into the mount.
2. Extend to the desired
height and then
retighten the shaft
adjustment collar to
secure in place.
Adjusting the Handle
Adjusting the Cutter Head
Head Tilt Head Angle
Adjusting the Height
Attaching a Blade

Battery protection system
The tool is equipped with the battery protection system, which helps to ensure a long
service life.
The output power automatically cuts off during operation when the tool and/or battery
are placed under the following situations:
• When the tool is overloaded:
If this occurs, release the trigger switch and remove causes of overload, then pull
the switch trigger again to restart.
• When the remaining battery capacity becomes low:
Recharge the battery pack.
Note: The battery protection system does not in any way damage the tool.
Note: The indicated capacity may be lower than the actual level during use or
immediately after using the tool.
3. BATTERY & CHARGING
CAUTION: THE CHARGER FOR THIS PRODUCT
SHOULD BE PROTECTED BY A RESIDUAL CURRENT
DEVICE (RATED AT 30mA OR LESS).
Battery Charge Indicator
The purchased battery is equipped with a
battery charge indicator to show the state of
the battery charge.
Press the charge indicator button and look to
see which LED lights.
Battery requires
immediate charging
Low state of charge, requires charging soon.
Mid state of charge
Full state of charge.
Note: The battery needs to be removed from the tool to check the state of charge.
Charging your lithium ion battery - Eco Charger
The tools battery has been shipped in a low charge condition, and requires
charging prior to use. Allow several cycles of charging and discharging
(through use of the tool) for the battery to reach its optimum performance /
runtime.
1. Connect the charger into a mains power outlet.
4. The charger LED will illuminate red signifying that the battery is
charging.
3. With the battery sitting on a at
surface, align the raised ribs on the
battery with the recess in the charger
and slide onto the battery ensuring a
rm connection.
2. The charger LED will ash green
showing power is being supplied
to the charger.
5. When removing the charger from the
battery, rst press the battery release
tab, then slide the charger from its
position.
Charger LED Indicator
LED Indicator Situation
GREEN (Flashing) Stand By (no battery pack is inserted)
RED (Illuminated) Battery is charging (low charge)
GREEN (Illuminated) Battery is charged and ready for use
RED (Flashing) Battery or Charger fault
RED & GREEN (Flashing) Battery pack is too hot or too cold (remove battery from
charger and store at room temperature 20ºC. Insert
battery again when at correct charging temperature). If
this happens again, the battery is defective and needs
to be replaced.
Note: The battery will not develop a memory, it does not have to be fully
discharged before recharging.
CAUTION! IF THE BATTERY IS TOO HOT OR TOO
COLD WHEN INSERTED INTO THE CHARGER,
THE LED WILL FLASH RED AND GREEN. REMOVE
BATTERY FROM CHARGER AND STORE AT ROOM
TEMPERATURE 20ºC BEFORE CHARGING.

4. CONTROLS & OPERATION
OPERATION
1. Press and hold the lock-
off switch forward.
Switching On and Off
CAUTION! BEFORE YOU START THE UNIT, MAKE SURE
THAT THE GRASS TRIMMER IS NOT MAKING CONTACT
WITH ANY OBJECTS.
WARNING! INSPECT THE AREA TO BE TRIMMED
AND REMOVE ANY WIRE, CORD OR STRING-LIKE
OBJECTS WHICH COULD BECOME ENTANGLED IN
THE ROTATING BLADE.
WARNING! DO NOT OPERATE THE TRIMMER ON A
TREE, ON A LADDER, OR ON A SCAFFOLD, THIS IS
EXTREMELY DANGEROUS.
CAUTION! BYSTANDERS MUST KEEP A MINIMUM SAFE
DISTANCE OF 10M AWAY FROM THE TRIMMER WHILE IT
IS OPERATING.
WARNING! STONES, PIECES OF METAL AND OTHER
OBJECTS CAN BE THROWN OUT AT HIGH SPEED BY
THE BLADE.
2. Squeeze the on/off trigger to
start the trimmer.
3. To stop the trimmer,
release the On/Off
trigger.
NOTE: DO NOT CUT GRASS WHEN WET. (THE BEST
RESULTS ARE ACHIEVED ON DRY GRASS.)
1. Extend the edging guide to
prevent the cutting head from
getting too close to an object
such as a tree trunk or wall.
2. Hold the trimmer with both
handles for best control and
balance.
3 To turn on squeeze the on/off
trigger whilst holding the lock-off
button down.
4. Move the grass trimmer into the
grass to allow it to cut.
6. Release the on/off trigger and
allow the motor to come to a
complete standstill.
5. Several passes will be required
to cut long grass.
Using the Grass Trimmer
1. Align the ribs of the battery with
the recess in below the handle
and slide in until it clicks into
place.
2. To remove, press and hold the
battery release tab and then slide
out.
Inserting & Removing the Battery
30°
PXCLTK-218U

5. TRIMMING & EDGING
OPERATION
Trimming
Edging
Move the grass trimmer from side to side as
you walk forward, holding it at an angle of
approx. 30° (Light cuts are better than heavy
cuts as they allow the cut grass to fall away
from the cutting head).
Place the edging guide along the ground
and slide the grass trimmer along the edge
of the path.
30°
WARNING! ALWAYS ENSURE THE TOOL HAS
COMPLETELY STOPPED AND THE BATTERY IS
REMOVED PRIOR TO ANY MAINTENANCE.
Replacing the Spindle Plate
1. Unscrew the countersunk head
screw in the centre of the spindle
plate, rotate anti-clockwise to
remove. Once removed put aside
for re-assembly.
2. Lift off the spindle plate.
3. Mount and fasten the new
spindle plate.
MAINTENANCE
Problem Cause Remedy
Trimmer is not
starting
Possible clogging Clean the cutter head of any grass.
Battery is low in charge Charge battery
Battery not inserted properly Insert battery pack correctly
Trimmer is not
operating at full
capacity
Possible clogging Clean the cutter head of any grass.
Cutting tall grass at ground
level.
Make several passes from top down.
Motor stops while
operating
Battery has no power Charge battery
Grass wraps around
the shaft and
trimmer head.
Cutting tall grass at ground
level.
Make several passes from top down.
Spare parts can be ordered from the Special Orders Desk at your local Bunnings Warehouse or
Homebase store.
For further information, or any parts visit
www.ozito-diy.co.uk or contact Ozito Customer Service:
Great Britain: 0151 294 4488
Ireland: 1850 882711
E-mail: info@ozito-diy.co.uk
Troubleshooting
Service Information
Please note that the following parts of this product are subject to normal or natural wear and
that the following parts are therefore also required for use as consumables.
* Not necessarily included in the scope of delivery!
Category Example
Wear parts* Blade head, Battery
Consumables Blade
Missing parts
• Keep ventilation slots of the trimmer clean at all times. Periodically clean out the grass from the cutting
head and the rim of the blade guard to ensure efcient operation at all times.
• After each use, blow air through the tool housing to ensure it is free from all dust, dirt, etc. Build up of
dust, dirt particles may cause the tool to overheat and shorten the life of the tool.
• If the housing of the trimmer requires cleaning, do not use solvents but a moist soft cloth or soft brush
only.
• Never let any liquid get inside the tool, never immerse any part of the tool into liquid.
• No lubrication is necessary as the tool has sealed bearings.
• When not in use, the grass trimmer should be stored in a dry, frost free location not within the reach of
children.
Note: Ozito Industries will not be responsible for any damage or injuries caused by the repair of the grass
trimmer by an unauthorised person or by mishandling of the grass trimmer. This tool is designed for DIY use -
use in commercial or industrial environments will void the warranty.
Spare Parts
MAINTENANCE cont.
Gao/Product-ManagementWeichselgartner/General-Manager
explains the following conformity according to EU directives and norms for
the following product
Cordless Grass Trimmer PXCLTK-018U / Eco Charger PXCG-120U (Ozito)
2014/29/EU
2005/32/EC_2009/125/EC
2014/35/EU
2006/28/EC
X2014/30/EU
2014/32/EU
2014/53/EC
2014/68/EU
90/396/EC_2009/142/EC
89/686/EC_96/58/EC
X2011/65/EU
X2006/42/EC
Annex IV
Reg. No.:
X2000/14/EC_2005/88/EC
Annex V
XAnnex VI
Noise: measured LWA = 84,3 dB (A); guaranteed LWA = 94 dB (A)
P = KW; L/Ø = cm
2004/26/EC
Emission No.:
Standard references: EN 60335-1; EN 60335-2-29; EN 50636-2-91; EN 62233
EN 55014-1; EN 55014-2; EN 61000-3-2; EN 61000-3-3
Landau/Isar, den 21.07.2017
First CE: 16 Archive-File/Record: NAPR016849
Art.-No.: 34.111.89 I.-No.: 11027 Documents registrar: Robert Gehard
Subject to change without notice Wiesenweg 22, D-94405 Landau/Isar
ISC GmbH · Eschenstraße 6 · D-94405 Landau/Isar

BATTERY AND CHARGER SAFETY WARNINGS
ADDITIONAL INFORMATION
The equipment is designed for cutting lawns and small areas of grass in private and hobby gardens.
Equipment designed for use in private and hobby gardens is regarded as unsuitable for use in public
facilities, parks and sports centers, along roadways, or in agriculture and forestry. The operating instructions
as supplied by the manufacturer must be kept and referred to in order to ensure that the equipment is
properly used and maintained.
Important. This equipment must not be used for composting purposes
(shredding) as this could result in injury or damage to property.
The equipment is to be used only for its prescribed purpose. Any other use is deemed to be a case of misuse.
The user/operator and not the manufacturer will be liable for any damage or injuries of any kind caused as a
result of this.
Please note that our equipment has not been designed for use in commercial, trade or industrial applications.
Our warranty will be voided if the machine is used in commercial, trade or industrial businesses or for
equivalent purposes.
Proper use
Technical data
Protection class ................................................III
Lwa sound power level ............................ 84.3 dB
LpA sound pressure level ......................... 68.3 dB
K uncertainty ............................................2.3 dB
Vibration ..................................................5.8 m/s²
K uncertainty .......................................... 2.2 m/s²
Sound pressure level
at the operator‘s ear ............................... 78 dB(A)
K uncertainty .................................................3 dB
Charging unit:
Input: ........................... 110-240V~50-60Hz, 21W
Output: ...................................... 21 V DC, 800mA
Important.
The vibration value changes according to the area of application of the electric equipment and may exceed
the specied value in exceptional circumstances.
Reduce noise generation and vibration to a minimum!
• Use only equipment that is in perfect condition.
• Maintain and clean the equipment regularly.
• Adapt your way of working to the equipment.
• Do not overload the equipment.
• Have the equipment checked if necessary.
• Switch off the equipment when not in use.
• Wear gloves.
Caution!
Residual risks
Even if you use this electric power tool in accordance with instructions,
certain residual risks cannot be rules out. The following hazards may arise
in connection with the equipment’s construction and layout:
1. Lung damage if no suitable protective dust mask is used.
2. Damage to hearing if no suitable ear protection is used.
3. Health damage caused by hand-arm vibrations if the equipment is used over a prolonged period.
For EU countries only
Never place any electric power tools in your household refuse.
To comply with European Directive 2012/19/EC concerning old electric and electronic equipment and its
implementation in national laws, old electric power tools have to be separated from other waste and
disposed of in an environment-friendly fashion, e.g. by taking to a recycling depot. Recycling alternative
to the return request: As an alternative to returning the equipment to the manufacturer, the owner of the
electrical equipment must make sure that the equipment is properly disposed of if he no longer wants to
keep the equipment. The old equipment can be returned to a suitable collection point that will dispose of the
equipment in accordance with the national recycling and waste disposal regulations. This does not apply to
any accessories or aids without electrical components supplied with the old equipment.
This consignment contains lithium-ion batteries. In accordance with special provision 188 this consignment
is not subject to the ADR regulations. Handle with care. Danger of ignition in case of damage to the
consignment package. If the consignment package is damaged: Check and if necessary repackage. For further
information contact: 0049 1807 10 20 20 66 (xed network 14 ct/min, mobile phone max. 42 ct/min) Outside
Germany charges will apply instead for a regular call to a landline number in Germany.
We pay a great deal of attention to the design of every battery pack to ensure that we supply you with batteries which feature maximum
power density, durability and safety. The battery cells have a wide range of safety devices. Each individual cell is initially formatted and its
electrical characteristic curves are recorded. This data are then used exclusively to be able to assemble the best possible battery packs.
Despite all the safety precautions, caution must always be exercised when handling batteries. The following points must be
obeyed at all times to ensure safe use.
Safe use can only be guaranteed if undamaged cells are used. Incorrect handling can cause cell damage.
Important: Analyses conrm that incorrect use and poor care are the main causes of the damage caused by high performance batteries.
Information about the battery
1. The battery pack supplied with your cordless tool is not charged. The battery pack has to be charged before you use the tool for the rst
time.
2. For optimum battery performance avoid low discharge cycles. Charge the battery pack frequently.
3. Store the battery pack in a cool place, ideally at 15°C and charged to at least 40%.
4. Lithium-ion batteries are subject to a natural ageing process. The battery pack must be replaced at the latest when its capacity falls to
just 80% of its capacity when new. Weakened cells in an aged battery pack are no longer capable of meeting the high power requirements
and therefore pose a safety risk.
5. Do not throw battery packs into an open re. There is a risk of explosion!
6. Do not ignite the battery pack or expose it to re
7. Do not exhaustively discharge batteries. Exhaustive discharge will damage the battery cells. The most common cause of exhaustive
discharge is lengthy storage or non-use of partly discharged batteries. Stop working as soon as the performance of the battery falls
noticeably or the electronic protection system triggers. Place the battery pack in storage only after it has been fully charged.
8. Protect batteries and the tool from overloads. Overloads will quickly result in overheating and cell damage inside the battery housing
without this overheating actually being apparent externally.
9. Avoid damage and shocks. Replace batteries which have been dropped from a height of more than one meter or which have been
exposed to violent shocks without delay, even if the housing of the battery pack appears to be undamaged. The battery cells inside the
battery may have suffered serious damage. In this respect, please also read the waste disposal information.
10. If the battery pack suffers overloading and overheating, the integrated protective cut-off will switch off the equipment for safety reasons.
Important. Do not press the ON/OFF switch any more if the protective cut-off has actuated. This may damage the battery pack.
11. Use only original battery packs. The use of other batteries may result in injuries, explosion and a re risk
Information on chargers and the charging process
1. Please check the data marked on the rating plate of the battery charger. Be sure to connect the battery charger to a power supply with
the voltage marked on the rating plate. Never connect it to a different mains voltage
2. Protect the battery charger and its cable from damage and sharp edges. Have damaged cables repaired without delay by a qualied
electrician.
3. Keep the battery charger, batteries and the cordless tool out of children’s reach.
4. Do not use damaged battery chargers.
5. Do not use the supplied battery charger to charge other cordless tools.
6. In heavy use the battery pack will become warm. Allow the battery pack to cool to room temperature before commencing with the
charging.
7. Do not over-charge batteries. Do not exceed the maximum charging times. These charging times only apply to discharged batteries.
Frequent insertion of a charged or partly charged battery pack will result in over-charging and cell damage. Do not leave batteries in the
charger for days on end.
8. Never use or charge batteries if you suspect that the last time they were charged was more than 12 months previously. There is
a high probability that the battery pack has already suffered dangerous damage (exhaustive discharge).
9. Charging batteries at a temperature below 10°C will cause chemical damage to the cell and may cause a re.
10. Do not use batteries which have heated during the charging process, as the battery cells may have suffered dangerous damage.
11. Do not use batteries which have suffered curvature or deformation during the charging process or which show other non-typical
symptoms (gassing, hissing, cracking,…)
12. Never fully discharge the battery pack (recommended depth of discharge max. 80%) A complete discharge of the battery pack will lead
to premature ageing of the battery cells.
13. Never charge the batteries unsupervised.
Protection from environmental inuences
1. Wear suitable work clothes. Wear safety goggles.
2. Protect your cordless tool and the battery charger from moisture and rain. Moisture and rain can cause dangerous cell damage.
3. Do not use the cordless tool or the battery charger near vapours and inammable liquids.
4. Use the battery charger and cordless tools only in dry conditions and an ambient temperature of 10-40°C.
5. Do not keep the battery charger in places where the temperature is liable to reach over 40°C. In particular, do not leave the battery
charger in a car that is parked in the sunshine.
6. Protect batteries from overheating. Overloads, over-charging and exposure to direct sunlight will result in overheating and cell
damage. Never charge or work with batteries which have been overheated – replace them immediate if possible.
7. Storage of batteries, battery chargers and cordless tools. Store the charger and your cordless tool only in dry places with an
ambient temperature of 10-40°C. Store your lithium-ion battery pack in a cool, dry place at a temperature of 10-20°C. Protect them from
humidity and direct sunlight. Only place fully charged batteries in storage (charged at least 40%).
8. Prevent the lithium-ion battery pack from freezing. Battery packs which were stored below 0°C for more than 60 minutes must be
disposed of.
9. When handling batteries beware of electrostatic charge: Electrostatic discharges cause damage of the electronic protection system
and the battery cells. Avoid electrostatic charging and never touch the battery poles.
Rechargeable batteries and cordless electric machines and tools contain materials that are potentially harmful to the environment. Never
place any cordless electric machines or tools in your household refuse. When cordless electric machines or tools become defective
or worn, remove the rechargeable batteries and return them to iSC GmbH (address: Eschenstrasse 6, D-94405, Germany). If the
rechargeable batteries cannot be removed, return the complete cordless machine or tool. You can then be sure that the equipment will be
correctly disposed of by the manufacturer.
When shipping or disposing of batteries and cordless tools, always ensure that they are packed individually in plastic bags to
prevent short circuits and res.
Caution! Read the instruction
manual before starting!
Caution! Wear goggles and
ear muffs!
Caution! Protection from
moisture!
Keep other people
out of area!
The equipment
continues to rotate!
The reprinting or reproduction by any other means,
in whole or in part, of documentation and papers
accompanying products is permitted only with the
express consent of the iSC GmbH.
Subject to technical changes.
Store the battery only in dry rooms with an ambient
temperature of +10°C to +40°C. Place only charged batteries in
storage (charged at least 40%). (not included in delivery)
For use in dry rooms only.
Safety class II
Danger!
The equipment and packaging material are not toys. Do not let children play
with plastic bags, foils or small parts. There is a danger of swallowing or
suffocating!
Important.
The charging unit is allowed to be used only for the lithium-ion batteries of the Power-X-Change series!
The machine may exceed 85 dB (A). The operator will require noise protection measures if this is the case.
The noise was measured in accordance with EN ISO 11201: 2010 and EN ISO 3744: 2010. The value of the
vibrations emitted by the handle was determined in accordance with EN 28662-1: 1992.

GENERAL POWER TOOL SAFETY WARNINGS
ELECTRICAL SAFETY
WARNING! When using mains-powered tools, basic safety precautions, including
the following, should always be followed to reduce risk of fire, electric shock, personal
injury and material damage.
Read the whole manual carefully and make sure you know how to switch the tool off in an emergency, before operating the tool.
Save these instructions and other documents supplied with this tool for future reference.
Please Before you connect the charger to the mains supply make sure that the data on the rating plate are identical to the mains data.
This tools charger is double insulated therefore no earth wire is required.
If the supply cord is damaged, it must be replaced by an electrician or a power tool repairer in order to avoid a hazard.
Note: Double insulation does not take the place of normal safety precautions when operating this tool. The insulation system is for
added protection against injury resulting from a possible electrical insulation failure within the tool.
The power supply for this products charger should be protected by a residual current device (rated at 30mAor less). A residual current
device reduces the risk of electric shock.
Danger! Read all safety regulations and instructions.
Any errors made in following the safety regulations and instructions may result in an electric shock, re and/or serious injury. Keep all
safety regulations and instructions in a safe place for future use.
The term “electric tool” used in the safety instructions refers to electric tools operated from the mains power supply (with a power cable)
and to battery operated electric tools (without a power cable).
1. Workplace safety
a) Keep your work area clean and well illuminated. Untidy or unlit work areas can result in accidents.
b) Do not operate the electric tool in an environment where there is a risk of explosions and where there are inammable
liquids, gases or dust. Electric tools produce sparks which could set the dust or vapours alight.
c) Keep the electric tool out of the reach of children and other persons. If there is a distraction, you may lose control of the
appliance.
2. Electrical safety
a) The connector plug from this electric tool must t into the socket. The plug should never be altered in any way. Never use
adapter plugs together with earthed electric tools. Unaltered plugs and correct sockets reduce the risk of an electric shock.
b) Avoid bodily contact with earthed surfaces such as pipes, heating, ovens and fridges. The risk of electric shock is increased if
your body is earthed.
c) Keep the tool out of the rain and away from moisture. The ingress of water into an electric tool increases the risk of an electric
shock.
d) Do not use the cable to carry the electric tool, to hang it up or to pull it out of the socket. Keep the cable away from heat, oil,
sharp edges and moving parts of the appliance. Damaged or entangled cables increase the risk of an electric shock.
e) If you are working outdoors with an electric tool, only use extension cables which are designed specically for this purpose.
Using specially designed outdoor extension cables, the risk of electric shock is reduced.
f) If operation of the electric tool in a damp environment can not be avoided, use a earth-leakage circuit-breaker. The earth-
leakage circuit-breaker reduces the risk of an electric shock.
3. Safety of persons
a) Be careful, watch what you are doing and use an electric tool sensibly. Do not use the tool if you are tired or under the
inuence of drugs, alcohol or medication. A moment of inattention when using the electric tool can result in serious injuries.
b) Wear personal protection equipment and always wear safety goggles. Wearing personal protection (such as dust masks, non-
slip safety shoes, safety helmet or ear protection, depending upon the type and use of the electric tool) reduces the risk of injury.
c) Make sure that the appliance cannot start up accidentally. Ensure that the electric tool is switched off before you connect it
to the power supply and/or insert the battery, or pick up or carry the tool. If your nger is on the switch whilst carrying the electric
tool or if you connect the appliance to the mains when it is switched on, this can lead to accidents.
d) Remove keys and wrenches before switching on the electric tool. A tool or key which comes into contact with rotating parts of
the appliance can lead to injuries.
e) Avoid abnormal working postures. Make sure you stand squarely and keep your balance at all times. In this way, you can
control the electric tool better in unexpected circumstances.
f) Wear suitable work clothes. Do not wear loose clothing or jewellery. Keep hair, clothes and gloves away from moving parts.
Loose clothing, jewellery or long hair can get trapped in moving parts.
g) If vacuuming devices and draining devices can be tted, make sure that these are correctly attached and correctly used.
The use of a dust extraction system can reduce the danger posed by dust.
4. Usage and treatment of the electric tool
a) Do not overload the appliance. Use the correct tool for your work. You will be able to work better and more safely within the
given performance boundaries.
b) Do not use an electric tool with a defective switch. An electric tool that cannot be switched on or off is dangerous and must be
repaired.
c) Pull the plug out of the socket and/or remove the battery before making any adjustments to the appliance, changing
accessories or putting the appliance down. This safety measure prevents starting the electric tool unintentionally.
d) Keep unused electric tools out of the reach of children. Do not allow people who are not familiar with the appliance or who
have not read these instructions to use the appliance. Electric tools are dangerous if they are used by inexperienced people.
e) Clean your electric tool carefully. Check whether moving parts are functioning properly and not jamming, whether parts are
broken or damaged enough that the functioning of this electric tool is affected. Have damaged parts repaired before using the
appliance. Many accidents are caused by badly maintained electric tools.
f) Keep your cutting tools sharp and clean. Carefully maintained cutting tools with sharp cutting edges will jam less and are easier
to control.
g) Make sure to use electric tools, accessories, attachments, etc. in accordance with these instructions. Take the conditions in
your work area and the job in hand into account. Using electric tools for any purpose other than the one for which they are intended
can lead to dangerous situations.
5. Using and handling the cordless tool
a) Only charge the batteries in chargers that are recommended by the manufacturer. A charger that is designed for a certain type
of battery may pose a re risk if it is used with other types of battery.
b) Use only the correct batteries in the electric tools. The use of other batteries may result in injuries and a re risk.
c) Keep unused batteries away from paper clips, coins, keys, nails, screws and other metallic objects that could cause a short
circuit between the contacts. A short circuit between the battery contacts may cause burns or a re.
d) In case of incorrect use, uid may escape from the battery. Avoid contact with it. If you touch it by accident, rinse the
affected area with water. If you get the uid in your eyes, also seek medical advice. Leaking battery uid can cause skin irritation
or burns.
6. Service
a) Have your electric tool repaired only by trained personnel using only genuine spare parts. This will ensure that your electric
tool remains safe to use.
• Before you begin your work, examine the material you want to cut. Remove any foreign bodies. Continue to watch out for foreign
bodies while you are working. If you come across any foreign bodies while cutting, turn off the machine and remove the items in
question.
• Work only when visibility is adequate.
• Make sure you stand squarely at all times while working. Be careful when walking backwards. Tripping hazard!
• Never leave the equipment unsupervised in the work area. If you stop work for a while, leave the equipment in a safe place.
• If you stop your work in order to go to another area to work, you must make sure that the equipment is switched off while you are going
there.
• Never use the equipment while it is raining or in damp or wet surroundings.
• Protect your equipment against moisture and rain.
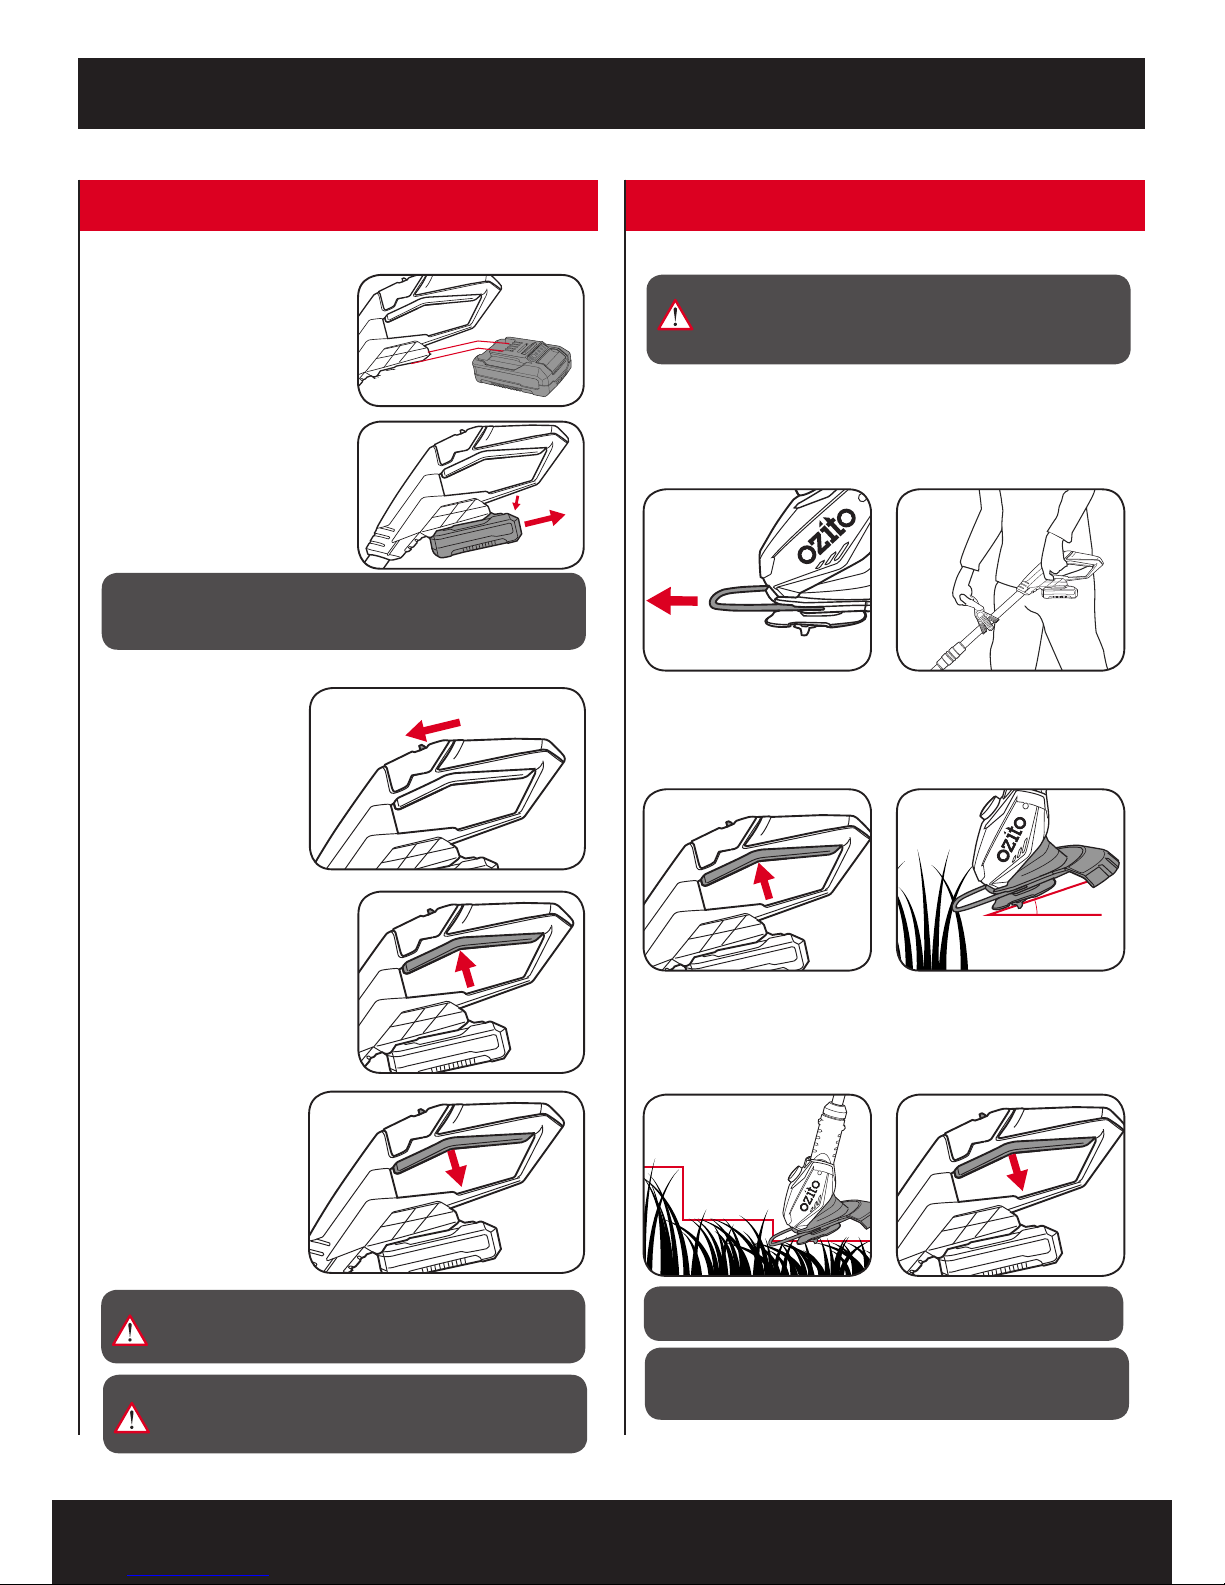
• Before you switch on the equipment, check that the cutting unit will not touch any stones or other objects.
• Always wear suitable working clothes to prevent injuries to the head, hands and feet. For this purpose wear a helmet, safety goggles
(or visor), high boots (or strong shoes and long trousers made of tough fabric) and work gloves.
• When the equipment is in operation, you must always hold it away from your body!
• Do not switch on the equipment when it is turned around or when it is not in working position.
• Switch off the motor when the equipment is not being used, when you leave it unsupervised, when checking the equipment, when
removing or replacing the spool, or when transporting the equipment from one place to another.
• Keep the equipment away from other people, especially children, and from pets. There may be stones and other objects in the grass
that is cut and thrown up.
• When you are working, keep a distance of at least 5 m from other persons and pets.
• Do not cut against hard objects. This will help you to prevent causing injury to yourself and damage to the equipment.
• Use the edge of the safety guard to keep the equipment away from walls, different surfaces and fragile objects.
• Never use the equipment without the safety guard.
• This equipment is not allowed to be used by children or by persons with reduced physical, sensory or mental capacities or those with a
lack of experience and knowledge. Children should be supervised so that they do not play with te equipment. Children are not allowed to
carry out the cleaning or maintenance.
• Avoid abnormal working postures. Make sure you stand squarely and keep your balance at all times. Always maintain good footing on
inclines. Only operate the equipment at a walking pace.
• Risk of injury from dangerous moving parts!
• The moving parts are not allowed to be touched before the battery has been removed and all moving parts have come to a complete
standstill.
• Read the directions with due care. Familiarize yourself with the operator controls and proper operation of the equipment.
• Never allow children or other persons who are not familiar with the operating instructions to use the equipment. Contact your local
governmental agency for information regarding minimum age requirements for the user.
• Always keep in mind that the user of the equipment is personally responsible for accidents or hazards involving other persons or their
property.
• Before use, always carry out a visual check to make sure that the safety devices or covers are not missing or damaged and that they
are correctly tted.
• Never use the equipment in bad weather conditions and particularly never when there is a risk of lightning.
• Never use the equipment with a damaged cover or safety device or when a cover or safety device is missing.
• Switch on the motor only when there are no hands or feet within range of the cutting unit.
• Always switch off the equipment and remove the battery
- when you leave the equipment unsupervised.
- before you remove a blockage.
- before you examine, clean or work on the equipment.
- after the equipment strikes a foreign body.
- when the equipment begins to make unusual vibrations (examine immediately).
• Risk of injury from the cutting unit! Keep hands and feet away from the cutting unit!
• Use only spare parts and accessories which are recommended by the manufacturer.
• Examine and service the equipment regularly.
Important! The safety guard is there to ensure your safety and the safety of others. It is also essential for the
equipment to work correctly. Failure to comply with this instruction will invalidate your warranty as well as create a
potential source of danger.
• Never use your hands to try to stop the cutting unit. Always wait for it to stop by itself.
• Use only genuine cutting units.
• Make sure that the air vents are free of dirt.
• Do not try to use the equipment to cut grass which is not growing on the ground; for example, do not try to cut grass growing on walls
or stones, etc.
• The person operating the grass trimmer is liable for any damages sustained by third parties within the equipment’s working radius as a
result of its use.
• Do not cross roads or gravel paths with the equipment switched on.
• When you are not using the equipment, keep it in a dry place out of the reach of children.
• Use the equipment only in the way described in these operating instructions and always hold it perpendicular to the ground. Every
other position is dangerous.
• Check at regular intervals that the screws are properly tightened.
• The area to be cut must always be kept cleared of cables and other objects.
• If the equipment has to be lifted for transporting, be sure to switch off the motor rst and wait for the cutter to come to a standstill. Each
time you leave the equipment, switch off the motor.
• Under no circumstances are you to cut against hard objects during use. This is imperative to prevent injury to yourself and damage to
the equipment.
• Use only original replacement parts for repairs.
• Before starting up the equipment, and after any collision, check the equipment for signs of wear or damage and have any necessary
repairs carried out
• Always keep your hands and feet away from the cutting unit, especially when switching the motor on.
• Unplug the rechargeable battery before checking, cleaning or doing any work on the equipment and when it is not being used.
• Acquaint yourself with the controls and how to use the tool.
• Stop using the equipment when there are people – particularly children – or pets nearby.
• Never use the machine if protective equipment is damaged or missing.
• Never mount metal cutting elements.
• Electrically powered trimmers should be repaired only by authorized persons.
• Use only spare parts and accessories which are recommended by the manufacturer
Important: The cutting unit continues to run for a few seconds after the motor is switched off .
The cutter continues to rotate!
Do not lose this safety information.
Caution! Read the instruction
manual before starting!
Caution! Wear goggles and
ear muffs!
Caution! Protection from
moisture!
Keep other people
out of area!
The equipment
continues to rotate!
The reprinting or reproduction by any other means,
in whole or in part, of documentation and papers
accompanying products is permitted only with the
express consent of the iSC GmbH.
Subject to technical changes.
Store the battery only in dry rooms with an ambient
temperature of +10°C to +40°C. Place only charged batteries in
storage (charged at least 40%). (not included in delivery)
For use in dry rooms only.
Safety class II
ADDITIONAL SAFETY INSTRUCTIONS
Table of contents
Other Ozito Trimmer manuals

Ozito
Ozito HTE-550 User manual

Ozito
Ozito HTE-550U User manual

Ozito
Ozito Power Xchange PXCGTS-018 User manual

Ozito
Ozito PXC PXHTS-1850 User manual

Ozito
Ozito PHT-410 User manual

Ozito
Ozito PXCHT-6502U User manual

Ozito
Ozito LTR-529U Installation instructions

Ozito
Ozito OZHT460A User manual

Ozito
Ozito HTER-600U User manual

Ozito
Ozito OHT-018 User manual

Ozito
Ozito PXCGSS-018 User manual

Ozito
Ozito 18V Li-ion User manual

Ozito
Ozito LTR-630 User manual

Ozito
Ozito EPHT-500 User manual

Ozito
Ozito PXLTS-1830 User manual

Ozito
Ozito LTR-301 User manual

Ozito
Ozito OZCHT18VA User manual

Ozito
Ozito POWER XCHANGE PXCBLLTC-318 User manual

Ozito
Ozito HTL-072 User manual

Ozito
Ozito HT-501 User manual