Martin XHV Air Cannon User manual

Martin®
XHV Air Cannon
Operator’s Manual
M3404

Important
MARTIN ENGINEERING HEREBY DISCLAIMS ANY LIABILITY FOR: DAMAGE DUE TO
CONTAMINATION OF THE MATERIAL; USER’S FAILURE TO INSPECT, MAINTAIN AND TAKE
REASONABLE CARE OF THE EQUIPMENT; INJURIES OR DAMAGE RESULTING FROM USE OR
APPLICATION OF THIS PRODUCT CONTRARY TO INSTRUCTIONS AND SPECIFICATIONS
CONTAINED HEREIN. MARTIN ENGINEERING’S LIABILITY SHALL BE LIMITED TO REPAIR
OR REPLACEMENT OF EQUIPMENT SHOWN TO BE DEFECTIVE.
Observe all safety rules given herein along with owner and Government standards and regulations. Know
and understand lockout/tagout procedures as defined by American National Standards Institute (ANSI)
z244.1-1982, American National Standard for Personnel Protection - Lockout/Tagout of Energy Sources -
Minimum Safety Requirements and Occupational Safety and Health Administration (OSHA) Federal
Register, Part IV, 29 CFR Part 1910, Control of Hazardous Energy Source (Lockout/Tagout); Final Rule.
The following symbols may be used in this manual:
DANGER
!
Danger: Immediate hazards that will result in severe personal injury or death.
WARNING
!
Warning: Hazards or unsafe practices that could result in personal injury.
CAUTION
!
Caution: Hazards or unsafe practices that could result in product or property damages.
IMPORTANT
Important: Instructions that must be followed to ensure proper installation/operation of equipment.
NOTE
Note: General statements to assist the reader.

Martin Engineering M3404-05/12 iMartin®XHV Air Cannons
Table of Contents
Section Page
List of Figures . . . . . . . . . . . . . . . . . . . . . . . . . . . . . . . . . . . . . . . . . . . . . . . . . . . . . . . . . . . . . . ii
Introduction . . . . . . . . . . . . . . . . . . . . . . . . . . . . . . . . . . . . . . . . . . . . . . . . . . . . . . . . . . . . . . . . 1
General . . . . . . . . . . . . . . . . . . . . . . . . . . . . . . . . . . . . . . . . . . . . . . . . . . . . . . . . . . . . . . . . 1
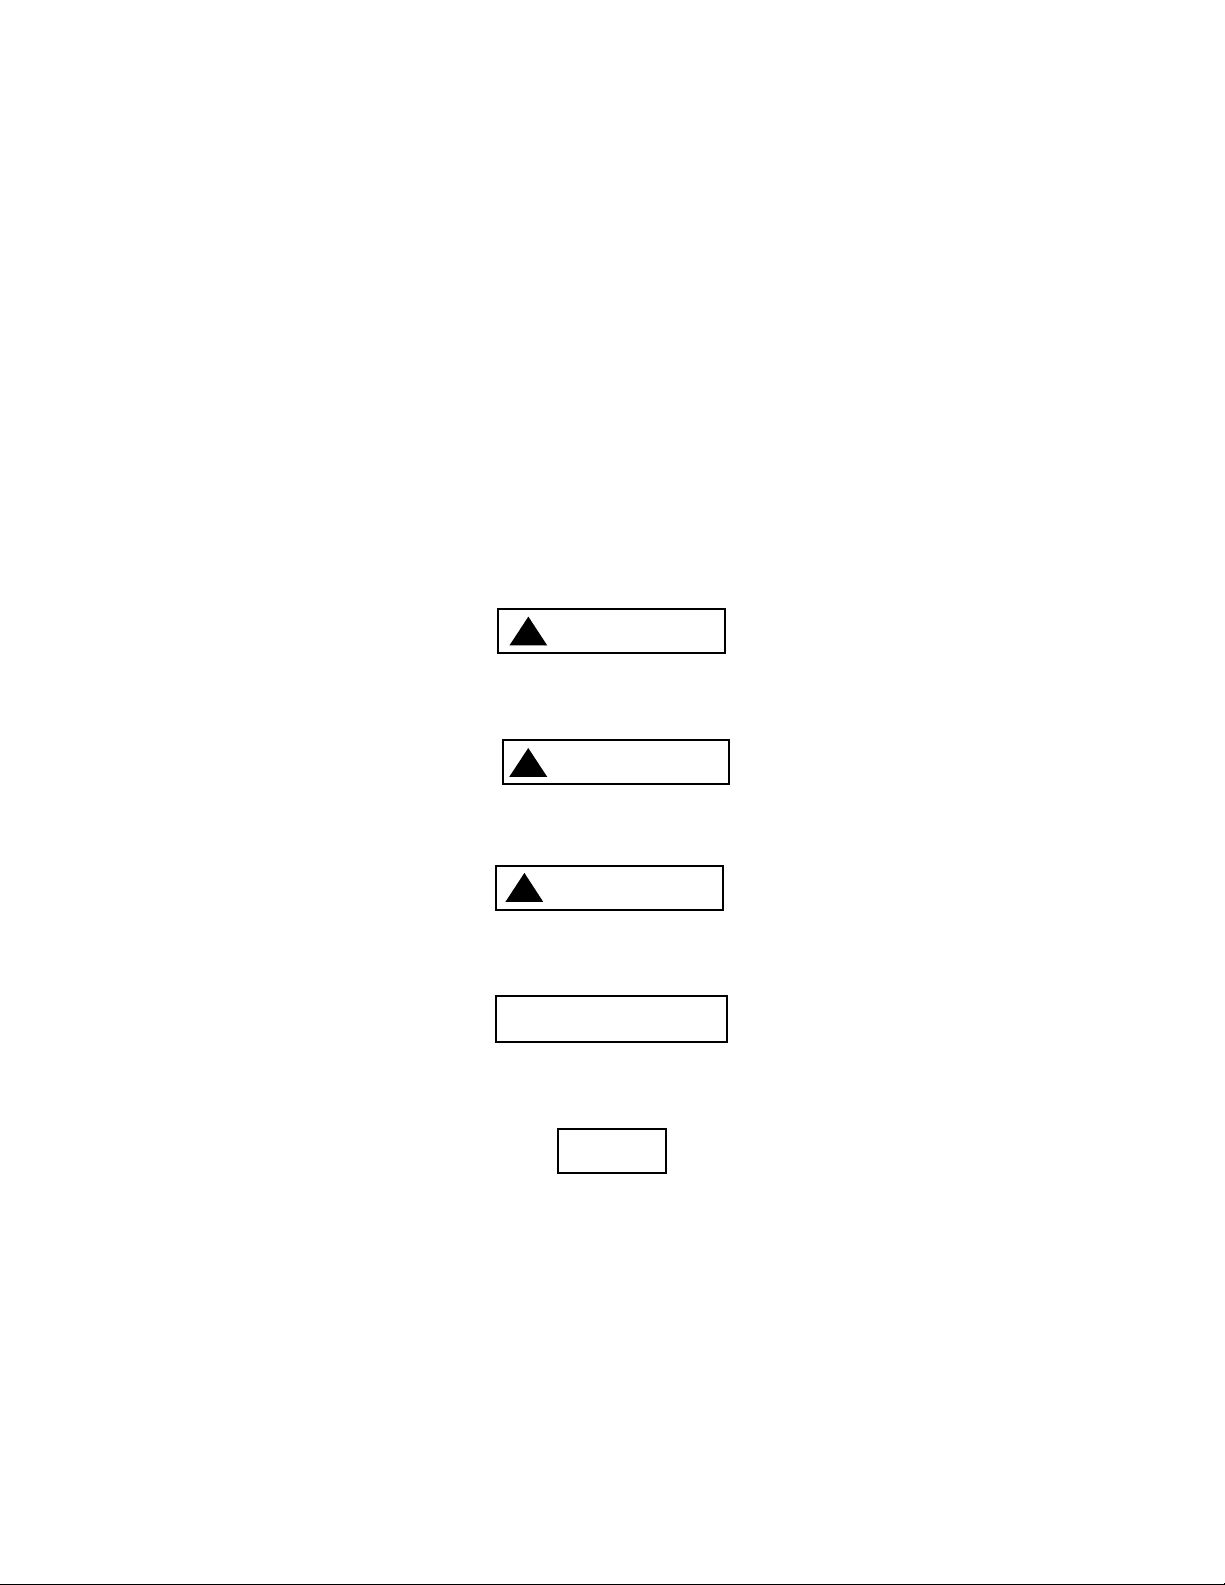
Operation . . . . . . . . . . . . . . . . . . . . . . . . . . . . . . . . . . . . . . . . . . . . . . . . . . . . . . . . . . . . . . 1
Air cannon materials . . . . . . . . . . . . . . . . . . . . . . . . . . . . . . . . . . . . . . . . . . . . . . . . . . . . . 1
Model and serial numbers . . . . . . . . . . . . . . . . . . . . . . . . . . . . . . . . . . . . . . . . . . . . . . . . . 2
Specifications . . . . . . . . . . . . . . . . . . . . . . . . . . . . . . . . . . . . . . . . . . . . . . . . . . . . . . . . . . . 3
Required accessories . . . . . . . . . . . . . . . . . . . . . . . . . . . . . . . . . . . . . . . . . . . . . . . . . . . . . 3
References . . . . . . . . . . . . . . . . . . . . . . . . . . . . . . . . . . . . . . . . . . . . . . . . . . . . . . . . . . . . . 4
Safety . . . . . . . . . . . . . . . . . . . . . . . . . . . . . . . . . . . . . . . . . . . . . . . . . . . . . . . . . . . . . . . . . 4
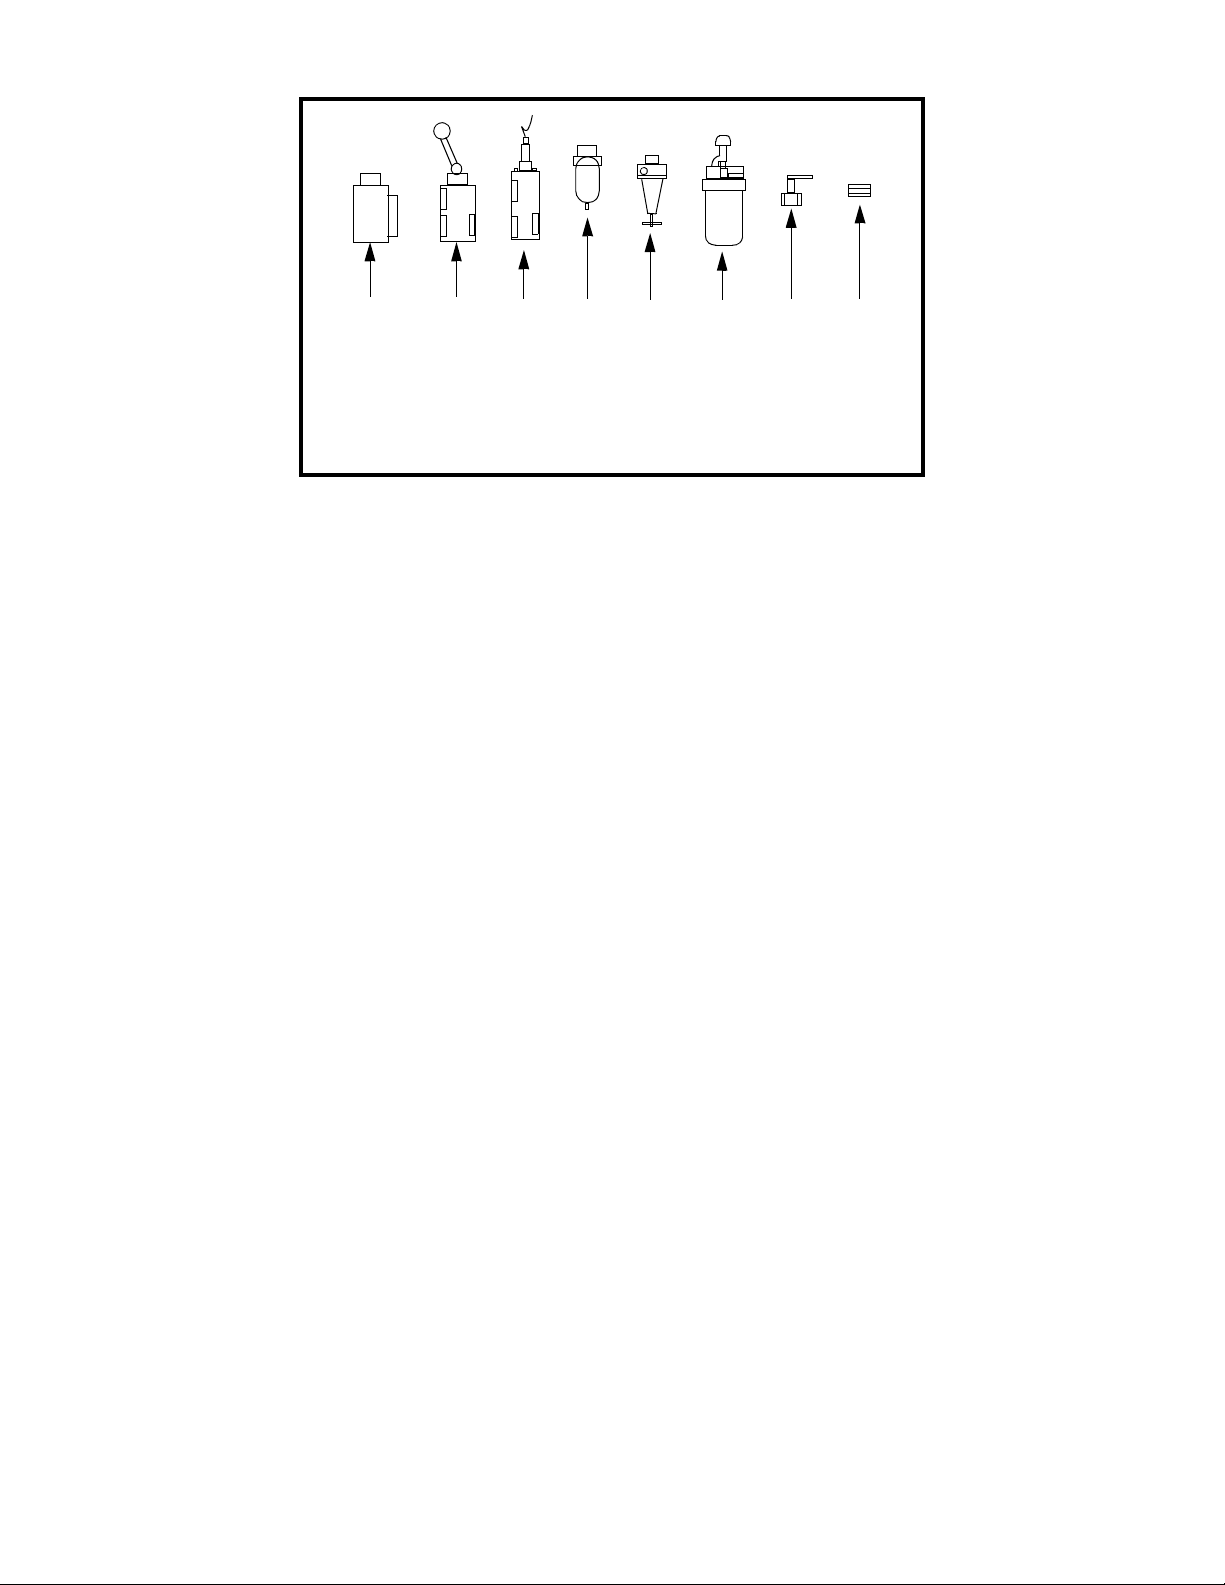
Materials required . . . . . . . . . . . . . . . . . . . . . . . . . . . . . . . . . . . . . . . . . . . . . . . . . . . . . . . 4
Before Installing Air Cannon. . . . . . . . . . . . . . . . . . . . . . . . . . . . . . . . . . . . . . . . . . . . . . . . . . .5
Installing Air Cannon . . . . . . . . . . . . . . . . . . . . . . . . . . . . . . . . . . . . . . . . . . . . . . . . . . . . . . . . 7
Installing mounting plate . . . . . . . . . . . . . . . . . . . . . . . . . . . . . . . . . . . . . . . . . . . . . . . . . . 7
Connecting air cannon to mounting plate . . . . . . . . . . . . . . . . . . . . . . . . . . . . . . . . . . . . . 11
Installing restraining cable . . . . . . . . . . . . . . . . . . . . . . . . . . . . . . . . . . . . . . . . . . . . . . . . . 12
Connecting air supply to air cannon. . . . . . . . . . . . . . . . . . . . . . . . . . . . . . . . . . . . . . . . . . 13
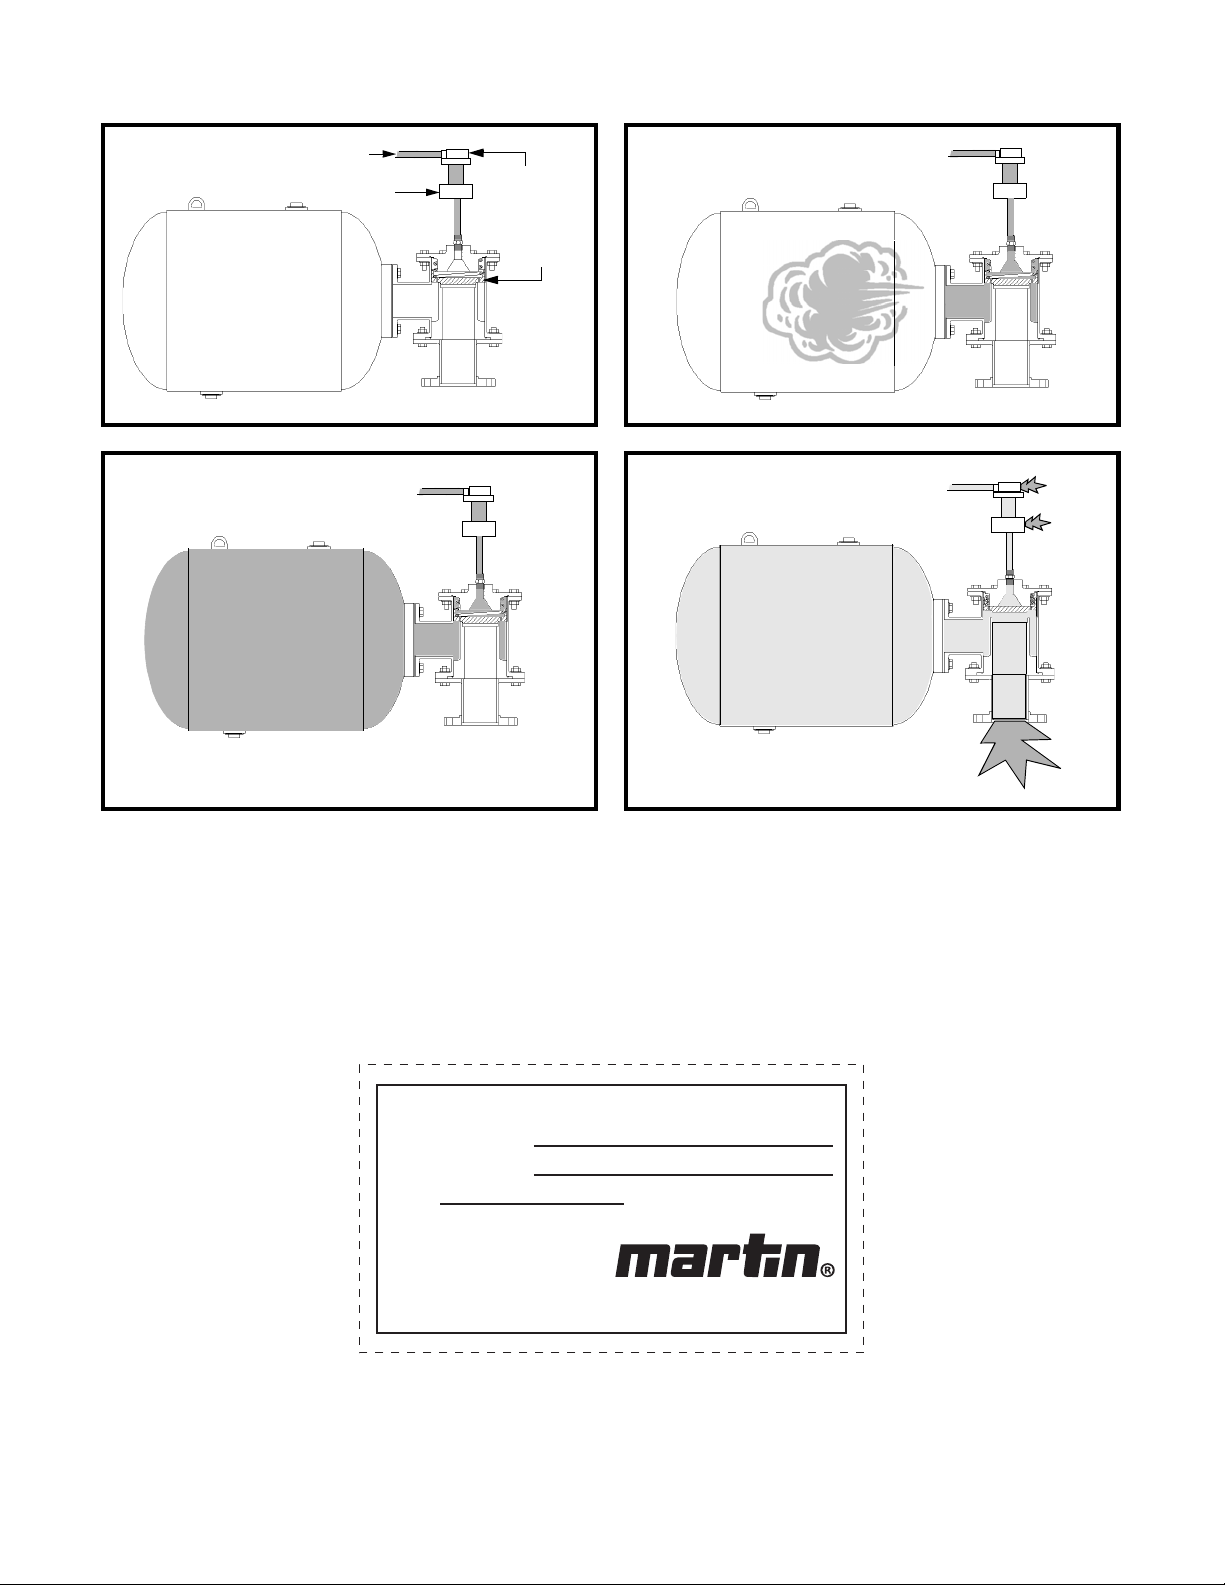
Installing manual valves and electrical solenoid valves . . . . . . . . . . . . . . . . . . . . . . . . . 13
Installing solenoid enclosures. . . . . . . . . . . . . . . . . . . . . . . . . . . . . . . . . . . . . . . . . . . . . 16
After Installing Air Cannon. . . . . . . . . . . . . . . . . . . . . . . . . . . . . . . . . . . . . . . . . . . . . . . . . . . . 19
Maintenance. . . . . . . . . . . . . . . . . . . . . . . . . . . . . . . . . . . . . . . . . . . . . . . . . . . . . . . . . . . . . . . . 21
Every month . . . . . . . . . . . . . . . . . . . . . . . . . . . . . . . . . . . . . . . . . . . . . . . . . . . . . . . . . . . . 21
Every year or 50,000 firings. . . . . . . . . . . . . . . . . . . . . . . . . . . . . . . . . . . . . . . . . . . . . . . . 22
Troubleshooting . . . . . . . . . . . . . . . . . . . . . . . . . . . . . . . . . . . . . . . . . . . . . . . . . . . . . . . . . . . . . 23
Repair. . . . . . . . . . . . . . . . . . . . . . . . . . . . . . . . . . . . . . . . . . . . . . . . . . . . . . . . . . . . . . . . . . . . . 25
Disassembly . . . . . . . . . . . . . . . . . . . . . . . . . . . . . . . . . . . . . . . . . . . . . . . . . . . . . . . . . . . . 25
Inspection . . . . . . . . . . . . . . . . . . . . . . . . . . . . . . . . . . . . . . . . . . . . . . . . . . . . . . . . . . . . . . 26
Assembly . . . . . . . . . . . . . . . . . . . . . . . . . . . . . . . . . . . . . . . . . . . . . . . . . . . . . . . . . . . . . . 26
Part Numbers . . . . . . . . . . . . . . . . . . . . . . . . . . . . . . . . . . . . . . . . . . . . . . . . . . . . . . . . . . . . . . . 28
Martin®XHV Air Cannons . . . . . . . . . . . . . . . . . . . . . . . . . . . . . . . . . . . . . . . . . . . . . . . . 28
Mounting accessories. . . . . . . . . . . . . . . . . . . . . . . . . . . . . . . . . . . . . . . . . . . . . . . . . . . . . 28
Air Control components/kits . . . . . . . . . . . . . . . . . . . . . . . . . . . . . . . . . . . . . . . . . . . . . . . 29
Miscellaneous. . . . . . . . . . . . . . . . . . . . . . . . . . . . . . . . . . . . . . . . . . . . . . . . . . . . . . . . . . . 29
Appendix A. Martin®XHV Air Cannon Specifications . . . . . . . . . . . . . . . . . . . . . . . . . . . . . A-1
Appendix B. Martin®XHV Air Cannon Labels . . . . . . . . . . . . . . . . . . . . . . . . . . . . . . . . . . . B-1
Table of Contents

Martin Engineering M3404-05/12 ii Martin®XHV Air Cannons
List of Figures
Figure Title Page
1 Restricted Material . . . . . . . . . . . . . . . . . . . . . . . . . . . . . . . . . . . . . . . . . . . . 1
2 Air Cannon Charging and Discharging . . . . . . . . . . . . . . . . . . . . . . . . . . . . . 2
3 Serial and Model Number Plate . . . . . . . . . . . . . . . . . . . . . . . . . . . . . . . . . . 2
4 Air Cannon Accessories . . . . . . . . . . . . . . . . . . . . . . . . . . . . . . . . . . . . . . . . 4
5 Standard Mounting Plate . . . . . . . . . . . . . . . . . . . . . . . . . . . . . . . . . . . . . . . . 7
6 30° Mounting Plate . . . . . . . . . . . . . . . . . . . . . . . . . . . . . . . . . . . . . . . . . . . . 8
7 Fan Jet Mounting Plate . . . . . . . . . . . . . . . . . . . . . . . . . . . . . . . . . . . . . . . . . 8
8 Mounting Nozzles/Pipes (High Temp. Applications) . . . . . . . . . . . . . . . . . . 9
9 Installing Mounting Plate (High Temp. Applications) . . . . . . . . . . . . . . . . . 9
10 Riser Duct with Fan Jet Blow Nozzles (High Temp. Applications) . . . . . . . 10
11 Cyclone with High-Temperature Blow Pipes . . . . . . . . . . . . . . . . . . . . . . . . 11
12 Installing Restraining Cable . . . . . . . . . . . . . . . . . . . . . . . . . . . . . . . . . . . . . 12
13 Manual Valve Piping . . . . . . . . . . . . . . . . . . . . . . . . . . . . . . . . . . . . . . . . . . . 14
14 Electrical Solenoid Valve Piping . . . . . . . . . . . . . . . . . . . . . . . . . . . . . . . . . . 14
15 Solenoid Enclosure Piping . . . . . . . . . . . . . . . . . . . . . . . . . . . . . . . . . . . . . . 17
16a Martin®XHV 6” Air Cannon Assembly, P/N 36260-XXXX. . . . . . . . . . . . 30
16b Martin®XHV 6” Air Cannon Assembly Parts List . . . . . . . . . . . . . . . . . . . 31
17a Martin®XHV 4” Air Cannon Assembly, P/N 35132-XXXX. . . . . . . . . . . . 32
17b Martin®XHV 4” Air Cannon Assembly Parts List . . . . . . . . . . . . . . . . . . . 33
18a Martin®XHV 2” Air Cannon Assembly, P/N 35859-XXXX. . . . . . . . . . . . 34
18b Martin®XHV 2” Air Cannon Assembly Parts List . . . . . . . . . . . . . . . . . . . 35
List of Tables
Table Title Page
I Martin®XHV 6” Air Cannon Tank Weldment Part Numbers . . . . . . . . . . . 31
II Martin®XHV 4” Air Cannon Part Numbers. . . . . . . . . . . . . . . . . . . . . . . . . 33
III Martin®XHV 2” Air Cannon Tank Weldment Part Numbers . . . . . . . . . . . 35
List of Figures

Martin Engineering M3404-05/12 1Martin®XHV Air Cannons
Introduction
General The Martin®XHV Air Cannons are pneumatic, bulk material-moving systems
that quickly release compressed air into a storage vessel to restore flow to
material that is clinging (A), bridging (B), rat-holing (C), or arching (D) (see
Figure 1). This manual provides instructions for installing cannons on steel
structures only. For installations on other structures, call Martin Engineering
or a representative.
Figure 1. Restricted Material
Operation The Martin®XHV Air Cannon System consists of one or more air cannons
mounted on a storage vessel. The air cannon charges when the tank is filled
with plant compressed air or nitrogen between 40 psi (2.76 bar) and 120 psi
(8.27 bar) (A, Figure 2) that is controlled by a 3-way normally open solenoid
valve. Air fed through the valve body-mounted quick exhaust valve (QEV)
passes through the piston and into the tank (B). When tank pressure equals
line pressure, airflow is static and the cannon is ready to discharge (C). By
activating the solenoid valve, the air supply is shut off and the air line between
the QEV and solenoid is emptied. This allows the QEV to quickly release the
pressure holding the piston. The piston is instantly forced back by the pressure
stored in the tank which then exits through the discharge pipe, releasing the
energized air pressure stored in the tank. This blast of air is directed through
the discharge pipe and into the storage vessel (D).
Air cannon
materials
The air cannon tank is manufactured to American Society of Mechanical
Engineers (ASME) Code Rules, Section VIII, Division 1. It is National Board
registered, and is pressure vessel quality (PVQ). After the tank is welded,
paint is applied inside the tank to prevent rust and corrosion. Never weld
tank. Welding will melt paint and violate ASME coding.
ABC
D
Introduction

Martin Engineering M3404-05/12 2Martin®XHV Air Cannons
Figure 2. Air Cannon Charging and Discharging
Model and serial
numbers
Each Martin®XHV Air Cannon’s serial and model number is shown on a
plate attached to the tank (see Figure 3). Serial and model numbers must be
referenced when ordering parts from Martin Engineering or representative,
and on all correspondence.
Figure 3. Serial and Model Number Plate
AB
CD
Solenoid
QEV
Plant air
Piston
valve
Martin®Air Cannon
Serial Number
Model Number
Type
800-544-2947 309-852-2384 www.martin-eng.com
U.S. and corresponding
foreign patentspending.
Label P/N 21313
Introduction

Martin Engineering M3404-05/12 3Martin®XHV Air Cannons
Each model number is made up of “BB” followed by three numbers separated
by dashes. The first number indicates discharge pipe diameter, the second
number indicates tank diameter, and the third number indicates tank length
(all in inches). For example, model BB4-12-28 has a nominal discharge
diameter of 4 in. (102 mm), a tank diameter of 12 in. (305 mm), and a tank
length of 28 in. (711 mm).
Specifications Nine different Martin®XHV Air Cannon models are available. Each model is
listed below. The volume of air held in the tank increases with pressure.
Air cannon dimensions, tank volume, fill times, and discharge times are
provided in Appendix A.
Required
accessories
This manual includes instructions for installing accessories required for
Martin®XHV Air Cannons to be fully operational (see Figure 4). The
following accessories can be ordered from Martin Engineering and shipped
separately from air cannons (see “Part Numbers”):
• Quick exhaust valve (A).
• Air control components: manual valve (B) or electrical solenoid valve (C),
air filter (D), air regulator (E), air lubricator (F), lockout ball valve (G), and
check valve (H).
Air Cannon Model Part
Number
BB2-8-12 35859-0812
BB2-8-20 35859-0820
BB4-12-28 35132-1228
BB4-20-30 35132-2030
BB4-24-48 35132-2448
BB4-30-60 35132-3060
BB6-20-30 36260-2030
BB6-24-48 36260-2448
BB6-30-60 36260-3060
Introduction

Martin Engineering M3404-05/12 4Martin®XHV Air Cannons
Figure 4. Air Cannon Accessories
References The following documents are referenced in this manual:
• American National Standards Institute (ANSI) z244.1-1982, American
National Standard for Personnel Protection - Lockout/Tagout of Energy
Sources - Minimum Safety Requirements, American National Standards
Institute, Inc., 1430 Broadway, New York, NY 10018.
• Federal Register, Volume 54, Number 169, Part IV, 29 CFR Part 1910,
Control of Hazardous Energy Source (Lockout/Tagout); Final Rule,
Department of Labor, Occupational Safety and Health Administration
(OSHA), 32nd Floor, Room 3244, 230 South Dearborn Street,
Chicago, IL 60604.
•The National Electrical Code (NEC) Handbook, National Fire Protection
Association, 1 Batterymarch Park, P.O. Box 9101, Quincy MA 02269-9101.
• ICS 1-1988, General Standards for Industrial Control and Systems, and
250-1985, Enclosures for Electrical Equipment (1000 Volts Maximum),
National Electrical Manufacturers Association (NEMA), 2101 L Street
N.W., Washington, D.C. 20037.
•Section VIII, Rules for Construction of Pressure Vessels, Division 1,
American Society of Mechanical Engineers, United Engineering Center,
345 East 47th Street, New York, NY 10017.
Safety All safety rules defined in the above documents, and all owner/employer
safety rules, must be strictly followed when installing and servicing this
equipment.
Materials required Materials other than standard hand tools that are required to complete tasks
are listed where applicable.
D HCA GE F
B.
C.
D.
E.
F.
G.
H.
Manual valve
Electrical solenoid valve
Air filter
Air regulator
Air lubricator
Lockout ball valve
Check valve
B
Quick exhaust valveA.
Introduction

Martin Engineering M3404-05/12 5Martin®XHV Air Cannons
Before Installing Air Cannon
IMPORTANT
The delivery service is responsible for damage occurring in
transit. Martin Engineering CANNOT enter claims for
damages. Contact your transportation agent for more
information.
1. Inspect shipping container for damage. Report damage to delivery service
immediately and fill out delivery service’s claim form. Keep any damaged
goods subject to examination.
2. Remove air cannon from shipping container. Equipment in container
should include the following:
• Air cannon, relief valve, and pipe nipple.
• Air Blast Warning Label, P/N 31913.
• Lockout Valve Warning Tag, P/N 35146.
3. If you ordered accessories from Martin Engineering, remove from
shipping container. Equipment in container may include the following:
• Quick exhaust valve.
• Air control components: manual valve or electrical solenoid valve, air
filter/regulator/lubricator, air supply line, lockout ball valve, and check
valve.
4. If anything is missing, contact Martin Engineering or representative.
WARNING
!
Before installing air cannon, lock out/tag out any equipment
that is loading or unloading material from the storage vessel.
5. Turn off and lock out/tag out energy source to accessory equipment
according to ANSI standards (see “References”).
WARNING
!
If equipment will be installed in an enclosed area, test gas level
or dust content before using a cutting torch or welding. Using
a cutting torch or welding in an area with gas or dust may
cause an explosion.
6. If using a cutting torch or welding, test atmosphere for gas level or dust
content.
Before Installation

Martin Engineering M3404-05/12 6Martin®XHV Air Cannons
CAUTION
!
When blasting into closed storage vessel, exhaust vents must
be considered to prevent internal vessel air pressure from
increasing to point where it may damage vessel.
7. When blasting into closed storage vessel, consider exhaust vents to
prevent internal vessel air pressure from increasing to point where it may
damage vessel. Calculate temporary vessel pressure after air cannon
discharge with the following equation:
If calculated pressure is greater than 0.5 psi (.034 bar), install exhaust
vents to avoid damage to storage vessel. Observe local and state codes,
which may specify limits less than 0.5 psi (.034 bar).
IMPORTANT
Air cannon force output can vary depending on inlet pressure,
discharge opening size, structure size, material in structure,
and other factors. To determine maximum force output values
for your application, call Martin Engineering.
8. If you need to know air cannon maximum force output for your
application, call Martin Engineering.
Ppressure in air cannon air cannon volume×
air cannon volume unoccupied volume of vessel+
-------------------------------------------------------------------------------------------------------------------------=
Before Installation

Martin Engineering M3404-05/12 7Martin®XHV Air Cannons
Installing Air Cannon
IMPORTANT
Read entire section before beginning work.
To install air cannon, follow the procedures in this section corresponding to
the following steps:
1. Install mounting plate.
2. Connect air cannon to mounting plate.
3. Install restraining cable.
4. Connect air supply to air cannon. See “Installing manual valves and
electrical solenoid valves” or “Installing solenoid enclosures,” as
applicable.
Installing
mounting plate
Materials Required: Mounting plate or seal plate and support structure.
NOTE
If you are unsure where to locate air cannon(s) on your storage
vessel, contact Martin Engineering or your representative.
1. Mark location for each air cannon on storage vessel.
2. For internal storage vessel temperatures under 500°F (260°C), install
standard (30°) or fan jet mounting plate on vessel as follows:
a. If using a standard mounting plate (Figure 5), cut a round hole
4-5/8 in. (117 mm) in diameter in storage vessel for each mounting
plate. Place short nipple into hole and field weld mounting plate to
vessel skin.
Figure 5. Standard Mounting Plate
Short nipple
Vessel skin
Installation

Martin Engineering M3404-05/12 8Martin®XHV Air Cannons
b. If using a 30° mounting plate (Figure 6), cut a hole in storage vessel
for each mounting plate using templates on last page of this manual. If
templates are missing, contact Martin Engineering or representative.
Place mounting plate over hole and field weld to vessel skin.
Figure 6. 30° Mounting Plate
c. If using a fan jet mounting plate (Figure 7), cut a round hole in storage
vessel for each mounting plate or use template on last page of this
manual. Slide nipple through hole from inside. Field weld inside plate
and nipple to vessel wall.
d. Go to “Connecting air cannon to mounting plate.”
Figure 7. Fan Jet Mounting Plate
Vessel skin
Inside plate
Nipple
Vessel wall
Installation

Martin Engineering M3404-05/12 9Martin®XHV Air Cannons
3. For internal storage vessel temperatures of 500°F (260°C) or higher,
install XHV blow pipe and fan jet angle nozzle, fan jet blow nozzle, or
high-temperature blow pipe (Figure 8) on vessel as follows:
a. If using fan jet angle nozzle, contact Martin Engineering.
Figure 8. Mounting Nozzles/Pipes (High-Temperature Applications)
b. If using fan jet blow nozzle, do the following:
(1) Cut a 15-in. (381 mm) by 6-in. (152 mm) hole in skin and
refractory (A, Figure 9) (if present).
(2) If using high-temperature blow pipe, field weld onto fan jet blow
nozzle.
Figure 9. Installing Mounting Plate (High-Temperature Applications)
Fan jet blow nozzle
Fan jet angle nozzle
High-temperature blow pipe XHV blow pipe
A
EC
B
D
F
A.
B.
C.
D.
E.
F.
Refractory
Fan jet blow nozzle
Seal plate
Cut-out refractory
XHV blow pipe
Support structure
G. Companion flanges
G
Installation

Martin Engineering M3404-05/12 10 Martin®XHV Air Cannons
(3) Insert fan jet blow nozzle (B) in hole with nozzle face flush with
refractory lining surface. Position fan jet blow nozzle to sweep
adjacent wall when cannon discharges (see Figure 10).
Figure 10. Riser Duct with Fan Jet Blow Nozzles (High-Temperature Applications)
(4) Install 1/4-in. (6 mm) thick by 17-in. (432 mm) long by 8-in.
(203 mm) wide seal plate (C, Figure 9) over fan jet blow nozzle
opening.
(5) Field weld seal plate to vessel skin.
(6) Field weld fan jet blow nozzle to seal plate.
(7) Pack new refractory into hole that you cut out (D) in step 3.b(1) to
seal around fan jet blow nozzle.
(8) Field weld XHV blow pipe to high-temperature blow pipe (if
using) or fan jet blow nozzle.
(9) Go to step 3.d.
IMPORTANT
XHV blow pipe can be installed alone as described in step 3.c.
However, if using high-temperature blow pipe, also install
XHV blow pipe as described in step 3.c.(5).
c. If using high-temperature blow pipe and/or XHV blow pipe, do the
following:
(1) Cut a 5-in. (127 mm) round hole in skin and refractory
(A, Figure 9) (if present).
(2) Insert blow pipe (B) in hole with pipe end flush with refractory
lining surface. Position blow pipe to sweep walls when cannon
discharges (see Figure 11).
(3) Install 1/4-in. (6 mm) thick by 8-in. (203 mm) long by 8-in.
(203 mm) wide seal plate (C, Figure 9) over blow pipe opening in
one of the following ways:
(a) Cut seal plate in half and fit around blow pipe.
(b) Cut a 5-in. (127 mm) round hole in seal plate and install over
end of blow pipe.
Installation

Martin Engineering M3404-05/12 11 Martin®XHV Air Cannons
(4) Field weld seal plate to vessel skin.
(5) Field weld blow pipe to seal plate.
Figure 11. Cyclone with High-Temperature Blow Pipes
(6) Pack new refractory into hole that you cut out (D) in step 3.c(1) to
seal around high-temperature blow pipe.
(7) If using high-temperature blow pipe, field weld XHV blow pipe to
high-temperature blow pipe.
d. Go to “Connecting air cannon to mounting plate.”
Connecting air
cannon to
mounting plate
1. Thread (and weld, if desired) one companion flange (G, Figure 9) to XHV
blow pipe and other companion flange to XHV discharge weldment.
2. Bolt flange on discharge weldment to flange on blow pipe.
3. Position tank with inspection ports downward to provide maximum
drainage.
4. Go to “Installing restraining cable.”
Installation

Martin Engineering M3404-05/12 12 Martin®XHV Air Cannons
Installing
restraining cable
WARNING
!
If air cannon is mounted more than 6 in. (152 mm) above
ground, install restraining cable to secure air cannon to
storage vessel. Without restraining cable, air cannon could fall
and cause injury.
Do not use restraining cable to mount air cannon to storage
vessel wall. Purpose of restraining cable is to keep air cannon
from falling should it come loose from vessel wall, not as
primary means of securing air cannon to wall.
CAUTION
!
Do not use angle iron or support ring to secure air cannon
rigidly to storage vessel. If restrained too rigidly, tank cannot
flex and cannon can fail.
1. Weld D-ring (A, Figure 12) onto storage vessel (B) with 1/4-in. (6-mm)
field weld.
Figure 12. Installing Restraining Cable
2. Insert wire rope (C) through D-ring on storage vessel, making a 3-in.
(76-mm) loop. If wire rope supplied with air cannon is not long enough,
loop and clamp it to an additional cable and attach additional cable to air
cannon.
3. Clamp wire rope with one cable clamp (D) as close to loop as possible.
Place another cable clamp 1-3/4 in. (44 mm) from first clamp.
4. Leave at least 1 in. (25 mm) of wire rope on dead end.
5. Gradually tighten nuts alternately and evenly to 15 ft-lbs. Leave 2 to 3 in.
(51 to 76 mm) slack in wire rope.
6. Go to “Connecting air supply to air cannon.”
3.00
1.75
(76)
(44)
A.
B.
C.
D.
D-ring
Vessel
Wire rope
Cable clamp (2)
A
D
B
C
Installation

Martin Engineering M3404-05/12 13 Martin®XHV Air Cannons
Connecting air
supply to air
cannon
IMPORTANT
Read entire section before beginning work.
CAUTION
!
When pressure in the storage vessel is 4 psi (0.28 bar) or more,
apply equal or greater pressure to the air cannon inlet.
Absence of inlet pressure will allow material in the storage
vessel to enter the air cannon and contaminate the valve body
and tank.
Installing manual valves and electrical solenoid valves
Materials Required:
• Air filter/regulator/lubricator (1/2-in. NPT).
• Bushing (1/2-in. by 3/4-in.).
• Check valve (1/2-in. NPT).
• Lockout ball valve (1/2-in. NPT).
• Manual 3-way valve or electrical solenoid valve (1/2-in.).
•Martin
®Air Motor Oil.
• Pipe (1/2-in. NPT).
• Quick exhaust valve (1-in.).
• 90° street elbow (optional for quick exhaust valve—1-in.).
• 90° street elbow (optional for manual or electrical solenoid valves—3/4-in.).
IMPORTANT
To prevent leaking, apply pipe sealant to all fittings. Air
cannon will discharge randomly if leaks are present.
1. Apply pipe sealant to all fittings.
WARNING
!
Use ASME-approved relief valve only (supplied with XHV Air
Cannon).
2. Remove dust cap from tank inspection port and install relief valve
(A, Figure 13 or 14). Make sure other inspection ports are tightly plugged.
Installation

Martin Engineering M3404-05/12 14 Martin®XHV Air Cannons
Figure 13. Manual Valve Piping
Figure 14. Electrical Solenoid Valve Piping
B.
C.
D.
E.
F.
G.
Hex nipple
1-in. 90° street elbow
Quick exhaust valve
Manual 3-way valve
Bushing
1/2-in. pipe
H.
J.
K.
L.
M.
3/4-in. 90° street elbow
Air filter/regulator/lubricator
Lockout ball valve
Check valve
Air supply
A. Relief valve
D
C
E
J
G
KL
F
H
M
A
B
(not to scale)
B.
C.
D.
E.
F.
G.
Hex nipple
1-in. 90° street elbow
Quick exhaust valve
Electrical solenoid valve
Bushing
1/2-in. pipe
H.
J.
K.
L.
M.
3/4-in. 90° street elbow
Air filter/regulator/lubricator
Lockout ball valve
Check valve
Air supply
A. Relief valve
D
C
E
J
H
KL
FM
G
B
(not to scale)
A
Installation

Martin Engineering M3404-05/12 15 Martin®XHV Air Cannons
WARNING
!
Make sure exhaust port on quick exhaust valve is pointed
downward so that dirt cannot enter, and exhaust port is not
directed at personnel. Martin Engineering recommends
installing a 90° street elbow on quick exhaust valve exhaust
port and on manual or electrical solenoid valve exhaust ports
to prevent dirt from entering.
3. If using optional 90° street elbow (C) for quick exhaust valve, thread it
into quick exhaust valve exhaust port (D).
4. Thread quick exhaust valve outlet port (with exhaust port pointed down)
onto hex nipple and tighten.
IMPORTANT
Manual valves or electrical solenoid valves distributed by
Martin Engineering, which are made especially for this air
cannon, are recommended. Substitute valves may not work as
effectively.
Use any length pipe to connect air filter/regulator/lubricator
to check valve. Use 1/2-in. pipe only. Locate manual valve or
electrical solenoid valve within 15 ft (4-1/2 m) of air cannon.
5. Choose location for manual 3-way valve (E, Figure 13) or electrical
solenoid valve (E, Figure 14).
6. Install bushing (F, Figure 13 or 14) into quick exhaust valve inlet port.
7. Connect manual 3-way valve or electrical solenoid valve outlet port to
bushing/quick exhaust valve inlet port with no more than 15 ft (4-1/2 m)
of 1/2-in. pipe (G).
8. Install 90° street elbow (H) for manual 3-way valve or electrical solenoid
valve into valve exhaust port.
NOTE
Look at arrow on side of FRL, check valve, and lockout ball
valve to make sure flow is correct.
9. Connect air filter/regulator/lubricator (J) and manual 3-way valve or
electrical solenoid inlet port with desired length 1/2-in. pipe.
IMPORTANT
OSHA requires installation of a lockout ball valve (see
“References”).
10. Connect lockout ball valve (K) to air filter/regulator/lubricator with
desired length 1/2-in. pipe. Look at arrow on side of ball valve to make
sure flow is correct.
11. Fill lubricator with Martin®High-Temperature Oil. Set lubricator to
release one drop per hour.
12. Connect check valve (L) to lockout ball valve with desired length 1/2-in.
pipe. Look at symbol on side of check valve to make sure flow is correct.
Installation

Martin Engineering M3404-05/12 16 Martin®XHV Air Cannons
IMPORTANT
For electrical solenoid valve installations, design and wire
electrical solenoid controls according to NEC Handbook.
Electrical push buttons, timers, and programmable
controllers are available through Martin Engineering.
13. For electrical solenoid valve installations, if using electrical solenoid
controller, install according to instructions provided with controller.
WARNING
!
Do not exceed 125 psi (8.62 bar) maximum working pressure
or pressure relief valve will open. Minimum recommended
pressure for most applications is 80 psi (5.52 bar) but lower
pressures can be used. Make sure air supply is filtered and
regulated.
NOTE
Pressure relief valves of up to 150 psi are available from
Martin Engineering. Consult the Maximum Allowable
Working Pressure (MAWP) on tank's name plate before
substituting a different pressure relief valve. Never use a
pressure relief valve with a set pressure that is higher than the
MAWP of the tank.
WARNING
!
Pressure relief valve may relieve at any point between 90%
and 100% of set pressure. Exceeding MAWP can cause tank to
rupture.
14. Connect air supply (M) to check valve.
15. Anchor all pipes and wires to prohibit movement.
16. Operate air cannon as described under “After Installing Air Cannon.”
Installing solenoid enclosures
Materials Required:
• Air filter/regulator/lubricator (1/2-in. NPT).
• Bushing (3/4-in. to 3/8-in. NPT).
• Check valve (1/2-in. NPT).
• Controller.
• Lockout ball valve (1/2-in. NPT).
• Male adapter fittings (3/8-in. Tubing to 3/8-in. NPT).
• Solenoid enclosure.
•Martin
®High-Temperature Oil.
• Pipe (1/2-in. NPT).
• Quick exhaust valve (1-in.).
• Stainless steel tubing (3/8-in.).
• 90° street elbow (optional for quick exhaust valve—1-in.).
Installation
Table of contents
Other Martin Control Unit manuals
Popular Control Unit manuals by other brands

urmet domus
urmet domus 2 VOICE 1083/69 manual

Kentec Electronics
Kentec Electronics Syncro Si product manual

Cabletron Systems
Cabletron Systems MCC-DFL quick reference

Epson
Epson RX8900SA/CE Applications manual

Texas Instruments
Texas Instruments ADC12DJ5200RF user guide

Tektronix
Tektronix KEITHLEY 7700 instructions