manuals.online logo
Brands
  1. Home
  2. •
  3. Brands
  4. •
  5. Masson
  6. •
  7. Floodlight
  8. •
  9. Masson MFL TORANT 231078 User manual

Masson MFL TORANT 231078 User manual

Installation Instructions
1 | P a g e v 1 . 1 ( 1 2 / 2 0 1 8 )
TORANT LED FLOOD LIGHT
SKU# 231078, 231079
Rated Voltage 220-240V~ 50Hz
Thank you for purchasing this quality MFL product. To ensure correct function and safety, please read and follow all
instructions carefully before assembly, installation and use of this product. Please keep instructions for future reference.
Warranty
•This luminaire is covered by a 3 year warranty. The warranty is from date of purchase, not the date of installation.
•If the luminaire is not assembled and installed by a licensed electrician the warranty will be void.
•Please retain proof of purchase and evidence of assembly and installation by a licensed electrician.
•Warranty will be void if there is any damage due to improper usage or modification to the luminaire.
•Failure to comply with the instructions in this manual may increase the risk of damage or injury and will void warranty.
•The use of non-tested dimmers may damage your LED luminaire and will void your warranty.
Installation Requirements
•This luminaire must be assembled and installed by a licensed electrician.
•All wiring and installation of the luminaire must adhere to latest local and national wiring rules.
eg. AS/NZS 3000 Electrical installations.
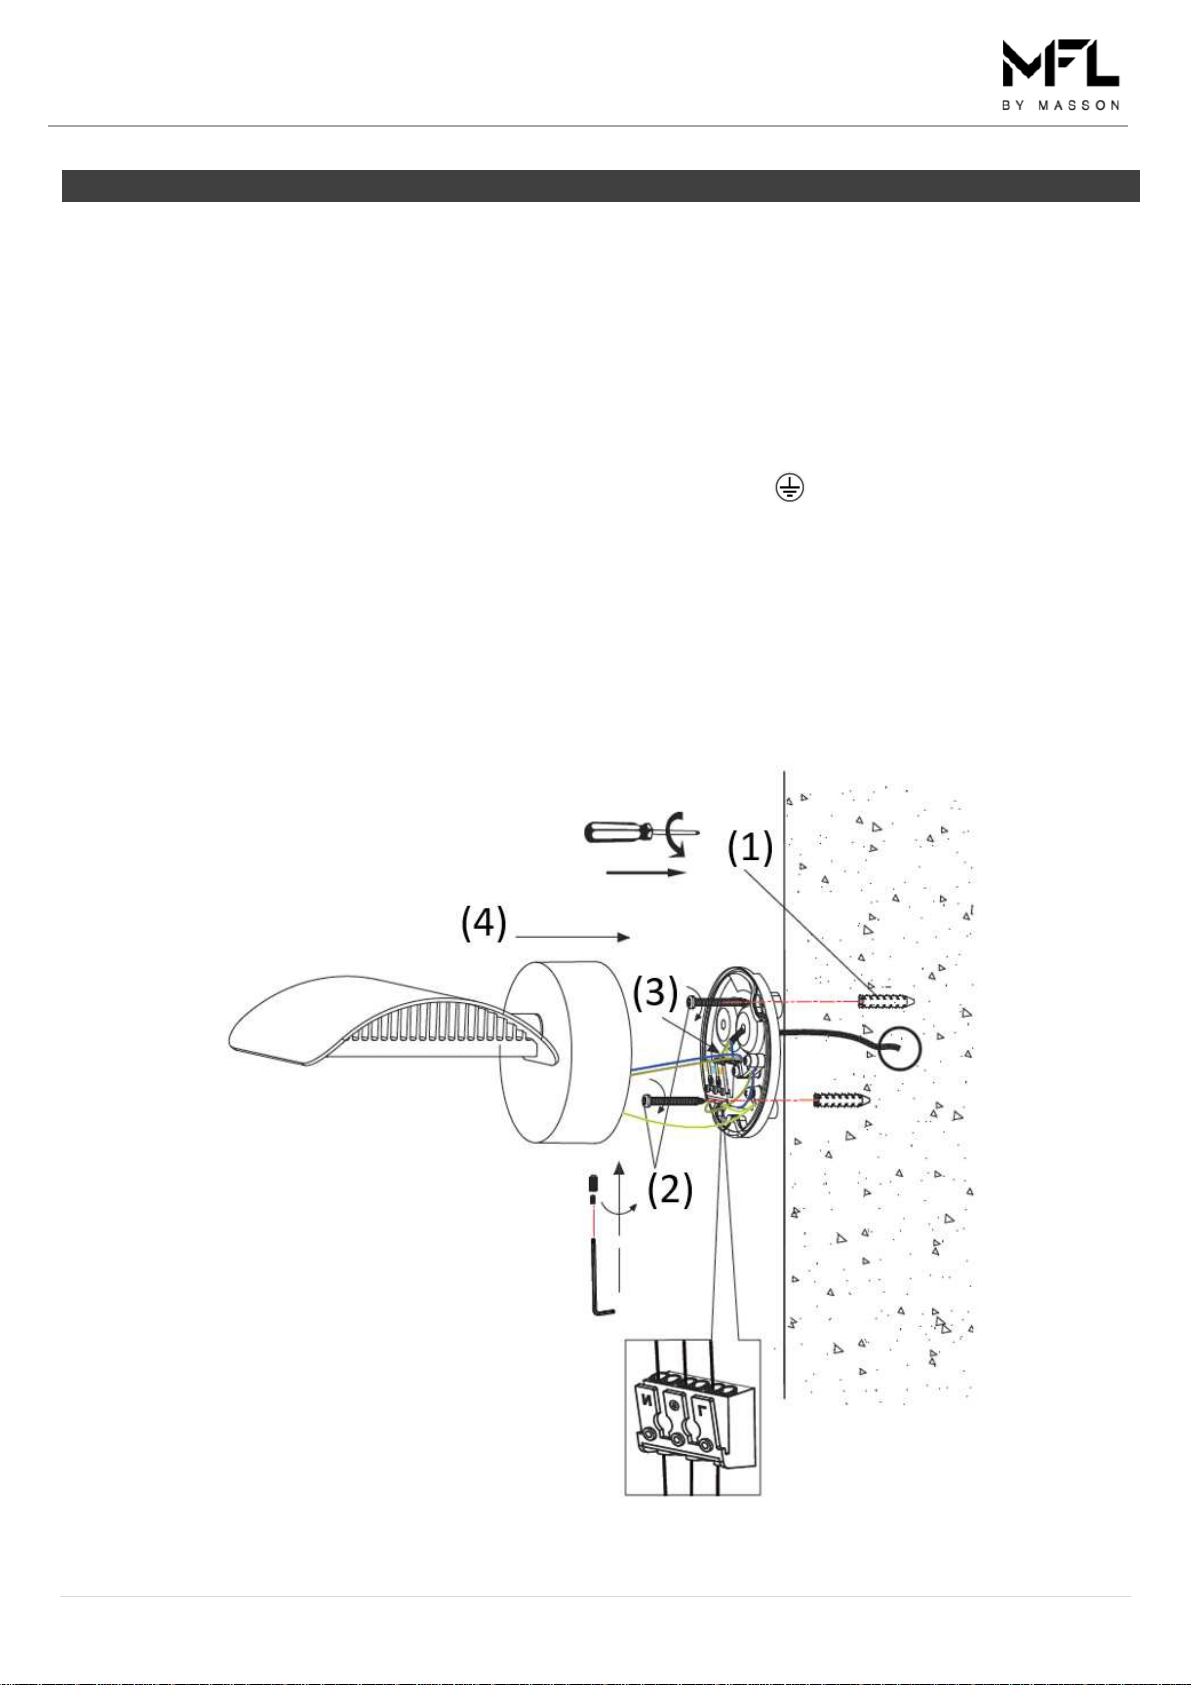
•This luminaire is a Class I product and must be earthed.
•Select a suitable location for installation:
- This fitting is protected against water penetration to IP65 standards, which is against low pressure jets of water
from all practicable direction. This must be maintained during installation.
- It is suitable for indoor or outdoor use.
- The mounting point must support 2 times the weight of the fitting.
•This luminaire is dimmable and has been tested at the date of publication with the dimmers listed in the specification
section. The use of a LED dimmer such as the Lucci LEDlux SKU# 290998 dimmer is highly recommended.
•NOTE: For the best dimming range, use with the Lucci LEDlux SKU# 290998 dimmer and adjust the variable
resistor at minimum and maximum dimming positions on the dimmer during the installation.
•NOTE: Dimming may cause buzzing sounds or a slight flicker. There may be slight delays with the LED light start up
or slight uneven light performance when more than one LED luminaire is linked together, switched ON or dimmed.
This is not a product fault and as such is not covered under warranty.
•NOTE: Some dimmers have a minimum load of 20W. Ensure the dimmer position is on the maximum setting before
turning on the LED light and adjust the dimmer down to your desired light level.
•NOTE: Testing cannot account for installation variables such as variation in mains supply voltage, cable
capacitance, electrical noise, transients, surges and ripple control signals (commonly found in NSW & QLD).
•Take care not to pull any electrical wires during unpacking as this may damage the connection.
•
Lay out all the components on a smooth surface and make sure there are no components missing before assembling.
If parts are missing, return the complete product to the place of purchase for inspection or replacement.
•Check whether the luminaire has been damaged during transport. Do not operate/install any product which appears
damaged in any way. Return the complete product to the place of purchase for inspection, repair or replacement.
•Ensure power to the circuit you are working on has been switched OFF before commencing any electrical work.
Installation Instructions
2 | P a g e v 1 . 1 ( 1 2 / 2 0 1 8 )
Installation Directions
1. Remove all packaging material from the product and be careful not to throw away accessories that may be hidden
within the packaging material. If assembly is required, lay the luminaire on a smooth non-scratch surface.
2. Use the mounting bracket as a template to mark the position of the holes onto the ceiling. Drill holes into the wall and
place the plastic anchors into the holes. (Step 1)
3. Secure the mounting bracket onto the wall with the screws provided. Ensure the screws and anchors used are
suitable for the mounting surface and the surrounding environment. (Step 2)
4. Connect the mains supply wire to the terminal block. (Step 3)
Mains Supply Wire Luminaire Wire / Terminal block
Earth – Yellow/Green Yellow/Green or
Neutral – Blue or Black Blue or N
Live – Brown or Red Brown or L
Ensure the wires are secure and no bare wires are exposed.
NOTE: It is recommended that a non-corrosive bead of silicone be applied before installation onto the wall
ensuring that no water can run down into the cabling.
5. Install the main body on the mounting bracket by tightening the screw with the provided allen key. (Step 4)
6. After the installation, switch on the luminaire to test and enjoy your new lighting product.
Installation Instructions
3 | P a g e v 1 . 1 ( 1 2 / 2 0 1 8 )
Troubleshooting
PROBLEM POSSIBLE CAUSE SUGGESTED SOLUTION
Does not work.
(New installation) Wiring loose or no power to the luminaire. Check your circuit breaker/safety switch
box turn on power to your circuit.
Does not work.
(Existing installation) No power to the luminaire.
Check your circuit breaker/safety switch
box and turn on power to your circuit.
Contact your nearest Beacon Lighting
store.
Flickers when dimming.
(New installation)
Non-tested dimmer used. Check the dimmer used. Ensure the
dimmer used is on the list of tested
dimmers in this manual.
Some dimmers have a variable loading
adjustment function.
eg. Lucci LEDlux SKU# 290998 dimmer.
This may not have been adjusted during the
installation of the dimmer.
The variable resistor needs to be
adjusted to suit the luminaire load to
reduce the flickering.
Flickers when dimming.
(Existing installation) Dimmer position on low.
Ensure the dimmer position is on the
maximum setting before turning on the
luminaire and adjust the dimmer down to
your desired light level.
Buzzing sound. Non-tested dimmer used. Check the dimmer used. Ensure the
dimmer used is on the list of tested
dimmers in this manual.
Uneven light start up. Dimmer position on low when switched on.
Ensure the dimmer position is on the
maximum setting before turning on the
luminaire and adjust the dimmer down to
your desired light level.
Safety Tips
•Always ensure the power is OFF and the fitting has cooled down before performing any maintenance, cleaning,
changing the globe or making any adjustment to the fitting.
•To avoid injury or damage to the fitting, ensure that power leads and screws are secure before connecting the power.
•The fitting must not be used if the shade has been cracked.
•The LEDs are not replaceable and there are no serviceable parts, do not attempt to dismantle or open the product.
•Ensure that the fitting does not come in contact with corrosive chemicals/solvents or abrasive cleaners etc.
•To clean, wipe with a damp clean cloth. Do NOT soak or immerse the product in water or other liquids.
Installation Instructions
4 | P a g e v 1 . 1 ( 1 2 / 2 0 1 8 )
Specifications
SKU # 231078 231079
Colour White Sandy Anthracite
Rated Voltage 220-240V~ 50Hz
Rated Wattage 15W
IP Rating IP 65
LED Specs 950 Lumens, 3000K,
CRI:80, Dimmable
Dimmer
Information
Highly Recommended Dimmers:
Lucci LEDlux SKU# 290998
Tested Dimmers:
Buster & Punch Dim-002, Clipsal 31E2RUDM, 31E2PUDM, 32E450UDM, 32E450TM and
32ELEDM, HPM Cat. 400T
Weight 1.1kg
Dimensions H:95mm W:130mm Ext:144 mm

This manual suits for next models

1

Popular Floodlight manuals by other brands

Flash F7000598 user manual

Flash

Flash F7000598 user manual

EuroLite 5010030A user manual

EuroLite

EuroLite 5010030A user manual

Velleman PEREL LEDA500 W-B Series user manual

Velleman

Velleman PEREL LEDA500 W-B Series user manual

Saxby Lighting 48742 Instruction leaflet

Saxby Lighting

Saxby Lighting 48742 Instruction leaflet

Lithonia Lighting OLF 2SH 40K 120 installation instructions

Lithonia Lighting

Lithonia Lighting OLF 2SH 40K 120 installation instructions

Core Lighting Point 30 user manual

Core Lighting

Core Lighting Point 30 user manual

Briteq STAGE BEAMERRGB MK2 user manual

Briteq

Briteq STAGE BEAMERRGB MK2 user manual

Glamox FL60 Series operating instructions

Glamox

Glamox FL60 Series operating instructions

Beghelli PLANEX instruction manual

Beghelli

Beghelli PLANEX instruction manual

Goobay 30640 user manual

Goobay

Goobay 30640 user manual

DTS TITAN PLUS SOLO user manual

DTS

DTS TITAN PLUS SOLO user manual

Vega D4-F installation guide

Vega

Vega D4-F installation guide

C-LITE C-FL-A-LCF Series installation instructions

C-LITE

C-LITE C-FL-A-LCF Series installation instructions

EuroLite TB-5 DMX-Barrel-Effect user manual

EuroLite

EuroLite TB-5 DMX-Barrel-Effect user manual

Chauvet SNAPSHOT LED PAR 38 TRI-B user manual

Chauvet

Chauvet SNAPSHOT LED PAR 38 TRI-B user manual

Ribimex Ribitech PRSPOT22PBAT User and maintenance manual

Ribimex

Ribimex Ribitech PRSPOT22PBAT User and maintenance manual

Eurolux FS252 manual

Eurolux

Eurolux FS252 manual

Soltech SOLTAB 10W installation manual

Soltech

Soltech SOLTAB 10W installation manual

manuals.online logo
manuals.online logoBrands
  • About & Mission
  • Contact us
  • Privacy Policy
  • Terms and Conditions

Copyright 2025 Manuals.Online. All Rights Reserved.