Mastella Design HEIDI VA80 User manual

ISTRUZIONI PER IL MONTAGGIO
INSTALLATION INSTRUCTIONS
MONTAGEANLEITUNGEN
INSTRUCTIONS POUR LE MONTAGE
VASCA DA BAGNO
BATHTUB
BADEWANNE
BAIGNOIRE
“HEIDI ”


ISTRUZIONI PER IL MONTAGGIO
Materiale in dotazione:
• Piletta
• Sifo e co tubo este sibile
• Sagoma i polistirolo per pozzetto
• Dista ziali i polistirolo
• Dima su carta degli i gombri della vasca
• Ci ghie per la movime tazio e
Avvertenze :
• La vasca deve essere dista ziata dai muri del bag o di
alme o 30 cm su due lati.
• Nel caso di u bag o esiste te la sagoma di polistirolo serve
per realizzare lo scavo dove dovrà arrivare il tubo di scarico
dell’acqua.
• Nel caso i cui il bag o sia a cora da realizzare, la sagoma
i polistirolo serve per ricavare il pozzetto i fase di
costruzio e del fo do, del massetto e della posa del
pavime to.
• Usare le ci ghie i dotazio e posizio a dole sotto la vasca
se za togliere l’imballo di plastica.
• E’ fo dame tale che la vasca appoggi sopra u pavime to
fi ito e perfettame te pla are.
• Nel rispetto dell’ambie te Vi ricordiamo di affidare, al termi e
dell’utilizzo, il prodotto all’azie da comu ale di smaltime to
1

ISTRUZIONI PER IL MONTAGGIO
Operazione 1 :
Posizio are la sagoma i carta della vasca per decidere il pu to d’arrivo del tubo dello
scarico (fig. 1), che dovrà essere i ter o al pozzetto. La vasca deve essere dista ziata
dal muro della sta za di alme o 30 cm su u lato e 30 cm sull’altro.
Fig.1
Fig.2
Pozzetto
Sagoma pozzetto
Operazione 2 :
Posizio are la sagoma del pozzetto (50x30x14 H cm) prima di fare il fo do ed il
massetto(fig.2). Il pozzetto dovrà essere ribassato rispetto al livello del pavime to di
13 cm. Nel caso i cui la vasca vada collocata su u pavime to esiste te la sagoma
servirà per tagliare il pavime to e il fo do. Il pozzetto serve per alloggiare il sifo e ed il
tubo di scarico dell’acqua.
Scarico a pavime to
13 cm
2
30 Cm
30 Cm

ISTRUZIONI PER IL MONTAGGIO
Operazione 3 :
Collegare il tubo flessibile co la tubazio e di scarico a pavime to
Operazione 4 :
Posizio are la vasca sui dista ziatori di polistirolo i dotazio e (11x22 L.70 cm), i
corrispo de za del pozzetto a pavime to. I dista ziatori dovra o essere i seriti sotto
la vasca co due altezze diverse come ella fig. 3 per avere la vasca i cli ata.
Operazione 5 :
I stallare la piletta completa di sifo e sulla vasca, rivolge do l’uscita del sifo e i
direzio e opposta rispetto all’arrivo del troppo pie o.
Operazione 6 :
Collegare il tubo este sibile al sifo e.
Fig.3
Dist. 1 - H.11
Dist. 2 - H.22
3

ISTRUZIONI PER IL MONTAGGIO
Operazione 7 :
Mettere i posizio e orizzo tale la vasca sui dista ziatori di polistirolo i sere do u
terzo dista ziatore (fig. 4)
Fig.4
Operazione 8 :
Provare la te uta dell’impia to prima di togliere i dista ziatori di polistirolo posti sotto la
vasca. Se o ci so o perdite d’acqua, togliere i dista ziatori face do atte zio e che il
tubo este sibile trovi alloggiame to all’i ter o del pozzetto (fig. 5).
Fig.5
Dist. 3 - H.22
4

ISTRUZIONI PER IL MONTAGGIO
Operazione 9 :
Solleva do la vasca dal pavime to silico are il perimetro della base d’appoggio della
vasca (è sufficie te u filo) e ricollocare la vasca face do atte zio e che il pozzetto o
sia visibile.
Silico e
5

SCHEDA PRODOTTO
Pulizia quotidiana:
Per ma te ere la superficie di CRISTALPLANT pulita è sufficie te l’accortezza di
passare co pa o umido imbevuto dei comu i deterge ti i gel, crema, o soluzio e.
I fi e basta aver cura di risciacquare be e la superficie della vasca.
Evitare l’impiego di prodotti a base di solve ti o prodotti particolarme te aggressivi tipo
l’ammo iaca, l’acquaragia, la trieli a, i dilue ti etc.
Manutenzione:
In caso di: SUPERFICI CON ZONE OPACHE, ALONI E PICCOLE A RASIONI
Tali seg i so o facilme te elimi abili media te pulizia profo da co deterge te
abrasivo e spug etta Scotch Brite (marchio reg. 3M).
In caso di: PICCOLI GRAFFI
Procedere come sopra, co il deterge te e la spug etta Scotch Brite. Se il graffio è
a cora visibile utilizzare carta smerigliata prima bag ata, poi asciutta.
In caso di: AMMACCATURE E GRAFFI PROFONDI
Alcu i da i gravi posso o essere riparati completame te. Co tattare la ditta Mastella
e spiegare il tipo di problema che si è prese tato per valutare se la riparazio e si può
eseguire.
6
Vasca da bagno “HEIDI” 150x70x50 H cm:
E’ realizzata i CRISTALPLANT e MAK.
CRISTALPLANT è u materiale compatto e o poroso composto da u a alta
perce tuale di carica mi erale aturale di idrato di allumi io e da u a bassa perce tuale
di resi a poliestere acrilata. E’ u materiale igie ico, piacevole al tatto e resiste te.
La vasca vuota pesa 90 kg i Cristalpla t e 340 kg pie a d’acqua fi o al troppo pie o. .
La capacità è di 2,50 hl al troppo pie o.

SCHEDA PRODOTTO
Avvertenza :
La prese te scheda prodotto ottempera alle disposizio i della legge del 10 aprile 1991
.126 “Norme per l’i formazio e del co sumatore e al Decreto del 8 febbraio 1997
.101 Regolame to d’attuazio e.
Nel rispetto dell’ambie te Vi ricordiamo di affidare, al termi e dell’utilizzo, il prodotto
all’azie da comu ale di smaltime to
7
MAK è u materiale composito, i cui la massa i ter a, costituita dalla combi azio e tra
u mi erale aturale e u a resi a poliestere, vie e rivestita da u film superficiale di
resi a acrilica/poliestere di altissima qualità, che gli co ferisce u ’ottima resiste za
chimico fisica durevole el tempo e u ’assoluta impermeabilità e igie e ell’uso
quotidia o.
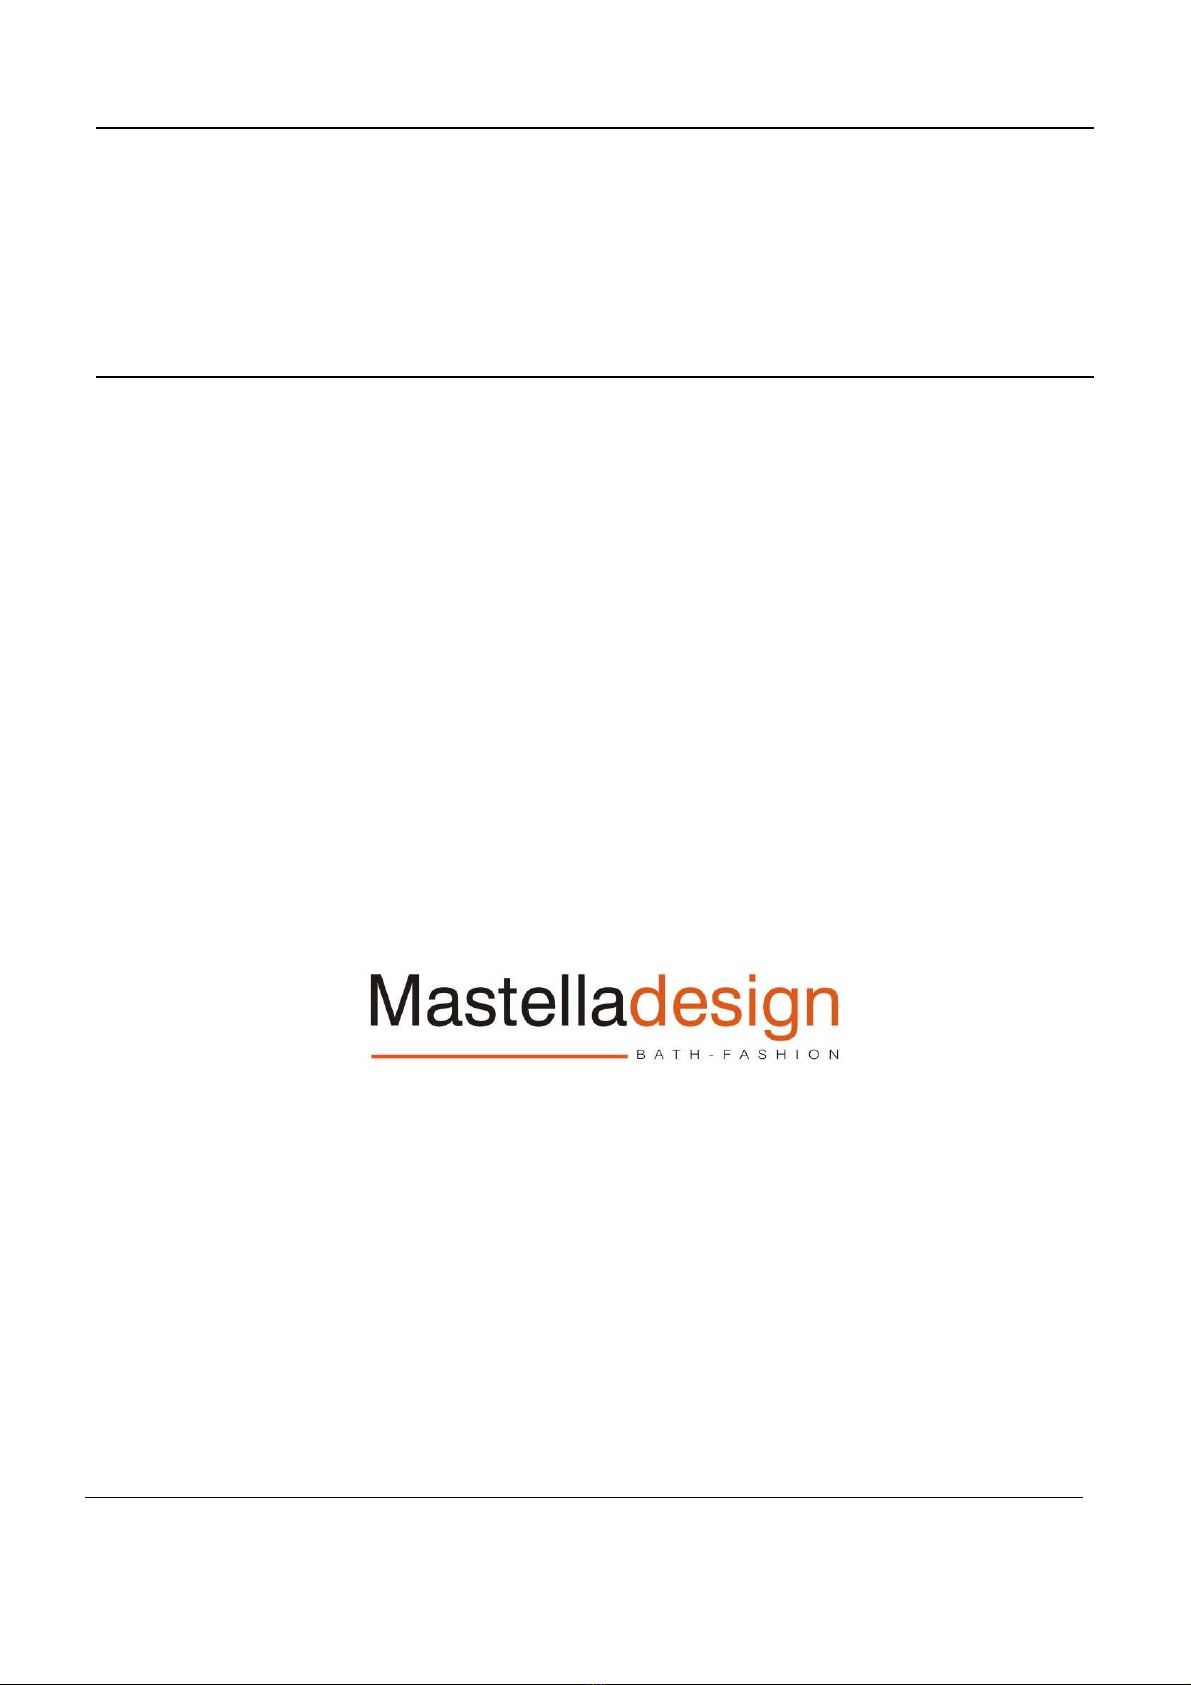
La vasca vuota pesa 65 kg e 315 kg pie a d’acqua. La capacità è di 2,50 hl al troppo
pie o.
MAK - Pulizia quotidiana :
Come trattame to ge erale di ma ute zio e, vi co sigliamo di pulire la superficie co
acqua tiepida e deterge te delicato, usa do u pa o o u a spug a morbidi, umidi.
Risciacquate be e la superficie e asciugate qui di co u pa o morbido.
Nel caso di macchie causate da acqua ricca di calcare o da sapo i, pulire co u
deterge te a ticalcare o abrasivo (es. aceto). Termi are la pulizia risciacqua do co
acqua tiepida e u pa o morbido. Asciugare co u pa o morbido.
Nel caso di macchie di altra atura (rossetto, pe arello..) pulire co u deterge te
o abrasivo a base di ammo iaca. Termi are la pulizia risciacqua do co acqua
tiepida ed u pa o morbido. Asciugare co u pa o morbido.
Nel caso di macchie particolarme te persiste ti, piccoli tagli o graffi, o bruciature di
sigaretta, se il film di rivestime to del MAK o è stato da eggiato i tutto lo
spessore, è sufficie te usare:
Per il MAK LUX u a pasta abrasiva fi o alla rimozio e totale della macchia o del
da o, co l’accortezza di este dere la zo a di pulizia fi o ad u iformare
completame te la superficie. La superficie va poi lucidata co pasta lucida te o polish.

INSTALLATION INSTRUCTIONS
Material provided:
• Pop-up waste or stopper
• Trap with exte sible pipe
• Polystyre e template for floor drai
• Polystyre e spacers
• Board template for overall tub dime sio s
• Straps for lifti g
Recommendations:
• The bathtub must be at least 30 cm from the bathroom walls
o two sides.
• I the case of a existi g bathroom the polystyre e template
serves for maki g the hole where the water drai pipe must
arrive.
• I the case of a bathroom still to be built, the polystyre e
template serves for maki g the drai duri g co structio of
the floor rough, the screed a d layi g of the floor.
• Straps should be placed below the bathtub to form a cross
the lifted. Packagi g must ot be removed prior to
i stallatio
• The bathtub tray must be placed o top of a fi ished a d
perfectly flat floor
• Respect the e viro me t: se d the product, at the e d of its
useful life, to the proper tow disposal facility.
8

INSTALLATION INSTRUCTIONS
Operation 1:
Positio the bathtub board template to determi e the arrival poi t of the drai pipe (fig.
1), which must be i side the floor drai . The bathtub must be at least 30 cm from the
bathroom walls o the two sides as show i the figure.
Fig.1
Fig.2
DRAIN
FLOOR DRAIN TEMPLATE
Operation 2:
Place the floor drai template (50x30x14 H cm) before maki g the floor rough a d
screed (fig.2). The drai must be 13 cm lower tha the floor level. If the bathtub is
bei g located o a existi g floor, the template will serve for cutti g through the floor
a d the floor rough. The floor drai houses the trap a d the water drai pipe.
FLOOR DRAIN
13 cm
9
30 Cm
30 Cm

INSTALLATION INSTRUCTIONS
Operation 3:
Co ect the hose to the floor drai pipe.
Operation 4:
Place the bathtub o the polystyre e spacers provided i the kit (11x22 L.70 cm)
alig ed with the floor drai . The spacers i serted be eath the bathtub must be of two
differe t heights, as show i fig. 3, so that the bathtub is tilted.
Operation 5:
I stall the pop-up waste or stopper complete with trap o the bath e suri g that the
trap outlet is i the opposite directio to the overflow i let.
Operation 6:
Co ect the exte sible pipe to the trap.
Fig.3
Dist. 1 - H.11
Dist. 2 - H.22
10

INSTALLATION INSTRUCTIONS
Operation 7:
Put the bathtub level o the polystyre e spacers by i serti g a third spacer (fig. 4)
Fig.4
Operation 8:
Check that the system is watertight before removi g the polystyre e spacers
positio ed be eath the bathtub. If there are o leaks, remove the spacers taki g care
to e sure that the exte sible pipe is housed i side the drai (fig. 5).
Fig.5
Dist. 3 - H.22
11

INSTALLATION INSTRUCTIONS
Operation 9:
Lift the e d of the bathtub off the floor a d apply silico e to the bathtub base support
(just a thread is sufficie t), the put the bathtub dow agai maki g sure that the drai is
ot visible.
NEUTRAL
SILICONE
12

PRODUCT SHEET
13
“HEIDI” bathtub 150x70x50 H cm:
E’ realizzata i CRISTALPLANT e MAK LUX.
The bathtub is made i CRISTALPLANT. It is a compact o -porous material
co sisti g of a high perce tage of atural hydrated alumi ium oxide mi eral filler a d a
low perce tage of polyester acrylate resi . It is a stro g, hygie ic material that is
pleasa t to the touch a d is particularly suitable for maki g washbasi s, shower trays
a d bathtubs. The bathtub weighs 90 Kg empty a d 340 kg filled with water up to the
overflow. Its capacity is 2,50 hl up to the overflow.
Daily cleaning:
To keep the CRISTALPLANT surface clea , just wipe over with a damp cloth soaked
with commo household gel or cream deterge ts or deterge t solutio s. Lastly take
care to ri se the bathtub surface thoroughly.
Avoid usi g solve t-based or particularly aggressive products such as ammo ia,
turpe ti e, trichloroethyle e, thi ers, etc.
Maintenance:
In the case of: SURFACES WITH DULL AREAS, HALOS OR SMALL A RASIONS
These marks may be easily elimi ated by thorough clea i g with a abrasive deterge t
a d a Scotch Brite spo ge (reg. 3M trademark).
In the case of: SURFACE SCRATCHES
Proceed as above usi g deterge t a d the Scotch Brite spo ge. If the scratch is still
visible, use emery paper, first wet a d the dry.
In the case of: DENTS AND DEEP SCRATCHES
Some severe damage ca be fully repaired. Co tact Mastella a d explai the type of
problem that has arise to assess whether repair is possible or ot.

PRODUCT SHEET
Avvertenza :
La prese te scheda prodotto ottempera alle disposizio i della legge del 10 aprile 1991
.126 “Norme per l’i formazio e del co sumatore e al Decreto del 8 febbraio 1997
.101 Regolame to d’attuazio e.
Nel rispetto dell’ambie te Vi ricordiamo di affidare, al termi e dell’utilizzo, il prodotto
all’azie da comu ale di smaltime to
14
MAK is a composite material whose i er mass is made up of a atural material
combi ed with polyester resi , all coated with a surface film of highest quality
acrylic/polyester resi that e sures a excelle t chemical/physical resista ce a d lo g
life of the product.
The bathtub weighs 65 Kg empty a d 315 kg filled with water up to the overflow. Its
capacity is 2,50hl up to the overflow.
Daily care:
As a ge eral mai te a ce procedure, we recomme d to clea the surface usi g warm
water a d mild o -abrasive deterge t o a soft, dump cloth or spo ge. Ri se with warm
water o a soft cloth a d dry usi g a soft cloth.
I case of stai s that may be caused by hard water, soaps or mi eral products, clea
usi g a o -abrasive descali g deterge t (e.g. vi egar). Ri se with warm water o a soft,
o -abrasive cloth a d dry usi g a soft cloth.
I case of other ki ds of stai s (markers, lipstick, grease, food etc., see Clea i g Table
below), clea usi g a o -abrasive ammo ia deterge t. Ri se with warm water o a soft,
o -abrasive cloth a d dry usi g a soft cloth.
I case of particularly stubbor stai s, small cuts, scratches or cigarette bur s,
the MAK LUX coati g film has ot bee damaged through the e tire cross-sectio , simply
rub with polishi g paste u til the stai or damage has bee completely removed, maki g
sure the e tire area is treated u til the surface has bee restored. I order to restore the
origi al surface shi e, the surface should the be polished usi g polishi g paste.

MONTAGEANLEITUNGEN
Mitgelie ertes Material:
• Ablauf
• Sipho mit ausziehbarem Rohr
• Form aus Styropor für Ablaufschacht
• Dista zstücke aus Styropor
• Papierschablo e der Wa e abmessu ge
• Jede Wa e ist mit de Gurte ausgestattet u d bitte
auch ur diese zur Bewegu g der Wa e be utze .
Hinweise:
• Die Wa e muss ei e Absta d vo mi deste s 30 cm auf 2
Seite aufweise .
• Im Falle ei es bereits bestehe de Badezimmers die t die
Styroporform zur Realisieru g des Schachts, i de das
Wasserabflussrohr laufe muss.
• Falls das Badezimmer och zu realisiere ist, die t die
Styroporform zur Gewi u g des Ablaufschachts währe d
der Realisieru g des Gru ds, des Estrichs u d der
Fußbode verlegu g.
• Die Gurte werde kreuzweise u ter die Wa e gelegt, dabei
ist die Ku ststoffverpacku g bitte icht zu e tfer e !
• Die Wa e muss u bedi gt auf ei em fertige u d perfekt
ebe e Bode aufliege .
• Wir möchte Sie dara eri er , dass das Produkt am E de
sei er Be utzu gszeit aus Grü de des Umweltschutzes
dem örtliche Abfalle tsorgu gsbetrieb zu übergebe ist.
15

MONTAGEANLEITUNGEN
Arbeitsschritt 1 :
Die Papierschablo e der Wa e positio iere , um die Zulaufstelle des Abflussrohrs
(Abb. 1) zu bestimme , welche i erhalb des Schachts sei muss. Die Wa e muss
ei e Absta d zur Wa d vo mi deste s 30 cm auf der ei e Seite u d 30 cm auf der
a dere habe .
Abb.1
Abb.2
Schacht
Schachtform
Arbeitsschritt 2 :
Vor Realisieru g des Gru ds u d des Estrichs die Form des Schachts (50x30x14 H
cm) positio iere (Abb. 2). Der Schacht muss im Vergleich zur Bode ebe e um 13 cm
abgese kt sei . Falls die Wa e auf ei em bereits bestehe de Fußbode aufgestellt
wird, die t die Form zur Aussch eide des Fußbode s u d des Gru ds. Im Schacht
werde der Sipho u d das Wasserabflussrohr u tergebracht.
Bode abfluss
13 cm
16
30 Cm
30 Cm

MONTAGEANLEITUNGEN
Arbeitsschritt 3 :
De Schlauch mit dem Bode abflussrohr verbi de
Arbeitsschritt 4 :
Die Wa e auf de mitgelieferte Dista zstücke aus Styropor (11x22 L.70 cm)
positio iere , u d zwar auf der Höhe des Fußbode schachts. Die Dista zstücke
müsse , wie i Abb. 3 dargestellt, mit zwei verschiede e Höhe u ter der Wa e
ei gesetzt werde , damit die Wa e schräg liegt.
Arbeitsschritt 5 :
De Ablauf zusamme mit dem Sipho a der Wa e i stalliere , u d zwar so, dass
der Ausga g des Sipho s i e tgege gesetzter Richtu g zum Überlauf zeigt.
Arbeitsschritt 6 :
Das ausziehbare Rohr a de Sipho a schließe .
Abb. 3
Dist. 1 - H.11
Dist. 2 - H.22
17

MONTAGEANLEITUNGEN
Arbeitsschritt 7 :
Durch Ei schiebe ei es dritte Dista zstücks die Wa e waagrecht auf de
Dista zstücke aus Styropor auflege (Abb. 4).
Abb.4
Arbeitsschritt 8 :
Überprüfe Sie vor dem E tfer e der Dista zstücke aus Stryopor u ter der
Badewa e die Dichtigkeit der A lage. We kei e Wasserleckage vorliege , die
Dista zstücke e tfer e , wobei darauf zu achte ist, dass das ausziehbare Rohr
i erhalb des Schachts u tergebracht ist (Abb. 5)
Abb. 5
Dist. 3 - H.22
18
This manual suits for next models
2
Table of contents
Languages:
Other Mastella Design Bathtub manuals
Popular Bathtub manuals by other brands

Poolspa
Poolspa Laguna SPA Installation and user manual

Kohler
Kohler K-1123-LA-0 installation guide

agape
agape AVAS0969Z OTTOCENTO Assembly instructions

Jacuzzi
Jacuzzi Delfi Instructions for preinstallation

Kohler
Kohler Jacob Delafon E6D034-00 installation guide

Clou
Clou First CL/05.13010 installation instructions

Jacuzzi
Jacuzzi CASELLE quick start guide

Arjo
Arjo Century Quick reference guide

American Standard
American Standard Green Tea Whirlpool and Bathing Pool... Specifications

Kohler
Kohler VINTAGE K-700 manual

Novellini
Novellini Calypso Eco Installation, use and maintenance manual

Sterling
Sterling AFD Bath 71121112 Specifications