manuals.online logo
Brands
  1. Home
  2. •
  3. Brands
  4. •
  5. Master cool
  6. •
  7. Water Pump
  8. •
  9. Master cool 90058-AUT User manual

Master cool 90058-AUT User manual

1
18 VOLT CORDLESS 1.5 CFM, 2 STAGE VACUUM PUMP
OPERATING INSTRUCTIONS
Oil Refill Cap
Oil Sightglass
Oil Drain Reinforced Base
LED Indicator
ON/OFF Switch
18 Volt DC Li-ion battery
Sure Grip Handle
18 Volt DC Li-ion battery
adapter sleeve
Inlet Ports
FEATURES
• Equipped with our exclusive oil mist free exhaust port
• Sure-Grip handle, ergonomically designed for superior comfort and portability
•Reinforced base provides extreme shock resistance
•Air cooled motor design allows for operation under high temperature conditions
• Pump runs with extremely high ultimate vacuum and low noise
• Accessible oil drain port & sight glass make both oil maintenance and accuracy easy
• Built-in device eliminates oil mist and an oil-gas separator at the air exhaust outlet prevents oil contamination in the
air exhaust
SPECIFICATIONS
• No. of Stages: 2
• Free Air Displacement: 1.5 CFM
• Motor: DC 18V, 90 W
• Ultimate Vacuum: 15 microns/3 Pa
• Oil Capacity: 3.5 oz.
• Dimensions without battery: 9.9 x 3.7 x 6.1”
• Net Weight: 7.9 lb
EACH VACUUM PUMP HAS BEEN FACTORY TESTED FOR CFM AND MICRON PERFORMANCE
Do not attempt to operate without using oil!
Use oil specfically refined for deep vacuum pumps
Use of oil not refined for deep vacuum pumps and or operating with contaminated oil will void warranty
99 Washington Street
Melrose, MA 02176
Phone 781-665-1400
Toll Free 1-800-517-8431
Visit us at www.TestEquipmentDepot.com
2
GENERAL SAFETY INSTRUCTIONS
ONLY QUALIFIED SERVICE PERSONNEL SHOULD OPERATE THIS UNIT. SOME COUNTRIES MAY REQUIRE THE USER TO
BE LICENSED. PLEASE CHECK WITH YOUR LOCAL GOVERNMENT AGENCY.
•DANGER - Avoid breathing refrigerant vapors and lubricant vapor or mist. Breathing high concentration levels may
cause heart arrhythmia, loss of consciousness, or even cause suffocation.
•CAUTION - Review battery and battery charger information. Do not charge damaged batteries. Risk of overheating and
fire
•WARNING - Do not operate the vacuum pump on systems under pressure. Damage to the pump may occur
•CAUTION - All hoses may contain liquid refrigerant under pressure. Contact with refrigerant may cause frostbite
or other related injuries. Wear proper personal protective equipment such as safety goggles and gloves. When
disconnecting any hose, please use extreme caution
•CAUTION - Avoid breathing refrigerant vapors and lubricant mist. Exposure may irritate eyes, nose, throat and skin.
Please read the manufacturers Material Safety Data Sheet for further safety information on refrigerants and lubricants
•CAUTION - Do not use this equipment in the vicinity of spilled or open containers of gasoline or other flammable
substances. Make certain that all safety devices are functioning properly before operating the equipment
•CAUTION - THIS EQUIPMENT IS INTENDED FOR USE OF FINAL EVACUATION OF A REFRIGERANT SYSTEM WITH
0-3 PSI (0-0.2 BAR)
•CAUTION - DO NOT RUN THIS EQUIPMENT WITH LOW OR NO OIL. RUNNING THIS EQUIPMENT WITH NO
LUBRICATION WILL CAUSE PREMATURE FAILURE
•WARNING - Do not evacuate combustible, explosive or poisonous gases
•WARNING - Do not evacuate gases that corrode metal or react chemically with pump oil
•CAUTION - The temperature of evacuated gas shall not exceed 176˚F (80˚C) and ambient temperature shall be 41 -
140˚F (5 - 60˚C)
•WARNING - No not touch the vacuum pump’s hot surface during operation
•WARNING - Do not block air outlet
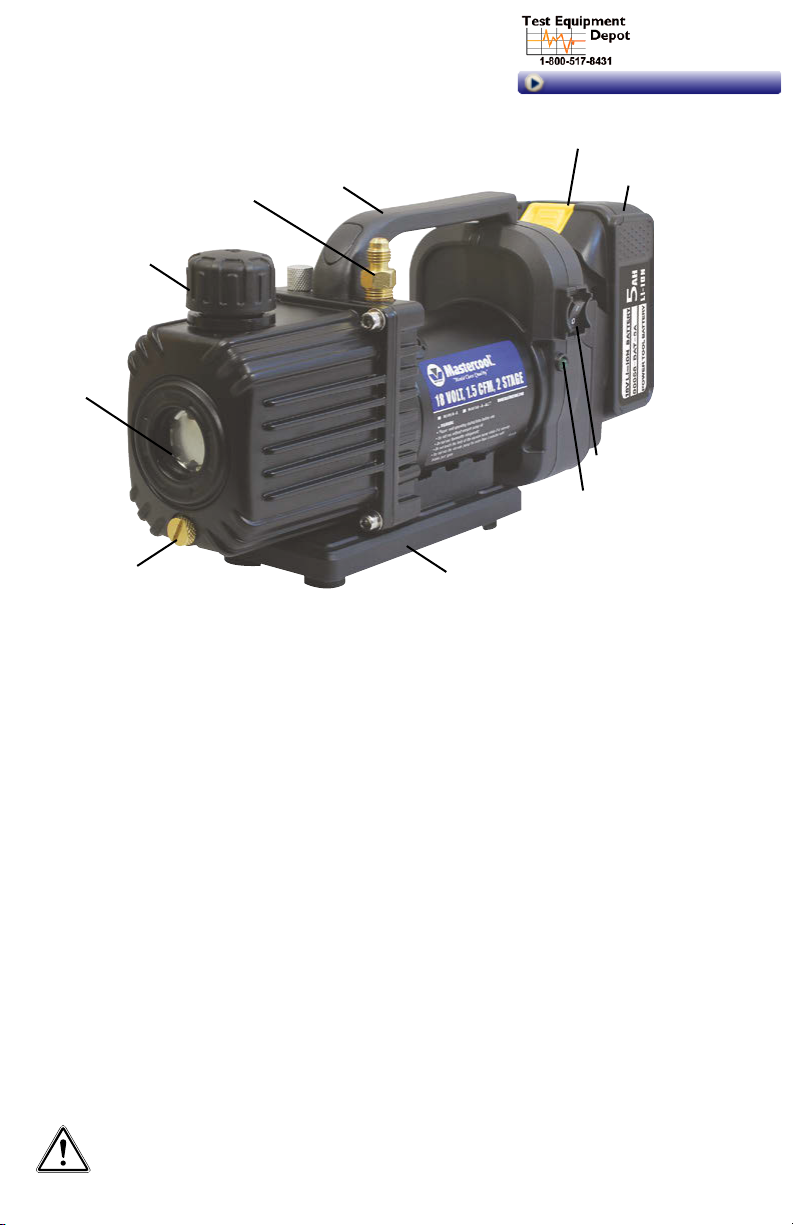
INITIAL PREPARATION
• Fully charge the 18VDC Li-ion battery.
OIL FILL
•CAUTION: DO NOT RUN THIS EQUIPMENT WITH LOW OR NO OIL. RUNNING THIS EQUIPMENT WITH NO
LUBRICATION WILL CAUSE PREMATURE FAILURE.
• This vacuum pump has been tested at the factory and shipped with only trace amounts of oil. OIL MUST BE ADDED
BEFORE OPERATING! Failure to add oil will damage cartridge and void warranty!
a. Make sure the oil drain valve located below the front casing is closed before attempting to add oil.
b. Remove the oil fill plug from the top of pump and insert the oil bottle into the fill port.
c. Slowly add oil until oil level rises to the top of the oil level line. Do not overfill with oil!
d. Replace oil fill port.
CHECKING OIL LEVEL
a. Open the gas ballast valve (small fitting located next to the handle) one turn.
b. Start pump and run with intake port capped for about two minutes. Observe the oil levelwith the pump running. The
oil level in the sight glass should be even with the level line.
c. If the level is low, open the intake port and run pump for 15 seconds, stop pump and observe oil level again. Add a
small amount of oil as needed.
NOTE: To achieve good final vacuum levels, the oil level should be visually seen through the sight glass.
GAS BALLAST VALVE
The gas ballast valve must be opened 1/4 turn for the first part of the evacuation procedure. This will help to eliminate
moisture and extend the life of the vacuum pump. After about two minutes close the valve and continue the evacuation
procedure to reach ultimate vacuum. Failure to close the valve completely during the final evacuation will result in high
3
vacuum reading.
During the first stages of evacuation, vapors are highly concentrated. Unfortunately, some vapors will condense into a
liquid and mix with the oil, thus reducing the oil’s ability to produce a deep vacuum. The GAS BALLAST VALVE emits a
controlled amount of dry air into the pump during compression to minimize this effect and keep oil relatively clean during
the first part of the evacuation.
Periodically remove the gas ballast valve needle and clean or replace the o-ring. Clean mating surfaces and lightly coat
with vacuum pump oil before securely re-tightening.
VACUUM PUMP OPERATION
WARNING: Do not operate on systems under pressure. Damage to the pump may occur.
1. Install fully charged 18VDC battery onto the vacuum pump.
NOTE: The battery has enough energy to run for about 45-60 minutes.
2. Check oil level in vacuum pump
3. Connect vacuum pump.
4. Open manifold valves.
5. Turn vacuum pump power switch “ON”.
6. Run vacuum pump until final vacuum level is met.
NOTE: Do not run vacuum pump continuously for more than 2 hours.
7. Once the final vacuum level is reached, close manifold valves, turn power switch “OFF”.
ROUTINE MAINTENANCE
It is recommended to change the vacuum pump oil after 25 hours of usage. The purity of the oil will determine the final
vacuum level achieved. Always use the recommended vacuum pump oil (VPOQ / VPOP / VPOG). The oil provided with the
pump has been specially blended to maintain maximum viscosity at normal running temperatures as well as cold weather
starts.
In order to reach the deep vacuum required, your vacuum pump needs clean, moisture-free oil during evacuation. Dirty oil
becomes a mixture of corrosive acids and water that effects the pump’s ability to pull a deep vacuum. Left sitting in the
pump, this sludge will rust and erode internal surfaces shortening the pump’s life.
NOTE: After every evacuation, while the pump is warm and oil is thin, take a small sample of oil from the drain port. If the
oil is contaminated, drain and replace.
NOTE: If the pump has been sitting for more than one month, the oil is considered contaminated regardless of
appearance and should be changed as outlined below.
Care should be taken to avoid contact of oil with skin or eyes. OIL MAY BE HOT! Used oil should be properly disposed of in
a leak-proof corrosive-resistant container according to local regulations.
OIL CHANGE PROCEDURES:
1. Be sure the pump oil is warmed up. If not warm, turn vacuum pump “ON” for 5 minutes.
2. Remove battery from vacuum pump.
3. Remove the oil drain cap and drain the contaminated oil into a suitable container. Tilt the vacuum pump toward the oil
drain port.
4. Once all the oil has been drained, re-secure the oil drain cap back onto the oil drain port.
5. Remove the exhaust / oil fill cap and add oil until it is seen in the middle of the oil sight glass. Re-secure exhaust / oil
fill cap.
TROUBLESHOOTING CHART
Condition Possible Problem Solution
Pump does not start 1. No power to motor
2. Power Switch to ON
1. Check battery
Poor vacuum 1. System leaks
2. Low oil level
3. Dirty oil
4. Air leaks at connection
5. Air leak through seal
1. Fix leaks
2. Add or replace oil
3. Flush and replace oil
4. Fix leaks
5. Replace shaft seal
4
Oil leaks 1. Oil leaks through exhaust
2. Oil leaks through shaft seal
3. Oil leaks through reservoir
4. System vented pressure
5. Pump tipped over
1. Oil level too high
2. Replace shaft seal
3. Tighten bolts or replace gasket
4. Check oil level
5. Check oil level
Unusually noisy 1. Bad bearings
2. Loose motor bolts
3. Dirty, low, or improper oil
4. Air leaks in connections
1. Replace motor
2. Tighten bolts
3. Replace oil
4. Fix leaks
High temperature 1. Worn bearings
2. Low oil level
1. Replace motor
2. Add or replace oil
RETURNING A PUMP
Please fax a request for a return authorization number to 973-252-2455. This applies to both warranty and non-warranty
service!
Pumps returned for service without a return authorization number will not be accepted. In your fax, include your NAME,
ADDRESS and PHONE NUMBER along with a detailed explanation of the problem. We will contact you (i.e. your phone
number) to discuss your problem and determine if you have to return your pump. If you have to return your pump, we will
issue you an RMA #. Then, please follow the instructions below.
• Drain oil, cap all ports and place tape over the cap. If you fail to do this, your pump will not be accepted and it will be
returned!!!
•Use the original shipping box and inserts if available. Shipping damages are impossible to claim on used machinery.
LIMITED WARRANTY INFORMATION
The vacuum pump is warranted against defects in material and workmanship for a period of one year. This warranty
does not cover failure due to abuse, improper usage, or progressive wear and tear. Warranty becomes valid to the original
owner and is effective on the purchase date. WARRANTY SERVICE IS PROVIDED THROUGH THE FACTORY ONLY. Please
contact the service department toll free for parts, service concerns, or to obtain a return authorization number for
warranty repair.
90058-5A-INST
WARNING: This product can expose you to chemicals including lead and lead compounds, which are known to the State of California
to cause cancer and birth defects or other reproductive harm. For more information go to www.P65Warnings.ca.gov.
Test Equipment Depot - 800.517.8431 - 99 Washington Street Melrose, MA 02176
TestEquipmentDepot.com

This manual suits for next models

5

Other Master cool Water Pump manuals

Master cool 90062a User manual

Master cool

Master cool 90062a User manual

Master cool 90063-2V-110-B User manual

Master cool

Master cool 90063-2V-110-B User manual

Master cool 90062-BL User manual

Master cool

Master cool 90062-BL User manual

Master cool 90058 User manual

Master cool

Master cool 90058 User manual

Popular Water Pump manuals by other brands

WilTec 51552 Operation manual

WilTec

WilTec 51552 Operation manual

Flotec FPCI3350 owner's manual

Flotec

Flotec FPCI3350 owner's manual

LEYBOLD TURBOVAC 340 M operating instructions

LEYBOLD

LEYBOLD TURBOVAC 340 M operating instructions

Grundfos MAGNA 32-60 instructions

Grundfos

Grundfos MAGNA 32-60 instructions

Polygroup SFX600 user guide

Polygroup

Polygroup SFX600 user guide

Gerus HP26 operating manual

Gerus

Gerus HP26 operating manual

Lorentz PSk2-7 troubleshooting guide

Lorentz

Lorentz PSk2-7 troubleshooting guide

SKF TMJL 100 Instructions for use

SKF

SKF TMJL 100 Instructions for use

AMT 4381-96 Specifications information and repair parts manual

AMT

AMT 4381-96 Specifications information and repair parts manual

Tuthill SOTERA SP100-10 Series Installation and operation manual

Tuthill

Tuthill SOTERA SP100-10 Series Installation and operation manual

Sealey RE83/840.V2 instructions

Sealey

Sealey RE83/840.V2 instructions

Jireh MOTORIZED COUPLANT PUMP manual

Jireh

Jireh MOTORIZED COUPLANT PUMP manual

Grundfos Unilift CC 5 Installation and operating instructions

Grundfos

Grundfos Unilift CC 5 Installation and operating instructions

Seamax SUP-20S Operation manual

Seamax

Seamax SUP-20S Operation manual

Grundfos Unilift APG Service instructions

Grundfos

Grundfos Unilift APG Service instructions

Grundfos Liftaway B Installation and operating instructions

Grundfos

Grundfos Liftaway B Installation and operating instructions

PSG Dover WILDEN PRO-FLO P8 Engineering, operation & maintenance

PSG Dover

PSG Dover WILDEN PRO-FLO P8 Engineering, operation & maintenance

Fristam Pumps FPM Series English translation of the original German Operating Manual

Fristam Pumps

Fristam Pumps FPM Series English translation of the original German Operating Manual

manuals.online logo
manuals.online logoBrands
  • About & Mission
  • Contact us
  • Privacy Policy
  • Terms and Conditions

Copyright 2025 Manuals.Online. All Rights Reserved.