MasterCraft AquaRinse User manual

SAFETY,
OPERATION &
MAINTENANCE
MANUAL
AQUARINSE™
VACUUM
SYSTEM
This unit is intended for commercial use.
SAVE THESE INSTRUCTIONS
Page 1 - AquaRinse Vacuum System - PN 418560 - Printed in USA 12/11/01
READ ALL
INSTRUCTIONS
BEFORE USING
This vacuum cleaner will afford you
many years of trouble-free operating
satisfaction, provided it is given proper
care. All parts have passed rigid quality
control standards prior to being assem-
bled to produce the finished product.
Prior to packaging, the vacuum was
again inspected for assurance of flaw-
less assembly.
Your vacuum is protectively packed to
prevent damage in shipment. We rec-
ommend that upon delivery, unpack the
vacuum and inspect it for any possible
damage. Only a visual examination will
reveal damage that may have occurred.
If damage is discovered, immediately
notify the transportation company that
delivered your vacuum. As a shipper, we
are unable to report claims for con-
cealed damage. You must originate any
claims within 5 days of delivery.
This manual is for your protection and
information. PLEASE READ CAREFUL-
LY since failure to follow precautions
could result in discomfort or injury.
READ & FOLLOW
ALL INSTRUCTIONS,
WARNINGS &
CAUTIONS BEFORE
USING THIS VACUUM
Page 1

IMPORTANT
SAFETY
INSTRUCTIONS
To Reduce the Risk of Fire, Electric Shock or Injury:
To avoid electric shock
DO NOT expose to rain - Store Indoors
Electric shock could occur if power nozzle is
used on wet surfaces.
When using this electric vacuum, basic precautions should always be
followed, including the following:
1] DO NOT leave the vacuum when
plugged in. Unplug it from the outlet when
not in use and before servicing.
2] This is NOT a toy. Close attention is
necessary when used around or near
children.
3] Use only as described in this safety
manual. Use only manufacturer’s recom-
mended attachments and accessories.
4] DO NOT use the vacuum with dam-
aged cord or plug. If the vacuum is not
working as it should, because it has been
dropped, damaged, left outdoors or
dropped into water, contact an authorized
service center or factory.
5] DO NOT pull the vacuum by the cord,
use cord as a handle, close a door on the
cord or pull cord around sharp edges and
corners. DO NOT run vacuum over the
cord. Keep the cord away from heated
surfaces.
6] DO NOT unplug the vacuum by pulling
on the cord. To unplug, grasp the plug,
not the cord.
7] DO NOT handle the vacuum plug or
vacuum with wet hands.
8] DO NOT put any objects into openings.
DO NOT use with any openings blocked;
keep free of dust, lint, hair, and anything
that may reduce air flow.
9] Keep hair, loose clothing, fingers, and
all parts of body away from openings and
moving parts.
10] DO NOT pick up anything that is
smoking or burning such as cigarettes,
matches, or hot ashes.
11] DO NOT use without wet adaptor in
place
12] Turn OFF all controls before unplug-
ging.
13] Use extra care when cleaning on
stairs.
14] DO NOT use this vacuum to pick up
flammable or combustible liquids such as
gasoline or use in areas where they may
be present.
15] DO NOT use where anesthetics or
oxygen are used.
16] Replace damaged or worn parts
immediately with genuine original equip-
ment parts to maintain safety and protect
your limited warranty.
17] DO NOT use an extension cord unless
absolutely necessary. If an extension cord
is used, then wire size must be #14
gauge or larger and should not exceed 50
feet in length. The extension cord must be
three-wire type to insure GROUNDING
protection.
This vacuum must be connected to a
properly grounded outlet only. See ground-
ing instructions (Page 3). This vacuum has
an outlet for the ring tank pump, always
turn it OFF the vacuum before connecting
or disconnecting the pump.
SAVE THESE INSTRUCTIONS
WARNING
Page 2

GROUNDING
INSTRUCTIONS
Improper use of the grounding plug can result in a
risk of electric shock.
Electrical equipment must be grounded.
If it should malfunction or breakdown,
grounding provides a path of least resist-
ance for electrical current to reduce the
risk of electric shock. This vacuum is
equipped with a cord having an equip-
ment-grounding conductor and ground-
ing plug. The plug must be inserted into
an appropriate outlet that is properly
installed and grounded in accordance
with all local codes and ordinances.
If repair or replacement of the cord or
plug is necessary, DO NOT connect the
grounded wire to either flat blade termi-
nal. The wire with insulation having an
outer surface that is green with or with-
out yellow stripes is the grounding wire.
GROUNDING
METHODS
This electric equipment is for use on a
nominal 120 volt circuit, and has a
grounded plug that looks like the plug
illustrated in (Fig A). A temporary adap-
tor that looks like the adaptor illustrated
in (Fig B & C) may be used to connect
this plug to a 2-pole receptacle as
shown in (Fig B) if a properly grounded
outlet is not available.
The temporary adaptor should be used
only until a properly grounded outlet (Fig
A) can be installed by a qualified electri-
cian. The green color rigid ear, lug or the
like extending from the adaptor must be
connected to a permanent ground such
as a properly grounded outlet box cover.
Whenever the adaptor is used, it must
be held in place by a metal screw (Fig3).
Improper connection of the equipment-grounding conductor can result in a risk
of electric shock. Check with a qualified electrician or service person if you are
in doubt as to whether the outlet is properly grounded.
DO NOT modify the plug provided with the equipment. If it will not fit the outlet,
have a proper outlet installed by a qualified electrician.
Note: In Canada, the use of a temporary adaptor is not permitted by the
Canadian Electrical Code.
CARE OF
VACUUM
Treat this vacuum as you would any
other high grade precision made prod-
uct. Dropping, unreasonable bumping
across thresholds and other misuses
may result in a damaged unit which will
not be covered by warranty.
When not in use, power cord should be
wrapped around the motor head for
storage.
Read this manual completely before
operating the vacuum. It is important to
follow instructions in this manual to pre-
vent the possibility of injury or damage
to the user and/or vacuum.
WARNING:
DANGER
Page 3

LIRE TOUTES LES
INSTRUCTIONS
AVANT DE FAIRE
FONCTIONNER
(CET APPAREIL)
Pour reduire les risques d'incendie, de choc electrique
ou de blessure:
POUR APPAREIL SEC
Pour réduire les risques de choc électrique, ne pas
aspirer de maitières humides, ne pas exposer à la pluie
et garder l'aspirateur à l'intérieur.
POUR APPAREIL HUMIDE
Pour réduire les risques de choc électrique, ne pas
exposer à la pluie et garder l'aspiraleur à l'intérieur.
L'utilisation d'un appareil électrique demande certaines précautions:
INSTRUCTIONS
VISANT LA
MISE
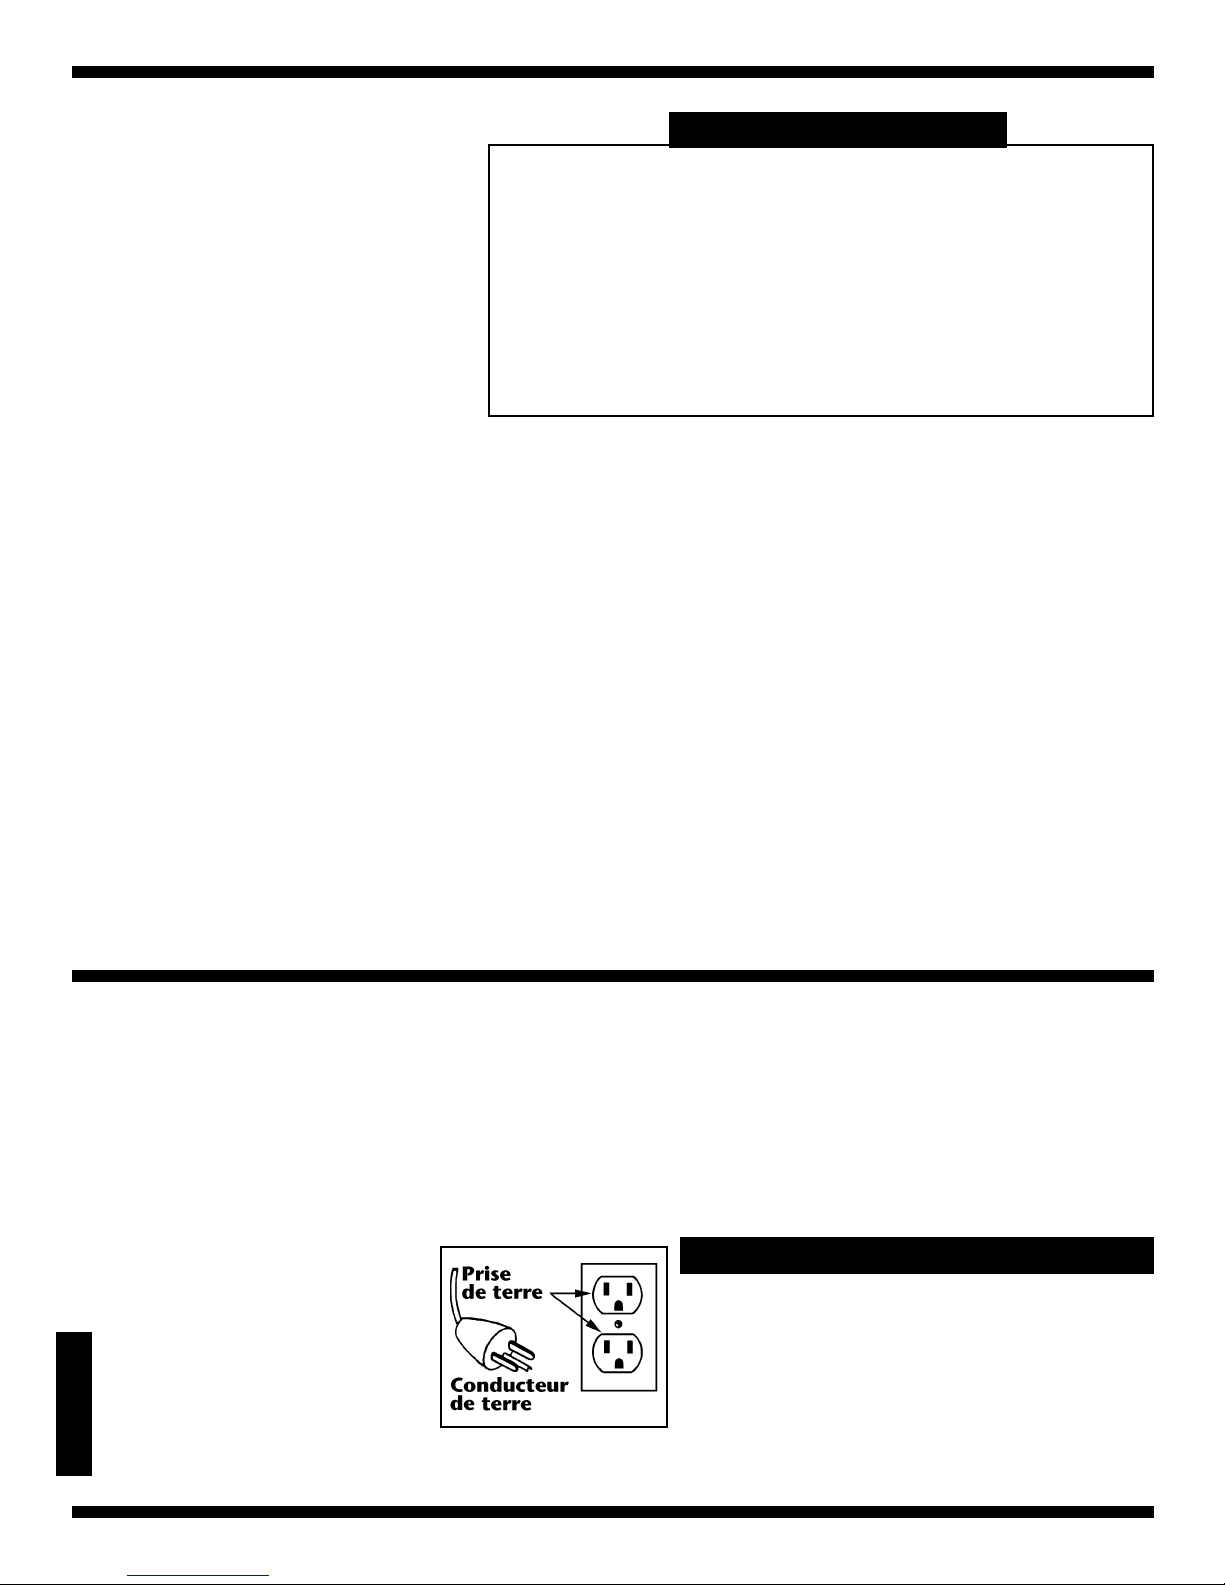
À LA TERRE Cet appareil est destiné à un circuit de
120V et est muni d'une fiche de mise à
la terre semblable à celle illustrée par le
croquis A de la figure "A". S'assurer que
l'appareil est branché à une prise de
courant ayant la même configuration
que la fiche. Aucun adaptatteur ne
devrait être utilisé avec cet appareil.
AVERTISSEMENT
CONSERVER CES INSTRUCTIONS
1] Ne pas laisser l'appareil sans surveil-
lance lorsqu'il est branché. Débrancher
lorsque l'appareil n'est pas utilise ét
avant l'entretien.
2] Ne pas permettre aux enfants de
jouer avec l'appareil. Une attention par-
ticulière est nécessaire lorsque l'ap-
pareil
est utilisé par des enfants ou à proxim-
ité de ces derniers.
3] N'utiliser que conformément à cette
notice avec les accessoires recom-
mandés par le fabricant.
4] Ne pas utiliser si le cordon ou la fiche
est endommagé. Retourner l'appareil à
un atelier de réparation s'il ne fonc-
tionne pas bien, s'il est tombé ou s'il a
été endommagé, oublié à l'extérieur ou
immergé.
5] Ne pas débrancher en tirant sur le
cordon. Tirer plutôt la fiche.
6] Ne pas toucher la fiche ou l'appareil
lorsque vos mains sont humides.
7] Ne pas tirer, soulever ou traîner l'ap-
pareil par le cordonNe pas utiliser le
cordon comme une poignée, le coincer
dans l'embrasure d'une porte ou l'ap-
puyer contre des arêtes vives ou des
coins. Ne pas faire rouler l'appareil sur
le cordon. Garder le cordon à l'écarte
des surfaces chaudes.
8] N'insérer aucun objet dans les ouver-
tures. Ne pas utiliser l'appareil
lorsqu'une ouverture est bloquée.
S'assurer que de la poussière, de la
peluche, des cheveux ou d'autres
matières ne réduisent pas le débit d'air.
9] Maintenir les cheveux, les vêtements
amples, les doigts et toutes les parties
du corps à l'écart des ouvertures et des
pièces mobiles.
10] Ne pas utiliser l'appareil si le sac à
poussière ou le filtre n'est pas en place.
11] Ne pas apsirer de matières en
combusion ou qui dégagent de la
fumée, comme des cigarettes, des
allumettes ou des cendres chaudes.
12] Mettre toutes les commandes à la
position ARRET avant dé debrancher
l'appareil.
13] User de prudence lors du nettoyage
des escaliers.
14. Ne pas aspirer des liquides inflam-
mables ou combustibles, comme de
l'essence, et ne pas faire fonctionner
dans des endroits où peuvent se trou-
ver de tels liquides.
15. Toujours mettre l’interruptuer de
l’appariel à la position ARRET avant de
brancher ou de débrancher la brosse à
moteur.
16. Ne brancher qu'à une prise de
courant avec mise àla terre. Voir les
instructions visant la mise à la terre.
Cet appareil doit être mis à la terre. En cas dé défaillance ou de panne éventuelles,
la mise à la terre fournit au courant un chemin de moindre résistance qui réduit le
risque de choc électrique. Cet appareil est pourvu d'un cordon muni d'un conduc-
teur de terre et d'une fiche avec broche de terre. La fiche doit être branchée dans
une prise appropriée correctement instalée et mise à la terre conformément aux
règlements et ordonnances municipaux.
AVERTISSEMENT:
Page 4
Un conducteur de terre mal raccordé peut entraîner un
risque de choc électrique. Consulter un électricien ou
un technicien d'entretien qualifié si vous n'êtes pas cer-
tain que la prise soit correctement mise à la terre. Ne
pas modifier la fiche fournie avec l'appareil-si elle ne
peut être inséreé dans la prise, faire installer une prise
adéquate par un électricien qualifié.

AQUARINSE™
VACUUM
SYSTEM
FEATURES
The AquaRinse™is a unique vac-
uum system designed for special
applications requiring both solu-
tion pressure spraying and con-
current liquid recovery.
This vacuum system is perfect
for use in marble/stone restora-
tion, extraction, spill cleanup,
and for rinsing and vacuuming
applications.
Powerful
Motor Head
w/Built-In
Convenience Outlet
Heavy-Duty
Clamps (3)
Solution Ring
Tank
w/Built-In
Pump
Poly Vacuum
Tank
Gate
Valve
with
Hose
Fitting
Specially Designed
Cleaning Attachment
Two 3” Front Casters
Two 8”
Rear
Wheels
Page 5
Features:
t Motor Head
P42015SAPPR - 120V 2
1
/
4
HP - 2 Stage,
By-pass Motor; 110” waterlift 115 CFM
w/cast aluminum dome.
P42035SAPPR - 120V 2 HP - 3 Stage,
By-Pass Motor; 135” waterlift - 92 CFM
Steel dome, powder coated to resist rust.
tHeavy-duty Clamps (3)
Chrome plated spring steel, extra wide
to ensure a positive vacuum seal.
t Automatic Water Shut-Off
Prevents overflowing of liquids and protects
motor from water damage.
t Poly Vacuum Tank
20 gallon recovery, rotationally molded of
1
/
4
” thick high-impact plastic. Won’t rust
or dent and resists chemical attack.
t Two-8” Heavy-Duty Rear Wheels
Mounted on
1
/
2
” dia. solid steel axle.
t Two-3” Front Casters
Ball bearing 360° swivel for excellent mobility.
t Gate Valve with Hose Fitting
Designed for quick evacuation of liquids
directly from tank or using a vacuum hose
t Solution Ring Tank w/Built-In Pump
10 gallon, rotationally molded of high impact
plastic w/100 PSI pump for continuous
rinsing of the floor, while picking up slurry.
Eliminates the need for a bucket and wringer.
t Cleaning Attachment
Specially designed with15 Ft hose-in-hose,
5 Ft aluminum wand, 14” squeegee w/6 spray
nozzle. Solution is sprayed on surfaces,
contained and vacuumed up in one pass.

Barb
Connector
Electric shock could occur if used on wet surfaces
DO NOT expose to rain - Store Indoors
The Aqua Rinse™ is equipped with a by-
pass motor and designed for wet pick-
up. To use the unit:
1] Disengage the three (3) clamps that
hold the motor head on the tank and
set aside.
2] Remove wet adaptor, blue hose-in-
hose, squeegee/spray nozzle and white
vacuum hose packed inside the tank.
Unpack the wand in separate carton.
3] Set wet adaptor on the tank, replace
motor head and snap down clamps.
4] Install blue hose-in-hose vacuum
hose to the intake fitting on vacuum tank
and wand.
A] Line up slots in
the swivel connec-
tor with retaining
rivets on the
intake.
B] Insert swivel
connector and
twist until rivets
reset against slot
end.
C. Push free end of hose onto grooved
end of upper wand.
6] Connect wand to squeegee tool by
turning wand nut counterclockwise
approximately (4) turns. Inset the tool
into wand coupling, hold tool in place
and turn nut clockwise until fully locked.
7] Connect one end of hose-in-hose
solution hose to quick disconnect cou-
pling on the trigger and other end on
the disconnect coupling on the
squeegee/spray attachment.
8] Check to make sure the ring tank
pump is plugged into the convenience
outlet on the motor head.
9] Connect power cord from pump to
convenience outlet on the vacuum
motor head.
10] Turn ON pump.
ASSEMBLY
INSTRUCTIONS
FILLING &
REMOVAL OF
LIQUID FROM
TANKS
Back
Opening
WARNING
Page 6
To Fill Ring Tank
1] Fill bucket with clean water.
2] Disconnect the blue hose-in-hose
from the wand. Slide the hose end into
the opening on back of the ring tank.
3] Using the white vacuum hose, put
one end into a bucket of water and
place other end on the barb connector
in front of ring tank.Turn ON vacuum.
The vacuum suction will fill the tank.
To Empty Ring Tank
1] Disconnect the blue hose-in-hose
from the wand and hold hose end on
barb connector on the front of the ring
tank.
2] Turn on the vacuum and let the suc-
tion drain the tank into the blue vacuum
tank.
To Drain Vacuum Tank
1] Center the drain valve over a drain in
the floor.
2] Pull up on the gate valve handle to
empty the tank.
3] After the tank is drained, and before
closing the drain valve make sure that
there are no obstructions that will pre-
vent the valve from closing.
Note: The white vacuum hose can also
be installed on the drain valve connec-
tor when draining the tank. This will
enable you to control splashing and flow
of liquid.

1] Position the AquaRinse™in the area
where you are doing the restoration.
2] After you finish (4) passes or (2)
cycles, turn on the ring tank pump and
vacuum.
3] Start cleaning by squeezing the floor
tool trigger while slowly pulling the floor
tool towards you, spraying solution and
recovering slurry in the same opera-
tions.
4] Before completing each path, shut off
solution supply and vacuum up the last
of the liquid.
5] Repeat if necessary, making sure all
the slurry is removed and the surface is
clean.
CAUTION: DO NOT run the pump with-
out solution, this can damage the pump.
OPERATING
INSTRUCTIONS
MAINTENANCE
INSTRUCTIONS
Due to the design, construction and
quality of materials, this vacuum system
requires a minimum of maintenance.
The following instructions are provided
to increase the service life of the unit
NOTE: Disconnect the power cord from
the outlet before doing any work on the
AquaRinse™.
After Each Use:
1] Drain the ring tank after each use.
2]. Drain the vacuum tank and rinse
with clean water.
3] Clean squeegee/spray nozzle.
After Repeated Use:
Vacuum Motor: Carbon brushes should
be replaced after operating 750 hours
or when the carbon brushes are worn
down to
3
/
8
" in length. Replace both car-
bon brushes at the same time
CAUTION: DO NOT leave water in tanks
over night or store with water in tanks.
Page 7

PROBLEM: Loss of Vacuum.
CAUSE: SOLUTION:
1] Clogged hose or wand. 1] Remove obstruction.
2] Tank rim damaged. 2] Replace tank.
3] Loose or broken fan. 3] Contact manufacturer or service center.
4] Motor not working. 4] Contact manufacturer or service center.
5] Float not functioning. 5] Check to see if ball moves freely.
7] Vacuum tank is full. 6] Drain dirty water out of tank.
6] Motor head cover gasket worn. 8] Replace gasket.
PROBLEM: Motors is not running.
CAUSE: SOLUTION:
1] Broken switch. 1] Contact manufacturer or service center
2] Power cord defective. 2] Contact manufacturer or service center.
3] Motor defective. 3] Contact manufacturer or service center.
4] Blown fuse or tripped circuit 4] Replace fuse or reset circuit breaker.
breaker at power source.
PROBLEM: Water blowing from vac when running.
CAUSE: SOLUTION:
1] Tank is full of liquid. 1] Empty tank.
2] Foamy liquid is being picked up. 2] Add defoamer to tank.
3] Float is stuck. 3] Check float.
PROBLEM: Streaking, uneven spray, or no spray.
CAUSE: SOLUTION:
1] Spray jets clogged. 1] Unclog jets.
2] Dirty or plugged spray jets. 2] Clean or replace spray jets.
3] Worn spray jets. 3] Replace spray jets.
4] Pressure hose filter plugged. 4] Clean or replace pressure hose filter.
5] Faulty pump. 5] Rebuild or replace pump.
6] Ring tank empty. 6] Flush out and refill.
8] Kink in hose. 7] Straighten hose.
9] Hose filter clogged. 8] Clean filter.
TROUBLE
SHOOTING
GUIDE
Address:
777 South Street
P. O. Box 2310
Newburgh, NY 12550-0606
TEL:
(800) 835-7812
(845) 565-8850
FAX:
(800) 752-6883
(845) 565-9392
URL:
www.floorcare.com
E-mail:
Page 8 - AquaRinse Vacuum System Manual - PN 418560 - Printed in USA 12/11/01
Page 8
Always disconnect power cable from electrical outlet
when working on this vacuum.
WARNING:
Table of contents
Other MasterCraft Vacuum Cleaner manuals

MasterCraft
MasterCraft 14" Installation manual

MasterCraft
MasterCraft IT1-1566 Guide

MasterCraft
MasterCraft ENVIROMASTER 9 Installation manual

MasterCraft
MasterCraft QuietMaster Guide

MasterCraft
MasterCraft Wide Area Vacuum Guide

MasterCraft
MasterCraft P42010SMP Guide

MasterCraft
MasterCraft 54-3672-4 User manual
Popular Vacuum Cleaner manuals by other brands

Bosch
Bosch GAS 55 M AFC Professional Original instructions

Niceboy
Niceboy ion hurricane H7 user manual

VOX electronics
VOX electronics SL-123 operating instructions

Global Equipment Company
Global Equipment Company 261930 Assembly instructions

Hoover
Hoover C1834 - HEPA 2 Motor Upright Part list manual

Eluxgo
Eluxgo ALT1019 user manual