mastro AHA0005 User manual

SSeerrvviiccee
www.mastroshop.com
Mastro GmbH
Hüserstraße 53
59075 Hamm / Germany
+49 (0)2381/973 71–0
+49 (0)2381/973 71– 88

C:\Bedienungsanleitungen\Bedienunganleitungen MBM\NGWR NGTL\Inst&BedEN.doc
INSTALLATIONS, OPERATION
AND MAINTENANCE INSTRUCTION
Gas-Wok China Ranges
Types:
Wall- and free standing ranges
Gas Rechaud
Types:
Table ranges
AHA0005
AHA0007
AHA0008
AHA0006
AHA0010
AHA0009

page 2
1. INSTALLATION
Before installation and operation of the appliance, the following must be observed.
For EU und CH (Switzerland) applies:
The applience must be connected and operated according to national regulations. This applies for
installation, air circulation of the room and exhaustion of combustion products.
For DE (Germany) applies:
The applience must be connected according existing installation regulations. It may only be operated in a
room with sufficient air circulation to avoid formation of unhealthy combustion products.
The following regulations, technical rules and regulations are compulsory for installation and operation of the
appliance:
Building regulations of the countries
Fire regulations of the countries
Regulations working premises
Building regulations fire technical requirements and air circulation
DVGW - Instruction G 600 (TRGI), „Technical rules for gas installations“
TRF „Technical rules liquid gas“
DVGW – Instruction G 634 „Installation commercial kitchens, gas operating installations“
Accident regulations VBG 21
Accident regulations VBG 77
Security rules kitchens ZH 1/37
Directions „Air technical installation kitchens“ VDI 2052
Regulations energy supply installations (GVU)
1.1 Directions
For the installation and adjustment of the appliances as well as for the changes of the gas types, an
authorized technician must be called. Sealed parts by the producer or authorized agent may not be touched
by the technician.
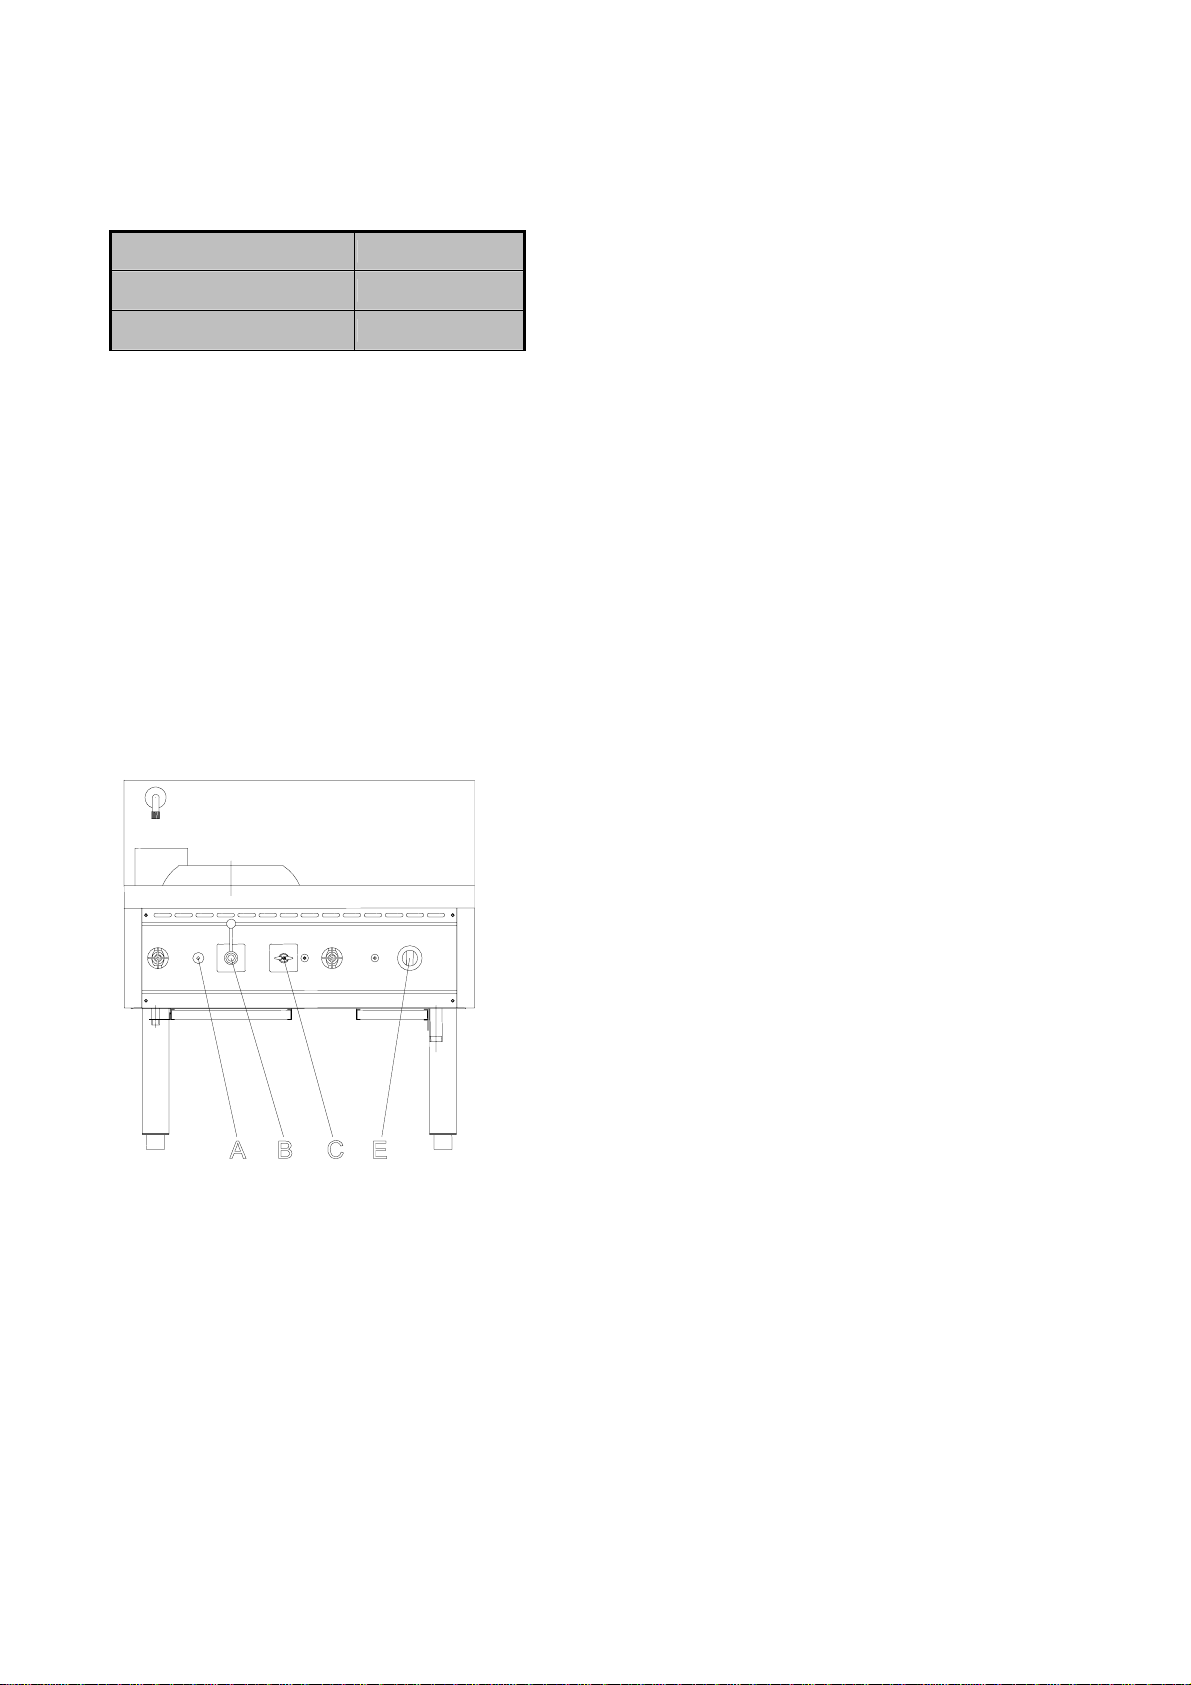
1.2 Place of Installation / Setting Appliance
The appliance must be placed on a stable solid platform. The platformmust be flat and horizontal. When
placed on a table, this must be of non-combustable material.
If the appliance on the wallside is connected with flexible tubes, then the appliance must be screwed to the
platform.
This fixation is a must for the Table Models.
If the appliance is placed near temperature sensitive parts (f.i. furniture, electric cables in the wall) there has
to be a distance of 100 mm to the rear wall and 200 mm to the side walls.
1.3 Gas connection
Before connecting the appliance, control if the gas type corresponds to the gas type od the place of
installation.
If this is not the case an adjustmanet must be made before starting up the appliance.
If flexible tubes are used, these tubes must be in DIN 3384. (Depending of the countries, those which are
allowed)
In the gas inlet there must be a gas stop cock, fixed in a suitable position.
Depending on national requirements, a thermo stop cock must be installed before the appliance.
After connection, all gas pipes must be checked with foam or leck sprays under pressure for indentifying gas
leaks.

page 3
2. Technical Data (valid only for DE / CH / AT)
The appliance is suitable for operation of earth- or liquid gas / Construction A1
Category II 2 ELL 3 B/P
call pressure allowed connection
pressure Ranges
Earthgas 20,0 mbar 18,0 - 25,0 mbar
Liquid gas 50,0 mbar 42,5 - 57,5 mbar
Outside this range the appliance may not be operated.
2.1 Technical Data (valid for EU)
The appliance is suitable for operation of earth- or liquid gas / Construction A1
Category II 2 ELL 3 B/P
Countries Category connection pressure
(mbar)
2. family 3. family
Earthgas Liquid gas
AT II2H3B/P 20 50
BE II2E+3+ 20/25 28-30/37
CH II2H3B/P 20 50
DE II2ELL3B/P 20 50
DK II2H3B/P 20 28-30
ES II2H3+ 20 28-30/37
FI II2H3B/P 20 28-30
FR II2E+3+ 20/25 28-30/37
GB II2H3+ 20 28-30/37
GR II2H3+ 20 28-30/37
IE II2H3+ 20 28-30/37
IT II2H3+ 20 28-30/37
LU I2E 20
NL II2L3B/P 25 28-30
NO I3B/P 28-30
PT II2H3+ 20 28-30/37
SE II2H3B/P 28-30
Gas connection values Full fireType Heat load
Earthgas E
Earthgas H
(G 20)
HuB 0,42 m3/h
Earthgas L
Earthgas LL
(G 25)
HuB 0,49 m3/h
Liquid gas
(G 30)
HuB 0,31 kg/h
Combustion
requirements
Exhaust
quantity
28 kW 2,96 m3/h 3,45 m3/h 2,21 kg/h 28,5 m3/h 32,0 m3/h
56 kW 5,92 m3/h 6,90 m /h 4,42 kg/h 57,0 m3/h 64,0 m3/h
66 kW 6,98 m3/h 8,13 m3/h 5,20 kg/h 66,7 m3/h 73,4 m3/h
84 kW 8,88 m3/h 10,35 m3/h 6,63 kg/h 85,5 m3/h 96,0 m3/h
104 kW 10,99 m3/h 12,81 m3/h 8,21 kg/h 105,8 m3/h 118,9 m3/h
28 kW 2,96 m3/h 3,45 m3/h 2,21 kg/h 28,5 m3/h 32,0 m3/h
AHA00008
AHA00006
AHA00010
AHA00007
AHA00005
AHA00009

page 4
The small combustion load of the Combi Wok burner is 4 kW.
This results in the following flow values:
Earthgas H, E (G20) 0,42 m3/h
Earthgas L, LL (G25) 0,49 m3/h
Liquid gas (G30) 0,31 kg/h
The appliance is operated in full combustion with fixed nozzles without adjustment.
The Wok burner has no small combustion adjustment.
It operates gradual from off (out) to in (in).
For the Combi Wok burner and the pilot flame the small combustion quantity is regulated for liquid gas with
ficed nozzles. For earhgas the nozzles are adjusted.
3. Instruction of Users
The user must be instructed how to operate the appliance. The instruction for use must be kept to the user.
The user must be told that after construction changes in the room, which affects the combustion supply, the
operation control must be carried out.
4. Operation
4.1 Operation elements
A= Safety tap button for wok burner:
to operate safety system
B= Wok burner gas valve handle:
to open and close the main burner gas supply
C= Pilot gas valve switch:
to open and close the pilot burner gas supply toward
wok range.
E= Security control knob:
to open and close the gas supply toward burner
soup and to arrange the flame (enlarge and down)
4.2 Start up Wok burner
Before operation the main gas cock on the appliance must be opened.
Then press the knob of the safety tap “A“ in and keep the knob pressed in.
With ignition pistol start up pilot flame. After pilot flame burns knob “A“ to remain pressed in for 15 - 20
seconds. If after releasing knob “A“ the pilot flame goes out, you have to repeat the ignition process.
Now turn gas valve handle “B“ anti clockwise to position “ON“, the Wok burner will ignite.
Attention! Do not lean over main burner during ignition process.
The high flame could lead to burns.

page 5
4.3 Closing of Wok burner
If the Wok burner is to be cut off temporary, the gas valve handle “B“ is to be turned clockwise to position
OFF. The burner remains operable.
For longer periods of closing and in the evening, the gas valve handle “B“ has to be placed clockwise to
position OFF and the pilot gas valve switch “C“ closed.
4.4 Operation Combi Wok burner (Soup burner)
Press security control knob “E“ and place anti clockwise in ignition position *.
Leave knob pressed in and ignite with ignition pistol the pilot flame. After the pilot flame burns, the knob must
remain pressed in for 15-20 seconds. If after releasing knob the pilot flame continues burning, the appliance
is operable. If the pilot flame goes out, you have to repeat the ignition process.
Turn the knob anti clockwise to the desired position between full combustion and small combustion.
4.5 Cut off Combi Wok burner (Soup burner)
If the Combi Wok burner should be cut off temporary, place security control knob clockwise to ignition
position *, the burner remains operative.
For longer periods of cut off and in the evening, place knob to position “O“.
5. Important Notice
The appliance is for commercial use and should be operated by qualified staff.
During operation the appliance must be attended.
It is necessary to have the appliance checked at regular intervals.
The time of checking depends on the use.
The checking must take place at least once a year.
On the Wok burner it is not alllowed to use pots with flat bottoms.
During full combustion without Wok pots on it, the flame extends over the Wok ring. During full combustion
with Wok pots on it, the flame extends to the side. In both cases burns to the staff are possible when
careless.
In case of problems, the appliance must be cut off. The main gas cock must be closed and the service
engineer is to be called.
An eventual change of the gas type may only be carried out by the producer or ist service agent.
5.1 ATTENTION – EXPLOSION RISK !!!!
It is strictly forbitten to cover the burners or drawers below or the air holes on the side walls, with Alu or
silver foil or similar materials.
This causes a wrong air circulation and gas combustion and overheats extremly the entire appliance and the
function of the burners.

page 6
6. Cleaning (see Photo below)
Bevor cleaning all armatures must be placed in position -O-. The main gas cock is to be closed. The
cleaning should be carried out after each use of the appliance. Food and Fat rests are to be removed.
Clean with warm water, if required some detergent, non agressive cleaner.
For cleaning do not use steel wool or scraper, since corrosion could occur also on stainless steel.
Pay attention that main burner and pilot flame are not dirty. If required burner must be cleaned with non
agressive detergents. The appliance may only be operated again when fully dry.
If the appliance is not used for longer periods, all steel parts should be treated with an oil drenched cloth,
leaving a protective film against corrosion.
Attention! Don’t clean the range with high pressure water.
The range will be have more long use life and smooth work, if you have regular clean every day.
.

page 7
7. Service
The appliance requires a regular service. We recommend a service contract.
Service and repairs may only be carried out by the producer or service agent with qualified staff.
For Service and repairs only original parts should be used.
During Service, security arrangements of the appliance, function of burners and operation of burning
operation is to be checked. It is to control that no lift off or back stroke of the burners in hot condition occurs.
All gas pipes and parts must be controlled for closeness. Slits of the burners and nozzles in the primary air
segment must be free of foreign debris.
The gas armatures must be checked for easy of operation. In case of heavy movements, requires the
exchange of these parts. Application of grease, in exceptional cases may only be done by the service
engineer. Sealed parts of the producer may not be touched by the service engineer. If apart from the listed
works other reparis should be required, same should be done.
Only proper handling of the appliance, regular service by service technicians, guarantees problemfree
function of the appliance with operation security.
This is also in view of legal regulations for technical equipment as well as accident regulations.
8. Behavior in disturbances
Disturbances can occur due to mistakes in the gas supply, dirtiness of functioning parts, wrong handling or
failing ignition, regulators, function of control parts.
If the gas supply is ok., all funtioning parts clean, wrong handling excluded, you have to call a service
engineer.
In case of disturbances the gas armature (main gas cock) must be closed.
Repairs may only be carried out by qualified service engineers under consideration of ruling regulations for
operation and installation.

page 8
List of Wok burner components
Del. N° Description Parts N° Quantity
1Burner Assy CH 8014 S 3
2Primary air control assy CH 8000 S 3
3Injector for burner CH 2830 3
4Safety device CH 3713 1
5Burner valve CH 2006 1
6Thermocouple WT 3890 1
7Pilot burner DBL WT 3851 1
8Handle shaft CH 4226 1
9 Handle valve assy CH 8006 S 1
10 Ball knob CH 2014 1
11 Pilot valve CH 2004 1

page 9
List of Combi Wok burner components (soup burner)
Del. N° Description Parts N° Quantity
1Burner assy CH 8020 S 1
2Primary air control CH 8000 S 1
3Injector for burner CH 4363 1
4Security tap WT 3875 1
5ABS knob valve WT 3602 1
6Thermocouple WT 3890 1
7Pilot burner DBL WT 3851 1

page 10
Components water system
03
Del. N° Description Parts N° Quantity
1Water cock GS 2305 2-3
2Water flow out GS 3910 1-2
3Sprayer Pipe 1-2

page 11
PROBLEM SOLUTIONS
ATTENTION – DANGER OF EXPLOSIONS !!!!
It is absolutly prohibited used alumatic paper or similer to cover the burner, the pilot unit and the side walls
over the drawer. Advice it will be damaged the range!
The above cause a wrong combustion and bad gasfire, it over heat extremly the unit and a bad function of
the burners will happened.
N° PROBLEM CAUSE REMEDY
A
1
Soup burner
Pilot flame does not ignite - Gas pipe pilot flame not closed
- Pilot flame clogged
- Pilot flame head clogged
- Pilot flame nozzle clogged
- Has the main gas pipe any
gas?
- Dismantle and clean
(evt. exchange)
- clean with steel brush
(evt. dismantle and clean)
- Pilot flame nozzle (C) replace
2Burner flame is yellow - Air regulation on nut required
- Burner is dirty
- Air regulation opening on nut
must be mininimum 15 mm
- Take out, take apart, clean
3Burner does not burnt - Gas cock is damagedt - control evt. exchange
4Pilot flame burns, but does not
stay
- Thermocouple dirty
- Thermocouple does not produce
voltage in millivolt
- Thermocouple is loose
- Thermocouple magnet on gas cock
defective
- clean with fine steel brush
- take apart and exchange
- again screw into position
- take apart and exchange
B
1
Wok range
Pilot flame does not ignite - Gas tube pilot flame is leaking
- Gas tube pilotf lame clogged
- Pilot flame head is clogged
- Pilot flame nozzle is clogged
- Security armature defective
- has main gas pipe any gas?
- take out and clean
(evt. exchange)
- clean with fine steel brush
(take out and clean)
- Pilot flame nozzle (C)
exchange
- Take out and replace
2Burner flame is yellow - Air regulation on nut required
- Burner is dirty
- Air regulation opening on nut
must be minimum 15 mm
- Take out, take apart, clean
3Burner does not burn - Gas cock defective - Control evt. exchange
4Pilot flame burns, but on
releasing securita arm, flame
does not stay
- Thermocouple dirty
- Thermocouple does not give voltage
in millivolt
- Thermocouple is loose
- Thermocouple magnet on gas cock
defective
- clean with fine steel brush
- take apart abd exchange
- again screw into position
- take apart and exchange

page 13
CONVERSION INSTRUCTION
Gas Wok China Ranges
Types:
Wall- and free standing ranges
Gas Rechaud
Types:
Table ranges
AHA0005
AHA0007
AHA0006
AHA0008
AHA0010
AHA0009

page 14
9. Gas conversion
The gas conversion may only be carried out by a qualified service engineer authorized by the producer.
9.1 Technical data (valid only for DE / CH / AT)
The applience is for operation of earth- or liquid gas / Construction A1
Category II 2 ELL 3 B/P
Call pressure Allowed connection
pressure ranges
Earthgas 20,0 mbar 18,0 - 25,0 mbar
Liquid gas 50,0 mbar 42,5 - 57,5 mbar
Beyond these pressure ranges the appliance may not be operated!
9.2 Technical data (valid for EU)
The applience is for operation of earth- or liquid gas / Construction A1
Category II 2 ELL 3 B/P
Country of
destination
Category Pressure ranges (mbar)
2. family 3. family
Earthgas Liquid gas
AT II2H3B/P 20 50
BE II2E+3+ 20/25 28-30/37
CH II2H3B/P 20 50
DE II2ELL3B/P 20 50
DK II2H3B/P 20 28-30
ES II2H3+ 20 28-30/37
FI II2H3B/P 20 28-30
FR II2E+3+ 20/25 28-30/37
GB II2H3+ 20 28-30/37
GR II2H3+ 20 28-30/37
IE II2H3+ 20 28-30/37
IT II2H3+ 20 28-30/37
LU I2E 20
NL II2L3B/P 25 28-30
NO I3B/P 28-30
PT II2H3+ 20 28-30/37
SE II2H3B/P 20 28-30
Gas connection values Full fireType Heat load
Earthgas E
Earthgas H
(G 20)
HuB 0,42 m3/h
Earthgas L
Earthgas LL
(G 25)
HuB 0,49 m3/h
Liquid gas
(G 30)
HuB 0,31 kg/h
Combustion
requirements
Exhaust
quantity
28 kW 2,96 m3/h 3,45 m3/h 2,21 kg/h 28,5 m3/h 32,0 m3/h
56 kW 5,92 m3/h 6,90 m3/h 4,42 m3/h 57,0 m3/h 64,0 m3/h
66 kW 6,98 m3/h 8,13 m3/h 5,20 kg/h 66,7 m3/h 73,4 m3/h
84kW 8,88 m3/h 10,35 m3/h 6,63 kg/h 85,5 m3/h 96,0 m3/h
28 kW 2,96 m3/h 3,45 m3/h 2,21 kg/h 28,5 m3/h 32,0 m3/h
AHA00005
AHA00007
AHA00008
AHA00006
AHA00009

page 15
The small combustion adjustment for the Combi Wok burner is 4 kW.
This result in the following flow values:
Earthgas H, E (G20) 0,42 m3/h
Earthgas L, LL (G25) 0,49 m3/h
Liquid gas (G30) 0,31 kg/h
9.3 Nozzle data table
Gas typet Pressure
(mbar)
Wok burner
Ø (mm)
Soup burner
full comb. small comb.
Ø (mm) Ø (mm)
Pilot flame
Ø (mm)
Earthgas E G20 20; 20/25 3 x 2,35 2,35 adjustable adjustable
Earthgas LL G25 20 3 x 2,60 2,60 adjustable adjustable
Earthgas L G25 25 3 x 2,50 2,50 adjustable adjustable
Liquid gas B/P G30 28 - 30
28 - 30/37
3 x 1,60 1,60 1,00 0,20
Liquid gas B/P G30 50 3 x 1,40 1,40 0,90 0,20
The applience is operated in full combustion with fixed nozzles without prior adjustment.
The Wok burner has no small combustion adjustment. Same is regulated gradual from OFF (out) to ON (in).
The Combi Wok burner and the pilot flame are operated for liquid gas for small combustion with fixed
nozzles, for earthgas same has to be regulated.
9.4 Nozzle change Wok burner
Remove fixing screw (1). Pull burner with gas
pipe out (2). Remove mixing chamber by
moving same anti clockwise from the nozzle.
Twist pressure ring (4) anti clockwise from
the nozzle. Pay attention that the pressure
spring is not lost.
Turn now the nozzle from the gas pipe and
then replace a nozzle according to the nozzle
data table for the required gas type into the
unit. The nozzle must be fixed with a non-
hardening sealing tape.
Then replace the burner by following
instructions in opposite direction. Pay
attention also to “primary air adjustment“.

page 16
9.5 Nozzle change Combi Wok burner
(soup burner) (full combustion nozzle)
Remove screw (5) and (6) take out complete
pipe (7).
Turn nozzle (8) with pressure ring and
pressure spring from mixing chamber.
Place a nozzle into unit according nozzle
data table for the required gas type.
The nozzle must be fixed with a non
hardening sealing tape.
Pay attention thet pressure ring and pressure
spring are incorporated in proper sequence.
Replace complete pipe gas tight into unit.
Pay attention to “primary air adjustment“
explained under Point 12.
10. Small combustion adjustment
For the Combi Wok burner (soup burner) the small combustion adjustment must be regulated to 4 kW for
earthgas.
The nozzle bore in the small combustion nozzle is 50 mbar and 30 mbar.
To regulate for earthgas proceed as follows:
Operate burner in small combustion.
Turn off handle of the security control knob.
With a small screw driver adjust small combustion nozzle (9) that 4 kW are obtained.
(Turn Clockwise reduces warmth load, turn anti clockwiseincreases warmth load).
The adjustment of the warmth load can be done according volume method, see flow chart.
The adjustment of the warmth load must be such that the burner in hot or cold,
ignites properly.
For changing to liquid gas the small combustion nozzle (9) turn slightly against the stroke.

page 17
11. Pilot flame adjustment
The Pilot flame must be regulated for earthgas. This is done as follows:
Pilot flame ignite covering screw (10) with washer (11). Remove with small
screw driver, nozzle (C) adjust that main burner ignites well. Turn
Uclockwise reduce gas flow, anti clockwise increases gas quantity.
When operated with liquid gas, nozzle (C) turn clockwise towards stroke.
After regulating washer (11) and covering screw (10) fix gas tight.
12. Primary air adjustment
The primary air is fixed and sealed by the producer and may not be touched.
The adjustment made by the producer applies to earth- and liquid gas.
The primary air opening in the mixing pipe (A) are always closed.
The primary air opening in the nut (B) on the front side of the burner is adjusted in
such a way that there is an opening of 15 mm (see drawing).
In case of a nozzle change (C) pay attention that the diameter is not changed. If
necessary a new adjustment must be done. There after nut mother (B) to be sealed
with laquer.
If necessary only slight corrections may be done.
13. Tests
After a conversion the following requirements must be fulfilled:
Nozzle diameter and pressure must be identical to the indication of the producer
The tightness of all gas pipes and parts must be secure
Ignition, through ignition, over ignition must be guaranteed for full combustion and small
combustion operation
The flame may not lift off nor beat back to the nozzles
All burners, ignition and control arrangements must be checked for dirt, secureness and function
The closing time of the thermo electric ignition control may not exceed 60 seconds
14. Sticker
Ater a conversion of a gas type has been carried out a new sticker must be placed on the appliance which
shows clearly the new gas type and gas pressure.

page 18
PROBLEM SOLUTIONS
ATTENTION – DANGER OF EXPLOSIONS !!!!
It is absolutly prohibited used alumatic paper or similer to cover the burner, the pilot unit and the side walls
over the drawer. Advice it will be damaged the range!
The above cause a wrong combustion and bad gasfire, it over heat extremly the unit and a bad function of
the burners will happened.
N° PROBLEM CAUSE REMEDY
A
1
Soup burner
Pilot flame does not ignite - Gas pipe pilot flame not closed
- Pilot flame clogged
- Pilot flame head clogged
- Pilot flame nozzle clogged
- Has the main gas pipe any
gas?
- Dismantle and clean
(evt. exchange)
- clean with steel brush
(evt. dismantle and clean)
- Pilot flame nozzle (C) replace
2Burner flame is yellow - Air regulation on nut required
- Burner is dirty
- Air regulation opening on nut
must be mininimum 15 mm
- Take out, take apart, clean
3Burner does not burnt - Gas cock is damagedt - control evt. exchange
4Pilot flame burns, but does not
stay
- Thermocouple dirty
- Thermocouple does not produce
voltage in millivolt
- Thermocouple is loose
- Thermocouple magnet on gas cock
defective
- clean with fine steel brush
- take apart and exchange
- again screw into position
- take apart and exchange
B
1
Wok range
Pilot flame does not ignite - Gas tube pilot flame is leaking
- Gas tube pilotf lame clogged
- Pilot flame head is clogged
- Pilot flame nozzle is clogged
- Security armature defective
- has main gas pipe any gas?
- take out and clean
(evt. exchange)
- clean with fine steel brush
(take out and clean)
- Pilot flame nozzle (C)
exchange
- Take out and replace
2Burner flame is yellow - Air regulation on nut required
- Burner is dirty
- Air regulation opening on nut
must be minimum 15 mm
- Take out, take apart, clean
3Burner does not burn - Gas cock defective - Control evt. exchange
4Pilot flame burns, but on
releasing securita arm, flame
does not stay
- Thermocouple dirty
- Thermocouple does not give voltage
in millivolt
- Thermocouple is loose
- Thermocouple magnet on gas cock
defective
- clean with fine steel brush
- take apart abd exchange
- again screw into position
- take apart and exchange
This manual suits for next models
5
Table of contents
Other mastro Cooker manuals

mastro
mastro ABB0001 Assembly instructions

mastro
mastro KCP96 V User manual

mastro
mastro ABA2001 Parts list manual

mastro
mastro ADK2001 Assembly instructions

mastro
mastro ABJ0001 Assembly instructions

mastro
mastro ACK2003 User guide

mastro
mastro ACA1001 User guide

mastro
mastro ABE0001 Assembly instructions

mastro
mastro ADA1001 Assembly instructions

mastro
mastro 65/40 CPE User manual