10
Detergent
To fill the detergent compartment
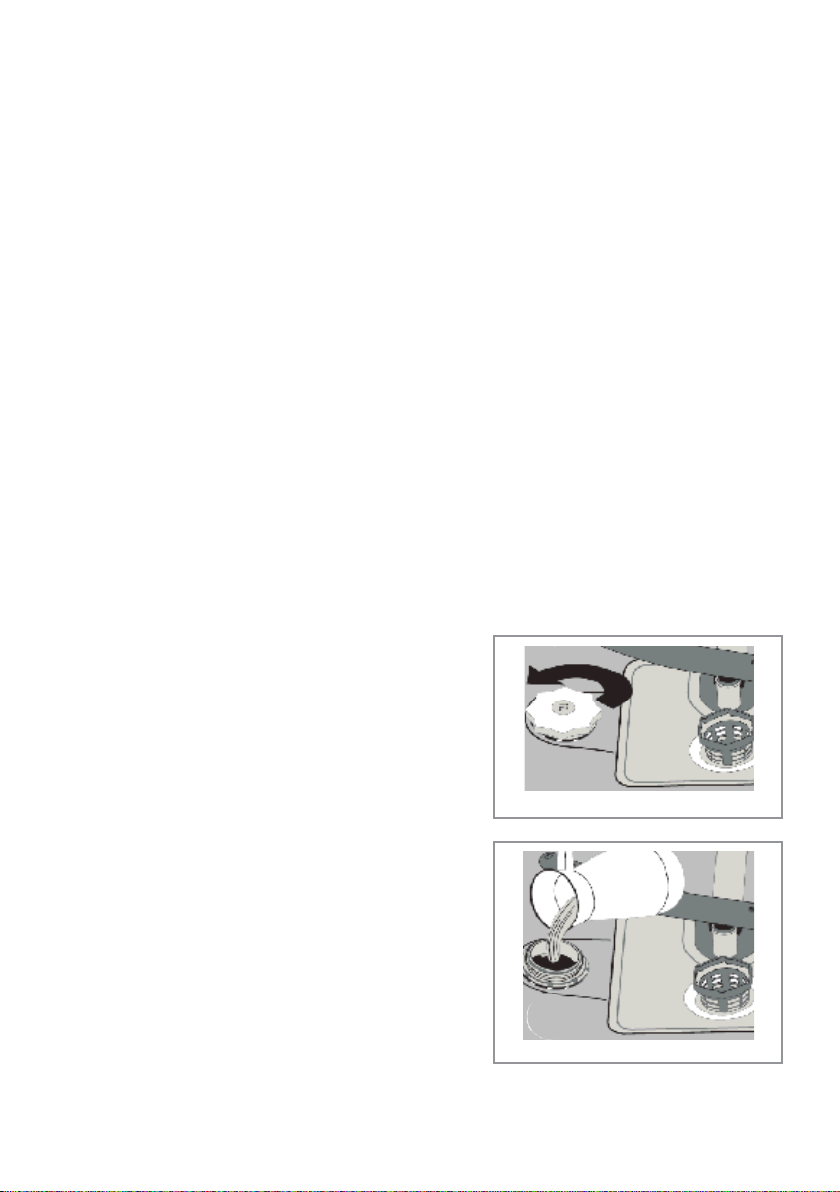
1. Push the latch as shown in figure 1.
2. Add the required amount of detergent. The main detergent
compartment “b” (figure 2) has lines to allow for specific amounts of
detergent. These are marked at either 15 cm3or 25 cm3, to be
used depending on how dirty the dishes are.
If your dishes are in need of an intensive wash, then add 5 cm3of
detergent into the prewash section of the compartment “a” (figure 2).
3. Then close the detergent compartment lid until the latch locks.
Please note: You should only use detergents designed specifically for
use in dishwashers.
If using dishwasher tablets, always use the detergent compartment, do not put
them in the main body of the dishwasher or in the cutlery basket. The solubility
of dishwasher tablets can vary depending on the temperature and duration of
the programme. As a result, it is recommended that powder detergents should
be used in the shorter programmes to allow better performance.
CDA recommends the use of separate detergent, rinse aid and dishwasher salt
rather than combination tablets as separates achieve better wash performance.
If you do use combination detergents, add salt and rinse aid to the dishwasher
and then adjust the water hardness setting and rinse aid setting to the
minimum. When you then use separate detergents again, you should fill the
salt and rinse aid compartments, adjust the water hardness setting to the
maximum and run an empty wash, then adjust the water hardness setting and
the rinse aid setting to the appropriate level.
Salt
To ensure the best efficiency, the dishwasher needs soft water. Hard water
means that lime residues remain on the dishes and the interior of the
dishwasher, affecting performance. The softener system is designed to
remove the ions that make the water hard to provide the best quality wash
performance. This is achieved by using dishwasher salt.
To add dishwasher salt, follow the steps below:
1. Remove the lower dishwasher basket and then unscrew the salt
compartment cap, as shown in figure 1.
2. Fill the compartment with dishwasher salt (do not use table salt), carefully
to prevent unnecessary spillage (figure 3). Before first use, you should
fill the compartment with 2kg of dishwasher salt and then fill up the salt
compartment with water (up to the brim of the compartment) as shown
in figure 3.
3. Replace the cap and the lower basket.
When the salt warning light on the control panel illuminates, you should
refill the salt compartment with salt only – do not add water to the salt
compartment after the first use.
You should run a prewash programme immediately after adding
dishwasher salt, to prevent any damage to the dishwasher systems.
fig 2
Fig. 3
Detergent
To fill the detergent compartment
1. Push the latch as shown in figure 1.
2. Add the required amount of detergent. The main detergent
compartment “b” (figure 2) has lines to allow for specific amounts of
detergent. These are marked at either 15 cm
3
or 25 cm
3
, to be
used depending on how dirty the dishes are.
If your dishes are in need of an intensive wash, then add 5 cm
3
of
detergent into the prewash section of the compartment “a” (figure 2).
3. Then close the detergent compartment lid until the latch locks.
Please note: You should only use detergents designed specifically for
use in dishwashers.
If using dishwasher tablets, always use the detergent compartment, do not put
them in the main body of the dishwasher or in the cutlery basket. The solubility
of dishwasher tablets can vary depending on the temperature and duration of
the programme. As a result, it is recommended that powder detergents should
be used in the shorter programmes to allow better performance.
CDA recommends the use of separate detergent, rinse aid and dishwasher salt
rather than combination tablets as separates achieve better wash performance.
If you do use combination detergents, add salt and rinse aid to the dishwasher
and then adjust the water hardness setting and rinse aid setting to the
minimum. When you then use separate detergents again, you should fill the
salt and rinse aid compartments, adjust the water hardness setting to the
maximum and run an empty wash, then adjust the water hardness setting and
the rinse aid setting to the appropriate level.
Salt
To ensure the best efficiency, the dishwasher needs soft water. Hard water
means that lime residues remain on the dishes and the interior of the
dishwasher, affecting performance. The softener system is designed to
remove the ions that make the water hard to provide the best quality wash
performance. This is achieved by using dishwasher salt.
To add dishwasher salt, follow the steps below:
1. Remove the lower dishwasher basket and then unscrew the salt
compartment cap, as shown in figure 1.
2. Fill the compartment with dishwasher salt (do not use table salt), carefully
to prevent unnecessary spillage (figure 3). Before first use, you should
fill the compartment with 2kg of dishwasher salt and then fill up the salt
compartment with water (up to the brim of the compartment) as shown
in figure 3.
3. Replace the cap and the lower basket.
When the salt warning light on the control panel illuminates, you should
refill the salt compartment with salt only – do not add water to the salt
compartment after the first use.
You should run a prewash programme immediately after adding
dishwasher salt, to prevent any damage to the dishwasher systems.
fig 2
Fig. 4
setting to the minimum. When you then use separate detergents again,
you should fill the salt and rinse aid compartments, adjust the water
hardness setting to the maximum and run an empty wash, then adjust
the water hardness setting and the rinse aid setting to the appropriate
level.
Salt
To ensure the best efficiency, the dishwasher needs soft water. Hard
water means that lime residues remain on the dishes and the interior
of the dishwasher, affecting performance. The softener system is
designed to remove the ions that make the water hard and provide the
best quality wash performance. This is achieved by using dishwasher
salt.
To add dishwasher salt
• Remove the lower dishwasher
basket and then unscrew the salt
compartment cap (Fig. 3).
• Fill the compartment with dishwasher
salt (do not use table salt) carefully,
to reduce the risk of spillage (Fig. 4).
Before first use, you should fill the salt
compartment with 1kg of dishwasher
salt and then top up the compartment
with water (up to the brim of the
compartment) (Fig. 4).
• Replace the cap and the lower basket.