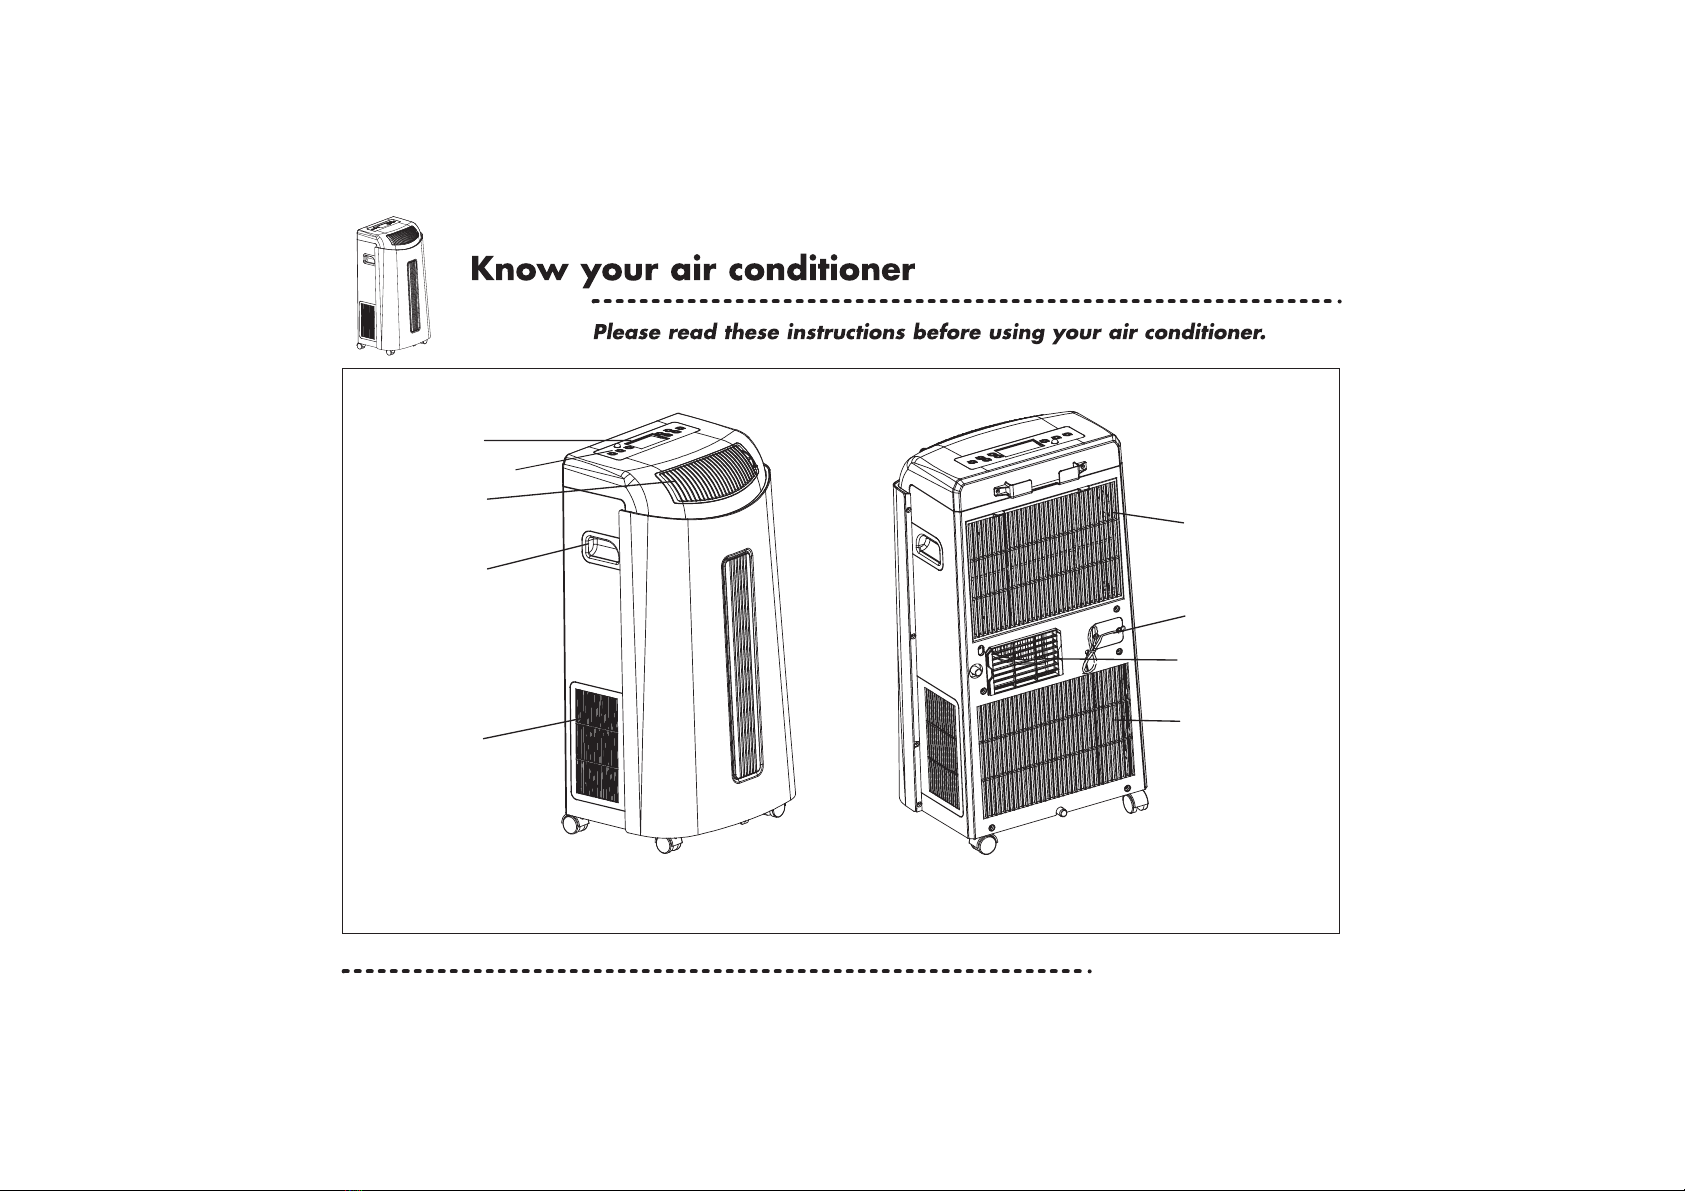
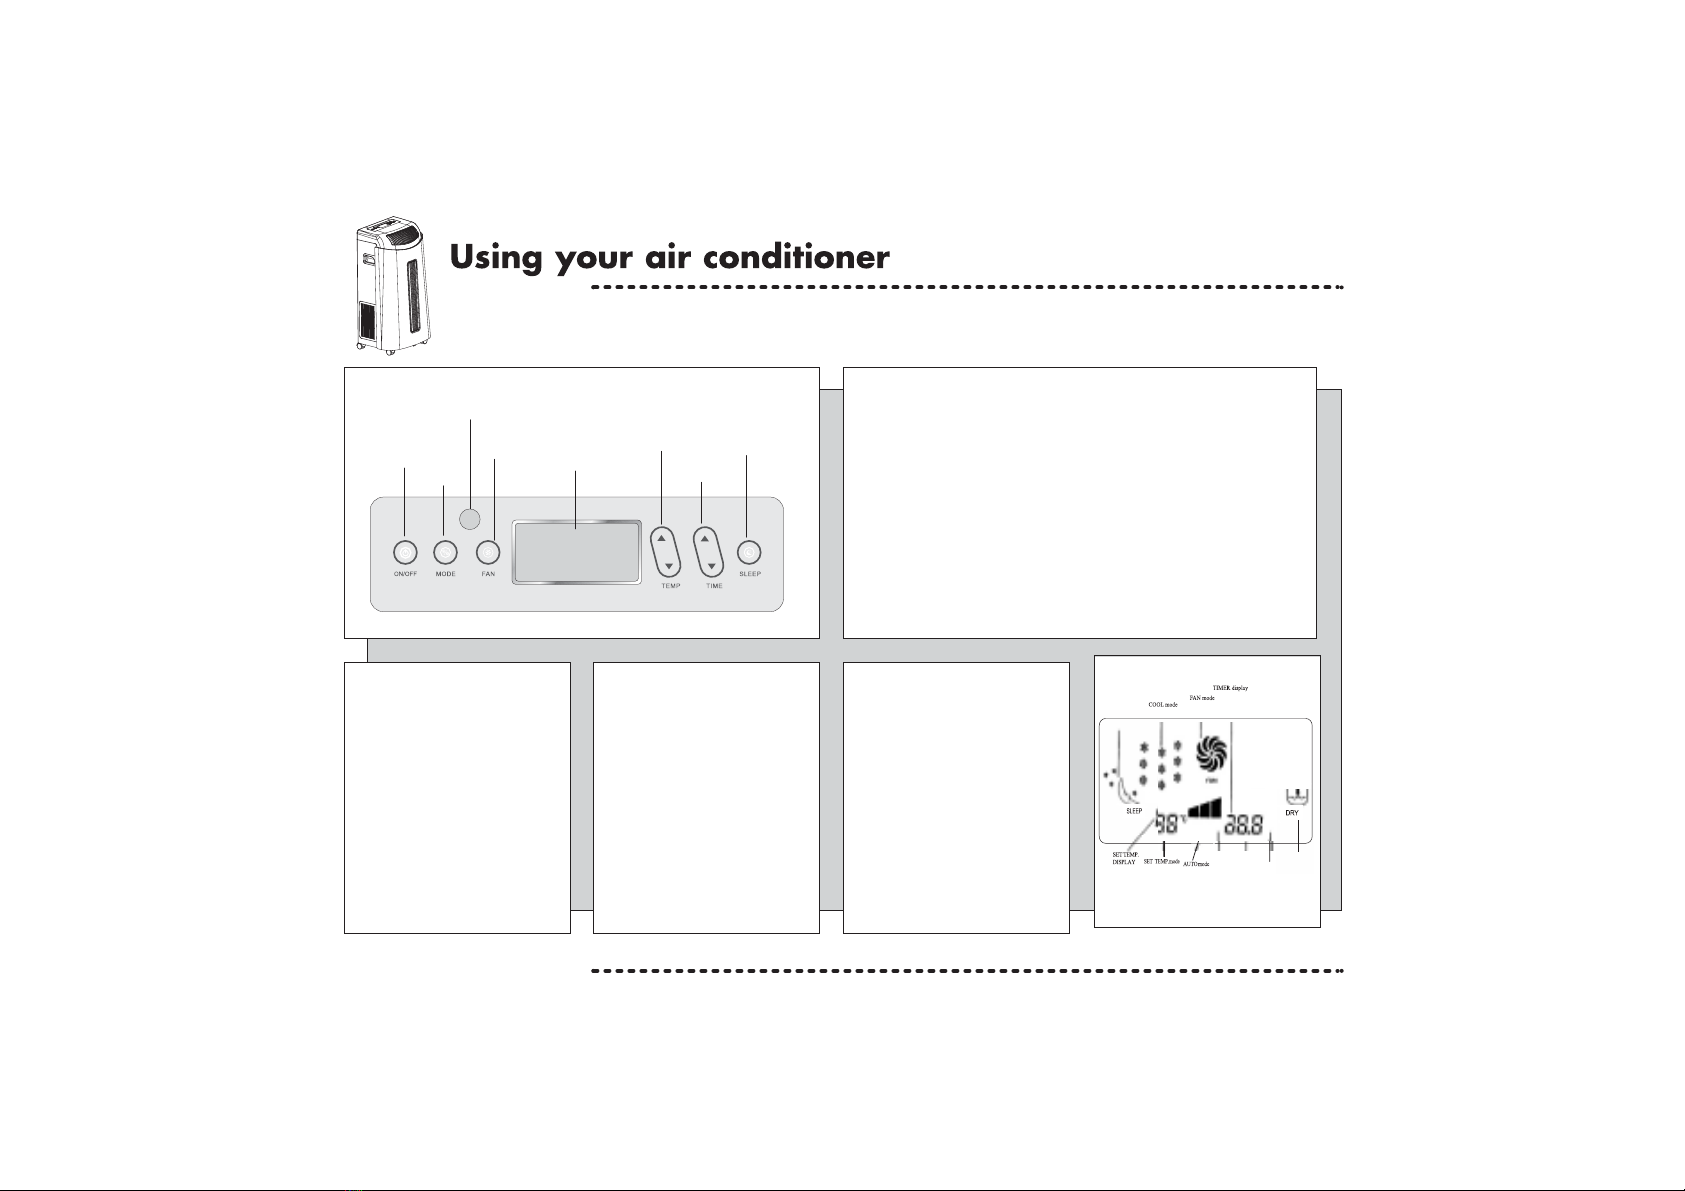
Matsui MAT-9KACW User manual

MAT-
9KACW

11
FRONT BACK
Lower Air Inlet
Handle
Air Outlet
Control Panel
Lower Air Inlet Grill
Air Exhaust Outlet
Power Cable
Upper Air Inlet Grill
Remote Control Sensor

If the air conditioner is knocked over during use, turn off the
unit and unplug from the mains supply immediately.
Your air conditioner should be used in such a way that it is
protected from moisture e.g. condensation and splashed water.
Do not place or store the unit where it can fall or be pulled
into water, or any other liquid.
Do not operate your air conditioner in a wet room such as a
bathroom or laundry room.
Do not touch the unit with wet/damp hands or when barefoot.
Do not press the buttons on the control panel with anything
other than your fingers.
Always transport your air conditioner in a vertical position and
and stand on a stable, level surface during use. Do not allow
the unit to sit on top of the mains lead.
Do not remove any fixed covers. Never use this applience if it
is not working properly, or if it has been dropped or damaged.
Keep an air path of at least 50cm around the unit from walls,
furniture and curtains.
Never use the mains switch to start and stop the unit.
Always use the switch on the control panel.
Turn off the unit when not in use. If the unit is not going to be
used over a long period of time, disconnect from the mains.
Always contact a qualified person to carry out repairs. If the
supply cord is damaged it must be repaired by a qualified
person.
Do not cover or obstruct the unit.
Do not use hazardous chemicals to clean or allow to come
into contact with the unit. Do not use the unit in the presence
of inflammable substances or vapour such as alcohol,
insecticide, petrol etc.
Do not allow children to operate the unit unsupervised.
Never use the unit without the filter.
Do not use the unit for functions other than those described
in this instruction manual.
Before moving the unit drain the water from the appliance.
Use a minimum of two people to move this unit safely.

CAUTION
3
If you need to bend the exhaust
duct, please refer to the following:
Bending the duct, as in the diagram
below, can cause malfunction.
1. Keep the exhaust duct in
a horizontal position when
attaching to the product.
. Do not add or connect any
other pipes to the product as
this could cause the air
conditioner to malfunction.
Please note: For product
servicing always contact a
qualified engineer.
Fig 1
Clip B
Clip A To connect the air exhaust:
1. Position the product close
to a window or outside door,
ie, Patio door.
. Fix the square end of the
exhaust duct (Clip A) to the
exhaust terminal on the
product, see Fig. 1.
Attention: The length of the
air exhaust must be between
500mm- 000mm.
Please note that a window kit for attaching the exhaust
hose to a window is available through Partmaster,
(details at the back of the instruction book).

4
Ensure that all windows and doors
are closed to obtain the maximum
dehumidifying and cooling effect.
COOL Mode
1. Press the MODE key to
select COO mode.
2. Press TEMP. key to select a
suitable temperature,
(between 16 C-30 C)
3. Press FAN key to select
between HIGH/MID/ OW speed.
AUTO Mode
Press the MODE key to select
AUTO mode. The air conditioner
will automatically select
between COO /DRY to ensure
a constant temperature.
The following MODES are
available on your air conditioner:
1. COO Mode.
2. DRY Mode.
3. FAN Mode.
4. AUTO Mode.
DRY Mode
Press the MODE key to select
DRY mode. The speed is NOT
adjustable.
CAUTION: When the air
conditioner is used as a
dehumidifier, there is no need
to connect the exhaust duct.
FAN Mode
1. Press MODE key to select
FAN mode.
2. Press FAN SPEED to select
between HIGH/MID/ OW.
o
o
LCD Display
Control Panel
Remote Control Indicator
FAN Speed
MODE
ON/OFF CD Screen
Temp. Key Sleep Key
Time Key
Functions of the Control Panel
1. ON/OFF Key - Press once to start, and press once more to stop.
2. MODE Key - Press this key to change the operation mode:
FAN - COO - DRY - AUTO.
3. FAN Speed Key - When the unit is running in FAN Mode there are 3
kinds of fan speed to select from: HIGH - MID - OW.
4. Temp. Key - When the unit is in COO mode the unit will
display the set temperature. Press the arrow up/down key to increase
or decrease the temperature.
5. Timer Key - Press the arrow up/down button to set the amount of time
you want the unit to stay on for (between 0.5-24 hours).
Press the Sleep Key to activate this function.
Allow this unit to stand for at least 4 hours before using for the first time.
Set Time
FAN Display ON/OFF
S EEP mode
DRY mode

Names and functions of the remote controller
5
CD Screen
Note: Ensure the remote is aimed at the remote control
sensor on the product.
MODE ey - Press the MODE key to scroll through
the following: COO /FAN/AUTO.
Please Note: To select DRY mode, use the DRY Key.
SEND ey - Press this key to send the operation.
eg. to choose cooling mode at 16 C. Press the MODE key
until the cool symbol is displayed. Press + C or - C until 16 C
is displayed. Press SEND to send command to the unit.
FAN ey - Press this key to select between HIGH/MID/ OW.
TIMER ey - Press this key to select Time or Timer mode.
Time - Allows you to adjust the clock using the Hr and Min keys.
When you have selected the time use the ON/OFF key to confirm.
Timer - Allows you to set a delay time of the unit switching itself on.
DRY ey - Press this key to set the dehumidifying function.
SLEEP ey - Press this key to set the sleep operation.
TEMP. eys - Pressing the temperature + and - keys will increase
or decrease the temperature setting buy 1 C (between 16 C-30 C).
Hr/Min ey - Press these keys to increase the hours/minutes in
the Time, Timer and Sleep modes.
ON/OFF ey - Insert the batteries into the remote control.
Press once to start and press once more to stop the unit.
o
oo
o
oo
o

6
Rubber Plug
Please note:
When the tank is full the indicator will flash
and the buzzer will sound.The LCD displa
will show error code H8 and the unit will
stop running.
TEMPORARY DRAINAGE
Place a suitable container under the drainage
pipe, then remove the rubber plug. Wait for
all the water to drain from the unit before
replacing the plug (Fig 1).
CAUTION:
Turn off the product and disconnect from
the mains suppl .
Alwa s ensure drainage holes are sealed
with plugs when not used.
CONTINUOUS DRAINAGE
If the unit is placed in a location allowing
continuous drainage, connect the drainage
pipe to the drainage hole (Fig 2/3), and
put the other end in a suitable drainage
location ie. outside.
Please Note: The water ma be discoloured.
This is normal.

7
CLEANING
Use a soft, damp cloth to wipe the
bod of the unit clean.
Never use chemicals, gasoline
detergents, chemicall treated
clothes or other cleaning solutions.
Never use water above 40 C as
this could cause the filter to warp
or discolour.
This air conditioner features an advanced filtration s stem
using filters to clean, deoderise and collect dust from the air.
CLEANING THE FILTER
Press the two hooks and remove the air filter from the
housing unit. The cover and the dust filter can be washed
under running water but must be dried before inserting back
into the unit. The carbon filter can not be washed,
but it can be vacuum cleaned.
It is recommended that ou clean the air filter once ever two
weeks and replace the carbon filter ever 12 months,
depending on how frequentl the unit is used.
(For replacement filters contact Partmaster Direct).
This s mbol on the product or in the instructions means that our electrical and electronic
equipment should be disposed at the end of its life separatel from our household
waste. There are separate collection s stems for rec cling in the EU.
For more information, please contact the local authorit or our retailer where ou
purchased the product.
To prolong the products life,
alwa s wait for at least 3
minutes after switching the
unit off, before attempting to
switch it back on again.
When our air conditioner is
not in use, keep the power
cord tid bu storing it at the
back of the unit.
END OF SEASON STORAGE
Unplug the unit and empt the
water tank. Clean or change the
filter if needed.
Once ou have cleaned the unit
turn it on to dr out the inside.
It is recommended that the unit
is put back into the original box
for storage.
Do not stack objects on top of
the unit.
WARNING
Before maintenance is carried out
on the product, turn off and
disconnect from the mains suppl .
Failure to do so could result
in electric shock.
o

8
The machine doesn t run
Is the machine plugged in and the mains suppl on?
Is the room temperature within the working range of the
unit (16 C - 32 C)?
The machine is very noisy
Is the floor underneath the unit uneven? Make sure all
four castors are positioned flat against the floor.
The compressor isn t running
Is it possible that the overheat protection of the compressor
is on? Turn the unit off. Wait a few minutes for the
temperature to cool and turn on again.
The machine is running but not cooling the room
If the sun is shining directl into the room, close the curtains.
Ensure the windows and doors are closed.
Is there something in the room producing heat?
The machine is on but doing very little
Are the filters dust or need cleaning?
Is the room temperature below our selected temperature?
Other abnormal conditions
Disconnect from the mains suppl and consult a
repair specialist.
o
o
SPECIFICATIONS
Power suppl : 230-240V
Cooling capacit : 9000/2600BTU/Hr
Air voulme (max speed): 430 m /h
Power input: 1200W
Refigerant t pe: R-410A
Refrigerant load: 550g
Recommended room size: up to 24m
Duct length: 2m
Cooling range: 16 C - 32 C
Net weight: 31Kgs
Dimension: 840HX450WX370Dmm
3
2
o
o
Table of contents
Other Matsui Air Conditioner manuals