manuals.online logo
Brands
  1. Home
  2. •
  3. Brands
  4. •
  5. Matsunichi
  6. •
  7. Digital Photo Frame
  8. •
  9. Matsunichi PhotoBlitz PF1009M User manual

Matsunichi PhotoBlitz PF1009M User manual

Other Matsunichi Digital Photo Frame manuals

Matsunichi PhotoBlitz PF800 User manual

Matsunichi

Matsunichi PhotoBlitz PF800 User manual

Matsunichi PhotoBlitz PF809 User manual

Matsunichi

Matsunichi PhotoBlitz PF809 User manual

Matsunichi PhotoBlitz PF5E User manual

Matsunichi

Matsunichi PhotoBlitz PF5E User manual

Popular Digital Photo Frame manuals by other brands

Alpina FlipUp FF-RP instructions

Alpina

Alpina FlipUp FF-RP instructions

Audiovox DPF701 owner's manual

Audiovox

Audiovox DPF701 owner's manual

LENCO DF-830 user manual

LENCO

LENCO DF-830 user manual

texet DPF-830 Instructions for use & care

texet

texet DPF-830 Instructions for use & care

Philips SPF2017 Specifications

Philips

Philips SPF2017 Specifications

Philips SPF1327 Specifications

Philips

Philips SPF1327 Specifications

Philips SPF7010/10 quick guide

Philips

Philips SPF7010/10 quick guide

Digital Spectrum MemoryVue MV-1500 user manual

Digital Spectrum

Digital Spectrum MemoryVue MV-1500 user manual

ViewSonic VFM1042-52 Specifications

ViewSonic

ViewSonic VFM1042-52 Specifications

YURAKU YUR.PHOTO 7B4C brochure

YURAKU

YURAKU YUR.PHOTO 7B4C brochure

Denver PFF-710WHITE MK2 user manual

Denver

Denver PFF-710WHITE MK2 user manual

Pandigital PAN8000DWPCF1 user guide

Pandigital

Pandigital PAN8000DWPCF1 user guide

Nokia SU-4 user guide

Nokia

Nokia SU-4 user guide

Philips 10FF3CDW null

Philips

Philips 10FF3CDW null

Rekam Deja View HD-850 user manual

Rekam

Rekam Deja View HD-850 user manual

Majestic DF 918HD MP3 user manual

Majestic

Majestic DF 918HD MP3 user manual

Digital Foci Image Moments IMT-063 user guide

Digital Foci

Digital Foci Image Moments IMT-063 user guide

Kodak W1020 - GUIA COMPLETO DO USUÁRIO FOR FIRMWARE VERSIONS EARLIER THAN... manual

Kodak

Kodak W1020 - GUIA COMPLETO DO USUÁRIO FOR FIRMWARE VERSIONS EARLIER THAN... manual

manuals.online logo
manuals.online logoBrands
  • About & Mission
  • Contact us
  • Privacy Policy
  • Terms and Conditions

Copyright 2025 Manuals.Online. All Rights Reserved.

33
www.matsunichi.com
33
1
www.matsunichi.com
1
This detailed operation manual is provided for you to obtain information concerning product in-
troduction, operating instructions, functional settings and safety precautions. Please read all of the
documents provided prior to installation and operation of the player for the first time. You should keep
this manual for future reference.
We were careful when compiling the manual and we consider the information provided herein to be
reliable and correct. However, product changes may occur during the production life cycle, so some
information may be slightly different for your unit. You are always welcome to give any comments
or suggestions. Matsunichi, Inc. (hereafter referred as Matsunichi) shall not be liable for any errors
contained herein or for any damages arising out of or related to this document or the information
contained herein.
Matsunichi shall not be liable for any damage due to the use of the unit or for any claims for dam-
ages brought by third parties.
Matsunichi shall not be liable for any data loss due to operation and use of the product, product
repair, battery failure/replacement, or any other condition, and shall not be liable for any indirect loss
resulting therefrom.
Matsunichi reserves the right to make changes in the specifications and other information contained
in this document without prior notification. Copyright 2007, Matsunichi, Inc. All rights reserved.
Thank you for purchasing this product
Please visit our web site: www.matsunichi.com
2
2
www.matsunichi.com
INDEX
Chapter 1 Overview .................................................................3
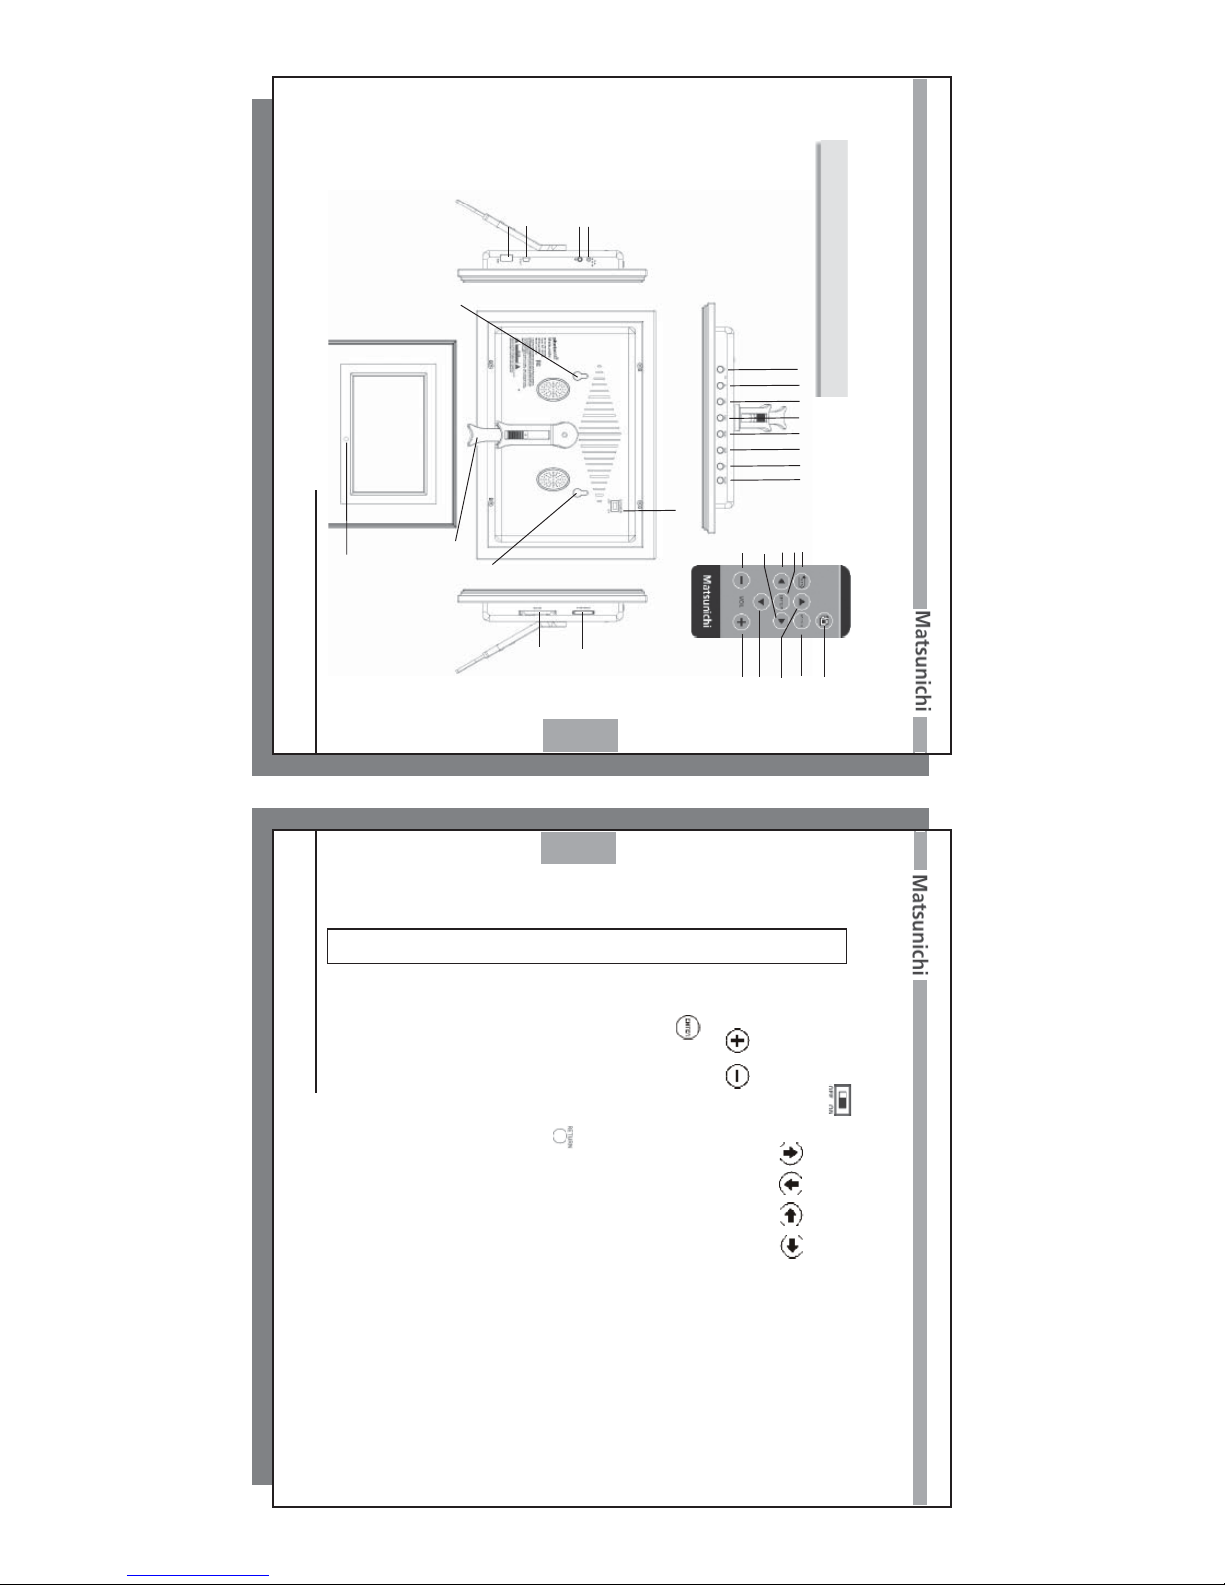
1-1 PF1009M Digital Frame................................................................3
1-2 Device & System Requirement........................................................4
1-3 Accessories Included....................................................4
1-4 Functions and Features........................................................7
Chapter 2 Connecting ......................................................9
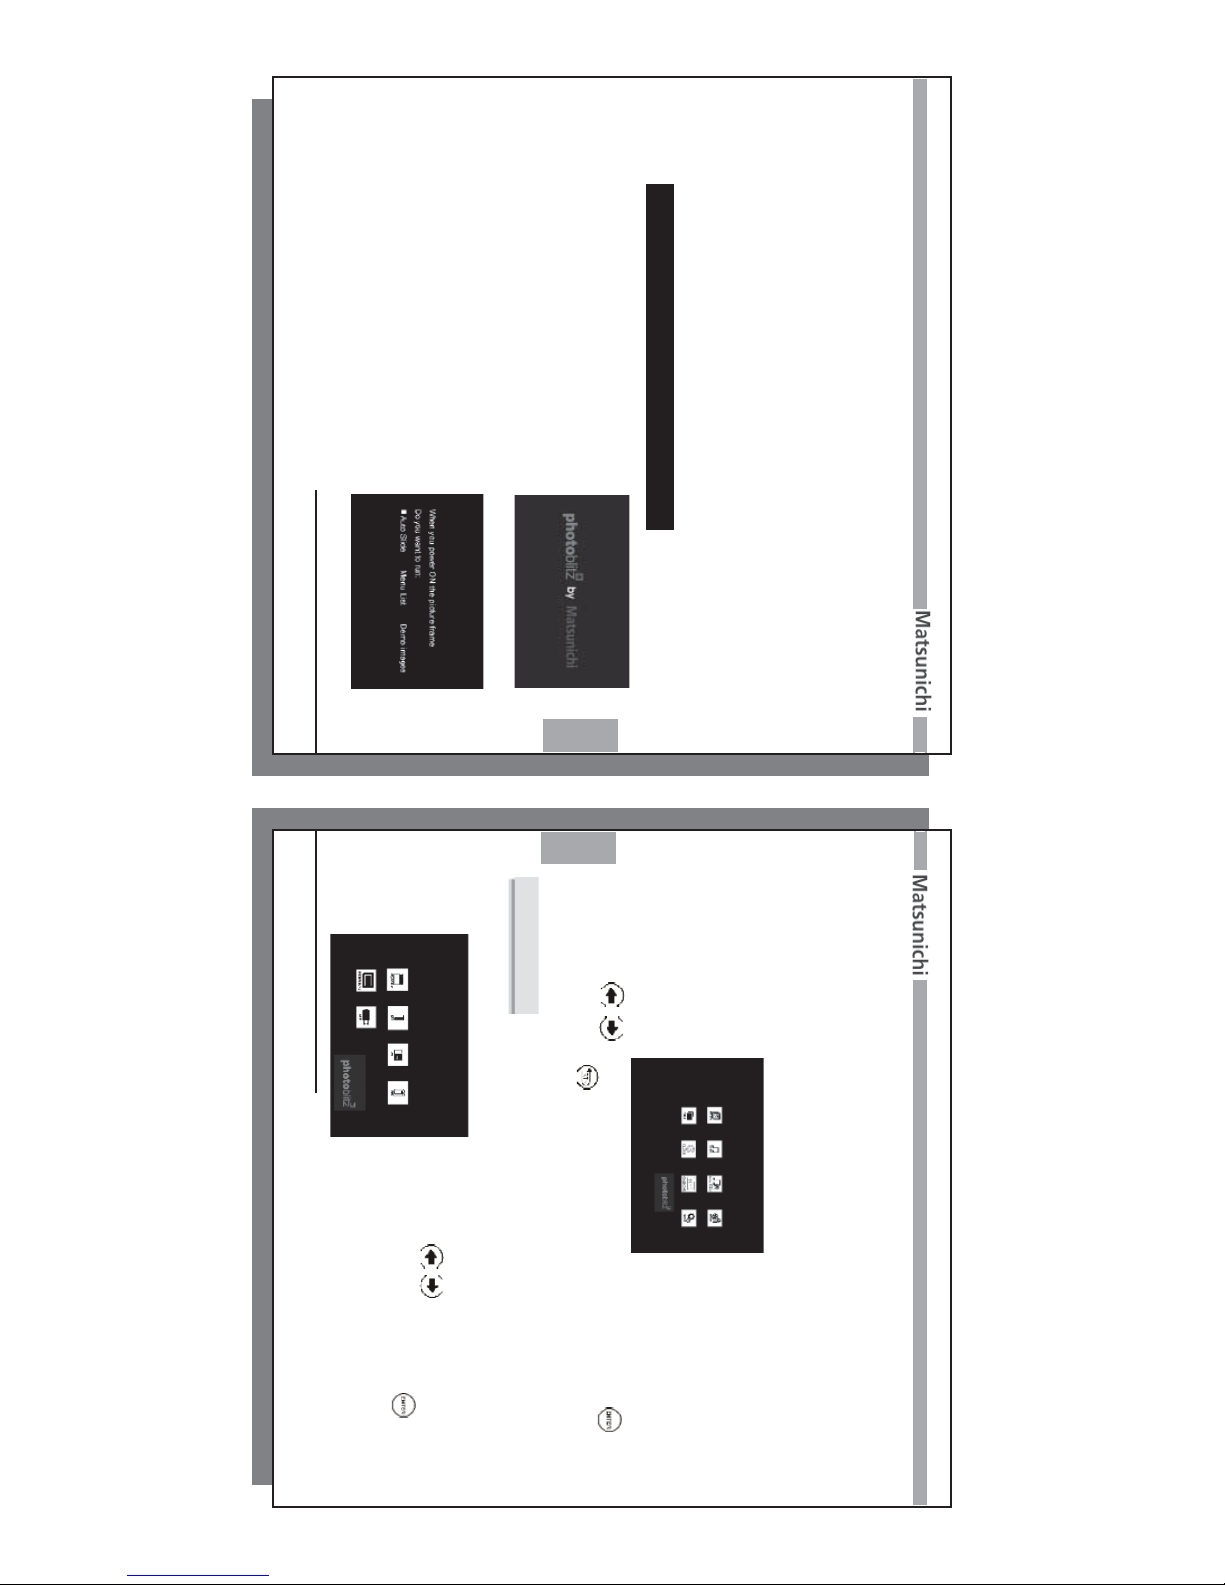
Chapter 3 Function application .......................................11
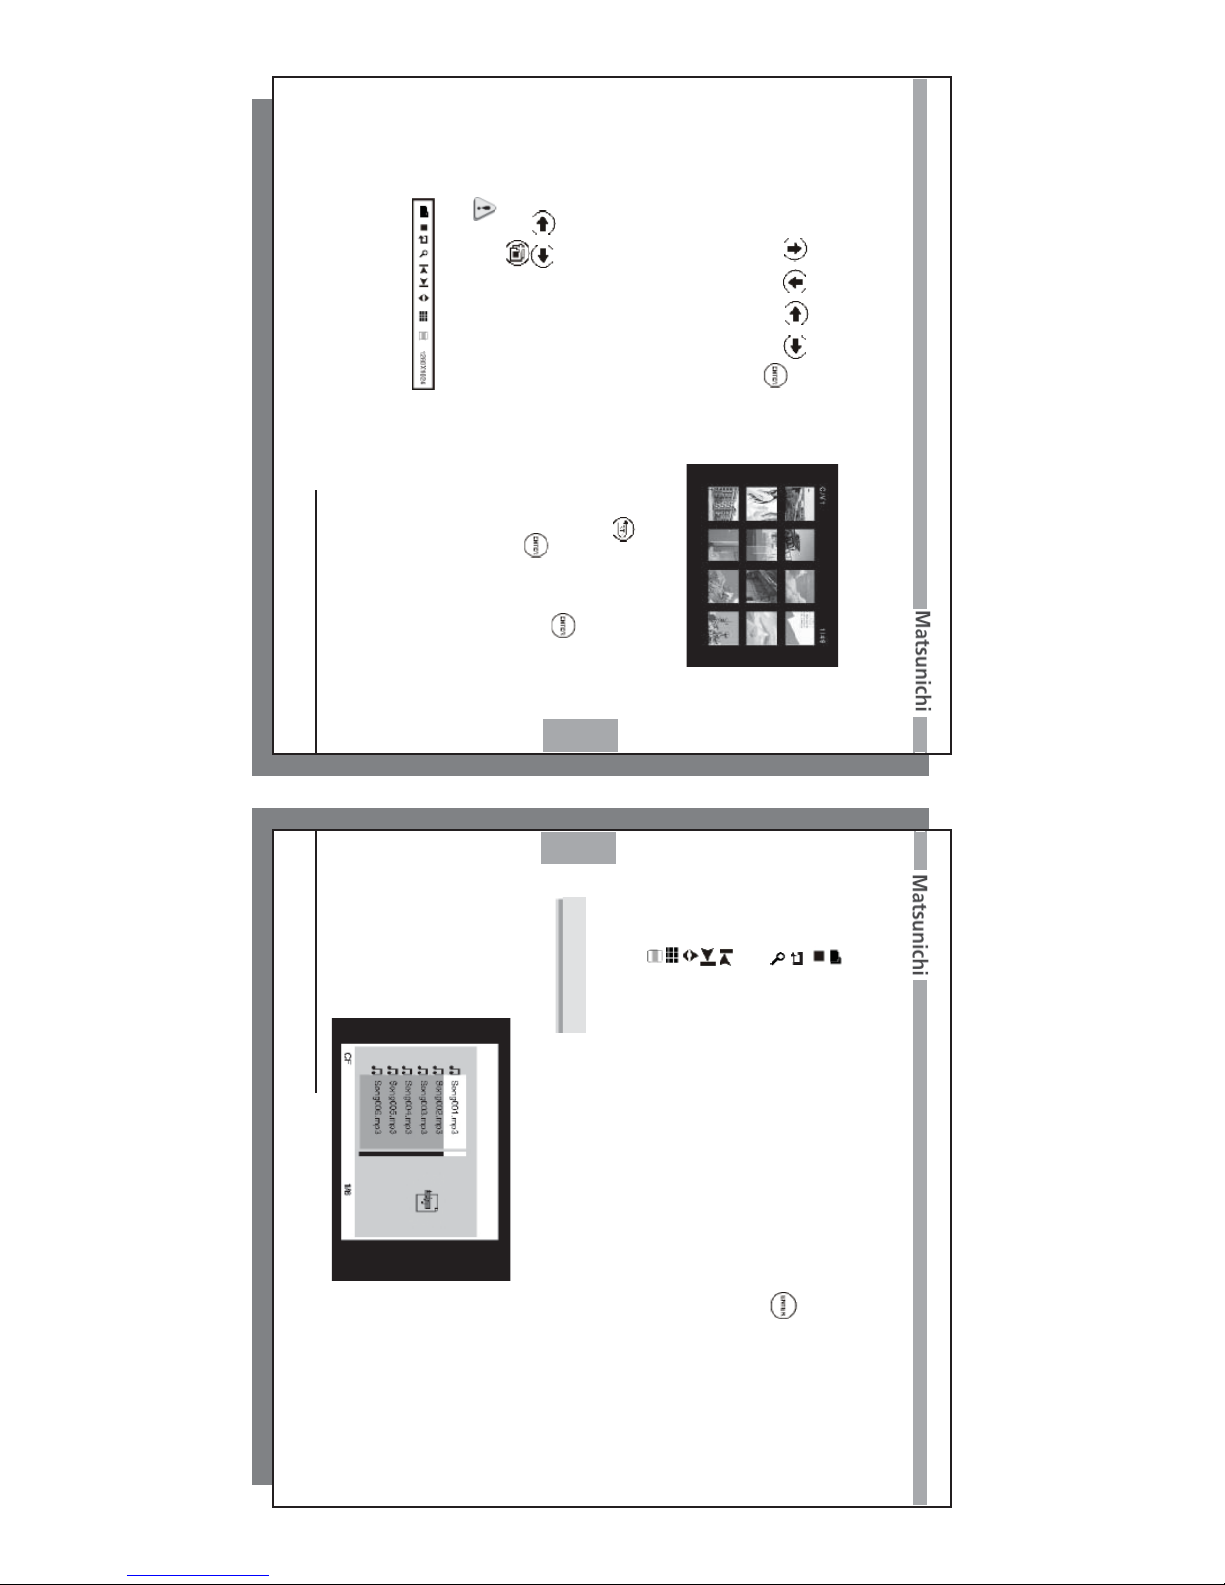
3-1 Photo ..............................................................................12
3-2 Music.........................................................................14
3-3 Photo & Music...............................................................16
3-4 Movie............................................................................17
3-5 Files - (Copy - Delete - Transcode)...................................................18
3-6 Clock / Calendar.................................................................................... 21
3-7 Setup.................................................................................. 22
3-8 Changing the Frame ............................................................................. 25
Chapter 4 Appendix ....................................................26
4-1 Technical specifications....................................................26
4-2 Care and Maintenance...................................................28
Limited Warranty ...........................................................29
3
www.matsunichi.com
3
Chapter 1 Overview
1-1 PF1009M Digital Frame
Includes both cherry wood and black changeable frames
Listen to MP3 music files
View JPEG (Up to 8K x 8K resolution), BMP, GIF, TIFF and PNG images
Supports AVI / Mpeg4 - part 2 Video format (up to 704 x 576 resolution)
Supports Compact Flash (CF), Secure Digital (SD), xD, Multi Media Card (MMC) and
Memory Stick & Memory Stick Pro (MS) memory cards
Programmable Display Dimmer
Multiple Image - slide show ( 4 images on display )
Clock - Calendar with photo slide show of internal memory & Alarm Clock.
Graphic menu operation, easy and convenient to use
Wireless Remote Control
Internal memory can store 500*+ pictures using transcoding technology
Auto Rotation & Date Stamp of image displayed (EXIF)
* Number of images stored in internal memory may be different based on transcoding
setting in setup and original image size.
4
4
www.matsunichi.com
The PF1009M has internal memory to store your
digital pictures but does not include an external
memory card in the packaging. The external memory
card (SD / MMC / MS / xD / CF / MS Pro) or USB
mass storage device with music, video and photo
files can be operated with this device.
System Requirements:
Minimum configuration of the PC required for file
upload/download:
Pentium MMX 2000 or above CPU;
An available USB port
Operating system: Microsoft Windows, Windows ME,
Windows 2000 Professional, Windows XP or above.
1-3 Accessories Included
1-2 Device & System Requirements
Remote control
w/ Battery
Stand
AC Adaptor User Manual
Your PF1009M comes with the following accessories. Please check that you have
everything listed below. Please DO NOT discard any of packaging material at this time.
USB Mini to Type A USB
adapter cable
(optional if your PF1009M has
only one Mini Type B USB
OTG Port)
5
www.matsunichi.com
5
Remote Control Preparation & Use
The wireless remote control already has a battery installed. To enable the remote, you
will need to remove the battery protector as show below.
1. Turn over the remote to the back cover.
2. Pull the plastic tab to enable the battery in the remote.
Your remote is now ready for use.
Remote Control
Plastic Tab
Pull
6
6
www.matsunichi.com
Remote Control Battery Holder
Release Clip Handle
Using the Wireless Remote Control
The remote control works best when pointed
directly at the unit. Stay within a 30 degree
angle on either side of the unit.
Battery Polarity
To replace the battery, remove the battery holder from the remote control. To re-
move the battery holder, use your thumb to squeeze the release clip in toward the
center, while simultaneously pulling the handle out with your index finger.
Place the battery into the holder as pictured below with the POSITIVE SIDE
(marked on battery as “+”) facing upwards and insert into the remote control to
complete the battery installation.
7
www.matsunichi.com
7
1-4 Functions And Features
13
11
12
5
4326
16
16
9
10
19
8
1
6
2
8
7
3
4
5
17
18
11
7
15
14
20
8
8
www.matsunichi.com
Power On / Off
Used to turn Off or On the PF1009M.
Up / Down / Left / Right / / /
Navigation keys. Press to choose previous / next option in the menu.
Volume /
Press to increase / decrease volume level.
Enter
Press to enter menu and sub-menus to configure different settings of the
player. Also used to confirm selected option.
Power Adapter Connector
Earphone Jack
Return to upper menu or previous menu -
SD / MMC / xD / MS Card Slot
CF Card Slot
Wireless Remote receiver
Adjustable Rotation / Tilt Stand
Wall Mounting holes
Start slide show
Main menu (Returns device to Main menu)
USB Device or Host (OTG) Port
USB Host port (optional of some PF1009M models)
1
2-5
6-7
8
9
10
11
12
13
14
15
16
17
18
19
20
9
www.matsunichi.com
9
a. Connect the player with the
stand as shown:
b. Connect the power adapter to the power outlet. Connect the DC-out port of the AC
adapter to the DC-in port of the unit. As shown below:
c. Insert a memory card into the appropriate socket (be careful to insert the card
properly). Move the power switch to ON position. You are now ready to enjoy
your photos, music and video files.
Chapter 2 Connecting
10
10
www.matsunichi.com
If your PF1009M has only one USB Mini OTG port, please use the USB Mini to Type
A cable adapter (supplied with accessories with PF1009M w/one USB Mini OTG
port).
e. Connecting to PC
(1) Position your PC properly so that you may access the USB port.
(Note: Some USB ports) may be found on the front panel instead of the back.
Contact your system vendor for detailed information if necessary).
(2) Plug the USB connector on the USB cable to your PC USB port.
(3) Turn on your PF1009M device, and then plug the smaller connector on USB
cable to the PF1009M USB DEVICE port.
d. Connect with a USB Mass Storage Device
You can also connect with a USB Mass Storage Device via the USB Port,
as show below:
11
www.matsunichi.com
11
First Time Powered ON Mode:
Message Prompt and User Preferences
The initial greeting looks like this:
When you power ON the PF1009M for
the first time or after doing a factory
setting reset, you will be asked to define
the user settings (Auto Start Slideshow,
Main Menu or Demo images). These
settings will allow you to have the
PF1009M automatically start a slideshow, go
to the main menu or display the demo images
when powered ON.
Chapter 3 Function Applications
(5) The system should detect the new hardware and install the driver for it
automatically.
(6) When the driver installation is finished, the device is ready to use. If you would
like to confirm that the device has been properly installed on your computer,
please double-click [My computer].
(7) Removable disks [H:] [I:] [J:] [K:][L:] appear on [My computer] (Removable disk
[H:] [I:] [J:] [K:][L:] represents the memory card such as CF / SD / MMC / XD / MS
and internal memory).
12
12
www.matsunichi.com
Setting Options:
Auto Slide - Device will automatically display a slide show when device is turned ON
(memory card or internal memory must contain photo files).
Menu List - When the device is turned on, it will display the "Main Menu", as shown
below:
Use the / navigation buttons to move through the selections and press
key to confirm. Press" " key or Menu Button on remote to go back to Main Menu.
Demo images - Device will display Demo images when device is turned on.
Choose “PHOTO” from the Main menu and then select memory device (internal or
plugged in memory card) to enter the Photo Digest/Playback menu.
3-1 Photo
Then Use the navigation buttons to
move through the selections and press
to confirm. The device will then enter the
photo digest browser, as shown below:
13
www.matsunichi.com
13
1. If you select a folder in the photo digest browser, the browser will open the
selected folder and display all of the files inside. Use to go to the previous level.
2. If you select any image file displayed in the File Menu, the picture frame will
display this photo and the Function Bar will pop up while you press . Use
/ to navigate the Function Bar functions. Use to confirm selection.
Use on the remote control to start a slide show from the selected photo.
NOTE: If the Auto Start feature in the SLIDESHOW SETUP menu is set to
ON, the playback of all photo files at power up will begin.
Function Bar
Use / / / to
navigate this page, press to
confirm your selection.
14
14
www.matsunichi.com
3-2 Music
Choose “Music” in the menu to enter the device selection interface to choose an
available memory device from the device list and then enter the file browser.
A. Slide show: Starts/Resumes Slideshow based on Slideshow Settings in Setup.
B. Stop: Stop and return to previous menu.
C. Rotate: Rotate current photo clockwise.
D. Zoom: Zoom in 2X, 3X, 4X and 5X Zoom Modes. Use buttons to scroll
after zooming into the photo. At this time you can press Up, Down, Left,
Right keys for pan function.
E. Previous: Displays previous photo.
F. Next: Displays next photo.
G. Photo ID: Shows photo properties.
H. Thumbnail: Go to thumbnail digest. (There are 20 small pictures in one screen).
I. Image copy: copy and store photo dispayed file to internal memory
(If transcoding in setup is Off, photo will be copied to internal memory without
any compression. If you have set the transcoding On to either L-M-H, the copied
photo will be compressed/resized and stored into internal memory)
15
www.matsunichi.com
15
Action buttons menu - Music Menu:
Use the / button to access the action buttons, including:
a. Play / Pause
b. Stop: Stop and return to previous menu
c. Previous: Skip to previous track during playback of music
d. Fast reverse: Fast reverse 2X / 3X / 4X / 5X speed modes within the current track
during playback of music
e. Fast forward: Fast forward 2X / 3X / 4X / 5X speed modes within the current track
during playback of music
f. Next: Skip to next track during playback of music
g. Music file ID: Show music file properties.
h. ID3 Tag: Display on screen ID3 tag information
Use the /navigation buttons to move through the selections and press to
play. Press / to adjust the music volume. As shown below:
16
16
www.matsunichi.com
3-3 PHOTO & MUSIC
Choose “PHOTO & MUSIC” in the Main menu to enter the device selection interface
to choose an available memory device from the device list and then enter file browser.
Use the / navigation buttons to move through the photo or music files and
press to play. Press / to adjust the music volume.
Action buttons menu - File Menu
While playing a file, Press button to access the action buttons, including:
a. Play/Pause
b. Stop: Stop and return to previous menu
c. Previous: Skip to previous track during playback of music
d. Fast reverse: Fast reverse 2X / 3X / 4X / 5X speed modes within the current track
during playback of music
17
www.matsunichi.com
17
e. Fast forward: Fast forward 2X/3X/4X/5X speed modes within the current track during
playback of music
f. Forward: Skip to next track during playback of music
g. Music file ID: Show music file properties
h. ID3 Tag: Show ID3 tag information
I. Repeat Mode: Press to select music playback repeat mode
Use the / button to access the action buttons, select " " then press
to pop up another function bar, as shown in the diagram:
Please refer to 3-1 PHOTO for more details.
3-4 MOVIE
Choose “MOVIE” in the menu to enter the device selection interface to choose an
available memory device from the device list and then enter file browser. Use the
/ navigation buttons to move through the selections and press to play as
below:
While playing a movie, press / to
adjust the movie volume.
Action buttons menu - Movie Menu:
Use the /button to access the action
buttons, including:
18
18
www.matsunichi.com
a. Play / Pause
b. Stop: Stop and return to previous menu
c. Previous: Skip to previous track during playback of Movie
d. Fast reverse: Fast reverse 2X / 3X / 4X / 5X speed modes within the current track
during playback of Movie
e. Fast forward: Fast forward 2X / 3X / 4X / 5X speed modes within the current track
during playback of Movie
f. Forward: Skip to next track during playback of Movie
g. Movie file ID: Show movie file properties
h. Zoom: Zoom in 2X, 3X, 4X and 5X Zoom Modes. Use buttons to scroll after
zooming into the movie
i. Subtitle: Set subtitle display ON / OFF. If the movie file does not contain subtitles,
then screen will display "NO Subtitles"
3-5 FILES
Choose “FILES” in the menu to enter the
device selection interface to choose an
available memory device from the device list
and then enter the File List browser.
In addition to the viewing file list, the FILES
menu has the additional features of copying
(one memory device to another), deleting or
transcoding (resize / compress your image
file to be store in the internal memory).