Mauser MA 1245 Guide

1245MA
1246MA
4153-1-1245-3-2
Taicang 2012-02
© Tribonia Intl.
Adjustment Manual
M
A
U
S
E
R
S
P
E
Z
I
A
L

215400 Taicang, Jiangsu

Index
Contents ..................................................................................Page
13 Adjustment ........................................................................................................................... 5
13.01 Notes on adjustment ....................................................................................................... ...... 5
13.02 Tools, gauges and other accessories for adjusting ............................................................... 5
13.03 Abbreviations ............................................................................................................. ............ 5
13.04 Explanation of the symbols................................................................................................ .... 5
13.05 Adjusting the basic machine ............................................................................................... ... 6
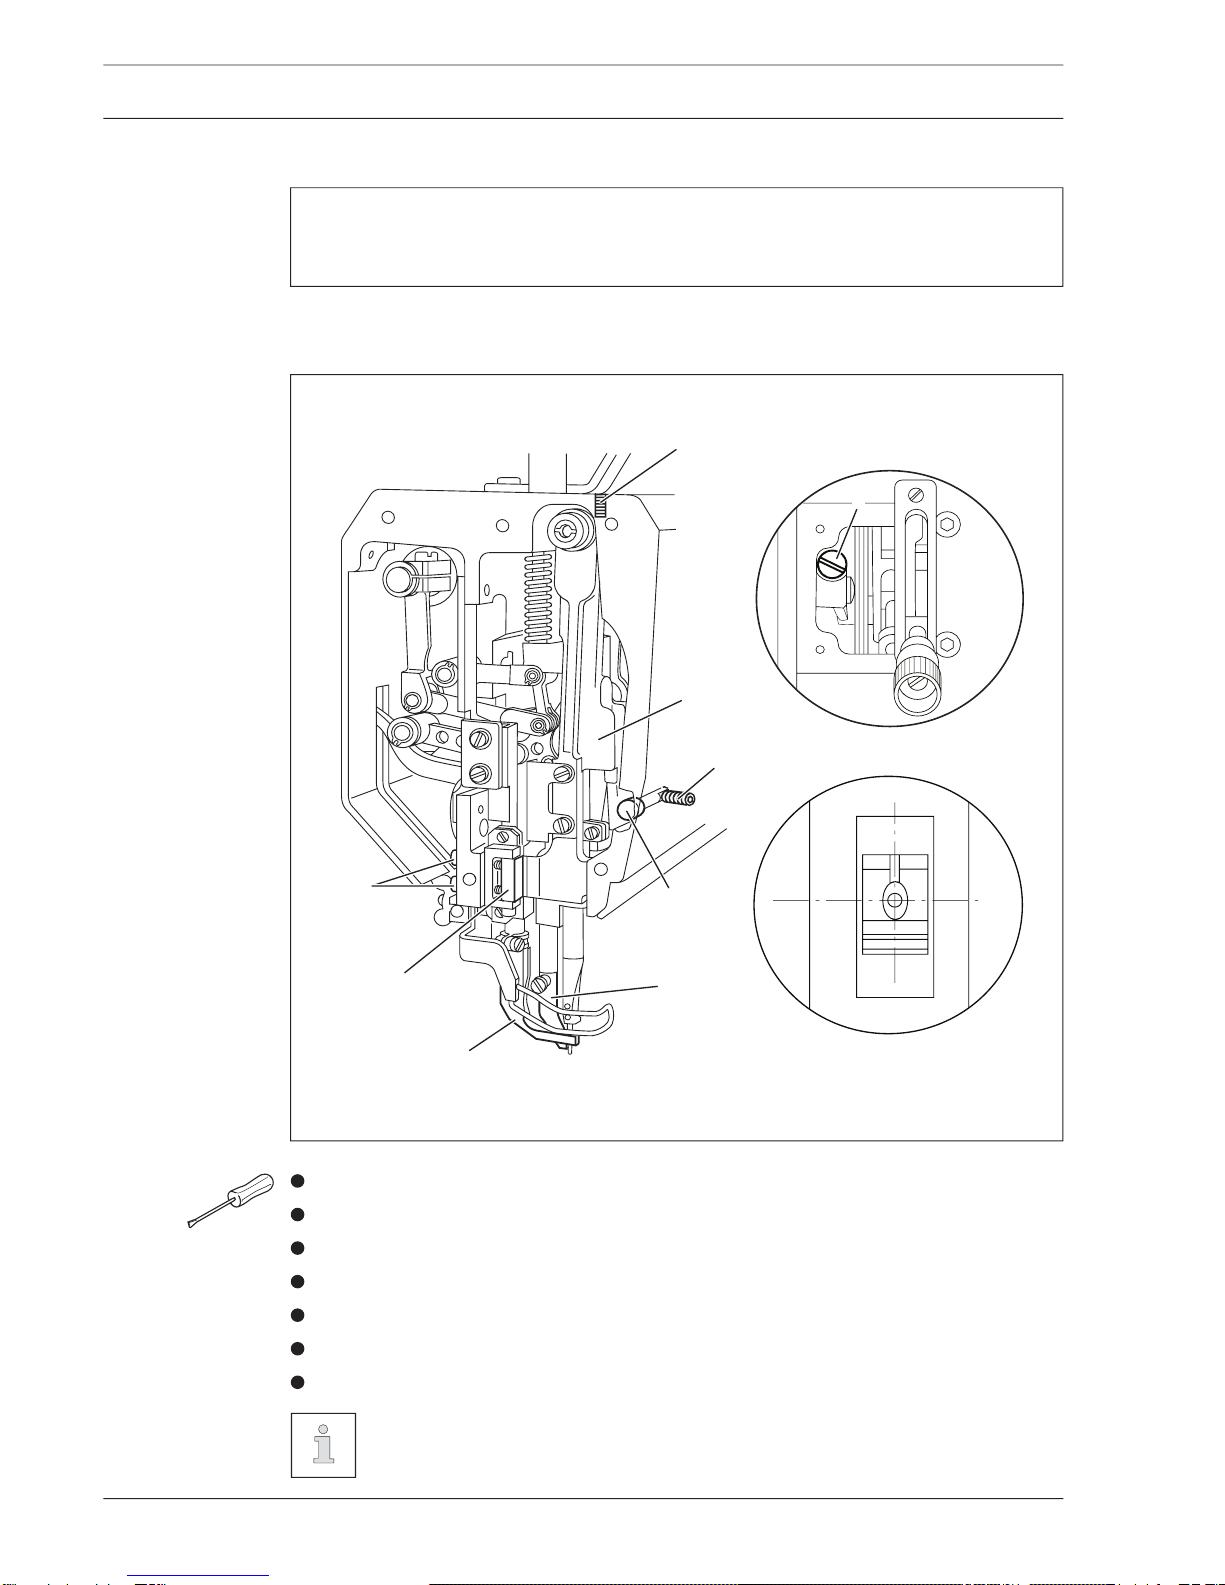
13.05.01 Positioning the feed dog across the direction of sewing ....................................................... 6
13.05.02 Positioning the feed dog in the direction of sewing .............................................................. 7
13.05.03 Height of the bottom feed-dog ......................................................................................... .... 8
13.05.04 Pre-adjusting the needle height ........................................................................................ ..... 9
13.05.05 Centering the needle in the needle hole.............................................................................. 10
13.05.06 Lifting motion of the bottom feed-dog . ............................................................................... 1 1
13.05.07 Driving motion of the bottom and top feeds........................................................................ 12
13.05.08 Hook-to-needle clearance, needle rise, needle height and needle guard ........................... 13
13.05.09 Top-feed stroke ........................................................................................................ ............ 15
13.05.10 Lifting motion of the top feed ........................................................................................ ..... 16
13.05.11 Bobbin-case opener .................................................................................................... ........ 17
13.05.12 Safety clutch .......................................................................................................... .............. 18
13.05.13 Needle thread tension release.......................................................................................... ... 19
13.05.14 Thread check spring .................................................................................................... ......... 20
13.05.15 Thread check spring .................................................................................................... ......... 21
13.05.16 Bobbin winder.......................................................................................................... ............ 22
13.05.17 Presser-foot pressure.................................................................................................. ......... 23
13.06 Adjusting the thread trimmer -900/56 ................................................................................. 24
13.06.01 Pre-adjusting the control cam ......................................................................................... .... 24
13.06.02 Tripping lever......................................................................................................... ............... 25
13.06.03 Pawl .................................................................................................................. .................. 26
13.06.04 Engaging solenoid...................................................................................................... .......... 27
13.06.05 Release trip .......................................................................................................... ............... 28
13.06.06 Engaging lever ......................................................................................................... ............ 29
13.06.07 Linkage rod ........................................................................................................... .............. 30
13.06.08 Final adjustment of the control cam .................................................................................... 31
13.06.09 Catch ................................................................................................................. .................. 33

Index
Contents ..................................................................................Page
13.06.10 Connecting rod (for MA 1246 only) ..................................................................................... 34
13.06.11 Thread-catcher height ................................................................................................. .............35
13.06.12 Knife ................................................................................................................. ................... 36
13.06.13 Thread catcher reverse position ............................................................................................... ..........37
13.06.14 Bobbin-thread clamp spring .................................................................................................... ............38
13.06.15 Tension release bar ............................................................................................................ ..................40
13.07 Parameter settings ........................................................................................................... ... 42
13.07.01 Parameter list......................................................................................................... .............. 42
14 Circuit diagrams................................................................................................................. 43

Adjustment
5
13 Adjustment
Please observe all notes from Chapter 1 Safety of the instruction manual!
In particular care must be taken to see that all protective devices are re tted
properly after adjustment, see Chapter 1.06 Danger warnings of the instruction
manual!
If not otherwise stated, the machine must be disconnected from the electrical
power supply. Danger of injury due to unintentional starting of the machine!
The illustrations in this section show the MA 1245 single-needle machine.
For the MA 1246 two-needle machine, various adjustments must be made
twice, i.e. to the left- and right-hand sewing hooks. This will be pointed out in
the respective sections, whereby it is often possible to apply the mirror image
of the illustrations.
13.01 Notes on adjustment
All following adjustments are based on a fully assembled machine and may only be carried
out by expert staff trained for this purpose.
Machine covers, which have to be removed and replaced to carry out checks and adjust-
ments, are not mentioned in the text.
The order of the following chapters corresponds to the most logical work sequence for
machines which have to be completely adjusted. If only speci c individual work steps are
carried out, both the preceding and following chapters must be observed.
Screws, nuts indicated in brackets ( ) are fastenings for machine parts, which must be
loosened before adjustment and tightened again afterwards.
13.02 Tools, gauges and other accessories for adjusting
Screwdrivers withi blade widths from 2 to 10 mm
Spanners (wrenches) in sizes from 7 to 14 mm
Allen keys from 1.5 to 6 mm
Metal rule (part No. 08-880 218-00)
Needle-rise gauge (part No. 61-111 600-01)
Gauge, (top feed stroke 7 mm) (Part No. 61-111 633-61)
Screw clamp (part No. 61-111 600-35)
13.03 Abbreviations
t.d.c. = top dead centre
b.d.c. = bottom dead centre
13.04 Explanation of the symbols
In this adjustment manual, symbols emphasize operations to be carried out or important in-
formation. The symbols used have the following meaning:
Note, information
Service, repair, adjustment, maintenance
(work to be carried out by quali ed staff only)

Adjustment
6
13.05 Adjusting the basic machine
13.05.01 Positioning the feed dog across the direction of sewing
Requirement
The bottom feed dog must be the same distance from the left and right side of the need-
le-plate cutout.
Loosen screws 1 and 2.
Laterally align rock shaft 3 in accordance with the requirement.
Now tighten screws 1.
The at sides of pins 4 must be opposite the at sides of screws 1 and rock
shaft 3 must exhibit neither play nor stiffness.
Screws 2 remain loose for the following adjustments..
Fig. 13 - 01
41
2
31
4

Adjustment
7
13.05.02 Positioning the feed dog in the direction of sewing
Requirement
With the longest stitch set, the bottom feed dog must have the same clearance the front
and the back with respect to the needle-plate cutout when feeding both forwards and
backwards.
Set the longest stitch.
Adjust rock shaft 1 in accordance with the requirement and tighten screws 2.
Fig. 13 - 02
2
1

Adjustment
8
13.05.03 Height of the bottom feed-dog
Requirement
With the stitch length set at "0", the bottom feed dog must protrude over the needle plate
as high as the teeth when at TDC.
Set stitch length "0".
Bring the bottom feed dog to its TDC by turning the handwheel.
Adjust feed dog carrier 1 (screws 2) in accordance with the requirement.
If required, the feed dog height can be reduced a little on machines without a
bottom feed lifting phase (without P).
Fig. 13 - 03
21

Adjustment
9
13.05.04 Pre-adjusting the needle height
Requirement
With the needle bar at BDC, the distance between the needle bar and the needle plate
must be 15 mm.
Move needle bar 1 (screw 2) in accordance with the requirement without moving it
laterally.
Fig. 13 - 04
2
1

Adjustment
10
13.05.05 Centering the needle in the needle hole
Requirement
With the stitch length set at "0", the needle must enter the needle hole exactly in the
middle.
Unscrew vibrating presser 1 and presser foot 2.
Set stitch length "0"and bring the needle bar to its TDC.
Insert a new needle. Loosen screws 3, 4, 5 and 6.
Position the needle directly over the bottom feed dog by turning the handwheel.
Move needle bar frame 7 in accordance with the requirement.
Tighten screws 3, 4 and 5.
Position stop 8 so that it is touching needle bar frame 7 and tighten screw 6.
The movement of needle bar frame 7 in guide 9 and of the top feed drive bars
must not be stiff.
Fig. 13 - 05
2
3
1
9
5
6
7
4
8

Adjustment
11
13.05.06 Lifting motion of the bottom feed-dog (This adjustment does not apply for machines
without a bottom feed lifting phase (without P) .
Requirement
With the needle bar at its BDC, the bottom feed dog must be at its TDC.
With the longest stitch set, the bottom feed dog must reach the top surface of the
needle plate at the same time as the needle point when the handwheel is turned.
1.
2.
Bring the needle bar to its BDC.
Turn feed lifting eccentric 1 (screws 2) in accordance with requirement 1.
In this position, tighten the accessible screw 2 until feed lifting eccentric 1 can be turned
with dif culty.
Turn feed lifting eccentric 1 a little further in accordance with requirement 2.
Tighten both screws 2.
Fig. 13 - 6
1 2

Adjustment
12
13.05.07 Driving motion of the bottom and top feeds
Requirement
With the longest stitch length set and the needle bar at its BDC, the top and bottom
feeds should not move when the reverse-feed lever is activated..
Set the longest stitch.
Loosen screws 1 just far enough so that the feed driving eccentric 2 can be turned on the
shaft with dif culty.
Bring the needle bar to its BDC.
Turn the feed driving eccentric 2 so that its eccentricity is facing downwards.
Now turn it a little in the direction of rotation in accordance with the requirement.
In this position, tighten screws 1.
Carry out a check in accordance with the requirement.
Fig. 13 - 7
12

Adjustment
13
13.05.08 Hook-to-needle clearance, needle rise, needle height and needle guard
(On Model 1246 make these adjustments on both sewing hooks.)
Requirement
When the stitch length is set at " 3"and with the needle rise position set (see table):
the hook point must be at "needle centre" with a hook-to-needle clearance of 0.05 to
0.1 mm;
the top of the needle eye must be 0.8 - 1,0 mm below the hook point;
and needle guard 5 must touch the needle just lightly..
1.
2.
3.
Set stitch length "3"and loosen screws 1, 2 and 3.
Bring the needle to its BDC and slide the appropriate feeler gauge under the needle bar
bearing.
Position the adjustable clamp against the feeler gauge and screw it tight.
Remove the feeler gauge and turn the balance wheel in its direction of rotation until the
adjustable clamp is touching the needle bar bearing.
Needle rise position:
Model B: 1,8 mm after b.d.c. off the needle bar
Model C: 2,0 mm after b.d.c. off the needle bar
1
3
Fig. 13 - 8
1
3
1
1
2
2
3
2

Adjustment
14
Move hook bearing 4 in accordance with requirement 1.
Tighten screws 1.
Position the hook point at the needle centre, taking care to ensure that the needle is not
de ected by needle guard 5.
While ensuring that bevel gear 6 is not too close, and that the hook does not have too
much play, tighten screws 2.
Position retaining collar 7 so that it rests on bevel gear 6 and tighten screws 3.
Adjust the needle height in accordance with requirement 2.
Align needle guard 5 in accordance with requirement 3.
On the MA1246 the linkage rod to the thread trimmer (also see Chapter
13.06.10) must be readjusted if the needle gauge is altered.
1
3
Fig. 13 - 8
1
3
1
1
2
2
3
2
4
6
6
7
5
7
4

Adjustment
15
13.05.09 Top-feed stroke
Requirement
At the largest top-feed stroke setting and stitch length " 0", presser foot 1 and vibrating
presser foot 2 must lift 7.0 mm from the needle plate when the handwheel is turned.
Set the largest top-feed stroke and the stitch length at " 0".
Bring presser foot 1 to rest on the needle plate.
Turn the handwheel in the direction of rotation until vibrating presser foot 2 has reached
its highest point.
Turn crank 3 (screws 4) in accordance with the requirement..
Fig. 13 - 9
1
2
3
4

Adjustment
16
13.05.10 Lifting motion of the top feed
Requirement
When presser foot 1 is resting on the needle plate, the vibrating presser foot 4 and the
point of the needle must both reach the needle plate at the same time when the top feed
stroke is set at maximum.
Allow presser foot 1 to rest on the needle plate.
Loosen screws 2 until feed lifting eccentric 3 can be turned on its shaft with dif culty.
Turn feed lifting eccentric 3 in accordance with the requirement.
Tighten screws 2.
Carry out a check in accordance with the requirement.
Fig. 13 - 10
2 3
1
4

Adjustment
17
13.05.11 Bobbin-case opener (On Model 1246 make these adjustments on both bobbin openers.)
Requirement
The needle thread must not be clamped between the bobbin-case opener 1 and the bob-
bin-case base 3 nor may it be clamped between projection 4 and the retaining trip of the
needle plate (see arrows).
Thread the machine, insert test material and allow the presser foot to rest on the needle
plate.
Sew a few stitches by turning the handwheel and carry out a check in accordance with
the requirement.
Turn bobbin-case opener 1 (screw 2) in accordance with the requirement.
Fig. 13 - 11
2
3
1
4

Adjustment
18
13.05.12 Safety clutch
Remove the jammed thread.
Press piston 1 and turn the handwheel until hook 3 of pawl 2 clicks into groove 4.
The safety clutch is set by the manufacturer and screws 5 are sealed.
If the thread jams, the safety clutch snaps out to prevent damage to the hook.
A description of how to snap the clutch back in follows.
Fig. 13 - 12
2
1
34

Adjustment
19
13.05.13 Needle thread tension release
Requirement
With the presser foot raised, both of the tension discs must be at least 0.5 mm apart.
Mittels Handhebel den Stoffdrückerfuß hochstellen.
Druckplatte 1 hinter der Spannungs-Trägerplatte 2 entprechend der Requirement richten.
If the tension is correct, release pin 3 must not be under pressure.
Fig. 13 - 13
2
3
1
The clearance of 0.5 mm is a minimum and can increase to more than 1 mm
when using thick threads.

Adjustment
20
13.05.14 Thread check spring (on the MA 1245 and 1246 without thread trimmer -900/56)
Requirement
The movement of thread check spring 2 must be nished when the needle point enters
the material (approx. 7 mm spring path).
Adjust stop 1 (screw 2) according to requirement.
To adjust the pressure of the spring, turn screw 3 (screw 4).
Due to technical reasons, the length of the thread-check spring path can vary a
little in either direction.
Fig. 13 - 14
3
1
2
4
Other manuals for MA 1245
1
This manual suits for next models
1
Table of contents
Other Mauser Sewing Machine manuals

Mauser
Mauser MA 2081 User manual

Mauser
Mauser MA 2545 User manual

Mauser
Mauser MO5100 Parts list manual

Mauser
Mauser MA 335 User manual

Mauser
Mauser MI5530 Parts list manual

Mauser
Mauser MO6101 Parts list manual

Mauser
Mauser MH1341 Parts list manual

Mauser
Mauser MA 1245 User manual

Mauser
Mauser MA 335 User manual

Mauser
Mauser MO5101 User manual