Max BD-CG015S User manual

Coffee Grinder User Manual
Model No.: BD-CG015S

IMPORTANT SAFEGUARDS
When using electrical appliances, basic safety precautions should always be followed:
1. Read all instructions.
2. To protect against fire, electric shock and injury to persons, do not immerse cord, plugs or machine in water or
other liquid.
3. Unplug from outlet when not in use, before putting on or taking off parts, and before cleaning. To unplug, grasp
plug and pull from electrical outlet. Never pull cord.
4. Avoid contact with moving parts
5. To reduce the risk of severe injury to persons or damage to the appliance, keep hands and utensils out of the
coffee bean box while grinding, and when the appliance is plugged in.
6. Do not operate the grinder with a damaged cord or plug or after the appliance malfunctions, or is dropped or
damaged in any manner. In this case, return the appliance to the approved Service Center for examination,
repair, or electrical or mechanical adjustment.
7. The use of attachments not recommended or sold by may cause fire, electric shock or injuries.
8. Do not use outdoors.
9. Do not let cord hang over edge of table or counter or touch hot surfaces, including the stove.
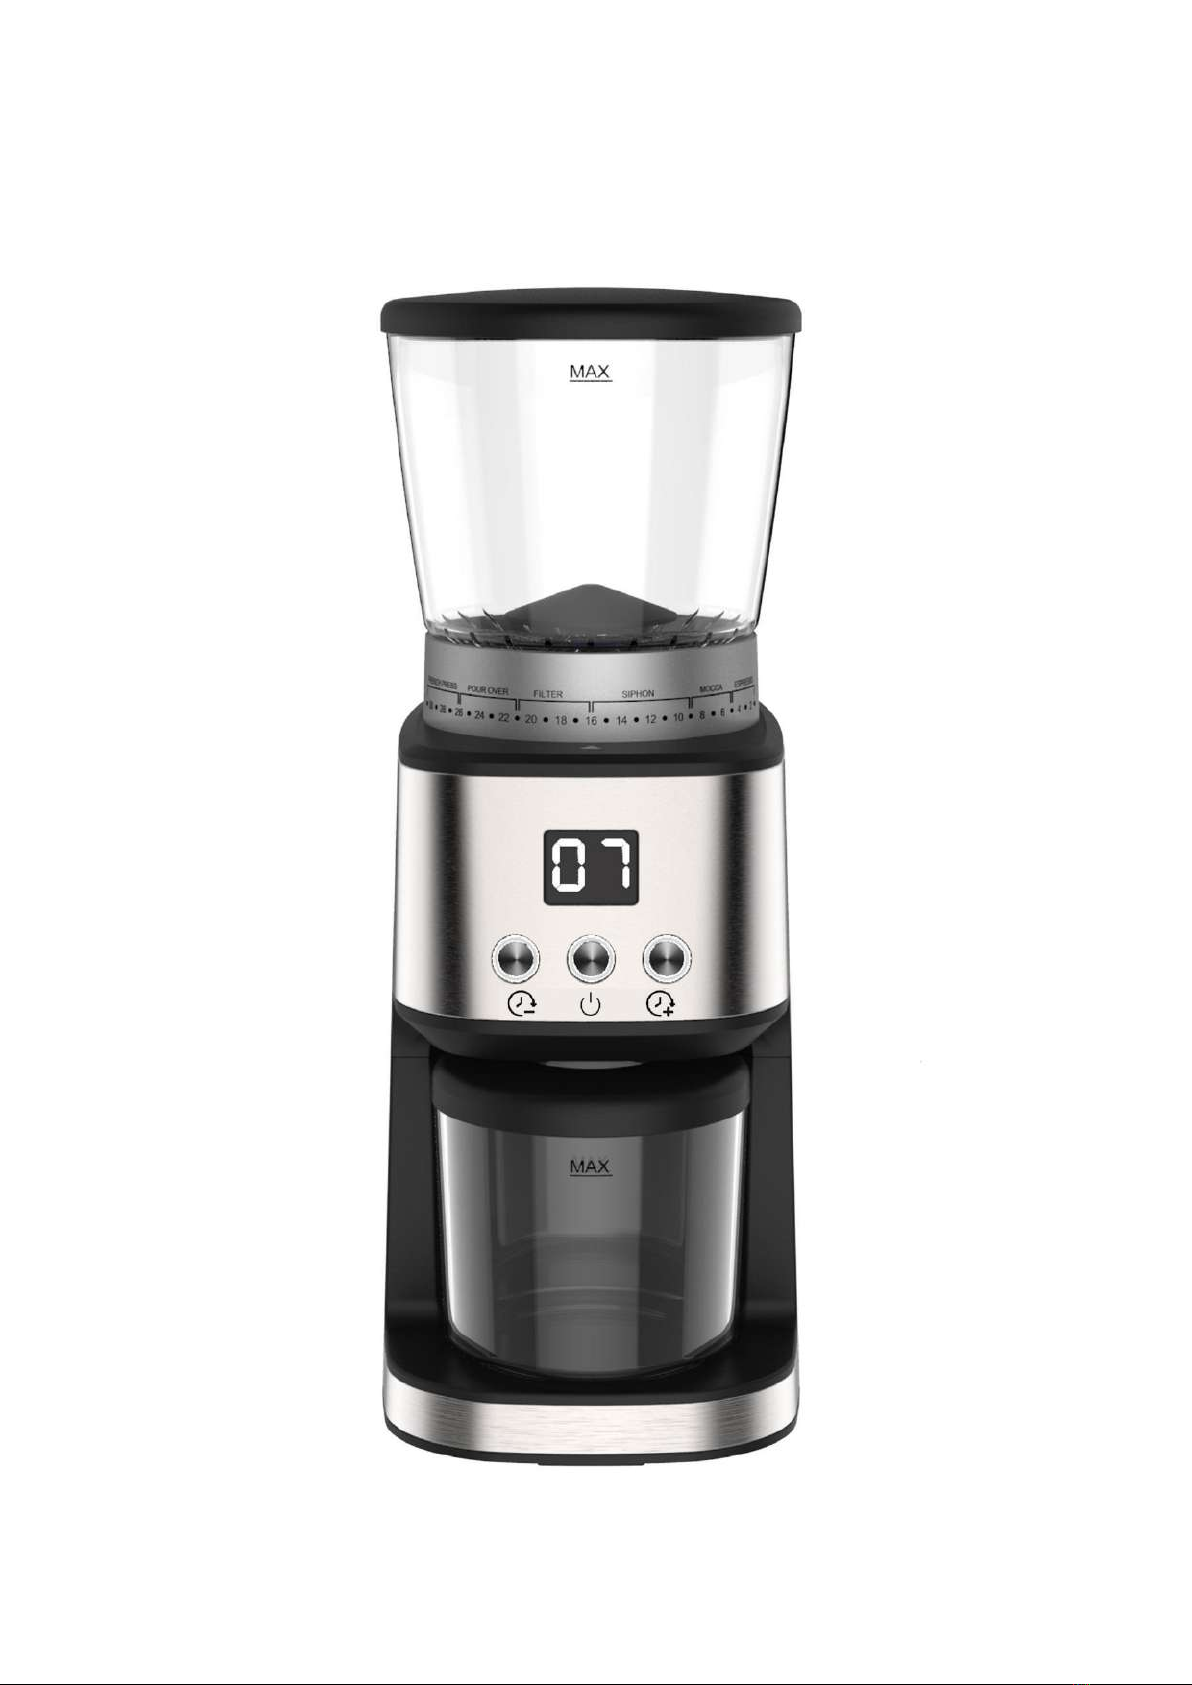
10. Check Coffee bean box for presence of foreign objects before using.
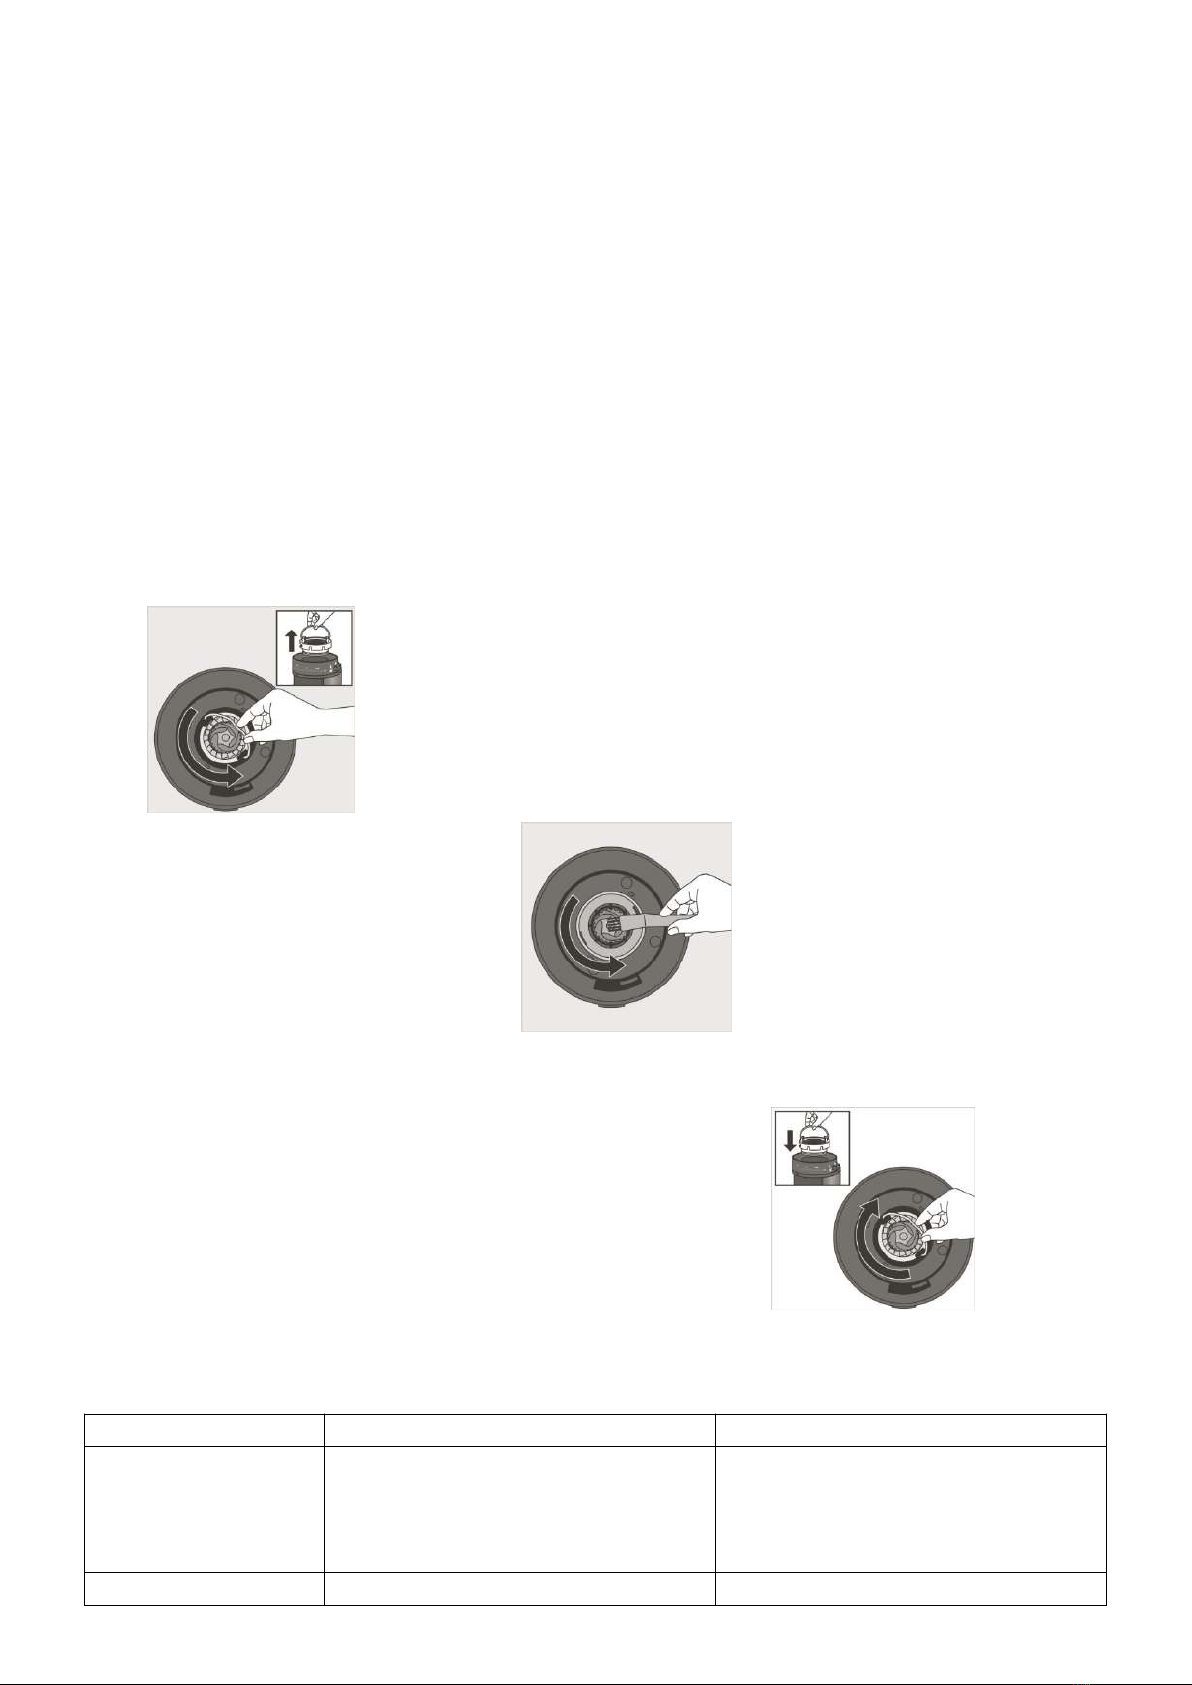
11. Always operate the burr grinder with the lid securely in place.
12. Do not place on or near a hot gas or electric burner or in a heated oven.
13. This product has been designed for household use only. Any commercial use, inappropriate use or failure to
comply with the instructions will void the manufacturer's Warranty.
14. This appliance is only used for roasted coffee beans grinding. Do not use the appliance for other intended
use (such as hard seeds, spice, nuts, etc.);
15. The capacity of powder jar cannot exceed the maximum mark.
16. Every appliance is inspected strictly during mass production, and be tested with coffee beans for grinding,
which may cause slight traces of use or residual coffee grounds;.
17. All machines are subject to stringent quality control. Practical tests using machines taken at random are
conducted and this may explain any slight marks or coffee residue showing prior to use.
18. the appliance is not to be used by persons with reduced physical, sensory or mental capabilities, or lack of
experience and knowledge, unless they have been given supervision or instruction.
19. Children shall not play with the appliance
20. Switch off the appliance and disconnect from supply before changing accessories or approaching parts that
move in use.
21. For an electronic copy of this manual, please contact our after sales support centre.
22. Always disconnect the appliance from the supply if it is left unattended and before assembling,
disassembling or cleaning.
23. Cleaning and user maintenance shall not be made by children unless they are aged from 8 years and above
and supervised
24.This appliance shall not be used by children. Keep the appliance and its cord out of reach of children
SAVE THESE INSTRUCTIONS
CAUTION
This appliance is for household use only. Any servicing other than cleaning and user maintenance should be
performed by the nearest authorized Service Center.
■ Do not immerse appliance in water.
■To reduce the risk of fire or electric shock, do not dismantle the appliance. Repair should be done by an
authorized Service Center only.

SHORT CORD INSTRUCTIONS
Regarding your Cord Set:
A. A short power-supply cord is provided to reduce the risks resulting from becoming entangled in or tripping
over a longer cord.
B. Extension cords should be used with caution.
C. If an extension cord is used, (1) the marked electrical rating of the extension cord should be at least as great
as the electrical rating of the appliance, (2) if the appliance is of the grounded type, the extension cord should be
of a grounded type and (3) the longer cord should be arranged so that it will not drape over the counter top or
table top where it can be pulled on by children or tripped over.
POLARIZED PLUG
This appliance has a polarized plug (one blade is wider than the other), to reduce the risk of electrical shock. This
plug will fit into a polarized outlet only one way.
If the plug does not fit fully into the outlet, reverse the plug. If it still does not fit,contact a qualified electrician. Do
not modify the plug in any way.
ABOUT GRINGDING COFFEE
The proper grind gives the most flavorful cup of coffee. The grind size and amount depend on the method by
which the coffee is to be brewed. Generally, the finer the grind the more quickly the coffee should be prepared.
That is why coffee ground for an espresso machine extraction is much finer than coffee to be brewed in a drip
system.
Coffee that is ground too fine for a particular brewing process - (For example, fine espresso grind used in a filter
drip coffee machine) will result in over-extraction and bitter, pungent tasting coffee. Conversely, coffee that is too
coarse for a particular brew method will result in under-extraction and weak, watery coffee. If the correct grind is
used, adding more coffee simply makes a brew stronger without making it bitter.
In addition to providing a range of grind settings, coffee grinders provide a consistent grind. This is important to
ensure the extraction is consistent across all of the ground coffee particles.
DESCRIPTION
A. Coffee Bean box lid
B. Coffee Bean box
C. Removable upper conical burr
D. Coarseness adjustment ring
E. Housing in Stainless steel
F. LED display
G. Time Decrement button
H. START/STOP button
I. Time Increment button
J. Brush
K. Coffee powder lid
L. Coffee powder jar

Caution:
Power saving mode: If without operation over 3 minutes, the unit enters Power saving mode
automatically, press any button it restarts.
BEFORE FIRST USE
Before using the coffee grinder, wipe the housing and Coffee bean box with a clean damp cloth. Wash the coffee
powder jar and the coffee powder jar lid in hot soapy water, then rinse and dry.
SET THE COFFEE BEAN BOX
How to remove the Coffee bean box
1. Make sure the coffee grinder is unplugged.
2. Press the Coffee bean box release lever located at the opposite of the grinding size
markings,
3. Turn the Coffee bean box counter-clockwise until the unlock icon aligns with the arrow and lift it up.
How to assemble the Coffee bean box
1. Make sure the top part of the conical burr is clear. If not, pls use the brush provided to clean the top part of the
burr,
2. Align the unlock icon on the base with the arrow on the Coffee bean box,

3. Turn the Coffee bean box clockwise until the lock icon aligns with the arrow ,
NOTE: If the coffee bean box is not assembled properly, the coffee grinder won't work.
SET COFFEE GRIND SIZE
1.Put the coffee powder jar at the correct position.
2.Fill coffee beans into coffee bean box, close the lid.
3.The coffee grinder has 31 grind size options. To adjust the grind size, rotate the coffee bean box and adjust
from fine to coarse according to the type of coffee you want.
See chart below:
GRIND SIZE SETTING RECOMMENDATIONS
Coffee
Type
Espresso
Mocca
Siphon
Filter Coffee
Pour Over
French Press
Grind
Size
Fine
Middle Fine
Middle
Middle
Middle
Coarse
Coarse
Grind
Setting
1-5
5-9
9-16
16-21
21-26
26-31

OPERATION INSTRUCTIONS
1. Control panel instruction
2. Button instruction
This unit has 3 buttons below:
-Time Decrement button, time setting from 1-40 seconds.
-Start / stop//Pulse mode
-Time Increment button, time setting from 1-40 seconds.
Instructions
1. Add coffee beans into the coffee bean box.
2. Select the coarseness by rotating the coarseness adjustment ring.
3.Power on the unit, the buzzer sounds one time and the IMD display shows "05”, three buttons are on light.
4.Time Decrement button
Default time is 05 seconds, time setting from 40S to 10S, each short press on this button gets 1s less, it shows
19,18,17,....10, but if the time enters less than 10 seconds, each short press goes 0.1 seconds less, it show
9.9,9.8,9.7,9.6.....0.1.
To make the timer goes faster, make a long press on this button.
After setting the time, press "start button" to start grinding.
If you want to stop grinding during operation, press “Start/stop button” one more time.
4. Increment button
When press this button, LED displays "20".
Default setting range is 20 seconds, a short press on this button each time to add 1 second, it shows
21,22,23,....40.
To make the timer goes faster, make a long press on this button.
After setting the time, press "start button" to start grinding.

If you want to stop grinding during operation, press “Start/stop button” one more time.
5. Start/stop button
After setting the time, press the Start/Stop button to start grinding.
Press the Start/Stop button again to stop grinding.
7. Start/stop button
This button is also for pulse mode. With long press on it, the display timer will count up to a maximum of 40
seconds. When you release the button, the grinder will return to standby mode.
CLEANING CONICAL BURRS
Regular cleaning helps the burrs achieve consistent grinding results which is especially important.
IMPORTANT!
For your appliance to run correctly, make certain that:
■The lid to the coffee bean box is correctly closed.
■The coffee powder jar and its lid are correctly placed in the body of the appliance.

■This appliance is equipped with an overheat protective device. If the appliance overheats, it will switch off
automatically. In this case let it cool down for 30 minutes then restart..
MAINTENANCE
■To keep all your coffee`s aroma and to avoid a degradation of the ground coffee, empty the ground coffee
container after each use.
■Always unplug from the power outlet before cleaning.
■Never place the grinder, power supply cord or plug in water or under running water.
■Do not use strong detergents or abrasive pads to clean the appliance.
■Clean the lids and the ground coffee holder in warm, soapy water.
■To remove the upper burr, hold of the upper mill and turn counter clockwise, then raise it vertically to
remove.
■Clean the upper burr with the cleaning brush (k).
■Carefully clean the inside of the coffee bean box with a damp cloth.
■To replace the upper burr, insert the burr and turn it once in the clockwise direction. For proper alignment,
residual coffee and coffee grounds in the lower burr will need to be cleared,
TROUBLESHOOTING GUIDE
Code in display
Trouble description
Trouble solution
E1
No bean holder or bean holder is not
connected tightly.
Assembly the bean holder or tighten the
bean holder until the micro switch is
closed, once bean holder is close then
error code E1 in display disappears.
E2
Total operating is 5 cycles, it power off
Unplug power cord, waiting for it cooling

automatically to protect the unit.
down, then restart.
Motor is overheating.
Waiting for motor cooling down over 10
minutes and restart.
This appliance shall not be used by children. Keep the appliance and its cord out of reach of children.
Appliances can be used by persons with reduced physical, sensory or mental capabilities or lack of experience and
knowledge if they have been given supervision or instruction concerning use of the appliance in a safe way and if
they understand the hazards involved.
Children shall not play with the appliance.
Correct Disposal of this product
This marking indicates that this product should not be disposed with other
household wastes throughout the EU. To prevent possible harm to the
environment or human health from uncontrolled waste disposal, recycle it
responsibly to promote the sustainable reuse of material resources. To return
your used device, please use the return and collection systems or contact the
retailer where the product was purchased. They can take this product for
environmental safe recycling.
Model: BD-CG015S
220V-240V〜50-60Hz
165W
Table of contents
Popular Coffee Grinder manuals by other brands

TEFAL
TEFAL SIMPLY INVENTS - ANNEXE 901 manual

Baratza
Baratza Vario operating instructions

Hamilton Beach
Hamilton Beach Custom Grind Custom Grind Deluxe Use & care guide

Russell Hobbs
Russell Hobbs Coffee Mill RHCM1 Instruction & guarantee

Vitek
Vitek VT-1543 Manual instruction

Breville
Breville COFFEE'N'SPICE CG2B Instructions for use