Maxcom BRV111 User manual

User’s Manual
VoIP ATA
BRV111,BRV102

Index
Chapter 1 Introduction..............................................................................................................................................3
1.1 Overview......................................................................................................................................................3
1.2 Features ......................................................................................................................................................3
1.3 System Requirements.................................................................................................................................4
Chapter 2 Installation................................................................................................................................................5
2.1 Checklist......................................................................................................................................................5
2.2 The Front LEDs...........................................................................................................................................5
2.3 The Rear Ports............................................................................................................................................6
2.4 Hardware installation...................................................................................................................................7
Chapter 3 Configuration..........................................................................................................................................11
3.1 Determine your connection settings..........................................................................................................11
3.3 Configuring with Web Browser..................................................................................................................11
3.3.1 Setup Wizard – WAN Settings....................................................................................................... 12
3.3.2 Setup Wizard – SNTP Settings...................................................................................................... 13
3.3.3 Setup Wizard – Service Domain Settings...................................................................................... 14
3.4.1 System Status ................................................................................................................................16
3.5.1 WAN Settings................................................................................................................................. 17
3.5.3 STUN Settings ............................................................................................................................... 19
3.5.4 DDNS Settings............................................................................................................................... 20
3.5.5 VLAN Settings................................................................................................................................21
3.5.6 DMZ Settings ................................................................................................................................. 22
3.5.7 Virtual Server Settings ................................................................................................................... 23
3.5.8 PPTP Settings................................................................................................................................24
3.6.1 Service Domain.............................................................................................................................. 25
3.6.2 Port Settings................................................................................................................................... 26
3.6.3 Codec Settings............................................................................................................................... 27
3.6.4 Codec ID Settings.......................................................................................................................... 28
3.6.5 DTMF Settings............................................................................................................................... 29
3.6.6 RPort Settings................................................................................................................................30
3.6.7 Other Settings................................................................................................................................31
3.7.1 Speed Dial Phone List.................................................................................................................... 32
3.8.1 Call Forward................................................................................................................................... 33
3.8.2 Volume Settings............................................................................................................................. 34
3.8.3 DND Settings ................................................................................................................................. 35
3.8.4 Auto Answer ................................................................................................................................... 36
3.8.5 Caller ID ......................................................................................................................................... 37
1

3.8.6 Dial Plan Settings........................................................................................................................... 38
3.8.7 Flash Time Settings........................................................................................................................ 40
3.8.8 Call Waiting Settings...................................................................................................................... 41
3.8.9 T.38 (FAX) Settings ........................................................................................................................ 42
3.8.10 Hot line Settings........................................................................................................................... 43
3.8.11 Alarm Settings .............................................................................................................................. 44
3.9.1 Auto Config..................................................................................................................................... 45
3.9.2 SNTP Settings................................................................................................................................46
3.9.3 FXO & FXS Port............................................................................................................................. 47
3.9.4 Tones Settings................................................................................................................................48
3.9.5 Advanced Settings ......................................................................................................................... 49
3.9.6 MAC Clone Settings....................................................................................................................... 50
3.10.1 System Authority.......................................................................................................................... 51
3.10.2 Save Changes.............................................................................................................................. 52
3.10.3 Update Firmware.......................................................................................................................... 53
3.10.4 Default Settings............................................................................................................................ 54
3.10.5 Reboot System............................................................................................................................. 55
3.11.1 Interactive Voice Response (IVR) interface for the Gateway....................................................... 56
3.12.1 TCP/IP Settings for Windows Operating System......................................................................... 59
Appendix Glossary.............................................................................................................................................. 66
Appendix B Cabling / Connection.......................................................................................................................... 73
2

Chapter 1 Introduction
The VoIPATA provides easy way to make a free call via internet. User can set it as PPPoE client, Static IP or
DHCP client to connect to the internet. The device is fully complaint with SIP v1/v2 standard so you need to
register a SIP account or number to make the phone call to your friends.
1.1 Overview
The VoIPATA is optimized to suitable for the growing demand of VoIP application, and it does so as a single,
highly-integrated and cost-effective solution. The NAT function let user can easy to set the device to link to the
internet and configure the VoIP setting to enjoy the call free via internet.
Note: We offer free SIP account number for our VoIP device at the beginning, but we only guarantee 1
year to let user to use the free SIP account number. User can find lots free SIP server from the internet or
service provider, so please choose the best way to register the SIP server. We only provide the free SIP
account for the default testing and you can use it only 1 year.
1.2 Features
zKey features
‧STUN ( Simple Travel of UDP over NAT)
‧Dynamic DNS
‧DMZ & VLAN Function
‧DHCP (dynamic host configuration protocol) server and client
‧NAT (network address translation)
zVoIP Features
‧Voice codec
G.711:64k bit/s (PCM)
G.723.1: 6.3k / 5.3k bit/s
G.726: 16k / 24k / 32k / 40k bit/s (ADPCM)
G.729A: 8k bit/s (CS-ACELP)
G.729B : addsAD & CNG to G.729
‧Voice Quality
VAD( Voice activity detection),
CNG ( Comfortable noise generator)
LEC (Line echo canceller)
Packet Loss Compensation
Adaptive Jitter Buffer
‧Call Function
CallHold
Call Waiting
CallForward
CallerID
3-Way Conferencing
‧DTMF Function
3

In-BandDTMF
Out-Band DTMF
SIPInfo
‧Phone Function
VolumeAdjustment
Speed dial key
Phone book
zSecurity
‧MD5 for SIP authentication (RFC2069/ RFC 2617)
‧Password protected system management
zEthernet Interface
‧Compliant with IEEE 802.3 and 802.3u 10/100 Mbps
zHTTP Web-Based Management
‧Firmware upgrade by UI
‧Customizable Web pages
‧WAN and LAN side connection statistics
‧Configuration of static routes and routing table
‧Password protected access
1.3 System Requirements
1) Personal computer (PC)
2) Pentium II 233 MHz processor minimum
3) 32 MB RAM minimum
4) 20 MB of free disk space minimum
5) Ethernet Network Interface Controller (NIC) RJ45 Port
6) Internet Browser
4

Chapter 2 Installation
This chapter offers information about installing the router. If you are not familiar with the hardware or software
parameters presented here, please consult your service provider for the values needed.
2.1 Checklist
Check the shipping box carefully to ensure that the contents include the items you ordered. If any of the items are
missing or damaged, contact your local distributor. The contents of your carton may vary depending on your
service provider.
Contents description
1) VoIPATA for home/office use
2) Installation and Operation Guide (this publication)
3) Power supply with 9V AC / 1 Ampere power adapter
4) RJ-11 telephone cable (6 ft)
5) Ethernet cable Ethernet category 5 twisted pair cable (6 ft)
2.2 The Front LEDs
VoIPATA with 1FXO & 1FXS (model BRV111)
VoIPATA with 2FXO (model BRV102)
5

LED State Description
POWER ON When the router power on.
ON When the device connect to Route.
WAN Flashing Data transfer.
ON When the device connect to PC.
LAN Flashing Data transfer.
Flashing When the phone off hook.
PHONE1 OFF When the phone on hook.
SIP RDY1 ON The SIP number is registered.
Flashing When the phone off hook.
PHONE2 OFF When the phone on hook.
SIP RDY2 ON The SIP number is registered.
LINE ON The PSTN Line is connected.
* Check the device you
bought, only for specific
model has these ports.
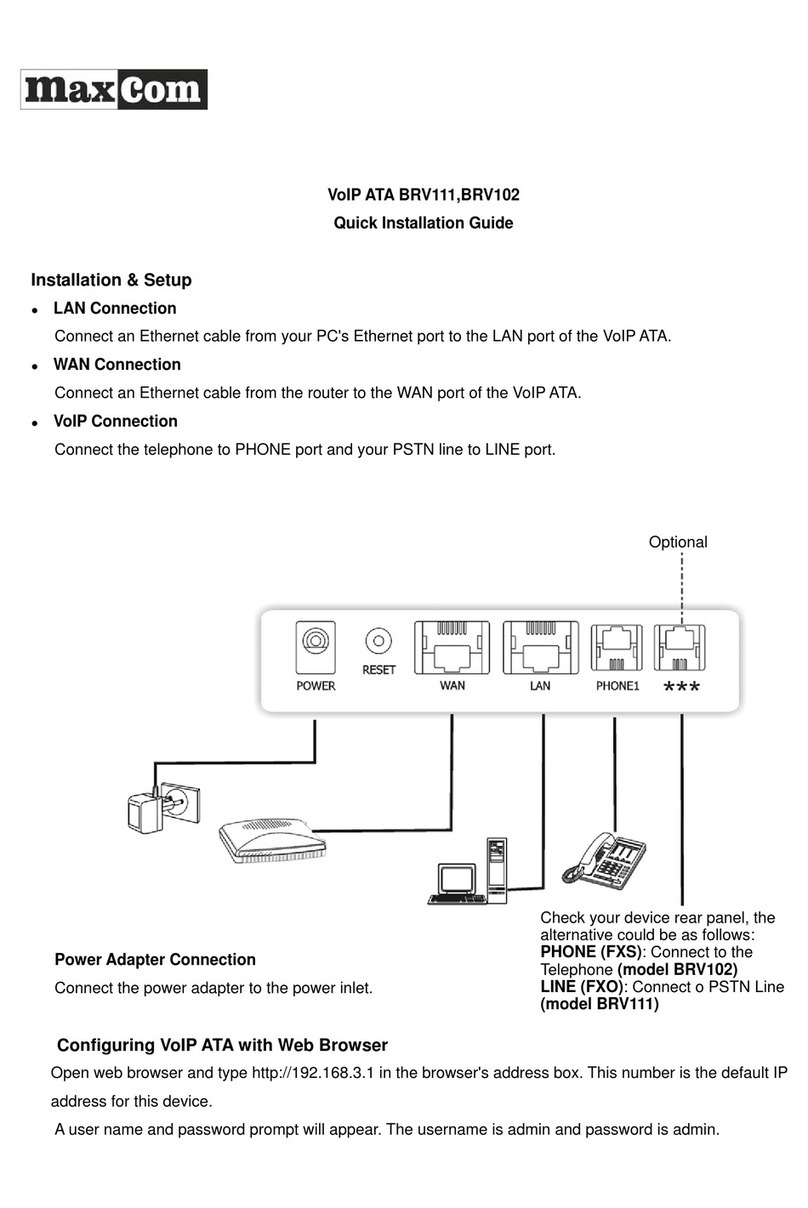
2.3 The Rear Ports
VoIPATA with 1FXO & 1FXS (model BRV111)
VoIPATA with 2FXO (model BRV102)
6

Connector Description
POWER Power connector with 9VDC/ 1.5Ampere.
Reset Switch The reset button, the router restore default settings when press until reboot.
WAN The device connects to a router or DSL router.
LAN For PC or NB to connect to the device.
PHONE/PHONE1 For analog phone to connect to the device.
PHONE2 For analog phone to connect to the device. (Check the device you bought, only specific
model has this port.)
LINE For the PSTN line to connect to the device. (Check the device you bought, only specific
model has this port.)
2.4 Hardware installation
This section describes how to connect and configure the device.
Step 1.
Connect the DSL/Cable Modem or Broadband Router.
Connect the gateway directly to the LAN port of these devices.
Step 2.
Connect a Phone to the RJ-11 Phone Ports.
Use the analog phone connects to the Phone port.
7

Step 3.
Connect the PSTN line to the RJ-11 Line port.
Connect the PSTN line to the Line port.
Optional: only specific model
supports this feature, please
check the one you buy, if no
this port (Line) it means no this
feature.
Step 4.
Connect the PowerAdapter to the Router.
Connect the power adapter to the port labeled POWER on the rear panel of router.
2.5 VoIP SIP application
1. Scenario 1 : (FXS to FXS) --- call free.
In this scenario, user can call from Area A to Area B via this device and no more expense for the phone call.
8

2. Scenario 2: (FXS to FXO) --- Internet call transfer to local PSTN call
In this scenario, user can call from Area A to Area B via this device and no more expense for the phone call.
Or from Area C a local home or office dial to Area A and set the gateway to transfer the phone toArea B, if
your office is at overseas; it will save international call expense and just charge the local call fromArea C
to Area A.
9

3. Scenario 3: (FXO to FXO) --- PSTN via Internet to another PSTN (save the international expense)
In this scenario, user can call from Area A to Area B via this device and no more expense for the phone call.
Or from Area C a local home or office dial to Area A and set the gateway to transfer the phone toArea B, if
your office is at overseas; it will save international call expense and just charge the local call fromArea C
to Area A.
Or call from Area C to Area D, both sides are charged the local call expense only.
10

Chapter 3 Configuration
3.1 Determine your connection settings
Before you configure the gateway; you need to know the connection information supplied by yourADSL service
provider or just set it as a DHCP client.
3.2 Connecting the Gateway to your network
Because the Gateway can act as a DHCP server, you will have to set your PC as DHCP Client to auto accept the
IPAddress from the Router. Generally there are several different operating modes for your applications.And you
can know which mode is necessary for your system. These modes are DHCP client, PPPoE, Fixed IP.
3.3 Configuring with Web Browser
It is advisable to change the administrator password to safeguard the security of your network.
To configure the router, open your browser, type 'http://192.168.3.1' into the address bar and click 'Go' to get to
the login page. Save this address in your Favorites for future reference.
11

3.3.1 Setup Wizard – WAN Settings
Setup Wizard is the easy way to set up this VoIP ATA quickly. In the first step, user can set the LAN mode and
WAN IP type. When finish the settings, click Next button to next page.
12

3.3.2 Setup Wizard – SNTP Settings
In this page, user can set up the SNTP server. User can setup the primary and second SNTP Server IPAddress,
to get the date/time information. Also you can base on your location to set the Time Zone, and how long need to
synchronize again. When you finished the setting, please click the Submit button. If there is nothing need to
change, please click the Save Change Item in the left side, then click the Save button. The change you made will
save into the system and the system will reboot automatically.
13

3.3.3 Setup Wizard – Service Domain Settings
In this page, user can set up the SIP server settings. In Service Domain Function you need to input the account
and the related information in this page, please refer to your ISP provider. User can register three SIP accounts.
User can dial the VoIP phone to your friends via first enable SIP account and receive the phone from these three
SIP accounts. For the second phone you can use the same way to register.
-- First you need clickActive to enable the Service Domain, then you can input the following items:
-- Display Name: you can input the name you want to display.
-- User Name: you need to input the User Name get from your ISP.
-- Register Name: you need to input the Register Name get from your ISP.
-- Register Password: you need to input the Register Password get from your ISP.
-- Domain Server: you need to input the Domain Server get from your ISP.
-- Proxy Server: you need to input the Proxy Server get from your ISP.
-- Outbound Proxy: you need to input the Outbound Proxy get from your ISP. If your ISP does not provide the
information, then you can skip this item.
-- User can see the Register Status in the Status item. If the item shows “Registered”, then your Gateway is
registered to the ISP, you can make a phone call directly.
-- If you have more than one SIP account, you can follow the steps to register to the other ISP account.
14

-- When you finished the setting, please click the Submit button.
-- If there is nothing need to change, please click the Save Change Item in the left side, then click the Save button.
The change you made will save into the system and the system will reboot automatically.
After finish the setup wizard, please click Save button to save the settings. The device will reboot again to save
the settings.
15

3.4.1 System Status
User can check the System status page for the Firmware version, VoIP Service status, WAN, LAN activities
status.
16

3.5.1 WAN Settings
There are 3 modes for WAN setting, Fixed IP, DHCP Client and PPPoE. User can choose one to suit for your
application. If you set the WAN as PPPoE client, you need to fill out the PPPoE user name and password at the
PPPoE Setting column.
If you set the LAN Mode as Bridge, it will by pass all the packets from WAN to LAN directly.
17

3.5.2 LAN Settings
User can change the LAN IP or disable the DHCP server at the page.
18

3.5.3 STUN Settings
Set a STUN server for VoIP Phone, you can enable or disable the phone at this page.
19
Other manuals for BRV111
1
This manual suits for next models
1
Table of contents
Other Maxcom Network Hardware manuals
Popular Network Hardware manuals by other brands

Alcatel-Lucent
Alcatel-Lucent 5620 Planning guide

Advantech
Advantech WISE-4000 Series user manual

Motorola
Motorola DIMETRA MTS 2 Installation, Configuration and Basic Service Manual

FieldServer
FieldServer Data Aire (DAP) FS-8704-49 Driver manual

Dahua
Dahua NVS0X04DH quick start guide

ADTRAN
ADTRAN Smart 16e Shelf user manual