Maxforce MBI Setup guide
REPAIR INSTRUCTIONS • INSTRUCCIONES PARA REPARACION,
Refer to Parts and Assembly diagram for part descriptions. Yea el diagrama de piezas
y
ensamblaje para la descripci6n de las piezas.
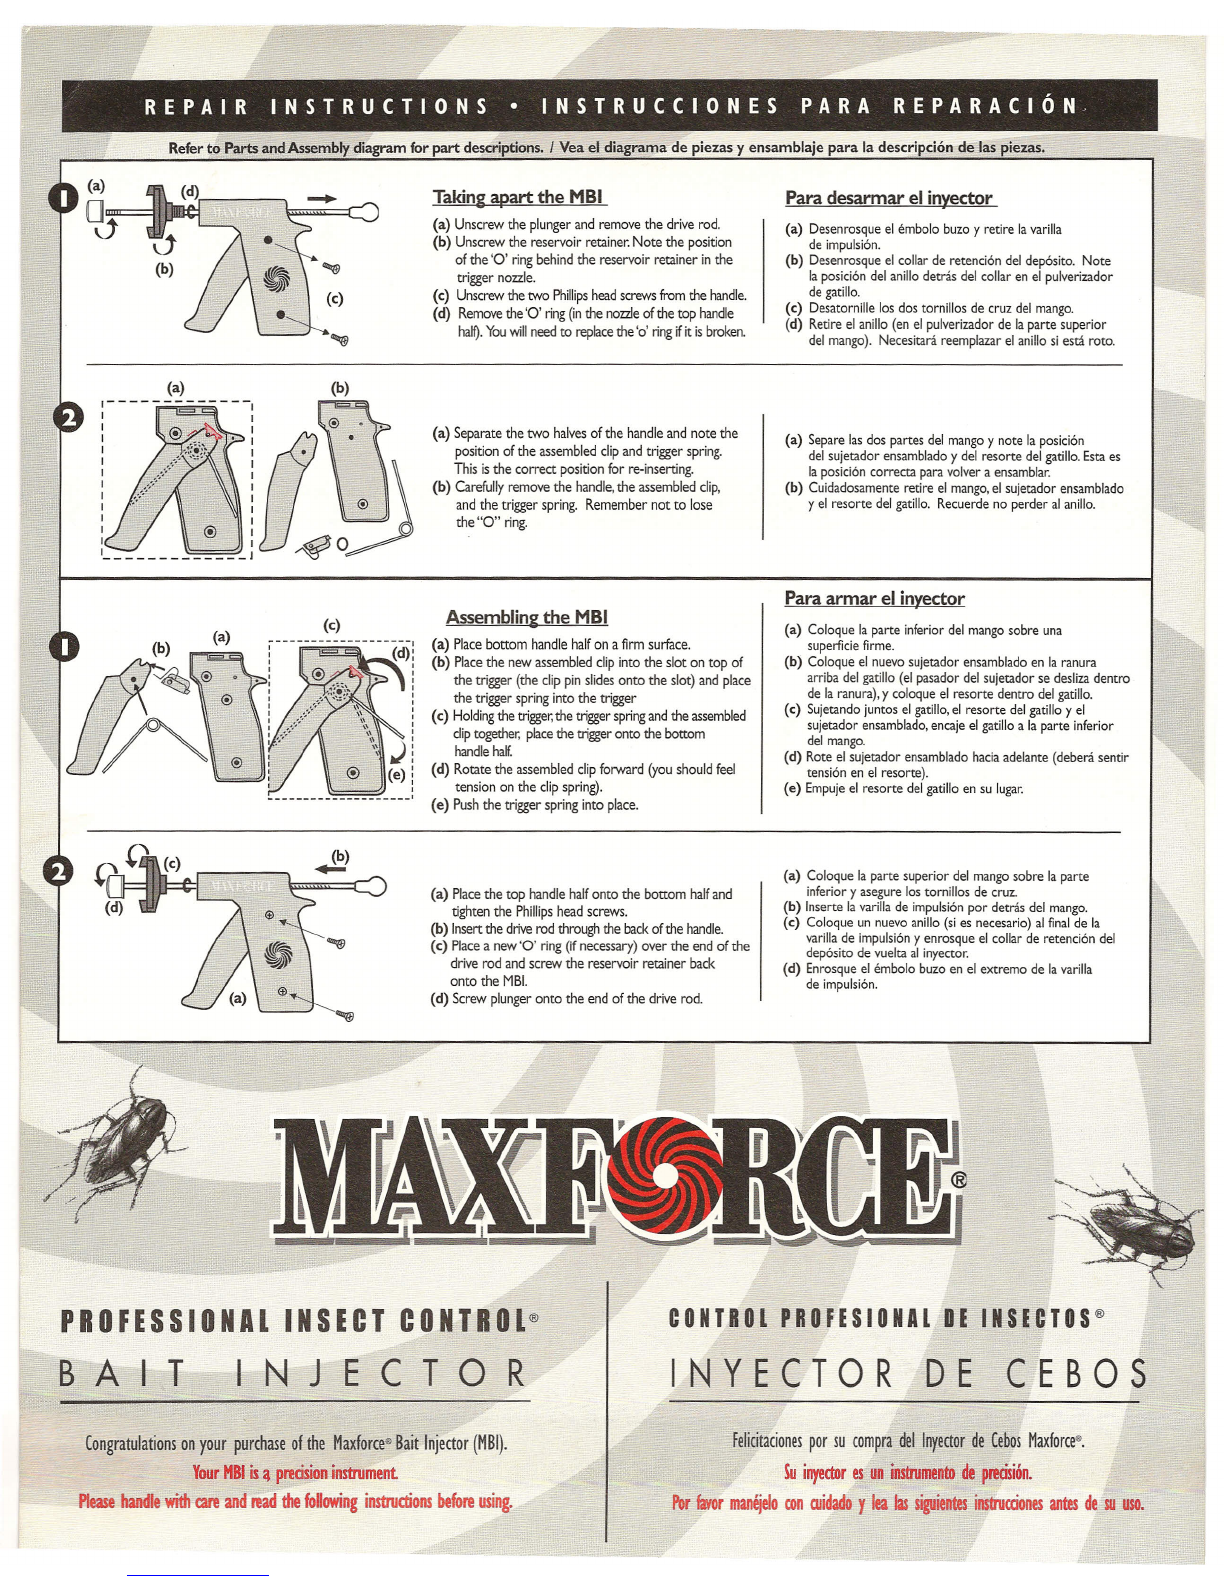
Taking apart the MBI
(a) Unscrew the plunger and remove the drive rod.
(b) Unscrew the reservoir retainer. Note the position
of the '0' ring behind the reservoir retainer in the
trigger nozzle.
(c) Unscrew the two Phillipshead screws from the handle.
(d) Remove the '0' ring (inthe nozzle of the top handle
half).Youwillneed to replace the
'0'
ring ifit is broken.
Para desarmar el inyector
(a) Desenrosque el embolo buzo y retire la varilla
de impulsi6n.
(b) Desenrosque el collar de retenci6n del dep6sito. Note
la posici6n del anillo detras del collar en el pulverizador
de gatillo.
(e) Desatornille los dos tornillos de cruz del mango.
(d) Retire el anillo (en el pulverizador de la parte superior
del mango). Necesitara reemplazar el anillo si esta roto.
(c)
(a) Separate the two halves of the handle and note the
position of the assembled clip and trigger spring.
This is the correct position for re-inserting.
(b) Carefully remove the handle, the assembled clip,
and the trigger spring. Remember not to lose
the 110" ring.
Assembling the MBI
(a) Place bottom handle half on a firm surface.
(b) Place the new assembled clip into the slot on top of
the trigger (the clip pin slides onto the slot) and place
the trigger spring into the trigger
(e) Holding the trigger,the trigger spring and the assembled
cliptogether. place the trigger onto the bottom
handle half.
(d) Rotate the assembled clip forward (you should feel
tension on the clip spring).
(e) Push the trigger spring into place.
(a) Separe las dos partes del mango y note la posici6n
del sujetador ensamblado y del resorte del gatillo. Esta es
la posicion correcta para volver a ensamblar.
(b) Cuidadosamente retire el mango, el sujetador ensamblado
y el resorte del gatillo. Recuerde no perder al anillo.
Para armar el inyector
(a) Coloque la parte inferior del mango sobre una
superfcie firme.
(b) Coloque el nuevo sujetador ensamblado en la ranura
arriba del gatillo (el pasador del sujetador se desliza dentro
de la ranura), y coloque el resorte dentro del gatillo.
(c) Sujetando juntos el gatillo, el resorte del gatillo y el
sujetador ensamblado, encaje el gatillo a la parte inferior
del mango.
(d) Rote el sujetador ensamblado hacia adelante (debera sentir
tensi6n en el resorte).
(e) Empuje el resorte del gatillo en su lugar.
(b)
••••••
(a) Place the top handle half onto the bottom half and
tighten the Phillips head screws.
(b) Insert the drive rod through the back of the handle.
(c) Place a new'O' ring (if necessary) over me end of me
drive rod and screw the reservoir retainer back
onto the MBI.
(d) Screw plunger onto the end of the drive rod.
(a) Coloque la parte superior del mango sobre la parte
inferior y asegure los tornillos de cruz.
(b) Inserte la varilla de impulsion por detras del mango.
(e) Coloque un nuevo anillo (si es necesario) al final de la
varilla de impulsi6n y enrosque el collar de retenci6n del
deposito de vuelta al inyector.
(d) Enrosque el embolo buzo en el extreme de la varilla
de impulsi6n.
PROFESSION L INSECT
CONTROL®
BAIT INJECTOR
CONTROL PROfESIONAL DE INSECTOS®
INYECTOR
C E B 0 S
DE
Congratulations on your purchase of the Maxforce" Bait Injector (MBI).
Your HBI is ~ precision inSlJUment
Please handle wid care and read the following inSlJUctions before using.
Felicitaciones por su compra del Inyector de Cebos Maxforce".
50
inyector es un instrumento de precisi6n.
Por favor manijelo con midado
y
lea
as siguientes instrucciones antes de so uso.
I
is a ~ ..
instru~ ~ handlewith~+
read
thefol~gi~nS before
using.
•
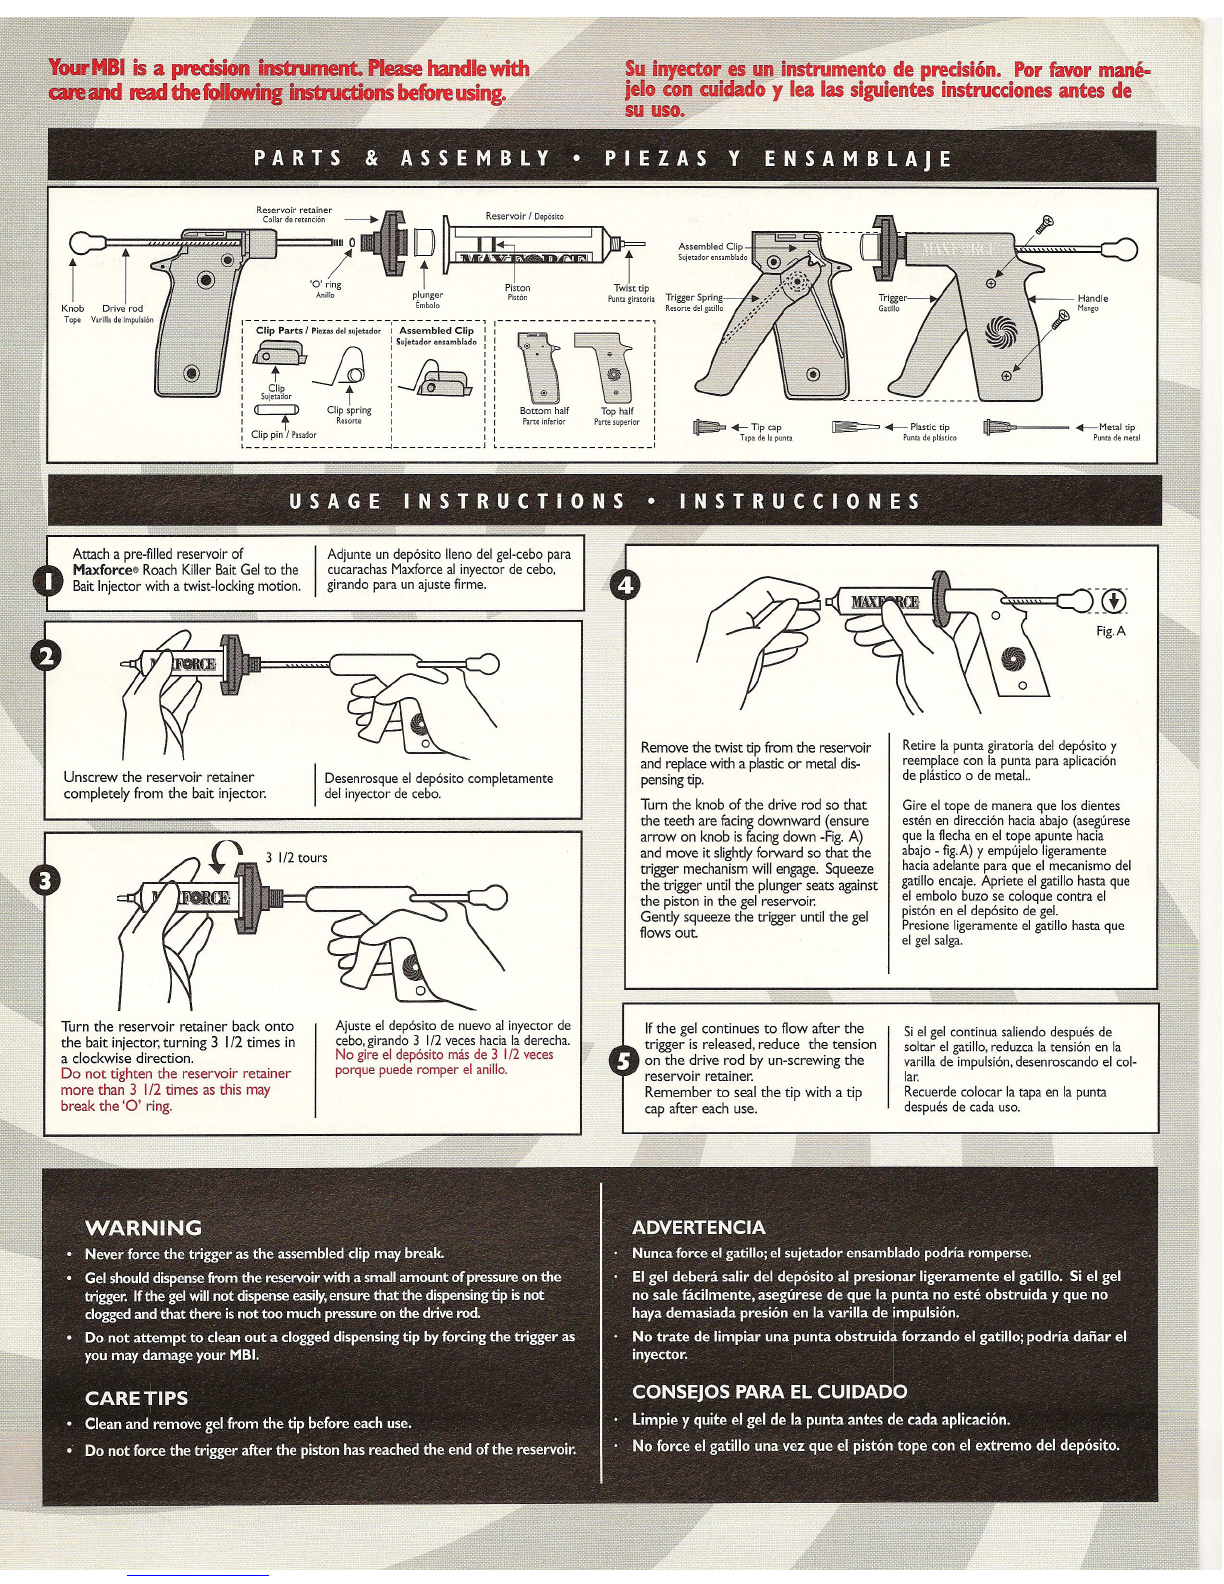
Reservoir retainer
-if . .
Co"" d. retenclcn
------+ ~
Remvo"
D.,,,;,,
'=l==~~=,,/'O
0
~~mFl:
o
ring
I
Piston
Anillo plunger Piston
Embolo
J------------------,-- ---------,
I Clip Parts
Piezas del sujetador I ssembled Clip I
:~:"'.'::. :Sujetadorensambfado:
, O:·'·".Jd' . '
,... '--e'
: t :.. :
r
Clip
I
0
I
I Sujetadcr
t
I I
'~ Clie sori
J
I
I
'p spring
I I
I Rescrte I
J
: Clippin/Pmdor : :
~ ~ J
Su inyector
$
Illt
instriimento de precision. Por favor mane-
jelo con cuidaCloy lea las siguientes instrucciones antes de
su
USO.
~Twist
tip
Puntagiratoria
1-- - - - - - - -- - - - - - - - - -,
, ,
w\£i
: Bottom half Tophalf :
I Parte inferior Parte superior r
, ,
, ,
~-----------------__I
Unscrew the reservoir retainer
completely from the bait injector. Desenrosque el dep6sito completamente
del inyector de cebo.
Turn the reservoir retainer back onto
the bait injector, turning
3 1/2
times in
a clockwise direction.
Do not tighten the reservoir retainer
more than 3
1/2
times as this may
break the '0' ring.
Ajuste el dep6sito de nuevo al inyector de
cebo, girando
3 1/2
veces hacia la derecha.
No gire el dep6sito mas de
3 1/2
veces
porque puede romper el anillo.
Retire la punta giratoria del dep6sito y
reemplace con la punta para aplicaci6n
de plastico
0
de metal..
Remove the twist tip from the reservoir
and replace with a plastic or metal dis-
pensingtip.
Turn the knob of the drive rod so that
the teeth are facing downward (ensure
arrow on knob is facing down -Fig.
A)
and move it slightly forvvard so that the
trigger mechanism will engage. Squeeze
the trigger until the plunger seats against
the piston in the gel reservoir.
Gently squeeze the trigger until the gel
flows out.
Gire el tope de manera que los dientes
esten en direcd6n hada abajo (asegurese
que la flecha en el tope apunte
hacia
abajo - fig.A) y ernpuielo ligeramente
hacia adelante para que el mecanismo del
gatillo encaje. Apriete el gatillo hasta que
el embolo buzo se coloque contra el
pist6n en el dep6sito de gel.
Presione ligeramente el gatillo hasta que
el gel salga.
Ifthe gel continues to flow after the
trigger is released, reduce the tension
on the drive rod by un-screwing the
reservoir retainer.
Remember to seal the tip with a tip
cap after each use.
Si el gel continua saliendo
despues
de
soltar el gatillo, reduzea la tensi6n en la
varilla de impulsi6n, desenroscando el col-
lar.
Recuerde colocar la tapa en la punta
despues de cada uso.
Popular Lawn And Garden Equipment manuals by other brands


RedMax
RedMax EXtreme EX-LRT Owner's/operator's manual

bellissa
bellissa 95460 Assembly instructions

Echo
Echo PAS-260 PRO - 12-06 Operator's manual

juwel
juwel WIKINGER 20381 Assembly instructions

Pond Pro
Pond Pro CAN-AIR KOI 2 owner's manual

Green Strike
Green Strike Mosquito Preventer Featuring Zero-Hatch... owner's manual


