Maxkon FVPS007 User manual

FVPS007 VACUUM PRESERVATION SYSTEM
USER MANUAL

1
FVPS007 VACUUM PRESERVATION SYSTEM
INSTRUCTIONS FOR PROPER USE AND CARE
This appliance is designed to meet AS/NZS standard, on 240V~, 50HZ,
The Vacuum preservation unit meets the “Essential safety requirements
for low voltage equipment” as specified in AS/NZS3820 1998 +A1 2004
IMPORTANT SAFEGUARDS
When using this electrical appliance, basic safety precautions should always be
observed, including the followings:
Read all of the instructions before using appliance.
1. Before plugging cord into electrical outlet or disconnecting, make sure
the control is OFF, and unplug from outlet when not in use or before
cleaning.
2. This appliance is not a toy, when used by or near children close
attention is necessary, and store it out of the reach of children. This
appliance is not intended for use by persons (including children) with
reduced physical, sensory or mental capabilities, or lack of
experience and knowledge, unless they have been given supervision
or instruction concerning use of the appliance by a person
responsible for their safety.
3. Do not use any attachments not recommended or appointed, don’t
use this appliance for other purpose except its intended use.
4. Stop using the machine immediately if power cord is damaged and
have it replaced by a professional.
5. Do not try to repair this appliance by yourself.
6. Do not use the appliance if it has fallen or if it appears to be damaged.
7. Avoid doing the following: pull or carry by the cord, use cord as a
handle, close a door on cord, or pull cord around sharp edges or
corners. Do not operate appliance over cord or cord / plug is wet.
8. Keep away from hot gas, or heated oven, or electric burner, and any
other hot surfaces.

5
4
3
2
1
2
9. It’s better not to use an extension cord with this unit. However, if one
is used, it must have a rating equal to or exceeding the rating of this
appliance.
10. When disconnected, to avoid any injury, please unplug by grasping
the plug, not power cord.
11. Before plugging appliance in or operating, make sure that your hands
are dry and safe to do the actions.
12. When it is “ON” or working position, always be on a stable surface,
such as table or counter.
13. It’s no need to use any lubricant, such as lubricating oils or water, on
this appliance.
14. When cleaning, do not immerse this appliance in water or any other
liquid.
15. Do not use this appliance outdoors or on a wet surface, it’s
recommended for household, indoor use only.
FUNCTIONS AND FEATURE

910
8
7
6 6
13
11 12
15
16
17
14
3

4
1. Bag Cutter: Used for bag roll cutting
2. Cancel Button: Stop working at any time
3. Indicator Light:: Shows the working status
4. Seal Time: According to food type to optimize the seal time – Normal
or Extended
5. Jar Port: To which the adaptor is connected
6. Release Button: Press to release the front cover from base as well as
release air.
7. Seal Only Button: Used for bags sealing only
8. Vacuum/Seal Button: Used for vacuuming and sealing bags
9. Canister Only Button: Used for vacuum canister only
10. Roll storage compartment: Store bag roll handy for the greatest
packaging convenience.
11. Sealing Stripe: Heated part for bag sealing
12. Upper Gasket: Keep air away by forming vacuum environment
with Lower Gasket
13. Hook: Make the lid be covered to the base steadily
14. Lower Gasket: Keep air away by forming vacuum environment with
Upper Gasket
15. Air Intake: The air outgoing way when vacuumize canisters
16. Fixed water channel:Draws air out of bag and catches any liquid
overflow.
17. Sealing Profile: Help to seal bags

SKETCHES FOR OPERATING INSTRUCTIONS
I. Cutting bag roll into small sachets
Step 1:Put out bag material to the
suitable length you want
Step 2: Close the lid and move
Incision Button from the begeinning
to the end
II. Preserve stuff with bag
Step 1: Put the bag with stuff to the
below of the air portal
Step 2: Close the upper lid and press
tightly
Step 3: Press the Vacuum/Seal button Step 4: Press down the Release
button till the lid opens automatically
5

III. Vacuum package with canister
Step 1: After the lid is closed,
connects the ends of adaptor
separately to the lid of canister
and jar port tightly as showed in
the picture
Step 2: Press Canister Only Button ,
the appliance will vacuum and stop
automatically.
Step 3: Press the Release
Button when finished
vacuumizing.
Step 4: Store the adaptor and cord
at the bottom as showed in the picture
6

7
OPERATING INSTRUCTIONS
Making a bag with bag roll
1. The Bag Cutter (1) must be positioned at either end of the cutter
slide slot before cutting.
2. Open the rear lid and place bag roll into Roll Storage
Compartment (10).
3. Pull the bag material out of Storage compartment (10) to the suitable
length you want then close the rear lid.
4. Press and slide Bag Cutter (1) from one side to the end with your
hand stressing the bag steadily to achieve a better effect.
5. Open the upper lid and place either open end of bag material on
Sealing Strip(11), close it and two click sound is heard.
6. Press the Seal Only Button (7) to start sealing.
7. When the Seal Indicator Light (3) turns off, sealing is completed.
8. Open the upper lid and take out the bag.
9. Now the bag is ready, you can vacuum package with it.
Note: Your appliance can not work with bag rolls wider than 30cm.
Preserve stuff with bag:
1. Put the stuff inside the bag;
2. Open upper lid, clean and straighten the open end of the bag, make
sure no wrinkle or ripples.
3. Place the both panels of the bag on Removable Interface (16), but
below Air Intake (15) which is the vacuum pump hole to ensure no
vacuum leaking ;
4. Close the lid and then press heavily on both sides of the lid until two
click sounds heard.
5. Press the Vacuum/Seal Button (8) then the bag will be automatically
vacuumed and sealed.
6. When the Indicator Lights of Seal Only and Seal/vacuum turn off, the
process is completed. Press the two Release Buttons (6), lift lid and
remove bag.
7. Refrigerate or freeze if needed.

8
NOTE: -For best sealing effect, it is better to let the appliance cool
down for 1minute before using it again.
-Wipe out any excess liquid or food residue on Removable
Interface after each bag package.
OPEN A SEALED BAG
Cut bag straight with scissors, just inside the sealing line.
RESEALING
You can reseal many foods in their original store packages (i.e. potato
chip bags), follow steps of “Preserve Stuff with bag” on this page to seal
when resealing foods.
Vacuum Package with Canister
1. Wipe canister cover, canister base and ensure they are clean and dry.
2. Put the food you want to preserve into the canister and leave at least
one inch of space between food and cover rim.
3. Place cover on canister, insert one end of accessory hose into port on
appliance. Put the other end “vacuum suck tray” on canister lid and
make sure the Vacuum suck tray completely cover the lid knob
switch.
4. Close the upper lid.
5. Press Canister Only Button (9). Motor will start to run for vacuum
6. When the Indicator Light of Canister Only (3) turns off, the vacuum
process is complete; Then gently twist and pull up the accessory hose
out of appliance.
Note: To simply test vacuum, when complete the vacuum process,
grasp the hose and lift the canister, the canister cover will not
depart.
Open Canister after vacuum packaging
In order to open the canister, you need to release vacuum by turning the
knob switch clockwise to max position according to the arrow pointing

9
direction. There are 2 ways to release completely, you can either wait
several seconds when turned to the max position or turn several times
without waiting.
Hints for best vacuuming performance:
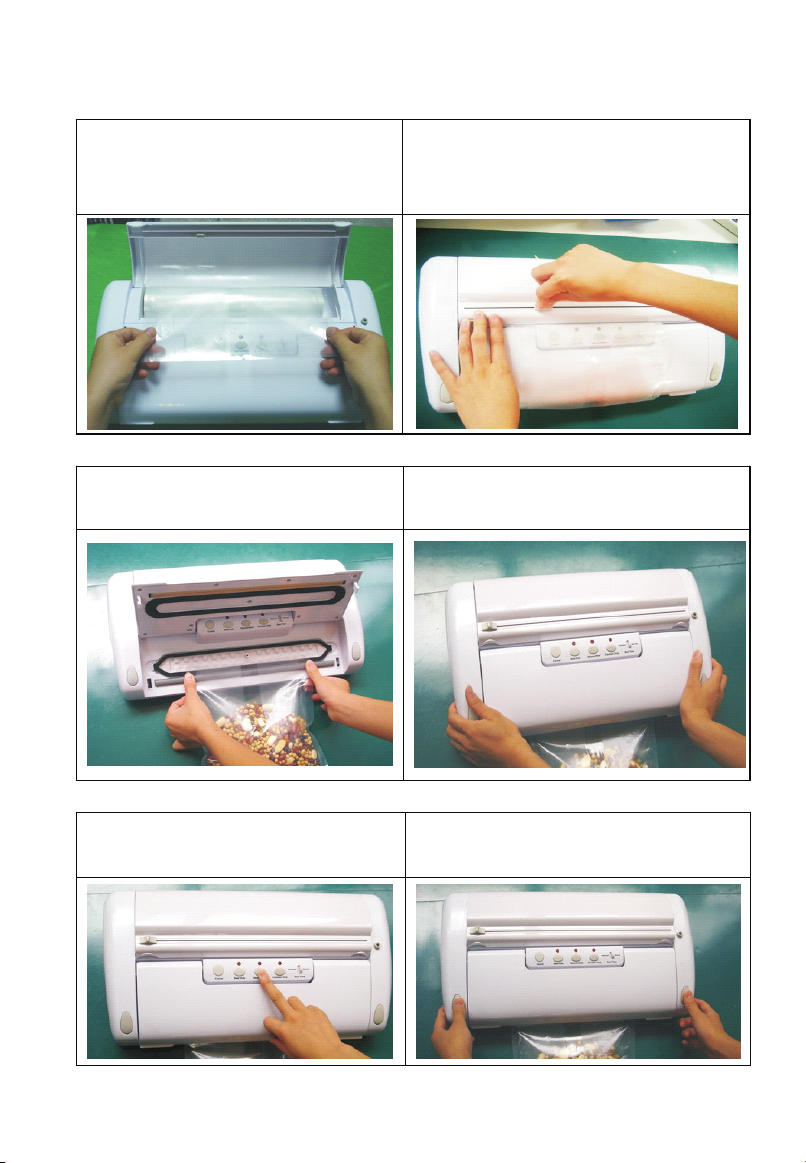
1. Do not put too much stuff inside the bag: leave enough space at the
open end of the bag so that the bag can be placed on the removable
interface more positively.
2. Do not wet the open end of the bag. Wet bag may be difficult to melt
and sealed tightly!
3. Clean and straighten the open end of the bag before sealing. Make
sure nothing is left on the open area of the bag, no wrinkle or creased
lines appeared on the open panels, Foreign objects or, creased bag
may cause difficulty to seal tightly;
4. Do not vacuum packaging objects with sharp points like fish bones
and hard shells! Sharp points may penetrate and tear the bag! You
may want to use a canister instead of a bag.
5. Fill a bag about 2/3 full with water, seal the end (don't vacuum).
Freeze the bag and use for ice in the cooler, or ice packs for sports
injuries.
6. Suggest to rest for 1 minute, after each sealing or vacuum sealing so
that cool down appliance.
7. For bag vacuum package, if it does not reach the required vacuum for
some unknown reason, the vacuum system will shut automatically
after 30 seconds, while for canister, appliance will shut automatically
after 2min.
8. During bag vacuum packaging process, small amounts of liquids,
crumbs or food particles can be inadvertently pull into removable
interface, clogging the pump and damaging your appliance. To
prevent this, follow these tips:
a) For moist and juicy foods such as raw meats:
Freeze first and avoid overfilling bags. You can also place a folded
paper towel inside top of bag, but below seal area, before vacuum

10
packaging.
b) For soups, sauces and liquids: freeze first and then vacuumize,
keep the vacuumized bag or canister with these stuff in refrigerator
c) For powdery or fine-grained foods: avoid overfilling bags or use a
canister. You can also place a coffee filter or paper towel inside
before vacuum packaging.
9. To avoid overfilling, always leave at least 3 inches of bag material
between bag contents and top of bag. Then leave at least one
additional inch of bag material for each time you plan to reuse bag.
10. When using canister, remember to leave one inch from canister
cover rim, and make sure upper lid is already locked before
vacuuming.
11. Pre-freeze fruits and blanch vegetables before vacuum packaging for
best results.
Note: To avoid possible illness, do not reuse bag after storing raw
meats, fish or greasy foods.
Vacuum Packaging Non-food items
The vacuum preservation system also protects non-food items from
oxidation, corrosion and moisture. Simply follow the directions to vacuum
package items using bag and canisters.
1. To vacuum package silver, wrap fork tines in soft cushioning material,
such as a paper towel, to avoid puncturing bag.
2. The appliance can keep camping supplies such as matches, first aid
kits and clothing clean and dry. Keep flares for auto emergencies
ready.
3. Also keep batteries, candles, film, photo, nut, bolts, screw and
anything you want to stay dry.
CLEANING AND MAINTENANCE
Vacuum Preservation System
1. Always unplug the unit before cleaning.
2. Do not immerse appliance in water or any other liquid.
3. Do not use abrasive cleaners to clean the unit, for they will possibly

11
scratch the surface.
4. Wipe the outside of the unit with a damp cloth, sponge or mild dish
soap.
5. Wipe away food residue and water inside or around component with a
paper towel.
6. Dry thoroughly before using again.
7. The removable interface is very easy cleaning as you can take it out
and re-assemble the airproof loop of sponge from the interface, and
put them into warm soapy water for safe washing.
Note: The airproof loop of sponge should be dried thoroughly before
re-assembling, when re-assembling, be careful to prevent any
damage, and assemble as original position to ensure no vacuum
leaking.
Preservation Bags
1. Wash bag material in warm water with a mild dishwashing soap.
2. Bags can be washed on the top rack in your dishwasher by turning
the bag inside out. Stand bags up so that the washing water can rinse
the entire surface.
3. Make sure that bags thoroughly dry before reusing.
Accessories (including canister base, cover and hose
accessories)
1. Washing all vacuum accessories in warm water with a mild
dishwashing soap, But do not immerse cover in water.
2. Canister bases (not lids) are top rack dishwasher safe. But canister
cover should be wipe down with a damp cloth.
3. Ensure the accessories to be dry thoroughly before reusing.
4. Canister and cover is not allowed to use in microwave or freezer.
Storing Your Vacuum Preservation System:
-Keep the unit in a flat and safe place, out of the reach of children.
-Do remember to make sure the upper lid of appliance is unlocked when
not in use and in storage.

12
VACUUM PACKAGE GUIDELINES
Vacuum sealing for the refrigerator
For the busy family, on-the-go meals can be prepared ahead and
vacuum-sealed in individual servings, and ready to heat anytime.
Preparing food for the freeze
1. In properly stored conditions, the appliance helps you to maintain the
food’s freshness. Try to start with the freshest food possible.
2. To freeze the foods which need to hold its shape or fragile, you can
vacuum packaging them in a vacuum bag and then return to freezer.
Food such as meats, berries and breads can be frozen without fear of
freezer burn for up to 24 hours.
3. For vacuum sealing liquid-based foods, such as soups, casseroles or
stews, first freeze it in a baking pan or tempered dish, then vacuum
seal, next to label and stack in your freezer as soon as it is in frozen
solid;
4. Blanch the vegetables by cooking briefly in boiling water or
microwave oven, cool them down in crunchy position, then vacuum
seal in convenient portions.
5. To vacuum seal the foods not frozen, two extra inches is required for
bag length to allow for expansion while freezing. Place the meat or
fish on a paper towel, and vacuum seal with the paper towel in the
bag, this way will help to absorb moisture from the foods.
6. Before storing the foods such as tortillas, crepes or hamburger patties,
use wax or parchment paper between them to stack the pieces, this
will be convenient to remove some of the food, reseal the rest and
immediately replace in the freezer.
FOOD STORAGE SAFETY INFORMATION
This Vacuum Preservation System will change the way you purchase and
store foods. Once you are accustomed to vacuum packing, it will become
an indispensable part of your food preparation. To follow the certain
procedures to ensure food quality and safety, when use this appliance to

13

14

15
barbecues.
3) Eliminate freezer burn
4) Package foods, such as meat, fish, poultry, seafood and vegetables
to freeze or refrigerate.
5) Package dry foods, such as beans, nuts, cereals to store longer.
2. It’s ideal to prepackage ingredients as well as individual portions for
the health-conscious, such as weight-conscious or those on diets or
nutritional regimes with special requirements.
3. This system can also be used to store and protect other items:
valuable items, such as photos, important documents, stamp
collections, book collections, jewellery, cards, comics etc.; hardware
items, such as screws, nails, studs and bolts; medicines, band-aids
and other first-aid items, etc..
General rules for food safety
From scientific study and common sense, we can learn the following food
safety rules, and it will lead you to improved safety and optimal food
storage.
1. The appliance is not to be used by children or persons with reduced
physical, sensory or mental capabilities, or lack of experience and
knowledge, unless they have been given supervision or instruction
2. Children being supervised not to play with the appliance.
3. If perishable foods have been heated, defrosted or un-refrigerated,
consume them immediately.
4. To re-vacuum the vacuum-packed foods after they are opened, and
follow the instructions to refrigerate after opening and store
re-vacuumed packages properly.
5. The suitable way to defrost your food is to place in refrigerator until
defrosted, never defrost foods in hot water or via heat sources, or a
microwave oven.
6. It will be harmful if you consume the foods which have been left out
at room temperature for more than a few hours, especially if they
have been prepared with a thick sauce, in a vacuum package, or in
some other low-oxygen environment.

16
7. To cool down food temperature quickly, please spread vacuum
packages evenly throughout the refrigerator or freezer.
We advise the following when packaging large volumes of meat, fish,
or any food products
1. Before vacuum sealing, it’s necessary to clean your hands, and all
utensils and surfaces to be used for cutting and vacuum sealing
foods.
2. Refrigerate or freeze the perishable foods immediately, if you have
vacuum-sealed them, and do not leave them sitting at room
temperature.
3. The shelf life of dry foods such as nuts, coconut or cereals will be
extended in vacuum-sealed package, while store them in a cook, dark
place. Oxygen and warm temperature will cause high-fat content
foods fat to rancidity.
4. Before vacuum sealing some fruit and vegetables, such as apples,
bananas, potatoes and root vegetables, peel them will extend their
shelf lives.
5. When vacuum seal some vegetables such as broccoli, cauliflower
and cabbage fresh for refrigeration, they will emit gases, so it’s need
to blanch and freeze these foods before vacuum sealing,
TROUBLESHOOTING
Nothing happens when press the vacuum sealer
1. Make sure the power cord is correctly plugged into the electrical outlet,
and in “on” position. Test electrical outlet by plugging in another
appliance, if it not workable, please check the circuit breakers or
fuses in your home.
2. Check power cord and plug, and make sure they are not damaged in
any way. If damaged, do not use the vacuum sealer.
Air is not removed from the bag completely

17
1. To seal properly, open end of bag should be resting entirely inside
vacuum channel area.
2. Check sealing strip and gasket beneath the lid for debris and position.
Wipe clean and smooth them back into place.
3. Bag may have a hole. To test, seal the bag with some air in it,
submerge in water, and apply pressure. If there are bubbles present,
it does indicate a leak and a new bag should be used.
4. To check if lid is completely latched into place.
Vacuum sealer bag loses vacuum after being sealed.
1. Wrinkles, crumbs, grease or liquids may cause leaks along the seal.
Reopen bag, wipe the top inside of the bag and smooth it out along
the sealing strip before resealing.
2. To check if there have moisture or juices from the food present within
the bag, if yes, you may need to cut open the bag and reseal it, or use
an entirely new bag. Foods with excess liquids should be frozen
before vacuum sealing.
3. If items with sharp edges, they may have punctured the bag, and
released the vacuum. Cushion sharp edges in the contents of the bag
with paper towels.
Vacuum sealer not sealing bag properly
1. If sealing strip over heat and melt the bag, it’s necessary to lift the lid
and allow sealing strip to cool for a few minutes.
2. Before re-pressing the “seal only” key, allow the unit to resume for 15
seconds.
The canister will not vacuum:
Ensure that rubber gasket ring on is free from food content.
Gently turn the canister lid knob if can automatically return its place.
Make sure accessory hose is securely into accessory port on appliance
and the vacuum suck tray complete cover lid knob.
If the upper lid of appliance are already lock into unit base.
Table of contents
Other Maxkon Kitchen Appliance manuals