7/96 /9
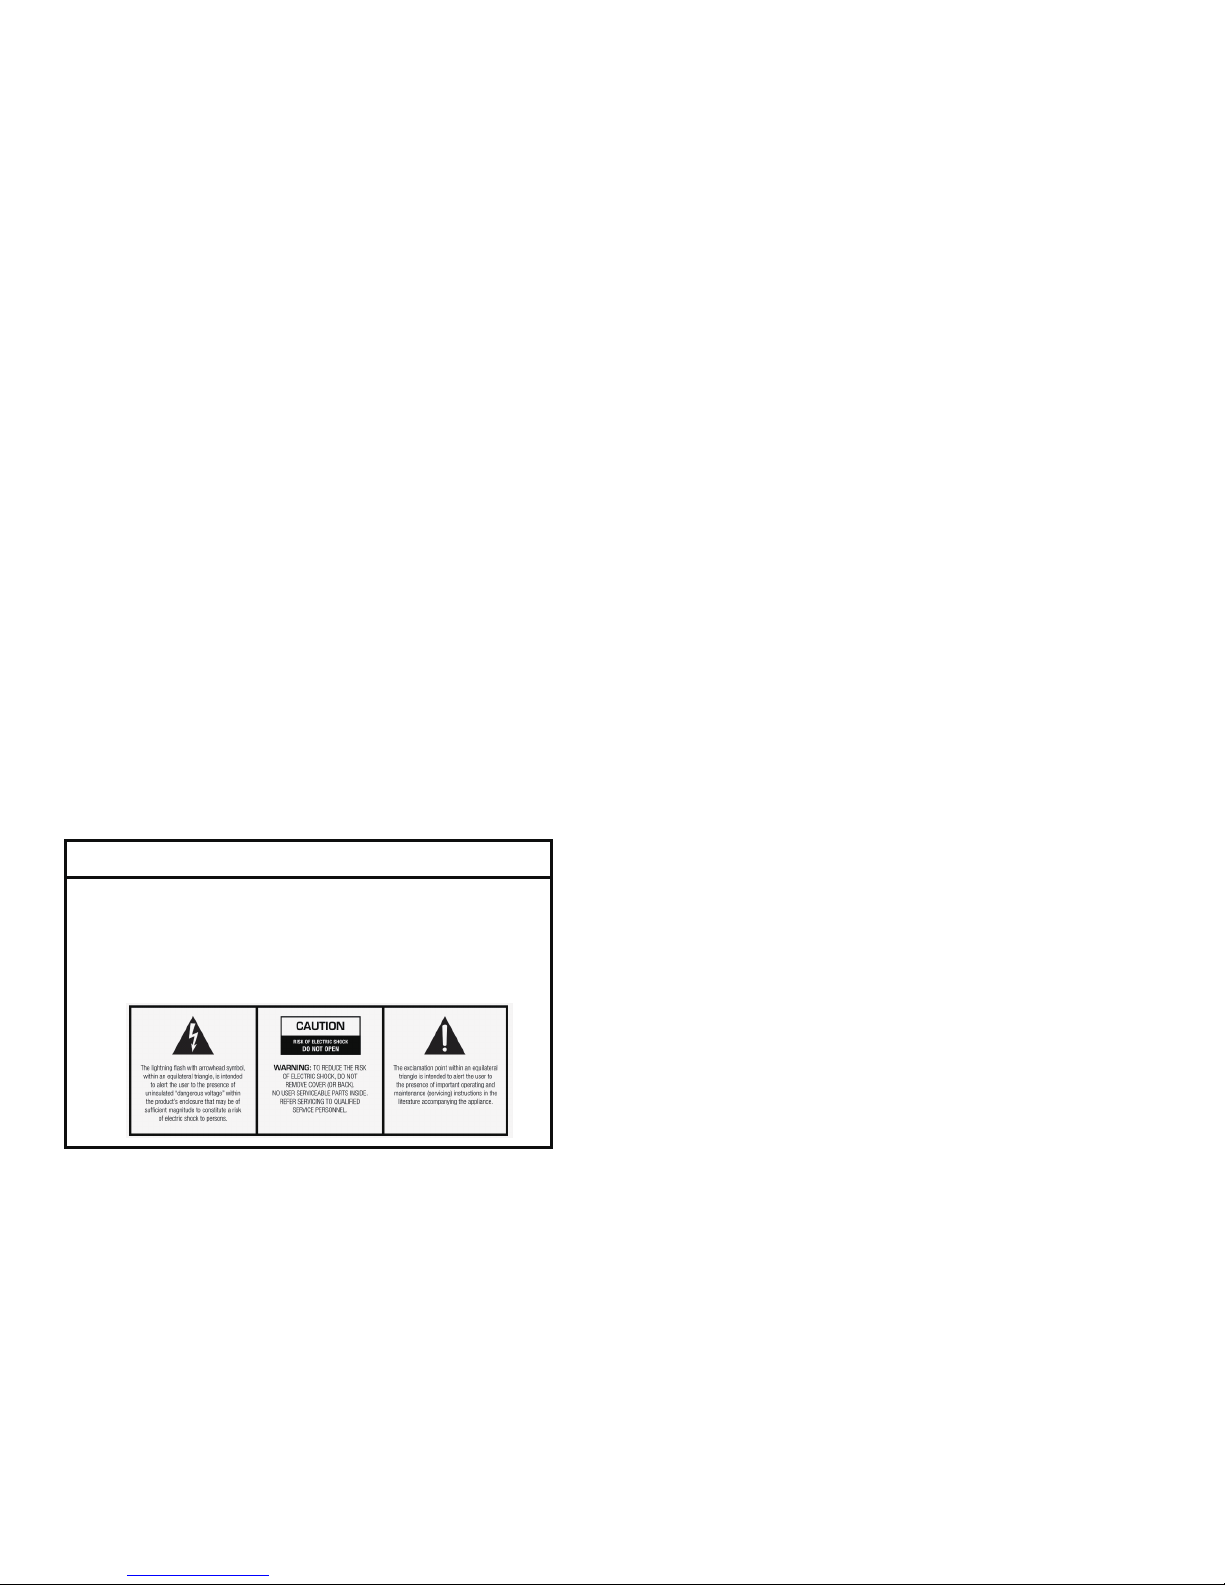
AMPLIFIER OPERATION GUIDANCE
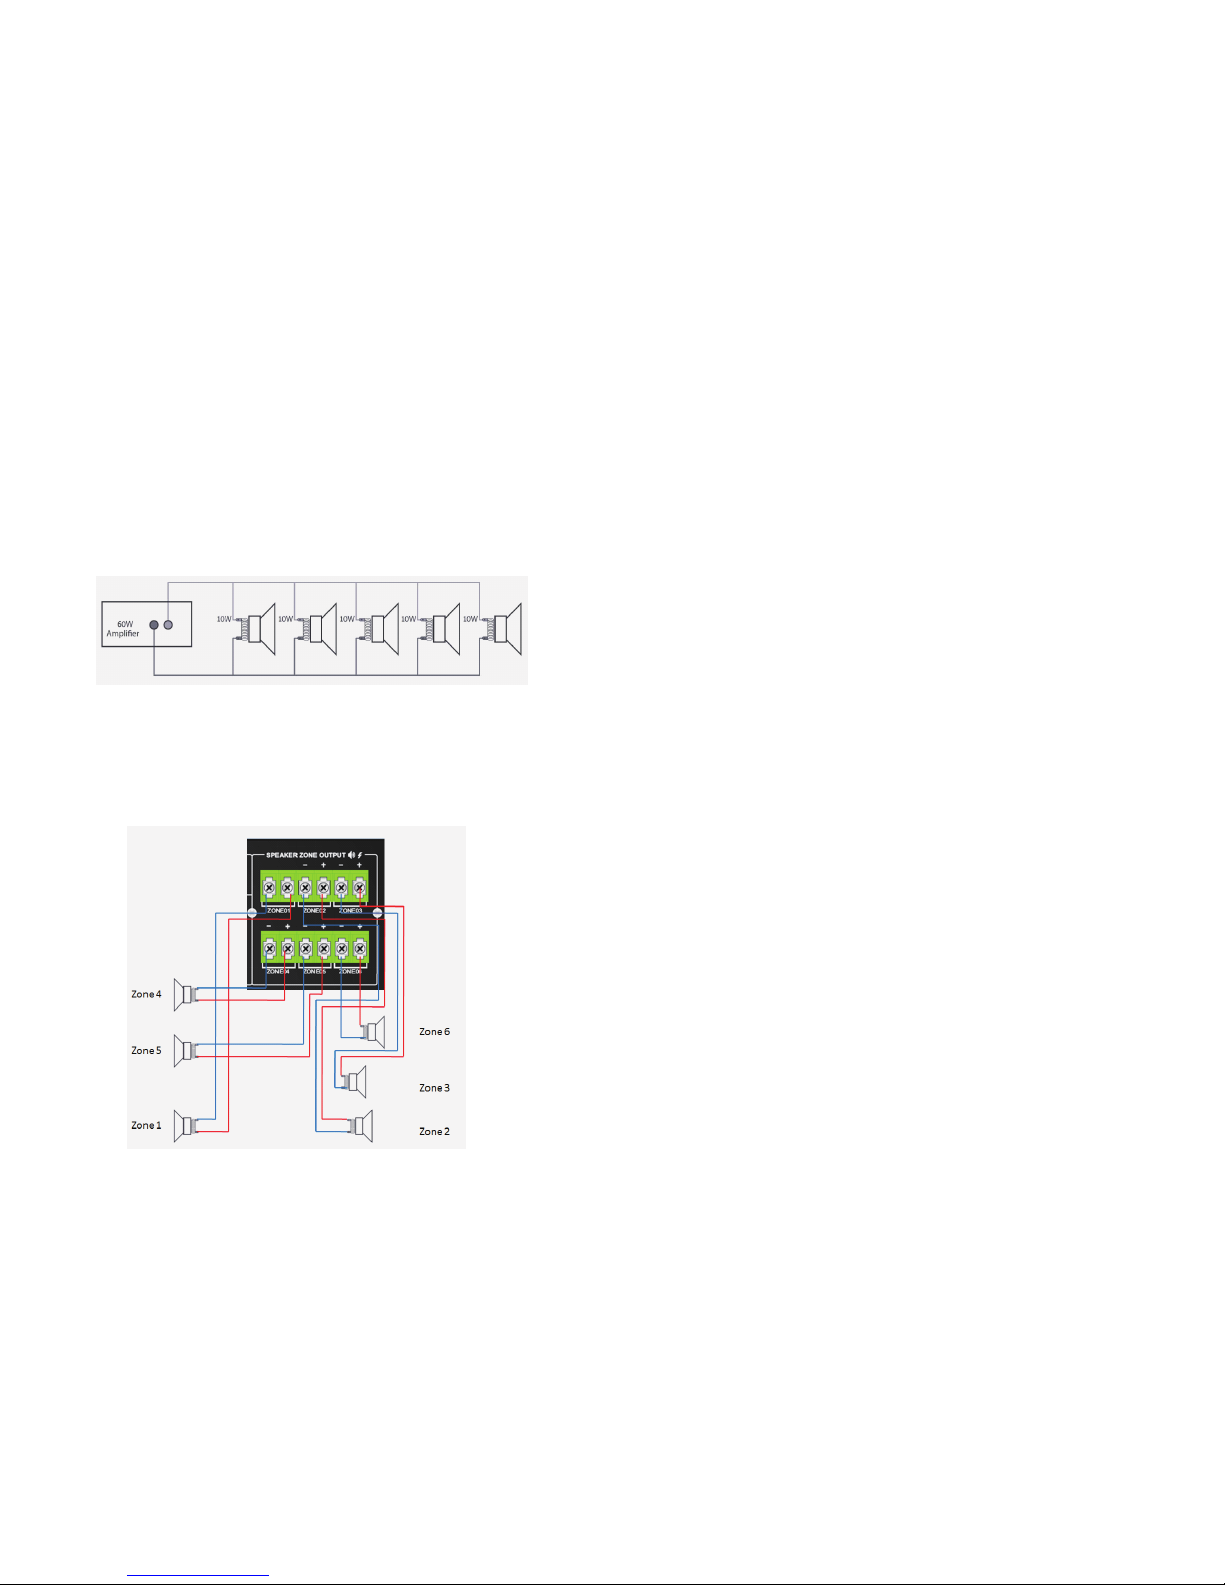
100V LINE SYSTEM
For 100V line systems, connect the amplifier to the first speaker in the system using double-insulated speaker wire which has
adequate current rating to handle the total output of the amplifier.
Connect the “100V” output terminal to the positive (+) connection of the speaker and “COM” output to the negative (-) connection of
the speaker. Connect further speakers in parallel to the first speaker with all positive terminals and connected together and all
negative terminals connected together as shown below, ie.
A 100V line speaker system can comprise of many speakers connected together. The determining factor for how many speakers can
no higher than the rated power of the amplifier.
OPERATION STEP
When all connections to the amplifier are made, turn all rotary controls down and switch on the power and a power “ON” LED
will illuminate. Turn BASS and TREBLE controls to the 12 o’clock position (pointing straight up) and turn MASTER rotary
control up part way for testing.
Ensure a signal is being fed to one of the line inputs 1, 2, 3, 4, 5, 6 or 7 and gradually increase the volume control for that
channel until the output is heard through the speakers. Turn up the MASTER to the maximum required volume level and
reduce the channel volume control if necessary.
Note: The initial test can be made using the built-in USB/SD/FM audio player. The output of the amplifier is represented on the
level meter LEDs and care should be taken that the Red “0” LED is only lit momentarily during use. Anything longer than a short
flash of this LED may be indicating distortion or clipping of the output signal and the MASTER should be turned down.
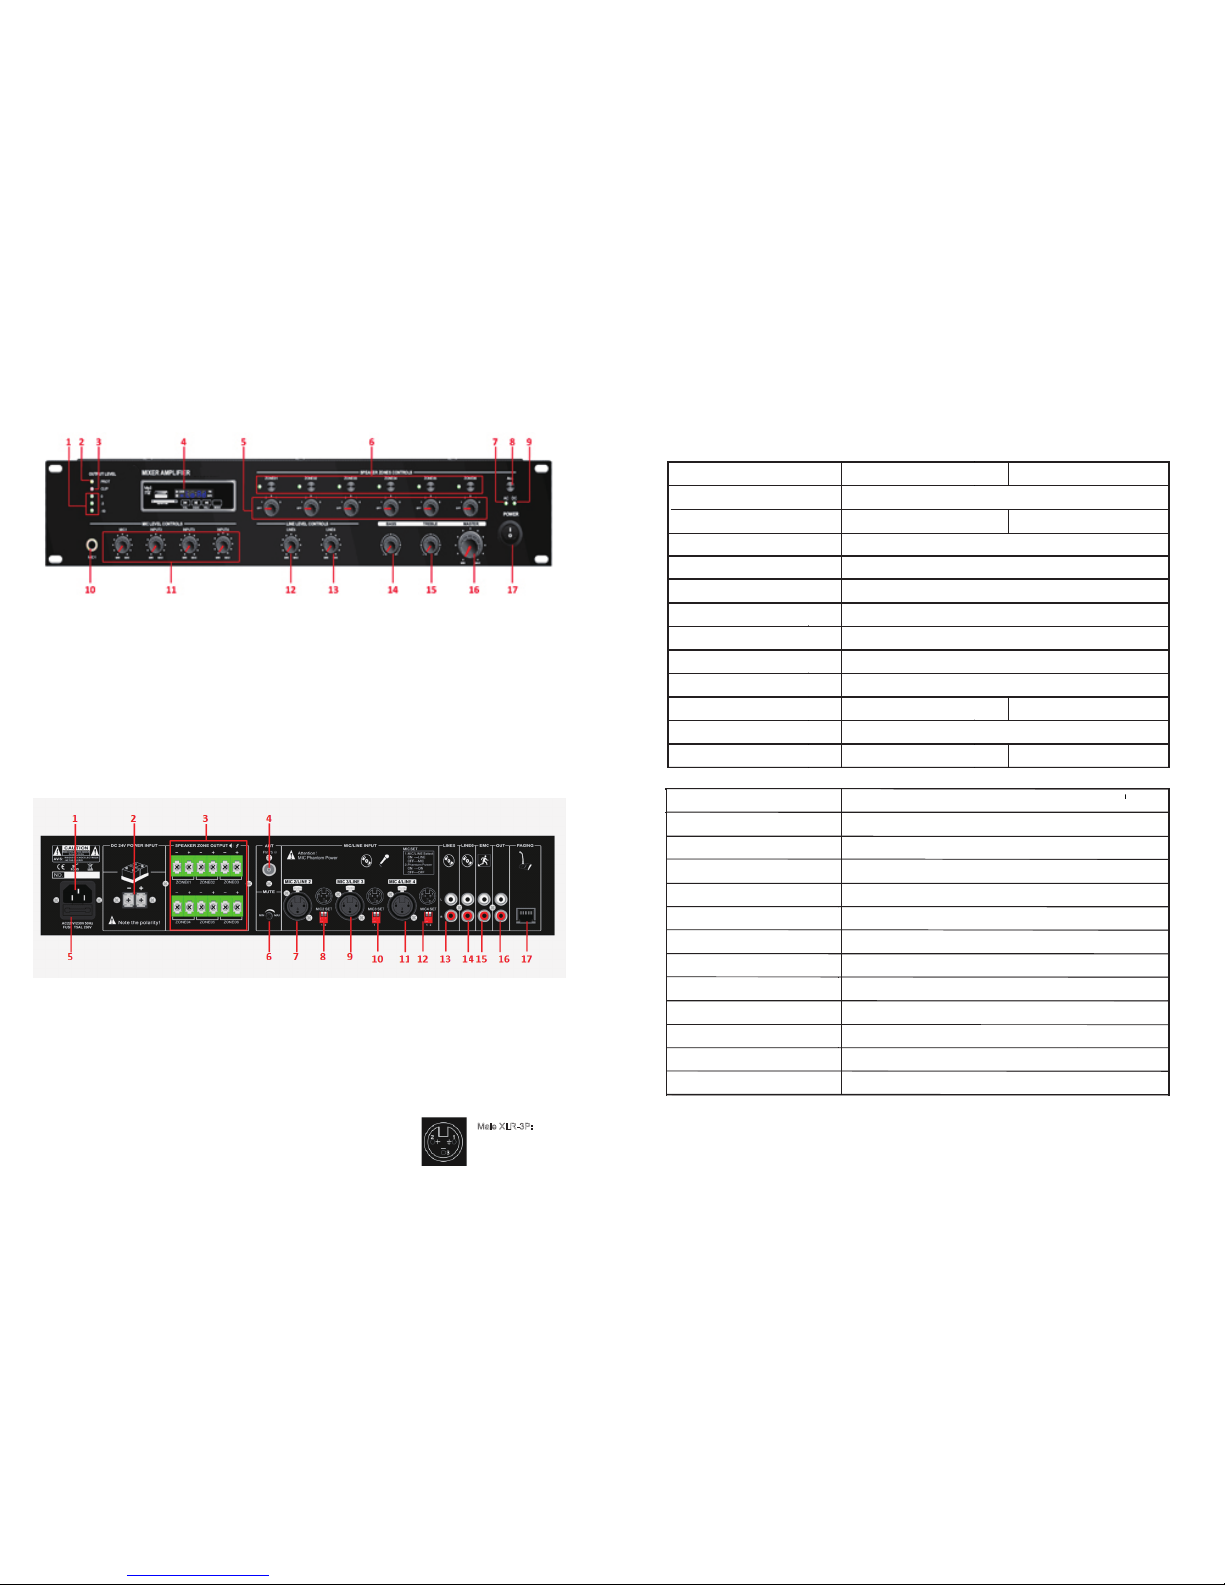
If a microphone is connected to MIC2-4 input, make sure it is switched on and if it requires phantom power, make sure this
feature is enabled. Gradually increase its volume control whilst speaking into the microphone until the required volume level is
reached. The microphone should not be able to “hear” the speakers, which can cause feedback (squealing or howling noise).
If the VOX feature is enabled, audio playback through channels 2-6 will be reduced in volume automatically when speaking into
MIC 1, use its attenuator to increase or decrease the mute level.
In addition to channel and MASTER volume controls, there are BASS and TREBLE EQ controls to adjust the tone of the overall
output. At the 12 o’clock position, these controls are applying no effect to the signal (no boost or cut). Moving the BASS control
clockwise boosts the low frequencies in the audio, whilst moving it anticlockwise will cut these low frequencies. Likewise,
moving the TREBLE control clockwise boosts the high frequencies in the audio, whilst moving it anticlockwise will cut these
high frequencies. Adjust these EQ controls to suit the type of audio signal or compensate for the room acoustics.
USB/SD PLAYBACK
Push a USB pen drive into the USB port and/or an SD card into the SD card input.
Press the CD/USB/SD button to ensure that the player is set to play from the required memory device. Press the PLAY/PAUSE
button to play the current track and press again to pause as needed.
Searching and playback of tracks is the same as described above for the CD player
FM TUNER
Press the FM select button to switch to the FM tuner function.
Use the Previous or Next buttons to select a stored channel.
TUNING AND STORING STATIONS
Use the Forward/Reverse seek buttons to manually tune the frequency in steps of 0.05MHz
Alternatively, press and hold the Forward/Reverse seek buttons to auto search for available stations.
Upon finding a station, the auto search will stop, giving the option to store this station.
At this point, pressing the PLAY/PAUSE button will flash a “00” channel number in the display.
Use the Previous/Next buttons to select an appropriate channel memory.
Press PLAY/PAUSE again to confirm and store the station into the selected channel memory.
Auto search can be stopped at any time by pressing the Forward/Reverse seek buttons.
MUTE ON/OFF
Pressing the MUTE ON/OFF button will mute the output of the audio player.
Pressing and holding the MUTE ON/OFF button will put the audio player in standby mode.
Press this button again to restore functions from standby mode.