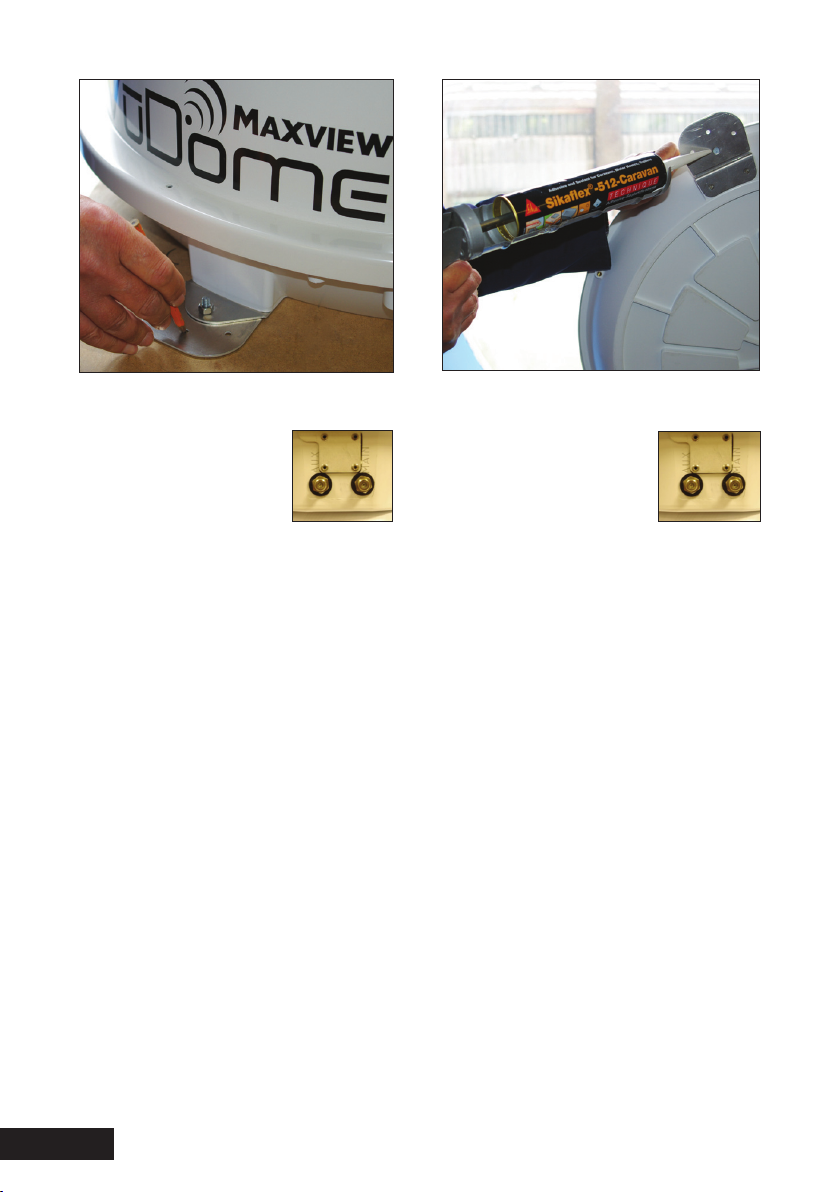
Maxview VuDome Auto User manual

MXL011
VUDOME AUTO
OWNERS MANUAL
BEDIENUNGSANLEITUNG
UK - Keep these instructions for future reference.
DE - Bitte bewahren Sie diese Anleitung gut auf.

UK
Thank you for purchasing this product, should you have any difficulty using your Fixed
Satellite System please contact our friendly Customer Helpline on (01553) 811000.
The VuDome Auto Satellite System is easily configured to lock onto the appropriate satellites
necessary to receive your favourite TV channels.
Please retain these instructions for future reference.
DE
Vielen Dank und herzlichen Glückwunsch, dass Sie sich für die VuDome - Auto Satelliten -
Antenne entschieden haben.
Sollten sich bei der Inbetriebnahme Schwierigkeiten ergeben kontaktieren Sie bitte unseren
Kundendienst unter +49 (0) 8145 9969980.
Die VuDome – Auto wird mit einer Steuerbox geliefert an der Sie den gewünschten
Satelliten auswählen. Bitte bewahren Sie die Anleitung gut auf
Introduction/Einführung
Page 2
Record your purchase/Bitte ausfüllen
UK - Please fill in the details above once purchased. This information will be required in the
unlikely event of a fault occuring with this system.
* This can be located near the entry plate on the dome unit.
DE - Bitte fügen Sie alle relevanten Daten ein, diese werden im Falle einer
Garantiereparatur benötigt.
* Die Seriennummer finden Sie unten an der Antenne in der Nähe der F-Anschlüsse.
PURCHASE DATE/KAUFDATUM _______________________________
*SERIAL NUMBER/SERIENNUMMBER _______________________________

Page 3
UK
This pack includes:
You will also need (sold separately):
Kit contents/Lieferumfang:
DE
Dieses Packet enthält:
• VuDome - Auto
• VuDome - Auto Steuerbox
• 1 x 10m Koax-Kabel
• 1 x 4.5m Koax-Kabel
• 1 x 0.9m Koax-Kabel
• 12V Anschluß-Kabel
• Dichtungsstöpsel und
• Schmiermittel
• Befestigungsmaterial
Des weiteren benötigen Sie
(nicht Lieferumfang enthalten):
• Fernsehgerät
• Free to Air oder SKY Satelliten Receiver
• Verbindungskabel zum TV-Gerät
UK
Drill and Drill Bit Set
Screwdriver Set
Adhesive, such as Sikaflex® -512 and/or
cleaner and Activator*
Multimeter
Side Cutters and Pliers
Tape Measure
*always follow manufacturers instructions
Parts & tools List/Benötigte
DE
Bohrer und Akkuschrauber
Verschiedene Schraubenzieher
Sicaex 232
Seitenschneider und Kombizange
Maßband

UK
Do not open the cover of the unit. No
user-serviceable parts inside. To open the
cover cancels the guarantee of the unit.
Refer to an authorised dealer.
To protect your unit from permanent
damage do not connect non
recommended equipment.
The antenna part of the system installed
on the vehicle adds extra height. It is very
important to be aware of this extra height
when the vehicle is on the move.
On installation personal safety should be
considered when using power/hand tools
and working at height.
The user is legally responsible for the
antenna mounted on top of the vehicle.
Important Safety
DE
Öffnen Sie nicht den Domedeckel der
Sat-Antenne. Die Antenne arbeitet
wartungsfrei. Wenn Sie den Deckel öffnen
erlischt die Garantie. Die Sat-Antenne darf nur
von autorisierten Händlern geöffnet werden.
Um die Sat-Antenne vor Schäden zu schützen
verbinden Sie sie nur mit den dafür
vorgesehenen Geräten. (Receiver) Bitte
bedenken Sie, wenn Sie die Sat-Antenne auf
Ihr Fahrzeug montieren, dass das Fahrzeug
entsprechend an Höhe gewinnt.
Wenn Sie die Sat-Antenne auf dem Dach
montieren beachten Sie bitte die
Sicherheitsvorschriften.
Der Monteur ist für den richtigen Sitz der
Antenne auf dem Dach verantwortlich.
Befolgen Sie bitte immer die
Installationsanleitung.
Wichtige Sicherheitshinweise

Page 5
2ND TV
2. TV-GERÄT
2nd Satellite Receiver
2. Receiver
MAIN TV
TV-GERÄT
Satellite Receiver
Receiver 2 x Coaxial Cable
2 x Koax-Kabel
UK
The VuDome Auto Satellite System
1) The Dome (Antenna) Unit
located on the roof of the vehicle.
Note: A TV and satellite receiver will
also be required along with
appropriate connecting cables to
complete the installation.
Diagram below shows typical
installation.
Introduction
DE
Die VuDome Auto
1) Die Antenne die sich auf dem
Fahrzeugdach befindet.
Achtung: Sie benötigen zur in
Betriebnahme einen Sat-Receiver dieser
befindet sich nicht im Lieferumfang der
VuDome Auto.
Unten sehen Sie die verschiedenen
Anschlussmöglichkeiten.
Producktvorstellung
ANT REC PWR 12V
Optional

Approximate
minimium distance
to dome edge see chart
Vehicle roof
Fitted obstruction
on vehicle roof
Dachaufbauten
Height of obstruction
Höhe des Hindernisses
Ungefähre minimale
Distanz von der VuDome
UK
Decide where you wish to mount your
VuDome, taking into account any obstacles
that might interfere with the tracking of the
satellite. It is recommended that you do a dry
run to find the best position, using the
following Criteria:
- The installation surface should be smooth,
flat and rigid
- The dome unit requires a 72cm diameter
mounting area
- There must be no “line of sight”
obstructions.
Air conditioning units, other antennas and
storage areas that are too close to the
dome unit may prevent the satellite signal
from reaching the dish. Refer to below:
DE
Wählen Sie den Montageplatz so aus das
die VuDome freie Sicht zum Satelliten hat
und nicht durch Dachaufbauten wie z. B.:
Dachboxen oder Klimaanlagen behindert
wird. Bevor Sie die VuDome entgültig
montieren empfiehlt es sich den aus-
gewählten Platz auszuprobieren. Wählen
Sie den Montageplatz nach folgenden
Kriterien aus:
- Die Montagefläche sollte sauber, flach
und stabil sein
- Der VuDome benötigt einen Platz von
72 cm Durchmesser
- Die Sicht zum Satelliten muss frei sein
und darf nicht durch hohe
Dachaufbauten behindert we
den. Siehe Abbildung unten.
Dome location Montageplatz
Page 6
OBSTRUCTION
25cm
28cm
31cm
33cm
36cm
38cm
APPROXIMATE MINIMUM
20cm
25cm
31cm
36cm
51cm
HÖHE DES
HINDERNISSES
25cm
28cm
30cm
33cm
36cm
38cm
DISTANZ VON DER VUDOME
20cm
25cm
31cm
36cm
51cm

UK
1. Position the VuDome on top of the vehicle
connectors should be directed to the rear
of the vehicle.
guidelines for surface preparation.
3. Use the pre-drilled holes in the mounting
feet as a guide to mark the feet and
fastener position on the roof.
each fixing area (as shown). We always
recommend using screws and adhesive for
fixing.
5. We recommend you follow the adhesive
before driving your vehicle.
DE
1. Positionieren Sie die VuDome sorgfältig
an den dafür vorgesehenen
Montageplatz. Die F-Anschlüsse
müssen zum Heck des Fahrzeuges
zeigen.
2. Lesen Sie Gebrauchsanweisung auf der
Sicaflex-Katusche.
3. Makieren Sie die Bohrungen auf Ihrem
Dach. Als Schablone dienen die
Befestigungsfüße an der VuDome Auto.
4. Sicaflex auf der Unterseite der
Befestigungsfüße auftragen (wie
gezeigt). Wir empfehlen die
Antenne nicht nur zu kleben sondern
auch zu verschrauben.
5. Beachten Sie die Aushärtezeit des\
Sicaflex bevor Sie mit Ihrem Fahrzeug
fahren.
Installation on vehicle Istallation
Back
Heck
Front
Front
Spacer if required
Falls benötigt/verwenden Sie Unterlegscheiben.
VuDome
Auto
Page 7

DE
WICHTIG!
Versiegeln Sie die Enden
der Koax-Kabel mit dem
mitgelieferten Fett.
Koax-Stecker müssen fest
verschraubt werden.
Verwenden Sie beim festziehen der
F-Stecker kein Werkzeug.
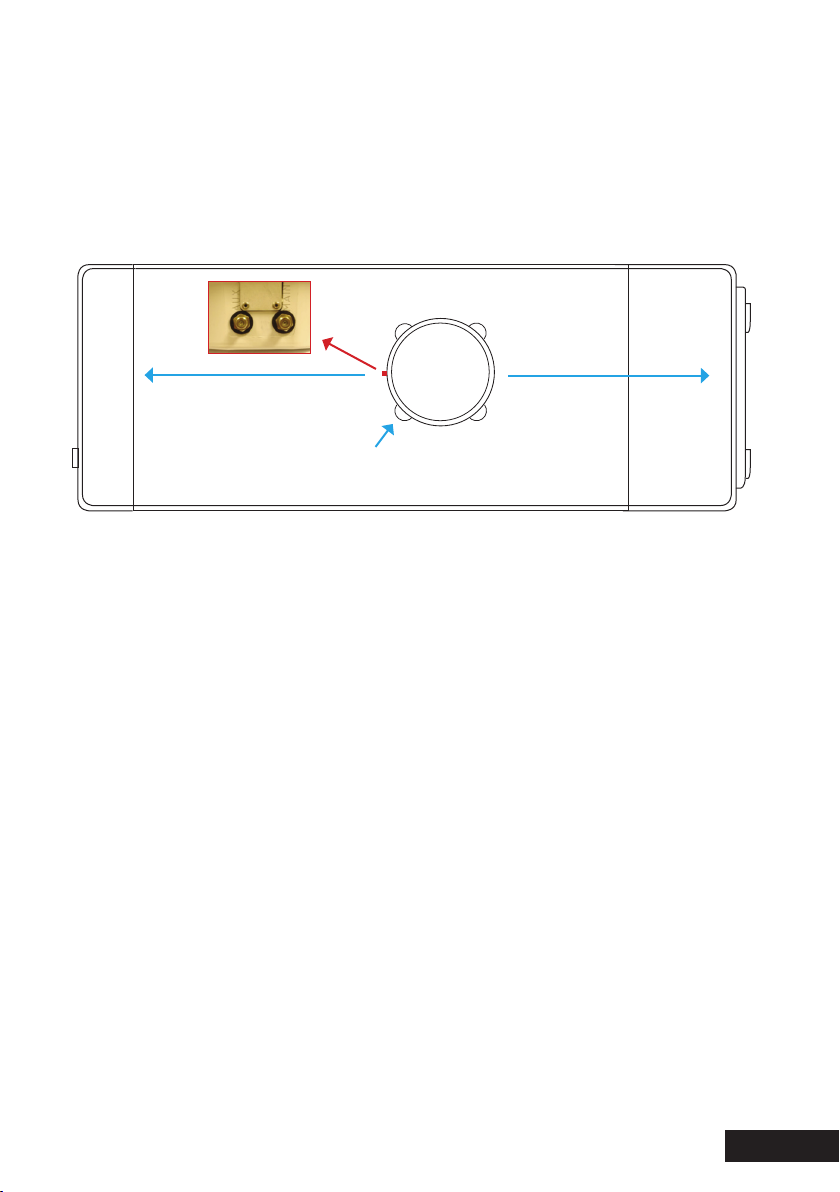
MAIN-Anschluss: An diesen Anschluss
muss Immer ein Receiver angeschlossen
sein wir empfehlen hierfür das 4,5 m
Koax-Kabel zu verwe vden.
AUX-Anschluss: Hier kann ein zweiter
Receiver angeschlossen werden. Wir
empfehlen hierfür das 10m Koax-Kabel zu
verwenden.
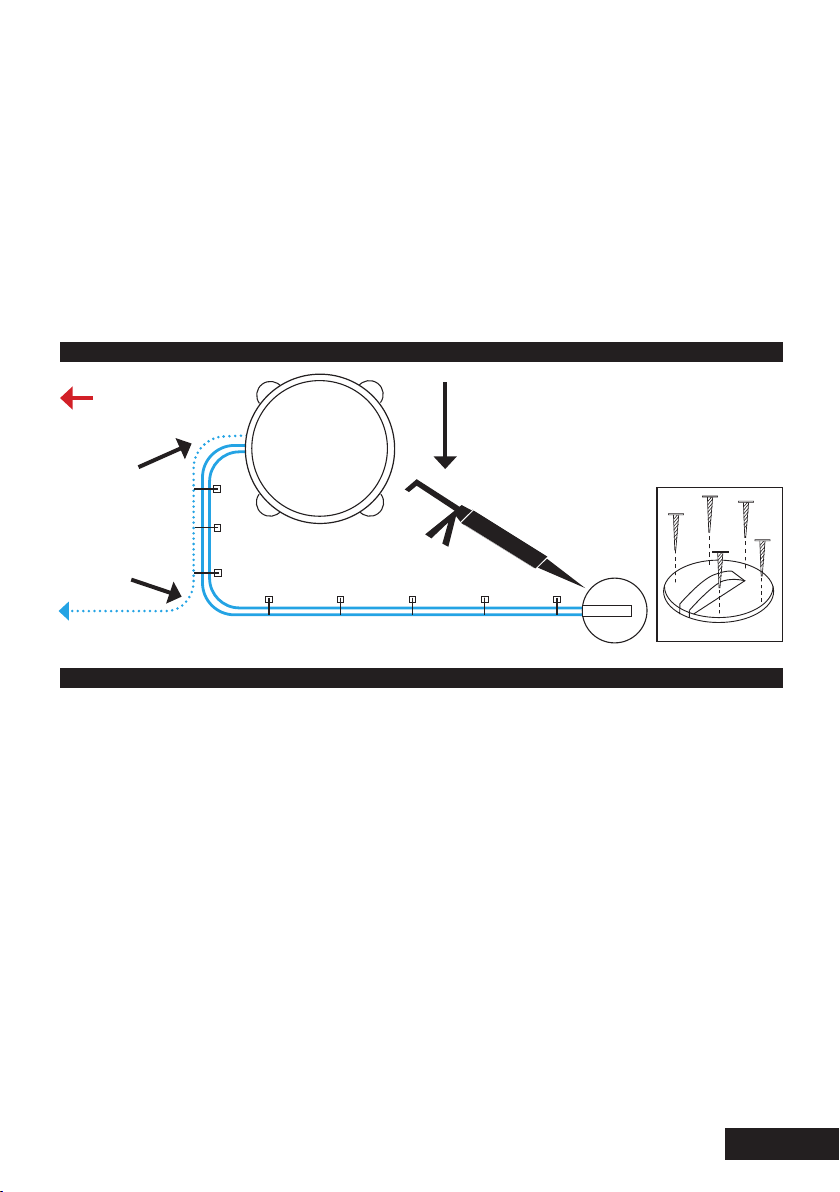
Platzieren Sie die Dachdurchführung für
das Koax-Kabel über einen Hänge-oder
Kleiderschrank etc. (idealerweise dort
wo unmittelbar der Sat-Receiver steht.
Vergewissern Sie sich das an dieser Stelle
der Dachdurchführung keine elektrischen
Leitungen verlegt sind. Bohren Sie ein
Loch durch das Dach und schieben Sie
das Koax-Kabel in den Innenraum des
Fahrzeuges.
UK
IMPORTANT!
Fill ends of coax cables with
supplied dielectric grease.
Coax connections should
be secure.
MAIN output: Always connect the coaxial
cable to the VuDome main output and
route this to the main LNB input on your
main receiver. If only using 1 receiver we
length is sufficient.
AUX output: To be used for second LNB
input for Sky+ or PVR. Can also be used
to route signal to a secondary receiver
location. We suggest to use the longer
10m cable.
Decide on location for cable entry cover
into vehicle (above an overhead locker or
wardrobe etc.). Check for cables within
roof space before drilling. Drill a hole
through the roof and push
cable into vehicle.
Page 8

No sharp bends
in wiring
verlegt werden
REAR OF VEHICLE
IMPORTANT
Sealant must be roof compatible
Die Verklebung muss kompatible mit der Dachhaut
sein wie z.B. Sicaflex.
Vudome
Auto
Or to optional auxiliary receiver
Optional/ zweiter Receiver
Edge of roof Dachkante
Verkleben Sie die Dachdurchführung
ebenfalls mit Sicaflex. Stellen Sie sicher
das die Montagestelle fettfrei und eben
ist. Um das Kabel am Dach entlang zu
routen verwenden Sie einen Kabelschacht
oder Kabelclips.
We recommend the cable entry is fixed
with fasteners and sealant/adhesive.
Apply sealant/adhesive to cable entry
hole drilled into roof. Ensure roof surface
is clean and dry and apply sealant/
adhesive to the face of the flange on the
cable entry cover. Now apply cover firmly
to roof. Secure cable to vehicle roof using
cable clips or alternatively use trunking.

UK
1. Make sure all connections are made as shown on page 5.
2. Turn on the TV and satellite receiver.
3. Press POWER on the VuDome Auto control panel.
If the unit is properly connected, the COAX light should flash for 10 seconds before turning
solid. This indicates the VuDome Auto is ready to search for satellites. If the ERROR light
appears, there is a problem with your connection, please see troubleshooting. You will also
currently set to.
The VuDome Auto supports the following Satellites:Astra 1 - Astra 2 - Astra 3 - Hotbird
Please see table below to understand how the lights correspond to these satellites.
DE
1. Vergewissern Sie sich, dass alle Verbindungen, wie auf Seite 5 beschrieben
durchgeführt worden sind.
2. Starten Sie Ihr Fernsehgerät und den Receiver.
3. Drücken Sie den “POWER” Knopf auf der Steuerbox der VuDome - Auto.
Wenn das Gerät richtig angeschlossen ist, sollte die COAX-LED erst für 10 Sekunden blinken
und dann dauerhaft leuchten. Dies zeigt an, dass die VuDome - Auto betriebsbereit ist.
Sollte die “ERROR”LED leuchten gibt es ein Problem mit der Verkabelung, siehe hierzu die
Fehlerbehebung. Die Sat-Scan LED 1-4 zeigt an welchen Satellit Sie zur Suche ausgewählt
haben. Die LED blinkt dreimal auf Die VuDome Auto unterstützt folgende Satelliten: Astra 1,
Astra 2, Astra 3 und Hotbird Siehe Tabelle unten, um zu verstehen welche LED welchen
Satelliten entspricht.
On/An: Off/Aus:
Power up/Inbetriebnahme
Euro channels
Euro channels
Euro channels
Satellite/Satelliten:
ASTRA 2 (28.2E)
ASTRA 3 (23.5E)
HOTBIRD(13.0E)
Light/Licht 1Light/Licht 2Light/Licht 3Light/Licht 4
341 2
FIRST TIME SET UP (plug & play).

UK
European users can also immediately search for their favourite channels.)
In most cases your pre-set satellite will be the one you wish to search for, in this case,
please skip to the SCAN section now (turn over).
If you would like to change the satellite which your VuDome Auto searches for please use
the following process:
1. Hold down POWER and SCAN simultaneously for 3 seconds or until a SAT SCAN &
COAX light begins to flash.
2.
satellites by pressing the SCAN button. You will see the SAT SCAN light will move,
corresponding to the new satellite you have selected (see table).
3. Once you have selected your satellite, again, simultaneously hold down POWER and
SCAN for 3 seconds. The lights will stop flashing.
4. You have now exited satellite selection mode and your new satellite is ready to be
searched.
Note:
This will now remain the pre-set satellite on the control box until this process is repeated.
Operation
Page 11

Page 12
DE
Die VuDome - Auto ist werksseitig auf ASTRA1 eingestellt d.h. die VuDome Auto ist bereit
den Satelliten zu suchen
In den meisten Fällen ist Ihr zweiter Lieblingssatellit, den Sie suchen möchten, auch
voreingestellt. In diesem Fall fahren Sie mit dem SCAN Abschnitt fort wie auf der nächsten
Seite beschrieben.
Wenn Sie den Satelliten ändern wollen den Ihre VuDome Auto suchen soll fahren Sie wie
folgt fort:
1. Halten Sie die Tasten POWER und SCAN gleichzeitig für 3 Sekunden gedrückt bis die
SAT-SCAN & COAX LED´s zu blinken beginnen.
2. Sie befinden sich nun im Satelliten-Auswahl-Modus. Sie können nun zwischen den vier
vorprogrammierten Satelliten auswählen indem Sie die SCAN-Taste Drücken. Nach
jedem drücken der Scan -Taste springt die LED auf eine andere Position. Wählen Sie den
gewünschten Satelliten entsprechend der Tabelle auf Seite 6 aus.
3. Sobald Sie Ihren gewünschten Satelliten gewählt haben halten Sie die POWER & SCAN
Taste gleichzeitig für 3 Sekunden gedrückt. Die LED´s hören nun auf zu blinken.
4. Sie haben nun den Satelliten-Auswahl-Modus verlassen und Ihr neu ausgewählter
Satellit ist bereit um gesucht zu werden.
Hinweis: Wenn sie die Antenne bewegen, müssen sie erneut einen SCAN-Vorgang
durchführen.
Die Bedienung

Page 13
UK
Once your system is set up to search for the correct satellite, you are ready to scan.
To do this, simply hold down the SCAN button for 3 seconds.
The antenna will now begin to search and the SAT SCAN lights on the control box will begin
cycling to confirm this. This process can take up to 10 minutes, however in most cases will
be considerably less.
Once the VuDome Auto has located a satellite, the SAT SCAN lights will stop cycling and the
light representing the satellite programmed to search will turn solid. This confirms that the
desired satellite has been located.
Ensuring your receiver is set to the correct satellite, you will now have a picture.
If after 10 minutes the lights stop cycling and the ERROR light appears. There has been a
problem locating the satellite; there are several reasons for this such as an obstruction or
unstable surface. In this case you should re-setup your system and rescan.
Please refer to the troubleshooting guide for more information.
Note: If you move the antenna unit, you will have to re-acquire the satellites by repeating
the scan process.
DE
Halten Sie Scan-Taste für 3 Sekunden gedrückt und die VuDome - Auto startet die Suche
des gewünschten Satelliten.
Die duchlaufenden Sat-Scan LED´s bestätigen den Suchvorgang. Dieser Vorgang kann bis
zu 10 Minuten dauern in den meisten Fällen aber deutlich weniger.
Sobald das System den gewünschten Satelliten gefunden hat wird das Durchlaufen der
SAT-SCAN LED´s gestoppt. Die Sat-SCAN LED leuchtet dann an dem Satellit der gefunden
worden ist.
Vergewissern Sie sich, dass Ihr Receiver auf den richtigen Satelliten eingestellt ist, wenn
das der Fall ist haben Sie jetzt ein Bild und können fernsehen.
Ist nach 10 Minuten immer noch keiner der Satelliten gefunden worden hören die LED´s
auf sich zu bewegen und es erscheint die ERROR LED d.h. es kann der gewünschte Satel-
liten nicht identifiziert werden. Gründe hierfür sind z.B. keine frei Sicht zum Satelliten die
Signale werden geblockt von Hindernissen wie z.B. andere Fahrzeuge, Bäume, Gebäude
usw. Die VuDome wurde während des Suchvorganges bewegt oder die Standfläche ist
instabil. Bitte beachten Sie die Anleitung zur Fehlerbehebung für weitere Informationen.
Hinweis: Wenn sie die Antenne bewegen, müssen sie erneut einen SCAN-Vorgang
durchführen.
Scan/Satelliten Suche

UK
After a period of inactivity, the VuDome Auto will enter standby mode. You will know
the system is in standby mode as the SAT SCAN light will turn off and the COAX light will
become dim. The system will continue to function in standby mode.
Alternatively, the system can be put into standby mode by pressing the power button once.
To exit standby mode, the power button must be pressed. You will know the system has
now exited standby mode as the COAX light will become brighter and the light representing
the current satellite will flash 3 times.
Note: You will not need to rescan your VuDome Auto on exiting standby mode unless the
antenna has been moved.
To power off your VuDome Auto. Hold down the POWER button for 3 seconds. All lights will
turn off. The system can now be disconnected.
DE
Nach einer gewissen Zeit versetzt sich die VuDome - Auto von selbst in den Stanby-Modus.
Das System befindet sich im Standby-Modus sobald die SAT-SCAN LED ausgeht und die
COAX LED gedimmt wird. Sie können auch im Standby-Modus weiterhin fernsehen.
Die VuDome - Auto kann auch alternativ durch drücken der POWER-Taste in den
Standby-Modus versetzt werden.
Um den Standby-Modus zu verlassen drücken Sie einfach die POWER-Taste, nun wird die
COAX-LED heller und die Sat-Scan LED des ausgewählten Satelliten blinkt 3 mal.
HINWEIS: Beim Verlassen des Standby-Modus muss kein erneuter Sat-Scan durchgeführt
werden.
Zum Ausschalten der VuDome - Auto halten Sie die POWER-Taste 3 Sekunden gedrückt bis
alle Lichter erloschen sind. Jetzt können Sie die VuDome - Auto vom Receiver trennen.
Power down/Ausschalten

Page 15
While the system is operating a faint
motor sound can be heard, this is normal.
Satellite reception is only possible when
the dome is positioned so that it has
direct line of sight in the direction of
the desired satellite and there are no
obstructions blocking the view, e.g. trees,
buildings.
The signal receiving performance of the
system may decrease with heavy rainfall
or snowfall. The same result may occur if
the antenna is covered with snow. In such
a case, gently remove the snow from the
antenna cover.
Dirt on the dome may decrease the signal
receiving performance over a period of
time. To prevent decrease of performance
gently clean the antenna cover
periodically.
Do not use abrasive cleaners as they may
Do not use solvent based cleaning agents
on plastic parts.
Während der Einstellung des Satelliten
Ist der Motor zu hören, dass ist normal.
Satellitenempfang Ist nur möglich wenn
Sie eine freie Sicht zum Satelliten haben.
Die Signale dürfen nicht von Häuser,
Bäumen,Berge usw. blockiert werden.
Der Sat-Empfang kann gestört werden
durch
heftigen Regen oder durch heftigen Sch-
neefall. Ebenfalls tritt eine Störung
Sat-Antenne mit Schnee bedeckt ist.
In solchen Fällen vorsichtig den Schnee
Nach einiger Zeit empfiehlt es sich den
Schmutz oder Staub von der Antennen
Verwenden Sie hierfür keine agressiven
Reinigungsmittel um nicht die Oberfläche
des Domes zu beschädigen.
Satellite Reception/Satellitenempfang

Page 16
Footprint Maps/Ausleuchtzone
UK
The footprint of a satellite is the ground area where the signal is available and determines
show areas in which this 37cm dish can receive signals when used with a compatible
ASTRA 2D ASTRA 2 SOUTH ASTRA 2 NORTH
DE
Die Ausleuchtzonen der einzelnen Satelliten zeigt in welchem Gebiet Sie mit der VuDome
- Auto Empfangen haben.
Es kann auf Grund schlechter Wetterverhältnisse zu Beeinträchtigungen kommen, sodass
nicht alle Sender empfangbar sind oder gar kein Satellitenfernsehen möglich ist.
HOTBIRD ASTRA 1

UK - Limited Warranty
Every Maxview VuDome Auto Satellite System is thoroughly inspected and tested before
leaving the factory, and is covered by the following two year parts limited warranty from the
date of original purchase:
Two year parts warranty: The customer is not responsible for the cost of replacement parts
if the original part is determined to be defective under the terms of the warranty. The
customer is responsible for the cost of replacement parts after two years.
Should any problems develop during the warranty period, contact Maxview. You must
contact Maxview before the warranty period expires. The customer must supply proof of
purchase (such as a dated sales receipt) when requesting warranty service. If customer
cannot supply proof, warranty period shall start 30 days after date of manufacture.
Only Maxview will perform warranty evaluations and repairs.
If it is determined that the unit needs to be returned to Maxview, the customer must return
COMPLETE product, to:
When returning product, Maxview will supply a Product Return Number (PRN). This number
must be clearly written on the box. Failure to clearly write PRN number on box may result in
delays in processing claim.
Along with product, customer should include in the box: his/her name, address, daytime
phone number, proof of purchase and description of the problem.
If inspection shows the trouble is caused by defective workmanship or material, Maxview
will repair (or replace if necessary) without charge.
This warranty does not cover installation and external wiring, or re-manufactured units.
This warranty does not cover damage caused by the use of a mounting bracket other than a
Maxview mounting bracket designed for the product. This warranty is not transferable from
the original owner.
Due to the expanding and changing satellite market, Maxview cannot be held responsible
for changes made to satellite services. Software updates to address such issues are not
covered under warranty.
Page 17

Page 18
Safety
To avoid tripping over and injury always route cable carefully.
This warranty also does not apply where:
for the product.
such repairs.
correctly.
TERMS & CONDITIONS
In no event shall Maxview be liable for any indirect, incidental, or consequential damages
from the sale or use of the product. This disclaimer applies both during and after the term
of the warranty.
This warranty gives you specific legal rights, but does not affect your statutory rights.
DE - Garantie
Die Garantie erstreckt sich über die Zeit von 2 Jahren ab Kaufdatum. Der Hersteller oder
Importeur übernimmt keine Haftung für Schäden, die durch nicht bestimmungsgemäßen
Gebrauch entstehen.

Care & maintenance/Pflege und Wartung
UK
The VuDome Auto has been designed to be maintenance and trouble free. For optimum
signal strength, keep the cover clean from dirt, bugs, and other debris. Periodic washing of
the top cover with mild soap and water is recommended.
1. Always handle the antenna and VuDome Auto Control Box with care. Do not drop the
antenna or VuDome Auto Control Panel. Avoid excessive shock or vibration to the
antenna or VuDome Auto Control Box
2. Use caution when carrying the antenna. Always carry the antenna by the handle.
3. Do not remove the cover of the antenna or VuDome Auto Control Box. Doing so is not
recommended by the manufacturer and will void the limited warranty.
electronic devices as this can cause heat build-up or block the satellite signal from
reaching the antenna.
debris by hand washing with mild soap and water.
DO NOT USE SOLVENTS TO CLEAN VUDOME AUTO.
TERMS & CONDITIONS
In no event shall Maxview be liable for any indirect, incidental, or consequential damages
from the sale or use of the product. This disclaimer applies both during and after the term
of the warranty. This warranty gives you specific legal rights, but does not affect your
statutory rights.
DE
Die VuDome Auto ist so konstruiert dass Sie keine besondere Pflege und Wartung
benötigt. Um immer ein optimales Signal zu erhalten empfiehlt es sich das Gehäuse
sauber zu halten. Verwenden Sie hierfür nur einen feuchten Lappen.
Verwenden Sie keine Lackverdünnung oder ähnliches. Bewegen Sie die Sat-Antenne
während des Suchvorganges nicht, da es zu Beschädigungen führen kann.

The CE mark which is attached to these products means it conforms
to the EMC (ElectroMagnetic Compatibility) Directive.
Products marked with the crossed out wheely bin must not be disposed of with
normal household waste but made available for separate household collection.
Separate collection of used products and their packaging allows materials
to be recycled and used again. Re use of recycled materials helps prevent
environmental pollution and reduces the demand for raw materials.
The Directive on the restriction of the use of certain hazardous substances in
DE
Die VuDome – Auto wurde konstruiert, gebaut und vermarktet in Übereinstimmung mit den
Bitte führen Sie dieses Produkt den entsprechenden Sammelstellen zu.
Diese gewähren eine umweltgerechte Entsorgung.
Certification & Environment/CE-Konfirmationserklärung
Page 20
This manual suits for next models
1
Table of contents
Other Maxview Marine Radar manuals
Popular Marine Radar manuals by other brands

Raymarine
Raymarine CYCLONE installation instructions

Furuno
Furuno FAR-2107 Series Operator's manual

Raymarine
Raymarine 37STV Gen2 Additional Instructions for Installation and Operation

Furuno
Furuno FAR2XX7 Series Configuration guide

Furuno
Furuno 1751 Operator's manual

Furuno
Furuno DRS4W Operator's manual