JRC JMR-9230-S User manual

01ETM ISO 9001, ISO 14001 Certified
Printed in Japan
Marine Service Department
+81-3-3492-1305
+81-3-3779-1420
Telephone :
Facsimile :
e-mail :
Alphatron Marine Systems Pte Ltd
Telephone :
Facsimile :
e-mail :
+65 6863 0335
+65 6863 3305
Singapore Branch
SEATTLE Branch
Telephone :
Facsimile :
e-mail :
+1-206-654-5644
+1-206-654-7030
CODE No.7ZPNA4466A
CODE No.7ZPNA4466A
JUL. 2015 Edition 3 JRC
Not use the asbestos
For further information,contact:
URL http://www.jrc.co.jp
Alphatron Marine B.V.
Telephone :
Facsimile :
e-mail :
+31 (0)10- 453 4000
+31 (0)10- 452 9214
Rotterdam (Head office)
URL http://www.alphatronmarine.com
MARINE RADAR EQUIPMENT
/ECDIS/CONNING
/ECDIS/CONNING
INSTALLATION MANUAL
INSTALLATION MANUAL
JMR-9230-S/S3
JMR-9230-S/S3
JMR-9225-7X3/9X3/6X/9X/6XH
JMR-9210-6X/6XH
JMR-9210-6X/6XH
JMR-9272-S
JMR-9272-S
JMR-9282-S/SH
JMR-9282-S/SH
JMR-7230-S/S3
JMR-7230-S/S3
JMR-7225-7X3/9X3/6X/9X/6XH
JMR-7210-6X/6XH
JMR-7210-6X/6XH
JMR-7272-S
JMR-7272-S
JMR-7282-S/SH
JMR-7282-S/SH
JAN-9201
JAN-9201
JAN-7201
JAN-7201
JAN-9202
JAN-9202
JAN-7202
JAN-7202


i
Cautions for High Voltage
High voltages, ranging from several hundreds to tens of thousands of volts, are used in
electronic apparatus, such as radio and radar instruments. These voltages are totally
harmless in most operations. However, touching a component inside the unit is very
dangerous. (Any person other than authorized service engineers should not maintain,
inspect, or adjust the unit.)
High voltages on the order of tens of thousand volts are most likely to cause instant deaths
from electrical shocks. At times, even voltages on the order of several hundred volts could
lead to electrocution. To defend against electrical shock hazards, don't put your hand into
the inside of apparatus. When you put in a hand unavoidably in case of urgent, it is strongly
suggested to turn off the power switch and allow the capacitors, etc. to discharge with a wire
having its one end positively grounded to remove residual charges. Before you put your
hand into the inside of apparatus, make sure that internal parts are no longer charged. Extra
protection is ensured by wearing dry cotton gloves at this time. Another important precaution
to observe is to keep one hand in your pocket at a time, instead of using both hands at the
same time.
It is also important to select a secure footing to work on, as the secondary effects of
electrical shock hazards can be more serious. In the event of electrical shocks, disinfect the
burnt site completely and obtain medical care immediately.
Precautions for Rescue of Victim
of Electric Shock
When a victim of electric shock is found, turn off the power source and ground the circuit
immediately. If this is impossible, move the victim away from the unit as quick as possible
without touching him or her with bare hands. He or she can safely be moved if an insulating
material such as dry wood plate or cloth is used.
Breathing may stop if current flows through the respiration center of brain due to electric
shock. If the electric shock is not large, breathing can be restored by artificial respiration. A
victim of electric shock looks pale and his or her pulse may become very weak or stop,
resulting in unconsciousness and rigidity at worst. It is necessary to perform first aid
immediately.
7ZPNA4466A

ii
Method of First-Aid Treatment
Precautions for First-Aid Treatments
Whenever a person is struck by an electrical shock, give the patient artificial respiration
immediately on the spot, unless it is absolutely necessary to move the patient for safety's
sake. Once started, artificial respiration should be continued rhythmically.
(1) Refrain from touching the patient carelessly as a result of the accident; the first-aider
could suffer from electrical shocks by himself or herself.
(2) Turn off the power calmly and certainly, and move the patient apart from the cable
gently.
(3) Call or send for a physician or ambulance immediately, or ask someone to call doctor.
(4) Lay the patient on the back, loosening the necktie, clothes, belts and so on.
(5) (a) Feel the patient's pulse.
(b) Check the heartbeat by bringing your ear close to the patient's heart.
(c) Check for respiration by bringing your face or the back of your hand to the patient's
face.
(d) Check the size of patient's pupils.
(6) Opening the patient's mouth, remove artificial teeth, cigarettes, chewing gum, etc. if
any. With the patient's mouth open, stretch the tongue and insert a towel or the like into
the mouth to prevent the tongue from being withdrawn into the throat. (If the patient
clenches the teeth so tight that the mouth won't open, use a screwdriver or the like to
force the mouth open and then insert a towel or the like into the mouth.)
(7) Wipe off the mouth to prevent foaming mucus and saliva from accumulating.

iii
Treatment to Give When the Patient Has a
Pulse Beating but Has Ceased to Breathe
Performing mouth-to-mouth artificial respiration - Fig. 1
(1) Bend the patient's face backward until it is directed to look back. (A pillow may be
placed under the neck.)
(2) Pull up the lower jaw to open up the airway. (To spread the airway)
(3) Pinching the patient's nose, breathe deeply and blow your breath into the patient's
mouth strongly, with care to close it completely. Then, move your mouth away and
take a deep breath, and blow into his or her mouth. Repeat blowing at 10 to 15 times
a minute (always with the patient's nostrils closed).
(4) Continue artificial respiration until natural respiration is restored.
(5) If the patient's mouth won't open easily, insert a pipe, such as one made of rubber or
vinyl, into either nostril. Then, take a deep breath and blow into the nostril through
the pipe, with the other nostril and the mouth completely closed.
(6) The patient may stand up abruptly upon recovering consciousness. Keep the patient
lying calmly, giving him or her coffee, tea or any other hot drink (but not alcoholic
drink) to keep him or her warm.
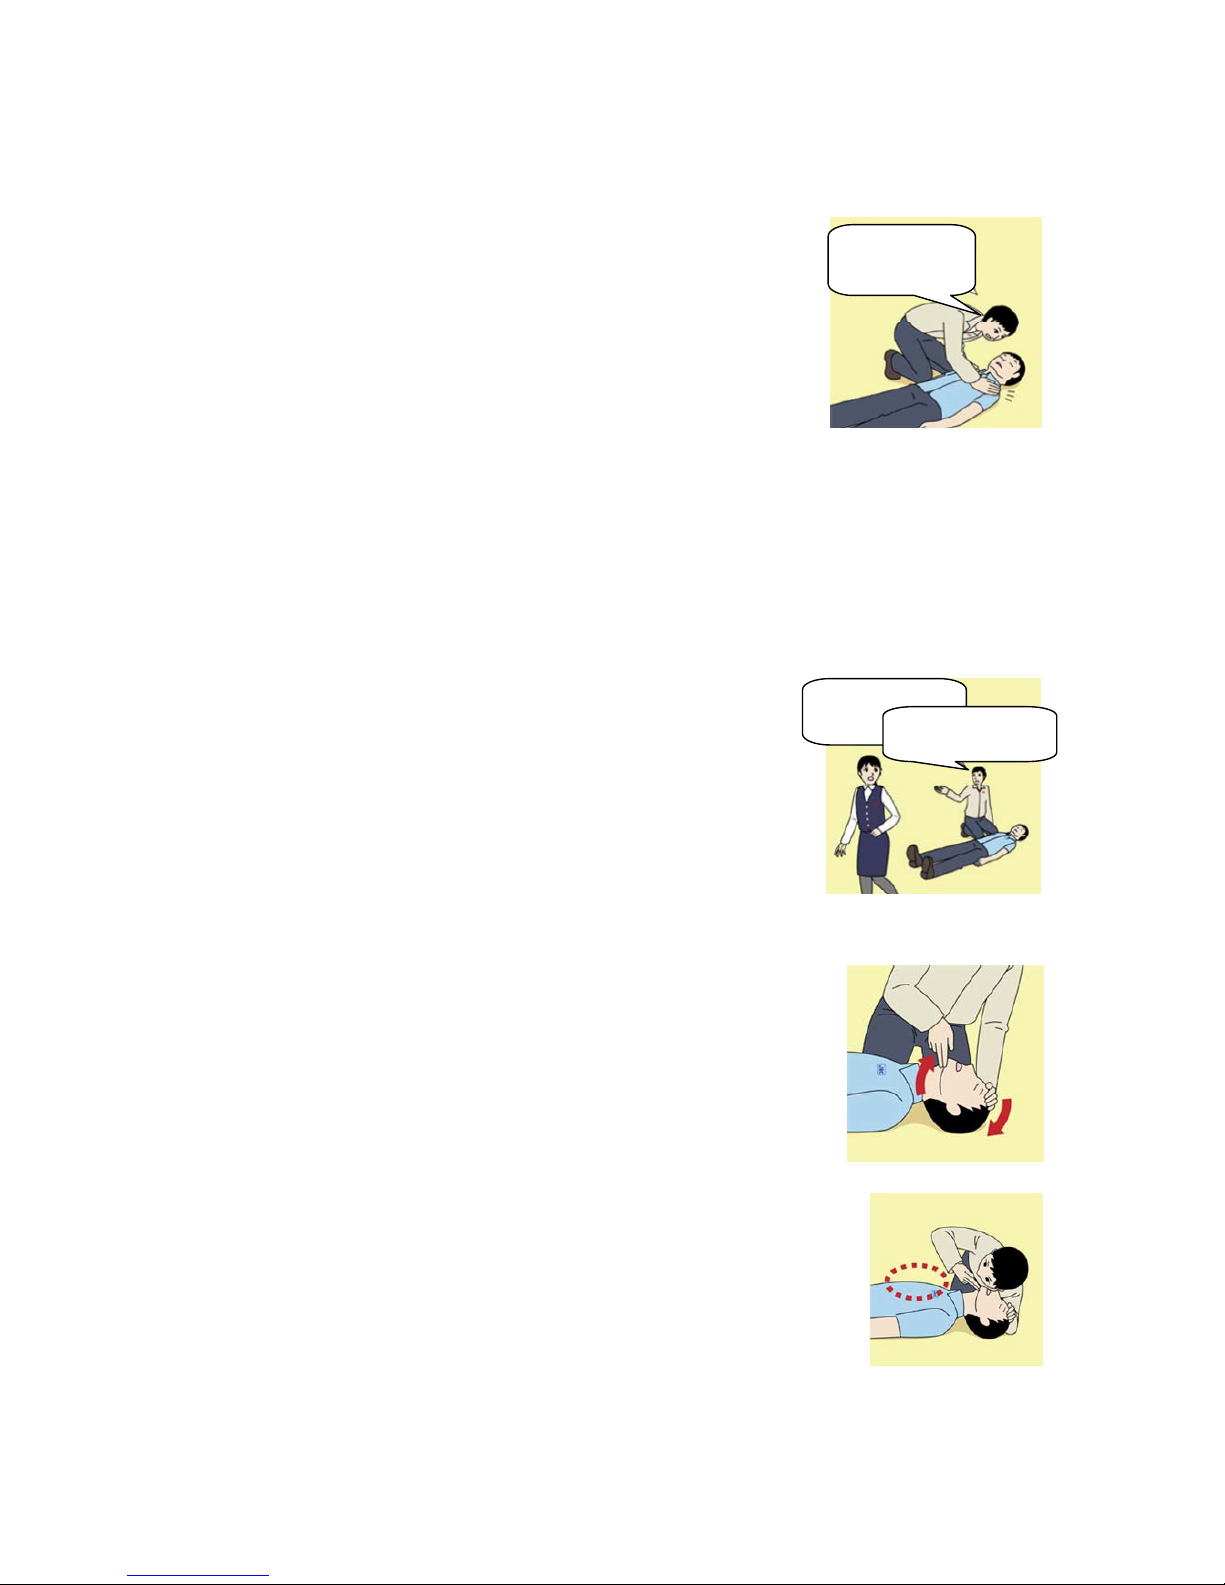
Mouth-to-mouth artificial respiration with the patient's head lifted
[1]
(1) Lift the back part of the patient's
head. Support the forehead with one
of your hand and the neck with the
other hand.[1].
Many patients will have their airways
opened by lifting their head in this
way to ease mouth-to-mouth artificial
respiration.
[2]
(2) Closing the patient's mouth with your
mouth, press your cheek against the
patient's nose[2].
Alternatively, hold the patient's nose
with your finger to prevent air leak
[3].
[3] (3) Blowing air into the patient's lungs.
Blow air into the patient's lungs until
chest is seen to rise. The first 10
breaths must be blown as fast as
possible.
Fig. 1 Mouth-to-mouth artificial respiration

iv
Treatment to Give When the Patient Has No
Pulse Beating and Has Ceased to Breathe
Performing cardiac massage - Fig. 2
If the patient has no pulse beating, with the pupils open and no heartbeat being heard, the
patient has a cardiac arrest and requires immediate artificial respiration. Continue this
until a medical specialist arrives, and follow his or her directions after that.
(1) Putting one hand on about the lower one third of the patient's ribs and the other hand
over the back of the first, with your elbow fully stretched (with bended elbow, you
can’t press to the extent the patient’s ribs are depressed), apply your body weight to
the hands to press the patient's body until it is depressed about 2 cm (Repeat this
about 50 times a minute). (Cardiac massage)
(2) If only one first-aider is available, perform a cardiac massage about 15 times and
then give mouth-to-mouth artificial respiration 2 times. Repeat this sequence.
If two first-aiders are available, while one person performs a cardiac massage 15
times, the other should give mouth-to-mouth artificial respiration 2 times. Repeat this
sequence. (Combined cardiac massage and mouth-to-mouth artificial respiration
method)
(3) Check the patient's pupils and feel the pulse from time to time. When the pupils are
restored to normal and the pulse begins to beat regularly, stop treating and keep the
patient calm while giving him or her coffee, tea or any other hot drink to keep him or
her warm while watching him or her carefully.
Fig. 2 Cardiac massage
[1]
[3]
[2]
[4]

v
Procedure for cardiopulmonary resuscitation (CPR) using the AED
(Automated External Defibrillator)
A person is collapsing.
- Secure the safety of the surrounding area.
- Prevent secondar
y
disasters.
Check for response.
- Call while tapping the shoulder.
Breathing
Recovery position
- Lay the injured or
ill person on
his/her side and
wait for the arrival
of the emergency
services.
Not responding
Ask for help.
- Make an 119 emergency call.
- Ask to bring an AED.
Listen to the appeal of the
injured or ill person and give
the necessary first-aid
treatment.
Responding
Not breathing
Give 2 rescue breaths; omittable Note(1)
Give CPR.
- 30 chest compressions
- Give 2 rescue breaths; omittable Note(1)
Note(1) Omission of rescue breathing:
If there is a fear of infection because the
injured or ill person has an intraoral injury,
you are hesitant about giving mouth-to-mouth
resuscitation, or preparing the mouthpiece for
rescue breathing takes too long, omit rescue
breathing and proceed to the next step.
Open the airway.
- Check for breathing.
Arrival of an AED
- Turn on the power.
- Use the AED by following its voice prompts.
Fitting of the electrode pads, etc.
Automatic electrocardiogram
analysis
- Do not touch the injured or ill
person.
Electric shock is needed.
Electric shock is not needed.
Delivery of electric shock
Resume CPR from chest
compressions by following the
voice prompts of the AED.
When the injured or ill
person has been
handed over to the
emergency services or
has started moaning or
breathing normally, lay
him/her on his/her side
in a recovery position
and wait for the arrival
of emergency services.
When to
stop CPR
A person is collapsing.
- Secure the safety of the surrounding area.
- Prevent secondar
y
disasters.
The AED
automatically
analyzes the
heart rhythm
every 2 min.

vi
Procedure for Cardiopulmonary Resuscitation (CPR) Using the AED
(Automated External Defibrillator)
1.Check the scene for safety to prevent secondary disasters
a) Do not touch the injured or ill person in panic when an accident has
occurred. (Doing so may cause electric shock to the first-aiders.)
b) Do not panic and be sure to turn off the power. Then, gently move
the injured or ill person to a safe place away from the electrical
circuit.
2.Check for responsiveness
a) Tap the shoulder of the injured or ill and shout in the ear saying, "Are you OK?"
b) It the person opens his/her eyes or there is some response or gesture, determine it as
"responding." But, if there is no response or gesture, determine it as "not responding."
3.If responding
a) Give first-aid treatment.
4.If not responding
a) Ask for help loudly. Ask somebody to make an emergency 119 call
and bring an AED.
• Somebody has collapsed. Please help.
• Please call 119.
• Please bring an AED.
• If there is nobody to help, call 119 yourself.
5.Open the airway
a) Touch the forehead with one hand. Lift the chin with the two fingers of
the middle finger and forefinger of the other hand and push down on
the forehead as you lift the jaw to bring the chin forward to open the
airway. If neck injury is suspected, open the airway by lifting the lower
jaw.
6.Check for breathing
a) After opening the airway, check quickly for breathing for no more than
10 seconds. Put your cheek down by the mouth and nose area of the
injured or ill person, look at his/her chest and abdomen, and check the
following three points.
• Look to see if the chest and abdomen are rising and falling.
• Listen for breathing.
• Feel for breath against your cheek.
Are you OK?
Please call 119.
Please bring an
AED

vii
b) If the injured or ill person is breathing, place him/her in the recovery
position and wait for the arrival of the emergency services.
• Position the injured or ill person on his/her side, maintain a clear and
open airway by pushing the head backward while positioning their
mouth downward. To maintain proper blood circulation, roll him/her
gently to position them in the recovery position in the opposite
direction every 30 minutes.
7.Give 2 rescue breaths (omittable)
a) If opening the airway does not cause the injured or ill person to begin to
breathe normally, give rescue breaths.
b) If there is a fear of infection because the injured or ill person has an
intraoral injury, you are hesitant about giving mouth-to-mouth
resuscitation, or getting and preparing the mouthpiece for rescue
breathing takes too long, omit rescue breathing and perform chest
compressions.
c) When performing rescue breathing, it is recommended to use a
mouthpiece for rescue breathing and other protective devices to
prevent infections.
d) While maintaining an open airway, pinch the person's nose shut with
your thumb and forefinger of the hand used to push down the forehead.
e) Open your mouth widely to completely cover the mouth of the injured or ill person so that no air
will escape. Give rescue breathing twice in about 1 second and check if the chest rises.
8.Cardiopulmonary resuscitation (CPR) (combination of chest compressions and
rescue breaths)
a) Chest compressions
1) Position of chest compressions
• Position the heel of one hand in the center of the chest, approximately between the
nipples, and place your other hand on top of the one that is in position.
Roll gently in the opposite
direction every 30 minutes.
CPR mask
Mouthpiece for rescue

viii
2) Perform chest compressions
• Perform uninterrupted chest compressions of
30 at the rate of about 100 times per minute
• While locking your elbows positioning yourself
vertically above your hands.
• With each compression, depress the chest wall to a depth of approximately 4 to 5 cm.
b) Combination of 30 chest compressions and 2 rescue breaths
1) After performing 30 chest compressions, give 2 rescue
breaths. If rescue breathing is omitted, perform only chest
compressions.
2) Continuously perform the combination of 30 chest
compressions and 2 rescue breaths without interruption.
3) If there are two or more first-aiders, alternate with each other
approximately every two minutes (five cycles of
compressions and ventilations at a ratio of 30:2) without interruption.
9.When to stop cardiopulmonary resuscitation (CPR)
a) When the injured or ill person has been handed over to the
emergency services
b) When the injured or ill person has started moaning or breathing
normally, lay him/her on his/her side in a recovery position and wait
for the arrival of emergency services.
10.Arrival and preparation of an AED
a) Place the AED at an easy-to-use position. If
there are multiple first-aiders, continue CPR
until the AED becomes ready.
b) Turn on the power to the AED unit.
Depending on the model of the AED, you
may have to push the power on button, or the AED automatically turns on when you open the
cover.
c) Follow the voice prompts of the AED.
11.Attach the electrode pads to the injured or ill person's bare chest
a) Remove all clothing from the chest, abdomen, and arms (male or
female).
b) Open the package of electrode pads, peel the pads off and securely
place them on the chest of the injured or ill person, with the adhesive
30 times
Compress
with these
parts (the
heels of
both
hands).
2 times
Turn on the power.

ix
side facing the chest. If the pads are not securely attached to the
chest, the AED may not function. Paste the pads exactly at the
positions indicated on the pads, If the chest is wet with water, wipe
dry with a dry towel and the like, and then paste the pads. If there is a
pacemaker or implantable cardioverter defibrillator (ICD), paste the
pads at least 3cm away from them. If a medical patch or plaster is
present, peel it off and then paste the pads. If the injured or ill person's chest hair is thick, paste
the pads on the chest hair once, peel them off to remove the chest hair, and then paste new
pads.
c) Some AED models require to connect a connector by following voice prompts.
d) Do not put child pads on adults (older than 8 years).
12.Electrocardiogram analysis
a) The AED automatically analyzes electrocardiograms. Follow the
voice prompts of the AED and ensure that nobody is touching the
injured or ill person while you are operating the AED.
b) On some AED models, you may need to push a button to analyze
the heart rhythm.
13.Electric shock (defibrillation)
a) If the AED determines that electric shock is needed, the voice
prompt saying, "Shock is needed" is issued and charging starts
automatically.
b) When charging is completed, the voice prompt saying, "Push the
shock button" is issued and the shock button flashes.
c) The first-aider must get away from the injured or ill person, make
sure that no one is touching him/her, and then press the shock button.
d) When electric shock is delivered, the body of the injured or ill person may jerk.
14.Resume cardiopulmonary resuscitation (CPR).
Resume CPR consisting of 30 chest compressions
and 2 rescue breaths by following the voice prompts
of the AED.
15.Automatic electrocardiogram analysis
a) When 2 minutes have elapsed since you resumed cardiopulmonary resuscitation (CPR), the
AED automatically analyzes the electrocardiogram.
b) If you suspended CPR by following voice prompts and AED voice prompt informs you that
shock is needed, give electric shock again by following the voice prompts.
If AED voice prompt informs you that no shock is needed, immediately resume CPR.
Press the shock button.

x
16.When to stop CPR (Keep the electrode pads on.)
a) When the injured or ill person has been handed over to the emergency services
b) When the injured or ill person has started moaning or breathing normally, lay him/her on
his/her side in a recovery position and wait for the arrival of emergency services.

xi
PREFACE
Thank you for purchasing the JRC Multi Function Display JMR-7200/9200 Series,
JAN-7201/9201 and JAN-7202/9202.
This equipment meets the performance standards of the IMO (International Maritime
Organization) and the IHO (International Hydro graphic Organization), and serves to improve
safety, reduce fuel combustion, concentrate voyage information as the main device of the
INS (Integrated Navigation System).
●For the best operation, read the instruction manual thoroughly before use.
●Keep this manual in a convenient place for future reference.
Make use of this manual when experiencing operation difficulties.
●The LCD of this equipment uses thin film transistors (TFT). If some pixels on the screen
are not clear, the color is different, or the screen is brighter than usual, it is not because of
defect, instead it is because of inherent characteristic of the TFT display technology.
●The information in this manual is subject to change without notice at any time.

xii
Before Operation
Pictorial Indication
Various pictorial indications are included in this installation
manual and are shown on this equipment so that you can
operate them safely and correctly and prevent any danger to
you and / or to other persons and any damage to your
property during operation. Such indications and their
meanings are as follows.
Please understand them before you read this manual:
DANGER This indication is shown where incorrect equipment
operation due to negligence may cause death or serious
injuries.
WARNING
This indication is shown where any person is supposed to
be in danger of being killed or seriously injured if this
indication is neglected and these equipment are not
operated correctly.
CAUTION This indication is shown where any person is supposed to
be injured or any property damage is supposed to occur if
this indication is neglected and these equipment are not
operated correctly.
Examples of Pictorial Indication
Electric Shock
The mark represents CAUTION (including DANGER and
WARNING).
Detailed contents of CAUTION ("Electric Shock" in the example
on the left) is shown in the mark.
Disassembling
Prohibited
The mark represents prohibition.
Detailed contents of the prohibited action ("Disassembling
Prohibited" in the example on the left) is shown in the mark.
Disconnect
the power plug
The mark represents instruction.
Detailed contents of the instruction ("Disconnect the power plug"
in the example on the left) is shown in the mark.
Warning Label
There is a warning label on the top cover of the equipment.
Do not try to remove, break or modify the label.

xiii
Precautions upon Equipment Operation
DANGER
Never attempt to check or repair the inside of the equipment.
Checking or repair by an unqualified person may cause a fire or an electric
shock.
Contact our head office, or a nearby branch or local office to request
servicing.
Never remove the cover of this equipment.
Touching the high-voltage section inside will cause an electric shock.
Do not attempt to disassemble or tamper with this equipment.
Otherwise, a fire, an electric shock, or a malfunction may occur.
When conducting maintenance, make sure to turn the main power off.
Failure may result in electric shock.
Turn off the main power before cleaning the equipment. Especially when a
rectifier is used, make sure to turn it off since voltage is still outputted from the
rectifier even after the indicator and the radar are turned off. Failure may
result in equipment failure, or death or serious injury due to electric shock.
When conducting maintenance work on the radar antenna, make sure to turn
its main power off.
Failure may result in electric shock or injuries.
Make sure to turn off the radar antenna safety switch. Failure may result in
injuries caused by physical contact with the rotating radar antenna.

xiv
Never directly touch the internal components of the radar antenna or
indicator. Direct contact with these high-voltage components may cause
electric shock. For maintenance, inspection, or adjustment of equipment
components, consult with our branch office, branch shop, sales office, or our
distributor in your district.
Do not get close to the radiant section of the radar antenna. It is a rotating
part, and it may cause injuries if it suddenly starts rotating and consequently
hits the body. It is recommended that the radiant section be installed at a high
place such as on the roof of the wheelhouse, on the flying bride, on the
trestle, or on the radar mast so that no one can get close to it. When any work
must be done on the radar antenna, make sure to turn the safety switch off.
Microwave radiation level of the radar antenna:
Keep away from the radar antenna during transmission.
Microwaves are generated from the front center of the radiant section of the
radar antenna at the levels indicated in the table below. Exposure to
microwaves at close range can result in injury (especially damage to eyes).
Microwave radiation level of the radar antenna
System 50 W/m220 W/m22.5 W/m2
NKE-2103 n/a 26 cm 123 cm
NKE-1125/1129/2254 5 cm 81 cm 162 cm
NKE-1130/1139 11 cm 76 cm 181 cm
NKE-2632 1.38cm 3.1cm 209.76cm
NKE-1632 1.45cm 3.25cm 128.37cm
Make sure to install the radar antenna at a place higher than human height.
Direct exposure to electromagnetic wave at close range will have adverse
effects on the human body.
When it is necessary to get close to the radar antenna for maintenance or
inspection purposes, make sure to turn the power switch of the display unit to
“OFF” or “STBY”.
Direct exposure to electromagnetic waves at close range will have adverse
effects on the human body.
When conducting maintenance work, make sure to turn off the power so that
the power supply to the equipment is completely cut off.
Some equipment components can carry electrical current even after the
power switch is turned off, and conducting maintenance work may result in
electric shock, equipment failure, or accidents.
When cleaning the display screen, do not wipe it too strongly with a dry cloth.
Also, do not use gasoline or thinner to clean the screen. Failure will result in
damage to the screen surface.

xv
Do not change MBS Level/Area unless absolutely necessary.
Incorrect adjustment will result in deletion of nearby target images and thus
collisions may occur resulting in death or serious injuries.
Confirm computer virus does not exist in USB memory beforehand when
reading and writing of the file by using USB memory device.
Influences other equipment when the display unit is infected with the virus,
and causes the breakdown.
Do not leave the USB memory or the like in the USB port after use.
Malfunctions may result.
Do not remove USB device while the access lamp (in USB device) is flashing.
Data is damage when the USB device is pulled out while accessing it, and it
case the breakdown.
Do not insert or remove the USB device while transmitting.
The radar image becomes unstable by accessing the USB device not
anticipated, and it causes the breakdown.
Do not place a glass or cup containing water, etc., or a small metal object on
this equipment.
If water or such object gets inside, a fire, an electric shock, or a malfunction
may occur.
In case water or a metal object gets inside the equipment, turn off the power
immediately, unplug the power supply cable from an electric outlet, and
contact our head office, or a nearby branch or local office to request servicing.
Keeping the equipment in operation under such condition may cause a fire,
an electric shock or a malfunction.
In case you find smoke, strange smell or unusual heat coming from the
equipment, turn off the power immediately, unplug the power supply cable
from an electric outlet, and contact our head office, or a nearby branch or
local office to request servicing.
Keeping the equipment in operation under such condition may cause a fire or
an electric shock.

xvi
Do not use the offset function during navigation.
If the equipment is used with the offset value entered as the own ship position
(deviated from the actual position), accidents may result.
When the offset values are entered, the [Offset] badge is displayed at the
position display on the Own Ship Information. Check the indication, and
cancel the offset function if necessary. Also, the message “Position Shift” is
displayed in the message display area.
If the LCD module breaks and the liquid inside spills out to stick to your skin,
wash it off immediately under running water for more than 15 minutes. If you
find any skin problem afterwards, consult a doctor immediately. If the liquid
gets in your eye, wash it off immediately under running water for more than 15
minutes, and then, consult a doctor as soon as possible.
Before starting automatic sailing, be sure to check the safety of the route and
the safety when crossing safety contour.
Otherwise, accidents may result.
If the own ship has arrived at the boundary of a WPT during automatic sailing,
be sure to check the safety and perform turning manually by the operator
him/herself.
Otherwise, the ship keeps the course with the leg bearing, and accidents may
result.
Input the ship’s parameter accurately according to the specification of the
ship.
Otherwise, accidents may result.

xvii
Use the radar only as a navigation aid.
The final navigation decision must always be made by the operator
him/herself.
Making the final navigation decision based only on the radar display
information may cause accidents such as collisions or running aground.
A malfunction as the screen is disordered or unshown may occur if the power
in the ship is instantaneously interrupted during operation of the radar. In this
case, the power should be turned on again.
Use Target Tracking (TT) function only as a navigation aid. The final
navigation decision must always be made by the operator him/herself.
Making the final navigation decision based only on tracking target information
may cause accidents.
Tracking target information such as vector, target numerical data, and alarms
may contain some errors. Also, targets that are not detected by the radar
cannot be acquired or tracked.
Making the final navigation decision based only on the radar display may
cause accidents such as collisions or running aground.
When using the [AUTO SEA] function, never set the suppression level too
high canceling out all image noises from the sea surface at close range.
Detection of not only echoes from waves but also targets such as other ships
or dangerous objects will become inhibited.
When using the [AUTO SEA] function, make sure to choose the most
appropriate image noise suppression level.
When using the [AUTO RAIN] function, never set the suppression level too
high.
Detection of not only echoes from the rain or snow but also targets such as
other ships or dangerous objects will become inhibited.
When using the [AUTO RAIN] function, make sure to choose the most
appropriate image noise suppression level.
When setting a guard zone, make sure to properly adjust gain, sea-surface
reflection suppression level, and rain/snow reflection suppression level so
that the optimal target images are always on the radar screen. The guard
zone alarm will not be activated for targets undetected by the radar, and it
may result in accidents such as collisions.
The simulation function is used exclusively for deciding whether or not target
tracking is properly operating. Therefore, never use this function unless you
wish to check target tracking operations.
Note especially that, if this function is used during actual navigation,
simulated targets are displayed and may become confused with other actual
targets. Therefore, never use this function during actual navigation.

xviii
Optimal values have been set for VD LEVEL and CONSTANT; therefore,
never change their values unless absolutely necessary. Failure may result in
accidents that would lower target tracking performance.
When replacing magnetrons, make sure to shut off the main power and let
the equipment stand for more than 5 minutes to discharge the high-voltage
circuit.
Failure may result in electric shock.
Make sure to take off your watch when your hand must get close to the
magnetron.
Failure may result in damage to the watch since the magnetron is a strong
magnet.
Make sure that two or more staff member work together when replacing the
LCD. If only one person attempts to replace the LCD, he/she may drop it and
become injured.
Do not directly touch the inverter circuit of the LCD display with a bare hand
since high voltage temporarily remains in the circuit even after the main
power is shut off.
Failure may result in electric shock.
Any adjustments must be made by specialized service personnel.
Incorrect settings may result in unstable operation, and this may lead to
accidents or equipment failure.
Do not make any adjustments during navigation.
Failure may result in adverse effects on the radar function which may lead to
accidents or equipment failure.
Do not change the quantization level settings unless absolutely necessary.
If set at an inappropriate value, the target acquisition or target tracking
function deteriorates, and this may lead to accidents.
Do not use or leave the equipment under direct sunlight for a long time or in
the temperatures above 55°C.
Otherwise, a fire or a malfunction may occur.
Do not block the ventilation opening of the equipment.
Otherwise, heat may accumulate inside to cause a fire or a malfunction.
This manual suits for next models
27
Table of contents
Other JRC Marine Radar manuals

JRC
JRC JMR-5410-6XH User manual

JRC
JRC JMA-5300 Series User manual

JRC
JRC JMA-5312-6HS User manual

JRC
JRC JMA-3910-4 User manual

JRC
JRC JMR-7230-S3 User manual

JRC
JRC JMA-9172-SA User manual

JRC
JRC JMR-5410-6X User manual

JRC
JRC JMA-5312-6/6HS User manual

JRC
JRC JMR-5410-4X User manual

JRC
JRC JUE-250 - Operator's manual