manuals.online logo
Brands
  1. Home
  2. •
  3. Brands
  4. •
  5. McALLISTER
  6. •
  7. Aircraft
  8. •
  9. McALLISTER Mig 17 User manual

McALLISTER Mig 17 User manual

McALLISTER MODELS & DESIGN
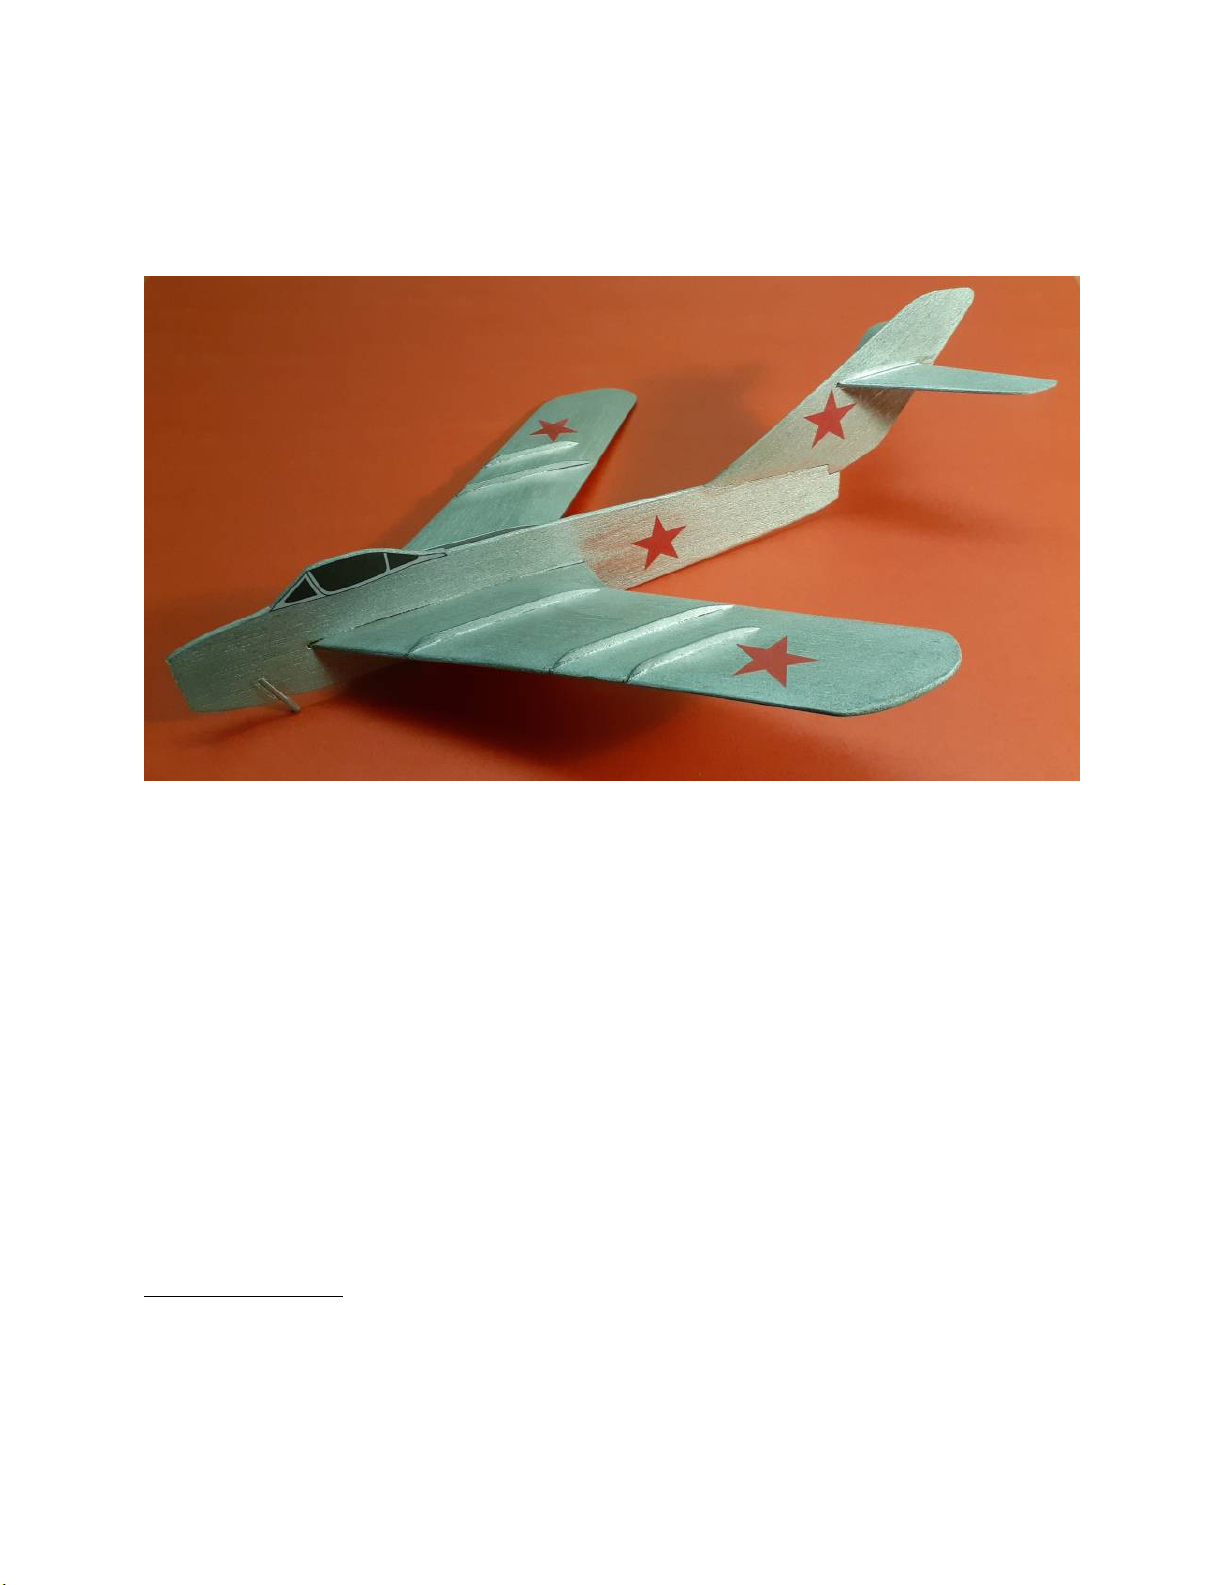
”Mig 17” Catapult Glider
Catapult launched gliders are great fun!
This simple profile scale glider can be hand thrown to fly in your backyard or go to a larger space
and use the included catapult to launch this jet high and fast! Careful adjustments are the way to
get the best out of a catapult glider. That will teach you trimming skills, which is a vital part of the
fun and enjoyment of flying model aircraft.
Follow the separate instructions for how to assemble the included catapult.
If you have any questions, please contact us at
[email protected]
Building Instructions
BEFORE YOU BEGIN
This model glider can be built using superglue, a waterproof wood glue like Titebond II, or balsa cement.
Some parts will require sanding to fit. A useful tool is a two-sided nail file, or you can glue medium and
fine sandpaper to each side of a straight stick.
A sharp craft knife can be used to remove the laser cut parts from the sheets. Adult supervision is highly
recommended when using sharp tools and superglue.
PREPARATION
Remove the parts from the laser cut sheets. Sand the small tabs off so that the edges are smooth.
CONSTRUCTION
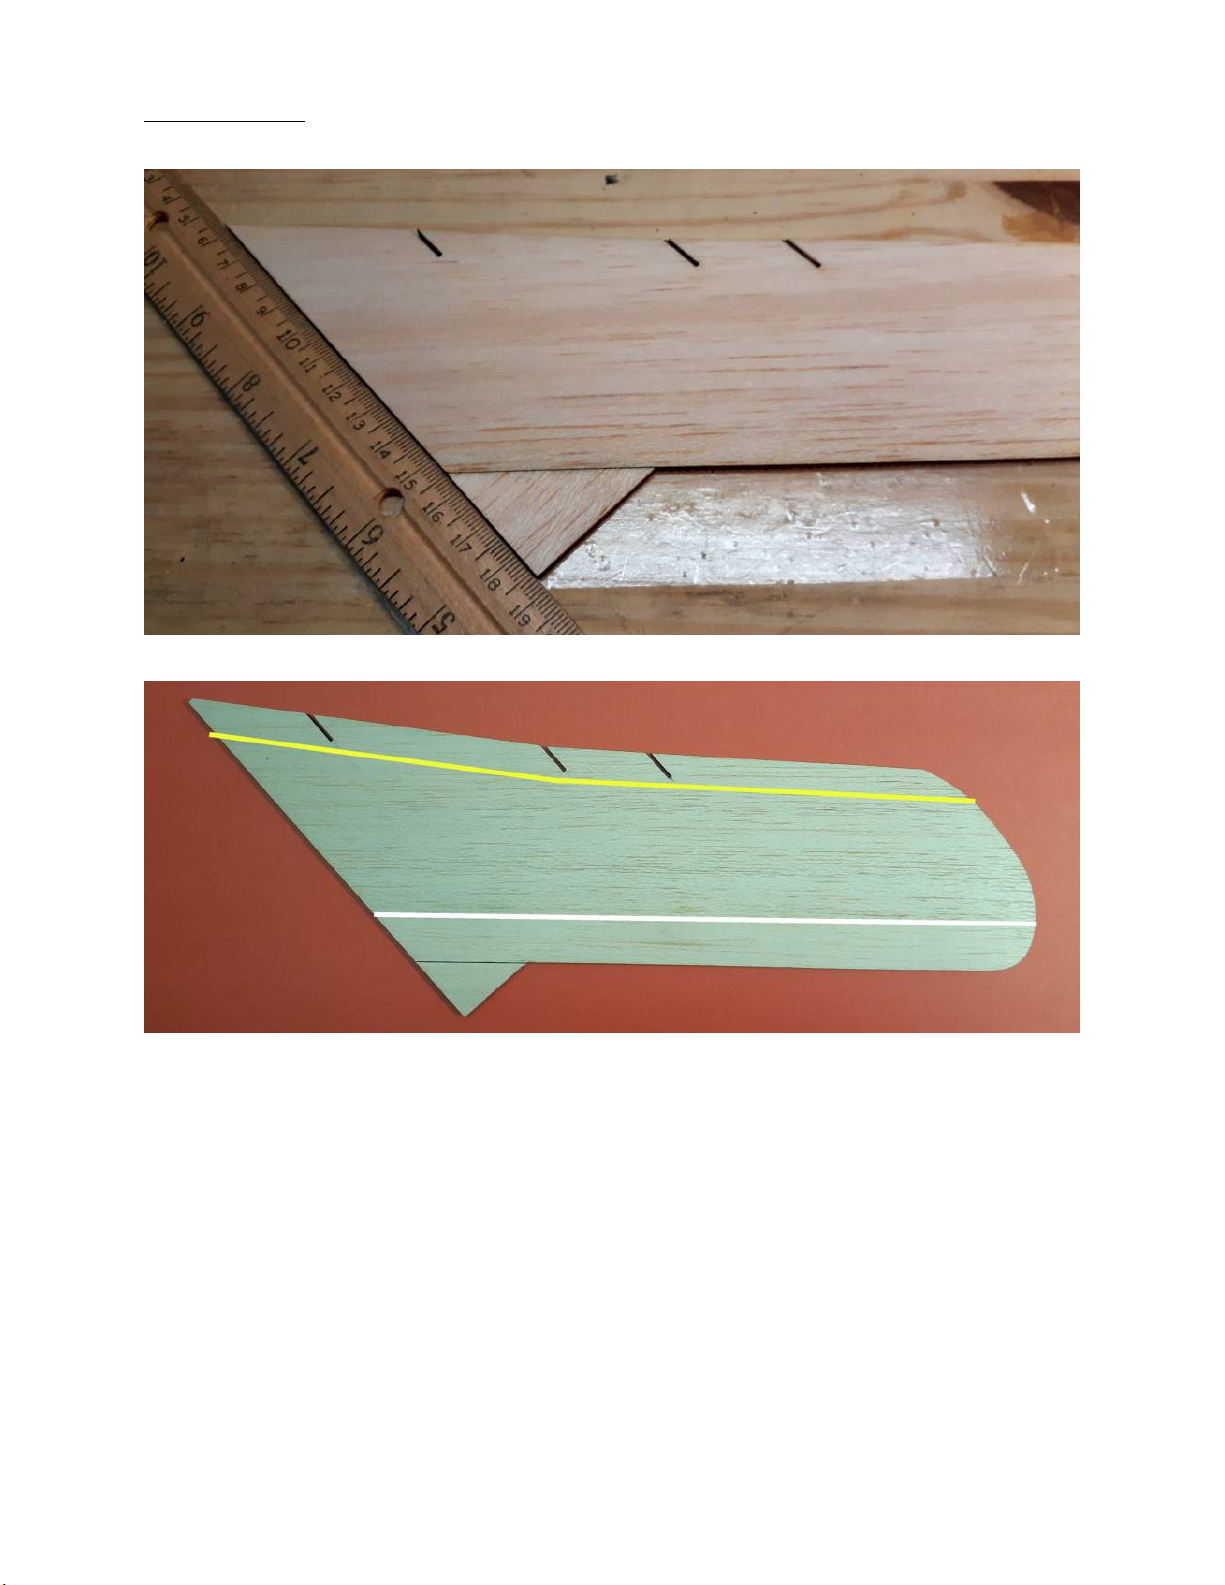
Glue the two wing trailing edge fillets to the rear of each wing. Use a ruler to align each perfectly.
Next, sand the wings to an aerofoil shape.
Take your sanding stick and sand the top front edge of the wing in a curve down to the bottom edge. Start
this about 3/8" (9mm) back from the front edge (yellow line). Then round the bottom corner of the front
edge. Do this along the whole length of one wing panel.
Next sand the top rear edge from a line which runs about 1/2” (12mm) from the trailing edge of the wing
(white line). Sand this area fairly flat until the trailing edge is a little less than 1/16” (1.5mm) thick. Then
sand the angle at the white line to make a smooth surface. The area where the rear wing fillet is needs to
be sanded down to the same thickness as the rest of the wing rear edge. See below.
Shape at the wing root.
Aim for a shape like this at the wing tip.
Repeat the process for the other wing. Make sure that you are making both a RIGHT wing and a LEFT
wing panel.
Join the two wing panels. First the center of each wing needs to be angled. Prop the wing tip up 5/8”
(16mm) with the center of the wing just over the edge of a board. Use the sanding stick held vertical to
make an angle for the joint. Do this on both wings.
Next put one wing flat on your board. Prop the other wing tip up 1-1/4” (32mm). Once you are satisfied
with the alignment, apply glue and leave to dry. A handy tip is to stick a strip of packaging tape to your
board and make the glue joint over that.
Slide the wing into the slot in the fuselage. Check that the wing join is directly down the center line of the
fuselage. Adjust the wing slot with sandpaper to get a good but not too tight fit.
Look from the front of the fuselage; the wings should be positioned so that they are at the same angle on
each side of the fuselage.
To check this, you can set the fuselage and wing inverted on a flat surface. Use a right angle to set the
fuselage vertical. Put a scrap of 1/8” (3mm) balsa under each wing tip. When satisfied with the alignment,
run thin superglue along each side of the joint to glue the wing in place. Glue on the top surface when the
glue is set.
Separate the plywood wing fences from the sheet. The longest fits closest to the fuselage. Sandpaper the
edges to remove some of the laser burning. The tab at the front of each fence fits into the slot into the
wing. Attach them so that they run parallel with the fuselage. Glue in place with superglue.
Glue the two halves of the tailplane together.
Slot the tailplane through the slot in the tailplane. Make sure that it is exactly centered. Set the fin at the
edge of a board and use a right angle to get the fin at 90 degrees to the tailplane. Glue in place with
superglue.
Position the tailplane and fin on the rear of the fuselage. The top edge of the tailplane will align with the
top edge of the fuselage and the rear of the fin will fit to the rear edge of the fuselage.
You can use small spring clamps to hold the tail fin in position. When you are satisfied with the fit, glue
the assembly onto the fuselage. Make sure that the fin is vertical and exactly in line with the fuselage
center line.
Glue the plywood catapult peg into the slot in the fuselage.
FINISHING
Using fine sandpaper, smooth all of the surfaces. You can fly the model as it is without further finishing
but avoid wet conditions. One thin coat of Zinsser Shellac (Traditional Finish & Sealer) will harden the
balsa wood and provide a degree of water resistance. Sand very lightly after coating.
The finished glider shown here was first sealed with Shellac and then given a light coat of Krylon silver
spray paint.
The paper cockpit details should be carefully cut out with small scissors or a sharp new blade. Look at the
photo for location. Stay away from the curved edge a little. The edges can be colored black with a
Sharpie later.
Spray the back of one of the paper pieces with Elmers Spray Adhesive or use a glue stick. (Liquid glues
may make the ink run). Glue one side in place and press it down firmly. Repeat for the other side making
sure that they align with each other.
Cut out the red stars, apply them in the same manner. Lightly brush a thin coat of Shellac over the paper
decals to protect them. Look at the photos here for locations of the stars. Another good reference is to
search online for Mig17 drawings.
Test Flights
The glider will need some nose weight to balance properly in flight. Use a small amout of modelling clay
(pea sized) as a starting point.
The initial balance point should be 3-1/2” (89mm) back from the root leading edge. That’s where the
leading edge of the wing meets the fuselage. Choose a calm day outside for your test flights.
Throw the glider with the wings level and the nose slightly down. Try to throw it just fast enough for it to
glide away from you steadily. If the model dives downwards, remove a little clay. If the model climbs and
then dives (stalling), add a little more clay. Aim for a fairly fast glide with a nice smooth flight.
For throw launching you can try tilting the model to the right (if you are right handed) and give it a hard
throw pointing upward at about 20 degrees. Keep adjusting your throw and nose weight until you get
some nice glides.
Catapult Flights
Warning: Never point a catapult model at, or near, anyone when launching. The glider will be
going fast from the launch so be very careful!
Catapult launched gliders are tricky to fly but great fun, too. For the first catapult launches use just one of
the 1/8” rubber loops. Hold the catapult in your left hand (do the same if left handed). Hook the rubber
loop onto the glider. Pull the glider back, tilt it about 40 degrees to the right and point upwards about 30
degrees. Holding the catapult still, let go of the glider.
The jet will arch up and to the right, hopefully the wings will level and it will glide down. Watch which way
it turns. After several tries add a very small amount of modelling clay to the left wing tip. This is to try to
make the glider go into a gentle left turn as it slows down after the launch.
Another trimming tool you can try is to cut a small rectangle (1/2” x 1/4") of thin card. Crease it slightly in
the middle and glue it to the bottom of the rudder on the left side. This is a rudder trim tab and is used to
help make the glider go into a left turn at the top of a stronger catapult launch.
To get the best out of any catapult glider we can recommend searching “catapult launch gliders” on
YouTube. Have fun!

Popular Aircraft manuals by other brands

Textron Aviation Cessna 525B Maintenance manual

Textron Aviation

Textron Aviation Cessna 525B Maintenance manual

Fokker WEEKEND 7438 quick start guide

Fokker

Fokker WEEKEND 7438 quick start guide

Parachutes de France ATOM Legend S Use and maintenance manual

Parachutes de France

Parachutes de France ATOM Legend S Use and maintenance manual

Skywalk POISON 2 XS manual

Skywalk

Skywalk POISON 2 XS manual

Tecnam P2006T Aircraft flight manual

Tecnam

Tecnam P2006T Aircraft flight manual

SOL paragliders FUN manual

SOL paragliders

SOL paragliders FUN manual

Schempp-Hirth Mini-Nimbus C Flight and service manual

Schempp-Hirth

Schempp-Hirth Mini-Nimbus C Flight and service manual

Ozone Oxygen 1 instruction manual

Ozone

Ozone Oxygen 1 instruction manual

Flexifoil Land Kite instructions

Flexifoil

Flexifoil Land Kite instructions

SOL paragliders ATMUS 2 Paraglider's Manual

SOL paragliders

SOL paragliders ATMUS 2 Paraglider's Manual

Advance acoustic Lightness 2 user manual

Advance acoustic

Advance acoustic Lightness 2 user manual

SGS 1-34R Maintenance manual

SGS

SGS 1-34R Maintenance manual

Cessna Swapping GIA 1 manual

Cessna

Cessna Swapping GIA 1 manual

DG Flugzeugbau DG-500 ELAN Orion Flight manual

DG Flugzeugbau

DG Flugzeugbau DG-500 ELAN Orion Flight manual

Alexander Schleicher ASH 26 E Maintenance manual

Alexander Schleicher

Alexander Schleicher ASH 26 E Maintenance manual

ROBBE Calif A21 S Assembly and operating instructions

ROBBE

ROBBE Calif A21 S Assembly and operating instructions

DAVINCI GLIDERS TANGO XS manual

DAVINCI GLIDERS

DAVINCI GLIDERS TANGO XS manual

Beechcraft KING AIR C90 Supplement manual

Beechcraft

Beechcraft KING AIR C90 Supplement manual

manuals.online logo
manuals.online logoBrands
  • About & Mission
  • Contact us
  • Privacy Policy
  • Terms and Conditions

Copyright 2025 Manuals.Online. All Rights Reserved.